Your landscaping guide - Boral
Your landscaping guide - Boral
Your landscaping guide - Boral

Create successful ePaper yourself
Turn your PDF publications into a flip-book with our unique Google optimized e-Paper software.
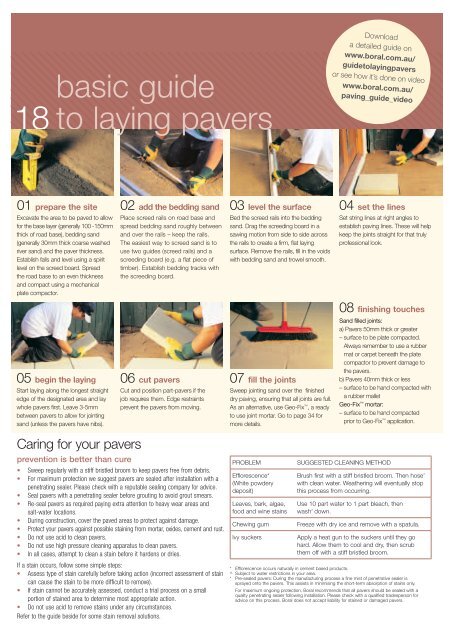
asic <strong>guide</strong><br />
18 to laying pavers<br />
Download<br />
a detailed <strong>guide</strong> on<br />
www.boral.com.au/<br />
<strong>guide</strong>tolayingpavers<br />
or see how it’s done on video<br />
www.boral.com.au/<br />
paving_<strong>guide</strong>_video<br />
01 prepare the site 02 add the bedding sand 03 level the surface<br />
Excavate the area to be paved to allow<br />
for the base layer (generally 100 -150mm<br />
thick of road base), bedding sand<br />
(generally 30mm thick coarse washed<br />
river sand) and the paver thickness.<br />
Establish falls and level using a spirit<br />
level on the screed board. Spread<br />
the road base to an even thickness<br />
and compact using a mechanical<br />
plate compactor.<br />
Place screed rails on road base and<br />
spread bedding sand roughly between<br />
and over the rails – keep the rails.<br />
The easiest way to screed sand is to<br />
use two <strong>guide</strong>s (screed rails) and a<br />
screeding board (e.g. a flat piece of<br />
timber). Establish bedding tracks with<br />
the screeding board.<br />
Bed the screed rails into the bedding<br />
sand. Drag the screeding board in a<br />
sawing motion from side to side across<br />
the rails to create a firm, flat laying<br />
surface. Remove the rails, fill in the voids<br />
with bedding sand and trowel smooth.<br />
04 set the lines<br />
Set string lines at right angles to<br />
establish paving lines. These will help<br />
keep the joints straight for that truly<br />
professional look.<br />
05 begin the laying<br />
Start laying along the longest straight<br />
edge of the designated area and lay<br />
whole pavers first. Leave 3-5mm<br />
between pavers to allow for jointing<br />
sand (unless the pavers have nibs).<br />
06 cut pavers<br />
Cut and position part-pavers if the<br />
job requires them. Edge restraints<br />
prevent the pavers from moving.<br />
07 fill the joints<br />
Sweep jointing sand over the finished<br />
dry paving, ensuring that all joints are full.<br />
As an alternative, use Geo-Fix , a ready<br />
to use joint mortar. Go to page 34 for<br />
more details.<br />
08 finishing touches<br />
Sand filled joints:<br />
a) Pavers 50mm thick or greater<br />
– surface to be plate compacted.<br />
Always remember to use a rubber<br />
mat or carpet beneath the plate<br />
compactor to prevent damage to<br />
the pavers.<br />
b) Pavers 40mm thick or less<br />
– surface to be hand compacted with<br />
a rubber mallet<br />
Geo-Fix mortar:<br />
– surface to be hand compacted<br />
prior to Geo-Fix application.<br />
Caring for your pavers<br />
prevention is better than cure<br />
• Sweep regularly with a stiff bristled broom to keep pavers free from debris.<br />
• For maximum protection we suggest pavers are sealed after installation with a<br />
penetrating sealer. Please check with a reputable sealing company for advice.<br />
• Seal pavers with a penetrating sealer before grouting to avoid grout smears.<br />
• Re-seal pavers as required paying extra attention to heavy wear areas and<br />
salt-water locations.<br />
• During construction, cover the paved areas to protect against damage.<br />
• Protect your pavers against possible staining from mortar, oxides, cement and rust.<br />
• Do not use acid to clean pavers.<br />
• Do not use high pressure cleaning apparatus to clean pavers.<br />
• In all cases, attempt to clean a stain before it hardens or dries.<br />
If a stain occurs, follow some simple steps:<br />
• Assess type of stain carefully before taking action (incorrect assessment of stain<br />
can cause the stain to be more difficult to remove).<br />
• If stain cannot be accurately assessed, conduct a trial process on a small<br />
portion of stained area to determine most appropriate action.<br />
• Do not use acid to remove stains under any circumstances.<br />
Refer to the <strong>guide</strong> beside for some stain removal solutions.<br />
PROBLEM<br />
Efflorescence*<br />
(White powdery<br />
deposit)<br />
Leaves, bark, algae,<br />
food and wine stains<br />
Chewing gum<br />
Ivy suckers<br />
SUGGESTED CLEANING METHOD<br />
Brush first with a stiff bristled broom. Then hose^<br />
with clean water. Weathering will eventually stop<br />
this process from occurring.<br />
Use 10 part water to 1 part bleach, then<br />
wash^ down.<br />
Freeze with dry ice and remove with a spatula.<br />
Apply a heat gun to the suckers until they go<br />
hard. Allow them to cool and dry, then scrub<br />
them off with a stiff bristled broom.<br />
* Efflorescence occurs naturally in cement based products.<br />
^ Subject to water restrictions in your area.<br />
* Pre-sealed pavers: During the manufacturing process a fine mist of penetrative sealer is<br />
sprayed onto the pavers. This assists in minimising the short-term absorption of stains only.<br />
For maximum ongoing protection, <strong>Boral</strong> recommends that all pavers should be sealed with a<br />
quality penetrating sealer following installation. Please check with a qualified tradesperson for<br />
advice on this process. <strong>Boral</strong> does not accept liability for stained or damaged pavers.