Envoy Communications Gateway - Simple Energy Works
Envoy Communications Gateway - Simple Energy Works
Envoy Communications Gateway - Simple Energy Works

You also want an ePaper? Increase the reach of your titles
YUMPU automatically turns print PDFs into web optimized ePapers that Google loves.
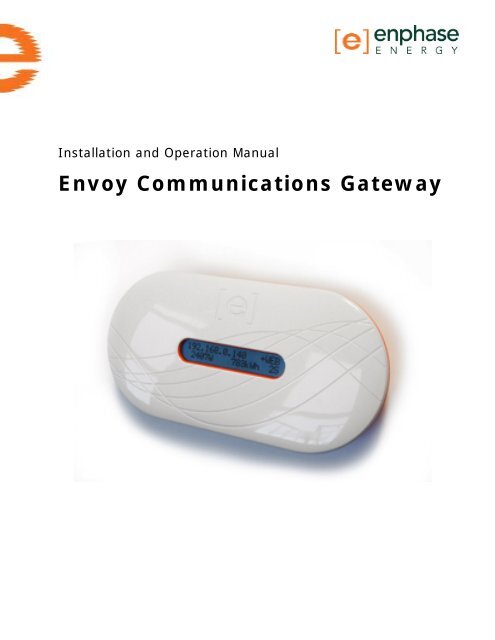
Installation and Operation Manual<br />
<strong>Envoy</strong> <strong>Communications</strong> <strong>Gateway</strong>
Page 2 Copyright Enphase <strong>Energy</strong> Inc. 2009 141-00008 rev 06
Contact Information<br />
Enphase <strong>Energy</strong> Inc.<br />
201 1 St Street, Suite 300<br />
Petaluma, CA 94952<br />
Phone: 707-763-4784 TOLL FREE: 877-797-4743<br />
Fax: 707-763-0784<br />
www.enphaseenergy.com<br />
info@enphaseenergy.com<br />
FCC Compliance<br />
This equipment has been tested and found to comply with the limits for a Class B<br />
digital device, pursuant to part 15 of the FCC Rules. These limits are designed to<br />
provide reasonable protection against harmful interference in a residential<br />
installation. This equipment generates, uses and can radiate radio frequency energy<br />
and, if not installed and used in accordance with the instructions, may cause harmful<br />
interference to radio communications. However, there is no guarantee that<br />
interference will not occur in a particular installation. If this equipment does cause<br />
harmful interference to radio or television reception, which can be determined by<br />
turning the equipment off and on, the user is encouraged to try to correct the<br />
interference by one or more of the following measures:<br />
Reorient or relocate the receiving antenna.<br />
Increase the separation between the equipment and the receiver.<br />
<br />
<br />
Connect the equipment into an outlet on a circuit different from that to which<br />
the receiver is connected.<br />
Consult the dealer or an experienced radio/TV technician for help.<br />
Changes or modifications not expressly approved by the party responsible for<br />
compliance may void the user’s authority to operate the equipment.<br />
Page 3 Copyright Enphase <strong>Energy</strong> Inc. 2009 141-00008 REV 06
Table of Contents<br />
Important Safety Information ......................................................................... 5<br />
Read this First ............................................................................................... 5<br />
Safety Instructions ......................................................................................... 5<br />
1 The Enphase <strong>Envoy</strong> <strong>Communications</strong> <strong>Gateway</strong> ............................................ 6<br />
Other Elements in the Enphase System ............................................................. 6<br />
How the <strong>Envoy</strong> <strong>Communications</strong> <strong>Gateway</strong> <strong>Works</strong> ................................................ 7<br />
2 <strong>Envoy</strong> Installation ................................................................................... 8<br />
Preparation ................................................................................................... 8<br />
Placement ..................................................................................................... 8<br />
Wall Mounting .............................................................................................. 10<br />
Install the <strong>Envoy</strong> Cable Connections ................................................................ 11<br />
Relocating the <strong>Envoy</strong> .................................................................................... 12<br />
3 <strong>Envoy</strong> Operation ................................................................................... 13<br />
Starting the <strong>Envoy</strong> ....................................................................................... 13<br />
How the <strong>Envoy</strong> Scans for Microinverters .......................................................... 13<br />
The <strong>Envoy</strong> Initial Screen Displays ................................................................... 14<br />
The <strong>Envoy</strong> LCD Panel Menu ........................................................................... 14<br />
Initiating a Scan for New Microinverters .......................................................... 15<br />
Performing a Communication Check ................................................................ 16<br />
Restarting the <strong>Envoy</strong> .................................................................................... 17<br />
Normal Operation ......................................................................................... 18<br />
Networking/Firewall Info ............................................................................... 18<br />
4 Troubleshooting .................................................................................... 19<br />
Potential Problems and Solutions .................................................................... 19<br />
5 <strong>Envoy</strong> Local Interface ............................................................................ 20<br />
Home Screen ............................................................................................... 20<br />
Production Screen ........................................................................................ 21<br />
Inventory Screen ......................................................................................... 21<br />
Event Messages ........................................................................................... 22<br />
6 Technical Data ..................................................................................... 24<br />
7 Appendix ............................................................................................. 25<br />
Limited Warranty ......................................................................................... 25<br />
Page 4 Copyright Enphase <strong>Energy</strong> Inc. 2009 141-00008 REV 06
Important Safety Information<br />
Read this First<br />
This manual contains important instructions to follow during installation<br />
and maintenance of the Enphase <strong>Envoy</strong> <strong>Communications</strong> <strong>Gateway</strong> (<strong>Envoy</strong>).<br />
To reduce the risk of electrical shock, and to ensure the safe installation and<br />
operation of the <strong>Envoy</strong>, the following safety symbols appear throughout this<br />
document to indicate dangerous conditions and important safety<br />
instructions.<br />
WARNING: This indicates a situation where failure to follow<br />
instructions may cause a serious hardware failure. Use extreme<br />
caution when performing this task.<br />
NOTE: This indicates information particularly important for optimal<br />
system operation. Follow these instructions closely.<br />
Safety Instructions<br />
• Perform all electrical installations in accordance with all local electrical codes and<br />
the National Electrical Code (NEC), ANSI/NFPA 70.<br />
• Be aware that only qualified personnel shall install or replace the Enphase <strong>Envoy</strong><br />
<strong>Communications</strong> <strong>Gateway</strong>.<br />
• Do not attempt to repair the Enphase <strong>Envoy</strong>; it contains no user-serviceable<br />
parts. If the Enphase <strong>Envoy</strong> fails, please return the unit to your distributor for<br />
maintenance. Tampering with or opening the <strong>Envoy</strong> will void the warranty.<br />
• Before installing or using the Enphase <strong>Envoy</strong>, please read all instructions and<br />
cautionary markings in the technical description and on the Enphase <strong>Envoy</strong>.<br />
NOTE: For Enphase <strong>Envoy</strong> Warranty Terms and Conditions see the<br />
Appendix on page 25 of this manual.<br />
Page 5 Copyright Enphase <strong>Energy</strong> Inc. 2009 141-00008 REV 06
1 The Enphase <strong>Envoy</strong> <strong>Communications</strong> <strong>Gateway</strong><br />
The <strong>Envoy</strong> is an integral component of the Enphase <strong>Energy</strong> Microinverter system. It<br />
operates between the Enphase Microinverters and the Enphase Enlighten webbased<br />
monitoring and analysis system. The <strong>Envoy</strong> functions as a gateway and<br />
monitors the microinverters that are connected to the photovoltaic modules. The<br />
<strong>Envoy</strong> collects energy and performance data from the microinverters over in-home<br />
AC power lines. It then forwards that data to the Enphase Enlighten web-based<br />
monitoring and analysis system, via the Internet, for statistical reporting.<br />
The following diagram shows the <strong>Envoy</strong> in the system.<br />
Other Elements in the Enphase System<br />
The Enphase Microinverter system is a fully integrated device that converts the<br />
DC output of a single solar module into grid-compliant AC power. In addition to<br />
performing the DC to AC conversion, it maximizes the modules' energy production by<br />
utilizing a sophisticated Maximum Power Point Tracking (MPPT) algorithm. This<br />
integrated system maximizes energy harvest, increases system reliability, and<br />
simplifies design, installation and management.<br />
The Enphase Enlighten web-based monitoring and analysis system analyzes the<br />
per-module data collected by each microinverter. Enlighten automatically detects any<br />
shortfall in energy production, identifies possible causes, and suggests solutions to<br />
correct the problem. The Enphase Enlighten website is constantly monitoring every<br />
module on every installation.<br />
Page 6 Copyright Enphase <strong>Energy</strong> Inc. 2009 141-00008 REV 06
How the <strong>Envoy</strong> <strong>Communications</strong> <strong>Gateway</strong> <strong>Works</strong><br />
Installation and operation of the <strong>Envoy</strong> requires no special computer or networking<br />
knowledge, nor any specialized equipment. The <strong>Envoy</strong> simply plugs into the house<br />
router for communications with the Enphase Enlighten monitoring and analysis<br />
website. The <strong>Envoy</strong> communicates with the individual microinverters over the<br />
existing power wires in the residence or business. After the <strong>Envoy</strong> is installed, no<br />
additional configuration work is required.<br />
After the <strong>Envoy</strong> is installed and completes its initial scan, it assembles an internal<br />
database of all known Enphase Microinverters at the site it manages. At regular<br />
intervals, the <strong>Envoy</strong> polls each microinverter for its energy data. Using your site’s<br />
broadband router, the <strong>Envoy</strong> then forwards that information on to the Enphase<br />
Enlighten monitoring and analysis website. The <strong>Envoy</strong> also reports any error<br />
conditions that affect itself or the microinverters. You can view both energy data and<br />
error conditions in the Enphase Enlighten web-based monitoring and analysis<br />
system.<br />
NOTE: The <strong>Envoy</strong> will automatically report system performance data<br />
to Enphase upon connection to the Internet. Please consult the<br />
Enphase privacy policy at http://www.enphaseenergy.com/privacy/ to<br />
learn more about Enphase's use of this data.<br />
Page 7 Copyright Enphase <strong>Energy</strong> Inc. 2009 141-00008 REV 06
2 <strong>Envoy</strong> Installation<br />
Preparation<br />
Before installing the <strong>Envoy</strong>, make sure that your site meets the following minimum<br />
requirements:<br />
Broadband is always on with a reliable Internet connection<br />
Web browser to view Enlighten is available<br />
Router / LAN with Ethernet port is available<br />
Standard AC electrical outlet is available<br />
Check the <strong>Envoy</strong> shipping box for the following items:<br />
<strong>Envoy</strong> <strong>Communications</strong> <strong>Gateway</strong><br />
Ethernet cable<br />
AC power cord<br />
User documentation<br />
Placement<br />
Place the <strong>Envoy</strong> as close as possible to the Service Panel (load center).<br />
After installing your <strong>Envoy</strong>, you may want to perform a<br />
<strong>Communications</strong> Check as described on page 16 to optimize the<br />
location of your <strong>Envoy</strong>.<br />
The <strong>Envoy</strong> can be placed on a table top or it can be wall mounted. For wall mounting<br />
instructions, see Wall Mounting on page 9.<br />
Page 8 Copyright Enphase <strong>Energy</strong> Inc. 2009 141-00008 REV 06
Wall Mounting<br />
Do not plug the <strong>Envoy</strong> into a power strip, surge protector, or<br />
uninterruptable power supply (UPS). The <strong>Envoy</strong> contains the protective<br />
circuits required for long, reliable operation. The surge suppression or<br />
filtering components of a power strip or other protective device can<br />
substantially diminish communication performance. If possible do not<br />
plug a power strip power cord into the same outlet that the <strong>Envoy</strong> is<br />
connected to. The surge suppression or filtering components of a<br />
power strip could still interfere with communications if they are close<br />
to the <strong>Envoy</strong>.<br />
Although, you do not necessarily need to place the <strong>Envoy</strong> near a broadband router, it<br />
may be best to do so for convenience of network cabling.<br />
Page 9 Copyright Enphase <strong>Energy</strong> Inc. 2009 141-00008 REV 06
Wall Mounting<br />
To mount the <strong>Envoy</strong> on a wall:<br />
1. Select a cool, dry, indoor location to locate the <strong>Envoy</strong>. Avoid heat<br />
generating devices (wall heaters, toaster ovens, etc)<br />
2. Use two drywall screws or wall anchors to affix the <strong>Envoy</strong> to the wall<br />
mounted at the dimensions shown (not included in kit). Maximum screw<br />
head diameter is .35”, A #8 screw is recommended.<br />
3. Slide the <strong>Envoy</strong> onto the mounting screws aligning the <strong>Envoy</strong> screw holes<br />
with the screws installed in step 2.<br />
Page 10 Copyright Enphase <strong>Energy</strong> Inc. 2009 141-00008 REV 06
Install the <strong>Envoy</strong> Cable Connections<br />
To install the <strong>Envoy</strong>, perform the steps below while referring to the installation<br />
diagram below.<br />
1. Register the <strong>Envoy</strong> as soon as possible. Call Enphase Customer Support at<br />
877-797-4743 or visit https://enlighten.enphaseenergy.com/register and<br />
register the <strong>Envoy</strong> by its serial number.<br />
2. Remove the <strong>Envoy</strong> removable serial number label as shown in the diagram<br />
below and attach it to the microinverter installation map.<br />
3. Plug the AC power cord into the AC input on the <strong>Envoy</strong>, and then plug the<br />
other end of the power cord into an ordinary 120VAC power outlet (not a<br />
power strip) located somewhere near your broadband router.<br />
Reminder: Do not plug the <strong>Envoy</strong> into a power strip, surge protector,<br />
or uninterruptable power supply (UPS). The <strong>Envoy</strong> contains the<br />
protective circuits required for long, reliable operation. The surge<br />
suppression or filtering components of a power strip or other<br />
protective device can substantially diminish communication<br />
performance.<br />
Page 11 Copyright Enphase <strong>Energy</strong> Inc. 2009 141-00008 REV 06
NOTE: To the left of the Ethernet port on the <strong>Envoy</strong>, you will notice a<br />
port identified by a USB symbol. Ignore this port as it is not currently<br />
used.<br />
4. Plug the Ethernet cable into the RJ-45 port on the <strong>Envoy</strong>, and plug the other<br />
end of the cable into a spare port on the broadband router. The Ethernet<br />
cable is manufactured with a torroid molded onto the cable approximately 7”<br />
from one of the RJ-45 connectors. The RJ-45 connector nearest the torroid<br />
should be connected to the <strong>Envoy</strong> gateway RJ-45 port.<br />
This cable doesn’t need to plug directly into a router. It could also connect to<br />
a normal LAN (Local Area Network) connection as it needs only to be able to<br />
obtain a DHCP (Dynamic Host Control Protocol) IP address and have a path to<br />
the Internet. The <strong>Envoy</strong> will only search for a DHCP IP address during power<br />
up sequence.<br />
5. Watch the LCD display for progress. Refer to Normal Operation on page 17 for<br />
more information.<br />
Relocating the <strong>Envoy</strong><br />
If you ever lose power, or need to relocate the <strong>Envoy</strong> to somewhere else on the<br />
premises, just plug it in (if not already done) and let the <strong>Envoy</strong> start up again. It will<br />
resume operation when power and internet connection are restored.<br />
Page 12 Copyright Enphase <strong>Energy</strong> Inc. 2009 141-00008 REV 06
3 <strong>Envoy</strong> Operation<br />
Starting the <strong>Envoy</strong><br />
It takes less than five minutes for the <strong>Envoy</strong> to be ready to work after applying<br />
power. This five-minute period is known as a boot sequence. You will know the<br />
<strong>Envoy</strong> has completed booting and has started normal operation when it displays both<br />
an IP address and the “+WEB” indication in the LCD window.<br />
INITIALIZING<br />
Normal Boot Sequence<br />
Starting D2.0.0<br />
2009/05/06 16:21:20<br />
192.168.2.140 +Web<br />
2407W 783kWh 25<br />
After the <strong>Envoy</strong> establishes an IP address and Internet connectivity, the <strong>Envoy</strong><br />
contacts an NTP (Network Time Protocol) server so that it can set an accurate, local<br />
time.<br />
How the <strong>Envoy</strong> Scans for Microinverters<br />
A newly installed <strong>Envoy</strong> automatically performs an initial scan to discover its<br />
associated microinverters. This initial scan continues to search for new<br />
microinverters for one week from initial start up of the <strong>Envoy</strong>. The purpose of this<br />
long scanning period is to account for additional microinverters that may be installed<br />
during this initial one-week time-frame. This scan identifies all microinverters at the<br />
managed site. This one-time process is not repeated. During the scan, you will notice<br />
some of the values increasing on the <strong>Envoy</strong>’s LCD display.<br />
NOTE: If the <strong>Envoy</strong> is power cycled (power turned off and on) during<br />
this initial one-week scan, the week-long scan will resume.<br />
The <strong>Envoy</strong> identifies each microinverter via the unique serial number assigned to<br />
each microinverter. If a microinverter is ever added or replaced at your site, you<br />
must initiate a new scan so that the <strong>Envoy</strong> can “see” the new microinverter.<br />
Page 13 Copyright Enphase <strong>Energy</strong> Inc. 2009 141-00008 REV 06
The <strong>Envoy</strong> Initial Screen Displays<br />
After the <strong>Envoy</strong> has completed the boot sequence it will scroll through 3 screens<br />
initially, the home screen, communication check screen, activation screen.<br />
192.168.2.140 +Web<br />
2407W 783kWh 25<br />
[▌▌▌ ] mm:ss +Web<br />
LEVEL Devices: n<br />
To Activate Call:<br />
1-877-797-4743<br />
The communication check screen will continue to display during the 7 day initial<br />
period unless disabled through the panel menu or Admin page of the web interface.<br />
The activate screen will continue to display during the 7 day initial period or until the<br />
<strong>Envoy</strong> has been registered using the Enlighten on-line registration page.<br />
The <strong>Envoy</strong> LCD Panel Menu<br />
You can access the <strong>Envoy</strong> LCD panel menu using the <strong>Envoy</strong> Menu button. Press and<br />
hold this button; after two seconds you will enter the <strong>Envoy</strong> menu. Continue holding<br />
the Menu button and Menu items will appear in the following order:<br />
Exit Menu<br />
Enable<br />
New Device Scan<br />
Disable<br />
New Device Scan<br />
Enable<br />
Communication Check<br />
Page 14 Copyright Enphase <strong>Energy</strong> Inc. 2009 141-00008 REV 06
Disable<br />
Communication Check<br />
To select a menu item, release the Menu button when the desired menu<br />
option appears. The menu continues to cycle as long as you are pressing the<br />
Menu button. See the following sections for detailed procedures.<br />
Each microinverter is powered by the photovoltaic module it is connected to,<br />
so device scan or communication check can only be successfully performed<br />
during daylight hours.<br />
Initiating a Scan for New Microinverters<br />
To initiate a scan:<br />
1. Press and hold the <strong>Envoy</strong> Menu button; after two seconds you will enter the<br />
<strong>Envoy</strong> menu. Continue holding the Menu button, when the LCD window<br />
displays: “Enable New Device Scan”; release the Menu button.<br />
Enable<br />
New Device Scan<br />
The LCD window then indicates:<br />
Device scan active<br />
for nnd:nnh:nnm<br />
2. The <strong>Envoy</strong> begins a 30 minute scan, if a longer scan is not already in<br />
progress, to identify all of the microinverters deployed at the premises.<br />
3. Log into the Enphase Enlighten web-based monitoring and analysis to view<br />
data on a per microinverter basis (and, hence, a per PV module basis).<br />
4. To disable or cancel a scan, press and hold the Menu button on the front of<br />
the <strong>Envoy</strong> for two seconds to view the <strong>Envoy</strong> menu on the LCD. When the<br />
LCD window displays: “Disable New Device Scan”; release the Menu button.<br />
Disable<br />
New Device Scan<br />
Page 15 Copyright Enphase <strong>Energy</strong> Inc. 2009 141-00008 REV 06
Performing a Communication Check<br />
If, when you are installing the <strong>Envoy</strong>, you are unsure of where it should be located<br />
for maximum performance, you may want to install the <strong>Envoy</strong> in different locations<br />
and check signal strength. A communication check starts automatically after an<br />
<strong>Envoy</strong> restart. In addition to this automatic check a user-initiated communication<br />
check can be started with the <strong>Envoy</strong> Menu button or through the administration page<br />
when connected to the <strong>Envoy</strong> local connection with a computer.<br />
To initiate a communication check:<br />
1. Press and hold the Menu button on <strong>Envoy</strong> for two seconds to bring up the<br />
<strong>Envoy</strong> menu on the LCD window. When the LCD window displays: “Enable<br />
Communication Check”, release the Menu button.<br />
Enable<br />
Communication Check<br />
The LCD window then indicates:<br />
Comm check enabled<br />
for 20min<br />
The <strong>Envoy</strong> begins a 20 minute communication check to assess the signal<br />
strength between the <strong>Envoy</strong> and the devices deployed at your site.<br />
2. Until the <strong>Envoy</strong> begins detecting devices (microinverters), the display reads:<br />
Comm Check +Web<br />
Scanning Devices...<br />
3. When the <strong>Envoy</strong> begins detecting devices (microinverters), the display reads:<br />
[▌▌▌ ] mm:ss +Web<br />
LEVEL Devices: n<br />
The “LEVEL” indicator in the LCD window may display any number of bars<br />
from zero to five. You can assume that the communication check is<br />
progressing normally and that signal strength is acceptable if two to five bars<br />
are displayed. If fewer than two bars are displayed, you may want to try the<br />
following options:<br />
Page 16 Copyright Enphase <strong>Energy</strong> Inc. 2009 141-00008 REV 06
- Relocate your <strong>Envoy</strong> closer to the electrical service-panel (load-center)<br />
as possible. This ensures that the <strong>Envoy</strong> receives the strongest<br />
possible signal from each microinverter.<br />
- Plug the <strong>Envoy</strong> into another circuit supporting fewer electronic devices,<br />
as these devices may interfere with communication between the<br />
microinverters and the <strong>Envoy</strong>.<br />
Remaining minutes and seconds are displayed (“mm:ss” in the example). The<br />
“Devices” counter displays the numbers of devices detected and will ascend<br />
until all devices are detected. The number of devices detected should match<br />
the number of installed microinverters.<br />
After 20 minutes, the communication check times out. If you want to end the<br />
communication check before it times out, press the menu button to activate<br />
the <strong>Envoy</strong> menu. When the LCD indicates “Disable Communication Check”,<br />
release the menu button.<br />
Restarting the <strong>Envoy</strong><br />
If the utility ever fails, or you need to restart the <strong>Envoy</strong>, just plug it in (if not already<br />
done) and let the <strong>Envoy</strong> start up again. It will resume operation when power and<br />
internet connection are restored. When it resumes operation, the LCD window<br />
displays the auto-start sequence. The system performs an automatic<br />
communications check. The LCD window alternates between two displays like those<br />
shown in the following:<br />
192.168.2.140 +Web<br />
2407W 783kWh 25<br />
[▌▌▌ ] mm:ss +Web<br />
LEVEL Devices: n<br />
For information on the “Level” and “Devices” indicators, refer to the descriptions in<br />
“Performing a Communication Check” on page 16. The auto-start sequence continues<br />
for 20 minutes after starting up the <strong>Envoy</strong>. After this check, normal operation<br />
resumes.<br />
Page 17 Copyright Enphase <strong>Energy</strong> Inc. 2009 141-00008 REV 06
Normal Operation<br />
Once the <strong>Envoy</strong> completes a scan, it begins or resumes normal operation. At this<br />
point, the indicators in the LCD window show current values for your system:<br />
192.168.2.140 +Web<br />
2407W 783kWh 25<br />
The displayed values are:<br />
<br />
<br />
Local IP address, for example: 192.168.2.140 (your actual local IP address<br />
will be different)<br />
Web connection indication: +Web<br />
NOTE: The following indicators may take several minutes to appear<br />
after starting up the <strong>Envoy</strong> or initiating a scan.<br />
<br />
<br />
<br />
Indication of the present power-production, in watts: (n)W (where n is a<br />
number)<br />
Indication of the life time kilowatt hours reported to this <strong>Envoy</strong>: (n)kWh<br />
(where n is a number)<br />
Indication of the number of online microinverters producing power and<br />
reporting in to the <strong>Envoy</strong>: (n) (where n is a number). The number of<br />
microinverters displayed will be zero at night.<br />
Networking/Firewall Info<br />
The <strong>Envoy</strong> communicates with the Enphase Enlighten website by initiating outbound<br />
TCP (Transmission Control Protocol) connections to Enphase over HTTPS (Hypertext<br />
Transfer Protocol over Secure Socket Layer) (TCP:443). The <strong>Envoy</strong> uses NTP<br />
(Network Time Protocol) (UDP:123) during boot sequence to synchronize time/date<br />
with an external NTP (public) pool of servers. You do not need to open any inbound<br />
firewall ports for normal operation.<br />
Page 18 Copyright Enphase <strong>Energy</strong> Inc. 2009 141-00008 REV 06
4 Troubleshooting<br />
The following sections describe possible problems. For information on system status<br />
and event messages see Event Messages on page 22.<br />
Potential Problems and Solutions<br />
IP ADDRESS Problem: If the IP address displayed on the <strong>Envoy</strong>’s LCD window does<br />
not match the DHCP subnet on your internal network and shows something<br />
beginning with “169.254.x.x”, this means that it was unsuccessful in obtaining a<br />
DHCP lease from your router.<br />
<br />
Check network connectivity to the router or other DHCP server. You may also<br />
wish to contact your Internet Service Provider or refer to your router<br />
documentation for assistance.<br />
LCD Window displays “-Web”: This means that the <strong>Envoy</strong> could not connect to<br />
the Internet to find an NTP server and could not connect to the Enlighten website.<br />
<br />
Check network connectivity to the premises router or switch. You may also<br />
wish to contact your Internet Service Provider or refer to your router<br />
documentation for assistance.<br />
LCD Window displays “<strong>Envoy</strong> Failure +Web or -Web”: This message displays<br />
after the <strong>Envoy</strong> has tried unsuccessfully three times to initialize. At this point, the<br />
<strong>Envoy</strong> attempts to open a VPN tunnel to allow Enphase to perform remote<br />
diagnostics addressing the problem. This attempt to open a tunnel occurs every hour<br />
on the hour. If successfully opened, the tunnel stays open for 50 minutes. The <strong>Envoy</strong><br />
displays “<strong>Envoy</strong> Failure +Web” to indicate that the tunnel is open. After the 50<br />
minute period, the tunnel is closed and the “-Web” indication may again be<br />
displayed.<br />
NOTE: Attempts to open a tunnel continue until recovery takes place,<br />
at which point the <strong>Envoy</strong> resumes normal operation.<br />
Microinverter count doesn’t match number of installed units: This message<br />
may indicate that the <strong>Envoy</strong> is not done scanning/discovering the entire array. It<br />
may indicate that the <strong>Envoy</strong> is having difficulty communicating over the power lines.<br />
It could also be a result of low light levels and the module voltage is too low for the<br />
microinverter to power-up.<br />
<br />
Try plugging the <strong>Envoy</strong> into an electrical socket in a different location, closer<br />
to your main electrical panel. Also, make sure that the <strong>Envoy</strong> is plugged<br />
directly into the wall and not into a power strip or surge protector.<br />
Page 19 Copyright Enphase <strong>Energy</strong> Inc. 2009 141-00008 REV 06
5 <strong>Envoy</strong> Local Interface<br />
Connection to the Enphase Enlighten web-based monitoring and analysis website<br />
requires an Internet connection. However, if there is no Internet access at the<br />
installation site, it is still possible to communicate directly with the <strong>Envoy</strong> using the<br />
Ethernet port and a personal computer with a web browser. The following steps<br />
describe how to access the <strong>Envoy</strong> and the data that is available through the local<br />
connection.<br />
1. Connect one end of the Ethernet cable supplied with the <strong>Envoy</strong> to the <strong>Envoy</strong> port<br />
labeled “Ethernet”.<br />
2. Connect the other end of the Ethernet cable to the RJ45 network port of the<br />
computer.<br />
3. Open the Internet browser application on the computer.<br />
4. In the browser address window enter the IP address displayed in the LCD window<br />
of the <strong>Envoy</strong> (192.194.2.141 in this example).<br />
If you fail to make a connection at this point, you can try to manually configure<br />
your subnet to 169.254.120.2, Subnet Mask 255.255.0.0 If this does not correct<br />
the problem, call Enphase Customer Support at 877-797-4743.<br />
Home Screen<br />
Once the browser has successfully connected with the <strong>Envoy</strong>, the following screen is<br />
displayed in the browser. This home screen provides a system overview and shows<br />
the current status of the inverters that have been identified by this <strong>Envoy</strong>. From this<br />
screen, you can access other screens in the interface.<br />
Click to<br />
view<br />
Inventory<br />
screen<br />
Click to<br />
view<br />
Production<br />
screen<br />
Page 20 Copyright Enphase <strong>Energy</strong> Inc. 2009 141-00008 REV 06
Production Screen<br />
To view system energy production statistics for your system, click “Production” from<br />
the <strong>Envoy</strong> home screen to navigate to the production screen.<br />
Inventory Screen<br />
To view a listing of the microinverters in your system, click “Inventory” from any<br />
screen to navigate to the inventory screen.<br />
Page 21 Copyright Enphase <strong>Energy</strong> Inc. 2009 141-00008 REV 06
Event Messages<br />
The table below lists messages that the <strong>Envoy</strong> can produce to indicate certain<br />
conditions. These messages appear on screen when your computer is connected to<br />
the <strong>Envoy</strong> local interface. These messages can provide Enphase Customer Support<br />
with valuable information, should you need to call for assistance.<br />
Where message is displayed:<br />
Home Screen Inventory Screen Description<br />
AC Frequency Out<br />
Of Range<br />
ac-freq-oor<br />
The frequency of the AC grid has<br />
exceeded the limits specified by UL<br />
1741.<br />
AC Voltage Out Of<br />
Range<br />
Audible alarm<br />
active<br />
ac-voltage-oos-p#<br />
(# = 1, 2 or 3)<br />
audible-active<br />
The voltage of the indicated AC<br />
phase (relative to neutral) has<br />
exceeded the limits specified by UL<br />
1741.<br />
The inverter's buzzer is active, either<br />
due to an internally detected error<br />
or by user command.<br />
Bad Flash Image bad-flash-image The inverter is not producing power<br />
because one of its flash memory<br />
images is corrupt. Contact Enphase<br />
<strong>Energy</strong> customer support at 877-<br />
797-4743 for assistance.<br />
Commanded Reset commanded-reset The inverter has reset, either<br />
following a successful image<br />
download or by user command.<br />
Control Request<br />
This event logs a user control<br />
request made using the<br />
Administration > Device Conditions<br />
and Controls page or via Enlighten.<br />
Critical<br />
Temperature<br />
critical-temp<br />
The inverter is producing less power<br />
in an attempt to not overheat (see<br />
Over Temperature)<br />
DC Too High dc-voltage-hi The DC input voltage to the inverter<br />
is too high; check that the PV<br />
module and inverter are compatible.<br />
DC Too Low dc-voltage-lo The DC input voltage to the inverter<br />
is too low; this is a normal condition<br />
at night, but during the day may<br />
indicate a bad or missing DC<br />
connection to the inverter.<br />
Download to<br />
module begun<br />
The <strong>Envoy</strong> has begun an image<br />
download to the indicated inverter.<br />
Download to<br />
module ended<br />
The <strong>Envoy</strong> has successfully<br />
downloaded an image to an inverter.<br />
Download to<br />
module failed<br />
The <strong>Envoy</strong> was unable to<br />
successfully download an image to<br />
an inverter.<br />
Page 22 Copyright Enphase <strong>Energy</strong> Inc. 2009 141-00008 REV 06
Where message is displayed:<br />
Home Screen Inventory Screen Description<br />
GFI Tripped gfi-tripped An inverter has detected ground<br />
fault current greater than one amp.<br />
The error can only be cleared via the<br />
<strong>Envoy</strong> after the ground fault<br />
condition has been remedied. The<br />
GFI can be cleared using the Device<br />
Conditions and Controls page unless<br />
the failure is permanent. Contact<br />
Enphase <strong>Energy</strong> customer support at<br />
877-797-4743 for assistance.<br />
Grid Gone grid-gone The AC utility grid is no longer<br />
present.<br />
Grid Instability grid-instability The inverter is not producing power<br />
due to one or more of these<br />
conditions: AC Frequency Out Of<br />
Range, AC Voltage Out Of Range, or<br />
Grid Gone. Note that Grid Instability<br />
will remain for about 5 minutes after<br />
the underlying conditions clear.<br />
Module added<br />
The <strong>Envoy</strong> has detected and is now<br />
associated to a new inverter.<br />
Module failed to<br />
report<br />
The <strong>Envoy</strong> has not received a<br />
response to the last three messages<br />
sent to an inverter.<br />
Inverter is off for the night<br />
Module Sleeping<br />
Over Temperature over-temp The inverter is not producing power,<br />
because it is too hot.<br />
Power generation forced-pwr-prod-off The inverter is not producing power<br />
off by command<br />
by user command.<br />
Power On Reset power-on-reset The inverter has powered on after<br />
having both AC and DC<br />
disconnected.<br />
Shutdown<br />
The <strong>Envoy</strong> shut down its internal<br />
processing.<br />
Skipped Cycles skipped-cycles The inverter has not produced power<br />
for more than 5% of the most recent<br />
production interval; this may be due<br />
to real problems in the grid, or a<br />
hardware failure of the inverter.<br />
Startup<br />
The <strong>Envoy</strong> started its internal<br />
processing.<br />
Page 23 Copyright Enphase <strong>Energy</strong> Inc. 2009 141-00008 REV 06
6 Technical Data<br />
<strong>Communications</strong> Interface<br />
Powerline<br />
Ethernet<br />
Power Requirements<br />
AC Outlet<br />
Power Consumption<br />
Mechanical Data<br />
Dimensions (WxHxD)<br />
Weight<br />
Ambient Temperature Range<br />
Cooling<br />
Enphase Proprietary<br />
10/100 Auto-sensing, Auto-negotiation<br />
120 VAC, 60 Hz<br />
2.5 Watts typical, 7 watts maximum<br />
8.8” x 4.4” x 1.7”<br />
(222.5 mm x 112mm x 43.2mm)<br />
12 oz (340g)<br />
-40˚C to +65˚C (-40˚ to 149˚F)<br />
Natural Convection – no fans<br />
Enclosure Environmental Rating Indoor - NEMA 1<br />
Features<br />
Standard Warranty Term<br />
Compliance<br />
1 year<br />
UL 60950, EN 60950, FCC Part 15 Class B<br />
Page 24 Copyright Enphase <strong>Energy</strong> Inc. 2009 141-00008 REV 06
7 Appendix<br />
Limited Warranty<br />
Enphase <strong>Energy</strong> Inc. ("Enphase") has developed a highly reliable <strong>Envoy</strong> <strong>Communications</strong><br />
<strong>Gateway</strong> that is designed to withstand normal operating conditions when used for its originally<br />
intended purpose in compliance with the Enphase User Manual supplied with the originally<br />
shipped system. The Enphase limited warranty ("Limited Warranty") covers defects in<br />
workmanship and materials of the <strong>Envoy</strong> <strong>Communications</strong> <strong>Gateway</strong> ("Defective Product") for a<br />
period of one (1) year from the date of original purchase of such <strong>Envoy</strong> <strong>Communications</strong><br />
<strong>Gateway</strong> at point of sale to the originally-installed end user location (the "Warranty Period").<br />
During the Warranty Period, the warranty is transferable to a different owner as long as the<br />
<strong>Envoy</strong> <strong>Communications</strong> <strong>Gateway</strong> remains installed at the originally-installed end user location.<br />
During the Warranty Period, Enphase will, at its option, repair or replace the Defective Product<br />
free of charge, provided that Enphase through inspection establishes the existence of a defect<br />
that is covered by the Limited Warranty. Enphase will, at its option, use new and/or<br />
reconditioned parts in repairing or replacing the Defective Product. Enphase reserves the right to<br />
use parts or products of original or improved design in the repair or replacement of Defective<br />
Product. If Enphase repairs or replaces a Defective Product, the Limited Warranty continues on<br />
the repaired or replacement product for the remainder of the original Warranty Period or ninety<br />
(90) days from the date of Enphase’s return shipment of the repaired or replacement product,<br />
whichever is later.<br />
The Limited Warranty covers both parts and labor necessary to repair the Defective Product, but<br />
does not include labor costs related to un-installing the Defective Product or re-installing the<br />
repaired or replacement product. The Limited Warranty also covers the costs of shipping repaired<br />
or replacement product from Enphase, via a non-expedited freight carrier selected by Enphase,<br />
to locations within the United States (including Alaska and Hawaii) and Canada, but not to other<br />
locations outside the United States or Canada. The Limited Warranty does not cover, and<br />
Enphase will not be responsible for, shipping damage or damage caused by mishandling by the<br />
freight carrier and any such damage is the responsibility of the freight carrier.<br />
To obtain repair or replacement service under this Limited Warranty, the customer must comply<br />
with the following policy and procedure:<br />
<br />
<br />
All Defective Product must be returned with a Return Merchandise Authorization Number<br />
(RMA) which customer must request from Enphase. Before requesting the RMA, however,<br />
the customer should contact an Enphase technical support representative to evaluate and<br />
troubleshoot the problem while the <strong>Envoy</strong> <strong>Communications</strong> <strong>Gateway</strong> is in the field, since<br />
many problems can be solved in the field.<br />
If in-field troubleshooting does not solve the problem, Customer may request the RMA<br />
number, which request must include the following information:<br />
<br />
<br />
<br />
<br />
Proof-of-purchase of the Defective Product in the form of (1) the dated purchase<br />
receipt from the original purchase of the product at point of sale to the end user,<br />
or (2) the dated dealer invoice or purchase receipt showing original equipment<br />
manufacturer (OEM) status, or (3) the dated invoice or purchase receipt showing<br />
the product exchanged under warranty<br />
Model number of the Defective Product.<br />
Serial number of the Defective Product.<br />
Detailed description of the defect.<br />
Page 25 Copyright Enphase <strong>Energy</strong> Inc. 2009 141-00008 REV 06
Shipping address for return of the repaired or replacement product.<br />
<br />
<br />
All Defective Product authorized for return must be returned in the original shipping<br />
container or other packaging that is equally protective of the product.<br />
The returned Defective Product must not have been disassembled or modified without the<br />
prior written authorization of Enphase.<br />
The Enphase <strong>Envoy</strong> <strong>Communications</strong> <strong>Gateway</strong>s are designed to withstand normal operating<br />
conditions and typical wear and tear when used for their original intent and in compliance with<br />
the installation and operating instructions supplied with the original equipment. The Limited<br />
Warranty does not apply to, and Enphase will not be responsible for, any defect in or damage to<br />
any Enphase <strong>Envoy</strong> <strong>Communications</strong> <strong>Gateway</strong>: (1) that has been misused, neglected, tampered<br />
with, altered, or otherwise damaged, either internally or externally; (2) that has been improperly<br />
installed, operated, handled or used, including use under conditions for which the product was<br />
not designed, use in an unsuitable environment, or use in a manner contrary to the Enphase<br />
User Manual or applicable laws or regulations; (3) that has been subjected to fire, water,<br />
generalized corrosion, biological infestations, acts of God, or input voltage that creates operating<br />
conditions beyond the maximum or minimum limits listed in the Enphase <strong>Envoy</strong> <strong>Communications</strong><br />
<strong>Gateway</strong> specifications, including high input voltage from generators or lightning strikes; (4) that<br />
has been subjected to incidental or consequential damage caused by defects of other<br />
components of the solar system; or (5) if the original identification markings (including<br />
trademark or serial number) of such <strong>Envoy</strong> <strong>Communications</strong> <strong>Gateway</strong> have been defaced,<br />
altered, or removed. The Limited Warranty does not cover costs related to the removal,<br />
installation or troubleshooting of the customer's electrical systems. The Limited Warranty does<br />
not extend beyond the original cost of the Enphase <strong>Envoy</strong> <strong>Communications</strong> <strong>Gateway</strong>.<br />
THE LIMITED WARRANTY IS THE SOLE AND EXCLUSIVE WARRANTY GIVEN BY ENPHASE AND,<br />
WHERE PERMITTED BY LAW, IS MADE EXPRESSLY IN LIEU OF ALL OTHER WARRANTIES,<br />
EXPRESS OR IMPLIED, STATUTORY OR OTHERWISE, INCLUDING, WITHOUT LIMITATION,<br />
WARRANTIES OF TITLE, QUALITY, MERCHANTABILITY, FITNESS FOR A PARTICULAR PURPOSE<br />
OR NON-INFRINGEMENT OR WARRANTIES AS TO THE ACCURACY, SUFFICIENCY OR<br />
SUITABILITY OF ANY TECHNICAL OR OTHER INFORMATION PROVIDED IN MANUALS OR OTHER<br />
DOCUMENTATION. IN NO EVENT WILL ENPHASE BE LIABLE FOR ANY SPECIAL, DIRECT,<br />
INDIRECT, INCIDENTAL OR CONSEQUENTIAL DAMAGES, LOSSES, COSTS OR EXPENSES<br />
HOWEVER ARISING, WHETHER IN CONTRACT OR TORT, INCLUDING WITHOUT LIMITATION ANY<br />
ECONOMIC LOSSES OF ANY KIND, ANY LOSS OR DAMAGE TO PROPERTY, OR ANY PERSONAL<br />
INJURY.<br />
To the extent any implied warranties are required under applicable law to apply to the <strong>Envoy</strong><br />
<strong>Communications</strong> <strong>Gateway</strong>, such implied warranties shall be limited in duration to the Warranty<br />
Period, to the extent permitted by applicable law. Some states and provinces do not allow<br />
limitations or exclusions on implied warranties or on the duration of an implied warranty or on<br />
the limitation or exclusion of incidental or consequential damages, so the above limitation(s) or<br />
exclusion(s) may not apply. This Limited Warranty gives the customer specific legal rights, and<br />
the customer may have other rights that may vary from state to state or province to province.<br />
Page 26 Copyright Enphase <strong>Energy</strong> Inc. 2009 141-00008 REV 06
Page 27 Copyright Enphase <strong>Energy</strong> Inc. 2009 141-00008 REV 06
Enphase <strong>Energy</strong> Inc.<br />
201 1 St Street, Suite 300<br />
Petaluma, CA 94952<br />
Phone: 707-763-4784<br />
TOLL FREE: 877-797-4743<br />
Fax: 707-763-0784<br />
www.enphaseenergy.com<br />
info@enphaseenergy.com<br />
Page 28 Copyright Enphase <strong>Energy</strong> Inc. 2009 141-00008 REV 06