Access Gateway Advanced Edition Administrator's Guide - Citrix ...
Access Gateway Advanced Edition Administrator's Guide - Citrix ...
Access Gateway Advanced Edition Administrator's Guide - Citrix ...

Create successful ePaper yourself
Turn your PDF publications into a flip-book with our unique Google optimized e-Paper software.
<strong>Access</strong> <strong>Gateway</strong> <strong>Advanced</strong> <strong>Edition</strong> Administrator’s <strong>Guide</strong><br />
<strong>Citrix</strong>® <strong>Access</strong> <strong>Gateway</strong> 4.5<br />
<strong>Citrix</strong> <strong>Access</strong> Suite
Copyright and Trademark Notice<br />
Use of the product documented in this guide is subject to your prior acceptance of the End User License Agreement. Copies of the End<br />
User License Agreement are included in the Documentation folder of the product CD-ROM.<br />
Information in this document is subject to change without notice. Companies, names, and data used in examples herein are fictitious<br />
unless otherwise noted. Other than printing one copy for personal use, no part of this document may be reproduced or transmitted in any<br />
form or by any means, electronic or mechanical, for any purpose, without the express written permission of <strong>Citrix</strong> Systems, Inc.<br />
© 2003-2006 <strong>Citrix</strong> Systems, Inc. All rights reserved.<br />
<strong>Citrix</strong>, <strong>Citrix</strong> Presentation Server, <strong>Citrix</strong> <strong>Access</strong> <strong>Gateway</strong>, ICA (Independent Computing Architecture), <strong>Access</strong> Suite, <strong>Citrix</strong> Program<br />
Neighborhood, and SmoothRoaming are registered trademarks or trademarks of <strong>Citrix</strong> Systems, Inc. in the United States and other<br />
countries.<br />
RSA Encryption © 1996-1997 RSA Security Inc., All rights reserved.<br />
Trademark Acknowledgements<br />
Adobe, Acrobat, and PostScript are trademarks or registered trademarks of Adobe Systems Incorporated in the U.S. and/or other<br />
countries.<br />
Apple, Mac, Mac OS, and Macintosh are registered trademarks or trademarks of Apple Computer Inc.<br />
Flash and Shockwave are trademarks or registered trademarks of Macromedia, Inc. in the United States and/or other countries.<br />
Java is a registered trademark of Sun Microsystems, Inc. in the U.S. and other countries.<br />
Microsoft, MS-DOS, Windows, Windows Server, Windows NT, Win32, Outlook, ActiveX, Active Directory and Vista are either<br />
registered trademarks or trademarks of Microsoft Corporation in the United States and/or other countries.<br />
Lotus, Domino, Notes, and iNotes are trademarks of International Business Machines Corporation in the United States, other countries, or<br />
both.<br />
Mozilla and Firefox are trademarks or registered trademarks of the Mozilla Foundation in the United States and/or other countries.<br />
Netscape and Netscape Navigator are registered trademarks of Netscape Communications Corp. in the U.S. and other countries.<br />
Secure Computing and SafeWord are registered trademarks of Secure Computing Corporation.<br />
McAfee and VirusScan are registered trademarks or trademarks of McAfee, Inc. and/or its affiliates in the US and/or other countries.<br />
Norton AntiVirus, Norton Personal Firewall, Symantec, Symantec AntiVirus Solution, and Symantec Desktop Firewall are registered<br />
trademarks or trademarks of Symantec Corporation in the US and/or other countries.<br />
OfficeScan, Trend Micro, and Trend Micro Incorporated are trademarks of Trend Micro in the US and/or other countries.<br />
ZoneAlarm and Zone Labs are trademarks or registered trademarks of Zone Labs LLC in the United States and other countries.<br />
All other trademarks and registered trademarks are the property of their owners.<br />
Document code: September 19, 2006 (JB)
CONTENTS<br />
Contents<br />
Chapter 1<br />
Chapter 2<br />
Chapter 3<br />
Welcome<br />
<strong>Access</strong> <strong>Gateway</strong> <strong>Advanced</strong> <strong>Edition</strong> . . . . . . . . . . . . . . . . . . . . . . . . . . . . . . . . . . . . .11<br />
Smart <strong>Access</strong> . . . . . . . . . . . . . . . . . . . . . . . . . . . . . . . . . . . . . . . . . . . . . . . . . . . .11<br />
SmoothRoaming . . . . . . . . . . . . . . . . . . . . . . . . . . . . . . . . . . . . . . . . . . . . . . . . .12<br />
Secure by Design. . . . . . . . . . . . . . . . . . . . . . . . . . . . . . . . . . . . . . . . . . . . . . . . .12<br />
New Features . . . . . . . . . . . . . . . . . . . . . . . . . . . . . . . . . . . . . . . . . . . . . . . . . . . .13<br />
New Name . . . . . . . . . . . . . . . . . . . . . . . . . . . . . . . . . . . . . . . . . . . . . . . . . . . . . .14<br />
Getting Information and Help<br />
<strong>Access</strong>ing Product Documentation. . . . . . . . . . . . . . . . . . . . . . . . . . . . . . . . . . . . . .15<br />
Document Conventions. . . . . . . . . . . . . . . . . . . . . . . . . . . . . . . . . . . . . . . . . . . .16<br />
Command-Line Conventions . . . . . . . . . . . . . . . . . . . . . . . . . . . . . . . . . . . . . . .17<br />
Getting Service and Support. . . . . . . . . . . . . . . . . . . . . . . . . . . . . . . . . . . . . . . . . . .18<br />
Subscription Advantage . . . . . . . . . . . . . . . . . . . . . . . . . . . . . . . . . . . . . . . . . . .18<br />
Knowledge Center Watches . . . . . . . . . . . . . . . . . . . . . . . . . . . . . . . . . . . . . . . .18<br />
Education and Training. . . . . . . . . . . . . . . . . . . . . . . . . . . . . . . . . . . . . . . . . . . . . . .19<br />
Customizing the Software. . . . . . . . . . . . . . . . . . . . . . . . . . . . . . . . . . . . . . . . . . . . .19<br />
Planning Your <strong>Access</strong> Strategy<br />
Step 1: Evaluating Corporate Infrastructure. . . . . . . . . . . . . . . . . . . . . . . . . . . . . . .21<br />
Step 2: Performing a Risk Analysis . . . . . . . . . . . . . . . . . . . . . . . . . . . . . . . . . . . . .25<br />
Step 3: Developing Your <strong>Access</strong> Strategy . . . . . . . . . . . . . . . . . . . . . . . . . . . . . . . .25<br />
Securing <strong>Access</strong> and Resources with Policies . . . . . . . . . . . . . . . . . . . . . . . . . .26<br />
Planning for Client Requirements. . . . . . . . . . . . . . . . . . . . . . . . . . . . . . . . . . . .26<br />
Traversing Firewalls . . . . . . . . . . . . . . . . . . . . . . . . . . . . . . . . . . . . . . . . . . . . . .27<br />
Protecting Sensitive Corporate Data. . . . . . . . . . . . . . . . . . . . . . . . . . . . . . . . . .27<br />
Evaluating Authentication Types . . . . . . . . . . . . . . . . . . . . . . . . . . . . . . . . . . . . . . .28<br />
One-Factor Authentication . . . . . . . . . . . . . . . . . . . . . . . . . . . . . . . . . . . . . . . . .29<br />
<strong>Advanced</strong> Authentication . . . . . . . . . . . . . . . . . . . . . . . . . . . . . . . . . . . . . . . . . .29<br />
Planning for High Availability . . . . . . . . . . . . . . . . . . . . . . . . . . . . . . . . . . . . . . . . .30
4 <strong>Access</strong> <strong>Gateway</strong> <strong>Advanced</strong> <strong>Edition</strong> Administrator’s <strong>Guide</strong><br />
Considering Users’ Needs . . . . . . . . . . . . . . . . . . . . . . . . . . . . . . . . . . . . . . . . . . . .31<br />
Chapter 4<br />
Chapter 5<br />
Licensing the <strong>Advanced</strong> <strong>Edition</strong><br />
Installing <strong>Citrix</strong> Licensing . . . . . . . . . . . . . . . . . . . . . . . . . . . . . . . . . . . . . . . . . . . .33<br />
Getting More Information . . . . . . . . . . . . . . . . . . . . . . . . . . . . . . . . . . . . . . . . . .34<br />
Obtaining Licenses . . . . . . . . . . . . . . . . . . . . . . . . . . . . . . . . . . . . . . . . . . . . . . . . . .34<br />
Determining the Licenses Required . . . . . . . . . . . . . . . . . . . . . . . . . . . . . . . . . .34<br />
Licensing Grace Period . . . . . . . . . . . . . . . . . . . . . . . . . . . . . . . . . . . . . . . . . . . .35<br />
Mixed Environments . . . . . . . . . . . . . . . . . . . . . . . . . . . . . . . . . . . . . . . . . . . . . .35<br />
Specifying the License Server . . . . . . . . . . . . . . . . . . . . . . . . . . . . . . . . . . . . . . . . .36<br />
Adding Shortcuts to the License Management Console . . . . . . . . . . . . . . . . . . . . .37<br />
Installing <strong>Advanced</strong> <strong>Access</strong> Control<br />
Planning Your Installation . . . . . . . . . . . . . . . . . . . . . . . . . . . . . . . . . . . . . . . . . . . .39<br />
Pre-Installation Tasks . . . . . . . . . . . . . . . . . . . . . . . . . . . . . . . . . . . . . . . . . . . . .39<br />
Post-Installation Tasks. . . . . . . . . . . . . . . . . . . . . . . . . . . . . . . . . . . . . . . . . . . . .41<br />
Server Requirements. . . . . . . . . . . . . . . . . . . . . . . . . . . . . . . . . . . . . . . . . . . . . . . . .41<br />
System Requirements . . . . . . . . . . . . . . . . . . . . . . . . . . . . . . . . . . . . . . . . . . . . .42<br />
Network Requirements . . . . . . . . . . . . . . . . . . . . . . . . . . . . . . . . . . . . . . . . . . . . . . .43<br />
Account Requirements . . . . . . . . . . . . . . . . . . . . . . . . . . . . . . . . . . . . . . . . . . . . . . .44<br />
Microsoft SQL Server User Account Requirements . . . . . . . . . . . . . . . . . . . . .44<br />
Service Account Requirements. . . . . . . . . . . . . . . . . . . . . . . . . . . . . . . . . . . . . .44<br />
Using Security Templates with the Service Account . . . . . . . . . . . . . . . . . . . . .45<br />
Database Requirements. . . . . . . . . . . . . . . . . . . . . . . . . . . . . . . . . . . . . . . . . . . . . . .46<br />
<strong>Access</strong> <strong>Gateway</strong> Requirements . . . . . . . . . . . . . . . . . . . . . . . . . . . . . . . . . . . . . . . .46<br />
Feature Requirements . . . . . . . . . . . . . . . . . . . . . . . . . . . . . . . . . . . . . . . . . . . . . . . .46<br />
HTML Preview Requirements . . . . . . . . . . . . . . . . . . . . . . . . . . . . . . . . . . . . . .46<br />
Live Edit Requirements. . . . . . . . . . . . . . . . . . . . . . . . . . . . . . . . . . . . . . . . . . . .49<br />
Email Synchronization Requirements. . . . . . . . . . . . . . . . . . . . . . . . . . . . . . . . .50<br />
Web Email Requirements . . . . . . . . . . . . . . . . . . . . . . . . . . . . . . . . . . . . . . . . . .50<br />
Using Microsoft Windows 2003 Server Web <strong>Edition</strong> for Web Email . . . . . . .52<br />
Endpoint Analysis Requirements . . . . . . . . . . . . . . . . . . . . . . . . . . . . . . . . . . . .52<br />
Authentication Software Requirements . . . . . . . . . . . . . . . . . . . . . . . . . . . . . . .53<br />
<strong>Citrix</strong> Presentation Server Integration Requirements . . . . . . . . . . . . . . . . . . . .54<br />
Requirements for Bypassing the Web Proxy . . . . . . . . . . . . . . . . . . . . . . . . . . .57<br />
Third Party Portal Integration Requirements . . . . . . . . . . . . . . . . . . . . . . . . . . .57<br />
Client Requirements . . . . . . . . . . . . . . . . . . . . . . . . . . . . . . . . . . . . . . . . . . . . . . . . .58<br />
Web Browser Requirements . . . . . . . . . . . . . . . . . . . . . . . . . . . . . . . . . . . . . . . .58<br />
Live Edit Client Requirements . . . . . . . . . . . . . . . . . . . . . . . . . . . . . . . . . . . . . .60
5 <strong>Access</strong> <strong>Gateway</strong> <strong>Advanced</strong> <strong>Edition</strong> Administrator’s <strong>Guide</strong><br />
Endpoint Analysis Client Requirements. . . . . . . . . . . . . . . . . . . . . . . . . . . . . . .61<br />
Secure <strong>Access</strong> Client Requirements . . . . . . . . . . . . . . . . . . . . . . . . . . . . . . . . . .61<br />
Console Requirements . . . . . . . . . . . . . . . . . . . . . . . . . . . . . . . . . . . . . . . . . . . . . . .62<br />
Installation Overview . . . . . . . . . . . . . . . . . . . . . . . . . . . . . . . . . . . . . . . . . . . . . . . .62<br />
Installing <strong>Advanced</strong> <strong>Access</strong> Control . . . . . . . . . . . . . . . . . . . . . . . . . . . . . . . . . . . .63<br />
Uninstalling <strong>Advanced</strong> <strong>Access</strong> Control . . . . . . . . . . . . . . . . . . . . . . . . . . . . . . .65<br />
Chapter 6<br />
Configuring <strong>Advanced</strong> <strong>Access</strong> Control<br />
Supported Configurations. . . . . . . . . . . . . . . . . . . . . . . . . . . . . . . . . . . . . . . . . . . . .68<br />
<strong>Access</strong> <strong>Gateway</strong> Configurations . . . . . . . . . . . . . . . . . . . . . . . . . . . . . . . . . . . . .68<br />
<strong>Advanced</strong> <strong>Access</strong> Control Configurations . . . . . . . . . . . . . . . . . . . . . . . . . . . . .68<br />
Double-Hop DMZ Configurations . . . . . . . . . . . . . . . . . . . . . . . . . . . . . . . . . . .69<br />
Changing the Server Configuration . . . . . . . . . . . . . . . . . . . . . . . . . . . . . . . . . .76<br />
Configuring Your Server . . . . . . . . . . . . . . . . . . . . . . . . . . . . . . . . . . . . . . . . . . . . .76<br />
Server Configuration Overview . . . . . . . . . . . . . . . . . . . . . . . . . . . . . . . . . . . . .76<br />
Steps to Configuring A Server . . . . . . . . . . . . . . . . . . . . . . . . . . . . . . . . . . . . . . . . .77<br />
Creating or Joining an <strong>Access</strong> Server Farm . . . . . . . . . . . . . . . . . . . . . . . . . . . .77<br />
Selecting a Database . . . . . . . . . . . . . . . . . . . . . . . . . . . . . . . . . . . . . . . . . . . . . .78<br />
Specifying an Existing Database Server. . . . . . . . . . . . . . . . . . . . . . . . . . . . . . .78<br />
Specifying a License Server . . . . . . . . . . . . . . . . . . . . . . . . . . . . . . . . . . . . . . . .79<br />
Selecting a Web Site Path . . . . . . . . . . . . . . . . . . . . . . . . . . . . . . . . . . . . . . . . . .79<br />
Securing Web Site Traffic with SSL. . . . . . . . . . . . . . . . . . . . . . . . . . . . . . . . . .80<br />
Finishing Server Configuration. . . . . . . . . . . . . . . . . . . . . . . . . . . . . . . . . . . . . .80<br />
Enabling <strong>Advanced</strong> <strong>Access</strong> Control. . . . . . . . . . . . . . . . . . . . . . . . . . . . . . . . . . . . .80<br />
Using the <strong>Access</strong> Management Console . . . . . . . . . . . . . . . . . . . . . . . . . . . . . . . . .82<br />
Installing the <strong>Access</strong> Management Console . . . . . . . . . . . . . . . . . . . . . . . . . . . .82<br />
Users and Accounts. . . . . . . . . . . . . . . . . . . . . . . . . . . . . . . . . . . . . . . . . . . . . . .82<br />
Deploying the Console to Administrators. . . . . . . . . . . . . . . . . . . . . . . . . . . . . .82<br />
The <strong>Access</strong> Management Console User Interface . . . . . . . . . . . . . . . . . . . . . . .82<br />
Starting the <strong>Access</strong> Management Console . . . . . . . . . . . . . . . . . . . . . . . . . . . . .83<br />
Finding Items in Your Deployment Using Discovery . . . . . . . . . . . . . . . . . . . .83<br />
Customizing Your Displays Using My Views . . . . . . . . . . . . . . . . . . . . . . . . . .84<br />
Configuring Your Farm with the Getting Started Panel . . . . . . . . . . . . . . . . . . . . .84<br />
Linking to <strong>Citrix</strong> Presentation Server. . . . . . . . . . . . . . . . . . . . . . . . . . . . . . . . . . . .85<br />
Specifying Server Farms . . . . . . . . . . . . . . . . . . . . . . . . . . . . . . . . . . . . . . . . . . .85<br />
Configuring Load Balance or Failover . . . . . . . . . . . . . . . . . . . . . . . . . . . . . . . .86<br />
Configuring Address Modes . . . . . . . . . . . . . . . . . . . . . . . . . . . . . . . . . . . . . . . .87<br />
Configuring Address Translation . . . . . . . . . . . . . . . . . . . . . . . . . . . . . . . . . . . .88<br />
Configuring the <strong>Access</strong> <strong>Gateway</strong> Address Mode. . . . . . . . . . . . . . . . . . . . . . . .88<br />
Associating <strong>Access</strong> Platform Sites . . . . . . . . . . . . . . . . . . . . . . . . . . . . . . . . . . .89
6 <strong>Access</strong> <strong>Gateway</strong> <strong>Advanced</strong> <strong>Edition</strong> Administrator’s <strong>Guide</strong><br />
Configuring Logon Points . . . . . . . . . . . . . . . . . . . . . . . . . . . . . . . . . . . . . . . . . . . .89<br />
Renaming Logon Points . . . . . . . . . . . . . . . . . . . . . . . . . . . . . . . . . . . . . . . . . . .92<br />
Logging on through the Logon Point . . . . . . . . . . . . . . . . . . . . . . . . . . . . . . . . . . . .92<br />
Updating Logon Page Information. . . . . . . . . . . . . . . . . . . . . . . . . . . . . . . . . . . . . .93<br />
Changing Expired Passwords . . . . . . . . . . . . . . . . . . . . . . . . . . . . . . . . . . . . . . . . . .93<br />
Setting the Default Logon Point . . . . . . . . . . . . . . . . . . . . . . . . . . . . . . . . . . . . . . . .93<br />
Removing Logon Points . . . . . . . . . . . . . . . . . . . . . . . . . . . . . . . . . . . . . . . . . . . . . .94<br />
Configuring the <strong>Access</strong> <strong>Gateway</strong> . . . . . . . . . . . . . . . . . . . . . . . . . . . . . . . . . . . . . . .95<br />
Configuring Split Tunneling. . . . . . . . . . . . . . . . . . . . . . . . . . . . . . . . . . . . . . . . . . .95<br />
Configuring <strong>Access</strong>ible Networks . . . . . . . . . . . . . . . . . . . . . . . . . . . . . . . . . . .96<br />
Forwarding System Messages . . . . . . . . . . . . . . . . . . . . . . . . . . . . . . . . . . . . . . . . .96<br />
Configuring Client Properties. . . . . . . . . . . . . . . . . . . . . . . . . . . . . . . . . . . . . . . . . .97<br />
Configuring Server Properties . . . . . . . . . . . . . . . . . . . . . . . . . . . . . . . . . . . . . . . . .98<br />
Configuring ICA <strong>Access</strong> Control . . . . . . . . . . . . . . . . . . . . . . . . . . . . . . . . . . . . . . .99<br />
Configuring Authentication with <strong>Citrix</strong> Presentation Server. . . . . . . . . . . . . . . . .100<br />
Chapter 7<br />
Chapter 8<br />
Securing User Connections<br />
Configuring <strong>Advanced</strong> Authentication . . . . . . . . . . . . . . . . . . . . . . . . . . . . . . . . .101<br />
Configuring RADIUS and LDAP Authentication . . . . . . . . . . . . . . . . . . . . . . . . .102<br />
Creating RADIUS Authentication Profiles. . . . . . . . . . . . . . . . . . . . . . . . . . . .102<br />
Creating LDAP Authentication Profiles . . . . . . . . . . . . . . . . . . . . . . . . . . . . . .104<br />
Assigning Authentication Profiles to Logon Points . . . . . . . . . . . . . . . . . . . . .105<br />
Setting Authentication Credentials for Logon Points . . . . . . . . . . . . . . . . . . .106<br />
Configuring RSA SecurID Authentication . . . . . . . . . . . . . . . . . . . . . . . . . . . . . .108<br />
Configuring SafeWord Authentication . . . . . . . . . . . . . . . . . . . . . . . . . . . . . . . . .110<br />
Configuring <strong>Advanced</strong> Authentication with SafeWord . . . . . . . . . . . . . . . . . .111<br />
Configuring Authentication with SafeWord Only . . . . . . . . . . . . . . . . . . . . . .111<br />
Configuring RADIUS with SafeWord . . . . . . . . . . . . . . . . . . . . . . . . . . . . . . .112<br />
Configuring Trusted Authentication . . . . . . . . . . . . . . . . . . . . . . . . . . . . . . . . . . .115<br />
Configuring the <strong>Access</strong> <strong>Gateway</strong> for Trusted Authentication . . . . . . . . . . . .115<br />
Configuring <strong>Advanced</strong> <strong>Access</strong> Control for Trusted Authentication . . . . . . . .116<br />
Adding Resources<br />
Creating Network Resources for VPN <strong>Access</strong>. . . . . . . . . . . . . . . . . . . . . . . . . . . .119<br />
Using the Entire Network Resource . . . . . . . . . . . . . . . . . . . . . . . . . . . . . . . . .120<br />
Defining Resources to Avoid Conflicts . . . . . . . . . . . . . . . . . . . . . . . . . . . . . .121<br />
Creating Web Resources. . . . . . . . . . . . . . . . . . . . . . . . . . . . . . . . . . . . . . . . . . . . .121<br />
Including Related Files . . . . . . . . . . . . . . . . . . . . . . . . . . . . . . . . . . . . . . . . . . .123<br />
Configuring Sites Secured with SSL . . . . . . . . . . . . . . . . . . . . . . . . . . . . . . . .123
7 <strong>Access</strong> <strong>Gateway</strong> <strong>Advanced</strong> <strong>Edition</strong> Administrator’s <strong>Guide</strong><br />
Web Resources that Keep Sessions Alive . . . . . . . . . . . . . . . . . . . . . . . . . . . .124<br />
Enabling Pass-Through Authentication for Web Resources . . . . . . . . . . . . . . . . .124<br />
Configuring Sites with Form-Based Authentication . . . . . . . . . . . . . . . . . . . .125<br />
Creating File Shares . . . . . . . . . . . . . . . . . . . . . . . . . . . . . . . . . . . . . . . . . . . . . . . .125<br />
Using Dynamic System Tokens . . . . . . . . . . . . . . . . . . . . . . . . . . . . . . . . . . . . . . .128<br />
Active Directory Attributes. . . . . . . . . . . . . . . . . . . . . . . . . . . . . . . . . . . . . . . .129<br />
Creating Resource Groups to Ease Policy Administration . . . . . . . . . . . . . . . . . .129<br />
Integrating Resource Lists in Third-Party Portals . . . . . . . . . . . . . . . . . . . . . . . . .130<br />
Chapter 9<br />
Chapter 10<br />
Controlling <strong>Access</strong> Through Policies<br />
Controlling User <strong>Access</strong>. . . . . . . . . . . . . . . . . . . . . . . . . . . . . . . . . . . . . . . . . . . . .131<br />
Integrating Your <strong>Access</strong> Strategy. . . . . . . . . . . . . . . . . . . . . . . . . . . . . . . . . . . . . .132<br />
Pooling Resources By <strong>Access</strong> Needs . . . . . . . . . . . . . . . . . . . . . . . . . . . . . . . .132<br />
Designing Policies From User Scenarios . . . . . . . . . . . . . . . . . . . . . . . . . . . . .133<br />
Differentiating <strong>Access</strong> Control and Publishing . . . . . . . . . . . . . . . . . . . . . . . .134<br />
Creating <strong>Access</strong> Policies. . . . . . . . . . . . . . . . . . . . . . . . . . . . . . . . . . . . . . . . . . . . .135<br />
Naming Policies. . . . . . . . . . . . . . . . . . . . . . . . . . . . . . . . . . . . . . . . . . . . . . . . .136<br />
Configuring Policy Settings to Control User Actions . . . . . . . . . . . . . . . . . . . . . .137<br />
Allowing <strong>Access</strong> to Standard Web Content . . . . . . . . . . . . . . . . . . . . . . . . . . .138<br />
Allowing File Type Association . . . . . . . . . . . . . . . . . . . . . . . . . . . . . . . . . . . .138<br />
Allowing HTML Preview . . . . . . . . . . . . . . . . . . . . . . . . . . . . . . . . . . . . . . . . .139<br />
Allowing Email Attachments . . . . . . . . . . . . . . . . . . . . . . . . . . . . . . . . . . . . . .139<br />
Allowing Live Edit . . . . . . . . . . . . . . . . . . . . . . . . . . . . . . . . . . . . . . . . . . . . . .140<br />
Allowing Logon . . . . . . . . . . . . . . . . . . . . . . . . . . . . . . . . . . . . . . . . . . . . . . . . . . .140<br />
Setting Conditions for Showing the Logon Page. . . . . . . . . . . . . . . . . . . . . . . . . .141<br />
Bypassing URL Rewriting . . . . . . . . . . . . . . . . . . . . . . . . . . . . . . . . . . . . . . . . . . .144<br />
Considerations about URL Rewriting. . . . . . . . . . . . . . . . . . . . . . . . . . . . . . . .144<br />
Limitations of Browser-Only <strong>Access</strong>. . . . . . . . . . . . . . . . . . . . . . . . . . . . . . . . . . .145<br />
Creating Connection Policies . . . . . . . . . . . . . . . . . . . . . . . . . . . . . . . . . . . . . . . . .146<br />
Creating Policies for Presentation Server Connections . . . . . . . . . . . . . . . . . .148<br />
Prioritizing Connection Policies . . . . . . . . . . . . . . . . . . . . . . . . . . . . . . . . . . . .149<br />
Creating Policy Filters . . . . . . . . . . . . . . . . . . . . . . . . . . . . . . . . . . . . . . . . . . . . . .149<br />
Creating Custom Filters . . . . . . . . . . . . . . . . . . . . . . . . . . . . . . . . . . . . . . . . . . . . .151<br />
Creating Continuous Scan Filters. . . . . . . . . . . . . . . . . . . . . . . . . . . . . . . . . . . . . .152<br />
Granting <strong>Access</strong> to the Entire Network . . . . . . . . . . . . . . . . . . . . . . . . . . . . . . . . .154<br />
Reviewing Policy Information with Policy Manager . . . . . . . . . . . . . . . . . . . . . .155<br />
Integrating <strong>Citrix</strong> Presentation Server<br />
Linking from <strong>Advanced</strong> <strong>Access</strong> Control to <strong>Citrix</strong> Presentation Server . . . . . . . .158
8 <strong>Access</strong> <strong>Gateway</strong> <strong>Advanced</strong> <strong>Edition</strong> Administrator’s <strong>Guide</strong><br />
Integrating Web Interface . . . . . . . . . . . . . . . . . . . . . . . . . . . . . . . . . . . . . . . . . . . .158<br />
Displaying Multiple Sites and Caching Credentials. . . . . . . . . . . . . . . . . . . . .160<br />
Coordinating <strong>Advanced</strong> <strong>Access</strong> Control and Web Interface Settings . . . . . . .162<br />
Configuring File Type Association . . . . . . . . . . . . . . . . . . . . . . . . . . . . . . . . . . . .163<br />
Integrating Third-Party Portals. . . . . . . . . . . . . . . . . . . . . . . . . . . . . . . . . . . . . . . .163<br />
Chapter 11<br />
Chapter 12<br />
Verifying Requirements on Client Devices<br />
Creating Endpoint Analysis Scans . . . . . . . . . . . . . . . . . . . . . . . . . . . . . . . . . . . . .166<br />
Using Scan Outputs to Filter Policies . . . . . . . . . . . . . . . . . . . . . . . . . . . . . . . .168<br />
Using Scan Outputs to Filter Logon Page Visibility . . . . . . . . . . . . . . . . . . . .168<br />
Scan Packages. . . . . . . . . . . . . . . . . . . . . . . . . . . . . . . . . . . . . . . . . . . . . . . . . . . . .168<br />
Adding Rules to Scans . . . . . . . . . . . . . . . . . . . . . . . . . . . . . . . . . . . . . . . . . . . . . .169<br />
Using Scan Outputs in Other Scans . . . . . . . . . . . . . . . . . . . . . . . . . . . . . . . . . . . .170<br />
Editing Conditions and Rules. . . . . . . . . . . . . . . . . . . . . . . . . . . . . . . . . . . . . . . . .171<br />
Editing the Available Conditions . . . . . . . . . . . . . . . . . . . . . . . . . . . . . . . . . . .171<br />
Editing Rules . . . . . . . . . . . . . . . . . . . . . . . . . . . . . . . . . . . . . . . . . . . . . . . . . . .172<br />
Using Data Sets in Scans . . . . . . . . . . . . . . . . . . . . . . . . . . . . . . . . . . . . . . . . . . . .172<br />
Lists . . . . . . . . . . . . . . . . . . . . . . . . . . . . . . . . . . . . . . . . . . . . . . . . . . . . . . . . . .172<br />
Maps. . . . . . . . . . . . . . . . . . . . . . . . . . . . . . . . . . . . . . . . . . . . . . . . . . . . . . . . . .172<br />
Creating Data Sets . . . . . . . . . . . . . . . . . . . . . . . . . . . . . . . . . . . . . . . . . . . . . . .173<br />
Adding Scan Packages . . . . . . . . . . . . . . . . . . . . . . . . . . . . . . . . . . . . . . . . . . . . . .174<br />
Grouping Scans . . . . . . . . . . . . . . . . . . . . . . . . . . . . . . . . . . . . . . . . . . . . . . . . .175<br />
Adding Language Packs . . . . . . . . . . . . . . . . . . . . . . . . . . . . . . . . . . . . . . . . . .175<br />
Scripting and Scheduling Scan Updates. . . . . . . . . . . . . . . . . . . . . . . . . . . . . . . . .175<br />
Updating Property Values in Scans . . . . . . . . . . . . . . . . . . . . . . . . . . . . . . . . .176<br />
Updating Data Sets . . . . . . . . . . . . . . . . . . . . . . . . . . . . . . . . . . . . . . . . . . . . . .177<br />
Creating Continuous Scans. . . . . . . . . . . . . . . . . . . . . . . . . . . . . . . . . . . . . . . . . . .178<br />
Providing Secure <strong>Access</strong> to Corporate Email<br />
Choosing an Email Solution. . . . . . . . . . . . . . . . . . . . . . . . . . . . . . . . . . . . . . . . . .182<br />
Providing <strong>Access</strong> to Published Email Applications. . . . . . . . . . . . . . . . . . . . . . . .183<br />
Providing Users with Secure Web-Based Email . . . . . . . . . . . . . . . . . . . . . . . . . .184<br />
Enabling <strong>Access</strong> to Web-Based Email. . . . . . . . . . . . . . . . . . . . . . . . . . . . . . . . . .184<br />
Integrating Web-Based Email <strong>Access</strong> with a Third-Party Portal . . . . . . . . . . . . .187<br />
Providing Users with Secure <strong>Access</strong> to Email Accounts. . . . . . . . . . . . . . . . . . . .188<br />
Enabling Users to Attach Files to Web-Based Email . . . . . . . . . . . . . . . . . . . . . .190<br />
Restricting File Attachment Types . . . . . . . . . . . . . . . . . . . . . . . . . . . . . . . . . .191<br />
Enabling <strong>Access</strong> to Email on Small Form Factor Devices . . . . . . . . . . . . . . . . . .192<br />
Updating the Mapisvc.inf File . . . . . . . . . . . . . . . . . . . . . . . . . . . . . . . . . . . . . . . .193
9 <strong>Access</strong> <strong>Gateway</strong> <strong>Advanced</strong> <strong>Edition</strong> Administrator’s <strong>Guide</strong><br />
Chapter 13<br />
Chapter 14<br />
Chapter 15<br />
Rolling Out <strong>Advanced</strong> <strong>Access</strong> Control to Users<br />
Developing a Client Software Deployment Strategy. . . . . . . . . . . . . . . . . . . . . . .195<br />
Determining Responsibility for Installing Client Software . . . . . . . . . . . . . . .196<br />
Supported Deployment Options . . . . . . . . . . . . . . . . . . . . . . . . . . . . . . . . . . . .198<br />
Determining Which Clients to Deploy . . . . . . . . . . . . . . . . . . . . . . . . . . . . . . .199<br />
Managing Client Software Using the <strong>Access</strong> Client Package . . . . . . . . . . . . . . . .200<br />
Client Software Available for the <strong>Access</strong> Client Package . . . . . . . . . . . . . . . .201<br />
Creating a Client Distribution Package. . . . . . . . . . . . . . . . . . . . . . . . . . . . . . .201<br />
Distributing and Installing Your Client Software Package . . . . . . . . . . . . . . .201<br />
Posting Client Software to a Share Point . . . . . . . . . . . . . . . . . . . . . . . . . . . . .203<br />
Downloading Client Software on Demand . . . . . . . . . . . . . . . . . . . . . . . . . . . . . .203<br />
Ensuring a Smooth Logon Experience with the Secure <strong>Access</strong> Client . . . . . . . . .205<br />
Modifying the Logon Point Redirect URL. . . . . . . . . . . . . . . . . . . . . . . . . . . .206<br />
Modifying Browser Delay Settings. . . . . . . . . . . . . . . . . . . . . . . . . . . . . . . . . .206<br />
Modifying Ticket Lifetime Settings . . . . . . . . . . . . . . . . . . . . . . . . . . . . . . . . .207<br />
Ensuring a Smooth Rollout. . . . . . . . . . . . . . . . . . . . . . . . . . . . . . . . . . . . . . . . . . .208<br />
Providing Logon Information to Users. . . . . . . . . . . . . . . . . . . . . . . . . . . . . . .208<br />
Browser Security Considerations . . . . . . . . . . . . . . . . . . . . . . . . . . . . . . . . . . . . . .209<br />
Customizing Browser Security Settings . . . . . . . . . . . . . . . . . . . . . . . . . . . . . .210<br />
Customizing the Logon Error Message . . . . . . . . . . . . . . . . . . . . . . . . . . . . . . . . .211<br />
Managing Your <strong>Access</strong> <strong>Gateway</strong> Environment<br />
Managing <strong>Access</strong> Server Farms Remotely . . . . . . . . . . . . . . . . . . . . . . . . . . . . . .213<br />
Controlling <strong>Access</strong> by Multiple Consoles . . . . . . . . . . . . . . . . . . . . . . . . . . . .214<br />
Using Groups in Policy Assignments . . . . . . . . . . . . . . . . . . . . . . . . . . . . . . . .215<br />
Securing the <strong>Access</strong> Management Console Using COM+ . . . . . . . . . . . . . . . . . .215<br />
Restarting COM+ Applications . . . . . . . . . . . . . . . . . . . . . . . . . . . . . . . . . . . .216<br />
Adding and Removing Farms. . . . . . . . . . . . . . . . . . . . . . . . . . . . . . . . . . . . . . . . .217<br />
Adding and Removing <strong>Gateway</strong> Appliances. . . . . . . . . . . . . . . . . . . . . . . . . . . . .217<br />
Changing Service Account and Database Credentials. . . . . . . . . . . . . . . . . . . . . .218<br />
Modifying Server Roles . . . . . . . . . . . . . . . . . . . . . . . . . . . . . . . . . . . . . . . . . . . . .219<br />
Removing Servers from the Farm . . . . . . . . . . . . . . . . . . . . . . . . . . . . . . . . . . . . .219<br />
Maintaining Availability of the <strong>Access</strong> Server Farm. . . . . . . . . . . . . . . . . . . . . . .220<br />
Exporting and Importing Configuration Data. . . . . . . . . . . . . . . . . . . . . . . . . .220<br />
Monitoring Sessions . . . . . . . . . . . . . . . . . . . . . . . . . . . . . . . . . . . . . . . . . . . . . . . .222<br />
Auditing <strong>Access</strong> to Corporate Resources<br />
Configuring Audit Logging . . . . . . . . . . . . . . . . . . . . . . . . . . . . . . . . . . . . . . . . . .225<br />
Interpreting Audit Events . . . . . . . . . . . . . . . . . . . . . . . . . . . . . . . . . . . . . . . . . . . .229
10 <strong>Access</strong> <strong>Gateway</strong> <strong>Advanced</strong> <strong>Edition</strong> Administrator’s <strong>Guide</strong><br />
Troubleshooting User <strong>Access</strong> to Resources. . . . . . . . . . . . . . . . . . . . . . . . . . . . . .230<br />
Performing Audit Log Maintenance. . . . . . . . . . . . . . . . . . . . . . . . . . . . . . . . . . . .230<br />
Appendix A<br />
Appendix B<br />
Glossary<br />
Scan Properties Reference<br />
Antivirus Scan Packages. . . . . . . . . . . . . . . . . . . . . . . . . . . . . . . . . . . . . . . . . . . . .240<br />
<strong>Citrix</strong> Scans for McAfee VirusScan . . . . . . . . . . . . . . . . . . . . . . . . . . . . . . . . .240<br />
<strong>Citrix</strong> Scans for McAfee VirusScan Enterprise . . . . . . . . . . . . . . . . . . . . . . . .240<br />
<strong>Citrix</strong> Scans for Norton AntiVirus Personal . . . . . . . . . . . . . . . . . . . . . . . . . . .241<br />
<strong>Citrix</strong> Scans for Symantec AntiVirus Enterprise . . . . . . . . . . . . . . . . . . . . . . .242<br />
<strong>Citrix</strong> Scans for Trend OfficeScan . . . . . . . . . . . . . . . . . . . . . . . . . . . . . . . . . .243<br />
<strong>Citrix</strong> Scans for Windows Security Center Antivirus . . . . . . . . . . . . . . . . . . .244<br />
Browser Scan Packages . . . . . . . . . . . . . . . . . . . . . . . . . . . . . . . . . . . . . . . . . . . . .245<br />
<strong>Citrix</strong> Scans for Browser Type . . . . . . . . . . . . . . . . . . . . . . . . . . . . . . . . . . . . .245<br />
<strong>Citrix</strong> Scans for Internet Explorer. . . . . . . . . . . . . . . . . . . . . . . . . . . . . . . . . . .245<br />
<strong>Citrix</strong> Scans for Internet Explorer Update . . . . . . . . . . . . . . . . . . . . . . . . . . . .246<br />
<strong>Citrix</strong> Scans for Mozilla Firefox . . . . . . . . . . . . . . . . . . . . . . . . . . . . . . . . . . . .247<br />
<strong>Citrix</strong> Scans for Netscape Navigator. . . . . . . . . . . . . . . . . . . . . . . . . . . . . . . . .247<br />
Firewall Scan Packages . . . . . . . . . . . . . . . . . . . . . . . . . . . . . . . . . . . . . . . . . . . . .248<br />
<strong>Citrix</strong> Scans for McAfee Desktop Firewall . . . . . . . . . . . . . . . . . . . . . . . . . . .248<br />
<strong>Citrix</strong> Scans for McAfee Personal Firewall Plus . . . . . . . . . . . . . . . . . . . . . . .249<br />
<strong>Citrix</strong> Scans for Microsoft Windows Firewall . . . . . . . . . . . . . . . . . . . . . . . . .250<br />
<strong>Citrix</strong> Scans for Norton Personal Firewall . . . . . . . . . . . . . . . . . . . . . . . . . . . .251<br />
<strong>Citrix</strong> Scans for Windows Security Center Firewall . . . . . . . . . . . . . . . . . . . .251<br />
<strong>Citrix</strong> Scans for ZoneAlarm . . . . . . . . . . . . . . . . . . . . . . . . . . . . . . . . . . . . . . .252<br />
<strong>Citrix</strong> Scans for ZoneAlarm Pro . . . . . . . . . . . . . . . . . . . . . . . . . . . . . . . . . . . .252<br />
Machine Identification Scan Packages. . . . . . . . . . . . . . . . . . . . . . . . . . . . . . . . . .253<br />
<strong>Citrix</strong> Scans for Domain Membership . . . . . . . . . . . . . . . . . . . . . . . . . . . . . . .253<br />
<strong>Citrix</strong> Scans for MAC Address . . . . . . . . . . . . . . . . . . . . . . . . . . . . . . . . . . . . .254<br />
Miscellaneous Scan Packages . . . . . . . . . . . . . . . . . . . . . . . . . . . . . . . . . . . . . . . .255<br />
<strong>Citrix</strong> Bandwidth Scan . . . . . . . . . . . . . . . . . . . . . . . . . . . . . . . . . . . . . . . . . . .255<br />
Operating System Scan Packages. . . . . . . . . . . . . . . . . . . . . . . . . . . . . . . . . . . . . .256<br />
<strong>Citrix</strong> Scans for Macintosh . . . . . . . . . . . . . . . . . . . . . . . . . . . . . . . . . . . . . . . .256<br />
<strong>Citrix</strong> Scans for Microsoft Windows Service Pack . . . . . . . . . . . . . . . . . . . . .256<br />
<strong>Citrix</strong> Scans for Microsoft Windows Update . . . . . . . . . . . . . . . . . . . . . . . . . .257
CHAPTER 1<br />
Welcome<br />
<strong>Citrix</strong> <strong>Access</strong> <strong>Gateway</strong> is a universal SSL VPN appliance that provides a secure,<br />
always-on, single point-of-access to all applications and protocols. It has all of<br />
the advantages of IPSec and SSL VPNs, without their costly and cumbersome<br />
implementation and management. With the <strong>Advanced</strong> <strong>Edition</strong>, <strong>Access</strong> <strong>Gateway</strong><br />
finely controls both the resources users can access and what actions they can<br />
perform, facilitating regulatory compliance. <strong>Access</strong> <strong>Gateway</strong> delivers the best<br />
access experience for everyone: secure access to corporate data for the business,<br />
easy access for users, and easy administration and management for IT.<br />
<strong>Access</strong> <strong>Gateway</strong> <strong>Advanced</strong> <strong>Edition</strong><br />
The <strong>Advanced</strong> <strong>Edition</strong> expands your <strong>Access</strong> <strong>Gateway</strong> environment with<br />
<strong>Advanced</strong> <strong>Access</strong> Control software, which provides your users with the following<br />
standard features.<br />
Smart <strong>Access</strong><br />
Smart<strong>Access</strong> analyzes the access scenario and then delivers the appropriate level<br />
of access without compromising security. Depending on who and where users are<br />
and what device and network they are using, users are granted different levels of<br />
access, such as the ability to preview, but not edit, documents.<br />
<strong>Advanced</strong> <strong>Access</strong> Control provides Smart<strong>Access</strong> through two key phases—sense<br />
and respond. In the sensing phase of Smart<strong>Access</strong>, the system analyzes the users’<br />
access scenario and then responds with an appropriate level of access. “Granted”<br />
or “denied” are no longer the only answers to an access attempt because<br />
organizations not only control which resources users get access to based on their<br />
access scenario, but how they can use these resources when they gain access.<br />
For example, a user at an airport kiosk could be allowed to only preview or read<br />
email attachments and files but would not be allowed to download, edit, or print<br />
these files. However, that same user working from home may be granted full<br />
download, editing, and printing capabilities. In addition, <strong>Advanced</strong> <strong>Access</strong><br />
Control integrates seamlessly with <strong>Citrix</strong> Presentation Server to give<br />
organizations this same level of granular control over published applications.
12 <strong>Access</strong> <strong>Gateway</strong> <strong>Advanced</strong> <strong>Edition</strong> Administrator’s <strong>Guide</strong><br />
SmoothRoaming<br />
<strong>Advanced</strong> <strong>Access</strong> Control supports SmoothRoaming technology by ensuring that<br />
as users move between devices, networks, and locations, the appropriate level of<br />
access is configured automatically for each new access scenario.<br />
Secure by Design<br />
<strong>Advanced</strong> <strong>Access</strong> Control provides users with access that is inherently secure by<br />
design, protecting both the security of company information as well as the<br />
integrity of the network.<br />
Smart<strong>Access</strong>, SmoothRoaming, and Secure by Design technologies work<br />
together by combining the following features:<br />
• Integrated endpoint security. Provides continuous real-time monitoring to<br />
ensure that the device is safe to connect and remain connected to the<br />
network. Endpoint analysis further evaluates the integrity of connecting<br />
devices and allows you to tailor the level of access you grant in policies<br />
according to analysis results.<br />
• VPN connectivity. Network resources enable direct SSL virtual private<br />
network (VPN) connectivity to servers, services, and networks within the<br />
corporate LAN.<br />
• Action controls. Allow administators to set policies that allow or deny<br />
viewing, editing, and saving documents depending on the user’s identity,<br />
device, location and connection.<br />
• Mobile device awareness. Re-factors email and file interfaces for personal<br />
digital assistants (PDAs) and small form factor devices.<br />
• Browser-only access. Provides access with any Web browser on any<br />
device to Web sites, files, and email. You can automatically render<br />
Microsoft Office documents for HTML Preview.<br />
• Secure access to Web-based email and files. Provides access to corporate<br />
email securely over the Internet through a Web-based user interface.<br />
Allows users to securely access Microsoft Outlook and Lotus Notes in real<br />
time and synchronize information for offline use. Enables access to<br />
corporate network file shares securely over the Internet through a Webbased<br />
user interface.<br />
• <strong>Advanced</strong> Presentation Server integration. You can use endpoint<br />
analysis and client location to control which published applications are<br />
available to the user. This feature extends Smart<strong>Access</strong> to Presentation<br />
Server, including the use of <strong>Advanced</strong> <strong>Access</strong> Control filters to control<br />
local client drive mapping, clipboard operations, and local printer mapping.
Chapter 1 Welcome 13<br />
• Multilingual support. Provides full server and client support for Japanese,<br />
German, French, and Spanish.<br />
• Standards-based encryption. Uses industry-standard SSL encryption to<br />
provide secure access to corporate resources.<br />
• Common management platform. Provides a unified framework<br />
containing client and server configuration, licensing, monitoring, and<br />
reporting tools for administrative simplicity, business visibility, and<br />
corporate security<br />
New Features<br />
This release provides the following new features and enhancements.<br />
• Support for UPN and Alternate UPN credentials. Users who log on to<br />
internal networks with credentials specified in User Principal Name (UPN)<br />
or Alternate UPN format can log on to the <strong>Access</strong> <strong>Gateway</strong> and seamlessly<br />
access corporate resources such as published Web sites, file shares, and<br />
Web email.<br />
• Enhanced access to <strong>Citrix</strong> Presentation Server published applications.<br />
<strong>Citrix</strong> Presentation Server published applications are accessible as <strong>Access</strong><br />
Platform sites from within the <strong>Access</strong> Interface, allowing users to quickly<br />
access and launch published applications. You can enable up to three<br />
<strong>Access</strong> Platform sites to display applications from multiple Presentation<br />
Server farms.<br />
• Support for third-party load balancers. In addition to its internal load<br />
balancing capabilities, <strong>Access</strong> <strong>Gateway</strong> <strong>Advanced</strong> <strong>Edition</strong> supports<br />
configurations that include third-party load balancers such as <strong>Citrix</strong><br />
Netscaler. In the event an <strong>Advanced</strong> <strong>Access</strong> Control server in a farm<br />
becomes unavailable, users are routed automatically to another <strong>Advanced</strong><br />
<strong>Access</strong> Control server.<br />
• Enhanced access to documents hosted on Sharepoint sites. Microsoft<br />
Sharepoint sites that are accessed through the Web proxy retain many of the<br />
menu-driven features users need to work with files, such as Delete, Edit<br />
Properties, and Alert Me.<br />
• Support for double-hop DMZ deployments. Organizations can provide<br />
an extra layer of security for their internal resources by deploying <strong>Access</strong><br />
<strong>Gateway</strong> appliances in a two-stage DMZ configuration.<br />
• Policies dynamically determine best resource delivery method. You can<br />
configure policies to determine the best method for accessing resources<br />
based on users’ connection bandwidth. Using the <strong>Citrix</strong> Bandwidth<br />
endpoint analysis scan, the connection bandwidth is calculated and the
14 <strong>Access</strong> <strong>Gateway</strong> <strong>Advanced</strong> <strong>Edition</strong> Administrator’s <strong>Guide</strong><br />
result is used to determine whether resources such as published applications<br />
are streamed or delivered to the user through an ICA session.<br />
New Name<br />
<strong>Access</strong> <strong>Gateway</strong> <strong>Advanced</strong> <strong>Edition</strong> is the new name for the products formerly<br />
known as <strong>Access</strong> <strong>Gateway</strong> with <strong>Advanced</strong> <strong>Access</strong> Control, <strong>Access</strong> <strong>Gateway</strong><br />
Enterprise, and MetaFrame Secure <strong>Access</strong> Manager.
CHAPTER 2<br />
Getting Information and Help<br />
The topics in this section describe how to get more information about the product<br />
and how to contact <strong>Citrix</strong>.<br />
• “<strong>Access</strong>ing Product Documentation” on page 15<br />
• “Getting Service and Support” on page 18<br />
• “Education and Training” on page 19<br />
• “Customizing the Software” on page 19<br />
<strong>Access</strong>ing Product Documentation<br />
Your product documentation includes PDF guides, online documentation, known<br />
issue information, integrated on-screen assistance, and application help.<br />
• User documentation is provided through the online help system and Adobe<br />
Portable Document Format (PDF) files. <strong>Guide</strong>s correspond to different<br />
features. For example, information for administrators is contained in the<br />
<strong>Access</strong> <strong>Gateway</strong> Standard <strong>Edition</strong> Administrator’s <strong>Guide</strong>. <strong>Guide</strong>s are stored<br />
in the \Documentation folder on the Server CD. Installation places<br />
documentation files in the<br />
C:\Program Files\<strong>Citrix</strong>\<strong>Access</strong> <strong>Gateway</strong>\Documentation\lang directory. In<br />
these examples, lang refers to the language, such as en for English, de for<br />
German, and so on.<br />
Note: Online guides are provided as Adobe Portable Document Format<br />
(PDF) files. To view, search, and print the PDF documentation, you need to<br />
have Adobe Acrobat Reader 5.0.5 with Search or Adobe Reader 6.0<br />
through 7.0. You can download these products for free from the Adobe<br />
Systems Web site at http://www.adobe.com/.<br />
• In many places in the user interface, integrated on-screen assistance is<br />
available to help you complete tasks. For example, in the <strong>Access</strong>
16 <strong>Access</strong> <strong>Gateway</strong> <strong>Advanced</strong> <strong>Edition</strong> Administrator’s <strong>Guide</strong><br />
Management Console, you can position your mouse over a setting to<br />
display help text that explains how to use that control.<br />
• Online help is available in many components such as the console. You can<br />
access the online help from the Help menu or Help button.<br />
The following documentation is included with your software:<br />
• The Readme files on the Server CD provide the latest information about<br />
functionality, known issues, and documentation changes. Be sure to read<br />
these documents for important information before you install the product or<br />
its components.<br />
• This manual, the <strong>Access</strong> <strong>Gateway</strong> <strong>Advanced</strong> <strong>Edition</strong> Administrator’s <strong>Guide</strong>,<br />
provides conceptual information and procedures for system administrators<br />
who plan, design, pilot, or deploy the software. It provides information<br />
about features, installation and setup, and access server farm maintenance.<br />
• <strong>Access</strong> <strong>Gateway</strong> <strong>Advanced</strong> <strong>Edition</strong> Upgrade <strong>Guide</strong> provides procedures for<br />
system administrators upgrading from an earlier release. It provides<br />
information about how to back up your access server farm’s data, upgrade<br />
server components, and migrate data and license information.<br />
• Getting Started with <strong>Citrix</strong> Licensing <strong>Guide</strong> and the licensing Readme file<br />
provide conceptual and procedural information about deploying,<br />
maintaining, and using licensing for <strong>Citrix</strong> products.<br />
Additional gateway appliance documentation available from the <strong>Access</strong><br />
<strong>Gateway</strong>’s Administration Portal includes Getting Started with <strong>Citrix</strong> <strong>Access</strong><br />
<strong>Gateway</strong> Standard <strong>Edition</strong>, <strong>Access</strong> <strong>Gateway</strong> Standard <strong>Edition</strong> Pre-Installation<br />
Checklist, <strong>Access</strong> <strong>Gateway</strong> Standard <strong>Edition</strong> <strong>Administrator's</strong> <strong>Guide</strong>, and a<br />
Readme file.<br />
To provide feedback about the documentation, go to www.citrix.com and click<br />
Support > Knowledge Center > Product Documentation. To access the<br />
feedback form, click the Submit Documentation Feedback link.<br />
Document Conventions<br />
This documentation uses the following typographic conventions for menus,<br />
commands, keyboard keys, and items in the program interface:
Chapter 2 Getting Information and Help 17<br />
Convention<br />
Boldface<br />
Italics<br />
%SystemRoot%<br />
Monospace<br />
Meaning<br />
Commands, names of interface items such as text boxes,<br />
option buttons, and user input.<br />
Placeholders for information or parameters that you<br />
provide. For example, filename in a procedure means you<br />
type the actual name of a file. Italics also are used for new<br />
terms and the titles of books.<br />
The Windows system directory, which can be WTSRV,<br />
WINNT, WINDOWS, or other name you specify when you<br />
install Windows.<br />
Text displayed in a text file.<br />
{ braces } A series of items, one of which is required in command<br />
statements. For example, { yes | no } means you must type<br />
yes or no. Do not type the braces themselves.<br />
[ brackets ] Optional items in command statements. For example, [/<br />
ping] means that you can type /ping with the command. Do<br />
not type the brackets themselves.<br />
| (vertical bar) A separator between items in braces or brackets in<br />
command statements. For example, { /hold | /release | /<br />
delete } means you type /hold or /release or /delete.<br />
… (ellipsis)<br />
You can repeat the previous item or items in command<br />
statements. For example, /route:devicename[,…] means<br />
you can type additional device names separated by<br />
commas.<br />
Command-Line Conventions<br />
Some components run from a DOS command line interface. If you are not<br />
familiar with DOS command lines, note that:<br />
• Slashes and hyphens in a command line are important and must be entered<br />
exactly as described in the instruction<br />
• The spacing on the command line is important and must be followed<br />
exactly as described in the instructions<br />
• Help is available for DOS-based programs by entering the command name<br />
followed by a forward slash and a question mark, for example:<br />
C:>sessmon/
18 <strong>Access</strong> <strong>Gateway</strong> <strong>Advanced</strong> <strong>Edition</strong> Administrator’s <strong>Guide</strong><br />
Getting Service and Support<br />
<strong>Citrix</strong> provides technical support primarily through the <strong>Citrix</strong> Solution Advisors<br />
(CSA) Program. Our CSA partners are trained and authorized to provide a high<br />
level of support to our customers. Contact your supplier for first-line support or<br />
check for your nearest CSA partner at http://www.citrix.com/support/.<br />
In addition to the CSA program, <strong>Citrix</strong> offers a variety of self-service, Web-based<br />
technical support tools that include the following:<br />
• The <strong>Citrix</strong> Knowledge Center, an interactive tool containing thousands of<br />
technical solutions to support your <strong>Citrix</strong> environment<br />
• Support forums, where you can participate in technical discussions and<br />
search for previous responses from other forum members<br />
• Software downloads, for access to the latest service packs, hotfixes, and<br />
utilities<br />
• Downloadable clients, available at http://www.citrix.com/download/<br />
Another source of support, <strong>Citrix</strong> Preferred Support Services, provides a range of<br />
options that allows you to customize the level and type of support for your<br />
organization’s <strong>Citrix</strong> products.<br />
Subscription Advantage<br />
Your product includes a one-year membership in the Subscription Advantage<br />
program. The <strong>Citrix</strong> Subscription Advantage program gives you an easy way to<br />
stay current with the latest software versions and information for your <strong>Citrix</strong><br />
products. Not only do you get automatic access to download the latest feature<br />
releases and software upgrades and enhancements that become available during<br />
the term of your membership, you also get priority access to important <strong>Citrix</strong><br />
technology information.<br />
You can find more information on the <strong>Citrix</strong> Web site at http://www.citrix.com/<br />
services/ (select Subscription Advantage). You can also contact your <strong>Citrix</strong> sales<br />
representative, <strong>Citrix</strong> Customer Care, or a member of the <strong>Citrix</strong> Solutions<br />
Advisors program for more information.<br />
Knowledge Center Watches<br />
The <strong>Citrix</strong> Knowledge Center allows you to configure watches. A watch notifies<br />
you if the topic you are interested in was updated. Watches allow you to stay<br />
notified of updates to Knowledge Base or Forum content. You can set watches on<br />
product categories, document types, individual documents, and on Forum product<br />
categories and individual topics.<br />
To set up a watch, log on to the <strong>Citrix</strong> Support Web site at
Chapter 2 Getting Information and Help 19<br />
http://support.citrix.com. After you are logged on, in the upper right corner, click<br />
My Watches and follow the instructions.<br />
Education and Training<br />
<strong>Citrix</strong> offers a variety of instructor-led training and Web-based training solutions.<br />
Instructor led courses are offered through <strong>Citrix</strong> Authorized Learning Centers<br />
(CALCs). CALCs provide high quality classroom learning using professional<br />
courseware developed by <strong>Citrix</strong>. Many of these courses lead to certification.<br />
Web-based training courses are available through CALCs, resellers, and from the<br />
<strong>Citrix</strong> Web site.<br />
Information about programs and courseware for <strong>Citrix</strong> training and certification is<br />
available from http://www.citrix.com/edu/.<br />
Customizing the Software<br />
The <strong>Citrix</strong> Developer Network (CDN) is an open-enrollment membership<br />
program that provides access to developer toolkits, technical information, and test<br />
programs. Software and hardware vendors, system integrators, ICA licensees, and<br />
corporate IT developers who incorporate <strong>Citrix</strong> computing solutions into their<br />
products can access CDN at http://apps.citrix.com/cdn/.<br />
Some operations can be scripted with a <strong>Citrix</strong> Software Development Kit (SDK).<br />
The Endpoint Analysis SDK that is included with your software supports<br />
customization of endpoint analysis and is located on the Server CD in the<br />
\Setup\EndpointAnalysisSDK folder.
20 <strong>Access</strong> <strong>Gateway</strong> <strong>Advanced</strong> <strong>Edition</strong> Administrator’s <strong>Guide</strong>
CHAPTER 3<br />
Planning Your <strong>Access</strong> Strategy<br />
Before you install <strong>Advanced</strong> <strong>Access</strong> Control, you should evaluate your<br />
infrastructure and collect the information necessary to develop an access strategy<br />
that meets the specific needs of your corporation. When planning an access<br />
strategy, follow the general steps below.<br />
“Step 1: Evaluating Corporate Infrastructure” on page 21<br />
“Step 2: Performing a Risk Analysis” on page 25<br />
“Step 3: Developing Your <strong>Access</strong> Strategy” on page 25<br />
Each of these steps is discussed in detail in the following sections. Consider<br />
documenting your findings throughout this process to assist you in designing and<br />
scoping the overall effort of the project, determining a realistic timeline for<br />
implementation, and setting benchmarks against which to measure your overall<br />
progress.<br />
Step 1: Evaluating Corporate Infrastructure<br />
Corporate infrastructure includes all of the hardware components comprising<br />
your company’s network such as client devices, servers, load balancers, firewalls,<br />
and so on. In addition, include the resources for which you want to provide access<br />
such as applications, services, and data in your assessment. The most common<br />
types of corporate infrastructure include:<br />
• Web applications such as a corporate intranet, Web-based email<br />
application, and so on<br />
• Corporate data such as databases, documents, presentations, spreadsheets,<br />
and so on<br />
• Servers such as Exchange or Notes/Domino servers, Web servers, database<br />
servers, and so on<br />
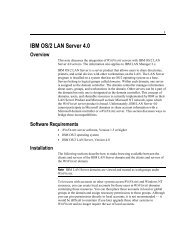
You can use <strong>Advanced</strong> <strong>Access</strong> Control to secure and control users’ access to all<br />
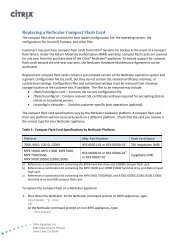
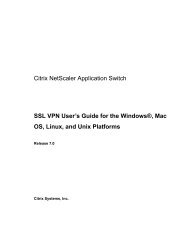
their resources on the corporate network. The following diagrams show three<br />
traffic routes (VPN, browser, or Presentation Server ICA) you can provide and<br />
combine to satisfy a wide variety of remote access needs.
22 <strong>Access</strong> <strong>Gateway</strong> <strong>Advanced</strong> <strong>Edition</strong> Administrator’s <strong>Guide</strong><br />
Virtual private network traffic:
Web browser traffic:<br />
Chapter 3 Planning Your <strong>Access</strong> Strategy 23
24 <strong>Access</strong> <strong>Gateway</strong> <strong>Advanced</strong> <strong>Edition</strong> Administrator’s <strong>Guide</strong><br />
Presentation Server traffic:
Chapter 3 Planning Your <strong>Access</strong> Strategy 25<br />
After you identify the elements within your corporate infrastructure, you can<br />
perform a risk analysis and then develop a strategy for providing the appropriate<br />
level of access to these resources.<br />
Note: <strong>Advanced</strong> <strong>Access</strong> Control includes built-in load balancing support.<br />
Therefore, you do not need to deploy a load balancer to manage requests made to<br />
<strong>Advanced</strong> <strong>Access</strong> Control servers.<br />
Step 2: Performing a Risk Analysis<br />
In the context of access control, vulnerabilities represent the possibility of<br />
unauthorized users gaining access to corporate resources. There are various<br />
methods of deriving risk, usually based on a combination of likelihood and<br />
consequence information. For example, when providing users with access to a<br />
specific corporate resource, how likely is a particular threat and what damage<br />
could be done if that threat is realized<br />
The key elements to consider when determining the risks associated with<br />
providing access to a corporate resource include the type of resource accessed,<br />
the sensitivity of the data included in that resource, and the environment from<br />
which the resource is accessed. Due to its subjective nature and the resulting<br />
damage, it is difficult to quantify risk. However, the goal of risk analysis is to<br />
ensure that your <strong>Advanced</strong> <strong>Access</strong> Control policies enable users to access<br />
corporate resources at an acceptable risk level.<br />
For example, consider the benefits of enabling users to access confidential data<br />
compared with the possibility that this data is accidentally revealed to<br />
unauthorized users. If your analysis reveals the risk is too great, you can create<br />
policies that further restrict access to this data and, as a result, minimize the risk<br />
associated with providing access to this data.<br />
Step 3: Developing Your <strong>Access</strong> Strategy<br />
After you collect information about your corporate infrastructure, identify the<br />
corporate resources for which you want to provide access, and perform a risk<br />
analysis, you are ready to develop your access strategy. This process includes<br />
determining how to integrate <strong>Advanced</strong> <strong>Access</strong> Control into your existing<br />
network.
26 <strong>Access</strong> <strong>Gateway</strong> <strong>Advanced</strong> <strong>Edition</strong> Administrator’s <strong>Guide</strong><br />
Securing <strong>Access</strong> and Resources with Policies<br />
Policies extend the security of your network by controlling which resources users<br />
can access and what actions users can perform on those resources. Before<br />
creating policies, consider:<br />
• Resources. Identify the resources for which you want to provide access.<br />
Use the results of your risk analysis to assist you in this process.<br />
• Users. Associate policies with the appropriate users.<br />
• <strong>Access</strong> scenarios. Develop policies to support the scenarios in which users<br />
access corporate resources. A scenario is defined by the logon point used to<br />
access the network, endpoint analysis scan results, authentication type, or a<br />
combination thereof. For example, determine if users can access their email<br />
over the Internet using a corporate laptop.<br />
In addition, determine the actions users can perform when they gain access.<br />
For example, you can specify whether users can modify documents using a<br />
published application, preview a document as an HTML file, and so on.<br />
For a detailed explanation about how to incorporate policies into your access<br />
strategy, see “Controlling <strong>Access</strong> Through Policies” on page 131.<br />
Planning for Client Requirements<br />
<strong>Advanced</strong> <strong>Access</strong> Control includes two methods of verifying information on the<br />
client device. Continuous scans verify required files, processes, or registry entries<br />
on client devices connecting to your network. These scans run repeatedly during<br />
the user session to ensure that the client device continues to meet your<br />
requirements. You can incorporate continuous scans into connection policies so<br />
that if a required file, process, or registry scan ceases to be verified, the<br />
connection is disconnected.<br />
Endpoint analysis scans detect information about a client device, such as the<br />
operating system version and service pack level. The scans run when a user tries<br />
to connect through a logon point. However, unlike continuous scans, endpoint<br />
analysis scans run only once per session. You can incorporate scan results into<br />
access policies, allowing you to base access to your networks and resources on<br />
the information you gather about the client device. For example, you can prohibit<br />
access to your corporate network by employees working from a home<br />
workstation unless the workstation is running a required version of antivirus<br />
software.<br />
For more information about incorporating continuous and endpoint analysis scans<br />
into your access strategy, see “Verifying Requirements on Client Devices” on<br />
page 165.
Chapter 3 Planning Your <strong>Access</strong> Strategy 27<br />
Traversing Firewalls<br />
<strong>Access</strong> <strong>Gateway</strong> eases firewall traversal and provides a secure Internet gateway<br />
between <strong>Advanced</strong> <strong>Access</strong> Control servers and client devices. Scenarios in which<br />
firewalls are commonly used include:<br />
• Demilitarized zones (DMZs). In this scenario, firewalls are used to create<br />
one-stage or two-stage DMZs to protect the corporate network from<br />
Internet traffic. This deployment requires users external to the network to<br />
traverse firewalls protecting the corporate network before gaining access to<br />
corporate resources.<br />
• Enclaves. In this scenario, firewalls limit traffic between specific segments<br />
of the network. For example, hospital administrators may segment their<br />
LAN so that access to sensitive information such as patient records is<br />
accessible only from specific enclaves within the network.<br />
• Perimeter of access server farm. In this scenario, firewalls secure<br />
<strong>Advanced</strong> <strong>Access</strong> Control servers from threats within the corporate LAN<br />
by forming a secure perimeter around the access server farm. This<br />
deployment ensures that the access server farm is not directly accessible to<br />
users.<br />
Corporations often implement a combination of the above deployments to protect<br />
against different types of threats. See the <strong>Access</strong> <strong>Gateway</strong> Standard <strong>Edition</strong><br />
Administrator’s <strong>Guide</strong> for more information about supported <strong>Access</strong> <strong>Gateway</strong><br />
deployment scenarios.<br />
Protecting Sensitive Corporate Data<br />
Sensitive data, often referred to as intellectual property, is any information,<br />
application, or service considered proprietary to the corporation. Examples of<br />
intellectual property include financial documents, customer data, employee<br />
records, and so on. The sensitivity of data is based on the assessment of impact if<br />
there is a loss of data confidentiality or integrity. When assessing the sensitivity<br />
of data consider:<br />
• Regulatory requirements. More stringent privacy laws impose new levels<br />
of confidentiality on several business sectors including health care,<br />
insurance, and finance. In addition, the global environment necessitates an<br />
awareness of regulations in any state or country in which your corporation<br />
performs business.<br />
• Legal ramifications. Determine if there are any legal implications related<br />
to the exposure of proprietary data; specifically, whether or not another<br />
party takes legal action against your corporation due to the exposure of<br />
confidential information to unauthorized users.
28 <strong>Access</strong> <strong>Gateway</strong> <strong>Advanced</strong> <strong>Edition</strong> Administrator’s <strong>Guide</strong><br />
• Competitive impact. Determine if the loss of information results in your<br />
corporation’s inability to remain competitive. For example, consider a<br />
scenario in which your company’s “secret recipe” is made available to your<br />
competitors.<br />
• Corporate reputation. Determine the impact to your corporation’s<br />
reputation if certain proprietary information is made available to<br />
unauthorized users. For example, consider a scenario in which your<br />
customers’ credit card information is accessed by unauthorized users. In<br />
addition to possible legal action, customers may lose faith in your<br />
company’s ability to maintain their privacy and, as a result, choose to stop<br />
using your services.<br />
The goal of intellectual property control is to prevent the exposure of sensitive<br />
corporate data. Using <strong>Advanced</strong> <strong>Access</strong> Control, you can protect intellectual<br />
property through the use of the following policy-based access control features:<br />
• HTML Preview. You can configure Microsoft Office files such as Word<br />
and Excel so that they display as HTML files instead of their native file<br />
format. This allows users to view but not modify the document. In addition,<br />
the risks associated with temporary files are mitigated as the HTML files<br />
are removed from the client device’s cache when the user terminates the<br />
session. Therefore, no sensitive data is accidentally left on the client device<br />
after users log off.<br />
• <strong>Citrix</strong> Presentation Server integration. You can configure files to open<br />
within a published application instead of a local application on a client<br />
device. This increases the protection of intellectual property because<br />
proprietary data remains within the protected corporate network at all<br />
times.<br />
In addition, you can share <strong>Advanced</strong> <strong>Access</strong> Control policy information<br />
with <strong>Citrix</strong> Presentation Server to selectively enable functionality for a<br />
specific published application session such as client drive mapping and<br />
local printing. For more information about filters, see “Controlling <strong>Access</strong><br />
Through Policies” on page 131.<br />
Evaluating Authentication Types<br />
Authentication is the process of determining whether users are, in fact, who they<br />
declare to be. <strong>Advanced</strong> <strong>Access</strong> Control supports one-factor and advanced<br />
authentication. Each authentication option is described in the following sections.
Chapter 3 Planning Your <strong>Access</strong> Strategy 29<br />
One-Factor Authentication<br />
One-factor authentication is based on something users know such as a PIN,<br />
password, or pass phrase. When implementing one-factor authentication, users<br />
authenticate to <strong>Advanced</strong> <strong>Access</strong> Control by entering their user name and<br />
password when they log on. Users are assumed to be valid because they enter the<br />
correct credentials.<br />
The advantages of using one-factor authentication include:<br />
• <strong>Advanced</strong> <strong>Access</strong> Control supports standard Windows- and LDAP-based<br />
one-factor authentication. Therefore, no additional effort or implementation<br />
costs are associated with this authentication method.<br />
• Passwords are easily revokable and replaceable in the event that they are<br />
compromised.<br />
• All users are familiar with user names and passwords.<br />
The disadvantages of using one-factor authentication include:<br />
• Passwords are highly susceptible to “social engineering” attacks where<br />
users unknowingly provide their passwords to unauthorized users.<br />
• Users can share passwords and as a result, it is not possible to rely on a<br />
password to ensure that the authentication is genuine. In addition, after<br />
sharing passwords for a particular purpose, users often forget to change<br />
their passwords. This allows multiple users to authenticate using the same<br />
set of credentials.<br />
<strong>Advanced</strong> Authentication<br />
<strong>Advanced</strong> authentication combines something a user knows with a second piece<br />
of information. The second piece of information can be something the user has,<br />
such as a hardware token, or something a user knows, such as an additional<br />
password. <strong>Advanced</strong> <strong>Access</strong> Control integrates with RSA Security SecurID,<br />
Secure Computing SafeWord, and RADIUS to support advanced authentication.<br />
The advantages of advanced authentication include:<br />
• It increases your overall confidence in the authentication process. Whether<br />
it is an additional password or a one-time passcode generated from a<br />
hardware token, requiring users to provide an additional piece of<br />
information greatly mitigates authentication-related risks. For example, if a<br />
user’s main password is compromised, an attacker must obtain the user’s<br />
RADIUS password or hardware token to access the network.<br />
• Token-based solutions provide an additional benefit in that users cannot<br />
record their authentication information for later use. This ensures that users
30 <strong>Access</strong> <strong>Gateway</strong> <strong>Advanced</strong> <strong>Edition</strong> Administrator’s <strong>Guide</strong><br />
adhere to the basic password protection best practice of not saving<br />
proprietary authentication information in electronic or paper format.<br />
The disadvantages of advanced authentication include:<br />
• Implementation costs are significant. In addition to the software required to<br />
validate advanced authentication information, token-based solutions also<br />
require the purchase of hardware tokens.<br />
• Tokens can be lost, stolen, or forgotten.<br />
Consider the advantages and disadvantages of one-factor and advanced<br />
authentication. For some corporations, one-factor authentication provides a<br />
sufficient level of security. However, if your corporation requires additional<br />
security, an advanced authentication solution may be more appropriate.<br />
Planning for High Availability<br />
<strong>Advanced</strong> <strong>Access</strong> Control includes built-in load balancing support. In addition,<br />
<strong>Advanced</strong> <strong>Access</strong> Control servers support industry-standard server clustering<br />
applications and techniques to ensure high availability and maximum business<br />
continuity. When planning your <strong>Advanced</strong> <strong>Access</strong> Control deployment, consider<br />
implementing one or more of the following solutions:<br />
• Database backups. Back up your <strong>Advanced</strong> <strong>Access</strong> Control SQL database<br />
to recover from a variety of problems including database storage failures,<br />
application errors, and user errors. In addition, backups are often critical<br />
when recovering from catastrophic disasters such as hurricanes, fires,<br />
floods, and so on.<br />
• Hardware redundancy. Prevent downtime due to hardware failures by<br />
detecting a failing component before it actually fails and bypassing a failure<br />
when it does occur. To achieve hardware redundancy, ensure your hardware<br />
meets the minimum requirements as specified in “Server Requirements” on<br />
page 41. In addition, determine if redundancy is needed in the following<br />
areas:<br />
• Switches and routers transporting <strong>Advanced</strong> <strong>Access</strong> Control traffic<br />
• Network cards on <strong>Advanced</strong> <strong>Access</strong> Control servers<br />
• Database servers<br />
• Server redundancy. Each <strong>Advanced</strong> <strong>Access</strong> Control server within an<br />
access server farm is configured for the HTML Preview server role by<br />
default. Therefore, each server you add to your farm acts as a redundant<br />
server to minimize downtime in the event of a server failure. If you do not<br />
want all servers in your farm assigned to this role, deploy one or more
Chapter 3 Planning Your <strong>Access</strong> Strategy 31<br />
servers for each <strong>Advanced</strong> <strong>Access</strong> Control server with this role enabled.<br />
For more information about assigning the HTML Preview server role, see<br />
“Modifying Server Roles” on page 219.<br />
• Database redundancy. A SQL database server stores all of <strong>Advanced</strong><br />
<strong>Access</strong> Control’s data. Therefore, to ensure that this data is always<br />
available to users, consider one or more of the high availability strategies:<br />
• Clustering<br />
• Log shipping<br />
Considering Users’ Needs<br />
• Network load balancing to switch SQL servers<br />
• Stretch clustering<br />
For more information about the above high availability solutions, refer to<br />
your SQL documentation.<br />
When planning your access strategy, consider the needs of your users. This<br />
analysis helps you determine the type of access users need to perform effectively.<br />
Consider the following issues:<br />
• Productivity. Create policies that provide the appropriate level of access<br />
for users to remain efficient and productive.<br />
• <strong>Access</strong> to resources. Evaluate which resources users need to access such as<br />
email, Web applications, published applications, file shares, and so on.<br />
• User interface. Determine the default user interface you want users to see<br />
when they log on. <strong>Advanced</strong> <strong>Access</strong> Control includes the <strong>Access</strong> Interface,<br />
a Web page that displays a user’s available corporate resources and email.<br />
In addition, you can configure any Web application such as a <strong>Citrix</strong> <strong>Access</strong><br />
Platform site or a third-party portal as the default user interface.<br />
• Working offline. Consider whether users periodically access the network<br />
to synchronize data and work offline. For example, users who travel often<br />
could benefit from securely accessing their email in real-time and<br />
synchronizing data to their client device. This allows these employees to<br />
remain productive because they can continue to work even while<br />
disconnected from the network.<br />
• Client devices. <strong>Advanced</strong> <strong>Access</strong> Control supports a range of client<br />
devices. Therefore, evaluate the hardware and software profile of your<br />
client devices including form factor, operating system, browser, and so on<br />
to ensure the client devices in your environment meet the minimum
32 <strong>Access</strong> <strong>Gateway</strong> <strong>Advanced</strong> <strong>Edition</strong> Administrator’s <strong>Guide</strong><br />
requirements of <strong>Advanced</strong> <strong>Access</strong> Control. For additional information<br />
about client device requirements, see “Client Requirements” on page 58.<br />
• Browser-only access. Determine if users need to access network file<br />
shares, Web email, and internal Web sites from “locked down” client<br />
devices that do not permit the downloading of any client software. In this<br />
scenario, a Web browser is the only client software needed to access the<br />
corporate network.<br />
Note: Not all Web applications support browser-only access. For more<br />
information, see “Limitations of Browser-Only <strong>Access</strong>” on page 145.
CHAPTER 4<br />
Licensing the <strong>Advanced</strong> <strong>Edition</strong><br />
<strong>Citrix</strong> Licensing limits the number of concurrent user sessions to the number of<br />
licenses purchased. If you purchase 100 licenses, you can have 100 concurrent<br />
user sessions at any time. When a user ends a session, the license is released for<br />
the next user. A user who connects from more than one computer at the same time<br />
uses a license for each session.<br />
The licensing process includes the following steps:<br />
• “Installing <strong>Citrix</strong> Licensing” on page 33 (optional if you already have<br />
<strong>Citrix</strong> Licensing)<br />
• “Obtaining Licenses” on page 34<br />
• “Specifying the License Server” on page 36<br />
• “Adding Shortcuts to the License Management Console” on page 37<br />
(optional)<br />
Installing <strong>Citrix</strong> Licensing<br />
<strong>Access</strong> <strong>Gateway</strong> <strong>Advanced</strong> <strong>Edition</strong> requires access to at least one shared or<br />
dedicated license server running <strong>Citrix</strong> Licensing. If your product portfolio<br />
already includes other <strong>Citrix</strong> products, you may already have a license server<br />
available to store and manage your user licenses. If so, you can skip this step and<br />
proceed to obtain your license files.<br />
Note: The <strong>Access</strong> <strong>Gateway</strong> Standard <strong>Edition</strong> uses a license server on the<br />
gateway appliance and does not require a dedicated <strong>Citrix</strong> license server. You<br />
must use a dedicated license server for the <strong>Advanced</strong> <strong>Edition</strong>. If you upgrade<br />
from the Standard <strong>Edition</strong> and do not already have a <strong>Citrix</strong> license server, you<br />
need to install one.<br />
You can install and configure <strong>Citrix</strong> Licensing before, during, or after you install<br />
<strong>Access</strong> <strong>Gateway</strong> <strong>Advanced</strong> <strong>Edition</strong>.
34 <strong>Access</strong> <strong>Gateway</strong> <strong>Advanced</strong> <strong>Edition</strong> Administrator’s <strong>Guide</strong><br />
Obtaining Licenses<br />
To install <strong>Citrix</strong> Licensing, follow the procedures in the Getting Started with<br />
<strong>Citrix</strong> Licensing <strong>Guide</strong>, available from:<br />
• The <strong>Citrix</strong> Knowledge Center (http://support.citrix.com/)<br />
• The Documentation folder on the product CD<br />
• Start > All Programs or Programs > <strong>Citrix</strong> > <strong>Access</strong> <strong>Gateway</strong> ><br />
Documentation on a server running <strong>Access</strong> <strong>Gateway</strong> <strong>Advanced</strong> <strong>Edition</strong><br />
Because licensing is a crucial part of your product installation, <strong>Citrix</strong> strongly<br />
recommends that you read the licensing guide before installing <strong>Citrix</strong> Licensing.<br />
Getting More Information<br />
In addition to the Getting Started with <strong>Citrix</strong> Licensing <strong>Guide</strong>, you can find a<br />
series of articles designed to provide you with more detailed information for tasks<br />
that extend beyond the scope of installing your licensing components. These<br />
articles are listed in Chapter 3 of the guide and are found in the <strong>Citrix</strong> Knowledge<br />
Center (http://support.citrix.com/).<br />
If you have not already done so, you must obtain license files to download and<br />
copy to your license server. License files contain the licenses that you allocated<br />
for a specified license server. You obtain these files from the Licensing area of the<br />
My<strong>Citrix</strong> Web site (http://www.mycitrix.com/).<br />
Before downloading a license file, be prepared with the case-sensitive name of<br />
the license server that will store the license file and the number of licenses you<br />
want to allocate to that server.<br />
Further details about the information to have ready and the steps for downloading<br />
license files are provided in the Getting Started with <strong>Citrix</strong> Licensing <strong>Guide</strong>,<br />
available on the product CD, from the Start menu of a server running the <strong>Access</strong><br />
<strong>Gateway</strong> <strong>Advanced</strong> <strong>Edition</strong>, or the Support area of the <strong>Citrix</strong> Web site<br />
(http://support.citrix.com).<br />
Determining the Licenses Required<br />
Users connecting through the <strong>Access</strong> <strong>Gateway</strong> <strong>Advanced</strong> <strong>Edition</strong> occupy two<br />
licenses—one for the gateway appliance and one for the <strong>Advanced</strong> <strong>Access</strong><br />
Control server. Therefore, ensure that you have an adequate number of both<br />
<strong>Access</strong> <strong>Gateway</strong> and <strong>Access</strong> <strong>Gateway</strong> <strong>Advanced</strong> <strong>Edition</strong> user licenses to support<br />
your deployment.<br />
Both types of licenses can be bundled together into a single license file for<br />
copying to the license server.
Chapter 4 Licensing the <strong>Advanced</strong> <strong>Edition</strong> 35<br />
Note that each server occupies one of the <strong>Access</strong> <strong>Gateway</strong> <strong>Advanced</strong> <strong>Edition</strong><br />
concurrent user licenses. When tallying the number of licenses you need, include<br />
one for each server.<br />
Licensing Grace Period<br />
A 96-hour grace period goes into effect at installation if you point your <strong>Access</strong><br />
<strong>Gateway</strong> <strong>Advanced</strong> <strong>Edition</strong> server to a license server with no product licenses<br />
installed. A grace period of 30 days goes into effect if communication with a<br />
license server is lost after having contacted the license server successfully at least<br />
once.<br />
During the grace period, user sessions are not disconnected. However, new user<br />
sessions cannot be connected. If the grace period runs out before communication<br />
is established with a license server with the appropriate licenses, all active user<br />
sessions are disconnected.<br />
Mixed Environments<br />
For environments with a mixture of deployments (in other words, <strong>Access</strong><br />
<strong>Gateway</strong> Standard <strong>Edition</strong> deployments and <strong>Advanced</strong> <strong>Edition</strong> deployments),<br />
you can allocate the desired number of licenses among the different deployments<br />
when you generate your license files.<br />
To allocate new or migrated licenses<br />
1. Log on to My<strong>Citrix</strong> (http://www.mycitrix.com).<br />
2. Choose Licensing > Fulfillment > Fulfill Eligible Products, choose the<br />
licensing program type of your license, and follow the on-screen<br />
instructions to select licenses. A Product Fulfillment Certificate verifies<br />
license conversion and presents the resulting license codes.<br />
After you generate new license codes, you must allocate licenses into license files<br />
that you copy to the license server. Allocating licenses lets you choose the<br />
number of licenses to include in a license file; you can allocate all or some of<br />
your available licenses at a time. The license file is a digitally signed, text-only<br />
file that contains product licenses and information needed by the license server.<br />
To download license files<br />
1. From My<strong>Citrix</strong> (http://www.mycitrix.com), choose Licensing > <strong>Citrix</strong><br />
Activation System > Activate or Allocate Licenses.<br />
2. Follow the on-screen allocation instructions. Note that the License Server<br />
Name is case-sensitive.<br />
3. Download the license file.
36 <strong>Access</strong> <strong>Gateway</strong> <strong>Advanced</strong> <strong>Edition</strong> Administrator’s <strong>Guide</strong><br />
By default, the <strong>Citrix</strong> Activation System saves files to the last location used by<br />
the Save As control. License files have the extension .lic. In the event you cannot<br />
locate the downloaded license file, search your computer for files with an .lic<br />
extension.<br />
Note:<br />
Care.<br />
If you have trouble downloading license files, contact <strong>Citrix</strong> Customer<br />
To copy licenses to the license server<br />
1. In the License Management Console, navigate to the License Files pages of<br />
the Configuration tab.<br />
2. On the License Files page, click Copy license file to License Server,<br />
browse to your license file, and copy it to the license server.<br />
3. Ensure that the license server recognizes the new file by performing one of<br />
the following actions.<br />
• In the License Management Console, from the Welcome page, click<br />
Configure License Server, followed by Update license data.<br />
• If you are not using the License Management Console, you must<br />
initiate a reread of the file. At a command prompt, navigate to<br />
C:\Program Files\<strong>Citrix</strong>Licensing\LS\ and type the following<br />
command:<br />
lmreread -c @localhost<br />
After the license server recognizes the file, your <strong>Citrix</strong> products can be<br />
launched.<br />
Important: Do not edit license files without understanding their format. You<br />
can unintentionally corrupt them and render the licensing system unusable.<br />
Specifying the License Server<br />
All computers in an access server farm must communicate with the same license<br />
server. You can specify the license server during initial installation through the<br />
Server Configuration Utility, or specify it later through the farm node of the<br />
<strong>Access</strong> Management Console.
Chapter 4 Licensing the <strong>Advanced</strong> <strong>Edition</strong> 37<br />
To specify a license server<br />
1. From the console tree, select the server farm node and choose Define<br />
license server under Other Tasks.<br />
2. Configure the following settings:<br />
A. Host name. Type the name of the license server.<br />
B. License server port number. This is the port number the product<br />
uses to communicate with the license server. Unless you must<br />
perform configurations to accommodate a firewall or the default port<br />
is already in use, <strong>Citrix</strong> recommends you leave the port at its default<br />
setting.<br />
Adding Shortcuts to the License Management Console<br />
The License Management Console snap-in allows you to create a shortcut to one<br />
or more license servers. You have the option of installing the snap-in when you<br />
install the product or can add it later from the product CD. Use the shortcut to run<br />
the License Management Console remotely and administer licensing for your<br />
farm.<br />
To create a shortcut to the license servers in your environment<br />
1. From the console tree, click the Licensing node.<br />
2. Under Common Tasks, click Add shortcut to license server.<br />
3. For Server name, type the DNS name or IP address of the license server<br />
for your farm.
38 <strong>Access</strong> <strong>Gateway</strong> <strong>Advanced</strong> <strong>Edition</strong> Administrator’s <strong>Guide</strong>
CHAPTER 5<br />
Installing <strong>Advanced</strong> <strong>Access</strong> Control<br />
The installation of <strong>Advanced</strong> <strong>Access</strong> Control varies depending on your<br />
deployment scenario. You can install the logical server components on a single<br />
physical server or distribute components across multiple servers.<br />
The topics in this section provide the following information:<br />
• “Planning Your Installation” on page 39<br />
• “Server Requirements” on page 41<br />
• “Network Requirements” on page 43<br />
• “Feature Requirements” on page 46<br />
• “Authentication Software Requirements” on page 53<br />
• “<strong>Citrix</strong> Presentation Server Integration Requirements” on page 54<br />
• “Client Requirements” on page 58<br />
• “Console Requirements” on page 62<br />
• “Installation Overview” on page 62<br />
• “Installing <strong>Advanced</strong> <strong>Access</strong> Control” on page 63<br />
Planning Your Installation<br />
As part of your access strategy, you must also plan for the installation of the<br />
<strong>Access</strong> <strong>Gateway</strong> <strong>Advanced</strong> <strong>Edition</strong> components and the requirements for the<br />
features you want to implement. This section provides an overview of the tasks<br />
you must perform before and after you install the <strong>Advanced</strong> <strong>Access</strong> Control<br />
software.<br />
Pre-Installation Tasks<br />
Many of the features of <strong>Access</strong> <strong>Gateway</strong> <strong>Advanced</strong> <strong>Edition</strong> require that certain<br />
components are installed or settings are configured before you install the<br />
<strong>Advanced</strong> <strong>Access</strong> Control software.
40 <strong>Access</strong> <strong>Gateway</strong> <strong>Advanced</strong> <strong>Edition</strong> Administrator’s <strong>Guide</strong><br />
The following table provides an overview of these prerequisites to help you plan<br />
your installation. References to additional information about each component or<br />
feature are included.<br />
Component or Feature Required Task Additional Information<br />
<strong>Access</strong> <strong>Gateway</strong> appliance Install appliance(s) <strong>Access</strong> <strong>Gateway</strong> Standard <strong>Edition</strong><br />
Pre-Installation Checklist<br />
<strong>Access</strong> <strong>Gateway</strong> Standard <strong>Edition</strong><br />
Administrator’s <strong>Guide</strong><br />
<strong>Advanced</strong> <strong>Access</strong> Control server<br />
Database server<br />
License sever<br />
HTML Preview<br />
Ensure the server meets all hardware<br />
and software requirements<br />
• Supported version of Microsoft<br />
Windows<br />
• Windows Installer 3.0 or 3.1<br />
• .NET Framework 2.0<br />
• MDAC 2.7 or 2.8<br />
Set Web extensions<br />
• ASP.NET (Allowed)<br />
• Active Server Pages (Allowed)<br />
• FrontPage Server Extensions<br />
(Prohibited<br />
• WebDAV (Prohibited)<br />
Ensure network configuration meets<br />
requirements<br />
Ensure service account meets<br />
requirements<br />
Install database server and create<br />
user account<br />
Restart the server if installing on the<br />
<strong>Advanced</strong> <strong>Access</strong> Control server<br />
Install <strong>Citrix</strong> License Server on the<br />
<strong>Advanced</strong> <strong>Access</strong> Control server or a<br />
separate server<br />
Install Microsoft Office (without<br />
Outlook) on the <strong>Advanced</strong> <strong>Access</strong><br />
Control server<br />
“System Requirements” on page 42<br />
“Network Requirements” on page 43<br />
“Service Account Requirements” on<br />
page 44<br />
“Microsoft SQL Server User<br />
Account Requirements” on page 44<br />
“Database Requirements” on page<br />
46<br />
“Installing <strong>Advanced</strong> <strong>Access</strong><br />
Control” on page 63<br />
Getting Started with <strong>Citrix</strong> Licensing<br />
<strong>Guide</strong><br />
“HTML Preview Requirements” on<br />
page 46
Chapter 5 Installing <strong>Advanced</strong> <strong>Access</strong> Control 41<br />
Component or Feature Required Task Additional Information<br />
Web email<br />
Install Microsoft Exchange System<br />
Management Tools and Microsoft<br />
Exchange Administrator 5.5 on the<br />
<strong>Advanced</strong> <strong>Access</strong> Control server<br />
Update the mapisvc.inf file on the<br />
<strong>Advanced</strong> <strong>Access</strong> Control server<br />
Post-Installation Tasks<br />
“Installing the Microsoft Exchange<br />
System Management Tools and<br />
Administrator Software” on page 51<br />
“Default Email Interface<br />
Requirements” on page 51<br />
RADIUS Authentication Install Visual J# .NET 2.0 “RADIUS Requirements” on page<br />
53<br />
RSA SecurID Authentication<br />
Install RSA ACE/Agent for<br />
Windows<br />
“SecurID Requirements” on page 54<br />
Secure Computing SafeWord Install SafeWord Agent “SafeWord Requirements” on page<br />
54<br />
<strong>Access</strong> Management Console<br />
If installing on a standalone<br />
workstation, ensure required<br />
software is installed<br />
“Console Requirements” on page 62<br />
The following table provides an overview of tasks you perform immediately after<br />
installing the <strong>Advanced</strong> <strong>Access</strong> Control software. References to additional<br />
information about each component or feature are included.<br />
Component or Feature Required Task Additional Information<br />
<strong>Access</strong> <strong>Gateway</strong> appliance<br />
HTML Preview<br />
Configure communication with<br />
<strong>Advanced</strong> <strong>Access</strong> Control server(s)<br />
To display PDF files, install and<br />
configure conversion software<br />
“Enabling <strong>Advanced</strong> <strong>Access</strong><br />
Control” on page 80<br />
“HTML Preview Requirements” on<br />
page 46<br />
Server Requirements<br />
Before proceeding with software installation, verify that the servers you are using<br />
meet the hardware and software requirements for <strong>Advanced</strong> <strong>Access</strong> Control.<br />
Important: To ensure that installation of <strong>Advanced</strong> <strong>Access</strong> Control progresses<br />
smoothly, use servers that are not configured as domain controllers. During<br />
installation, <strong>Advanced</strong> <strong>Access</strong> Control adds a service account to the local<br />
Administrators group that is not present on a domain controller. If you attempt to<br />
install <strong>Advanced</strong> <strong>Access</strong> Control on a domain controller, the service account<br />
cannot be added and the installation will fail.
42 <strong>Access</strong> <strong>Gateway</strong> <strong>Advanced</strong> <strong>Edition</strong> Administrator’s <strong>Guide</strong><br />
System Requirements<br />
• PC with a 550 MHz processor<br />
• 768 MB of physical memory<br />
• 9 GB of available hard disk space<br />
• Microsoft Windows 2000 Server Family with Service Pack 4, or Windows<br />
Server 2003, Standard <strong>Edition</strong>, Web <strong>Edition</strong>, or Enterprise <strong>Edition</strong> with all<br />
service packs and updates installed<br />
• Internet Information Services (IIS) 5.0 or 6.0<br />
• Microsoft Windows Installer 3.0 or 3.1<br />
• Microsoft .NET Framework 2.0<br />
• Microsoft Data <strong>Access</strong> Components (MDAC) Version 2.7 Refresh or 2.8<br />
Important: You must install the Windows Installer (WindowsInstaller-<br />
KB884016-v2-x86.exe), the .NET Framework, and MDAC 2.7 Refresh<br />
(mdac_typ.exe) before you install <strong>Advanced</strong> <strong>Access</strong> Control. The Windows<br />
Installer, .NET Framework, and MDAC 2.7 Refresh executable files are located<br />
on the <strong>Advanced</strong> <strong>Access</strong> Control Server CD-ROM.<br />
To set Web services extensions<br />
Before installing <strong>Advanced</strong> <strong>Access</strong> Control, you must ensure the following Web<br />
services extensions are set appropriately in the Internet Information Services (IIS)<br />
Manager:<br />
Extension Name Required for <strong>Advanced</strong> <strong>Access</strong> Status in IIS Manager<br />
Control Installations<br />
ASP.NET Yes Allowed<br />
Active Server Pages Yes Allowed<br />
FrontPage Server<br />
Extensions<br />
WebDAV<br />
No. Must be prohibited for the Web<br />
proxy to function properly.<br />
No. Must be prohibited for Outlook<br />
Web <strong>Access</strong> (OWA) to display the<br />
contents of users’ inboxes.<br />
Prohibited<br />
Prohibited
Chapter 5 Installing <strong>Advanced</strong> <strong>Access</strong> Control 43<br />
1. Click Start > Programs or All Programs > Administrative Tools ><br />
Internet Information Services (IIS) Manager.<br />
2. Expand the local computer node and then select Web Services Extensions.<br />
3. Make the following selections as required:<br />
• Select ASP.NET and click Allow.<br />
• Select Active Server Pages and click Allow.<br />
• Select FrontPage Server Extensions and click Prohibit.<br />
• Select WebDAV and click Prohibit.<br />
You may need to register ASP.NET if you installed the .NET Framework before<br />
installing IIS. To register ASP.NET, locate aspnet_regiis.exe and then type<br />
aspnet_regiis.exe -i from a command prompt.<br />
Network Requirements<br />
Before installing <strong>Advanced</strong> <strong>Access</strong> Control, ensure that your network<br />
configuration meets the following requirements:<br />
• The computers or resources that users will access are connected to the<br />
<strong>Advanced</strong> <strong>Access</strong> Control servers you will deploy<br />
• The <strong>Advanced</strong> <strong>Access</strong> Control server is:<br />
• A member of the domain to which users who authenticate to the<br />
server belong<br />
—Or—<br />
• A member of a domain that trusts and is trusted by the domain(s) of<br />
the authenticating users<br />
• In a multi-domain environment, trust relationships have been established so<br />
that users in all domains can authenticate and access resources<br />
• To provide access to the Internet, a Domain Naming System (DNS) host<br />
record resolves to a public IP address for the <strong>Access</strong> <strong>Gateway</strong> appliance<br />
Note: To configure <strong>Advanced</strong> <strong>Access</strong> Control successfully, the server must<br />
belong to a domain. If the <strong>Advanced</strong> <strong>Access</strong> Control server is a member of a<br />
workgroup and not a domain, the Server Configuration wizard does not run.
44 <strong>Access</strong> <strong>Gateway</strong> <strong>Advanced</strong> <strong>Edition</strong> Administrator’s <strong>Guide</strong><br />
Account Requirements<br />
This section describes the server accounts required to install <strong>Advanced</strong> <strong>Access</strong><br />
Control.<br />
Microsoft SQL Server User Account<br />
Requirements<br />
When creating an access server farm, <strong>Advanced</strong> <strong>Access</strong> Control requests an<br />
account for access to SQL Server. The specified account must permit <strong>Advanced</strong><br />
<strong>Access</strong> Control to create a database for the access server farm and then connect to<br />
the database.<br />
To create the database during install, at a minimum, the account must be included<br />
in the Database Creators server role on SQL Server. After <strong>Advanced</strong> <strong>Access</strong><br />
Control creates the database, the database user must be assigned the<br />
db_datareader and db_datawriter permissions.<br />
SQL Server 2000 supports Windows Authentication mode, which requires<br />
Windows user accounts for access, and Mixed Mode, which accepts Windows<br />
user accounts and SQL Server accounts.<br />
When you first install <strong>Advanced</strong> <strong>Access</strong> Control and create an access server farm,<br />
Setup creates a database with the same name as the access server farm. Setup<br />
does not create additional databases when you add servers to an access server<br />
farm.<br />
Note: The database creation and access requirements in this section apply to<br />
both SQL Server authentication and Windows authentication for database user<br />
accounts.<br />
Service Account Requirements<br />
When you install <strong>Advanced</strong> <strong>Access</strong> Control and create a new access server farm,<br />
the Server Configuration wizard prompts you for an account to use for<br />
communicating with services and servers in the farm. This account is referred to<br />
as the service account. You must specify an existing account to be the service<br />
account. If you do not have a service account, create one prior to installing<br />
<strong>Advanced</strong> <strong>Access</strong> Control. Valid service accounts meet the following<br />
requirements:<br />
• The service account must be a member of the local Administrators group on<br />
every server in the farm.
Chapter 5 Installing <strong>Advanced</strong> <strong>Access</strong> Control 45<br />
• The service account must not be disabled and not subject to password<br />
expiration or other credential changes. If the service account is removed,<br />
the access server farm will not operate.<br />
• The service account can be a local user account only if you are creating a<br />
single-server access server farm and do not intend to scale the farm. You<br />
cannot install <strong>Advanced</strong> <strong>Access</strong> Control on multiple servers with a local<br />
user account selected for the service account. <strong>Citrix</strong> strongly recommends<br />
using a domain account instead of a local user account when installing<br />
<strong>Advanced</strong> <strong>Access</strong> Control.<br />
Important: If you specify a local user account as the service account,<br />
ensure the local user account also has database owner permissions for the<br />
database <strong>Advanced</strong> <strong>Access</strong> Control creates during Setup. If the local user<br />
account does not have database owner permissions, some features might<br />
not be available to users.<br />
• In an Active Directory environment, when specifying the service account<br />
user name in User Principal Name (UPN) or Alternate UPN format, you<br />
must enter the full domain name.<br />
If necessary, you can change the service account after installing <strong>Advanced</strong> <strong>Access</strong><br />
Control. For more information about changing service account details, see<br />
“Changing Service Account and Database Credentials” on page 218.<br />
Note: If you are deploying <strong>Advanced</strong> <strong>Access</strong> Control in an environment where<br />
the Restricted Group policy is used to control the membership to the local<br />
Administrators group, ensure the user associated with the service account is in<br />
one of the groups added by the Restricted Group policy. For additional<br />
information, refer to the Resource Kit for Windows 2000 or Windows 2003.<br />
Using Security Templates with the Service<br />
Account<br />
Your corporate IT policy may require that security templates be applied to reduce<br />
the attack surface area of your Windows servers. The Highly Secure security<br />
template (HiSECWS.INF) removes the service account from the local<br />
Administrators group when applied after installing <strong>Advanced</strong> <strong>Access</strong> Control.<br />
After applying this security template, add the service account back to the local<br />
Administrators group. Otherwise, <strong>Advanced</strong> <strong>Access</strong> Control will not function<br />
correctly.
46 <strong>Access</strong> <strong>Gateway</strong> <strong>Advanced</strong> <strong>Edition</strong> Administrator’s <strong>Guide</strong><br />
Database Requirements<br />
<strong>Access</strong> <strong>Gateway</strong> <strong>Advanced</strong> <strong>Edition</strong> supports the following database packages:<br />
• Microsoft SQL Server 2005<br />
• Microsoft SQL Server 2000 with Service Pack 4<br />
• Microsoft SQL Server Express 2005<br />
Note: If you install Microsoft SQL Server and you create a database before you<br />
install <strong>Advanced</strong> <strong>Access</strong> Control, be sure to specify case-insensitive collation<br />
when you create the database. This ensures the names you assign to resources<br />
remain unique and prevents resources with duplicate names from being created.<br />
<strong>Access</strong> <strong>Gateway</strong> Requirements<br />
Feature Requirements<br />
The <strong>Access</strong> <strong>Gateway</strong> appliance is a universal SSL VPN appliance that provides<br />
users with controlled access to application and information resources. For<br />
information about requirements for installing and using the <strong>Access</strong> <strong>Gateway</strong><br />
appliance, see the Getting Started with <strong>Citrix</strong> <strong>Access</strong> <strong>Gateway</strong> Standard <strong>Edition</strong><br />
guide.<br />
You can use <strong>Advanced</strong> <strong>Access</strong> Control to allow users to view, upload, or<br />
download Web-based resources using any client device that has a Web browser.<br />
However, some features such as Live Edit use additional client software. Other<br />
features require additional server software. This section provides information to<br />
help you plan access to features depending on a feature’s client or server<br />
requirements.<br />
HTML Preview Requirements<br />
HTML Preview enables users to view files such as Microsoft Office documents<br />
or Adobe Acrobat PDF files in HTML.<br />
Installing Microsoft Office for HTML Preview<br />
To use HTML Preview to view Microsoft Office documents, the following<br />
software must be installed on a Web server in your access server farm:<br />
• Microsoft Word 2000, XP, or 2003
Chapter 5 Installing <strong>Advanced</strong> <strong>Access</strong> Control 47<br />
• Microsoft Excel 2000, XP, or 2003<br />
• Microsoft Powerpoint 2000, XP, or 2003<br />
• Microsoft Visio 2002 or 2003<br />
If you install these programs after installing <strong>Advanced</strong> <strong>Access</strong> Control, you will<br />
need to restart the <strong>Citrix</strong> Activation Engine Service.<br />
If you use HTML Preview with Microsoft Office documents, be aware of the<br />
following considerations:<br />
• Microsoft Outlook must be excluded from the Office installation because it<br />
interferes with <strong>Advanced</strong> <strong>Access</strong> Control’s Web email functions.<br />
• All devices deploying HTML Preview content to users should have<br />
adequate Microsoft Office licenses. For more information about licensing<br />
requirements, refer to your Microsoft Office Licensing Agreement.<br />
• If multiple servers are configured for HTML Preview, these servers must<br />
have the same version of Microsoft Office installed. Otherwise, a document<br />
viewed with HTML Preview may appear different to some users,<br />
depending on the version of Office rendering the document.<br />
For more information about using HTML Preview to provide access to<br />
documents, see “Allowing HTML Preview” on page 139.<br />
Using Macros with HTML Preview<br />
When using HTML Preview to access Microsoft Office documents, it is possible<br />
to run macros embedded within these documents. Viewing a document containing<br />
macros could represent a security risk to your deployment because the macros<br />
may run on the <strong>Advanced</strong> <strong>Access</strong> Control server within the context of the service<br />
account.<br />
Before implementing HTML Preview, evaluate each of the following strategies<br />
for mitigating this potential risk:<br />
• Set macro security in each Microsoft Office application according to your<br />
organization’s network security policies<br />
• Configure each Microsoft Office application to run in the context of a User<br />
account with limited privileges<br />
Important: These strategies do not provide protection against possible security<br />
risks related to functional issues in Microsoft Office applications (for example,<br />
Microsoft Word crashes when opening a document). As you evaluate these<br />
strategies, consider Microsoft’s recommendations for server and application<br />
security as well as your organization’s information security requirements.
48 <strong>Access</strong> <strong>Gateway</strong> <strong>Advanced</strong> <strong>Edition</strong> Administrator’s <strong>Guide</strong><br />
To disable embedded macros in Microsoft Office<br />
1. Launch the Microsoft Office application installed on the <strong>Advanced</strong> <strong>Access</strong><br />
Control server.<br />
2. Set the macro security level to the highest level available for the version of<br />
the Microsoft Office application you are running.<br />
3. Disable trust for all installed add-ins and templates.<br />
For more information about setting macro security for Microsoft Office<br />
applications, refer to the Microsoft Office documentation or the Microsoft Office<br />
Web site.<br />
To configure Microsoft Office applications to run under a User account<br />
This procedure involves automating Office applications using an unattended user<br />
account. For more information about this approach and its accompanying<br />
considerations, refer to Microsoft knowledgebase article 288367, How to<br />
configure Office applications to run under a specific user account.<br />
1. Log on to the <strong>Advanced</strong> <strong>Access</strong> Control server as Administrator and create<br />
a new User account.<br />
2. Start the Office application you want to configure and press ALT+F11 to<br />
load the Visual Basic for Applications (VBA) editor.<br />
3. Close the application and the VBA editor.<br />
4. Click Start > Run and type DCOMCNFG to open the Component<br />
Services console.<br />
5. From the DCOM Config node, locate the Office application you want to<br />
configure. They are listed as follows:<br />
• Microsoft Excel Application<br />
• Microsoft PowerPoint Presentation<br />
• Microsoft Word Document<br />
6. Right-click the application and select Properties.<br />
7. Click the Security tab and perform the following tasks:<br />
A. Under Launch and Activation Permissions, select Customize and<br />
then click Edit.<br />
B. Add the User account you created and allow Local Launch and<br />
Local Activation permissions. Ensure the SYSTEM,<br />
INTERACTIVE and Everyone accounts are present.<br />
C. Under <strong>Access</strong> Permissions, select Customize and then click Edit.
Chapter 5 Installing <strong>Advanced</strong> <strong>Access</strong> Control 49<br />
D. Add the User account you created and allow the Local <strong>Access</strong><br />
permission.<br />
8. On the Identity tab, select This user and enter the credentials of the User<br />
account you created.<br />
9. Restart the server.<br />
Repeat these steps for each Office application you want to configure. After you<br />
restart the server, start the Task Manager and then start each application to verify<br />
it is running under the new User account.<br />
Using HTML Preview with PDF Documents<br />
If you want to use HTML Preview with PDF documents, you must install on the<br />
<strong>Advanced</strong> <strong>Access</strong> Control server software that converts the PDF file to HTML.<br />
For more information about configuring <strong>Advanced</strong> <strong>Access</strong> Control to view PDF<br />
files, see the <strong>Citrix</strong> Knowledge Center article CTX107543: Customizing HTML<br />
Preview in <strong>Advanced</strong> <strong>Access</strong> Control located on the <strong>Citrix</strong> Web site.<br />
Live Edit Requirements<br />
Live Edit is a convenient way for users to work remotely with files such as Word<br />
documents and Excel spreadsheets using a Web browser.<br />
To use Live Edit, users must have the following software installed on their<br />
computers:<br />
• Microsoft Internet Explorer 6.0 SP1<br />
• Live Edit Client ActiveX control<br />
• An appropriate Microsoft Office editing application such as:<br />
• Microsoft Word 2000, XP or 2003<br />
• Microsoft Excel 2000, XP, or 2003<br />
• Microsoft Powerpoint 2000, XP, or 2003<br />
• Microsoft Visio 2002 or 2003<br />
Note: After installing any Microsoft Office applications, run the application for<br />
the first time before using Live Edit. This ensures that any post-installation tasks<br />
are completed and allows the Live Edit Client to display documents for editing<br />
without delay.
50 <strong>Access</strong> <strong>Gateway</strong> <strong>Advanced</strong> <strong>Edition</strong> Administrator’s <strong>Guide</strong><br />
For information about requirements for running the Live Edit Client, see “Client<br />
Requirements” on page 58. For more information about using Live Edit to<br />
provide access to documents, see “Allowing Live Edit” on page 140.<br />
Email Synchronization Requirements<br />
Email synchronization allows users to synchronize their email folders on their<br />
client devices with their folders on Microsoft Exchange or Lotus Notes/Domino<br />
servers to prepare for working offline.<br />
Email synchronization requires the following components:<br />
• Microsoft Outlook 2000, XP, or 2003; or Lotus Notes R5, R6, or R7<br />
installed on the client device<br />
• Secure <strong>Access</strong> Client installed on the client device<br />
• An email server running Microsoft Exchange or Lotus Notes/Domino<br />
For more information about requirements for the Secure <strong>Access</strong> Client, see<br />
“Client Requirements” on page 58. For more information about email<br />
synchronization, see “Providing Users with Secure <strong>Access</strong> to Email Accounts” on<br />
page 188.<br />
Web Email Requirements<br />
You can provide users with access to corporate email resources using Web email.<br />
Using the included default email interface, users can access their email accounts<br />
from a workstation or a handheld device with only a Web browser. This interface<br />
functions only with email servers using Microsoft Exchange.<br />
<strong>Advanced</strong> <strong>Access</strong> Control also supports using Outlook Web <strong>Access</strong>, Lotus<br />
iNotes/Domino Web <strong>Access</strong>, or other Web email interfaces. Outlook Web <strong>Access</strong><br />
and iNotes do not operate on handheld devices such as PDAs.<br />
The following table lists the components required for each supported Web email<br />
platform.
Chapter 5 Installing <strong>Advanced</strong> <strong>Access</strong> Control 51<br />
<strong>Advanced</strong> <strong>Access</strong> Control<br />
Web Email<br />
Outlook Web <strong>Access</strong><br />
iNotes/Domino Web <strong>Access</strong><br />
Required Email<br />
Server<br />
Microsoft Exchange Server,<br />
Versions 2000 or 2003 with all<br />
service packs and critical<br />
updates installed<br />
Microsoft Exchange Server,<br />
Versions 2000 or 2003 with all<br />
service packs and critical<br />
updates installed<br />
IBM Lotus Domino Server,<br />
Versions R6 or R7<br />
Required Server<br />
Administration<br />
Tools<br />
Microsoft Exchange System<br />
Management Tools<br />
Microsoft Exchange 5.5<br />
Administrator<br />
Microsoft Exchange System<br />
Management Tools<br />
Microsoft Exchange 5.5<br />
Administrator<br />
N/A<br />
Supported Web<br />
Browsers<br />
Internet Explorer 6.0 SP1<br />
Safari 1.1 and 1.3<br />
Netscape Navigator 8.0<br />
Mozilla Firefox 1.0<br />
Internet Explorer 6.0 SP1<br />
Internet Explorer 6.0 SP1<br />
Default Email Interface Requirements<br />
If you are using Microsoft Exchange 2000 and you want to use the default Email<br />
Interface, you must install Microsoft Exchange System Management Tools and<br />
then update the mapisvc.inf file on the <strong>Advanced</strong> <strong>Access</strong> Control server. For<br />
more information, see “Updating the Mapisvc.inf File” on page 193.<br />
Installing the Microsoft Exchange System Management<br />
Tools and Administrator Software<br />
Microsoft Exchange System Management Tools and Microsoft Exchange 5.5<br />
Administrator supply the MAPI components that are required for Web email<br />
functionality. These tools are supported on the following operating systems:<br />
• Microsoft Windows 2000 Server Family with Service Pack 3 or 4<br />
• Windows Server 2003, Standard <strong>Edition</strong> or Enterprise <strong>Edition</strong><br />
When using these tools, it is important that you:<br />
• Install Microsoft Exchange System Management Tools and Microsoft<br />
Exchange 5.5 Administrator on the server before installing <strong>Advanced</strong><br />
<strong>Access</strong> Control or other software such as Microsoft Office. This ensures the<br />
required Messaging Application Programming Interface (MAPI)<br />
components are installed correctly.<br />
• Install the versions of Microsoft Exchange System Management Tools and<br />
Microsoft Exchange 5.5 Administrator that are included with the version of<br />
Microsoft Exchange you are using. If they do not match, Web email may<br />
not function correctly.
52 <strong>Access</strong> <strong>Gateway</strong> <strong>Advanced</strong> <strong>Edition</strong> Administrator’s <strong>Guide</strong><br />
• Ensure the WebDAV Web service extension is set to “Prohibit” if you use<br />
Outlook Web <strong>Access</strong> for your Web-based email interface. If this extension<br />
is set to “Allowed,” users’ inboxes may not display correctly.<br />
For information about configuring Web email, see “Providing Users with Secure<br />
Web-Based Email” on page 184.<br />
Using Microsoft Windows 2003 Server Web<br />
<strong>Edition</strong> for Web Email<br />
If you are using Microsoft Windows Server 2003 Web <strong>Edition</strong> and you have<br />
Microsoft Exchange 2003 in your environment, you cannot install Microsoft<br />
Exchange System Management Tools or Microsoft Exchange 5.5 Administrator.<br />
Instead, copy the MAPI components to the %SystemRoot%/system32 directory<br />
of the <strong>Advanced</strong> <strong>Access</strong> Control server.<br />
To install the MAPI components on a server running Microsoft Windows<br />
2003 Server Web <strong>Edition</strong><br />
1. On the server running Microsoft Exchange 2003, copy the following files:<br />
• mapi32.dll<br />
• mapisvc.inf<br />
2. On the <strong>Advanced</strong> <strong>Access</strong> Control server, paste the files to the<br />
%SystemRoot/system32 directory.<br />
User Profile <strong>Access</strong> Requirements<br />
<strong>Advanced</strong> <strong>Access</strong> Control stores MAPI user profiles in the Temp folder located in<br />
the <strong>Advanced</strong> <strong>Access</strong> Control installation directory. Users configured for Web<br />
email must have read/write access to this folder. Before installing <strong>Advanced</strong><br />
<strong>Access</strong> Control, you must add the users to the Users group on all <strong>Advanced</strong><br />
<strong>Access</strong> Control servers. The installation process grants the Users group read/write<br />
access to the Temp folder.<br />
Endpoint Analysis Requirements<br />
You can configure endpoint analysis scans to be run on client devices to check<br />
them for protective measures, such as operating system patches and antivirus<br />
software, before users access resources.<br />
Endpoint analysis scans require the Endpoint Analysis Client that can be installed<br />
as an ActiveX control, a plug-in for Netscape Navigator or Firefox, or as a<br />
Windows 32-bit application. To download and install the ActiveX control, users<br />
must be members of the Administrators or Power Users group of the client<br />
device.
Chapter 5 Installing <strong>Advanced</strong> <strong>Access</strong> Control 53<br />
Important: If the Endpoint Analysis Client is not installed on a client system,<br />
the user can access only those resources for which a scan is not required.<br />
For information about requirements for running the Endpoint Analysis Client, see<br />
“Client Requirements” on page 58. For more information about configuring<br />
endpoint analysis scans, see “Creating Endpoint Analysis Scans” on page 166.<br />
Authentication Software Requirements<br />
<strong>Advanced</strong> <strong>Access</strong> Control supports using the following authentication methods to<br />
strengthen the security of your deployment:<br />
• Microsoft Active Directory<br />
• Lightweight Directory <strong>Access</strong> Protocol (LDAP)<br />
• Remote Authentication Dial-In User Service (RADIUS)<br />
• RSA SecurID 5.2 or 6.0<br />
• Secure Computing SafeWord Premier<strong>Access</strong> and SafeWord for <strong>Citrix</strong><br />
LDAP Requirements<br />
To use LDAP with <strong>Access</strong> <strong>Gateway</strong> <strong>Advanced</strong> <strong>Edition</strong>, you must have an LDAPcompliant<br />
directory service in your environment such as Microsoft Active<br />
Directory, Novell eDirectory, or IBM Directory Server.<br />
Important: User credentials specified in User Principle Name (UPN) or<br />
Alternate UPN formats are not supported when using LDAP as an authentication<br />
method.<br />
RADIUS Requirements<br />
To use RADIUS with <strong>Access</strong> <strong>Gateway</strong> <strong>Advanced</strong> <strong>Edition</strong>, you must install the<br />
Microsoft Visual J# .NET Version 2.0 executable file (vjredist.exe) on the server<br />
running <strong>Advanced</strong> <strong>Access</strong> Control before you install the <strong>Advanced</strong> <strong>Access</strong><br />
Control software. This executable file is located in the JSharp20 folder on the<br />
<strong>Advanced</strong> <strong>Access</strong> Control Server CD-ROM.<br />
Important: User credentials specified in User Principle Name (UPN) or<br />
Alternate UPN formats are not supported when using RADIUS as an<br />
authentication method.
54 <strong>Access</strong> <strong>Gateway</strong> <strong>Advanced</strong> <strong>Edition</strong> Administrator’s <strong>Guide</strong><br />
For more information about using RADIUS with logon points, see “Creating<br />
RADIUS Authentication Profiles” on page 102.<br />
Supported RADIUS Authentication Protocols<br />
<strong>Access</strong> <strong>Gateway</strong> <strong>Advanced</strong> <strong>Edition</strong> supports implementations of RADIUS that<br />
are configured to use the Password Authentication Protocol (PAP) for user<br />
authentication. Other authentication protocols such as the Challenge-Handshake<br />
Authentication Protocol (CHAP) are not supported.<br />
For more information about configuring RADIUS authentication, see “Creating<br />
LDAP Authentication Profiles” on page 104.<br />
SecurID Requirements<br />
To use SecurID authentication with <strong>Access</strong> <strong>Gateway</strong> <strong>Advanced</strong> <strong>Edition</strong>, install<br />
the RSA ACE/Agent for Windows software before installing the <strong>Advanced</strong><br />
<strong>Access</strong> Control software. If you install <strong>Advanced</strong> <strong>Access</strong> Control before you<br />
install the ACE/Agent, SecurID authentication does not function correctly.<br />
For information about requirements for installing RSA SecurID, refer to the RSA<br />
product documentation.<br />
SafeWord Requirements<br />
To use SafeWord authentication with <strong>Access</strong> <strong>Gateway</strong> <strong>Advanced</strong> <strong>Edition</strong>:<br />
• Obtain the latest version of the SafeWord Agent from Secure Computing<br />
• Install the SafeWord Agent software on the server before installing the<br />
<strong>Advanced</strong> <strong>Access</strong> Control software<br />
For information about requirements for installing SafeWord Premier<strong>Access</strong> and<br />
SafeWord for <strong>Citrix</strong>, refer to the Secure Computing documentation for these<br />
products.<br />
<strong>Citrix</strong> Presentation Server Integration<br />
Requirements<br />
To access resources published with <strong>Citrix</strong> Presentation Server using file type<br />
association or Web Interface, users must have a <strong>Citrix</strong> Presentation Server Client<br />
on their client device.<br />
<strong>Advanced</strong> <strong>Access</strong> Control supports integration with the following versions of<br />
<strong>Citrix</strong> Presentation Server:<br />
• <strong>Citrix</strong> Presentation Server 4.0<br />
• MetaFrame Presentation Server 3.0
Chapter 5 Installing <strong>Advanced</strong> <strong>Access</strong> Control 55<br />
• MetaFrame XP 1.0 Feature Release 3 with Service Pack 4<br />
• MetaFrame for UNIX 4.0<br />
Note: <strong>Advanced</strong> <strong>Access</strong> Control supports application policies that are applied<br />
using <strong>Citrix</strong> Presentation Server Version 4.0 and above. While <strong>Advanced</strong> <strong>Access</strong><br />
Control can communicate with older versions of <strong>Citrix</strong> Presentation Server, it<br />
does not allow application-specific policies to be applied.<br />
You can configure the logon point to use either the Web Client or the Client for<br />
Java on demand when users access published resources.<br />
<strong>Advanced</strong> <strong>Access</strong> Control supports using the following <strong>Citrix</strong> Presentation Server<br />
Clients:<br />
Client English Japanese German Spanish French<br />
<strong>Citrix</strong> Presentation Server Client<br />
Version 9.2<br />
Yes Yes Yes Yes Yes<br />
Client for Java Version 9.4 Yes Yes Yes Yes Yes<br />
Web Client Version 9.2 Yes Yes Yes Yes Yes<br />
For more information about requirements for running the Client for Java, see the<br />
Client for Java Administrator’s <strong>Guide</strong>. For more information about configuring<br />
<strong>Advanced</strong> <strong>Access</strong> Control to access published resources, see “Allowing File Type<br />
Association” on page 138.<br />
<strong>Citrix</strong> Presentation Server for UNIX Requirements<br />
If you want to integrate <strong>Advanced</strong> <strong>Access</strong> Control with <strong>Citrix</strong> Presentation Server<br />
for UNIX, be aware of the following:<br />
• Workspace Control is not supported<br />
• Smart<strong>Access</strong> is not supported<br />
• Because Web Interface requires users to enter a domain when logging on,<br />
users must enter the word “unix” as the domain to authenticate to Web<br />
Interface through <strong>Advanced</strong> <strong>Access</strong> Control<br />
Smart<strong>Access</strong> Requirements<br />
The Smart<strong>Access</strong> feature enables organizations to better control how published<br />
applications are accessed and used.
56 <strong>Access</strong> <strong>Gateway</strong> <strong>Advanced</strong> <strong>Edition</strong> Administrator’s <strong>Guide</strong><br />
You can use Smart<strong>Access</strong> with <strong>Advanced</strong> <strong>Access</strong> Control to control which<br />
resources users can access, based on their access scenario, and what they can do<br />
within those resources after they get access. Smart<strong>Access</strong> integrates with Web<br />
Interface for <strong>Citrix</strong> Presentation Server to give organizations granular control<br />
over published applications. To use Smart<strong>Access</strong>, you must have the following<br />
components in your environment:<br />
• <strong>Citrix</strong> <strong>Access</strong> <strong>Gateway</strong> <strong>Advanced</strong> <strong>Edition</strong><br />
• <strong>Citrix</strong> Presentation Server 4.0<br />
Note:<br />
Smart<strong>Access</strong> is not supported with <strong>Citrix</strong> Presentation Server for UNIX.<br />
If you are using Web Interface to access published applications, you must also<br />
have the following software:<br />
• <strong>Access</strong> Suite Console 4.0 for <strong>Citrix</strong> Presentation Server with the Web<br />
Interface Extension 4.2 patch applied<br />
• Web Interface for <strong>Citrix</strong> Presentation Server 4.0 or 4.5<br />
You must also ensure that address translation and firewall settings are identical<br />
for the Web Interface and <strong>Advanced</strong> <strong>Access</strong> Control. For more information about<br />
configuring Smart<strong>Access</strong>, see the Web Interface Administrator’s <strong>Guide</strong>.<br />
Multiple <strong>Access</strong> Platform Site and Credential Caching<br />
Requirements<br />
<strong>Advanced</strong> <strong>Access</strong> Control supports displaying up to three <strong>Citrix</strong> <strong>Access</strong> Platform<br />
sites within the <strong>Access</strong> Interface. If the credentials used to log on to the <strong>Access</strong><br />
Platform sites are different from those used for <strong>Advanced</strong> <strong>Access</strong> Control, you<br />
can cache these credentials so users are not required to reenter them. These<br />
features require:<br />
• Web Interface for <strong>Citrix</strong> Presentation Server 4.0 or 4.5.<br />
• <strong>Advanced</strong> <strong>Access</strong> Control to authenticate users with Active Directory<br />
credentials only. Credential caching is not supported for use with RADIUS,<br />
LDAP, RSA SecurID, or Secure Computing SafeWord.<br />
SmoothRoaming Requirements<br />
The SmoothRoaming features of <strong>Citrix</strong> Presentation Server provide users with<br />
uninterrupted access to information. These features include Workspace Control,<br />
Session Reliability, and Dynamic Session Reconfiguration.
Chapter 5 Installing <strong>Advanced</strong> <strong>Access</strong> Control 57<br />
Note:<br />
UNIX.<br />
Workspace Control is not supported with <strong>Citrix</strong> Presentation Server for<br />
You can use SmoothRoaming features with <strong>Advanced</strong> <strong>Access</strong> Control to enable<br />
users to move between client devices and gain access to all of their applications<br />
when they log on. To use SmoothRoaming, you must have the <strong>Advanced</strong> or<br />
Enterprise edition of <strong>Citrix</strong> Presentation Server 3.0 or 4.0 installed on a server in<br />
your environment. SmoothRoaming is not available in the <strong>Citrix</strong> Presentation<br />
Server Standard <strong>Edition</strong>.<br />
Requirements for Bypassing the Web Proxy<br />
If you want users to bypass the Web proxy when accessing a Web resource, you<br />
can allow them to access the resource using the Secure <strong>Access</strong> Client. For<br />
information about requirements for running the Secure <strong>Access</strong> Client, see “Client<br />
Requirements” on page 58.<br />
Third Party Portal Integration Requirements<br />
<strong>Access</strong> <strong>Gateway</strong> <strong>Advanced</strong> <strong>Edition</strong> supports integration with third party portals<br />
such as Microsoft Sharepoint to provide convenient access to Web resources, file<br />
shares, Web email, and published applications. To integrate Microsoft Sharepoint<br />
you must have one of the following versions installed in your environment:<br />
• Microsoft Sharepoint 2001<br />
• Microsoft Sharepoint 2003<br />
Typically, users can work with documents managed by Sharepoint using menudriven<br />
commands. When users access the Sharepoint site through the Web proxy,<br />
menu items that require ActiveX to function are not available. The following<br />
table describes these menu items:<br />
Menu Item Requires ActiveX Available to Users by<br />
Default<br />
View Properties No Yes<br />
Edit Properties No Yes<br />
Edit in Microsoft Office Yes No<br />
Delete No Yes<br />
Check In No Yes<br />
Check Out No Yes
58 <strong>Access</strong> <strong>Gateway</strong> <strong>Advanced</strong> <strong>Edition</strong> Administrator’s <strong>Guide</strong><br />
Menu Item Requires ActiveX Available to Users by<br />
Default<br />
Version History No Yes<br />
Alert Me No Yes<br />
Discuss Yes No<br />
Create Document Workspace No<br />
Yes<br />
Additionally, custom menu items that require ActiveX to function are not<br />
available to users when Sharepoint is accessed through the Web proxy.<br />
Client Requirements<br />
This section describes the client requirements for the platforms that <strong>Advanced</strong><br />
<strong>Access</strong> Control supports.<br />
Web Browser Requirements<br />
<strong>Advanced</strong> <strong>Access</strong> Control supports the use of Web browsers on the following<br />
platforms:<br />
Devices Operating System Web Browser<br />
Desktop Workstations<br />
Microsoft Windows:<br />
Windows XP Home/<br />
Professional SP2<br />
Windows 2000 Professional<br />
SP4<br />
Internet Explorer 6.0 SP1<br />
Netscape Navigator 8.0<br />
Mozilla Firefox 1.5<br />
Apple Macintosh OS X<br />
(English only) 10.3.9 or greater<br />
Safari 2.0<br />
Netscape Navigator 8.0<br />
Mozilla Firefox 1.5<br />
Red Hat Linux Netscape Navigator 8.0<br />
Mozilla Firefox 1.0.4
Chapter 5 Installing <strong>Advanced</strong> <strong>Access</strong> Control 59<br />
Devices Operating System Web Browser<br />
PDAs and Smartphones PalmOS 5.4<br />
(Palm Treo 650)<br />
Microsoft Windows Mobile 5.0<br />
(UT Starcom/Verizon Wireless<br />
XV6700)<br />
Microsoft Windows Mobile<br />
2003<br />
(HP iPAQ hw6515 Mobile<br />
Messenger)<br />
RIM BlackBerry<br />
(BlackBerry 7130e)<br />
Symbian (Japanese only)<br />
(Motorola FOMA M1000)<br />
PalmSource Web Browser 2.0<br />
Internet Explorer<br />
Internet Explorer<br />
Default Web Browser<br />
Default Web Browser<br />
Note: If you are using Apple Macintosh OS X, apply all updates, service packs,<br />
and patches to ensure Web-based features function properly.
60 <strong>Access</strong> <strong>Gateway</strong> <strong>Advanced</strong> <strong>Edition</strong> Administrator’s <strong>Guide</strong><br />
The following table describes localization support based on the platform and Web<br />
browser:<br />
Web Browser English Japanese German Spanish French<br />
Internet Explorer 6.0 SP1<br />
(Windows 2000/XP)<br />
Netscape Navigator 8.0<br />
(Windows 2000/XP)<br />
Netscape Navigator 7.1<br />
(Windows 2000/XP)<br />
Netscape Navigator 7.0<br />
(Windows 2000/XP)<br />
Mozilla Firefox 1.5<br />
(Windows 2000/XP)<br />
Yes Yes Yes Yes Yes<br />
Yes No No No No<br />
Yes Yes Yes No Yes<br />
Yes Yes Yes Yes Yes<br />
Yes Yes Yes Yes Yes<br />
Safari 2.0 (Mac OS X) Yes No No No No<br />
Netscape Navigator 7.1<br />
(Mac OS X)<br />
Netscape Navigator 7.0<br />
(Mac OS X)<br />
Mozilla Firefox 1.5<br />
(Mac OS X)<br />
Yes No No No No<br />
Yes No No No No<br />
Yes No No No No<br />
<strong>Advanced</strong> <strong>Access</strong> Control delivers content to client Web browsers by transmitting<br />
Web pages encoded with HTML and JavaScript. In most cases, standard client<br />
configurations can support <strong>Advanced</strong> <strong>Access</strong> Control.<br />
You must ensure the following settings are configured for each Web browser:<br />
• Enable execution of client-side JavaScript<br />
• Allow downloading of signed ActiveX controls<br />
• Allow downloading of Java applets if you provide access to published<br />
applications and restrict users to the Client for Java<br />
For more information about configuring Web browsers for use with <strong>Advanced</strong><br />
<strong>Access</strong> Control, see “Browser Security Considerations” on page 209.<br />
Live Edit Client Requirements<br />
The Live Edit Client is an ActiveX control that downloads automatically to a<br />
client Web browser to provide remote editing capabilities for Microsoft Office<br />
documents.
Chapter 5 Installing <strong>Advanced</strong> <strong>Access</strong> Control 61<br />
To use the Live Edit Client, the following software is required on users’<br />
workstations:<br />
• Microsoft Windows 2000 or XP with all service packs and critical updates<br />
• Microsoft Internet Explorer 6.0 SP1 with cookies enabled and permission<br />
to load signed ActiveX controls<br />
Note: Windows 2000 or XP users must be members of the Administrators or<br />
Power Users group to download and install ActiveX controls.<br />
Endpoint Analysis Client Requirements<br />
The Endpoint Analysis Client collects device information such as operating<br />
system, antivirus, or Web browser versions prior to logging on to <strong>Advanced</strong><br />
<strong>Access</strong> Control. The Endpoint Analysis Client can be distributed as an ActiveX<br />
control, a browser plug-in, or a Windows 32-bit application.<br />
To use the Endpoint Analysis Client, the following software is required on users’<br />
workstations:<br />
• Microsoft Windows 2000 or XP with all service packs and critical updates<br />
• Microsoft Internet Explorer 6.0 SP1 with cookies enabled and permission<br />
to load signed ActiveX controls if distributing the ActiveX control<br />
• Netscape Navigator 8.0 if distributing the browser plug-in<br />
• Mozilla Firefox 1.5 if distributing the browser plug-in<br />
Note: Windows 2000 or XP users must be members of the Administrators or<br />
Power Users group to download and install ActiveX controls.<br />
Secure <strong>Access</strong> Client Requirements<br />
The Secure <strong>Access</strong> Client acts as a proxy between the client computer and the<br />
<strong>Access</strong> <strong>Gateway</strong> appliance. The Secure <strong>Access</strong> Client can be distributed as a<br />
desktop application for Microsoft Windows or Linux operating systems. The<br />
Secure <strong>Access</strong> Client is downloaded and installed automatically when users enter<br />
the secure Web address of the <strong>Access</strong> <strong>Gateway</strong> appliance and a logon point in a<br />
Web browser.
62 <strong>Access</strong> <strong>Gateway</strong> <strong>Advanced</strong> <strong>Edition</strong> Administrator’s <strong>Guide</strong><br />
Note: Windows 2000 and XP users must be members of the Administrators or<br />
Power Users group to install applications. Linux users must have the tcl and tk<br />
packages installed to use the Secure <strong>Access</strong> Client.<br />
The Secure <strong>Access</strong> Client is not supported in double-hop DMZ deployments. If<br />
you deploy <strong>Access</strong> <strong>Gateway</strong> <strong>Advanced</strong> <strong>Edition</strong> in a double-hop DMZ, users<br />
access resources only through a browser-only connection.<br />
Console Requirements<br />
The <strong>Access</strong> Management Console is the configuration and administration tool for<br />
<strong>Advanced</strong> <strong>Access</strong> Control. You can install the console on an <strong>Advanced</strong> <strong>Access</strong><br />
Control server or on a standalone workstation.<br />
The Console requires at least:<br />
• Windows Server 2003, Standard <strong>Edition</strong>, Enterprise <strong>Edition</strong>, or Datacenter<br />
<strong>Edition</strong> with Service Pack 1; Microsoft Windows Server 2003, 64-bit<br />
<strong>Edition</strong>; Windows XP Professional with Service Pack 2; or Windows 2000<br />
Professional with Service Pack 4<br />
• 25 MB of hard drive space<br />
• .NET Framework Version 2.0<br />
• Microsoft Data <strong>Access</strong> Components (MDAC) Version 2.7 Refresh<br />
Important: If you install the console on the <strong>Advanced</strong> <strong>Access</strong> Control server,<br />
you must install the .NET Framework and MDAC 2.7 Refresh (mdac_typ.exe)<br />
before you install <strong>Advanced</strong> <strong>Access</strong> Control. The .NET Framework and MDAC<br />
2.7 Refresh executable files are located on the <strong>Advanced</strong> <strong>Access</strong> Control Server<br />
CD-ROM.<br />
Installation Overview<br />
This overview includes the basic steps for installing <strong>Advanced</strong> <strong>Access</strong> Control.<br />
<strong>Citrix</strong> supports deploying <strong>Advanced</strong> <strong>Access</strong> Control on a single server or on<br />
multiple servers.<br />
For important information to consider before installing <strong>Citrix</strong> products, review<br />
the readme files and administrator guides for components you plan to install. The<br />
readme files and administrator guides are available in the Documentation folder<br />
of the <strong>Advanced</strong> <strong>Access</strong> Control Server CD-ROM.
Chapter 5 Installing <strong>Advanced</strong> <strong>Access</strong> Control 63<br />
To get started with <strong>Advanced</strong> <strong>Access</strong> Control, complete the following steps:<br />
1. Before you begin installation, use Windows Update to ensure all <strong>Advanced</strong><br />
<strong>Access</strong> Control servers are patched with critical updates.<br />
2. Ensure your servers meet all requirements for components and features you<br />
plan to use.<br />
3. Install and configure <strong>Citrix</strong> Licensing. See the Readme for <strong>Citrix</strong> Licensing<br />
and the Getting Started with <strong>Citrix</strong> Licensing <strong>Guide</strong>, available in the<br />
Documentation folder of the <strong>Advanced</strong> <strong>Access</strong> Control Server CD-ROM.<br />
Note: <strong>Citrix</strong> recommends performing this step before installing<br />
<strong>Advanced</strong> <strong>Access</strong> Control to save time during server configuration and<br />
prevent user access delays due to licensing issues. However, you can install<br />
the licensing server during or after server configuration.<br />
4. Install <strong>Advanced</strong> <strong>Access</strong> Control and the <strong>Access</strong> Management Console.<br />
5. Install additional components, if applicable.<br />
6. After you install components, visit the <strong>Citrix</strong> Hotfixes and Service Packs<br />
Web site to download and install critical updates.<br />
Installing <strong>Advanced</strong> <strong>Access</strong> Control<br />
The <strong>Advanced</strong> <strong>Access</strong> Control Setup wizard guides you through the process of<br />
installing <strong>Advanced</strong> <strong>Access</strong> Control and its components.<br />
To install <strong>Advanced</strong> <strong>Access</strong> Control<br />
1. Insert the <strong>Advanced</strong> <strong>Access</strong> Control Server CD-ROM in the CD drive. The<br />
startup screen appears if autorun is enabled. If autorun is not enabled,<br />
navigate to the CD root directory and double-click AutoRun.exe.<br />
2. On the startup screen, click <strong>Access</strong> <strong>Gateway</strong> <strong>Advanced</strong> <strong>Edition</strong>.<br />
3. Read and accept the <strong>Citrix</strong> license agreement.
64 <strong>Access</strong> <strong>Gateway</strong> <strong>Advanced</strong> <strong>Edition</strong> Administrator’s <strong>Guide</strong><br />
4. Select any of the following components to install:<br />
• Server. Installs the <strong>Advanced</strong> <strong>Access</strong> Control server software,<br />
including the Logon Agent and server configuration tools.<br />
• Management console. Installs the configuration and management<br />
tool for <strong>Advanced</strong> <strong>Access</strong> Control and the other products in the <strong>Citrix</strong><br />
<strong>Access</strong> Suite.<br />
• <strong>Access</strong> Management Console - Licensing. Installs the Licensing<br />
Console snap-in. For more information about this snap-in, see “The<br />
<strong>Access</strong> Management Console User Interface” on page 82.<br />
• <strong>Access</strong> Management Console - Diagnostics. Installs the Diagnostic<br />
Facility Console snap-in. You do not need to install this component<br />
unless requested to do so by a <strong>Citrix</strong> Technical Support<br />
representative. For more information about this snap-in, see “The<br />
<strong>Access</strong> Management Console User Interface” on page 82.<br />
5. Follow the on-screen instructions to complete the Setup wizard.<br />
As <strong>Advanced</strong> <strong>Access</strong> Control is installed, a message box displays the progress.<br />
When the installation is complete, you can configure the server with the Server<br />
Configuration utility or you can install <strong>Advanced</strong> <strong>Access</strong> Control on other<br />
servers.<br />
To begin configuring your server, click Finish. For more information about<br />
configuring your server, see “Configuring Your Server” on page 76.<br />
Troubleshooting the Installation<br />
During installation, <strong>Advanced</strong> <strong>Access</strong> Control creates the log file<br />
CTXMSAM40_Install.log that you can use to troubleshoot the server installation.<br />
This log file is written to a temporary folder by default. To define the location of<br />
this folder, <strong>Advanced</strong> <strong>Access</strong> Control checks the following environment<br />
variables:<br />
• TMP<br />
• TEMP<br />
• USERPROFILE<br />
• windir<br />
The first valid path that Windows finds among these variables becomes the<br />
location of the installation log files.<br />
You can override this default path by typing /logfilepath folder_path at a<br />
command prompt, where folder_path is the location where you want to store the<br />
installation log files.
Chapter 5 Installing <strong>Advanced</strong> <strong>Access</strong> Control 65<br />
Uninstalling <strong>Advanced</strong> <strong>Access</strong> Control<br />
If you want to remove an <strong>Advanced</strong> <strong>Access</strong> Control component from a server, use<br />
Add/Remove Programs on the Control Panel. Depending on the options you<br />
selected during installation, remove these components in the following order:<br />
• <strong>Citrix</strong> <strong>Access</strong> <strong>Gateway</strong> 4.5 Server<br />
• <strong>Citrix</strong> <strong>Access</strong> <strong>Gateway</strong> 4.5 Console<br />
• <strong>Citrix</strong> License Server Administration<br />
• <strong>Citrix</strong> <strong>Access</strong> Management Console - Diagnostics<br />
• <strong>Citrix</strong> <strong>Access</strong> Management Console - Framework<br />
Note: If you remove the <strong>Citrix</strong> <strong>Access</strong> <strong>Gateway</strong> Console component before<br />
removing the <strong>Citrix</strong> <strong>Access</strong> <strong>Gateway</strong> Server component, the Server component<br />
cannot be removed successfully.<br />
The <strong>Citrix</strong> License Server Administration and <strong>Citrix</strong> <strong>Access</strong> Management<br />
Console - Diagnostics components can be removed at any time in the<br />
uninstallation. However, the <strong>Citrix</strong> <strong>Access</strong> Management Console - Framework<br />
component must be removed last.<br />
To remove <strong>Advanced</strong> <strong>Access</strong> Control components<br />
1. Choose Start > Control Panel > Add or Remove Programs.<br />
2. In Add or Remove Programs, select an <strong>Advanced</strong> <strong>Access</strong> Control<br />
component.<br />
3. Click Change or Remove. The wizard prompts for verification that you<br />
want to remove the software.<br />
4. Click Yes or Next to remove the component.
66 <strong>Access</strong> <strong>Gateway</strong> <strong>Advanced</strong> <strong>Edition</strong> Administrator’s <strong>Guide</strong>
CHAPTER 6<br />
Configuring <strong>Advanced</strong> <strong>Access</strong><br />
Control<br />
After you install <strong>Advanced</strong> <strong>Access</strong> Control, you configure each of your servers in<br />
the access server farm. The following topics discuss server configuration:<br />
• “Supported Configurations” on page 68<br />
• “Configuring Your Server” on page 76<br />
• “Steps to Configuring A Server” on page 77<br />
• “Enabling <strong>Advanced</strong> <strong>Access</strong> Control” on page 80<br />
• “Using the <strong>Access</strong> Management Console” on page 82<br />
• “Configuring Your Farm with the Getting Started Panel” on page 84<br />
• “Linking to <strong>Citrix</strong> Presentation Server” on page 85<br />
• “Configuring Logon Points” on page 89<br />
• “Logging on through the Logon Point” on page 92<br />
• “Updating Logon Page Information” on page 93<br />
• “Changing Expired Passwords” on page 93<br />
• “Setting the Default Logon Point” on page 93<br />
• “Removing Logon Points” on page 94<br />
• “Configuring the <strong>Access</strong> <strong>Gateway</strong>” on page 95<br />
• “Configuring Split Tunneling” on page 95<br />
• “Forwarding System Messages” on page 96<br />
• “Configuring Client Properties” on page 97<br />
• “Configuring Server Properties” on page 98<br />
• “Configuring ICA <strong>Access</strong> Control” on page 99
68 <strong>Access</strong> <strong>Gateway</strong> <strong>Advanced</strong> <strong>Edition</strong> Administrator’s <strong>Guide</strong><br />
• “Configuring Authentication with <strong>Citrix</strong> Presentation Server” on page 100<br />
Supported Configurations<br />
You can deploy <strong>Access</strong> <strong>Gateway</strong> <strong>Advanced</strong> <strong>Edition</strong> in a variety of ways to meet<br />
the needs of your organization. Supported configurations include:<br />
• One or more <strong>Access</strong> <strong>Gateway</strong> appliances deployed in the DMZ and the<br />
<strong>Advanced</strong> <strong>Access</strong> Control server deployed in the internal network<br />
• One or more <strong>Access</strong> <strong>Gateway</strong> appliances deployed behind a load balancer<br />
in the DMZ and the <strong>Advanced</strong> <strong>Access</strong> Control server deployed in the<br />
internal network<br />
• A double-hop DMZ scenario where one or more <strong>Access</strong> <strong>Gateway</strong><br />
appliances are deployed in the first DMZ, one or more <strong>Access</strong> <strong>Gateway</strong><br />
appliances are deployed in the second DMZ, and the <strong>Advanced</strong> <strong>Access</strong><br />
Control server is deployed in the internal network<br />
<strong>Access</strong> <strong>Gateway</strong> Configurations<br />
Depending on your organization’s needs, you can deploy one or multiple <strong>Access</strong><br />
<strong>Gateway</strong> appliances. If your deployment includes a load balancer with multiple<br />
appliances, you configure each appliance with the same FQDN as the load<br />
balancer but you do not specify <strong>Access</strong> <strong>Gateway</strong> failover servers. The load<br />
balancer handles failover as well as load balancing.<br />
If your deployment includes multiple appliances without a load balancer, you<br />
configure each appliance with a unique FQDN and specify the other appliances as<br />
failover servers. For more information about deploying the <strong>Access</strong> <strong>Gateway</strong><br />
appliance, see Getting Started with <strong>Citrix</strong> <strong>Access</strong> <strong>Gateway</strong> Standard <strong>Edition</strong>.<br />
<strong>Advanced</strong> <strong>Access</strong> Control Configurations<br />
<strong>Advanced</strong> <strong>Access</strong> Control supports the following access server farm<br />
configurations:<br />
• <strong>Advanced</strong> <strong>Access</strong> Control on a single server.<br />
Install <strong>Advanced</strong> <strong>Access</strong> Control on a single server. The server contains all<br />
required access server farm components, including the database server.<br />
• <strong>Advanced</strong> <strong>Access</strong> Control on a single server and Microsoft SQL Server<br />
on a separate server.<br />
Install Microsoft SQL Server on a separate server. Install <strong>Advanced</strong> <strong>Access</strong><br />
Control and specify the SQL database server for the server farm database.
Chapter 6 Configuring <strong>Advanced</strong> <strong>Access</strong> Control 69<br />
• <strong>Advanced</strong> <strong>Access</strong> Control on multiple servers.<br />
Install Microsoft SQL Server on a separate database server. Install<br />
<strong>Advanced</strong> <strong>Access</strong> Control on multiple servers.<br />
Double-Hop DMZ Configurations<br />
You can deploy two <strong>Access</strong> <strong>Gateway</strong> appliances in a double-hop DMZ to control<br />
access to corporate resources through <strong>Advanced</strong> <strong>Access</strong> Control. In a double-hop<br />
DMZ configuration, three firewalls divide the DMZ into two stages to provide an<br />
extra layer of security for the internal network. One <strong>Access</strong> <strong>Gateway</strong> resides in<br />
the first DMZ while one or more <strong>Access</strong> <strong>Gateway</strong> appliances reside in the second<br />
DMZ. The <strong>Advanced</strong> <strong>Access</strong> Control server resides in the internal network.<br />
The <strong>Access</strong> <strong>Gateway</strong> in the first DMZ handles the client connections and<br />
performs the security functions of an SSL VPN. This <strong>Access</strong> <strong>Gateway</strong> encrypts<br />
the client connections, determines how clients are authenticated, and controls<br />
access to the servers in the internal network.<br />
The <strong>Access</strong> <strong>Gateway</strong> in the second DMZ serves as a proxy device. This <strong>Access</strong><br />
<strong>Gateway</strong> enables the ICA traffic to traverse the second DMZ to complete<br />
Presentation Server Client connections to the access server farm.<br />
Communications between the <strong>Access</strong> <strong>Gateway</strong> in the first DMZ and the Secure<br />
Ticket Authority (STA) in the internal network are also proxied through the<br />
<strong>Access</strong> <strong>Gateway</strong> Proxy in the second DMZ.<br />
Note: The term <strong>Access</strong> <strong>Gateway</strong> Proxy refers to the <strong>Access</strong> <strong>Gateway</strong> appliance<br />
deployed in the second DMZ.<br />
When <strong>Access</strong> <strong>Gateway</strong> <strong>Advanced</strong> <strong>Edition</strong> is deployed in a double-hop DMZ<br />
configuration, the <strong>Access</strong> <strong>Gateway</strong> appliance in the first DMZ can communicate<br />
with any number of appliances in the second DMZ. However, the <strong>Access</strong><br />
<strong>Gateway</strong> Proxy in the second DMZ can communicate with only one appliance in<br />
the first DMZ. Notification messages from the <strong>Advanced</strong> <strong>Access</strong> Control server<br />
are proxied through the <strong>Access</strong> <strong>Gateway</strong> in the second DMZ to the appliance in<br />
the first DMZ. For more information about communication between the <strong>Access</strong><br />
<strong>Gateway</strong> and <strong>Access</strong> <strong>Gateway</strong> Proxy, see “Understanding the Relationship<br />
between the <strong>Access</strong> <strong>Gateway</strong> and the <strong>Access</strong> <strong>Gateway</strong> Proxy” on page 70.<br />
In a double-hop DMZ deployment, users connect to the <strong>Access</strong> <strong>Gateway</strong> in the<br />
first DMZ with a Web browser and a <strong>Citrix</strong> Presentation Server Client. Users<br />
access the logon point on the <strong>Advanced</strong> <strong>Access</strong> Control server with a Web<br />
browser to access corporate resources. Users connect with a <strong>Citrix</strong> Presentation<br />
Server Client to use the resources to which they have access such as published<br />
applications.
70 <strong>Access</strong> <strong>Gateway</strong> <strong>Advanced</strong> <strong>Edition</strong> Administrator’s <strong>Guide</strong><br />
Important: The Secure <strong>Access</strong> Client is not supported in a double-hop DMZ<br />
deployment. You cannot use the Secure <strong>Access</strong> Client to access network<br />
resources when <strong>Access</strong> <strong>Gateway</strong> appliances are deployed in a double-hop DMZ<br />
configuration.<br />
Understanding the Relationship between the <strong>Access</strong><br />
<strong>Gateway</strong> and the <strong>Access</strong> <strong>Gateway</strong> Proxy<br />
Although the <strong>Access</strong> <strong>Gateway</strong> in the first DMZ can communicate with any<br />
number of <strong>Access</strong> <strong>Gateway</strong> Proxy appliances in the second DMZ, the <strong>Access</strong><br />
<strong>Gateway</strong> Proxy in the second DMZ can communicate with only one <strong>Access</strong><br />
<strong>Gateway</strong> in the first DMZ. If you deploy multiple <strong>Access</strong> <strong>Gateway</strong> appliances in<br />
the first DMZ, you should configure each appliance to communicate only with<br />
the <strong>Access</strong> <strong>Gateway</strong> Proxy that is configured to communicate with that specific<br />
<strong>Access</strong> <strong>Gateway</strong>.<br />
For example, an administrator has two <strong>Access</strong> <strong>Gateway</strong> appliances in the first<br />
DMZ (named Appliance 1 and Appliance 2) and four <strong>Access</strong> <strong>Gateway</strong> Proxy<br />
appliances in the second DMZ (named Appliance 4, Appliance 5, Appliance 6,<br />
and Appliance 7). The administrator configures Appliances 4 and 5 to<br />
communicate with Appliance 1; and Appliances 6 and 7 communicate with<br />
Appliance 2, as illustrated below.
Chapter 6 Configuring <strong>Advanced</strong> <strong>Access</strong> Control 71<br />
When configuring Appliance 1 in the first DMZ, the administrator enables<br />
communication only with the <strong>Access</strong> <strong>Gateway</strong> Proxy that is configured to<br />
communicate with Appliance 1. Therefore, the administrator configures<br />
Appliance 1 to communicate with Appliances 4 and 5 only. Likewise, the<br />
administrator configures Appliance 2 to communicate with Appliances 6 and 7<br />
only. The illustration below shows this configuration.<br />
In this example, each <strong>Access</strong> <strong>Gateway</strong> in the first DMZ communicates with a<br />
subset of the <strong>Access</strong> <strong>Gateway</strong> Proxy appliances in the second DMZ. This ensures<br />
the Proxy appliances are able to respond to the appropriate <strong>Access</strong> <strong>Gateway</strong> in the<br />
first DMZ. Otherwise, notifications from the <strong>Advanced</strong> <strong>Access</strong> Control server<br />
would be lost and users could not log on and use corporate resources.<br />
Deploying Double-Hop DMZ Configurations<br />
Deploying <strong>Access</strong> <strong>Gateway</strong> <strong>Advanced</strong> <strong>Edition</strong> in a double-hop DMZ<br />
configuration involves the following tasks:<br />
• Installing the <strong>Access</strong> <strong>Gateway</strong> appliances in the first and second DMZs.<br />
• Adding the IP addresses and FQDNs of the <strong>Advanced</strong> <strong>Access</strong> Control<br />
server, the <strong>Access</strong> <strong>Gateway</strong> in the first DMZ, and the <strong>Access</strong> <strong>Gateway</strong><br />
Proxy in the second DMZ to the Hosts file on the <strong>Access</strong> <strong>Gateway</strong><br />
appliances in both DMZs and the <strong>Advanced</strong> <strong>Access</strong> Control server. This<br />
task is required if you are not using DNS in your environment.
72 <strong>Access</strong> <strong>Gateway</strong> <strong>Advanced</strong> <strong>Edition</strong> Administrator’s <strong>Guide</strong><br />
• Configuring the <strong>Access</strong> <strong>Gateway</strong> Proxy in the second DMZ to<br />
communicate with the <strong>Access</strong> <strong>Gateway</strong> in the first DMZ and the <strong>Advanced</strong><br />
<strong>Access</strong> Control server.<br />
• Configuring the <strong>Access</strong> <strong>Gateway</strong> in the first DMZ to communicate with the<br />
<strong>Access</strong> <strong>Gateway</strong> Proxy in the second DMZ.<br />
• Configuring the <strong>Access</strong> <strong>Gateway</strong> in the first DMZ to communicate with the<br />
<strong>Advanced</strong> <strong>Access</strong> Control server.<br />
Important: To deploy this configuration correctly, you must perform these<br />
tasks in the specified order. For example, if you configure the <strong>Access</strong> <strong>Gateway</strong> in<br />
the first DMZ before you configure the <strong>Access</strong> <strong>Gateway</strong> Proxy in the second<br />
DMZ, you will receive errors and communication between the appliances will not<br />
occur even if all the settings are correctly configured.<br />
Step 1: Installing <strong>Access</strong> <strong>Gateway</strong> Appliances<br />
The <strong>Access</strong> <strong>Gateway</strong> Standard <strong>Edition</strong> Administrator’s <strong>Guide</strong> describes in detail<br />
the process for installing the <strong>Access</strong> <strong>Gateway</strong> in the first DMZ and the <strong>Access</strong><br />
<strong>Gateway</strong> Proxy in the second DMZ. After you install these appliances, proceed to<br />
Step 2.<br />
Step 2: Adding Entries to the Hosts Files on the <strong>Access</strong> <strong>Gateway</strong><br />
and <strong>Advanced</strong> <strong>Access</strong> Control Server<br />
The Hosts files on the <strong>Access</strong> <strong>Gateway</strong> appliances and the <strong>Advanced</strong> <strong>Access</strong><br />
Control server consist of entries that are used to resolve FQDNs to IP addresses.<br />
If you are not using DNS in your double-hop DMZ configuration, you must add<br />
these entries.<br />
Use the Administration Tool to add the following entries to the Hosts file:<br />
• On the <strong>Access</strong> <strong>Gateway</strong>, add the FQDNs and IP addresses of the <strong>Access</strong><br />
<strong>Gateway</strong> Proxy in the second DMZ and the <strong>Advanced</strong> <strong>Access</strong> Control<br />
server<br />
• On the <strong>Access</strong> <strong>Gateway</strong> Proxy, add the FQDNs and IP addresses of the<br />
<strong>Access</strong> <strong>Gateway</strong> in the first DMZ and the <strong>Advanced</strong> <strong>Access</strong> Control server<br />
On the <strong>Advanced</strong> <strong>Access</strong> Control server, use a text editor to add the FQDNs and<br />
IP addresses of the <strong>Access</strong> <strong>Gateway</strong> appliances in both DMZs to the Hosts file.<br />
To add entries to the Hosts file on the <strong>Access</strong> <strong>Gateway</strong><br />
1. From the Administration Tool, click the <strong>Access</strong> <strong>Gateway</strong> Cluster tab and<br />
then expand the window for the <strong>Access</strong> <strong>Gateway</strong> in the first DMZ.
Chapter 6 Configuring <strong>Advanced</strong> <strong>Access</strong> Control 73<br />
2. Click the Name Service Providers tab.<br />
3. Under Edit the HOSTS file, in IP address, enter the IP address of the<br />
<strong>Access</strong> <strong>Gateway</strong> Proxy installed in the second DMZ.<br />
4. In FQDN, enter the FQDN you want to associate with the IP address you<br />
entered in the previous step. Click Add.<br />
5. Repeat Steps 3 and 4 to add entries for any remaining <strong>Access</strong> <strong>Gateway</strong><br />
Proxy appliances installed in the second DMZ and for the <strong>Advanced</strong><br />
<strong>Access</strong> Control server.<br />
To add entries to the Hosts file on the <strong>Advanced</strong> <strong>Access</strong> Control server<br />
1. In Windows Explorer, locate the Hosts file in the<br />
%SystemRoot\system32\drivers\etc directory.<br />
2. Open the file using a text editor.<br />
3. On a separate line, type the IP address and associated FQDN of each<br />
appliance.<br />
4. Save the Hosts file.<br />
5. Repeat Steps 1 through 4 for each <strong>Advanced</strong> <strong>Access</strong> Control server in your<br />
farm.<br />
Step 3: Configuring Communication with the <strong>Access</strong> <strong>Gateway</strong><br />
Proxy and <strong>Advanced</strong> <strong>Access</strong> Control<br />
For a double-hop DMZ configuration, you must first configure the <strong>Access</strong><br />
<strong>Gateway</strong> Proxy in the second DMZ to communicate with the <strong>Access</strong> <strong>Gateway</strong> in<br />
the first DMZ and with the <strong>Advanced</strong> <strong>Access</strong> Control server in the internal<br />
network. After you complete this step, the <strong>Access</strong> <strong>Gateway</strong> Proxy is ready to<br />
establish communication with the <strong>Access</strong> <strong>Gateway</strong> in the first DMZ.<br />
Note: You can configure the <strong>Access</strong> <strong>Gateway</strong> Proxy to communicate with only<br />
one <strong>Access</strong> <strong>Gateway</strong> in the first DMZ. For more information about<br />
communication between the <strong>Access</strong> <strong>Gateway</strong> and <strong>Access</strong> <strong>Gateway</strong> Proxy, see<br />
“Understanding the Relationship between the <strong>Access</strong> <strong>Gateway</strong> and the <strong>Access</strong><br />
<strong>Gateway</strong> Proxy” on page 70.<br />
To configure communication between the <strong>Access</strong> <strong>Gateway</strong> Proxy and the<br />
<strong>Access</strong> <strong>Gateway</strong><br />
If you have multiple appliances installed in the second DMZ, perform this<br />
procedure on each appliance.
74 <strong>Access</strong> <strong>Gateway</strong> <strong>Advanced</strong> <strong>Edition</strong> Administrator’s <strong>Guide</strong><br />
1. From the Administration Tool, select the <strong>Access</strong> <strong>Gateway</strong> Cluster tab and<br />
then expand the window for the appliance in the second DMZ.<br />
2. On the General Networking tab, in DMZ Configuration, select Second<br />
hop in double DMZ.<br />
3. In Protocol, select either SOCKS over SSL or SOCKS.<br />
4. In Port, the default port is either 443 (for secure connections) or 1080 (for<br />
unsecure connections).<br />
5. Select the <strong>Advanced</strong> <strong>Access</strong> Control check box.<br />
6. In FQDN of the first appliance in the DMZ, type the FQDN or IP address<br />
of the <strong>Access</strong> <strong>Gateway</strong> in the first DMZ. If you are using the SOCKS over<br />
SSL protocol, you must type the FQDN address. If you are using the<br />
SOCKS protocol, you can type either the FQDN or IP address.<br />
7. Click Submit and restart the <strong>Access</strong> <strong>Gateway</strong> Proxy.<br />
After you configure the <strong>Access</strong> <strong>Gateway</strong> Proxy, you can configure the <strong>Access</strong><br />
<strong>Gateway</strong> in the first DMZ.<br />
Step 4: Configuring Communication between the <strong>Access</strong><br />
<strong>Gateway</strong> and <strong>Access</strong> <strong>Gateway</strong> Proxy<br />
In a double-hop DMZ configuration, the <strong>Access</strong> <strong>Gateway</strong> in the first DMZ<br />
communicates with the <strong>Access</strong> <strong>Gateway</strong> Proxy in the second DMZ to deliver<br />
requests to the <strong>Advanced</strong> <strong>Access</strong> Control server in the internal network.<br />
Note: If you have multiple <strong>Access</strong> <strong>Gateway</strong> appliances installed in the first<br />
DMZ, you will need to configure each of these appliances to communicate with a<br />
subset of <strong>Access</strong> <strong>Gateway</strong> Proxy appliances. For more information, see<br />
“Understanding the Relationship between the <strong>Access</strong> <strong>Gateway</strong> and the <strong>Access</strong><br />
<strong>Gateway</strong> Proxy” on page 70.<br />
To configure communication between the <strong>Access</strong> <strong>Gateway</strong> and <strong>Access</strong><br />
<strong>Gateway</strong> Proxy<br />
1. From the Administration Tool, click the <strong>Access</strong> <strong>Gateway</strong> Cluster tab and<br />
then expand the window for the <strong>Access</strong> <strong>Gateway</strong> in the first DMZ.<br />
2. On the General Networking tab, in DMZ Configuration, select First hop<br />
in double DMZ.<br />
3. Select the Configure for <strong>Advanced</strong> <strong>Access</strong> Control check box. Click<br />
Add.
Chapter 6 Configuring <strong>Advanced</strong> <strong>Access</strong> Control 75<br />
4. In the Add appliance from second hop window, complete the following:<br />
• FQDN or IP address. Enter the FQDN or IP address of the <strong>Access</strong><br />
<strong>Gateway</strong> Proxy installed in the second DMZ. If you are using the<br />
SOCKS over SSL protocol, you must enter the FQDN address. If you<br />
are using the SOCKS protocol, you can enter either the FQDN or IP<br />
address.<br />
Note: This FQDN or IP address is also used by the <strong>Advanced</strong><br />
<strong>Access</strong> Control server to communicate with the <strong>Access</strong> <strong>Gateway</strong><br />
Proxy. When the <strong>Advanced</strong> <strong>Access</strong> Control server registers the<br />
<strong>Access</strong> <strong>Gateway</strong> in the first DMZ, the <strong>Gateway</strong> Appliances node in<br />
the <strong>Access</strong> Management Console displays the <strong>Access</strong> <strong>Gateway</strong><br />
Proxy’s information.<br />
• Port. The default port for a SOCKS over SSL connection is 443. The<br />
default port for a SOCKS connection is 1080. You can change the<br />
default ports as necessary.<br />
• Protocol. Select SOCKS over SSL if you want to secure the SOCKS<br />
connection to the <strong>Access</strong> <strong>Gateway</strong> Proxy in the second DMZ with<br />
SSL. Select SOCKS if you want this connection to be unsecured.<br />
• Second hop appliance MAC address. Enter the MAC address of the<br />
network card associated with Interface 0 on the <strong>Access</strong> <strong>Gateway</strong><br />
Proxy installed in the second DMZ.<br />
5. Click Validate to verify that the <strong>Access</strong> <strong>Gateway</strong> in the first DMZ can<br />
connect to the <strong>Access</strong> <strong>Gateway</strong> Proxy in the second DMZ using the<br />
specified address, protocol, and port.<br />
6. Repeat Steps 3 through 5 to add more appliances to the Appliances in<br />
second hop list.<br />
Note: The <strong>Access</strong> <strong>Gateway</strong> in the first DMZ uses the Appliances in<br />
second hop list to load balance connections to the appliances installed in the<br />
second DMZ.<br />
7. Click Submit and restart the <strong>Access</strong> <strong>Gateway</strong>.
76 <strong>Access</strong> <strong>Gateway</strong> <strong>Advanced</strong> <strong>Edition</strong> Administrator’s <strong>Guide</strong><br />
Step 5: Configuring Communication between the <strong>Access</strong><br />
<strong>Gateway</strong> and <strong>Advanced</strong> <strong>Access</strong> Control<br />
In a double-hop DMZ configuration, the <strong>Access</strong> <strong>Gateway</strong> in the first DMZ<br />
communicates with the <strong>Advanced</strong> <strong>Access</strong> Control server through the <strong>Access</strong><br />
<strong>Gateway</strong> Proxy in the second DMZ. To configure the <strong>Access</strong> <strong>Gateway</strong> in the first<br />
DMZ to communicate with the <strong>Advanced</strong> <strong>Access</strong> Control server, see “Enabling<br />
<strong>Advanced</strong> <strong>Access</strong> Control” on page 80 for instructions.<br />
Changing the Server Configuration<br />
You can make changes to the access server farm configuration at any time from<br />
the console. When you install more than one <strong>Advanced</strong> <strong>Access</strong> Control server in<br />
an access server farm, you can configure additional servers to provide recovery,<br />
enhance performance, and increase the server farm’s capacity to support<br />
additional users. For more information about managing <strong>Advanced</strong> <strong>Access</strong><br />
Control servers, see “Managing Your <strong>Access</strong> <strong>Gateway</strong> Environment” on page<br />
213.<br />
Configuring Your Server<br />
After you install <strong>Advanced</strong> <strong>Access</strong> Control, you configure your servers using the<br />
Server Configuration utility. This section describes the following configuration<br />
tasks:<br />
• Creating an access server farm<br />
• Selecting a farm database and specifying a database server<br />
• Specifying the <strong>Citrix</strong> Licensing Server<br />
• Selecting a Web site path and securing Logon Agent traffic<br />
• Enabling <strong>Advanced</strong> <strong>Access</strong> Control<br />
Server Configuration Overview<br />
The Server Configuration utility allows you to perform preliminary configuration<br />
tasks such as creating an access server farm and specifying a license server.<br />
This utility sets up the account you specify as the service account. It adds the<br />
account to the local Administrators group and grants the following local security<br />
policy rights:<br />
• Act as part of the operating system<br />
• Log on as a batch job
Chapter 6 Configuring <strong>Advanced</strong> <strong>Access</strong> Control 77<br />
• Log on as a service<br />
Important: The Server Configuration utility cannot create a SQL user account<br />
for access to the farm database. You must create an account in SQL Enterprise<br />
Manager before you change the user account for database access. The database<br />
user account must have System Administrator privileges.<br />
The Server Configuration utility does not add the service account to network<br />
shares.<br />
The Server Configuration utility does not remove previous service accounts from<br />
the local security policy or network shares. If this is a security concern, remove<br />
the old accounts after updating the account information with the utility.<br />
The Server Configuration utility performs the following operations:<br />
• Verifies all account information<br />
• Updates services<br />
• Stops <strong>Advanced</strong> <strong>Access</strong> Control services<br />
• Starts <strong>Advanced</strong> <strong>Access</strong> Control services<br />
• Updates internal service account information<br />
• Updates internal database account information<br />
• Synchronizes the access server farm<br />
Steps to Configuring A Server<br />
After installing <strong>Advanced</strong> <strong>Access</strong> Control, you can configure a server with the<br />
Server Configuration Utility.<br />
To run the Server Configuration utility<br />
Click Start > Programs > <strong>Citrix</strong> > <strong>Access</strong> <strong>Gateway</strong> > Server Configuration.<br />
Creating or Joining an <strong>Access</strong> Server Farm<br />
When you install <strong>Advanced</strong> <strong>Access</strong> Control on a server, you can create a new<br />
access server farm or add the server to an existing access server farm.<br />
• Create a new access server farm<br />
Choose this option if you are creating an access server farm. The access<br />
server farm name becomes the SQL Server database name. Choosing this
78 <strong>Access</strong> <strong>Gateway</strong> <strong>Advanced</strong> <strong>Edition</strong> Administrator’s <strong>Guide</strong><br />
option requires you to enter licensing, service account, and database<br />
information.<br />
• Join an existing access server farm<br />
Choose this option if you are adding a server to an existing access server<br />
farm. Choosing this option requires you to enter service account and<br />
database information.<br />
Selecting a Database<br />
When you create an access server farm, the Server Configuration utility prompts<br />
you to specify whether to use an existing SQL Server database or to install a local<br />
database engine. The database server stores the configuration data for the access<br />
server farm.<br />
• Microsoft SQL Server<br />
Choose this option to use a supported version of Microsoft SQL Server as<br />
the database server for the access server farm. SQL Server can run on the<br />
same server running <strong>Advanced</strong> <strong>Access</strong> Control or on a separate database<br />
server.<br />
Important: If you want to select a SQL Server database, be sure the SQL<br />
Service is running on the server you want to specify. If the SQL Service is<br />
not running, the Server Configuration utility cannot detect the server.<br />
• Microsoft SQL Server Express<br />
Choose this option if you want <strong>Advanced</strong> <strong>Access</strong> Control to install the<br />
necessary components for a local database server and create a database for<br />
the access server farm. The Server Configuration utility searches for an<br />
instance of SQL Server Express labeled <strong>Citrix</strong>AAC. If this instance is not<br />
found, the Server Configuration utility installs this instance for you.<br />
Note: Use the Microsoft SQL Server Express option for a pilot<br />
deployment of <strong>Advanced</strong> <strong>Access</strong> Control. <strong>Citrix</strong> recommends the use of<br />
Microsoft SQL Server for large-scale deployments.<br />
Specifying an Existing Database Server<br />
If you select Microsoft SQL Server as your database, the Server Configuration<br />
utility prompts you to specify the server on which SQL Server is installed.<br />
• Farm database server. Type the name of the database server.
Chapter 6 Configuring <strong>Advanced</strong> <strong>Access</strong> Control 79<br />
• <strong>Access</strong> server farm name. Type the name of the access server farm you<br />
want to create or join.<br />
• Use the Service Account to access the configuration database. Choose<br />
this option to use the <strong>Advanced</strong> <strong>Access</strong> Control service account credentials<br />
to access the SQL database.<br />
• Use SQL Authentication to access the configuration database. Choose<br />
this option to use the SQL database account credentials to access the SQL<br />
database. If you choose this option, you must also enter the database user<br />
name and password.<br />
Specifying a License Server<br />
If you are creating a new access server farm, the Server Configuration utility<br />
prompts you to identify the license server you want to use to validate your<br />
installation of <strong>Advanced</strong> <strong>Access</strong> Control. You must select one of the following<br />
options to continue server configuration.<br />
• I would like to use an existing license server. Choose this option if you<br />
want to specify a license server that you installed directly. In the Host<br />
name box, type the name of the license server you want to use. If the<br />
license server uses a port other than 27000, clear the Use default port<br />
check box and then type the correct port in the License server port box.<br />
• I would like to install a new license server on this computer. Choose this<br />
option if you want to install a license server on the same machine as the<br />
server running <strong>Advanced</strong> <strong>Access</strong> Control. When you complete the server<br />
configuration, <strong>Advanced</strong> <strong>Access</strong> Control installs the license server.<br />
• I do not wish to configure licensing at this time. Choose this option if you<br />
want to specify a license server later. If you do not specify a license server,<br />
users will receive an “<strong>Access</strong> Denied” message when they attempt to log on<br />
to <strong>Advanced</strong> <strong>Access</strong> Control.<br />
Selecting a Web Site Path<br />
The Web site path is the location where all Web content for <strong>Advanced</strong> <strong>Access</strong><br />
Control is installed. Review the Web site path that <strong>Advanced</strong> <strong>Access</strong> Control<br />
detects to ensure it is valid for your deployment.<br />
To change the physical path<br />
1. Select the Web site you want to change.<br />
2. Click the Use custom path for web content check box.<br />
3. In the Path box, type the physical path you want to use for the Web site.<br />
You can also click Browse to navigate to the directory you want to specify.
80 <strong>Access</strong> <strong>Gateway</strong> <strong>Advanced</strong> <strong>Edition</strong> Administrator’s <strong>Guide</strong><br />
Securing Web Site Traffic with SSL<br />
When you select a Web site path, you can also enable the Secure Sockets Layer<br />
(SSL) protocol to secure communication with the Logon Agent.<br />
To secure Web site traffic, click the Secure traffic between the Logon Agent<br />
and the Authentication Service check box.<br />
Important: You must have the required digital certificates installed on the<br />
server before configuring <strong>Advanced</strong> <strong>Access</strong> Control. This check box is not<br />
enabled unless SSL is enabled on the server.<br />
Finishing Server Configuration<br />
The Server Configuration utility displays a summary of your selected options and<br />
configuration settings. After you review the summary, click Next to initiate server<br />
configuration. When configuration is complete, click Finish and proceed to<br />
enabling <strong>Advanced</strong> <strong>Access</strong> Control to manage the <strong>Access</strong> <strong>Gateway</strong> appliance.<br />
Enabling <strong>Advanced</strong> <strong>Access</strong> Control<br />
To use the granular access control features of <strong>Advanced</strong> <strong>Access</strong> Control, you<br />
must enable the <strong>Access</strong> <strong>Gateway</strong> appliance to communicate with the <strong>Advanced</strong><br />
<strong>Access</strong> Control server.<br />
Note: If you are deploying <strong>Access</strong> <strong>Gateway</strong> <strong>Advanced</strong> <strong>Edition</strong> in a double-hop<br />
DMZ deployment, you enable communication with <strong>Advanced</strong> <strong>Access</strong> Control<br />
after several other tasks are completed. For more information about these<br />
additional tasks, see “Double-Hop DMZ Configurations” on page 69.<br />
To enable communication with <strong>Advanced</strong> <strong>Access</strong> Control, you perform the<br />
following tasks using the <strong>Access</strong> <strong>Gateway</strong> Administration Tool:<br />
• In the Name Service Providers tab, enter the DNS and WINS information<br />
for your <strong>Advanced</strong> <strong>Access</strong> Control server.<br />
• In the Routes tab, configure the IP routes as needed.<br />
• In the <strong>Advanced</strong> Options tab, select <strong>Advanced</strong> <strong>Access</strong> Control and enter the<br />
server information.
Chapter 6 Configuring <strong>Advanced</strong> <strong>Access</strong> Control 81<br />
After you perform these tasks and reboot the appliance, you use the<br />
Administration Tool to manage appliance-specific settings only. For more<br />
information about using the Administration Tool, see the <strong>Access</strong> <strong>Gateway</strong><br />
Standard <strong>Edition</strong> Administrator’s <strong>Guide</strong>.<br />
Important: When you enable <strong>Advanced</strong> <strong>Access</strong> Control to manage global<br />
gateway appliance settings, the corresponding settings in the Administration Tool<br />
are deactivated and any existing configuration values are removed. If you<br />
configured these settings with the Administration Tool before enabling <strong>Advanced</strong><br />
<strong>Access</strong> Control, you must configure these settings again in the <strong>Access</strong><br />
Management Console. For more information about configuring these settings in<br />
the console, see “Configuring the <strong>Access</strong> <strong>Gateway</strong>” on page 95.<br />
If you disable appliance administration with <strong>Advanced</strong> <strong>Access</strong> Control, the global<br />
gateway appliance settings you configured in the console are deactivated and<br />
existing configuration values are removed.<br />
To enable <strong>Advanced</strong> <strong>Access</strong> Control<br />
1. Launch the <strong>Access</strong> <strong>Gateway</strong> Administration Tool and select an <strong>Access</strong><br />
<strong>Gateway</strong> appliance.<br />
2. On the <strong>Access</strong> <strong>Gateway</strong> Cluster tab, click <strong>Advanced</strong> Options.<br />
3. To manage the <strong>Access</strong> <strong>Gateway</strong> cluster using the <strong>Access</strong> Management<br />
Console, select <strong>Advanced</strong> <strong>Access</strong> Control.<br />
4. In Server running <strong>Advanced</strong> <strong>Access</strong> Control, type the IP address or<br />
FQDN of the server that is running <strong>Advanced</strong> <strong>Access</strong> Control.<br />
Important: If you specify the FQDN of the server running <strong>Advanced</strong><br />
<strong>Access</strong> Control and you cannot connect to the server, ensure you have<br />
entered the DNS servers you want to use in the Name Service Providers tab<br />
of the Administration Tool. If you specify the IP address of the server<br />
running <strong>Advanced</strong> <strong>Access</strong> Control, you do not need to specify the DNS<br />
servers.<br />
5. To encrypt communication between the <strong>Access</strong> <strong>Gateway</strong> appliance and the<br />
<strong>Advanced</strong> <strong>Access</strong> Control server, select Secure server communication.<br />
6. Click Submit to save your changes.<br />
7. Restart the <strong>Access</strong> <strong>Gateway</strong>.
82 <strong>Access</strong> <strong>Gateway</strong> <strong>Advanced</strong> <strong>Edition</strong> Administrator’s <strong>Guide</strong><br />
Using the <strong>Access</strong> Management Console<br />
The <strong>Access</strong> Management Console extends your ability to manage your<br />
deployment by integrating many of the administrative features of your <strong>Citrix</strong><br />
products into the Microsoft Management Console (MMC). The <strong>Access</strong><br />
Management Console is a standalone snap-in to the MMC. Management<br />
functionality is provided through a number of management tools (extension snapins)<br />
that you can select when you install the <strong>Access</strong> Management Console or at<br />
any time later.<br />
Installing the <strong>Access</strong> Management Console<br />
Before installing any snap-ins to the <strong>Access</strong> Management Console, ensure that<br />
you installed the <strong>Access</strong> Management Console - Framework Version 4.5. If you<br />
try to install any snap-ins before installing the Framework on your server, the<br />
installation fails. You cannot install any snap-in if a newer version of the snap-in<br />
is present on your server. If you try to do so, the installation fails. Before you<br />
install an older version of a snap-in, first uninstall your existing snap-in.<br />
Users and Accounts<br />
You must be a <strong>Citrix</strong> administrator to use the <strong>Access</strong> Management Console. You<br />
should therefore ensure that the correct administrator privileges are in place<br />
before allowing others to use the console.<br />
Do not run the console in two sessions simultaneously on one computer using the<br />
same user account. Changes made on the console in one session can overwrite<br />
changes made in the other.<br />
Deploying the Console to Administrators<br />
To use the console to make changes to an <strong>Advanced</strong> <strong>Access</strong> Control deployment,<br />
administrators must have permission to run the <strong>Access</strong> <strong>Gateway</strong> Server COM+<br />
application. For more information about granting COM+ permissions, see<br />
“Securing the <strong>Access</strong> Management Console Using COM+” on page 215.<br />
The <strong>Access</strong> Management Console User Interface<br />
The main user interface of the <strong>Access</strong> Management Console consists of three<br />
panes:<br />
• The left pane contains the console tree.<br />
• The task pane in the middle displays administrative tasks and tools. This<br />
pane is not present in the MMC.
Chapter 6 Configuring <strong>Advanced</strong> <strong>Access</strong> Control 83<br />
• The details pane on the right displays information about your deployment<br />
items and associated tasks.<br />
The following nodes are available under the top-level node in the console tree:<br />
• Alerts. Lists the alerts created by all the items in your deployment. Doubleclick<br />
an alert to drill down to the affected item.<br />
• Search Results. Displays the results of any search that you performed.<br />
Click Search in the task pane to perform a standard or advanced search.<br />
• My Views. Allows you to customize the information that you display in the<br />
details pane.<br />
In addition, nodes are created by some <strong>Access</strong> Management Console snap-ins<br />
when they are installed. Depending on your <strong>Access</strong> Management Console<br />
installation, the following snap-ins are available:<br />
• Licensing. Launches the License Management Console that allows you to<br />
manage licenses for your <strong>Citrix</strong> products. For more information about the<br />
License Management Console, see the Getting Started with <strong>Citrix</strong><br />
Licensing <strong>Guide</strong>.<br />
• Diagnostic Facility. Creates and packages trace logs and other system<br />
information to assist <strong>Citrix</strong> Technical Support in diagnosing problems.<br />
Starting the <strong>Access</strong> Management Console<br />
To start the <strong>Access</strong> Management Console<br />
Click Start > Programs > <strong>Citrix</strong> > Management Consoles > <strong>Access</strong><br />
Management Console.<br />
Finding Items in Your Deployment Using<br />
Discovery<br />
Before you can use the <strong>Access</strong> Management Console to manage the items in your<br />
deployment, you must run discovery. Discovery is not equivalent to locating<br />
items that already exist in the console tree, which you perform using Search in the<br />
task pane. In contrast, discovery adds items to the console tree.<br />
You discover items using the Run discovery task. The first time you open the<br />
console, discovery runs automatically. At any stage afterwards, run discovery to<br />
locate newly installed products or components and to update the console if items<br />
were added to or removed from your deployment. For example, if another<br />
instance of the console was used to configure settings, you need to run discovery<br />
to add those updates.
84 <strong>Access</strong> <strong>Gateway</strong> <strong>Advanced</strong> <strong>Edition</strong> Administrator’s <strong>Guide</strong><br />
To run discovery for all components<br />
1. Select Suite Components in the console tree.<br />
2. Click Run discovery in the task pane.<br />
To run discovery for one component in the console tree, select the component and<br />
then click Run discovery.<br />
Running discovery is something that you should consider doing on a regular basis<br />
to ensure that you have the most up-to-date view of your deployment. Run<br />
discovery if:<br />
• You installed or removed an <strong>Access</strong> <strong>Gateway</strong> or <strong>Advanced</strong> <strong>Access</strong> Control<br />
item or component. The Console does not recognize any recently installed<br />
items or components until you run discovery.<br />
• Items are added to or removed from an existing deployment. The console<br />
tree, the details pane, and the available tasks are “refreshed” only after<br />
discovery is completed.<br />
• Your administrative privileges change or you change a custom<br />
administrator’s privileges. Modifications to privileges do not take effect in<br />
the console until you rerun discovery.<br />
Customizing Your Displays Using My Views<br />
You can create custom displays of the details pane called My Views. These are<br />
configurable displays that give you quick access to items you need to examine<br />
regularly or items in different parts of the console tree that you want to group in<br />
the same display. Instead of repeatedly browsing the console tree, you can place<br />
the items in a single, easily retrieved display. For example, you can create a My<br />
View to display policies for servers in different access server farms.<br />
Configuring Your Farm with the Getting Started Panel<br />
To help you configure your deployment, the Getting Started panel presents links<br />
to several wizards that guide you through tasks such as configuring email and<br />
access policies.<br />
To access the Getting Started Panel<br />
1. Select the <strong>Access</strong> <strong>Gateway</strong> node in the navigation pane.<br />
2. Under Other Tasks in the task pane, click Getting started.<br />
You can also right-click the <strong>Advanced</strong> <strong>Access</strong> Control node or the farm node in<br />
the console tree and then click All Tasks > Getting started.
Chapter 6 Configuring <strong>Advanced</strong> <strong>Access</strong> Control 85<br />
By default, the Getting Started panel appears when you click the <strong>Advanced</strong><br />
<strong>Access</strong> Control node. To prevent the Getting Started panel from appearing<br />
automatically, clear the Always show this page check box located near the<br />
bottom of the panel.<br />
Linking to <strong>Citrix</strong> Presentation Server<br />
You can link the access server farm to farms running <strong>Citrix</strong> Presentation Server.<br />
This allows you to offer published resources from <strong>Citrix</strong> Presentation Server<br />
through file type association or the Web Interface. When file type association is<br />
allowed by policies, opening a document launches it in an associated application<br />
running on a server.<br />
To link your access server farm to farms running <strong>Citrix</strong> Presentation Server, you:<br />
• Specify the farm(s) you want to link to your access server farm<br />
• Configure load balancing or failover if the server farm includes multiple<br />
servers<br />
• Configure address modes if the server farm is behind a firewall configured<br />
for Network Address Translation (NAT)<br />
Before you link your access server farm, ensure the following requirements are<br />
met in <strong>Citrix</strong> Presentation Server:<br />
• Published resources are assigned to the same user groups assigned to<br />
resources in the access server farm.<br />
• The option Allow connections made through <strong>Access</strong> <strong>Gateway</strong> is enabled<br />
for each published resource. This option appears in the access control<br />
settings of the published resource properties.<br />
• In each server’s properties, the option Trust requests sent to the XML<br />
Service is selected.<br />
Specifying Server Farms<br />
Create a list of the server farms that are available to users of <strong>Access</strong> <strong>Gateway</strong>.<br />
This list is used in logon point properties to specify which farms are available to<br />
users of the logon point. Each server farm you configure contains a list of servers<br />
you can use to specify load balancing or failover among servers within the farm.<br />
To specify server farms<br />
1. In the console tree, select the access server farm node and click Edit farm<br />
properties in Common Tasks.<br />
2. Select the Presentation Server Farm page and click New.
86 <strong>Access</strong> <strong>Gateway</strong> <strong>Advanced</strong> <strong>Edition</strong> Administrator’s <strong>Guide</strong><br />
3. In the <strong>Citrix</strong> Presentation Server farm name box, type the name or IP<br />
address of the farm to which you want to link your access server farm.<br />
Note: <strong>Advanced</strong> <strong>Access</strong> Control accepts server farm names up to 50<br />
characters long. If the server farm name is longer than 50 characters, type<br />
the IP address instead.<br />
4. If you want to secure the link between <strong>Advanced</strong> <strong>Access</strong> Control and <strong>Citrix</strong><br />
Presentation Server, select the Secure communication with the farm by<br />
applying a secure protocol check box.<br />
Note: To apply a secure protocol, you must have the appropriate client<br />
and server certificates installed on the <strong>Advanced</strong> <strong>Access</strong> Control servers<br />
and <strong>Access</strong> <strong>Gateway</strong> appliances.<br />
5. Click Next and then click Add.<br />
6. In the Server name box, type the machine name of the server running<br />
<strong>Citrix</strong> Presentation Server.<br />
Configuring Load Balance or Failover<br />
You can balance the load of requests sent to servers running <strong>Citrix</strong> Presentation<br />
Server. Requests follow the sequence of the server list in Presentation Server<br />
Farm Properties. The initial request goes to the first server on the list, the next<br />
request goes to the second server, and so on. After the last server, the process<br />
starts again at the top of the list.<br />
Important: Do not prioritize the data collector or master ICA browser server as<br />
the first server on the list.<br />
You can use the list to sequence failover in case connectivity to a server becomes<br />
unavailable. Use failover support to ensure continued access to published<br />
resources.<br />
The server list can sequence load balancing or failover support, but not both. By<br />
default, the server list is used for failover.<br />
To implement load balancing or failover support<br />
1. Select the access server farm node and click Edit farm properties.<br />
2. On the Presentation Server Farms page, select the farm and click Edit.<br />
The Presentation Server Farm Properties appear.
Chapter 6 Configuring <strong>Advanced</strong> <strong>Access</strong> Control 87<br />
3. On the Servers page, use Up and Down to change the sequence of servers.<br />
4. Select Load balance requests to servers or Set failover sequence of<br />
unavailable servers.<br />
5. To change the bypass interval, change the value displayed in minutes. The<br />
default is five minutes.<br />
Configuring Address Modes<br />
If your server farm is behind a firewall and the firewall is configured for Network<br />
Address Translation (NAT), you can define settings to determine the IP address of<br />
the server included in ICA files.<br />
To configure address modes for client IP addresses<br />
1. Select the access server farm node and click Edit farm properties.<br />
2. On the Presentation Server Farms page, select the farm and click Edit.<br />
3. On the Address Mode page, click New.<br />
4. In the Client IP Address box, type the incoming client IP address or range<br />
of IP addresses for client requests in dot address format (for example,<br />
255.255.255.255). For <strong>Access</strong> <strong>Gateway</strong>, the incoming address is the<br />
address of the <strong>Access</strong> <strong>Gateway</strong> appliance.<br />
5. Select the Server Address Mode from the list:<br />
• Normal. The IP address sent to the client is the actual address of the<br />
server. This is the default setting.<br />
• Alternate Address. The IP address sent to the client is the alternate<br />
address of the server. Alternate addresses are configured on the server<br />
running <strong>Citrix</strong> Presentation Server. To use this option, you must have<br />
a firewall with NAT enabled and alternate IP addresses assigned to<br />
the servers. For more information about setting alternate addresses,<br />
see the <strong>Citrix</strong> Presentation Server Administrator’s <strong>Guide</strong>.<br />
• Translated Address. The IP address sent to the client is based on the<br />
configured address translation mappings. For more information, see<br />
“Configuring Address Translation” on page 88.<br />
• <strong>Access</strong> <strong>Gateway</strong>. The IP address sent to the client is the actual<br />
address of the <strong>Access</strong> <strong>Gateway</strong> appliance. To use this option, you<br />
must also define the <strong>Access</strong> <strong>Gateway</strong> settings. For more information,<br />
see “Configuring the <strong>Access</strong> <strong>Gateway</strong> Address Mode” on page 88.<br />
You can assign addressing modes for specific IP addresses or a range of IP<br />
addresses. You can use asterisks as wildcards (such as 10.12.128.*) to indicate a<br />
range of IP addresses.
88 <strong>Access</strong> <strong>Gateway</strong> <strong>Advanced</strong> <strong>Edition</strong> Administrator’s <strong>Guide</strong><br />
Configuring Address Translation<br />
If your server farm is behind a firewall, you can hide internal server addresses by<br />
performing the following tasks:<br />
• Map the internal IP address of each server to an external IP address<br />
• Specify the client addresses that use the translated address<br />
Note: To use this option, you must have a firewall with Network Address<br />
Translation (NAT) enabled.<br />
To map the internal IP address of a server<br />
1. Select the access server farm node and click Edit farm properties.<br />
2. On the Presentation Server Farms page, select the farm and click Edit.<br />
The Presentation Server Farm Properties appear.<br />
3. On the Address Mode page, click Address Translation.<br />
4. Click New.<br />
5. Enter the internal IP address and port of the server running <strong>Citrix</strong><br />
Presentation Server.<br />
6. In the Translated address box, enter the external IP address and port that<br />
clients must use to connect to the server.<br />
7. On the Address Mode page, click New to open the New Client Address<br />
Mode dialog box. Add the client IP address or range of addresses for the<br />
clients that use the translated address you just configured. Select<br />
Translated Address from the Server Address Mode list.<br />
The Address Translation settings apply only to the specified client IP addresses<br />
on the Address Mode page.<br />
Configuring the <strong>Access</strong> <strong>Gateway</strong> Address Mode<br />
If you are providing applications through <strong>Citrix</strong> Presentation Server, you must<br />
configure the server address mode. The server address mode determines which<br />
server IP address is sent to users when they open applications from the farm<br />
running <strong>Citrix</strong> Presentation Server.<br />
To configure the <strong>Access</strong> <strong>Gateway</strong> address mode<br />
1. Select the access server farm and click Edit farm properties.<br />
2. On the Presentation Server Farms page, select the farm and click Edit.
Chapter 6 Configuring <strong>Advanced</strong> <strong>Access</strong> Control 89<br />
3. On the Address Mode page, click <strong>Access</strong> <strong>Gateway</strong>.<br />
4. Select the option to configure <strong>Access</strong> <strong>Gateway</strong>.<br />
5. Enter the <strong>Access</strong> <strong>Gateway</strong> server name (exactly as it appears on the server<br />
certificate) and port.<br />
6. If the servers in your server farm are behind a firewall and configured to<br />
use NAT alternate addresses, select the option to use alternate addresses.<br />
Associating <strong>Access</strong> Platform Sites<br />
If you display multiple sites within the <strong>Access</strong> Interface and want to preserve<br />
Workspace Control functions, you must select an <strong>Access</strong> Platform site to<br />
associate with a Presentation Server farm. After you configure and publish an<br />
<strong>Access</strong> Platform site as a Web resource, you can select the site from the Web<br />
Interface page of the farm properties. For more information, see “Displaying<br />
Multiple Sites and Caching Credentials” on page 160.<br />
Configuring Logon Points<br />
The logon point defines the logon page for users and specifies settings that are<br />
applied to user sessions. These initial settings include the required authentication<br />
strength, the clients to use, the home page, and the accessible server farms. User<br />
sessions inherit the properties of the logon point through which they connect.<br />
To determine the logon points you will need, consider:<br />
• The users who will be accessing your deployment. For example, users in a<br />
particular department may require their own logon point. Likewise, users<br />
with a specific relationship to your organization, such as partners, may<br />
require their own logon point.<br />
• The devices with which users access the logon point. For example, users<br />
who access resources with small form factor devices such as a PDA may<br />
require a logon point separate from the logon point accessed with<br />
workstations.<br />
• The policies you want to create that restrict access to resources based on the<br />
logon point used. For example, users who authenticate from a specific<br />
logon point can access specific resources that are unavailable when using a<br />
different logon point.<br />
For more information about using logon points in policies to control access to<br />
resources, see “Controlling <strong>Access</strong> Through Policies” on page 131.<br />
To configure a logon point in your deployment, you perform the following tasks:<br />
• Create the logon point using the console
90 <strong>Access</strong> <strong>Gateway</strong> <strong>Advanced</strong> <strong>Edition</strong> Administrator’s <strong>Guide</strong><br />
• Deploy the logon point using the Server Configuration utility<br />
To create a logon point<br />
1. In the console tree, select Logon Points.<br />
2. Under Common Tasks in the task pane, click Create logon point.<br />
3. Type a unique name and description for the new logon point.<br />
4. Select a home page from the following options:<br />
• Display the default navigation page. Displays the <strong>Access</strong> Interface,<br />
a built-in default home page for users, with tabs for email, file shares,<br />
and Web applications.<br />
• Display the home page application with the highest display<br />
priority. Displays the Web application listed at the top of the display<br />
order list. To change the display priority, click Set Display Order.<br />
5. On the Authentication and Authorization pages, select the authentication<br />
method and group authority you want to use when users log on. For more<br />
information about configuring authentication, see “Securing User<br />
Connections” on page 101.<br />
6. On the Presentation Server Farms page, add the farms that you want to<br />
make available to users through file type association. If you are using the<br />
Web Interface to deliver published applications, you do not need to add<br />
farms to the logon point. For more information about using the Web<br />
Interface with <strong>Advanced</strong> <strong>Access</strong> Control, see “Integrating <strong>Citrix</strong><br />
Presentation Server” on page 157.<br />
7. Configure options for sound, windows, and Workspace Control.<br />
Note: Workspace Control allows users to reconnect to their open<br />
applications. If users have pop-up blockers enabled, they are prompted to<br />
allow each application to open in a separate window.<br />
8. On the Clients page, select the clients you want to deploy to users during<br />
logon.<br />
9. On the Sessions Settings page, set the options for the method of prompting<br />
users for their domain and the number of days to warn users about<br />
password expiration.
Chapter 6 Configuring <strong>Advanced</strong> <strong>Access</strong> Control 91<br />
Note: Users who allow their passwords to expire cannot log on to<br />
<strong>Advanced</strong> <strong>Access</strong> Control. For more information about restoring access to<br />
these users, see “Changing Expired Passwords” on page 93.<br />
10. On the Session Timeouts page, set the interval, in minutes, for the<br />
following time-out settings:<br />
• Maximum time for VPN client sessions. The length of time a<br />
session using the Secure <strong>Access</strong> Client is allowed to remain active.<br />
The default value of zero means the session remains active<br />
indefinitely.<br />
• Maximum time for traffic inactivity before session ends. The<br />
length of time a browser-only session or a session using the Secure<br />
<strong>Access</strong> Client is allowed to remain active without any traffic activity<br />
detected. The default value is 20 minutes. You may want to increase<br />
this value if users experience excessive time-outs with features such<br />
as Live Edit that do not communicate with the <strong>Advanced</strong> <strong>Access</strong><br />
Control server to keep sessions active. If you enter zero for this<br />
setting, the session will remain active regardless of inactivity.<br />
• Maximum time for mouse and keyboard inactivity before VPN<br />
session ends. The length of time a session using the Secure <strong>Access</strong><br />
Client is allowed to remain active without any mouse or keyboard<br />
input detected. If you enter zero for this setting, the session will<br />
remain active regardless of inactivity.<br />
11. On the Visibility page, select whether to show the logon page to users<br />
logging on through the <strong>Access</strong> <strong>Gateway</strong> or to set conditions for showing the<br />
logon page to users logging on to <strong>Advanced</strong> <strong>Access</strong> Control directly. The<br />
default logon point is always visible to users logging on through the <strong>Access</strong><br />
<strong>Gateway</strong>. For more information about using conditions for showing the<br />
logon page, see “Setting Conditions for Showing the Logon Page” on page<br />
141.<br />
To deploy a logon point<br />
1. Click Start > Programs or All Programs > <strong>Citrix</strong> > <strong>Access</strong> <strong>Gateway</strong> ><br />
Server Configuration.<br />
2. From the Configured Logon Points page, select the logon point you want<br />
to deploy.<br />
3. Click Deploy.
92 <strong>Access</strong> <strong>Gateway</strong> <strong>Advanced</strong> <strong>Edition</strong> Administrator’s <strong>Guide</strong><br />
Renaming Logon Points<br />
If you rename an existing logon point, you must redeploy it to make it available to<br />
users. To redeploy a renamed logon point, open the Server Configuration utility<br />
and select the renamed logon point. Click Update to redeploy the logon point.<br />
Logging on through the Logon Point<br />
When you deploy a logon point, a logon point folder is created in a virtual<br />
directory named <strong>Citrix</strong>LogonPoint. A URL pointing to the logon point folder can<br />
be used to access the network. For example:<br />
https://appliancename/<strong>Citrix</strong>LogonPoint/logonpointname<br />
where appliancename is the FQDN or IP address of the <strong>Access</strong> <strong>Gateway</strong><br />
appliance and logonpointname is the name of the logon point folder.<br />
During installation, <strong>Advanced</strong> <strong>Access</strong> Control creates a logon point, called<br />
SampleLogonPoint, that you can use for testing. To access this logon point, you<br />
type the following URL:<br />
https://appliancename/<strong>Citrix</strong>LogonPoint/SampleLogonPoint<br />
where appliancename is the FQDN or IP address of the <strong>Access</strong> <strong>Gateway</strong><br />
appliance.<br />
Important: The sample logon point is designed for testing purposes only.<br />
Default policies created for the sample logon point allow all authenticated users<br />
to see the logon page and to log on. After testing your system, replace the sample<br />
logon point or edit these policies to comply with your network security<br />
guidelines. For more information, see “Controlling <strong>Access</strong> Through Policies” on<br />
page 131.<br />
Users can also access the default logon point by typing the following URL:<br />
https://appliancename/<br />
where appliancename is the FQDN or IP address of the <strong>Access</strong> <strong>Gateway</strong><br />
appliance. For more information about default logon points, see “Setting the<br />
Default Logon Point” on page 93.<br />
For more information about distributing logon points to users, see “Rolling Out<br />
<strong>Advanced</strong> <strong>Access</strong> Control to Users” on page 195.
Updating Logon Page Information<br />
Chapter 6 Configuring <strong>Advanced</strong> <strong>Access</strong> Control 93<br />
The <strong>Access</strong> <strong>Gateway</strong> stores copies of the Web pages and graphic files that<br />
comprise the logon pages users see when they access resources. You must update<br />
these files when you:<br />
• Deploy a new logon point<br />
• Customize an existing logon page<br />
• Redeploy a renamed logon point<br />
To update logon page files on the <strong>Access</strong> <strong>Gateway</strong><br />
1. From the console tree, expand Logon Points and select the logon point you<br />
want to update.<br />
2. In Common Tasks, click Refresh logon page information.<br />
If the <strong>Access</strong> <strong>Gateway</strong> is unavailable when you perform this task, the console<br />
displays an error message indicating the gateway appliance is out of date. If the<br />
<strong>Access</strong> <strong>Gateway</strong> becomes available when you rerun the task, the console displays<br />
a message indicating the update was successful.<br />
Changing Expired Passwords<br />
The Session Settings page in the logon point properties allows you to specify the<br />
number of days to warn users about password expiration. Users can change their<br />
password at any time during this period and continue accessing resources through<br />
the logon point. Users who allow their passwords to expire are denied access and<br />
are not prompted to change their expired passwords.<br />
To restore access to users with expired passwords, select the User must change<br />
password at next logon check box in the user’s Windows account properties.<br />
The next time the user attempts to log on to <strong>Advanced</strong> <strong>Access</strong> Control, the user is<br />
prompted to change the expired password.<br />
Setting the Default Logon Point<br />
Default logon points enable users to log on to the access server farm through the<br />
<strong>Access</strong> <strong>Gateway</strong> without specifying a logon point. You can designate a logon<br />
point as the default using the console. When you install <strong>Advanced</strong> <strong>Access</strong> Control<br />
the SampleLogonPoint is designated as the default logon point. Only one logon<br />
point can be designated as the default at any time.
94 <strong>Access</strong> <strong>Gateway</strong> <strong>Advanced</strong> <strong>Edition</strong> Administrator’s <strong>Guide</strong><br />
When you set a logon point as the default, the logon point becomes visible<br />
automatically to users logging on through the <strong>Access</strong> <strong>Gateway</strong>. If, at a later time,<br />
you set a different logon point as the default, the logon point remains visible to<br />
these users. If you want the logon point to be visible only to users logging on to<br />
<strong>Advanced</strong> <strong>Access</strong> Control within the corporate network, you must change the<br />
visibility settings in the logon point properties. For more information about<br />
configuring logon points, see “Configuring Logon Points” on page 89.<br />
To set a default logon point<br />
1. In the console tree, expand Logon Points and select the logon point you<br />
want to designate as the default.<br />
2. Under Common Tasks, click Set as default logon point.<br />
Removing Logon Points<br />
To remove a logon point from your deployment, you perform the following tasks:<br />
• Remove any policies associated with the logon point<br />
• Delete the logon point from the console<br />
• Remove the logon point’s virtual directory from the <strong>Advanced</strong> <strong>Access</strong><br />
Control server using the Server Configuration utility<br />
To delete a logon point from the console<br />
1. In the console tree, expand Logon Points and then select the logon point<br />
you want to delete.<br />
2. Under Common Tasks in the task pane, click Delete logon point.<br />
To remove a logon point’s virtual directory from the server<br />
1. Click Start > Programs or All Programs > <strong>Citrix</strong> > <strong>Access</strong> <strong>Gateway</strong> ><br />
Server Configuration.<br />
2. On the Configured Logon Points page, select the logon point you want to<br />
remove.<br />
3. Click Remove.
Configuring the <strong>Access</strong> <strong>Gateway</strong><br />
Chapter 6 Configuring <strong>Advanced</strong> <strong>Access</strong> Control 95<br />
To enable the full range of access control features in <strong>Advanced</strong> <strong>Access</strong> Control,<br />
you configure the settings on the <strong>Advanced</strong> Options tab in the <strong>Access</strong> <strong>Gateway</strong><br />
Administration Tool. Additionally, you use the <strong>Access</strong> Management Console to<br />
configure the settings that govern all the gateway appliances in your access server<br />
farm. These settings include:<br />
• Enable split tunneling and specify the networks that can be accessed<br />
through the <strong>Access</strong> <strong>Gateway</strong><br />
• Capture system log messages<br />
• Enable Simple Network Management Protocol (SNMP) logs<br />
• Enable features that are controlled by the communication between the<br />
Secure <strong>Access</strong> Client and the <strong>Access</strong> <strong>Gateway</strong><br />
• Create client access control lists (ACLs)<br />
Configuring Split Tunneling<br />
Split tunneling enables client devices to communicate with public Internet<br />
resources and your corporate network concurrently.<br />
Enabling split tunneling can improve the efficiency of the client connection and<br />
minimizes the occurrence of “<strong>Access</strong> Denied” messages when users access<br />
resources on the Internet or your corporate network. However, split tunneling<br />
requires you to configure a list of accessible networks so that users can access<br />
corporate resources. If this list is not defined, users cannot access any corporate<br />
resources regardless of any policies granting access.<br />
Disabling split tunneling maximizes the security of client connections and<br />
requires no additional configuration for users to begin accessing corporate<br />
resources. When split tunneling is disabled, all network traffic sent by the Secure<br />
<strong>Access</strong> Client is routed through the <strong>Access</strong> <strong>Gateway</strong>, including traffic to public<br />
Internet Web sites. Therefore, when users log on through the <strong>Access</strong> <strong>Gateway</strong>,<br />
they can access only the resources you define. If a user tries to access a resource<br />
that you have not defined, such as a public Web site, access is denied by default.<br />
To configure split tunneling<br />
1. From the console tree, select <strong>Gateway</strong> Appliances.<br />
2. Under Common Tasks, click Edit gateway appliances properties.<br />
3. On the <strong>Access</strong>ible Networks page, select or clear the option to enable split<br />
tunneling.
96 <strong>Access</strong> <strong>Gateway</strong> <strong>Advanced</strong> <strong>Edition</strong> Administrator’s <strong>Guide</strong><br />
4. If you enable split tunneling, click New to configure the list of accessible<br />
networks.<br />
5. In the New <strong>Access</strong>ible Network box, select the addressing method you<br />
want to use.<br />
6. Enter the destination IP address and, depending on the selected addressing<br />
method, the corresponding subnet mask or network prefix length.<br />
Configuring <strong>Access</strong>ible Networks<br />
<strong>Access</strong>ible networks are the networks and subnets that can be accessed through<br />
the <strong>Access</strong> <strong>Gateway</strong> when split tunneling is enabled for the Secure <strong>Access</strong> Client.<br />
Users can access a server or subnode address provided that address is defined in<br />
one of the accessible networks. When a user logs on using the Secure <strong>Access</strong><br />
Client, the access control list (ACL) received during authorization governs the<br />
accessible networks available to that user.<br />
When using accessible networks, be aware of the following limitations:<br />
• The Secure <strong>Access</strong> Client can recognize only 24 accessible networks. If<br />
your organization has a large number of subnets and you want to enable<br />
split tunneling, you may need to define supersets of networks so that you<br />
can define all required networks within the 24 recognized accessible<br />
networks.<br />
• When you enable split tunneling, all network resources you create in the<br />
<strong>Access</strong> Management Console must fall within the accessible networks you<br />
define. If you create a network resource that falls outside of these accessible<br />
networks, users cannot access the resource regardless of any policies<br />
granting access.<br />
When you define an accessible network in the <strong>Access</strong> Management Console, you<br />
specify the destination using either an IP address and subnet mask or the<br />
Classless Inter-Domain Routing (CIDR) addressing scheme.<br />
Forwarding System Messages<br />
System message logs contain information that can help support personnel assist<br />
with troubleshooting. You can forward system messages to a syslog server or<br />
enable SNMP logs.<br />
To forward <strong>Access</strong> <strong>Gateway</strong> messages to a syslog server<br />
1. From the console tree, select <strong>Gateway</strong> Appliances.<br />
2. Under Common Tasks, click Edit gateway appliances properties.
Chapter 6 Configuring <strong>Advanced</strong> <strong>Access</strong> Control 97<br />
3. On the Syslog and SNMP page under Syslog Settings, type the IP address<br />
or the FQDN of the syslog server you want to capture system messages sent<br />
by the <strong>Access</strong> <strong>Gateway</strong>.<br />
4. In Syslog facility, select the facility you want to use for captured messages.<br />
Select User Level for generic user processes. Select Local Use 0 - 7 if you<br />
defined one of these facilities for <strong>Access</strong> <strong>Gateway</strong> processes. For example,<br />
a syslog server may have Local Use 0 defined for anonymous FTP<br />
processes while Local Use 1 is reserved for <strong>Access</strong> <strong>Gateway</strong> processes.<br />
5. In Statistics broadcast interval, type the frequency in minutes at which<br />
you want the <strong>Access</strong> <strong>Gateway</strong> to send system messages. If the broadcast<br />
interval is set to zero, broadcasting is continuous.<br />
To enable logging of SNMP messages<br />
When Simple Network Management Protocol (SNMP) is enabled, the <strong>Access</strong><br />
<strong>Gateway</strong> reports the MIB-II system group (1.3.6.1.2.1). The <strong>Access</strong> <strong>Gateway</strong><br />
does not support <strong>Access</strong> <strong>Gateway</strong>-specific SNMP data.<br />
1. From the console tree, select <strong>Gateway</strong> Appliances.<br />
2. Under Common Tasks, click Edit gateway appliances properties.<br />
3. On the Syslog and SNMP page under SNMP Settings, select Enable<br />
logging of SNMP messages.<br />
4. In SNMP server name or address, type the location of the SNMP server.<br />
This required field is informational only.<br />
5. In Name of SNMP contact or associate, type the contact. This field is<br />
informational only.<br />
6. In SNMP Community, type the name of the community. This required<br />
field is informational only.<br />
7. In Port, type the port.<br />
Configuring Client Properties<br />
The Client Properties page of the gateway appliances properties controls a variety<br />
of settings that affect the interaction between the <strong>Access</strong> <strong>Gateway</strong> and the Secure<br />
<strong>Access</strong> Client.<br />
To configure client properties<br />
1. From the console tree, select <strong>Gateway</strong> Appliances.<br />
2. Under Common Tasks, click Edit gateway appliances properties.
98 <strong>Access</strong> <strong>Gateway</strong> <strong>Advanced</strong> <strong>Edition</strong> Administrator’s <strong>Guide</strong><br />
3. On the Client Properties page, select any of the following check boxes:<br />
• Require SSL client certificate for users connecting via the<br />
gateway appliances. If you want additional authentication, select<br />
this option to require certificates for Windows client computers. If a<br />
client certificate is required, it must be provided by the network<br />
administrator. The certificate is installed separately into the certificate<br />
store using the Microsoft Management Console. When this<br />
requirement is enforced, every computer that logs on through the<br />
<strong>Access</strong> <strong>Gateway</strong> must have an SSL client certificate that is in P12<br />
format.<br />
• Enable internal failover. Select this option to enable the Secure<br />
<strong>Access</strong> Client to connect to the <strong>Access</strong> <strong>Gateway</strong> from inside the<br />
firewall if the <strong>Access</strong> <strong>Gateway</strong> IP address cannot be reached. When<br />
internal failover is configured, the client will failover to the internal<br />
IP address of the <strong>Access</strong> <strong>Gateway</strong> if the external IP address cannot be<br />
reached. The Secure <strong>Access</strong> Client must connect at least once to<br />
retrieve the failover list. This list is then cached in the registry.<br />
Note:<br />
Internal failover is not available for browser-only access.<br />
Configuring Server Properties<br />
• Enable failover among gateway appliances. You can configure an<br />
<strong>Access</strong> <strong>Gateway</strong> to failover to multiple <strong>Access</strong> <strong>Gateway</strong>s. Because<br />
the <strong>Access</strong> <strong>Gateway</strong> failover is active/active, you can use each<br />
<strong>Access</strong> <strong>Gateway</strong> as a primary gateway for a different set of users.<br />
The Server Properties page of the gateway appliances properties controls settings<br />
related to securing communications between the <strong>Access</strong> <strong>Gateway</strong> and Secure<br />
<strong>Access</strong> Client and improving Voice over IP connections.<br />
To configure server properties<br />
1. From the console tree, select <strong>Gateway</strong> Appliances.<br />
2. Under Common Tasks, click Edit gateway appliances properties.<br />
3. On the Server Properties page, select any of the following check boxes:<br />
• Validate SSL certificates on backend. Select this option to require<br />
the <strong>Access</strong> <strong>Gateway</strong> to validate SSL server certificates. This<br />
increases security for internal connections originating from the<br />
<strong>Access</strong> <strong>Gateway</strong>. Validating SSL server certificates is an important
Chapter 6 Configuring <strong>Advanced</strong> <strong>Access</strong> Control 99<br />
security measure because it can help prevent security breaches, such<br />
as man-in-the-middle attacks. The <strong>Access</strong> <strong>Gateway</strong> requires<br />
installing the proper root certificates that are used to sign the server<br />
certificates.<br />
• Improve latency for Voice over IP traffic. Select this option to<br />
improve the latency and audio quality of Voice over IP (VoIP) traffic<br />
over an SSL connection. If you select this option, the <strong>Access</strong><br />
<strong>Gateway</strong> appliance uses a 56-bit key to encrypt this traffic. <strong>Citrix</strong><br />
recommends the use of strong ciphers to reduce the possibility of a<br />
malicious attack to the corporate network. For more information<br />
about improving VoIP connections made through the <strong>Access</strong><br />
<strong>Gateway</strong> appliance, see the <strong>Access</strong> <strong>Gateway</strong> Standard <strong>Edition</strong><br />
Administrator’s <strong>Guide</strong>.<br />
4. Select the bulk encryption cipher you want to use for symmetric encryption<br />
of data over SSL connections.<br />
Configuring ICA <strong>Access</strong> Control<br />
<strong>Citrix</strong> Presentation Server uses the Independent Computing Architecture (ICA)<br />
protocol for communication between its clients and servers. When using the<br />
<strong>Access</strong> <strong>Gateway</strong> as a proxy to tunnel ICA traffic without the Secure <strong>Access</strong><br />
Client, you can control which servers running <strong>Citrix</strong> Presentation Server that<br />
users can access. To do this, you provide an access control list (ACL) in the<br />
<strong>Access</strong> Management Console. When users request published applications through<br />
the <strong>Access</strong> <strong>Gateway</strong>, they are granted or denied access based on the ACL you<br />
provide.<br />
If you are using the Web Interface to deliver published applications through the<br />
<strong>Access</strong> <strong>Gateway</strong>, you must configure the Web Interface’s Secure <strong>Gateway</strong><br />
settings with the FQDN of the <strong>Access</strong> <strong>Gateway</strong>.<br />
Important: ACLs you specify are not applied when published applications are<br />
configured as network resources.<br />
To configure ICA access control<br />
1. From the console tree, select <strong>Gateway</strong> Appliances.<br />
2. Under Common Tasks, click Edit gateway appliances properties.<br />
3. On the ICA <strong>Access</strong> Control page, select the option to provide unrestricted<br />
access or use an ACL to restrict access to servers running <strong>Citrix</strong><br />
Presentation Server.
100 <strong>Access</strong> <strong>Gateway</strong> <strong>Advanced</strong> <strong>Edition</strong> Administrator’s <strong>Guide</strong><br />
4. To provide an ACL, click New.<br />
5. In Start IP address and End IP address, type the range of IP addresses of<br />
the servers running <strong>Citrix</strong> Presentation Server you want to include.<br />
6. In Port, type the port number or enable the default port.<br />
7. In Protocol, select the protocol you want to use.<br />
• Select ICA to allow ICA/SOCKS connections to the selected servers.<br />
Typically, you would use ICA for servers running <strong>Citrix</strong> Presentation<br />
Server that accept ICA/SOCKS connections.<br />
• Select CGP to allow CGP connections to the selected servers.<br />
Typically, you would use CGP for servers running <strong>Citrix</strong> Presentation<br />
Server that accept CGP connections. CGP can provide session<br />
reliability if you enable session reliability on the selected servers.<br />
Configuring Authentication with <strong>Citrix</strong> Presentation<br />
Server<br />
<strong>Citrix</strong> Presentation Server works with the Web Interface and the Secure Ticket<br />
Authority (STA) to provide authentication and authorization for clients. To<br />
provide access to published applications using the Web Interface through the<br />
<strong>Access</strong> <strong>Gateway</strong>, you must configure the STA settings in the gateway appliances<br />
properties. You also configure these settings to preserve Workspace Control when<br />
you enable the display of multiple <strong>Access</strong> Platform sites within the <strong>Access</strong><br />
Interface.<br />
To configure the <strong>Access</strong> <strong>Gateway</strong> to use the Secure Ticket Authority<br />
1. From the console tree, select <strong>Gateway</strong> Appliances.<br />
2. Under Common Tasks, click Edit gateway appliances properties.<br />
3. On the Secure Ticketing Authority page, click New.<br />
4. Type the IP address or FQDN of the server where the STA is installed.<br />
5. Select Use secure communication to secure the connection to the STA.<br />
6. In STA Path, type the path of the STA.<br />
7. In STA ID, type the ID of the STA or click Retrieve STA ID to<br />
automatically enter the ID based on the server and path.
CHAPTER 7<br />
Securing User Connections<br />
<strong>Access</strong> <strong>Gateway</strong> <strong>Advanced</strong> <strong>Edition</strong> supports authentication and authorization for<br />
users connecting from remote locations. <strong>Advanced</strong> <strong>Access</strong> Control supports<br />
several authentication types including Active Directory, LDAP, RADIUS, RSA<br />
SecurID, and Secure Computing Safeword products.<br />
You can enable these authentication types by configuring the Logon Point<br />
Properties in the <strong>Access</strong> Management Console. When you configure a logon<br />
point, you select the authentication and authorization methods you want to use.<br />
For example, you can select LDAP to authenticate users and Active Directory to<br />
authorize users to access certain corporate resources.<br />
The following topics discuss how to configure these authentication types:<br />
• “Configuring <strong>Advanced</strong> Authentication” on page 101<br />
• “Configuring RADIUS and LDAP Authentication” on page 102<br />
• “Configuring RSA SecurID Authentication” on page 108<br />
• “Configuring SafeWord Authentication” on page 110<br />
• “Configuring Trusted Authentication” on page 115<br />
Configuring <strong>Advanced</strong> Authentication<br />
<strong>Access</strong> <strong>Gateway</strong> <strong>Advanced</strong> <strong>Edition</strong> supports using Active Directory as the only<br />
authenticator and group authority as well as with another authentication method<br />
such as RADIUS, RSA SecurID, or Secure Computing SafeWord. When you<br />
configure advanced authentication, only Active Directory is allowed as the group<br />
authority for the logon point you want to use.<br />
To use RADIUS with <strong>Access</strong> <strong>Gateway</strong> <strong>Advanced</strong> <strong>Edition</strong>, Visual J# .NET 2.0<br />
must be installed on the <strong>Advanced</strong> <strong>Access</strong> Control server. See “RADIUS<br />
Requirements” on page 53 for more information.
102 <strong>Access</strong> <strong>Gateway</strong> <strong>Advanced</strong> <strong>Edition</strong> Administrator’s <strong>Guide</strong><br />
To configure a logon point with advanced authentication<br />
If you are configuring advanced authentication with RADIUS, ensure you<br />
configure a RADIUS authentication profile before you configure the logon point.<br />
See “Creating RADIUS Authentication Profiles” on page 102 for more<br />
information.<br />
1. In the console tree, select the logon point you want to configure. For more<br />
information about creating a new logon point, see “Configuring Logon<br />
Points” on page 89.<br />
2. On the Authentication page, under <strong>Advanced</strong> Authentication select the<br />
authentication method you want to use with Active Directory.<br />
3. On the Authorization page, only Active Directory is selected. If you are<br />
using a RADIUS profile with Active Directory, select whether or not the<br />
RADIUS and Active Directory servers use the same password.<br />
If you are configuring advanced authentication with RADIUS, you need to set the<br />
RADIUS authentication credentials for the logon point. For more information,<br />
see “Setting Authentication Credentials for Logon Points” on page 106.<br />
For more information about configuring advanced authentication for SecurID and<br />
SafeWord products, see “Configuring RSA SecurID Authentication” on page 108<br />
and “Configuring <strong>Advanced</strong> Authentication with SafeWord” on page 111.<br />
Configuring RADIUS and LDAP Authentication<br />
To use RADIUS or LDAP authentication when users log on through a logon<br />
point, perform the following tasks:<br />
• Install and configure a RADIUS or LDAP server<br />
• Create RADIUS or LDAP authentication profiles<br />
• Assign the authentication profile to a logon point<br />
• Set the authentication credentials for the logon point<br />
To use RADIUS with <strong>Access</strong> <strong>Gateway</strong> <strong>Advanced</strong> <strong>Edition</strong>, Visual J# .NET 2.0<br />
must be installed on the <strong>Advanced</strong> <strong>Access</strong> Control server. See “RADIUS<br />
Requirements” on page 53 for more information.<br />
Creating RADIUS Authentication Profiles<br />
Authentication profiles allow you to configure RADIUS settings at the farm level<br />
and apply them to one or more logon points. Creating a RADIUS authentication<br />
profile involves the following tasks:
Chapter 7 Securing User Connections 103<br />
• Define RADIUS server authentication to specify the RADIUS servers you<br />
want to use, the time-out period, and to configure server load balancing or<br />
failover<br />
• Define RADIUS authorization using the attributes and values configured<br />
on your RADIUS server<br />
To define RADIUS authentication<br />
1. In the console tree, select the access server farm node and click Edit farm<br />
properties in Common Tasks.<br />
2. Select Authentication Profiles and then click New under RADIUS<br />
profiles. Type a name and description to define the profile.<br />
3. Click New to enter the RADIUS server and corresponding ports.<br />
4. If you have multiple RADIUS servers, select to use the server list for one of<br />
the following:<br />
• Load balancing of requests to the servers. Requests follow the<br />
sequence of the server list so that the initial request goes to the first<br />
server in the list, the next request goes to the second server, and so on.<br />
• Failover sequence of communication if servers become<br />
unavailable. In the event connectivity to a server becomes<br />
unavailable, connectivity with another server in the list ensures<br />
RADIUS authentication services remain available to users.<br />
5. Use the arrows to change a server’s position in the list.<br />
6. Change the value in the Bypass failed servers for this time interval field<br />
if you want to specify the amount of time an unavailable server should be<br />
bypassed. The default value is 300 seconds.<br />
7. If you want to audit RADIUS events, select Enable RADIUS auditing.<br />
8. If you want to change the period in which the user authentication process<br />
times out for lack of a server response, change the value in the Cancel<br />
authentication after this time field. By default, authentication times out<br />
after 30 seconds elapse.<br />
To define RADIUS authorization<br />
1. From the RADIUS Profile Configuration dialog box, click Configure<br />
Authorization.<br />
2. In Group attribute name, type the group name that is defined on your<br />
RADIUS server.
104 <strong>Access</strong> <strong>Gateway</strong> <strong>Advanced</strong> <strong>Edition</strong> Administrator’s <strong>Guide</strong><br />
3. Type the Separator you want to use if multiple user groups are included in<br />
the RADIUS configuration. A separator can be a period, a semicolon, or a<br />
colon.<br />
4. In the Vendor identifier field, type the vendor-specific code number that<br />
was entered on your RADIUS server.<br />
5. In the Vendor specified type field, type the vendor-assigned attribute<br />
number.<br />
Creating LDAP Authentication Profiles<br />
Authentication profiles allow you to configure LDAP settings at the farm level<br />
and apply them to one or more logon points. When using LDAP authentication<br />
and Active Directory authorization, group names, including character and case,<br />
must be identical.<br />
To create an LDAP authentication profile<br />
1. In the console tree, select the access server farm node and click Edit farm<br />
properties in Common Tasks.<br />
2. Select Authentication Profiles and then click New under LDAP profiles.<br />
3. Type a name and description to define the profile.<br />
4. Type the name or IP address of the LDAP server you want to use.<br />
5. In Port, type the server port number that your LDAP server uses for LDAP<br />
requests.<br />
6. In Administrator DN, type the distinguished name of the administrative<br />
user that has access to your LDAP server and the rights to look up user<br />
entries in the LDAP repository. The following are examples of syntax for<br />
this field:<br />
“domain/user name”<br />
“ou=administrators,dc=ace,dc=com”<br />
“user@domain.name” (for Active Directory)<br />
“cn=Administrator,cn=Users,dc=ace,dc=com”<br />
For Active Directory, the group name, specified as cn=groupname, is<br />
required. The group name that is defined in the <strong>Access</strong> <strong>Gateway</strong> must be<br />
identical to the group name that is defined on the LDAP server.<br />
For other LDAP directories, the group name either is not required or, if<br />
required, is specified as ou=groupname.<br />
The <strong>Access</strong> <strong>Gateway</strong> binds to the LDAP server using the administrator<br />
credentials and then searches for the user. After locating the user, the
Chapter 7 Securing User Connections 105<br />
<strong>Access</strong> <strong>Gateway</strong> unbinds the administrator credentials and rebinds with the<br />
user credentials.<br />
7. In Base DN, type the distinguished name under which user lookups should<br />
begin. Base DN is usually derived from the Bind DN by removing the user<br />
name and specifying the group where users are located. Examples of syntax<br />
for Base DN include:<br />
“ou=users,dc=ace,dc=com”<br />
“cn=Users,dc=ace,dc=com”<br />
8. In LDAP attribute for user logon names, type the attribute under which<br />
the <strong>Access</strong> <strong>Gateway</strong> should look for user logon names for the LDAP server<br />
that you are configuring. Depending on the directory service you are using,<br />
type one of the following attributes:<br />
• For Active Directory, use the default sAMAccountName.<br />
• For Novell eDirectory or Lotus Domino, use cn.<br />
• For IBM Directory Server, use uid.<br />
• For Sun ONE Directory , use uid or cn.<br />
9. In LDAP group attribute, type the name of the group attribute the <strong>Access</strong><br />
<strong>Gateway</strong> should use to obtain the groups associated with a user during<br />
authorization. Depending on the directory service you are using, type one<br />
of the following attributes:<br />
• For Active Directory, use the default memberOf.<br />
• For Novell eDirectory, use groupMembership.<br />
• For IBM Directory Server, use ibm-allGroups<br />
• For Sun ONE Directory, use nsRole.<br />
Assigning Authentication Profiles to Logon<br />
Points<br />
After you configure RADIUS or LDAP authentication profiles, you must assign<br />
these profiles to a logon point. You can assign authentication profiles in the logon<br />
point properties, on the Authentication and Authorization pages.<br />
You can use RADIUS profiles as the sole authentication method or as part of<br />
advanced authentication with Active Directory. You can use LDAP profiles as the<br />
sole authentication method only.
106 <strong>Access</strong> <strong>Gateway</strong> <strong>Advanced</strong> <strong>Edition</strong> Administrator’s <strong>Guide</strong><br />
If you assign an LDAP profile to authenticate users, you can use Active Directory<br />
or an LDAP profile to authorize users. If you assign a RADIUS profile for<br />
authentication, you can choose the LDAP or RADIUS profile for authorization.<br />
When using a RADIUS profile for authentication, you must use the same profile<br />
for authorization.<br />
When you use RADIUS or LDAP profiles, you can specify how users access<br />
resources that require Active Directory credentials. In an advanced authentication<br />
scenario where Active Directory is the group authority, you can specify whether<br />
the Active Directory and RADIUS servers share the same password. In scenarios<br />
where RADIUS or LDAP authenticate and authorize users, you can enable passthrough<br />
authentication to Active Directory. This allows users to access resources<br />
smoothly, without entering their Active Directory credentials. To do this, you<br />
supply the default Active Directory domain. User accounts in the default Active<br />
Directory domain match those on your RADIUS or LDAP servers.<br />
To assign authentication profiles to a logon point<br />
1. In the console tree, select the logon point you want to configure. For more<br />
information about creating a new logon point, see “Configuring Logon<br />
Points” on page 89.<br />
2. Under Common Tasks, click Edit logon point.<br />
3. On the Authentication page, select the RADIUS or LDAP profile you<br />
want to use to identify users in your organization.<br />
4. On the Authorization page, select the RADIUS or LDAP profile you want<br />
to use to determine the level of access users receive when they authenticate<br />
successfully.<br />
After you assign the authentication profile to the logon point, use the Server<br />
Configuration utility to set the authentication credentials for the profile.<br />
Setting Authentication Credentials for Logon<br />
Points<br />
Logon point authentication credentials consist of the global or server-specific<br />
RADIUS secrets or LDAP passwords that you specify. Before you set the<br />
authentication credentials, ensure a RADIUS or LDAP authentication profile has<br />
been assigned to the logon point.
Chapter 7 Securing User Connections 107<br />
If your deployment is configured to use RADIUS authentication, and your<br />
RADIUS server is configured to use PAP, you can strengthen user authentication<br />
at the logon point by assigning a strong shared secret to the RADIUS server.<br />
Strong RADIUS shared secrets consist of random sequences of upper and<br />
lowercase letters, numbers, and punctuation and are at least 22 characters long. If<br />
possible, use a random character generation program to create RADIUS shared<br />
secrets.<br />
To further protect RADIUS traffic, assign a different shared secret to each <strong>Access</strong><br />
<strong>Gateway</strong> appliance or each <strong>Advanced</strong> <strong>Access</strong> Control server. When you define<br />
clients on the RADIUS server, you can also assign a separate shared secret to<br />
each client. If you do this, you must configure separately each <strong>Access</strong> <strong>Gateway</strong><br />
realm that uses RADIUS authentication. If you synchronize configurations<br />
among several <strong>Access</strong> <strong>Gateway</strong> appliances in a cluster, all the appliances will be<br />
configured with the same secret.<br />
To assign RADIUS shared secrets<br />
1. On the <strong>Advanced</strong> <strong>Access</strong> Control server, click Start > Programs or All<br />
Programs > <strong>Citrix</strong> > <strong>Access</strong> <strong>Gateway</strong> > Server Configuration.<br />
2. Click Configured Logon Points and then select the logon point that you<br />
have configured to use RADIUS authentication.<br />
3. Click Authentication Credentials.<br />
4. Under RADIUS Servers, select Global secret for all servers or Server<br />
specific secrets.<br />
5. Type the global secret in the Authentication secret and Confirm<br />
authentication secret boxes.<br />
6. For server-specific secrets, double-click the IP address of the RADIUS<br />
server and enter the secret in the Server Credential box.<br />
To assign LDAP server passwords<br />
1. On the <strong>Advanced</strong> <strong>Access</strong> Control server, click Start > Programs or All<br />
Programs > <strong>Citrix</strong> > <strong>Access</strong> <strong>Gateway</strong> > Server Configuration.<br />
2. Click Configured Logon Points and then select the logon point that you<br />
have configured to use LDAP authentication.<br />
3. Click Authentication Credentials.<br />
4. Under LDAP Servers, select Global password for all servers or Server<br />
specific passwords.<br />
5. Type the global password in the Authentication secret and Confirm<br />
authentication secret boxes.
108 <strong>Access</strong> <strong>Gateway</strong> <strong>Advanced</strong> <strong>Edition</strong> Administrator’s <strong>Guide</strong><br />
6. For server-specific passwords, double-click the IP address of the LDAP<br />
server and enter the password in the Server Credential box.<br />
Configuring RSA SecurID Authentication<br />
If you use RSA SecurID for authentication, you can configure <strong>Access</strong> <strong>Gateway</strong><br />
<strong>Advanced</strong> <strong>Edition</strong> to authenticate user access with the RSA ACE/Server. The<br />
<strong>Advanced</strong> <strong>Access</strong> Control server acts as an RSA Agent Host to authenticate users<br />
who attempt to log on.<br />
You can configure the <strong>Advanced</strong> <strong>Access</strong> Control server to authenticate with RSA<br />
SecurID in the following ways:<br />
• With Active Directory, as an advanced authentication method<br />
• As the only authentication method, where LDAP is used as the group<br />
authority<br />
Configuring RSA SecurID authentication consists of the following tasks:<br />
• Configure the <strong>Advanced</strong> <strong>Access</strong> Control server(s) as an RSA ACE/Agent<br />
and generate a Sdconf.rec file<br />
• Generate an Sdroot certificate file for the <strong>Advanced</strong> <strong>Access</strong> Control<br />
server(s) and install the RSA ACE/Agent software<br />
• Test authentication with the RSA SecurID server<br />
• Configure a logon point for RSA SecurID authentication<br />
If you are using RSA SecurID as the only authentication method, ensure you have<br />
performed the following tasks prior to configuring the logon point:<br />
• Create an LDAP authentication profile<br />
• Assign the authentication profile to the logon point<br />
• Set the authentication credentials for the logon point<br />
For more information, see “Creating LDAP Authentication Profiles” on page<br />
104, “Assigning Authentication Profiles to Logon Points” on page 105, and<br />
“Setting Authentication Credentials for Logon Points” on page 106.<br />
To configure the <strong>Advanced</strong> <strong>Access</strong> Control server as an RSA ACE/Agent<br />
1. On the RSA ACE/Server computer, open the RSA ACE/Server Database<br />
Administration window and click Agent Host > Add Agent Host.<br />
2. In Name, type the fully-qualified domain name (FQDN) of the <strong>Advanced</strong><br />
<strong>Access</strong> Control server.
Chapter 7 Securing User Connections 109<br />
3. In Network Address, type the IP address of the <strong>Advanced</strong> <strong>Access</strong> Control<br />
server.<br />
4. In Agent Type, select NetSP Agent.<br />
5. From the Database Administration window, click Agent Host > Generate<br />
Configuration Files and then click One Agent Host.<br />
6. Double-click the name of the <strong>Advanced</strong> <strong>Access</strong> Control server and save the<br />
Sdconf.rec file in a folder on the computer.<br />
7. Copy the Sdconf.rec file to the %SystemRoot%/System32 folder on the<br />
<strong>Advanced</strong> <strong>Access</strong> Control server.<br />
To generate an Sdroot certificate file and install RSA ACE/Agent<br />
1. On the <strong>Advanced</strong> <strong>Access</strong> Control server, install and launch the RSA ACE/<br />
Agent Certificate Utility.<br />
2. In Current Directory, enter the path of the directory in which you want to<br />
store the certificate file.<br />
3. Click the New Root Certificate and Keys button.<br />
4. Enter your organization name, country, and key passwords.<br />
5. Install the RSA ACE/Agent for Windows software and select the following<br />
installation options:<br />
• In Setup Type, select Custom<br />
• In Custom Setup, select Local Authentication Client only. All<br />
other client options should not be installed.<br />
6. When prompted, locate the Sdroot certificate file you created.<br />
7. Follow the remaining onscreen instructions to install the RSA ACE/Agent<br />
software.<br />
8. Restart the server after installation finishes.<br />
To test authentication with RSA SecurID<br />
1. On the <strong>Advanced</strong> <strong>Access</strong> Control server, click Start > Control Panel ><br />
RSA ACE/Agent.<br />
2. From the Main tab, click the Test Direct Authentication with RSA ACE/<br />
Server button.<br />
3. From the RSA ACE/Server Configuration Information window, click the<br />
RSA ACE/Server Test Directly button and enter the user ID and token<br />
passcode for the user you are testing.
110 <strong>Access</strong> <strong>Gateway</strong> <strong>Advanced</strong> <strong>Edition</strong> Administrator’s <strong>Guide</strong><br />
If the test is successful, the “Successful Authentication” message appears. You<br />
can then configure logon points to use RSA SecurID authentication.<br />
To configure a logon point with RSA SecurID authentication<br />
If you are using RSA SecurID as the only authentication method, ensure you<br />
create an LDAP authentication profile, assign the profile to the logon point, and<br />
set the authentication credentials prior to configuring the logon point. For more<br />
information, see “Creating LDAP Authentication Profiles” on page 104 and<br />
“Setting Authentication Credentials for Logon Points” on page 106.<br />
1. In the console tree, select the logon point you want to configure. For more<br />
information about creating a new logon point, see “Configuring Logon<br />
Points” on page 89.<br />
2. Under Common Tasks, click Edit logon point.<br />
3. On the Authentication page, select one of the following options:<br />
• Under <strong>Advanced</strong> Authentication, select RSA to use SecurID with<br />
Active Directory to authenticate users.<br />
• Under Authentication, select RSA to use SecurID as the only<br />
authentication method.<br />
4. If you are using RSA SecurID as the only authentication method, on the<br />
Authorization page, select the LDAP profile you want to use.<br />
Configuring SafeWord Authentication<br />
The SafeWord product line provides secure authentication using a token-based<br />
passcode. Once the passcode is used, it is immediately invalidated by SafeWord<br />
and cannot be used again. <strong>Access</strong> <strong>Gateway</strong> <strong>Advanced</strong> <strong>Edition</strong> supports<br />
authentication with SafeWord for <strong>Citrix</strong> and SafeWord Premier<strong>Access</strong>.<br />
You can configure the <strong>Advanced</strong> <strong>Access</strong> Control server to authenticate with<br />
SafeWord in the following ways:<br />
• With Active Directory, as an advanced authentication method<br />
• As the only authentication method, where LDAP is used as the group<br />
authority<br />
• With RADIUS, where the <strong>Advanced</strong> <strong>Access</strong> Control server acts as a<br />
RADIUS client to a server configured with Microsoft Internet<br />
Authentication Service (IAS)
Chapter 7 Securing User Connections 111<br />
Configuring <strong>Advanced</strong> Authentication with<br />
SafeWord<br />
When you configure advanced authentication, Active Directory works with<br />
SafeWord to authenticate users and determines the level of access users have once<br />
they log on. To configure advanced authentication with SafeWord, perform the<br />
following tasks:<br />
• Install and configure the SafeWord for <strong>Citrix</strong> Secure <strong>Access</strong> Manager<br />
Agent on the <strong>Advanced</strong> <strong>Access</strong> Control server. <strong>Citrix</strong> strongly recommends<br />
obtaining the latest version of the agent software from Secure Computing to<br />
ensure SafeWord authentication is successful. Refer to the Secure<br />
Computing product documentation for information about configuring the<br />
agent.<br />
• Create a logon point and configure authentication and authorization using<br />
the <strong>Access</strong> Management Console.<br />
To configure advanced authentication with SafeWord<br />
1. On the <strong>Advanced</strong> <strong>Access</strong> Control server, install the SafeWord for <strong>Citrix</strong><br />
Secure <strong>Access</strong> Manager agent software located on the SafeWord product<br />
CD. When prompted, accept the option to use the latest agent software from<br />
Secure Computing and then select the Secure <strong>Access</strong> Manager Agent<br />
option.<br />
2. Restart the <strong>Advanced</strong> <strong>Access</strong> Control services. You can use the Server<br />
Configuration utility to restart all the services simultaneously.<br />
3. Restart the <strong>Citrix</strong> <strong>Access</strong> <strong>Gateway</strong> Server COM+ application from the<br />
Component Services console.<br />
4. From the console tree, select the logon point you want to configure and<br />
click Edit logon point in Common Tasks. For more information about<br />
creating a new logon point, see “Configuring Logon Points” on page 89.<br />
5. On the Authentication page, under <strong>Advanced</strong> Authentication, select<br />
SafeWord.<br />
Configuring Authentication with SafeWord Only<br />
When you configure SafeWord as the only authentication method for users, you<br />
must use LDAP as the group authority. If you want to use SafeWord as the sole<br />
authentication method, perform the following tasks:<br />
• Install and configure the SafeWord for <strong>Citrix</strong> Secure <strong>Access</strong> Manager<br />
Agent on the <strong>Advanced</strong> <strong>Access</strong> Control server. <strong>Citrix</strong> strongly recommends<br />
obtaining the latest version of the agent software from Secure Computing to
112 <strong>Access</strong> <strong>Gateway</strong> <strong>Advanced</strong> <strong>Edition</strong> Administrator’s <strong>Guide</strong><br />
ensure SafeWord authentication is successful. Refer to the Secure<br />
Computing product documentation for information about configuring the<br />
agent.<br />
• Create an LDAP authentication profile that you can assign to the logon<br />
point as the group authority.<br />
• Create a logon point and configure authentication and authorization using<br />
the <strong>Access</strong> Management Console.<br />
• Set the authentication credentials for the logon point.<br />
To configure authentication with SafeWord only<br />
1. On the <strong>Advanced</strong> <strong>Access</strong> Control server, install the SafeWord for <strong>Citrix</strong><br />
Secure <strong>Access</strong> Manager agent software located on the SafeWord product<br />
CD. When prompted, accept the option to use the latest agent software from<br />
Secure Computing and then select the Secure <strong>Access</strong> Manager Agent<br />
option.<br />
2. Restart the <strong>Advanced</strong> <strong>Access</strong> Control services. You can use the Server<br />
Configuration utility to restart all the services simultaneously.<br />
3. Restart the <strong>Citrix</strong> <strong>Access</strong> <strong>Gateway</strong> Server COM+ application from the<br />
Component Services console.<br />
4. Create an LDAP authentication profile. For more information, see<br />
“Creating LDAP Authentication Profiles” on page 104.<br />
5. From the console tree, select the logon point you want to configure and<br />
click Edit logon point in Common Tasks. For more information about<br />
creating a new logon point, see “Configuring Logon Points” on page 89.<br />
6. On the Authentication page, select SafeWord.<br />
7. On the Authorization page, select the LDAP authentication profile you<br />
want to use.<br />
To complete the configuration, you need to set the authentication credentials for<br />
the logon point to which you assigned the LDAP profile. See “Setting<br />
Authentication Credentials for Logon Points” on page 106 for more information.<br />
Configuring RADIUS with SafeWord<br />
To authenticate users, SafeWord uses the RADIUS protocol, Microsoft Internet<br />
Authentication Service (IAS), and a user database stored on an Active Directory<br />
server.<br />
To use RADIUS with <strong>Access</strong> <strong>Gateway</strong> <strong>Advanced</strong> <strong>Edition</strong>, Visual J# .NET 2.0<br />
must be installed on the <strong>Advanced</strong> <strong>Access</strong> Control server. See “RADIUS<br />
Requirements” on page 53 for more information.
Chapter 7 Securing User Connections 113<br />
If you want to use RADIUS with either SafeWord product, perform the following<br />
tasks:<br />
• Configure Microsoft Internet Authentication Service (IAS) on a separate<br />
server and configure the <strong>Advanced</strong> <strong>Access</strong> Control server as a RADIUS<br />
client.<br />
• Create a RADIUS authentication profile for the IAS server. If you want to<br />
use LDAP as the group authority instead of RADIUS, you must also create<br />
an LDAP authentication profile. For more information, see “Configuring<br />
RADIUS and LDAP Authentication” on page 102.<br />
• Assign the RADIUS authentication profile to the logon point. If you use<br />
LDAP as the group authority, you must also assign the LDAP<br />
authentication profile to the logon point. For more information, see<br />
“Assigning Authentication Profiles to Logon Points” on page 105.<br />
• Set the RADIUS authentication credentials for the logon point. If you use<br />
LDAP as the group authority, you must also set the LDAP authentication<br />
credentials. For more information, see “Setting Authentication Credentials<br />
for Logon Points” on page 106.<br />
• On the SafeWord server, install and configure the SafeWord IAS Agent<br />
software.<br />
To configure IAS and configure a RADIUS client<br />
Before proceeding, ensure IAS is installed on a server in your environment. You<br />
can install IAS using Add/Remove Programs in Control Panel. For more<br />
information, see the Windows online help.<br />
1. Open the Microsoft Management Console (MMC) and install the snap-in<br />
for IAS.<br />
2. In the left pane, right-click Remote <strong>Access</strong> Policies and select New<br />
Remote <strong>Access</strong> Policy. The New Remote <strong>Access</strong> Policy Wizard appears.
114 <strong>Access</strong> <strong>Gateway</strong> <strong>Advanced</strong> <strong>Edition</strong> Administrator’s <strong>Guide</strong><br />
3. Complete the wizard, using the following settings:<br />
• Set up a custom policy and then type a unique policy name.<br />
• Select Windows Groups for the policy and select the group(s)<br />
containing the users to be authenticated with SafeWord<br />
• Select Grant remote access permission and click Edit Profile.<br />
• On the Authentication tab, clear the check boxes selected by default<br />
and then select only Unencrypted authentication (PAP, SPAP).<br />
• Click the <strong>Advanced</strong> tab and remove the attributes that appear by<br />
default. Then, add the Vendor Specific RADIUS Standard attribute.<br />
• In the Vendor-specific Attribute Information box, select Yes to<br />
specify that the attribute conforms to the RADIUS RFC specification.<br />
• Click Configure Attribute and enter the following settings:<br />
• In Vendor-assigned attribute number, type 0.<br />
• In Attribute Format, select String.<br />
• In Attribute value, enter the group name(s) you specified for<br />
the policy. For example, if you specified the Sales and Finance<br />
groups, you enter CTXSUserGroups=sales;finance.<br />
4. From the left pane of the MMC, right-click RADIUS Clients and select<br />
New RADIUS Client.<br />
5. Type a name for the client and enter the IP address or the FQDN of the<br />
<strong>Advanced</strong> <strong>Access</strong> Control server.<br />
6. Ensure RADIUS Standard is selected and then provide a shared secret that<br />
the <strong>Advanced</strong> <strong>Access</strong> Control server can use to authenticate with the<br />
RADIUS server.<br />
To configure the SafeWord IAS Agent<br />
1. Launch the IAS Agent by clicking Start > Programs or All Programs ><br />
Secure Computing > SafeWord > IAS Agent > Configure IAS Agent.<br />
2. Click Authentication Engine and enter the host name or IP address of the<br />
authentication engine.<br />
3. Click Groups and enter the user group and domain of the users using<br />
SafeWord tokens.
Chapter 7 Securing User Connections 115<br />
Configuring Trusted Authentication<br />
To further strengthen your <strong>Access</strong> <strong>Gateway</strong> environment, you can ensure that<br />
each <strong>Access</strong> <strong>Gateway</strong> that connects to an <strong>Advanced</strong> <strong>Access</strong> Control server is a<br />
trusted device. To do this, you configure each <strong>Access</strong> <strong>Gateway</strong> to present a client<br />
certificate when prompted. Then, you configure each <strong>Advanced</strong> <strong>Access</strong> Control<br />
server to request the client certificate from each <strong>Access</strong> <strong>Gateway</strong> in your<br />
environment.<br />
Configuring the <strong>Access</strong> <strong>Gateway</strong> for Trusted<br />
Authentication<br />
Before you configure the <strong>Access</strong> <strong>Gateway</strong>, ensure that:<br />
• The <strong>Access</strong> <strong>Gateway</strong> uses SSL to communicate with the <strong>Advanced</strong> <strong>Access</strong><br />
Control server. This is required because the virtual directories the <strong>Access</strong><br />
<strong>Gateway</strong> must access on the <strong>Advanced</strong> <strong>Access</strong> Control server are secured.<br />
• The <strong>Access</strong> <strong>Gateway</strong> trusts the root certificate for the certificate authority<br />
that issued the client certificate. If not, you will need to install it as a trusted<br />
root certificate.<br />
• You have obtained a client certificate from a recognized certificate<br />
authority so you can install it on the <strong>Access</strong> <strong>Gateway</strong>.<br />
To verify the <strong>Access</strong> <strong>Gateway</strong> is using SSL<br />
1. Open the <strong>Access</strong> <strong>Gateway</strong> Administration Tool and select the <strong>Access</strong><br />
<strong>Gateway</strong> from the <strong>Access</strong> <strong>Gateway</strong> Cluster tab.<br />
2. Click the <strong>Advanced</strong> Options tab.<br />
3. To enable SSL communication, select the Secure server communication<br />
check box.<br />
To install the root certificate as a trusted certificate<br />
Before you install the root certificate, check to be sure it conforms to the Base64<br />
file format. <strong>Access</strong> <strong>Gateway</strong> does not recognize other formats as valid.<br />
1. From the Administration Tool, select the <strong>Access</strong> <strong>Gateway</strong> and then click<br />
the Administration tab.<br />
2. In Manage trusted root certificates, click Manage.<br />
3. From Trusted Root Certificate Management, click the Manage tab.<br />
4. Click Upload Trusted Root Certificate.<br />
5. Select the root certificate you want to install.
116 <strong>Access</strong> <strong>Gateway</strong> <strong>Advanced</strong> <strong>Edition</strong> Administrator’s <strong>Guide</strong><br />
6. Reboot the <strong>Access</strong> <strong>Gateway</strong>.<br />
After the <strong>Access</strong> <strong>Gateway</strong> reboots, verify the root certificate appears in the<br />
Trusted Issuers tab of the Trusted Root Certificate Management window. You can<br />
then install the client certificate.<br />
To install the client certificate on the <strong>Access</strong> <strong>Gateway</strong><br />
1. Open the Administration Tool and select the <strong>Access</strong> <strong>Gateway</strong> from the<br />
<strong>Access</strong> <strong>Gateway</strong> Cluster tab.<br />
2. Click the Administration tab and then click Browse to upload a .pem<br />
private key and client certificate.<br />
3. Locate the client certificate and enter the passphrase when prompted.<br />
4. Reboot the <strong>Access</strong> <strong>Gateway</strong>.<br />
After you install the client certificate, you can configure the <strong>Advanced</strong> <strong>Access</strong><br />
Control server to require the certificate from the <strong>Access</strong> <strong>Gateway</strong>.<br />
Configuring <strong>Advanced</strong> <strong>Access</strong> Control for Trusted<br />
Authentication<br />
To configure the <strong>Advanced</strong> <strong>Access</strong> Control server to request the client certificate<br />
from each <strong>Access</strong> <strong>Gateway</strong> in your environment, you perform the following<br />
tasks:<br />
1. Create or assign a server certificate<br />
2. Add the root certificate from the certificate authority that issued the <strong>Access</strong><br />
<strong>Gateway</strong> client certificate to the Certificate Trust List on the server<br />
3. Configure the virtual directories that the <strong>Access</strong> <strong>Gateway</strong> will access to<br />
require client certificates<br />
To create or assign a server certificate<br />
1. Click Start > All Programs > Administrative Tools > Internet<br />
Information Services (IIS) Manager.<br />
2. Expand the local computer node and the Web Sites node.<br />
3. Right-click the Default Web Site node and select Properties.<br />
4. Click the Directory Security tab and then click the Server Certificate<br />
button under Secure communications.<br />
5. Follow the onscreen instructions in the IIS Certificate Wizard to create a<br />
new server certificate or assign an existing certificate.
Chapter 7 Securing User Connections 117<br />
After the server certificate is assigned, you can add the root certificate to the<br />
server’s Certificate Trust List and configure the server to require client<br />
certificates.<br />
To add the root certificate to the <strong>Advanced</strong> <strong>Access</strong> Control server’s<br />
Certificate Trust List<br />
1. Open Internet Information Services (IIS) Manager and locate the Default<br />
Web Site node.<br />
2. Right-click the Default Web Site node and select Properties.<br />
3. Click the Directory Security tab and then click the Edit button under<br />
Secure communications.<br />
4. Select the Enable certificate trust list check box.<br />
5. Click the New button and follow the onscreen instructions to complete the<br />
Certificate Trust List wizard. This wizard allows you to add the root<br />
certificate that matches the <strong>Access</strong> <strong>Gateway</strong>’s client certificate to the<br />
Certificate Trust List.<br />
To configure the server to require client certificates<br />
1. In Internet Information Services (IIS) Manager, expand the Default Web<br />
Site node and locate the <strong>Citrix</strong><strong>Gateway</strong>ConfigService node.<br />
2. Right-click the <strong>Citrix</strong><strong>Gateway</strong>ConfigService node and select Properties.<br />
3. Click the Directory Security tab and then click the Edit button under<br />
Secure communications.<br />
4. Select the Require secure channel checkbox.<br />
5. Under Client certificates, select Require client certificates.<br />
6. In Internet Information Services (IIS) Manager, right-click the<br />
<strong>Citrix</strong>LogonAgentService node and select Properties.<br />
7. Click the Directory Security tab and then click the Edit button under<br />
Secure communications.<br />
8. Select the Require secure channel check box.<br />
9. Under Client certificates, select Require client certificates.
118 <strong>Access</strong> <strong>Gateway</strong> <strong>Advanced</strong> <strong>Edition</strong> Administrator’s <strong>Guide</strong>
CHAPTER 8<br />
Adding Resources<br />
To control your corporate resources with <strong>Advanced</strong> <strong>Access</strong> Control, you add<br />
them to the console and then create policies for them.<br />
Resources include corporate applications, Web sites, portals, file shares, services,<br />
servers, email, and email synchronization—essentially any resource that you<br />
want to provide for user access.<br />
This section describes how and why you configure the following types of<br />
resources:<br />
• Network resources<br />
• Web resources<br />
• File shares<br />
For information about configuring email resources, see “Providing Secure <strong>Access</strong><br />
to Corporate Email” on page 181.<br />
Creating Network Resources for VPN <strong>Access</strong><br />
Use network resources to define subnets or servers on the corporate network that<br />
users can connect to directly through a VPN tunnel using the Secure <strong>Access</strong><br />
Client. By default, users are denied access to network resources until you create<br />
policies that grant them access permission.<br />
To create a network resource<br />
1. In the console tree, select Network Resources and click Create network<br />
resource in Common Tasks.<br />
2. In the New Network Resource wizard, enter a name and description for the<br />
resource.<br />
3. On the Specify Servers and Ports page, click New to add network<br />
identification, port, and protocol information for the resource.<br />
• To define entire subnets, specify network addresses with subnet<br />
masks. For example, to define all servers on the 10.x.x.x network,
120 <strong>Access</strong> <strong>Gateway</strong> <strong>Advanced</strong> <strong>Edition</strong> Administrator’s <strong>Guide</strong><br />
specify a subnet mask of 255.0.0.0. To define a single server, you can<br />
define a specified network IP address such as 10.2.3.4 with subnet<br />
mask 255.255.255.255.<br />
• For Port, you can specify multiple ports or port ranges by separating<br />
each port with a comma and hyphenating ranges. For example, the<br />
entry “22,80,110-120” means that the resource uses port 22, port 80,<br />
and all ports between and including 110-120.<br />
• The Secure <strong>Access</strong> Client software listens on the specified port.<br />
4. Specify whether or not to create a default policy. If you create a default<br />
policy, you can edit its properties later.<br />
After defining a network resource, you can create policies that control its user<br />
access and connection settings.<br />
The only access control permission you can grant for a network resource is to<br />
allow or deny access. Because users connect directly to the services defined by<br />
the specified port or network subnode, the Web proxy is not used. Connecting to<br />
resources through the Web proxy is required if you want to tailor the level of<br />
access with action controls such as HTML Preview and Live Edit.<br />
When users connect with the Secure <strong>Access</strong> Client they can view a list of their<br />
network resources in the client properties.<br />
Using the Entire Network Resource<br />
The Entire Network resource is a built-in resource you can use to grant or deny<br />
Secure <strong>Access</strong> Client access to all servers and services on the secure network.<br />
The definition of the “entire network” might be limited in scope if you have<br />
enabled split tunneling in the global properties for gateway appliances. If split<br />
tunneling is enabled, the Entire Network resource does not override the definition<br />
of accessible networks. In other words, when split tunneling is enabled, the Entire<br />
Network resource equals the definition you have configured for accessible<br />
networks. For more information about split tunneling and accessible networks,<br />
see “Configuring Split Tunneling” on page 95.<br />
Note: Entire Network includes all resources on the secure network, including<br />
servers or subnets you add later. For example, if you create an access policy that<br />
includes Entire Network and later add a server to the network, the new server is<br />
controlled by the settings of the existing policy.<br />
For more information about creating policies that include Entire Network, see<br />
“Granting <strong>Access</strong> to the Entire Network” on page 154.
Chapter 8 Adding Resources 121<br />
Defining Resources to Avoid Conflicts<br />
Because you have multiple choices for configuring your corporate resources, you<br />
can create resources that overlap. For example, you can create a file share<br />
resource for File Share B on Server A and also create a network resource for<br />
Server A. Both of these resources overlap by including File Share B.<br />
If you assign overlapping resources to different policies, it is possible to create<br />
conflicts between the action controls provided for the same corporate resource.<br />
Overlapping definitions arise if you use network resources to provide access to<br />
entire servers, networks, or subnets and simultaneously use file shares and Web<br />
resources to define parts of the same servers, networks, and subnets. The<br />
following bullets describe a scenario in which such an overlap exists:<br />
• Server A is a file share server for which you define a network resource. A<br />
policy assigned to the network resource allows all company employees<br />
remote VPN access to the server when they use a trusted client device and<br />
the advanced authentication combination of Active Directory with RSA<br />
SecurID.<br />
• File Share B is a shared folder on Server A.<br />
• You define File Share B as a file share resource for browser access. You<br />
assign this file share to a policy that allows access if users are using a logon<br />
point visible only from the internal company network.<br />
Although your intention with the second policy above is to restrict the access to<br />
File Share B, the actual result is that the first policy allows users full access to<br />
File Share B through a VPN tunnel to the entire server.<br />
To avoid conflicts:<br />
• Define network resources so that they do not overlap with browser-based<br />
resources (file shares and Web resources).<br />
• Assign overlapping resources to the same policy.<br />
Creating Web Resources<br />
Web resources define the Web pages, sites, or applications that you want to secure<br />
with policies. You can group multiple URLs and define them as a single Web<br />
resource.<br />
By default, users are denied access to a Web resource until you create policies<br />
that grant access permissions.
122 <strong>Access</strong> <strong>Gateway</strong> <strong>Advanced</strong> <strong>Edition</strong> Administrator’s <strong>Guide</strong><br />
To create a Web resource<br />
1. In the console tree, select Resources > Web resources and click Create<br />
Web resource in Common Tasks.<br />
2. Enter a name and description for the resource.<br />
3. On the Configure Addresses page, click New for each URL address you<br />
want to add and enter the address.<br />
Addresses can include:<br />
• virtual directories but not individual documents. For example, you<br />
can add http://PeopleManagementSystem/Recruiting/<br />
but not<br />
http://PeopleManagementSystem/How-to-Interview.html<br />
• dynamic system tokens, such as<br />
http://www.MyCompany.com/users/#<br />
Addresses cannot include:<br />
• general regular expressions such as<br />
http://www.server[1-0]+.com/[A-Za-z]+(A-Za-z0-9)*/<br />
• wildcards such as<br />
*.MyURL.com or http://www.*/Dept/MyCompany.com<br />
4. From the Application type list, select the type of application the URL<br />
opens. The application type determines if specialized information is needed<br />
in the URL configuration.<br />
• <strong>Citrix</strong> Web Interface 4.2 or later points to a Web Interface site<br />
displaying users’ published applications from <strong>Citrix</strong> Presentation<br />
Server. For more information see “Integrating Web Interface” on<br />
page 158.<br />
• SharePoint points to a SharePoint site.<br />
• SharePoint with Web Interface Web Part points to a Web Part<br />
designed to provide <strong>Citrix</strong> Web Interface as an area on a SharePoint<br />
site. Supports Smart<strong>Access</strong> features through the Web Interface.<br />
• Web Application points to a Web site URL that needs no specialized<br />
configuration information. This is the default setting.<br />
• Web Application (requires session cookies) points to Web sites<br />
allowed to receive cookies. By default the Web proxy does not<br />
forward cookies to redirected URL addresses. The Web proxy does<br />
not pass cookies to the default Web application type.
Chapter 8 Adding Resources 123<br />
5. From the Authentication types supported area of the New URL dialog<br />
box, you can enable pass-through authentication to the site by selecting the<br />
site’s authentication method. For more information, see “Enabling Pass-<br />
Through Authentication for Web Resources” on page 124.<br />
6. Select the option to publish in users’ lists of resources if you want this<br />
resource to appear on the <strong>Access</strong> Interface.<br />
• The home page must be a page within the exact URL you specify in<br />
Step 3. For example, if you enter http://MyCompany.net for the<br />
resource address, you can specify a page within that site, such as<br />
http://MyCompany.net/Finance.aspx.<br />
• If your directory service uses the homepage token, you can enter<br />
# for the URL home page. For more information about<br />
using tokens, see “Using Dynamic System Tokens” on page 128.<br />
Note: If you are enabling <strong>Advanced</strong> <strong>Access</strong> Control to display multiple<br />
<strong>Citrix</strong> <strong>Access</strong> Platform sites within the <strong>Access</strong> Interface, you must publish<br />
the site so you can associate it with a Presentation Server farm. For more<br />
information, see “Displaying Multiple Sites and Caching Credentials” on<br />
page 160.<br />
7. Select the option to use an interface that is common for all browser types if<br />
users are not allowed to use ActiveX controls or use a variety of browser<br />
versions. Selecting this option presents users with a generic interface that<br />
does not require advanced browser technologies such as ActiveX.<br />
8. Specify whether or not to create a default policy. If you create a default<br />
policy, you can edit its properties later.<br />
Including Related Files<br />
For Web sites, make sure when you create the resource that you include all the<br />
necessary files required by the pages of the Web site, such as image files that<br />
might be stored in a separate location or separate server. For example, if a site<br />
such as www.citrix.com uses images stored on www.webimages.site.com, add the<br />
URL www.webimages.site.com to the Web resource.<br />
Configuring Sites Secured with SSL<br />
When creating Web resources that contain URL addresses secured with Secure<br />
Sockets Layer (SSL), you must ensure that all servers in the access server farm<br />
with the role of Web server have the root certificate for the secured URL<br />
addresses.
124 <strong>Access</strong> <strong>Gateway</strong> <strong>Advanced</strong> <strong>Edition</strong> Administrator’s <strong>Guide</strong><br />
This requirement does not apply if the Web proxy is bypassed for access to the<br />
server hosting the URL address. For more information about bypassing URL<br />
rewriting, see “Bypassing URL Rewriting” on page 144.<br />
Web Resources that Keep Sessions Alive<br />
User sessions for Web resources and applications normally time out according to<br />
the time-out settings of the logon point through which users connect.<br />
Note that when users view a Web resource that uses a keep-alive mechanism, the<br />
session remains open until the user closes the window displaying the Web<br />
resource. An example of such a resource is Microsoft Outlook Web <strong>Access</strong>,<br />
which performs regular polling to discover new email messages. This polling<br />
keeps the user’s session open until the Outlook Web <strong>Access</strong> window is closed.<br />
Enabling Pass-Through Authentication for Web<br />
Resources<br />
You can pass user credentials to Web servers on the secured network configured<br />
for Basic, Digest, or Integrated Windows Authentication. This feature avoids<br />
requiring users to enter their credentials multiple times to access Web resources.<br />
For example, if a team Web site in your organization is configured for Digest<br />
Authentication, you can pass the credentials with which users log on to the<br />
<strong>Access</strong> <strong>Gateway</strong> to that site. If you do not enable the URL address to support<br />
Digest Authentication, users might be required to log on to the Web site.<br />
Note that the authentication required for a Web site is determined by the settings<br />
of the site’s host Web server.<br />
When configuring a Web resource, you can enable its URL addresses to use one<br />
of the following methods of pass-through authentication:<br />
• Basic authentication. Credentials are passed to the Web site in plain text.<br />
Important: Because credentials are passed in plain text, consider using<br />
SSL for Web sites that use Basic pass-through authentication.<br />
• Digest authentication. Hashed credentials are passed to the Web site using<br />
Digest Authentication.<br />
• Integrated Windows authentication. Hashed credentials are passed to the<br />
Web site using Integrated Authentication. NTLM or Kerberos<br />
authentication is used, depending on your Web server configuration.
Chapter 8 Adding Resources 125<br />
Caution: When using any of the three pass-through authentication methods, the<br />
target Web application is first presented with the credentials with which the user<br />
logged on to the <strong>Access</strong> <strong>Gateway</strong>. <strong>Access</strong>ing Web sites that require a second,<br />
differing set of credentials through <strong>Access</strong> <strong>Gateway</strong> can result in the caching of<br />
the second set of credentials.<br />
Creating File Shares<br />
To specify pass-through authentication for a Web site<br />
1. In the console tree, select the Web resource and click Edit Web resource in<br />
Common Tasks.<br />
2. On the URL Addresses page, select the Web site’s URL and click Edit.<br />
3. In the Authentication types supported area, select the authentication<br />
method being used by the Web site.<br />
Configuring Sites with Form-Based<br />
Authentication<br />
Web sites that require form-based authentication must be configured with the<br />
application type of Web application.<br />
Each URL defined in a Web resource is assigned an application type. For URLs<br />
that are assigned the application type Web Application, credentials are not<br />
passed and users might need to log on to the Web site. This is the default setting.<br />
You must use this option for sites that require form-based authentication.<br />
File shares are shared directories, folders, and files on your network that you want<br />
to secure with policies.<br />
You can group multiple shares and define them as a single resource. Grouping file<br />
shares requires you to create fewer policies, because each policy you create for<br />
the resource applies to all shares in the group.<br />
By default, users are denied access to file shares until you create policies that<br />
grant them access permission.<br />
To create a file share<br />
1. In the console tree, select Resources > File Shares and click Create file<br />
share in Common Tasks.<br />
2. Enter a name and description for the resource.
126 <strong>Access</strong> <strong>Gateway</strong> <strong>Advanced</strong> <strong>Edition</strong> Administrator’s <strong>Guide</strong><br />
3. On the Configure Addresses page, click New to add each shared item, for<br />
example, \\MyServer\Shared-Files-Folder.<br />
• You can include addresses for specific document files as well as<br />
directories.<br />
• You can use dynamic system tokens, such as #. To use<br />
system tokens, the service account in the Server Configuration for<br />
<strong>Advanced</strong> <strong>Access</strong> Control must be a domain account and not a local<br />
machine account.<br />
4. In the File Share dialog box, select Publish for users in their list of<br />
resources if you want this resource to be listed on the <strong>Access</strong> Interface.<br />
5. Specify whether or not to create a default policy. If you create a default<br />
policy, you can edit its properties later.<br />
If you do not select the option to publish a file share, users can still navigate to the<br />
share in their browsers as long as a policy allows access to the file share. A file<br />
share that a user has access to but which is not published can also be accessed if it<br />
appears embedded in a Web page or email.<br />
Uploading Large Documents to File Shares<br />
When users access a published file share through the <strong>Access</strong> Interface and<br />
policies allow them to upload documents, users can upload documents up to 100<br />
MB in size by default. To enable users to upload larger documents, you must edit<br />
the Windows Registry.<br />
Caution: Using Registry Editor incorrectly can cause serious problems that can<br />
require you to reinstall the operating system. <strong>Citrix</strong> cannot guarantee that<br />
problems resulting from incorrect use of Registry Editor can be solved. Use<br />
Registry Editor at your own risk. Make sure you back up the registry before you<br />
edit it.<br />
To enable users to upload documents larger than 100 MB<br />
1. From Registry Editor, find the following key:<br />
HKEY_LOCAL_MACHINE\SOFTWARE\CITRIX\MSAM\FEI<br />
2. Click Edit > New > DWORD Value and type MaxUploadSize in the right<br />
pane.<br />
3. Right-click on the new value and select Modify.<br />
4. In Value Data, type the maximum document size in kilobytes (KB). For<br />
example, to specify a maximum size of 120 MB, you type 120000.
5. Under Base, select Decimal.<br />
Chapter 8 Adding Resources 127
128 <strong>Access</strong> <strong>Gateway</strong> <strong>Advanced</strong> <strong>Edition</strong> Administrator’s <strong>Guide</strong><br />
Using Dynamic System Tokens<br />
You can use dynamic token replacement in UNC or URL addresses when<br />
defining resources that can retrieve dynamic information from the directory<br />
service. Dynamic token replacement provides replacement of strings with user<br />
attributes obtained from Active Directory.<br />
Note: There is one attribute from Lightweight Directory <strong>Access</strong> Protocol<br />
(LDAP) or NT Directory Services that you can use without Active Directory.<br />
This is the # attribute. All other attributes require Active Directory.<br />
For example, if an enterprise with thousands of employees provides each user<br />
with a unique file share named for the user, it is more efficient to use a token in<br />
place of the user name rather than listing each explicit file share to define the<br />
resource group.<br />
To use system tokens the service account in the Server Configuration for<br />
<strong>Advanced</strong> <strong>Access</strong> Control must be a domain account and not a local machine<br />
account.<br />
Use the following syntax for token replacement:<br />
#<br />
Examples:<br />
\\Public-shares\Departments\#\Reports<br />
http://inotes.my-server.com/mail/#.nsf
Chapter 8 Adding Resources 129<br />
Active Directory Attributes<br />
The following attributes can be used with Active Directory.<br />
#<br />
#<br />
#<br />
#<br />
#<br />
#<br />
#<br />
#<br />
#<br />
#<br />
#<br />
#<br />
#<br />
#<br />
#<br />
#<br />
#<br />
Creating Resource Groups to Ease Policy Administration<br />
Resource groups enable you to group different types of resources into a single<br />
entity and apply policies to the group. Using resource groups requires fewer total<br />
policies and eases policy administration. The basic steps for bundling resources<br />
are:<br />
1. Decide which resources you want to provide to users under a specific<br />
access scenario. For example, make a list of all the resources (including<br />
email, Web sites, and file shares) that your sales force needs to access from<br />
corporate laptops they use on the road.<br />
2. Ensure that each of the resources from Step 1 is configured in the console.<br />
For example, if you want to include five corporate Web sites and Webbased<br />
email, make sure you configure one or more Web resources that<br />
include these sites and configure Web Email before you create the resource<br />
group.
130 <strong>Access</strong> <strong>Gateway</strong> <strong>Advanced</strong> <strong>Edition</strong> Administrator’s <strong>Guide</strong><br />
3. Create a resource group that includes all the resources you listed in Step 1.<br />
4. Create a filter that includes your requirements for the access scenario. For<br />
example, you can create a filter that requires users to authenticate with RSA<br />
authentication, log on to your Sales logon point URL, and pass specified<br />
endpoint analysis scans of the client device.<br />
5. Create a policy for the resource group. Associate the policy with the filter<br />
you created in Step 4 and select the action controls you want for each<br />
resource.<br />
Resource group names or descriptions do not appear to users in published lists of<br />
resources. The name and description you define for a resource group is for<br />
administrative use only. If you choose to publish a Web resource or file share,<br />
users see the resource’s description (not the description of the resource group) in<br />
their lists of resources.<br />
Each resource type has a wizard to guide you through adding the resource. These<br />
wizards are available from Common Tasks when the Resources node is selected.<br />
By default, users are denied access to any resource you define until you create<br />
policies that grant access permissions. This includes all resources and resource<br />
groups.<br />
Integrating Resource Lists in Third-Party Portals<br />
If you provide users with the lists of Web resources or file shares included with<br />
<strong>Advanced</strong> <strong>Access</strong> Control, you can integrate these lists into any portal solution.<br />
For example, if you are using Microsoft SharePoint as a portal or information<br />
aggregation point, you can display for users their list of Web resources or file<br />
shares in the SharePoint portal.<br />
To integrate user resource lists with a third-party portal<br />
1. Configure Web resources and files shares for users.<br />
2. Configure your portal product’s Web site viewer to display one or both of<br />
the following:<br />
• The Web resources list at http://servername/<strong>Citrix</strong>SessionInit/<br />
URLList.aspx<br />
• The file share list at http://servername/citrixfei/myfiles.asp<br />
where servername is the name of a Web server running <strong>Access</strong> <strong>Gateway</strong><br />
<strong>Advanced</strong> <strong>Edition</strong>.
CHAPTER 9<br />
Controlling <strong>Access</strong> Through<br />
Policies<br />
Policies provide granular control of access at the resource level. Use policies to<br />
control which resources users can get to and what actions they can perform on<br />
those resources. You can leverage the power of filters to apply policies based on<br />
information detected about the client device, who users are, the strength of their<br />
authentication, and where they are logging on. Filters provide the flexibility to<br />
match policies with your access scenarios. This section discusses how to<br />
implement policies and formulate strategies to control resources according to the<br />
user scenario.<br />
Policies extend the security of your network environment by enabling you to<br />
control:<br />
• <strong>Access</strong>. You can control users’ ability to connect to your resources unless<br />
they meet security requirements such as identity, authentication, antivirus,<br />
firewall, and client software.<br />
• Actions. You can control specific actions that users perform on resources<br />
accessed through the browser, based on the user scenario.<br />
• Connections. You can control Secure <strong>Access</strong> Client connections and apply<br />
settings to those connections.<br />
Controlling User <strong>Access</strong><br />
Policies help you secure the corporate network even before users log on and<br />
allow you to extend that security down to the individual resource level. Policies<br />
enable you to:<br />
• Provide connection privileges to trusted devices only. When you create<br />
policies for the “Allow Logon” resource, you can deny connection<br />
privileges unless the client device meets your minimum security<br />
requirements verified through endpoint analysis scans. You can use<br />
connection policies with continuous scans to monitor Secure <strong>Access</strong> Client
132 <strong>Access</strong> <strong>Gateway</strong> <strong>Advanced</strong> <strong>Edition</strong> Administrator’s <strong>Guide</strong><br />
connections throughout the user session, disconnecting as soon as the client<br />
device fails to meet your requirements.<br />
• Allow logon permission only to trusted users and devices. When you<br />
configure logon point properties, you can hide the logon page from users<br />
with unknown client devices or client devices that do not meet your<br />
security requirements. This feature prevents viruses on the client device<br />
from stealing the users’ credentials as they type them on the logon page.<br />
• Allowing or denying individual actions on resources. After users pass<br />
your security requirements for connecting, they must be granted explicit<br />
permission to a resource before the resource is available to them. You<br />
control this access through policies defined for each resource or group of<br />
resources. For more information about creating policies, see “Creating<br />
<strong>Access</strong> Policies” on page 135.<br />
By default, users are not provided permission to access or take action on any<br />
resources on your networks. You must define your resources for the farm and then<br />
create policies that grant access to them and control actions users can perform on<br />
them.<br />
<strong>Advanced</strong> <strong>Access</strong> Control policies extend the operating system security settings<br />
and cannot override them. For example, if a user is denied access to a file share in<br />
the share’s Windows NT File System (NTFS) security settings, granting access to<br />
that file share through <strong>Access</strong> <strong>Gateway</strong> policies will not allow access to the file<br />
share.<br />
Note: <strong>Access</strong> to applications and resources published by <strong>Citrix</strong> Presentation<br />
Server is not controlled by <strong>Advanced</strong> <strong>Access</strong> Control policies. <strong>Access</strong> to these<br />
resources depends on the properties of the logon point through which users log on<br />
and the permissions that users are assigned in <strong>Citrix</strong> Presentation Server.<br />
Integrating Your <strong>Access</strong> Strategy<br />
The way you define resources and create policies is influenced by your overall<br />
strategy for controlling access. The goal is to make sure users get the level of<br />
access that you can securely provide given the user situation.<br />
Your strategy determines how you pool resources and design policies.<br />
Pooling Resources By <strong>Access</strong> Needs<br />
Before defining resources and creating policies, pool resources into resource<br />
groups that reflect their relative security requirements. When you define<br />
resources, group similar resources together.
Chapter 9 Controlling <strong>Access</strong> Through Policies 133<br />
For example, you might create a resource group that contains several file shares,<br />
Web resources, and email that require very restricted access when users are<br />
connecting remotely. In another resource group you might add Web resources and<br />
file shares and that you want users to have access to at all times, as long as they<br />
have a trusted client device.<br />
Designing Policies From User Scenarios<br />
Plan policies according to a basic set of user scenarios, such as the ones presented<br />
in the next table. Start with just a few scenarios. Define a few types of resources,<br />
pool them into resource groups, and practice creating policies until you have<br />
enough policies to cover all the user scenarios needed in your organization.<br />
The following table provides a few example scenarios of user situations with<br />
different access and actions that might be permitted:<br />
User Device Resources Users Can <strong>Access</strong> Actions Users Can Take<br />
Corporate desktop<br />
running required<br />
antivirus software<br />
Remote corporate<br />
device running required<br />
antivirus and firewall<br />
software<br />
• All corporate networks and file<br />
systems<br />
• Full email services<br />
• Corporate portals and Web<br />
applications<br />
• Published applications through<br />
<strong>Citrix</strong> Presentation Server<br />
• Other applications<br />
• Web applications<br />
• Synchronized email applications<br />
• Published applications through<br />
<strong>Citrix</strong> Presentation Server<br />
• Limited access to file systems<br />
• Servers or services defined as<br />
network resources<br />
• Download files<br />
• Upload files<br />
• Edit files on the local client device<br />
• Edit files on servers running <strong>Citrix</strong><br />
Presentation Server<br />
• Send documents as email attachments<br />
• Edit and save documents with Live Edit<br />
ActiveX control without needing to<br />
download and upload<br />
• Limited client mapping or printing<br />
documents on servers running <strong>Citrix</strong><br />
Presentation Server<br />
• Send documents as email attachments<br />
• Connect directly to network resources<br />
through VPN using Secure <strong>Access</strong> Client
134 <strong>Access</strong> <strong>Gateway</strong> <strong>Advanced</strong> <strong>Edition</strong> Administrator’s <strong>Guide</strong><br />
User Device Resources Users Can <strong>Access</strong> Actions Users Can Take<br />
Public kiosk running a<br />
required browser<br />
• Web applications<br />
• Web-based email only<br />
• Limited access to published<br />
applications<br />
• Preview documents as HTML<br />
• No client mapping or printing documents<br />
on servers running <strong>Citrix</strong> Presentation<br />
Server<br />
Personal digital<br />
assistant (PDA)<br />
Web-based email only • View Web-based email, which supports<br />
refactoring for small devices<br />
• Preview documents as HTML, which<br />
supports refactoring for small devices<br />
• Send documents as email attachments<br />
• No application access<br />
Remote corporate<br />
laptops for system<br />
administrators who<br />
cover emergencies from<br />
home<br />
Full access to individual mission critical<br />
applications defined as network<br />
resources or the Entire Network resource<br />
Connect directly to network resources through<br />
VPN using Secure <strong>Access</strong> Client<br />
After you develop an access strategy, you configure resources, policies, and<br />
filters in combinations that comply with and extend your corporate security<br />
guidelines. Resources and policies define the access control you allow. Filters<br />
define when and under what conditions the access is granted.<br />
Differentiating <strong>Access</strong> Control and Publishing<br />
Allowing access to a resource through policy control is not the same as<br />
publishing the resource. When you define file shares and Web resources you can<br />
choose to publish the resource, which means it is listed for users on the <strong>Access</strong><br />
Interface or third-party portals.<br />
The built-in file share and Web resource lists can also appear as plug-ins to thirdparty<br />
corporate portals. For information about integrating resource lists in thirdparty<br />
portals, see “Integrating Resource Lists in Third-Party Portals” on page<br />
130.<br />
Enabling the <strong>Access</strong> permission to a Web resource permits the user to view it with<br />
a browser. What the user can do with the item or which application is used to<br />
open it depends on the group of policy settings you have defined for the resource.<br />
Simply enabling the <strong>Access</strong> permission for a resource does not provide a<br />
navigation to that resource. For example, if you enable the <strong>Access</strong> permission to a<br />
URL address but do not publish it, users can get to the URL only through a link<br />
embedded on a Web page or, if the resource is configured to bypass the Web<br />
proxy, by typing the URL directly in their browser.
Chapter 9 Controlling <strong>Access</strong> Through Policies 135<br />
You must create a Web resource or network resource for any application that you<br />
want users to have remote access to and you must create policies for these items<br />
granting explicit “<strong>Access</strong>” permission for users. Configuring file share access is<br />
slightly different than for Web resources, because you do not choose the “<strong>Access</strong>”<br />
permission in policies for file shares. Users can view a file share resource through<br />
their browser if you publish the resource and if the operating system access<br />
control list (ACL) allows access permission to the users. Policies for file shares<br />
define the users who can view the file share, the actions those users are allowed to<br />
take on the documents in those file shares, and the conditions under which they<br />
can take the actions.<br />
Creating <strong>Access</strong> Policies<br />
You must create policies to provide users with access to resources. By default,<br />
users have no access privileges to any resource. When you create an access<br />
policy, you define who has access, the conditions under which access is granted,<br />
and the granular access controls that are allowed or denied.<br />
To create an access policy<br />
1. In the console tree select Policies and choose Create access policy from<br />
Common Tasks.<br />
2. In the New <strong>Access</strong> Policy wizard, name and describe the policy.<br />
3. On the Select Resources page, select the resource groups and resources for<br />
the policy to control.<br />
• Select Network Resources > Entire Network if you want this policy<br />
to control access to all visible servers and services on the network.<br />
• Select the Allow Logon resource if you want this policy to include<br />
the conditions under which the users are allowed to log on to the<br />
network.<br />
Take care to review selections in the available resources tree. When you<br />
select or clear a category of resource, such as File Shares, all items grouped<br />
under that category are selected or cleared. Expand nodes to display the<br />
selections under each category.<br />
4. On the Configure Settings page, enable each desired setting individually<br />
and select Allow or Deny. Take care to review your selections in the<br />
settings tree.<br />
It is possible to select policy settings on the Configure Settings page for<br />
types of resources that you did not select for the policy to control. The<br />
policy applies settings only for the resources that are selected for the policy.
136 <strong>Access</strong> <strong>Gateway</strong> <strong>Advanced</strong> <strong>Edition</strong> Administrator’s <strong>Guide</strong><br />
5. On the Select Filter page, select a filter that defines the conditions to be<br />
met for the policy to be enforced.<br />
If you have not yet configured filters, you can edit the policy and assign a<br />
filter to it later.<br />
6. On the Select Users page, select the users to whom the policy applies.<br />
Note: If multiple policies apply to a resource, a policy that denies an access<br />
permission takes precedence over other policies that allow the access permission.<br />
Naming Policies<br />
All policy names must be unique. Developing a consistent naming convention or<br />
practice eases administration of policies. Because policies are defined per<br />
resource to provide granular control, you can potentially create many policies.<br />
The naming convention you develop should help you quickly identify the<br />
resource and, if possible, the level of access you are applying.<br />
You can develop a convention that meets your organization’s needs. In general,<br />
the policy name should include the resource. One typical naming convention<br />
names policies by resource name and an access level phrase that coincides with<br />
your access strategy or the permissions allowed. For example:<br />
• Web resource X_full access_all users<br />
• Web resource X_limited access_field users<br />
• Web resource X_full access_administrators<br />
• File share Z_all actions_all users<br />
• File share Z_restricted actions_unknown devices<br />
You can change the name of default policies.<br />
To change a policy name<br />
1. Select the policy in the right details pane of the console.<br />
2. At the bottom of the details pane click Edit policy properties.<br />
3. In the policy Properties, change the name and save the policy.
Chapter 9 Controlling <strong>Access</strong> Through Policies 137<br />
Configuring Policy Settings to Control User Actions<br />
Policies for resources opened through the browser (Web resources, file shares,<br />
and email) enable you to control not only access, but also what actions users can<br />
perform with the resource.<br />
Policy settings enable you to allow or deny specific action controls. Configure<br />
policy settings in the policy wizard or policy properties.<br />
The policy settings that are available when you create a policy depend on the type<br />
of resource you are securing and your environment. For example, if the access<br />
server farm is not configured to link to a farm running <strong>Citrix</strong> Presentation Server,<br />
the File Type Association permission setting is not available.<br />
Depending on the type of resource and your farm configuration, you can allow or<br />
deny the following policy settings:<br />
Policy Setting<br />
<strong>Access</strong><br />
Bypass URL<br />
Rewriting<br />
Download<br />
Email as<br />
Attachment<br />
Description<br />
Allows users access to the resource through a Web browser or Secure<br />
<strong>Access</strong> Client connection.<br />
For Web-based email, this setting allows all functionality provided<br />
by the Web-based email application, such as viewing and sending<br />
emails, managing the Calendar, and viewing an address book, but<br />
does not allow the ability to access email attachments. <strong>Access</strong>ing<br />
email attachments is allowed through the Email as Attachment<br />
setting.<br />
For network resources, <strong>Access</strong> allows a direct VPN connection to<br />
the resource using the Secure <strong>Access</strong> Client. <strong>Access</strong> is the only<br />
permission you can set for network resources.<br />
Allows the browser to retrieve a Web resource without the URL<br />
address of the resource being rewritten by the Web proxy component<br />
of <strong>Advanced</strong> <strong>Access</strong> Control. By default, URL addresses are<br />
rewritten by the Web proxy.<br />
For more information, see “Bypassing URL Rewriting” on page 144.<br />
Allows documents or email attachments to be sent to the user’s<br />
browser as HTTP content and saved on the local client device. The<br />
browser performs its default action depending on the MIME type of<br />
the content.<br />
Allows users to attach documents to email. You can use this control to<br />
allow users to email documents without having other action controls<br />
(such as Download) that require sending the document to the client<br />
device.
138 <strong>Access</strong> <strong>Gateway</strong> <strong>Advanced</strong> <strong>Edition</strong> Administrator’s <strong>Guide</strong><br />
Policy Setting<br />
File Type<br />
Association<br />
HTML Preview<br />
Live Edit<br />
Upload<br />
Description<br />
Allows users to open documents in applications published through<br />
<strong>Citrix</strong> Presentation Server. You can use this permission to allow users<br />
to open and edit documents on servers in the trusted environment and<br />
avoid sending the document to the user’s client device. You can use<br />
file type association only for document types that are associated with<br />
a published application and only if the logon point properties are<br />
correctly configured.<br />
Allows users to view non-HTML content as HTML in a browser<br />
without needing to run additional client software. Supports a wide<br />
range of client devices, including small form factors. Users need this<br />
access control or Download to view an HTML document in a file<br />
share. This feature is available only for document types for which<br />
there is conversion software installed on a farm Web server. At least<br />
one Web server must have the conversion software installed and must<br />
be assigned to perform the HTML Preview server role.<br />
Allows users to edit remote documents using the Live Edit Client, an<br />
ActiveX control. Users can conveniently edit and save documents<br />
without needing to download and upload them.<br />
Allows users to save new documents and overwrite existing files in a<br />
file share.<br />
Allowing <strong>Access</strong> to Standard Web Content<br />
The only policy setting that applies for standard Web content is the Allow or<br />
Deny <strong>Access</strong> setting. Standard Web content includes those document types that<br />
you typically view with a browser. These documents are simply downloaded to<br />
the client device as usual for browsing, and do not come under the varying levels<br />
of access control (HTML Preview or Live Edit, for example) that you can apply<br />
to other document types.<br />
The following document types are treated as standard Web content:<br />
Text:<br />
Applications:<br />
Images:<br />
HTML; CSS; XML; X-component<br />
X-Java Script; S-Component<br />
GIF; JPEG; PNG<br />
Allowing File Type Association<br />
Allowing file type association for a resource enables users to open the resource<br />
with an application running in <strong>Citrix</strong> Presentation Server. Providing file type<br />
association as the only means for editing resource documents can heighten<br />
security because it requires that editing occur on the server and not on the client<br />
device.
Chapter 9 Controlling <strong>Access</strong> Through Policies 139<br />
For example, you might choose to grant file type association for a file share<br />
where employees post reports of ongoing project meetings, without providing the<br />
ability to download or upload.<br />
Providing file type association requires that:<br />
• Users run <strong>Citrix</strong> Presentation Server Client software on the client device.<br />
• Users connect through a logon point configured for <strong>Citrix</strong> Presentation<br />
Server.<br />
• Users are assigned to the desired applications in <strong>Citrix</strong> Presentation Server.<br />
• <strong>Citrix</strong> Presentation Server is configured to work with <strong>Advanced</strong> <strong>Access</strong><br />
Control.<br />
Allowing HTML Preview<br />
HTML Preview enables users to view non-HTML content in a browser without<br />
requiring any additional client software. HTML Preview displays documents:<br />
• For read-only permission<br />
• On a wide range of devices when the associated application is not available<br />
• On small form factor devices such as PDAs<br />
HTML Preview is designed primarily for situations in which you want users to be<br />
able to view documents even if they don’t have an application installed on the<br />
client device that can display the document. For example, you might decide to<br />
allow HTML Preview for employees who need to view documents on the road<br />
from public kiosks, PDAs, or non-corporate devices.<br />
For more information about the requirements of providing HTML Preview in the<br />
farm, see “HTML Preview Requirements” on page 46.<br />
Allowing Email Attachments<br />
The Email as Attachment access control is designed to allow users to email<br />
documents from a location on a remote server to a recipient, without having to<br />
download the document to the client device. You might choose to allow Email as<br />
Attachment along with or in similar situations as the HTML Preview.<br />
For example, you might provide email attachment capability for employees on<br />
the road when they are using unrecognized or untrusted client devices. These<br />
employees can view documents, write their comments in a Web-based version of<br />
their email program, and attach the document to the email message. Users can<br />
take these actions without downloading the document to the client device.
140 <strong>Access</strong> <strong>Gateway</strong> <strong>Advanced</strong> <strong>Edition</strong> Administrator’s <strong>Guide</strong><br />
Allowing Live Edit<br />
Live Edit is a convenience feature that allows users to edit remote documents<br />
with an ActiveX control. Users can edit and save documents without needing to<br />
download and upload them.<br />
The following notes explain how Live Edit works in combination with other<br />
action controls you can allow for the same resource:<br />
• Live Edit allowed without other action controls. Users can save the<br />
document on the source repository.<br />
• Live Edit and Email As Attachment allowed. Users can save the<br />
document on the local client device and email it from within the Live Edit<br />
session.<br />
• Live Edit and Download allowed. Users can save the document on the<br />
local client device.<br />
• Live Edit and Upload allowed. Users can save the document on the local<br />
client device. Users can upload (save) the document to published file<br />
shares. Published file shares have the option Publish for users in their list<br />
of resources selected in their properties.<br />
For more information the requirements for using Live Edit in your environment,<br />
see “Live Edit Requirements” on page 49.<br />
Allowing Logon<br />
The privilege of logging on is treated as a resource so you can secure the privilege<br />
through policies, just as you do for other resources. This feature enables you to<br />
configure additional requirements, beyond the authentication of credentials, that<br />
users must meet to log on to your network.<br />
The resource is named Allow Logon. You can select the Allow Logon resource<br />
along with other resources when you create an access policy.<br />
Users cannot log on until you create an access policy to allow them to do so.
Chapter 9 Controlling <strong>Access</strong> Through Policies 141<br />
To allow users to log on<br />
1. Open the properties of an existing access policy or create a new access<br />
policy.<br />
• To open an existing policy’s properties, select Policies and click<br />
Manage policies in Common Tasks. Search for the policy you want,<br />
select it, right-click, and choose Edit policy.<br />
• To create a new access policy, select Policies in the console tree and<br />
click Create access policy in Common Tasks.<br />
2. On the Resources page, select Allow Logon.<br />
3. On the Settings page, locate the heading Allow Logon and select from<br />
under it <strong>Access</strong>.<br />
4. Select Enable this policy to control this setting and select Allow, unless<br />
denied by another policy.<br />
Setting Conditions for Showing the Logon Page<br />
The logon point sends the logon page to the client device browser, allowing users<br />
to enter their credentials. You can make display of the logon page conditional by<br />
requiring that users’ client devices pass endpoint analysis scans before displaying<br />
the page.<br />
This feature adds security to your logon page. For example, you can create an<br />
endpoint analysis scan that verifies that the client device is running your required<br />
level of antivirus protection. Client devices that are not running the required level<br />
of antivirus protection might host a virus or sniffing program to record a user’s<br />
keystrokes. Such programs can record and steal credentials as users log on.<br />
You can set conditions for showing the logon page in logon point properties. If<br />
users do not meet the specified conditions, they receive an <strong>Access</strong> Denied error<br />
when they attempt to open the logon page URL.<br />
If you do not set any conditions in the Visibility section of logon point properties,<br />
the logon page is visible to any user who is allowed to browse to the URL.<br />
To set conditions for showing the logon page<br />
1. In the console tree, select the logon point and click Edit logon point in<br />
Common Tasks.<br />
2. In the logon point properties, select the Visibility page.<br />
3. Select Show logon page.<br />
4. If you want to show the logon page conditionally, use the logical expression<br />
builder to define the conditions to be met by the connecting client device.
142 <strong>Access</strong> <strong>Gateway</strong> <strong>Advanced</strong> <strong>Edition</strong> Administrator’s <strong>Guide</strong><br />
A. Insert the logical operators AND, OR, and NOT and click Endpoint<br />
Analysis Output to choose from a list of your configured scans.<br />
B. Review the resulting logical statement in the Expression preview.<br />
Note: The expression builder appears unavailable until you have created<br />
endpoint analysis scans.<br />
The Root object displayed in the expression builder does not affect<br />
expression logic. The root signals the beginning of your expression tree.<br />
Example 1: An Expression Requiring One Scan<br />
To create an expression that requires the client device to be running a required<br />
level of McAfee VirusScan, click Endpoint Analysis Output and choose the scan<br />
output for the antivirus application. The expression builder contains:<br />
<strong>Citrix</strong> Scans for McAfee VirusScan.scan_name.Verified-McAfee-<br />
VirusScan<br />
where scan_name is the name you assigned to the scan when you created it.<br />
Example 2: Creating a Conditional Expression with OR<br />
Assume that the conditions you want to set are reflected by the following<br />
statement: Show the logon page to users with client devices that are running a<br />
required level of McAfee VirusScan or McAfee VirusScan Enterprise. Before you<br />
build this conditional expression, you must create an endpoint analysis scan for<br />
your required versions of McAfee VirusScan and McAfee VirusScan Enterprise.<br />
Note: This example requires you to have configured two endpoint analysis<br />
scans to verify whether or not the client device is running McAfee VirusScan or<br />
McAfee VirusScan Enterprise. For information about creating scans, see<br />
“Creating Endpoint Analysis Scans” on page 166.<br />
1. Select the Root object in the tree and click OR.<br />
2. Click Endpoint Analysis Output and choose the scan output for McAfee<br />
Virus Scan.<br />
3. Click Endpoint Analysis Output and choose the scan output for McAfee<br />
Virus Scan Enterprise.<br />
The result of this example procedure looks like this in the expression tree:<br />
ROOT<br />
OR<br />
<strong>Citrix</strong> Scans for McAfee VirusScan.scan_name.Verified-<br />
McAfee-VirusScan
Chapter 9 Controlling <strong>Access</strong> Through Policies 143<br />
<strong>Citrix</strong> Scans for McAfee VirusScan Enterprise.scan_<br />
name.Verified-McAfee-VirusScan-Enterprise<br />
where scan_name is the name you assigned to the scans.<br />
Example 3: Creating a Complex Conditional Expression with NOT<br />
The following example shows a conditional expression using the NOT operator.<br />
To pass this complex condition, the client device must have your required version<br />
of McAfee VirusScan or McAfee VirusScan Enterprise, but the device cannot be<br />
connecting with the Mozilla Firefox browser.<br />
Note: This example requires you to have configured three endpoint analysis<br />
scans to verify whether or not the client device is running McAfee VirusScan or<br />
McAfee VirusScan Enterprise, and to also verify if the client device is connecting<br />
with the Mozilla Firefox browser. For information about creating scans, see<br />
“Creating Endpoint Analysis Scans” on page 166.<br />
1. Select the Root object in the tree and click AND.<br />
2. Click OR.<br />
3. Click Endpoint Analysis Output and choose your scan output for McAfee<br />
VirusScan.<br />
4. Click Endpoint Analysis Output and choose your scan output for McAfee<br />
VirusScan Enterprise.<br />
5. Select the AND object that you created in Step 1 and click NOT.<br />
6. Click Endpoint Analysis Output and choose your scan output for Mozilla<br />
Firefox.<br />
The result of the example looks like this in the expression tree:<br />
ROOT<br />
AND<br />
OR<br />
<strong>Citrix</strong> Scans for McAfee VirusScan.scan_name.<br />
Verified-McAfee-VirusScan<br />
<strong>Citrix</strong> Scans for McAfee VirusScan Enterprise.<br />
scan_name.Verified-McAfee-VirusScan-Enterprise<br />
NOT<br />
<strong>Citrix</strong> Scans for Mozilla Firefox.scan_name.<br />
Verified-Mozilla-Firefox-Connecting<br />
where scan_name is the name you assigned to the scans.<br />
The Expression preview shows the following logical statement:<br />
((<strong>Citrix</strong> Scans for McAfee VirusScan.scan_name.Verified-<br />
McAfee-VirusScan OR <strong>Citrix</strong> Scans for McAfee VirusScan<br />
Enterprise.scan_name.Verified-McAfee-VirusScan-Enterprise)
144 <strong>Access</strong> <strong>Gateway</strong> <strong>Advanced</strong> <strong>Edition</strong> Administrator’s <strong>Guide</strong><br />
AND (NOT <strong>Citrix</strong> Scans for Mozilla Firefox.scan_name.<br />
Verified-Mozilla-Firefox-Connecting))<br />
where scan_name is the name you assigned to the scans.<br />
Note the following about this example:<br />
• Inserting the NOT operator results in an OR NOT logic by default. If you<br />
want logic for AND NOT, insert the AND operator before the NOT<br />
operator in your tree, as you did in the above example.<br />
• The Mozilla Firefox scan package verifies a minimum version number. In<br />
this example, we want to verify any known version. To detect all known<br />
versions, we can create the scan to verify that the client device is<br />
connecting with a minimum of version 0.1.<br />
Bypassing URL Rewriting<br />
By default, <strong>Access</strong> <strong>Gateway</strong> rewrites the URL addresses of Web resources using<br />
a built-in Web proxy component. Web servers in the farm proxy the URL<br />
addresses of these internal resources. If you select the policy setting to bypass<br />
URL rewriting, you decrease your ability to set differing levels of access. This<br />
occurs because some action controls (policy settings) are not available for the<br />
resource unless Web proxy URL rewriting is used.<br />
In some documentation, this feature is referred to as bypassing the Web proxy.<br />
You might decide to bypass URL rewriting to:<br />
• Increase performance among the farm’s Web servers<br />
• Provide end-to-end SSL connections between the client device browser and<br />
the destination Web server hosting the resource<br />
• Provide access to internal Web sites that do not allow or work well when<br />
their URLs are rewritten.<br />
• Provide access to Web resources that are stored on a Web server hosting<br />
<strong>Advanced</strong> <strong>Access</strong> Control.<br />
Considerations about URL Rewriting<br />
Note the following considerations when deciding to use or bypass the URL<br />
rewriting feature:<br />
• If you select Bypass URL rewriting for a Web resource, all URL addresses<br />
for the host name are subject to the option and bypass the Web proxy. For<br />
example, if you select the option for the address<br />
“http://www.server1.company.com/folder1/folder2/”, all URL addresses
Chapter 9 Controlling <strong>Access</strong> Through Policies 145<br />
hosted on server1.company.com bypass the Web proxy, even if those<br />
addresses are not specified within the Web resource.<br />
• Users cannot access Web resources stored on a Web server hosting<br />
<strong>Advanced</strong> <strong>Access</strong> Control unless URL rewriting is bypassed. If you want to<br />
provide such access, you must create a policy for the Web resources and<br />
select Bypass URL Rewriting in the policy settings.<br />
• Ensure that the Web sites you make accessible are secure from<br />
vulnerabilities such as cross-site scripting and SQL injection. When the<br />
Web proxy is used to rewrite Web resource URLs (the default case), all<br />
resources appear to reside on the Web proxy server. In such cases you<br />
cannot rely upon protection by the JavaScript “same origin” policy to<br />
prevent malicious scripts from one server accessing properties of resources<br />
on another server, because resources from all servers appear to share the<br />
same origin.<br />
To bypass URL Rewriting<br />
Select Bypass URL rewriting in the policy settings of the policy that controls<br />
access to the Web resource.<br />
Important: When defining resources that bypass URL rewriting, you must<br />
specify entire servers, such as //server/. All URL addresses hosted on the<br />
specified server are bypassed by the Web proxy, even if those URL addresses<br />
appear in the properties of other Web resources that are supposed to be routed<br />
through the Web proxy.<br />
Limitations of Browser-Only <strong>Access</strong><br />
If your <strong>Advanced</strong> <strong>Access</strong> Control deployment does not require any client<br />
software on client devices, your deployment is considered to provide browseronly<br />
access. In this scenario, users need only a Web browser to access corporate<br />
resources.<br />
Browser-only access to Web resources depends on the URL rewriting function of<br />
the Web proxy. Some Web applications do not handle URL rewriting well or do<br />
not allow the cookie management needed for browser-only access. Such<br />
applications are better suited for the simplified functionality of a common<br />
browser interface or client access through the <strong>Access</strong> <strong>Gateway</strong>.<br />
For example, the more a Web application uses the following advanced<br />
technologies, the less likely it is to work smoothly with proxied URL rewriting:<br />
• Flash animations
146 <strong>Access</strong> <strong>Gateway</strong> <strong>Advanced</strong> <strong>Edition</strong> Administrator’s <strong>Guide</strong><br />
• Shockwave multimedia objects<br />
• ActiveX controls<br />
• <strong>Advanced</strong> Java scripting languages<br />
Test the behavior of those Web applications that you plan to provide only through<br />
a browser. If the applications do not behave as expected, consider the following<br />
alternatives:<br />
• Bypass the Web proxy. You can choose for users to bypass the Web proxy.<br />
For remote users (and possibly internal users in deployments of secure<br />
enclaves), this means using the <strong>Access</strong> <strong>Gateway</strong> with the Secure <strong>Access</strong><br />
Client. For more information about bypassing the proxy, see “Bypassing<br />
URL Rewriting” on page 144.<br />
• Network resources. You can create a network resource to provide users<br />
direct access to the application using the Secure <strong>Access</strong> Client. Network<br />
resources do not appear in published lists of users’ resources such as the<br />
<strong>Access</strong> Interface.<br />
• Common browser interface. You can choose to use a basic browserindependent<br />
interface that suppresses use of enhanced display or<br />
functionality.<br />
To implement the common interface, open the Properties for the Web<br />
resource, choose the URL Addresses page, and select Use the interface<br />
that is common for all browser types.<br />
Note: You cannot incorporate the failover feature for <strong>Access</strong> <strong>Gateway</strong><br />
appliances for users accessing Web resources only with a browser.<br />
Creating Connection Policies<br />
Connection policies control connections that use the Secure <strong>Access</strong> Client. You<br />
can assign filters to connection policies to define when the policy applies.<br />
Take care not to confuse connection policies with access policies:<br />
• Connection policies allow Secure <strong>Access</strong> Client connections and applies<br />
settings to those connections. You must allow use of the Secure <strong>Access</strong><br />
Client to establish connections to any network resource and for email<br />
synchronization, because these types of resources do not allow browseronly<br />
access.<br />
• <strong>Access</strong> policies define access permissions that specified users have to<br />
resources under specified conditions. For example, an access policy
Chapter 9 Controlling <strong>Access</strong> Through Policies 147<br />
determines whether or not a group of users can access a certain file share<br />
and whether they can preview files in HTML or use Live Edit to modify the<br />
file.<br />
One of the filters you can apply to a connection policy is a continuous scan filter.<br />
A continuous scan filter comprises a set of scans that continue to monitor the<br />
connection during the entire user session. As soon as the client device ceases to<br />
meet the requirements defined in the continuous scan filter, the connection is<br />
disconnected.<br />
To create a connection policy<br />
1. In the console tree, select Policies > Connection Policies and choose<br />
Create connection policy from Common Tasks.<br />
2. Name and describe the policy.<br />
3. Configure the connection settings you want to apply by selecting each<br />
setting and choosing Yes or No to allow or deny it. You must allow the<br />
setting Launch Secure <strong>Access</strong> Client if access allowed to make additional<br />
settings available. Select from among the following settings:<br />
• Authenticate after system resume forces authentication after the<br />
client device goes into standby or hibernate mode.<br />
• Authenticate after network interruption forces authentication if<br />
the network connection is interrupted.<br />
• Enable split DNS allows failover to a user’s local DNS if the remote<br />
DNS is not available. By default, <strong>Access</strong> <strong>Gateway</strong> checks a user’s<br />
remote DNS only.<br />
• Execute logon scripts runs Windows logon scripts when the<br />
connection is established.<br />
• Desktop sharing allows users to share their desktop with other users<br />
who are logged on to the <strong>Access</strong> <strong>Gateway</strong> from a Secure <strong>Access</strong><br />
Client. Users can then share their desktop by right-clicking the Secure<br />
<strong>Access</strong> Client icon in the Windows notification area and selecting<br />
Share Desktop.
148 <strong>Access</strong> <strong>Gateway</strong> <strong>Advanced</strong> <strong>Edition</strong> Administrator’s <strong>Guide</strong><br />
4. If you want to give client devices a unique IP address, add and define the<br />
address pools from which address aliases are assigned. On the Define IP<br />
Pool Configuration page, click New to add each available IP pool.<br />
• For <strong>Access</strong> <strong>Gateway</strong>, enter the IP address of the <strong>Access</strong> <strong>Gateway</strong><br />
appliance.<br />
• For <strong>Gateway</strong>, enter the IP address of the default gateway if you use<br />
one. If you do not use a default gateway, you can leave this box blank.<br />
• Each IP range should be valid but unused on the network.<br />
• To avoid conflicting assignments, ensure that you configure a unique<br />
IP range or ranges for each gateway appliance. You should not assign<br />
the same IP range or ranges to multiple gateway appliances.<br />
Note: If you add address pools, you must restart each <strong>Access</strong><br />
<strong>Gateway</strong> appliance in the farm before the IP pool becomes available.<br />
You might want to schedule IP pool configuration for a convenient<br />
time.<br />
5. Select filters that define the conditions for policy enforcement. You can<br />
select two types of filters:<br />
• A filter defines requirements for logon points, endpoint analysis,<br />
authentication, and client certificates. This type of filter checks for<br />
your requirements once during logon.<br />
• A continuous scan filter defines requirements of registry entries,<br />
files, or processes that must be verified on the client device. This<br />
filter checks its requirements throughout the user session.<br />
6. Select users and user groups to whom the policy applies.<br />
Creating Policies for Presentation Server<br />
Connections<br />
If you create policies for Secure <strong>Access</strong> Client connections to <strong>Citrix</strong> Presentation<br />
Server, you must:<br />
• Define at least one IP pool in the connection policy properties<br />
• Create a network resource that includes the server or servers running<br />
Presentation Server
Chapter 9 Controlling <strong>Access</strong> Through Policies 149<br />
If no IP pools are defined, the client device is identified by the IP address of the<br />
<strong>Access</strong> <strong>Gateway</strong> appliance and connects directly to the server running<br />
Presentation Server without being controlled by policies assigned to the network<br />
resources defined for the servers running Presentation Server.<br />
Prioritizing Connection Policies<br />
Because multiple connection policies can apply to the same user, you can<br />
prioritize connection policies. The settings in policies with a higher ranking<br />
priority take precedence over those in lower ranking policies.<br />
To prioritize connection policies<br />
1. In the console tree, select Connection Policies and choose Set connection<br />
policy priority from Common Tasks.<br />
2. Select a policy and use the arrow buttons to move its position in the ordered<br />
list. The highest priority policy appears at the top of the list.<br />
Creating Policy Filters<br />
Filters define the conditions under which the policy applies. Consider the<br />
following example of a policy statement:<br />
Allow access and HTML Preview permission only to the Quarterly Sales Reports<br />
file share for Sales department users when they log on from outside the secure<br />
network using an SSL client certificate.<br />
The filter part of the above policy statement is “when they log on from outside the<br />
secure network using an SSL client certificate.” If you authenticate remote<br />
workers through a specific logon point, you can filter by the logon point and you<br />
can require the use of a client certificate.<br />
You can configure four types of conditions for a filter:<br />
• Logon point. Applies the policy based on the URL with which the user<br />
connects to the network.<br />
• Authentication strength. Applies the policy based on the authentication<br />
being used. The options available in the filter depend on the authentication<br />
configurations you have set up. For more information see “Securing User<br />
Connections” on page 101.<br />
• Endpoint analysis scan outputs. Applies the policy based on information<br />
gathered by endpoint analysis scans of the client device. You must<br />
configure scans before any scan outputs are available to integrate into a<br />
filter.
150 <strong>Access</strong> <strong>Gateway</strong> <strong>Advanced</strong> <strong>Edition</strong> Administrator’s <strong>Guide</strong><br />
• Client certificate requirements. Applies the policy based on the presence<br />
of specified criteria in the SSL client certificate.<br />
Filters are designed so you can name them and use the same filter for multiple<br />
policies. Each policy uses one filter only. To achieve the effect of using multiple<br />
filters, you can use the custom filter feature to create complex filters that contain<br />
other filters.<br />
To create a policy filter<br />
You can create a filter before, at the same time, or after you create the policies<br />
you want to associate with it.<br />
1. Open the New Filter wizard from one of the following locations:<br />
• In the console tree, select Policies > Filters and click Create filter in<br />
Common Tasks.<br />
• On the Select Filters page of a policy wizard, click New.<br />
2. Enter a name and description for the filter.<br />
3. Select the option Create a typical filter.<br />
4. If you want the policy to apply when users enter through specific logon<br />
points, select those logon points.<br />
5. If you want the policy to apply based on the authentication used, select the<br />
authentication.<br />
6. If you want the policy to apply based on endpoint analysis scans of the<br />
client device, select the appropriate scan outputs.<br />
7. If you want the policy to apply based on required information in an SSL<br />
client certificate, select Specify SSL client certificate matching criteria.<br />
You can require that the certificate contain specified values for common<br />
name, organization, or organizational unit.<br />
• You cannot specify SSL client certificate values for filtering unless<br />
the option to require client certificates is selected in <strong>Access</strong> <strong>Gateway</strong><br />
Global Properties (<strong>Gateway</strong> Appliances > Edit gateway appliances<br />
properties > Client Properties).<br />
• Do not add quotation marks around the values you enter for common<br />
name, organization, or organizational unit.<br />
Each type of filter condition is optional. For example, you can configure a filter<br />
based on logon point only. Logically, the conditions defined in a filter are<br />
combined with the AND logical operator, and within a condition type, the settings<br />
are combined with an OR operator. For example, if your filter settings specify<br />
Logon Point A, Logon Point B, and Scan Output C, the policy is applied with the<br />
following logic:
Chapter 9 Controlling <strong>Access</strong> Through Policies 151<br />
(Logon Point A or Logon Point B) and Scan Output C<br />
Creating Custom Filters<br />
You can create custom filters that use logical expressions with the operators<br />
AND, OR, and NOT, allowing you to create filters of greater complexity than you<br />
can with typical filters. With typical filters you are limited to selecting conditions<br />
that the wizard combines with AND logic only. Because they are made from<br />
logical expressions, custom filters provide more complexity and flexibility, but<br />
they are harder to create.<br />
Using custom filters is optional and not required for common configurations. For<br />
ease of administration, use typical policy filters.<br />
To build a custom filter with logical expressions<br />
1. In the console tree, select Policies > Filters and click Create filter in<br />
Common Tasks. The New Filter wizard opens.<br />
2. Enter a name and description for the filter.<br />
3. Select the option Create a custom filter.<br />
4. On the Build Custom Filter page, use the logical expression builder to<br />
create an expression that reflects the conditions you want met before the<br />
policy is enforced.<br />
• Insert the logical operators AND, OR, and NOT along with elements<br />
for logon point, authentication, endpoint analysis output, client<br />
certificate, or another filter to create the logical expression.<br />
• Note that the Root object displayed in the expression builder does not<br />
affect expression logic. The root signals the beginning of your<br />
expression tree.<br />
Example: Creating a Custom Filter<br />
Assume for this example that your network security strategy is to deny logon<br />
privileges to client devices running Windows 2000 unless those devices have<br />
Windows 2000 Service Pack 4 installed OR are running Internet Explorer 6.0.<br />
You want to build a filter for this scenario that you can assign to a policy that<br />
includes the Allow Logon privilege.<br />
Before creating the custom filter, create two scans as follows:
152 <strong>Access</strong> <strong>Gateway</strong> <strong>Advanced</strong> <strong>Edition</strong> Administrator’s <strong>Guide</strong><br />
1. Use “<strong>Citrix</strong> Scans for Windows Service Pack” to create a scan with these<br />
settings:<br />
• Rule conditions: operating system = Windows 2000; client device<br />
regional locale = all<br />
• Property value to verify: Service Pack 4<br />
2. Use “<strong>Citrix</strong> Scans for Internet Explorer” to create a scan with these settings:<br />
• Rule conditions: operating system = Windows 2000; client device<br />
regional locale = all<br />
• Property value to verify is the minimum required version: 6.0<br />
On the Build Custom Filter page of the New Filter wizard, follow these steps to<br />
create the logical expression:<br />
1. Click OR from the Insert group box.<br />
2. Click Endpoint Analysis Output and choose the scan output for Service<br />
Pack 4.<br />
3. Select OR in the expression builder and click Endpoint Analysis Output<br />
again to choose the scan output for Internet Explorer Version 6.0.<br />
The result in the expression builder appears as:<br />
OR<br />
<strong>Citrix</strong> Scans for Windows Service Pack.scan_name.Verified-Windows-<br />
Service-Pack<br />
<strong>Citrix</strong> Scans for Internet Explorer.scan_name.Verified-Internet-<br />
Explorer<br />
where scan_name is the name you assigned to the scans.<br />
For more examples of using an expression builder, see “Setting Conditions for<br />
Showing the Logon Page” on page 141.<br />
Creating Continuous Scan Filters<br />
Continuous scan filters define the continuous scan requirements for a connection<br />
policy. A continuous scan verifies one item (a file, registry entry, or process) on<br />
the client device. The filter can include one or more continuous scans for<br />
verification. When associated with a connection policy, the filter defines all the<br />
requirements to be verified by continuous scans for the connection policy to take<br />
effect.<br />
Note that continuous scan filters, unlike regular policy filters, cannot be used by<br />
<strong>Citrix</strong> Presentation Server policies. For more information, see “Integrating <strong>Citrix</strong><br />
Presentation Server” on page 157.
Chapter 9 Controlling <strong>Access</strong> Through Policies 153<br />
For information about continuous scans, see “Creating Continuous Scans” on<br />
page 178.<br />
To create a continuous scan filter<br />
1. In the console tree, select Policies > Continuous Scan Filters and click<br />
Create filter in Common Tasks.<br />
2. Enter a name and description for the filter.<br />
3. On the Configure Requirements page, use the logical expression builder<br />
to create an expression that reflects the conditions you want the client<br />
device to meet.<br />
• Insert the logical operators AND, OR, and NOT and click File Scan,<br />
Process Scan, or Registry Scan to choose from your configured<br />
scans.<br />
• Note that the Root object displayed in the expression builder does not<br />
affect expression logic. The root signals the beginning of your<br />
expression tree.<br />
Example 1: Conditional Expression Requiring One Scan<br />
Assume that you want to create an expression that requires an antivirus program's<br />
executable file to be installed on the client device and that you configured a file<br />
scan to verify this file. From the Configure Requirements page of the<br />
continuous scan filter wizard, click File Scan and choose the file scan. The result<br />
of this example procedure looks like this in the expression tree:<br />
ROOT<br />
scan_name<br />
where scan_name is the name you assigned to the scan when you created it.<br />
Example 2: Conditional Expression Requiring One of Two Scans<br />
Assume that the conditions you want to set are reflected by the following<br />
statement: Client devices must be running the process for a personal firewall from<br />
either Company A or Company B. Before you build this conditional expression,<br />
you must create a process scan for Company A's personal firewall process and<br />
another process scan for Company B's personal firewall process.<br />
1. Click OR.<br />
2. Click Process Scan and choose the scan for Company A’s personal firewall<br />
process.<br />
3. Click Process Scan and choose the scan for Company B’s personal firewall<br />
process.<br />
The result of this example procedure looks like this in the expression tree:
154 <strong>Access</strong> <strong>Gateway</strong> <strong>Advanced</strong> <strong>Edition</strong> Administrator’s <strong>Guide</strong><br />
ROOT<br />
OR<br />
scan_name_CompanyA_process<br />
scan_name_CompanyB_process<br />
where scan_name_CompanyA_process and scan_name_CompanyB_process are<br />
the names you assigned to the scans.<br />
For more examples of using an expression builder, see “Setting Conditions for<br />
Showing the Logon Page” on page 141.<br />
Granting <strong>Access</strong> to the Entire Network<br />
The Entire Network resource represents all visible servers and services on your<br />
secure network. If policies allow connections and access to this resource, Secure<br />
<strong>Access</strong> Client users can access these servers or services through an SSL virtual<br />
private network tunnel created between the client device and the network. The<br />
Entire Network resource is a built-in network resource, the properties of which<br />
cannot be edited or deleted. To control the conditions under which the Entire<br />
Network resource is accessed, you must create access policies just as you do for<br />
all other types of resources.<br />
You can use the Entire Network resource to:<br />
• Quickly set up your deployment and test access<br />
• Provide unlimited access to a special class of user, such as administrators<br />
who need wide access for disaster recovery or emergency operations<br />
• Provide open access by default and later develop policies that deny access<br />
to specified resources according to your security plan<br />
The general steps involved in granting access to the Entire Network include:<br />
1. Create an access policy for the Entire Network resource allowing access to<br />
selected users.<br />
2. Create a connection policy allowing user connections.<br />
3. Filter the policies according to the conditions or requirements you want to<br />
impose.<br />
Because the Entire Network resource includes all visible servers on the network,<br />
take care to allow access to this resource only under the conditions you intend.<br />
<strong>Access</strong> to this resource is a powerful level of access.
Chapter 9 Controlling <strong>Access</strong> Through Policies 155<br />
Reviewing Policy Information with Policy Manager<br />
Policy Manager enables you to search your policies by resource, users, and filters.<br />
You can use keywords for your searches. The search results can assist with quick<br />
policy planning, management, or troubleshooting. The following are only a<br />
sample of the types of information you can find quickly with Policy Manager:<br />
• Find all the policies that affect a specified user or user group<br />
• View all the policy settings that pertain to a specified resource<br />
• List all policies that use a specified filter<br />
• Find all policies that control the permission to logon<br />
To search for policies and settings<br />
1. Open Policy Manager by selecting Policies in the console and choosing<br />
Manage policies from Common Tasks.<br />
2. Use a mixture of keywords in the Resource, User, and Filter text boxes<br />
and click Search. For example, to find every policy assigned to “All<br />
authenticated users,” type all in the User text box.<br />
• By default all policies are shown when you open the Policy Manager.<br />
Clicking Clear at any time empties the search criteria boxes and<br />
returns to a view of all policies.<br />
• Double-click a filter to open the filter’s properties. Double-click in<br />
any other column to open the policy’s properties.<br />
• Click a column heading to sort results alphabetically by that column’s<br />
entries. Click the same column again to reverse the sort order.<br />
Note: Policy Manager does not present information about the filtered results of<br />
policy control with live connecting clients, such as the resulting set of access<br />
permissions after endpoint analysis scans or continuous scans are taken into<br />
consideration.
156 <strong>Access</strong> <strong>Gateway</strong> <strong>Advanced</strong> <strong>Edition</strong> Administrator’s <strong>Guide</strong>
CHAPTER 10<br />
Integrating <strong>Citrix</strong> Presentation<br />
Server<br />
You can integrate <strong>Advanced</strong> <strong>Access</strong> Control and <strong>Citrix</strong> Presentation Server so<br />
that users can easily access all of their resources, including published<br />
applications, from a common interface. For example, you can embed a <strong>Citrix</strong><br />
<strong>Access</strong> Platform site within the <strong>Access</strong> Interface. The <strong>Access</strong> Interface is a<br />
navigation page shipped with <strong>Advanced</strong> <strong>Access</strong> Control that can list available<br />
published applications alongside other available resources such as Web resources,<br />
file shares, and so on.<br />
In addition, you can share information collected by <strong>Advanced</strong> <strong>Access</strong> Control to<br />
extend the policy-based access control capabilities of <strong>Citrix</strong> Presentation Server.<br />
By integrating <strong>Advanced</strong> <strong>Access</strong> Control filters within <strong>Citrix</strong> Presentation Server<br />
policies, you can control which published applications users can access and what<br />
they can do within those applications once they get access. This allows you to<br />
create <strong>Citrix</strong> Presentation Server policies to accommodate different access<br />
scenarios based on a variety of factors such as authentication strength, logon<br />
point, and client device information such as endpoint analysis.<br />
For example, you can include endpoint analysis information collected by<br />
<strong>Advanced</strong> <strong>Access</strong> Control within a <strong>Citrix</strong> Presentation Server policy to determine<br />
access to a published application. In addition, you can selectively enable clientside<br />
drive mapping, cut and paste functionality, and local printing based on the<br />
logon point used to access the published application.<br />
The next section discusses the supported deployments as well as the procedures<br />
required to integrate <strong>Citrix</strong> Presentation Server and <strong>Advanced</strong> <strong>Access</strong> Control. If<br />
you are passing <strong>Advanced</strong> <strong>Access</strong> Control information into <strong>Citrix</strong> Presentation<br />
Server for policy evaluation, you must complete the following steps as well:<br />
• Create one or more filters within <strong>Advanced</strong> <strong>Access</strong> Control. See “Creating<br />
Policy Filters” on page 149 for more information about creating filters.<br />
• Create policies within <strong>Citrix</strong> Presentation Server that reference <strong>Advanced</strong><br />
<strong>Access</strong> Control filters. See the <strong>Citrix</strong> Presentation Server Administrator’s<br />
<strong>Guide</strong> for more information about creating policies.
158 <strong>Access</strong> <strong>Gateway</strong> <strong>Advanced</strong> <strong>Edition</strong> Administrator’s <strong>Guide</strong><br />
Note: Continuous scan filters, unlike regular policy filters, cannot be used by<br />
<strong>Citrix</strong> Presentation Server policies.<br />
Linking from <strong>Advanced</strong> <strong>Access</strong> Control to <strong>Citrix</strong><br />
Presentation Server<br />
Complete the steps below to enable <strong>Citrix</strong> Presentation Server to allow<br />
connections from <strong>Advanced</strong> <strong>Access</strong> Control.<br />
1. Ensure that published resources are assigned to the same user groups<br />
assigned to resources in the access server farm.<br />
2. In <strong>Citrix</strong> Presentation Server:<br />
• Enable Allow connections made through MetaFrame Secure<br />
<strong>Access</strong> Manager for each published resource. This option appears in<br />
the access control settings of the published resource properties.<br />
• In each server's properties, select the option Trust requests sent to<br />
the XML Service.<br />
3. Complete the steps required to integrate published applications within your<br />
deployment. Integration options include:<br />
Integrating Web Interface<br />
• <strong>Citrix</strong> <strong>Access</strong> Platform site created by Web Interface. Display<br />
published applications within a <strong>Citrix</strong> <strong>Access</strong> Platform site. For more<br />
information, see “Integrating Web Interface” on page 158.<br />
• File type association. Documents are launched in an associated<br />
application running on a server in a <strong>Citrix</strong> Presentation Server farm.<br />
For more information, see “Configuring File Type Association” on<br />
page 163.<br />
• Third-party portals. Embed a <strong>Citrix</strong> <strong>Access</strong> Platform site within a<br />
third-party portal such as Microsoft SharePoint. For more<br />
information, see “Integrating Third-Party Portals” on page 163.<br />
<strong>Advanced</strong> <strong>Access</strong> Control provides several methods for integrating <strong>Citrix</strong> <strong>Access</strong><br />
Platform sites created with Web Interface including:<br />
• <strong>Citrix</strong> <strong>Access</strong> Platform site embedded within the <strong>Access</strong> Interface. When<br />
the <strong>Access</strong> Interface is selected as the default home page, a <strong>Citrix</strong> <strong>Access</strong>
Chapter 10 Integrating <strong>Citrix</strong> Presentation Server 159<br />
Platform site is displayed alongside file shares and Web applications. You<br />
can also configure the <strong>Access</strong> Interface to display up to three Presentation<br />
Server sites in a separate tab.<br />
• <strong>Citrix</strong> <strong>Access</strong> Platform site configured as the default home page for a logon<br />
point. Once logged on, users are presented the <strong>Citrix</strong> <strong>Access</strong> Platform site.<br />
Note: Web Interface and its accompanying documentation is available for<br />
download from the <strong>Citrix</strong> Web site at www.citrix.com/.<br />
To integrate a <strong>Citrix</strong> <strong>Access</strong> Platform site<br />
This procedure requires that you use Version 4.2 of the <strong>Access</strong> Management<br />
Console to create and manage <strong>Citrix</strong> <strong>Access</strong> Platform sites integrated with<br />
<strong>Advanced</strong> <strong>Access</strong> Control. Version 4.0 of the console or command-line tool<br />
cannot be used to manage sites created with later versions of the console. In<br />
addition, once a <strong>Citrix</strong> <strong>Access</strong> Platform site is configured with the <strong>Advanced</strong><br />
<strong>Access</strong> Control access method, users can access this site only through <strong>Advanced</strong><br />
<strong>Access</strong> Control. Attempts to directly access the site are denied.<br />
Complete the following steps in <strong>Advanced</strong> <strong>Access</strong> Control.<br />
1. Configure <strong>Citrix</strong> Presentation Server to communicate with <strong>Advanced</strong><br />
<strong>Access</strong> Control. See “Integrating <strong>Citrix</strong> Presentation Server” on page 157<br />
for more information.<br />
2. Create a Web resource for the <strong>Citrix</strong> <strong>Access</strong> Platform site with the<br />
following settings:<br />
• Select <strong>Citrix</strong> Web Interface 4.2 or later as the application type<br />
• Select the Publish for users in their list of resources check box<br />
3. Specify the appropriate policy settings for the Web resource referencing the<br />
<strong>Citrix</strong> <strong>Access</strong> Platform site.<br />
4. Provide access to the <strong>Citrix</strong> <strong>Access</strong> Platform site in one of the following<br />
ways:<br />
• Display the <strong>Citrix</strong> <strong>Access</strong> Platform site as the default home page.<br />
Configure a logon point to display the application with the highest<br />
display priority as the home page. Then, configure the <strong>Citrix</strong> <strong>Access</strong><br />
Platform site as the application with the highest priority.<br />
• Embed a <strong>Citrix</strong> <strong>Access</strong> Platform site within the <strong>Access</strong> Interface.<br />
Configure a logon point to display the <strong>Access</strong> Interface as the home<br />
page. The <strong>Citrix</strong> <strong>Access</strong> Platform site is embedded as a frame within<br />
the <strong>Access</strong> Interface.
160 <strong>Access</strong> <strong>Gateway</strong> <strong>Advanced</strong> <strong>Edition</strong> Administrator’s <strong>Guide</strong><br />
See “Configuring Logon Points” on page 89 for more information.<br />
In Web Interface, complete the following steps. For additional information about<br />
configuring Web Interface, see the Web Interface Administrator’s <strong>Guide</strong>.<br />
1. Select Using <strong>Advanced</strong> <strong>Access</strong> Control when specifying an access method<br />
for the site.<br />
2. Enter the URL of the <strong>Advanced</strong> <strong>Access</strong> Control authentication service.<br />
In both Web Interface and <strong>Advanced</strong> <strong>Access</strong> Control, ensure the Workspace<br />
Control, Java Client fallback, and session time-out settings are configured<br />
properly. For more information, see “Coordinating <strong>Advanced</strong> <strong>Access</strong> Control and<br />
Web Interface Settings” on page 162.<br />
Displaying Multiple Sites and Caching Credentials<br />
You can embed multiple <strong>Citrix</strong> <strong>Access</strong> Platform sites within the <strong>Access</strong> Interface<br />
and cache the credentials used to log on to those sites. You can display up to three<br />
<strong>Access</strong> Platform sites as well as enable each site to “remember” and “forget”<br />
users’ logon credentials.<br />
Using Multiple <strong>Access</strong> Platform Sites from the <strong>Access</strong><br />
Interface<br />
By enabling multiple <strong>Access</strong> Platform sites to display within the <strong>Access</strong><br />
Interface, you can provide access to published applications from multiple<br />
Presentation Server farms. To enable <strong>Advanced</strong> <strong>Access</strong> Control to display these<br />
sites, you create and run a Visual Basic script that modifies the values of the<br />
CredentialCachingEnabled and MultipleWebInterfaceEnabled fields in the<br />
FarmSettings table of the configuration database. When you do this, the layout of<br />
the <strong>Access</strong> Interface changes to accommodate up to three sites. <strong>Access</strong> Platform<br />
sites appear in the Applications tab while Web email appears on the Email tab.<br />
File shares and published Web sites appear on the Home tab.<br />
Using Credential Caching<br />
When users log on to <strong>Advanced</strong> <strong>Access</strong> Control, their credentials are passed<br />
through to the <strong>Access</strong> Platform sites. If the credentials for <strong>Advanced</strong> <strong>Access</strong><br />
Control match the credentials for the <strong>Access</strong> Platform site, users are<br />
automatically logged on to the site. Additionally, if Workspace Control is enabled<br />
at the logon point, published applications that were disconnected in the previous<br />
session are automatically reconnected. If these credentials differ, users are<br />
prompted to provide the correct credentials. After logging on, users can select the<br />
Remember my logon check box to avoid re-entering their <strong>Access</strong> Platform site<br />
credentials. Users can also delete their cached credentials by clicking the Forget<br />
My Logon icon.
Chapter 10 Integrating <strong>Citrix</strong> Presentation Server 161<br />
Note: If users choose to store credentials for an <strong>Access</strong> Platform site and their<br />
credentials for logging on to <strong>Advanced</strong> <strong>Access</strong> Control are later changed,<br />
<strong>Advanced</strong> <strong>Access</strong> Control automatically deletes the stored credentials the next<br />
time the users log on. The users are then prompted to re-enter their credentials for<br />
the <strong>Access</strong> Platform site.<br />
When you enable credential caching, <strong>Advanced</strong> <strong>Access</strong> Control stores the <strong>Access</strong><br />
Platform site credentials in the UserData table in the configuration database.<br />
When a user logs on, the Web proxy reads the encrypted credentials from the<br />
configuration database and forwards them to the <strong>Citrix</strong> <strong>Access</strong> Platform site. If<br />
credential caching is disabled or the cached credentials for the site are incorrect,<br />
users are prompted to enter the correct credentials to log on to the <strong>Access</strong><br />
Platform site.<br />
Preserving Workspace Control<br />
When users log on to <strong>Advanced</strong> <strong>Access</strong> Control, the credentials they enter are<br />
used to provide Workspace Control with the Presentation Server farms specified<br />
in the access server farm properties. If users enter one set of credentials to log on<br />
to <strong>Advanced</strong> <strong>Access</strong> Control and a different set of credentials to log on to the<br />
<strong>Access</strong> Platform site, they may not be able to disconnect or reconnect their<br />
applications when you enable multiple sites to be displayed. To preserve<br />
Workspace Control for users with differing sets of credentials, you perform the<br />
following tasks:<br />
• Associate each <strong>Citrix</strong> <strong>Access</strong> Platform site with its corresponding farm<br />
configured in <strong>Advanced</strong> <strong>Access</strong> Control.<br />
• Define a Secure Ticket Authority (STA) so the <strong>Access</strong> <strong>Gateway</strong> can<br />
authenticate users to the farm. For more information about defining the<br />
STA, see “Configuring Authentication with <strong>Citrix</strong> Presentation Server” on<br />
page 100.<br />
To enable the display of multiple <strong>Citrix</strong> <strong>Access</strong> Platform sites and enable<br />
credential caching<br />
1. On the <strong>Advanced</strong> <strong>Access</strong> Control server, create a .vbs file that contains the<br />
following script:<br />
Dim object<br />
Dim farmsetting<br />
Set object =<br />
WScript.CreateObject("<strong>Citrix</strong>.Msam.Amc.BusinessObjects.FarmSett<br />
ingManager")<br />
Set farmsetting = object.GetFarmSetting ()<br />
farmsetting.CredentialCachingEnabled = 1
162 <strong>Access</strong> <strong>Gateway</strong> <strong>Advanced</strong> <strong>Edition</strong> Administrator’s <strong>Guide</strong><br />
farmsetting.MultipleWebInterfaceEnabled = 1<br />
obj.UpdateFarmSetting (farmsetting)<br />
2. Save and close the file.<br />
3. Double-click the file to run the script.<br />
To associate a <strong>Citrix</strong> <strong>Access</strong> Platform site with the corresponding farm<br />
Before you can associate an <strong>Access</strong> Platform site with a Presentation Server farm,<br />
you must configure the site as a Web resource and publish it for users to access<br />
from the <strong>Access</strong> Interface. If you do not select Publish for users in their list of<br />
resources when you configure the <strong>Access</strong> Platform site as a Web resource, the<br />
site is not available to associate with a Presentation Server farm.<br />
1. In the console tree, select the access server farm node and click Edit farm<br />
properties in Common Tasks.<br />
2. From the Presentation Server Farms page, select the farm and click Edit.<br />
3. On the Web Interface page, select the site you want to associate with the<br />
farm.<br />
To ensure Workspace Control functions for all users, you must define a STA in<br />
the gateway properties. For more information, see “Configuring Authentication<br />
with <strong>Citrix</strong> Presentation Server” on page 100.<br />
Coordinating <strong>Advanced</strong> <strong>Access</strong> Control and Web<br />
Interface Settings<br />
Certain <strong>Citrix</strong> Presentation Server settings are available for configuration within<br />
<strong>Advanced</strong> <strong>Access</strong> Control and Web Interface. However, because a <strong>Citrix</strong> <strong>Access</strong><br />
Platform site integrated with <strong>Advanced</strong> <strong>Access</strong> Control can be referenced by<br />
more than one logon point, it is possible for one logon point to embed a <strong>Citrix</strong><br />
<strong>Access</strong> Platform site within its <strong>Access</strong> Interface page while another logon point<br />
displays the site as its default home page. This can cause conflicts with certain<br />
published application settings. To ensure your settings work as intended, follow<br />
the instructions below.<br />
• Workspace Control. Disable all <strong>Advanced</strong> <strong>Access</strong> Control Workspace<br />
Control settings for all logon points that have a <strong>Citrix</strong> <strong>Access</strong> Platform site<br />
as their home page. This ensures that the settings configured within Web<br />
Interface are used. All other logon points can have Workspace Control<br />
configured as desired.<br />
• Java Client Fallback. Ensure that logon points using the <strong>Access</strong> Interface<br />
as their home page have the same Java Client fallback settings as the <strong>Citrix</strong><br />
<strong>Access</strong> Platform site.
Chapter 10 Integrating <strong>Citrix</strong> Presentation Server 163<br />
• Session time-out. Ensure all logon points use the same settings as the<br />
<strong>Citrix</strong> <strong>Access</strong> Platform site.<br />
Configuring File Type Association<br />
When file type association is allowed, users opening a document launch it in an<br />
associated application running on servers in <strong>Citrix</strong> Presentation Server farms. For<br />
example, if a user opens a document within a file share configured with file type<br />
association, the document opens within a published application. File type<br />
association is available to Web resources, file shares, and Web-based email.<br />
To configure file type association for file shares, Web resources, and Webbased<br />
email<br />
Before you configure file type association, verify that published application<br />
settings in <strong>Citrix</strong> Presentation Server specify the associations you want. For<br />
example, if you want a published application to be launched for users when they<br />
open a bitmap image (.bmp) file, make sure that the application’s settings<br />
associate it with .bmp files.<br />
1. Configure <strong>Citrix</strong> Presentation Server to communicate with <strong>Advanced</strong><br />
<strong>Access</strong> Control. See “Integrating <strong>Citrix</strong> Presentation Server” on page 157<br />
for more information.<br />
2. Specify the farm(s) you want to link to your access server farm. See<br />
“Specifying Server Farms” on page 85 for more information.<br />
3. Specify the <strong>Citrix</strong> Presentation Server farms available to the logon point.<br />
See “Configuring Logon Points” on page 89 for more information.<br />
4. Create an access policy for the file share, Web resource, or Web-based<br />
email application and enable and allow the File Type Association action<br />
control. See “Configuring Policy Settings to Control User Actions” on page<br />
137 for more information.<br />
Integrating Third-Party Portals<br />
You can incorporate a <strong>Citrix</strong> <strong>Access</strong> Platform site into a third-party portal such as<br />
SharePoint to provide convenient access to published applications next to other<br />
Web applications and content. You can integrate <strong>Advanced</strong> <strong>Access</strong> Control within<br />
this deployment to provide granular policy-based control over files, Web content<br />
and applications, and published applications.
164 <strong>Access</strong> <strong>Gateway</strong> <strong>Advanced</strong> <strong>Edition</strong> Administrator’s <strong>Guide</strong><br />
Important: Web Interface for Microsoft SharePoint is a Web Part that allows<br />
the integration of a Web Interface within SharePoint. For more information about<br />
Web Interface for Microsoft SharePoint, see the <strong>Citrix</strong> Web site. Generic thirdparty<br />
portals must support the display of IFRAME-based Web content to properly<br />
integrate a <strong>Citrix</strong> <strong>Access</strong> Platform site.<br />
To display a <strong>Citrix</strong> <strong>Access</strong> Platform site in a portal<br />
1. Configure <strong>Citrix</strong> Presentation Server to communicate with <strong>Advanced</strong><br />
<strong>Access</strong> Control. See “Integrating <strong>Citrix</strong> Presentation Server” on page 157<br />
for more information.<br />
2. Create a Web resource for the <strong>Citrix</strong> <strong>Access</strong> Platform site with the<br />
following settings:<br />
• When integrating with SharePoint, select SharePoint with Web<br />
Interface Web Part application type<br />
• When integrating with a generic third-party portal, select <strong>Citrix</strong> Web<br />
Interface 4.2 or later application type<br />
3. Enable the Publish for users in their list of resources check box.<br />
4. Specify the appropriate policy settings for the Web resource referencing the<br />
<strong>Citrix</strong> <strong>Access</strong> Platform site.<br />
5. Create a Web resource for the SharePoint site or third-party portal<br />
containing the <strong>Citrix</strong> <strong>Access</strong> Platform site and specify the appropriate<br />
policy settings.<br />
6. In Web Interface, configure a <strong>Citrix</strong> <strong>Access</strong> Platform site to use <strong>Advanced</strong><br />
<strong>Access</strong> Control as its access method by:<br />
A. Selecting Using <strong>Advanced</strong> <strong>Access</strong> Control when specifying an<br />
access method for the site<br />
B. Entering the URL of the <strong>Advanced</strong> <strong>Access</strong> Control authentication<br />
service<br />
7. In both Web Interface and <strong>Advanced</strong> <strong>Access</strong> Control, ensure the Workspace<br />
Control, Java Client fallback, and session time-out settings are configured<br />
properly. For more information, see “Coordinating <strong>Advanced</strong> <strong>Access</strong><br />
Control and Web Interface Settings” on page 162.
CHAPTER 11<br />
Verifying Requirements on Client<br />
Devices<br />
Endpoint analysis is a process that scans a client device and detects information<br />
such as the presence and version level of operating system, antivirus, firewall, or<br />
browser software. Use endpoint analysis to verify that the client device meets<br />
your requirements before allowing it to connect to your network. You can monitor<br />
files, processes, and registry entries on the client device throughout the user<br />
session to ensure that the device continues to meet requirements.<br />
You can use two types of scans:<br />
• Endpoint analysis scans detect information about the client device, such<br />
as the presence and version level of operating system, antivirus, firewall, or<br />
browser software. This information can be included as a filter within an<br />
access policy or a connection policy. Endpoint analysis scans are run once,<br />
during logon.<br />
• Continuous scans are scans of the client device that occur repeatedly<br />
throughout the session to ensure that the client device continues to meet<br />
requirements. The feature prevents, for example, users from changing the<br />
status of a client device requirement after establishing the connection.<br />
Types of continuous scans include file scans, process scans, and registry<br />
scans. For more information, see “Creating Continuous Scans” on page<br />
178.<br />
You can incorporate detected information into policies, enabling you to grant<br />
different levels of access based upon the client device. For example, you can<br />
provide full access with download permission to users who connect from the field<br />
using corporate laptops that are up-to-date with antivirus and firewall software<br />
requirements. For users connecting from kiosks or untrusted home computers,<br />
you can provide a more restricted level of access that allows previewing<br />
documents only or editing the documents on remote servers without downloading<br />
them.<br />
Endpoint analysis performs these basic steps:<br />
• Examines an initial set of information about the client device to determine<br />
which scans to apply
166 <strong>Access</strong> <strong>Gateway</strong> <strong>Advanced</strong> <strong>Edition</strong> Administrator’s <strong>Guide</strong><br />
• Runs all applicable scans<br />
• Compares property values detected on the client device against desired<br />
property values listed in your configured scans<br />
• Produces an output verifying if desired property values are found<br />
When a user tries to connect through a logon point, endpoint analysis checks the<br />
scans that are filtered for the logon point. All scans with conditions met by the<br />
client device are run on the client device using the Endpoint Analysis Client<br />
software. These scans return results (called scan outputs) of detected information<br />
or True or False results of required property values.<br />
Note: The <strong>Citrix</strong> Scans for Macintosh and <strong>Citrix</strong> Scans for Browser Type do not<br />
require that the Endpoint Analysis Client software run on the client device. These<br />
scans can gather their results from information provided to the server from the<br />
client device directly, without using Endpoint Analysis Client software.<br />
Note that scans with conditions not matching the client device do not run on the<br />
client device; however, even these scans receive a default output defined by the<br />
scan package, such as False.<br />
Endpoint analysis completes before the user session consumes a license.<br />
To configure endpoint analysis<br />
Follow these general steps to configure endpoint analysis:<br />
1. Identify the scan packages that check the properties you want to verify.<br />
2. Create scans, configuring the conditions under which they run and the<br />
properties they verify.<br />
3. Add additional rules if you want a scan to apply to multiple scenarios.<br />
4. Use scan outputs in policies when you configure policy filters.<br />
5. Deploy client software to users.<br />
You can log endpoint analysis events through the system Event Viewer. For more<br />
information about auditing such events, see “Auditing <strong>Access</strong> to Corporate<br />
Resources” on page 225.<br />
Creating Endpoint Analysis Scans<br />
Scans verify specific properties of client devices connecting to your network,<br />
such as the installed version of an antivirus software product or verification that<br />
the machine belongs to a required domain.
Chapter 11 Verifying Requirements on Client Devices 167<br />
Scans have rules that define when the scan is applied to a client device. Each rule<br />
includes a set of conditions, which are required attributes of the client device that<br />
must all be met for the scan to be applied.<br />
Creating a scan includes defining the prerequisite conditions under which the<br />
scan runs and configuring the properties to verify.<br />
Note: For detailed information about the configurable properties of a specific<br />
scan, see the “Scan Properties Reference” on page 239.<br />
To create a scan<br />
1. In the console tree, select the scan package for the properties you want to<br />
scan.<br />
2. From the Common Tasks area, click Create scan.<br />
3. Name the scan.<br />
4. Select the conditions that will define when the scan runs.<br />
5. Provide a rule name for the set of conditions and properties you are<br />
configuring.<br />
6. Select all acceptable values for each condition.<br />
• The condition is met if the client device matches any of the values<br />
you select<br />
• The wizard presents a separate page for each condition<br />
7. Configure the property values to verify.<br />
• For example, to verify that a minimum version of an antivirus<br />
program is running on the client device, enter the minimum version<br />
number.<br />
• The wizard presents a separate page for each property value the scan<br />
verifies. If the scan verifies multiple property values, the client device<br />
must meet the requirements for all specified values.<br />
• Version numbers follow the typical syntax for the specific product<br />
and require at least one decimal point; for example, 2.1 or 2.1.1.<br />
For information about individual scan packages and the properties you can set for<br />
them, see “Scan Properties Reference” on page 239.<br />
After creating a scan, you can add more rules to make the scan apply to multiple<br />
user scenarios.
168 <strong>Access</strong> <strong>Gateway</strong> <strong>Advanced</strong> <strong>Edition</strong> Administrator’s <strong>Guide</strong><br />
Scan Packages<br />
Using Scan Outputs to Filter Policies<br />
You can use endpoint analysis scan outputs to filter policy enforcement. Filtering<br />
with scan outputs allows you to secure access to your network and resources<br />
based on properties of the client device, such as whether or not it is running<br />
required minimum levels of antivirus or firewall software.<br />
To use a scan output in a policy<br />
The following steps describe the general process for using scan outputs in<br />
policies.<br />
1. Create a scan that verifies the properties you require.<br />
2. Create a policy filter that uses the scan output from Step 1.<br />
3. Create a policy and assign to it the filter you created in Step 2.<br />
Steps 2 and 3 above can be combined in the policy wizard.<br />
Using Scan Outputs to Filter Logon Page Visibility<br />
You can use the scanned information you discover about the client device to filter<br />
users’ ability to see the logon page. For more information, see “Setting<br />
Conditions for Showing the Logon Page” on page 141.<br />
Scan packages enable you to create scans to verify the properties of a client<br />
device, such as the installed version of an antivirus software product. Each<br />
package is designed to verify specific properties or software products.<br />
Scan packages are listed in the console under the Endpoint Analysis node.<br />
You can view individual properties of a scan package in the console, including a<br />
description of its scan outputs. Look at the scan output descriptions when you<br />
want to know which information about the client device is retrieved or verified.<br />
A scan output can take two forms:<br />
• Information about the client device. For example, the scan package <strong>Citrix</strong><br />
Scans for Trend OfficeScan detects and retrieves a value that is the product<br />
version of Trend OfficeScan running on the client device, if any.<br />
• A true/false Boolean verification indicating if the scan’s required property<br />
values were detected.<br />
To view the scan outputs produced by a scan package<br />
1. In the console tree, select the scan package.
Chapter 11 Verifying Requirements on Client Devices 169<br />
Adding Rules to Scans<br />
2. From the details pane on the right, select Properties from the display<br />
menu. The scan output table describes each output produced by the<br />
package.<br />
Rules are sets of conditions that define when to apply a scan and which property<br />
values to check. Multiple rules can apply to a single scan. The first rule of a scan<br />
is defined when you create the scan. After creating the scan, you can add more<br />
rules to make the scan apply to multiple scenarios.<br />
For example, the same scan can check for version X of an antivirus program on<br />
devices running Windows NT-based operating systems. You can create a different<br />
rule to check for version Y of the same antivirus program on devices running<br />
earlier Windows operating systems.<br />
To add a rule<br />
1. Select the scan in the console tree and click Create rule in Common Tasks.<br />
2. Follow the wizard prompts to define the rule’s name, condition settings,<br />
and property value settings.<br />
Example: Adding Multiple Rules to a Scan<br />
Assume that your network security policy is to prevent access to client devices<br />
unless they have Service Pack 4 installed for Windows 2000 and Service Pack 2<br />
installed for any machines running Windows XP. You have an exception for<br />
employees in the Tokyo office, because the Tokyo IT department decided not to<br />
upgrade Windows XP to Service Pack 2 until further testing takes place. You can<br />
use the same scan with different rules to verify the correct service pack for all<br />
three of these scenarios.<br />
Your environment includes a logon point named “Tokyo” that is used by your<br />
Tokyo office users. Logon points apply settings to the connections that initiate<br />
through their URLs.<br />
The following steps create a scan that verifies these three service pack<br />
requirements.<br />
1. Create a scan with the <strong>Citrix</strong> Scans for Windows Service Pack, selecting the<br />
Logon Point condition to configure.
170 <strong>Access</strong> <strong>Gateway</strong> <strong>Advanced</strong> <strong>Edition</strong> Administrator’s <strong>Guide</strong><br />
2. Create the first rule during scan creation with these settings:<br />
• Conditions: set the Operating system to Windows 2000 and set the<br />
Logon point to all<br />
• Property value to verify: set the minimum required service pack to<br />
Service Pack 4<br />
3. Add a second rule to the same scan with these settings:<br />
• Conditions: set the Operating system to WindowsXP and set the<br />
Logon point to all except Tokyo<br />
• Property value to verify: set the minimum required service pack to<br />
Service Pack 2<br />
4. Add a third rule to the same scan with these settings:<br />
• Conditions: set the Operating system to WindowsXP and set the<br />
Logon point to Tokyo<br />
• Required property value: set the minimum required service pack to<br />
Service Pack 1<br />
Using Scan Outputs in Other Scans<br />
You can use scan outputs as conditions in other scans. This feature allows you to<br />
make the result of one scan a condition for another scan to run.<br />
To create conditions from scan outputs<br />
You can create conditions from scan outputs in the following three ways:<br />
• Select Endpoint Analysis or select a specific scan in the console tree and<br />
click Edit available conditions list in Common Tasks<br />
• On the Select Conditions page of the Create Scan wizard, select Use<br />
Another Scan’s Output as a Condition<br />
• Select a scan output in the Properties view for a specific scan and click<br />
Create condition<br />
Example: Using a Scan Output as a Condition<br />
Assume that you have two divisions, Sales and Finance, that are assigned their<br />
own domain. The Sales group requires all of its client devices connecting<br />
remotely to run Antivirus Program A, but the Finance group requires its client<br />
devices to run Antivirus Program B.
Chapter 11 Verifying Requirements on Client Devices 171<br />
Follow the steps below to verify that these client devices are running the required<br />
antivirus program version.<br />
1. Create two scans using <strong>Citrix</strong> Scans for Domain Membership:<br />
• A Sales domain scan to verify that client devices belong to the Sales<br />
domain<br />
• A Finance domain scan to verify that client devices belong to the<br />
Finance domain<br />
2. Create a scan to check only Sales domain client devices for Antivirus<br />
Program A:<br />
• On the Select Conditions page of the Create Scan wizard, select Use<br />
Another Scan’s Output as a Condition and follow the prompts to<br />
identify the scan output for the Sales domain scan you created in Step<br />
1<br />
• Use the scan output “Verified-domain” from the Sales domain scan as<br />
your new condition and require it to have a value of “True”<br />
3. Create a scan to check only Finance domain client devices for Antivirus<br />
Program B:<br />
• On the Select Conditions page of the Create Scan wizard, select Use<br />
Another Scan’s Output as a Condition and follow the prompts to<br />
identify the scan output for the Finance domain scan you created in<br />
Step 1<br />
• Use the scan output “Verified-domain” from the Finance domain scan<br />
as your new condition and require it to have a value of “True”<br />
You can use scan outputs in custom filters to achieve similar results for complex<br />
scenarios.<br />
Editing Conditions and Rules<br />
Editing the Available Conditions<br />
All rules for a scan share the scan’s list of available conditions. The available<br />
conditions are the conditions that you can configure for the scan’s rules.<br />
Interdependencies exist between the various rules and conditions of a scan.<br />
If you edit the list of available conditions, be aware of the following<br />
considerations:<br />
• If you add to a scan’s list of available conditions, all existing rules for the<br />
scan receive the new condition with all possible values selected for use. To
172 <strong>Access</strong> <strong>Gateway</strong> <strong>Advanced</strong> <strong>Edition</strong> Administrator’s <strong>Guide</strong><br />
make sure you do not change the conditions of existing rules in unexpected<br />
ways, check the properties for the scan’s rules after you add to the list of<br />
available conditions.<br />
• To remove a condition from a scan’s available conditions list, you must first<br />
remove all rules that use the condition or select all possible values for the<br />
condition in every rule that uses it.<br />
Editing Rules<br />
You can view all condition settings for a rule in the Properties display for the rule.<br />
For example, if you add to the conditions that are available for a scan, all existing<br />
rules of that scan receive the condition you added with all the settings selected.<br />
You might need to adjust the settings that are automatically copied to existing<br />
rules.<br />
To edit the condition settings for a rule, select the rule in the console tree and<br />
click Properties from the display menu in the details pane on the right.<br />
Using Data Sets in Scans<br />
Some scans reference a data set of values to compare against values detected on<br />
the client device. For example, you might require multiple operating system<br />
updates on the client device and need to verify that the entire set of updates are<br />
present. Such a list of required updates is an example of a data set. Data sets are<br />
stored in the farm database. You can create a data set by importing a commaseparated<br />
values (.csv) file or by entering individual values.<br />
Lists<br />
Lists are single-column data sets that indicate multiple required values for a<br />
single property. Scan packages that use lists include:<br />
• <strong>Citrix</strong> Scans for Windows Update verifies that client devices are running all<br />
of the updates you list in a data set<br />
• <strong>Citrix</strong> Scans for Internet Explorer Update verifies that client devices are<br />
running all of the updates you list in a data set<br />
Maps<br />
Maps, or double-column data sets, detect a value on the client device and map it<br />
to another value used in the scan.
Chapter 11 Verifying Requirements on Client Devices 173<br />
For example, <strong>Citrix</strong> Scans for MAC Address detects the MAC address for each<br />
network interface card (NIC) or network adapter on the client device. The scans<br />
reference a double-column data set to map the address (the first column value) to<br />
a group name (the second column value). Scans use this mapping to verify the<br />
logical group to which the client device belongs.<br />
Creating Data Sets<br />
Follow the procedure below to create a named data set and then enter data into it.<br />
For a list (single-column data set), you can enter data manually or import it from<br />
a .csv file. For a map (double-column data set), you must import initial data from<br />
a .csv file.<br />
Important: Data set values can be treated as case-sensitive, depending on the<br />
scan package using the data set. If you are using such a package, avoid creating<br />
conflicting entries that differ in case. For example, with the <strong>Citrix</strong> Scans for MAC<br />
Address package, it is possible to create an entry for the same address and map it<br />
to two different groups. One entry might map the address 00:50:8b:e8:f9:28 to the<br />
Finance group. Another entry can map the same address with different case<br />
lettering, 00:50:8B:E8:F9:28, to the Sales group. Such entries make scan results<br />
unreliable.<br />
To create a data set<br />
1. Select Endpoint Analysis in the console tree and click Manage data sets<br />
in Common Tasks.<br />
2. Select New.<br />
3. Enter a name for the new data set.<br />
4. Enter data in one of the following two ways:<br />
• Enter a path to a .csv file containing initial data to import. You must<br />
use this method to create a double-column set.<br />
• Leave the file path blank to create an empty single-column data set.<br />
Add values by editing the data set after you create it.<br />
You can edit an existing data set from the Data Sets dialog box. To open Data<br />
Sets, select Endpoint Analysis in the console tree and click Manage data sets in<br />
Common Tasks.<br />
Example: Verifying a Set of Required Updates<br />
This example describes the steps for creating a scan to verify that client devices<br />
are running required updates for Version 6.0 of Internet Explorer.
174 <strong>Access</strong> <strong>Gateway</strong> <strong>Advanced</strong> <strong>Edition</strong> Administrator’s <strong>Guide</strong><br />
1. Use the <strong>Citrix</strong> Scans for Internet Explorer scan package to create a scan that<br />
verifies whether or not the client device is running Version 6.0 of Internet<br />
Explorer.<br />
2. Create a single-column data set listing the Internet Explorer updates you<br />
require if the client device is running Version 6.0. Example values for such<br />
a data set might be KB834707, KB867232, and KB889293.<br />
3. Use the <strong>Citrix</strong> Scans for Internet Explorer Update scan package to create a<br />
scan to check for your required updates on client devices running Internet<br />
Explorer Version 6.0.<br />
A. On the Select Conditions page of the Create Scan wizard, click Use<br />
Another Scan’s Output as a Condition and identify the scan output<br />
that identifies product version from the scan you created in Step 1. In<br />
the Define Values dialog box, name this new condition and add the<br />
allowed value of 6.0.<br />
B. When prompted for the property values of the required updates, select<br />
the data set you created in Step 2.<br />
Adding Scan Packages<br />
Each scan package is designed to examine a set of properties for a specific<br />
software product. You can expand the default set of scan packages by importing<br />
new ones. <strong>Citrix</strong>, partners, or developers in your organization can develop<br />
additional scan packages using the Endpoint Analysis Software Development Kit<br />
(SDK) available on your product CD or the <strong>Citrix</strong> Web site at www.citrix.com.<br />
To import a scan package<br />
1. In the console tree, select a scan group or Endpoint Analysis and click<br />
Import scan package in Common Tasks.<br />
• If you want the package to appear in a scan group, you must select<br />
that scan group.<br />
• If you select Endpoint Analysis during the importing, the scan<br />
package does not appear under a scan group and appears directly<br />
under the Endpoint Analysis node.<br />
2. Browse to the scan package file and click OK.
Chapter 11 Verifying Requirements on Client Devices 175<br />
Grouping Scans<br />
Default scan groups for such categories as antivirus, firewall, and operating<br />
system software are provided in the console tree to help organize scan packages<br />
and their scans. Scan groups can help you find scan packages or scans more<br />
quickly. You can create and name your own groups.<br />
Scan groups exist to organize items within the console tree only and have no<br />
effect on how scans run.<br />
To create a scan group, select Endpoint Analysis in the console tree and click<br />
Create scan group in Common Tasks.<br />
Adding Language Packs<br />
A scan package developer can create language packs to expand the languages in<br />
which the package creates scans. For example, a developer can first develop a<br />
scan package for English and decide later to add language packs for French,<br />
German, or Spanish as development proceeds. Language packs are typically<br />
distributed as .cab files.<br />
To import a language pack for a scan package<br />
Select Endpoint Analysis in the console tree and click Import language pack in<br />
Common Tasks.<br />
Scripting and Scheduling Scan Updates<br />
Two command utilities are available to assist you in writing scripts or scheduling<br />
scan updates. You can run these utilities from a command prompt in the following<br />
default location on the server:<br />
\\Program Files\<strong>Citrix</strong>\<strong>Access</strong> <strong>Gateway</strong>\MSAMExtensions\<br />
Note: You must run discovery after using these utilitiesfor the console to find<br />
and display the new values.<br />
The next two sections describe each utility.
176 <strong>Access</strong> <strong>Gateway</strong> <strong>Advanced</strong> <strong>Edition</strong> Administrator’s <strong>Guide</strong><br />
Updating Property Values in Scans<br />
You can use the CtxEpaParamUpdate utility to update the required property<br />
values for a scan. For example, if you require client devices to have a specified<br />
pattern version level of antivirus software, you can create a script to update the<br />
scan when you need to change which pattern file is being detected. This<br />
command is designed for use as a scheduled task on a server with the <strong>Access</strong><br />
Management Console installed.<br />
Use the following syntax, including quotation marks:<br />
“ctxepaparamupdate” package_uri package_version “scan_name”<br />
“rule_name” “param_name” “new_value”<br />
where the parameters are:<br />
Parameter<br />
package_uri<br />
package_version<br />
scan_name<br />
rule_name<br />
param_name<br />
new_value<br />
Description<br />
URI of the scan package to which the scan belongs. You can<br />
find the URI information for a scan package in the<br />
management console Properties view for the scan package.<br />
Version of the scan package to which the scan belongs. You<br />
can find the version information for a scan package in the<br />
management console Properties view for the scan package.<br />
Name of the scan in which the property is set.<br />
Name of the rule in which the required property value is set.<br />
Parameter name for the required value. You can find the<br />
parameter name and its current setting in the management<br />
console in the Properties view for the scan rule.<br />
The new value. If the required property has a restricted value<br />
range, this new value must be within that range.<br />
Example: To update a scan with the CtxEpaParamUpdate utility<br />
Let us assume you want to update an existing scan from the scan package <strong>Citrix</strong><br />
Scans for McAfee VirusScan Enterprise. To update the required engine version to<br />
4.4 and the pattern version to 4641, type:<br />
“C:\Program Files\<strong>Citrix</strong>\<strong>Access</strong> <strong>Gateway</strong>\MSAMExtensions\<br />
CtxEpaParamUpdate.exe” C:\Program Files\<strong>Citrix</strong>\<strong>Access</strong> <strong>Gateway</strong>\<br />
Bin\EPAPackages\<strong>Citrix</strong>VSEMcAfee.cab 1.0 “scan_name” “rule_name”<br />
“PatternVersion” “4641”<br />
and also type:<br />
“C:\Program Files\<strong>Citrix</strong>\<strong>Access</strong> <strong>Gateway</strong>\MSAMExtensions\<br />
CtxEpaParamUpdate.exe” C:\Program Files\<strong>Citrix</strong>\<strong>Access</strong> <strong>Gateway</strong>\<br />
Bin\EPAPackages\<strong>Citrix</strong>VSEMcAfee.cab 1.0 “scan_name” “rule_name”<br />
“EngineVersion” “4.4”
Chapter 11 Verifying Requirements on Client Devices 177<br />
where scan_name and rule_name are the existing scan name and rule name.<br />
Updating Data Sets<br />
You can use CtxEpaDataSetUpdate to script or schedule updates to data sets. For<br />
example, you might prefer to create your own script to automate a task such as<br />
updating the pattern file number required for an antivirus program.<br />
Use the following command options (switches) with this utility:<br />
Switch option Description Syntax<br />
/import<br />
Creates a new data set by<br />
importing a .csv file<br />
ctxepadatasetupdate /import<br />
file_name.csv dataset_name<br />
/reimport<br />
Replaces all contents of an<br />
existing data set by importing<br />
a new .csv file<br />
ctxepadatasetupdate /reimport<br />
file_name.csv dataset_name<br />
/export<br />
Exports the data set in a .csv<br />
file<br />
ctxepadatasetupdate /export<br />
file_name.csv dataset_name<br />
/destroy Deletes the data set ctxepadatasetupdate /destroy<br />
dataset_name<br />
/add<br />
/overwrite<br />
Adds an additional value to<br />
the specified data set<br />
Replaces an entry in a<br />
mapping (double-column)<br />
data set<br />
ctxepadatasetupdate /add dataset_name<br />
key [value]<br />
ctxepadatasetupdate /overwrite<br />
dataset_name key value<br />
/remove Deletes an entry in a data set ctxepadatasetupdate /remove<br />
dataset_name key<br />
Use the following parameters in the command options above:<br />
Parameter<br />
file_name.csv<br />
dataset_name<br />
key<br />
value<br />
Description<br />
The name of the .csv file that contains the data set<br />
The name for the data set<br />
If the data set is a list (single-column data set), this is a value<br />
in the list. If the data set is a map (double-column data set),<br />
this is the first column value.<br />
If the data set is a map (double-column data set), this is the<br />
second column value. If the data set is a list (single-column<br />
data set), this parameter does not exist.
178 <strong>Access</strong> <strong>Gateway</strong> <strong>Advanced</strong> <strong>Edition</strong> Administrator’s <strong>Guide</strong><br />
For more information about data sets, see “Using Data Sets in Scans” on page<br />
172.<br />
To locate official parameter names in scans<br />
You can find parameter names from the scan properties in the console.<br />
1. In the console tree select a rule associated with the scan and choose the<br />
Properties view in the right details pane.<br />
2. Select the row that displays the property and look in the Parameter Name<br />
column.<br />
Creating Continuous Scans<br />
Continuous scans verify required files, processes, or registry entries on client<br />
devices connecting to your network. These scans run repeatedly during the user<br />
session to ensure that the client device continues to meet your requirements. You<br />
use continuous scans to define requirements for connection policies. If a file,<br />
process, or registry scan required by a connection policy ceases to be verified, the<br />
connection is disconnected.<br />
Each continuous scan checks a single file, process, or registry entry on the client<br />
device. You can bundle multiple scans together when you create a continuous<br />
scan filter. When assigned to a connection policy, the filter represents the<br />
requirements that are checked continuously during a connection. Unlike<br />
continuous scan filters, other filters attached to policies verify their requirements<br />
only at logon.<br />
To create a file scan<br />
1. In the console tree, select Policies > Continuous Scans > File Scans and<br />
click Create file scan from Common Tasks.<br />
2. Name the scan.<br />
3. Enter the file path.<br />
4. Enter the following optional information you can require the scan to find:<br />
• For Date on or after, enter a date to be verified against the file’s<br />
creation date.<br />
• The MD5 digital signature is added automatically from the entered<br />
file path. You can modify this value if a different signature is required<br />
on the client device. Because the MD5 signature for an executable<br />
file can differ among different machine platforms, verify that the<br />
signature you enter is used by your client devices.
Chapter 11 Verifying Requirements on Client Devices 179<br />
To create a process scan<br />
1. In the console tree, select Policies > Continuous Scans > Process Scans<br />
and click Create process scan from Common Tasks.<br />
2. Name the scan.<br />
3. Type the name or browse to the process.<br />
4. The MD5 digital signature is added automatically from the entered file<br />
path. You can modify this value if a different signature is required on the<br />
client device. The MD5 digital signature is not required and can be left<br />
blank. Because the MD5 signature for an executable file can differ among<br />
different machine platforms, verify that the signature you enter is used by<br />
your client devices.<br />
To create a registry scan<br />
1. In the console tree, select Policies > Continuous Scans > Registry Scans<br />
and click Create registry scan from Common Tasks.<br />
2. Name the scan.<br />
3. Type the Registry path, Registry type, Entry name, and Entry value.
180 <strong>Access</strong> <strong>Gateway</strong> <strong>Advanced</strong> <strong>Edition</strong> Administrator’s <strong>Guide</strong>
CHAPTER 12<br />
Providing Secure <strong>Access</strong> to<br />
Corporate Email<br />
Use <strong>Advanced</strong> <strong>Access</strong> Control to provide policy-based access to data on internal<br />
servers, including email servers. When you configure your content aggregation<br />
point—your intranet or corporate portal—you can provide your users with secure<br />
access to their email accounts. Using access policies, you can determine what<br />
level of access to give users and then what actions users can take after they are<br />
granted access.<br />
With <strong>Advanced</strong> <strong>Access</strong> Control, you can:<br />
• Integrate the email solution you are already using with the secure remote<br />
access <strong>Advanced</strong> <strong>Access</strong> Control provides. For example, if you are already<br />
using Microsoft Outlook Web <strong>Access</strong> or Lotus iNotes/Domino Web <strong>Access</strong><br />
to allow users to access their email over the Web, you can integrate either of<br />
those front ends with a content aggregation point such as your intranet or<br />
corporate portal. Users then get remote access to their email from this<br />
aggregation point, whether you decide to use the <strong>Access</strong> Interface provided<br />
with <strong>Advanced</strong> <strong>Access</strong> Control or another portal solution you have in place.<br />
If you do not already use Outlook Web <strong>Access</strong> or iNotes/Domino Web<br />
<strong>Access</strong> to allow your users to access their email over the Web, you can use<br />
the Web-based email interface provided with <strong>Advanced</strong> <strong>Access</strong> Control.<br />
• Provide access to any email applications you publish with <strong>Citrix</strong><br />
Presentation Server. You can include the links to published applications in a<br />
Presentation Server Web site.<br />
• Provide users with the ability to securely connect to their email accounts on<br />
Microsoft Exchange or Lotus Notes/Domino servers. Users can access all<br />
email functions as well as synchronize their email data to their client<br />
devices for offline use.<br />
• Provide users of small form factor devices, such as Personal Digital<br />
Assistants (PDAs), with secure remote access to email.<br />
• Allow users to attach to email message files stored on network shares<br />
without having to download the file to their local client device.
182 <strong>Access</strong> <strong>Gateway</strong> <strong>Advanced</strong> <strong>Edition</strong> Administrator’s <strong>Guide</strong><br />
Similar to other resources accessible through <strong>Advanced</strong> <strong>Access</strong> Control, you<br />
control access to email through policies. For example, you can create a policy to<br />
grant specific user groups access to Web-based email and create another policy to<br />
prevent specific user groups from synchronizing the data in their email accounts<br />
to their client devices.<br />
Additionally, you can create a policy that allows a specific user group to<br />
download attachments they receive using Web-based email and another policy<br />
that prevents a different user group from performing this action.<br />
Note: If recipients access their email through <strong>Advanced</strong> <strong>Access</strong> Control and it<br />
contains an embedded link to a file share or Web resource, a policy allowing the<br />
recipients access to that resource is also required. However, if the email is sent to<br />
recipients not using <strong>Advanced</strong> <strong>Access</strong> Control to access their email, no additional<br />
permissions are required. These users can view the attachment without policy<br />
restrictions.<br />
Choosing an Email Solution<br />
To decide which email solution to provide, look at what type of access your users<br />
need, what resources you already have in use in your network, and how much<br />
control you want to have over user actions after they are granted access.<br />
For example, if you want to allow users to securely access their email accounts<br />
over the Internet and you are already using Outlook Web <strong>Access</strong>, you can<br />
integrate the Outlook Web <strong>Access</strong> interface into the Email tab of the <strong>Access</strong><br />
Interface included with <strong>Advanced</strong> <strong>Access</strong> Control.<br />
Conversely, if you want to allow remote access to email and are not already using<br />
a Web front-end to your email servers, you can use the Web-based email interface<br />
included with <strong>Advanced</strong> <strong>Access</strong> Control.<br />
The following table lists the types of access to email and what you should<br />
consider when deciding whether or not to choose each option. For information<br />
about the minimum requirements for each email solution presented in this<br />
chapter, see “Feature Requirements” on page 46.
Chapter 12 Providing Secure <strong>Access</strong> to Corporate Email 183<br />
Web-based email<br />
with Outlook Web<br />
<strong>Access</strong> or iNotes/<br />
Domino Web <strong>Access</strong><br />
Web-based email<br />
with the <strong>Access</strong><br />
Interface<br />
Synchronization of<br />
email data to client<br />
devices<br />
Email application<br />
published with<br />
<strong>Citrix</strong> Presentation<br />
Server<br />
Client Device<br />
Requirements<br />
Compatible browser;<br />
see product<br />
documentation for<br />
additional requirements<br />
Compatible browser<br />
only<br />
(no other client software<br />
required)<br />
Email software<br />
(Microsoft Outlook or<br />
Lotus Notes) and Secure<br />
<strong>Access</strong> Client<br />
Presentation Server<br />
Client<br />
Server<br />
Requirements<br />
Email server<br />
(Microsoft<br />
Exchange or Lotus<br />
Notes/Domino)<br />
Microsoft Exchange<br />
(Notes/Domino not<br />
supported in this<br />
configuration)<br />
Email server<br />
(Microsoft<br />
Exchange or Lotus<br />
Notes/Domino)<br />
<strong>Citrix</strong> Presentation<br />
Server<br />
Small Form Factor<br />
Support<br />
No<br />
Yes<br />
No<br />
No<br />
Policy Enforcement<br />
When <strong>Access</strong>ing File<br />
Attachments<br />
Yes<br />
Yes<br />
No<br />
No<br />
Providing <strong>Access</strong> to Published Email Applications<br />
If you are using <strong>Citrix</strong> Presentation Server to provide access to email applications<br />
published on internal servers, you can easily integrate access to these applications<br />
with your <strong>Advanced</strong> <strong>Access</strong> Control deployment.<br />
Providing access to email through published applications extends the<br />
Smart<strong>Access</strong> capabilities of <strong>Advanced</strong> <strong>Access</strong> Control to Presentation Server by<br />
incorporating <strong>Advanced</strong> <strong>Access</strong> Control policy information such as endpoint<br />
analysis within Presentation Server policies. In addition, requiring users to access<br />
email by launching applications published with Presentation Server is the most<br />
secure method of providing email access because data never leaves the corporate<br />
network.<br />
Note: You can combine email access methods if you want to provide more than<br />
one method of remote access. For example, in addition to providing access to<br />
published email applications, you can also configure a Web-based email solution.<br />
To provide access to published email applications<br />
1. Publish and configure your email application for Smart<strong>Access</strong> in<br />
Presentation Server.
184 <strong>Access</strong> <strong>Gateway</strong> <strong>Advanced</strong> <strong>Edition</strong> Administrator’s <strong>Guide</strong><br />
2. Configure a Presentation Server Web site<br />
Providing Users with Secure Web-Based Email<br />
With <strong>Advanced</strong> <strong>Access</strong> Control, you can provide access to email accounts using<br />
the following Web-based interfaces.<br />
• The Web-based email interface included with <strong>Advanced</strong> <strong>Access</strong> Control<br />
allows users to access email accounts on Microsoft Exchange servers.<br />
Users do not need to download or install client software to access their<br />
email using this interface; they need to run only a supported browser.<br />
Additionally, the Web-based email user interface included with <strong>Advanced</strong><br />
<strong>Access</strong> Control is the only way to provide Web-based email access to PDAs<br />
and other small form factor devices.<br />
• Microsoft Outlook Web <strong>Access</strong> allows users to access email accounts on<br />
Microsoft Exchange servers.<br />
• Lotus iNotes/Domino Web <strong>Access</strong> allows users to access email accounts on<br />
Lotus Notes/Domino servers.<br />
Important: <strong>Advanced</strong> <strong>Access</strong> Control supports one back-end cluster— Notes/<br />
Domino or Exchange—per access server farm. However, you can configure<br />
multiple Outlook Web <strong>Access</strong> servers when using Exchange or multiple iNotes/<br />
Domino Web <strong>Access</strong> servers when using Lotus Notes/Domino.<br />
If you are using a portal solution, you can integrate the Web-based email interface<br />
included with <strong>Advanced</strong> <strong>Access</strong> Control with these portal products. See<br />
“Integrating Web-Based Email <strong>Access</strong> with a Third-Party Portal” on page 187 for<br />
more information.<br />
When you configure Web-based email access, users access their email from the<br />
Email tab on the <strong>Access</strong> Interface. If you prefer, you can configure <strong>Advanced</strong><br />
<strong>Access</strong> Control so that the Web-based email interface is the default interface users<br />
see when they log on to <strong>Advanced</strong> <strong>Access</strong> Control. See “Configuring Logon<br />
Points” on page 89 for more information about how to achieve this configuration.<br />
Enabling <strong>Access</strong> to Web-Based Email<br />
The basic steps to follow to enable access to Web-based email are:<br />
• Configure Web-based email in <strong>Advanced</strong> <strong>Access</strong> Control<br />
• Create policies to allow access to the email resource
Chapter 12 Providing Secure <strong>Access</strong> to Corporate Email 185<br />
Each of these steps is discussed in more detail below.<br />
To configure Web-based email for Microsoft Exchange<br />
Use the following procedure to allow users to send and receive Web-based email<br />
with Microsoft Exchange.<br />
1. In the console tree, select Web Email and click Configure Web email in<br />
Common Tasks.<br />
2. Select Microsoft Exchange.<br />
3. Select the Enable Web-based access check box.<br />
4. Select one of the following Web-based interfaces:<br />
• Email interface included with <strong>Advanced</strong> <strong>Access</strong> Control. Allows<br />
access to email without the need for users to download or install<br />
client software; they need to run only a supported browser.<br />
• Specify the IP address, FQDN, or NetBIOS name of your<br />
Microsoft Exchange server.<br />
• Display email as HTML to support advanced text formatting<br />
features including numbering, bullets, alignment, and linking to<br />
file shares and Web pages. Only enable this option when email<br />
messages originate from trusted sources within your corporate<br />
network.<br />
Caution: If email messages originate from outside your corporate<br />
network, configure Web email to display messages in plain text.<br />
Failure to do so may expose your <strong>Advanced</strong> <strong>Access</strong> Control servers<br />
and client devices to attacks using embedded malicious code within<br />
HTML-formatted messages. Displaying messages as plain text<br />
mitigates these types of attacks. Therefore, <strong>Citrix</strong> recommends<br />
configuring Web email to display messages in plain text when any<br />
email messages originate from outside your corporate network.<br />
• Use Microsoft Outlook Web <strong>Access</strong>. Allows access to email using<br />
Outlook Web <strong>Access</strong>.<br />
• Specify the application’s start page as well as the URLs for<br />
which the application requires access. The start page should<br />
resemble http://servername/exchange, where servername is the<br />
IP address, FQDN, or NetBIOS name of your Exchange server.<br />
If you use a load balancer to manage Outlook Web <strong>Access</strong><br />
servers, enter the URL of the load balancer as the start page and
186 <strong>Access</strong> <strong>Gateway</strong> <strong>Advanced</strong> <strong>Edition</strong> Administrator’s <strong>Guide</strong><br />
add the Outlook Web <strong>Access</strong> servers as URLs accessible by the<br />
application.<br />
Note: To allow access to an entire server, add http://servername to<br />
the URL list, where servername is the IP address, FQDN, or<br />
NetBIOS name of your Exchange server. This configuration is useful<br />
when providing access to dedicated Microsoft Exchange servers.<br />
• Enable the interface common for all browser types option to<br />
suppress the presentation of browser-specific ActiveX controls<br />
and other advanced display types. <strong>Citrix</strong> recommends this<br />
option if you have users who cannot download ActiveX<br />
controls or who use a variety of browser versions.<br />
Note: <strong>Citrix</strong> recommends that you first test your Web-based email<br />
application with this option disabled. If your testing reveals that the<br />
application displays improperly, enable this option and verify that the<br />
issue no longer exists.<br />
To configure Web-based Email for Lotus Notes/Domino<br />
Use the following procedure to allow users to send and receive Web-based email<br />
with Lotus Notes/Domino.<br />
1. In the console tree, select Web Email and click Configure Web email in<br />
Common Tasks.<br />
2. Select Lotus Notes/Domino or other email applications.<br />
3. Select Enable Web-based access.<br />
4. Specify the application’s start page as well as URLs for which the<br />
application requires access. If you use a load balancer to manage iNotes<br />
servers, enter the URL of the load balancer as the start page and add the<br />
iNotes servers as URLs accessible by the application.<br />
You can use dynamic token replacement to accommodate explicit links to<br />
individual user database files. For example, enter<br />
http://servername/mail/#.nsf, where servername is the<br />
NetBIOS name, IP address, or FQDN of your Lotus Notes/Domino server<br />
and the username token is replaced with the user’s user name obtained from<br />
Active Directory or Windows NT Directory Services. For a complete list of<br />
tokens supported by <strong>Advanced</strong> <strong>Access</strong> Control, see “Using Dynamic<br />
System Tokens” on page 128.
Chapter 12 Providing Secure <strong>Access</strong> to Corporate Email 187<br />
Note: To allow access to an entire server, add http://servername to the<br />
URL list, where servername is the IP address, FQDN, or NetBIOS name of<br />
your Lotus Notes/Domino server. This configuration is useful when<br />
providing access to dedicated Lotus Notes/Domino servers.<br />
5. Enable the interface common for all browser types option to suppress the<br />
presentation of browser-specific ActiveX controls and other advanced<br />
display types. <strong>Citrix</strong> recommends this option if you have users who cannot<br />
download ActiveX controls or who use a variety of browser versions.<br />
Note: <strong>Citrix</strong> recommends that you first test your Web-based email<br />
application with this option disabled. If your testing reveals that the<br />
application displays improperly, enable this option and verify that the issue<br />
no longer exists.<br />
6. Select the appropriate version of Lotus iNotes/Domino Web <strong>Access</strong> from<br />
the available email application types.<br />
When you are done configuring Web-based email, you must create a policy that<br />
allows users to access email.<br />
To allow user access to email, create a policy following the steps in “Creating<br />
<strong>Access</strong> Policies” on page 135.<br />
Note: For a recipient to access an email attachment through <strong>Advanced</strong> <strong>Access</strong><br />
Control, an email policy enabling the recipient at least one of the following is<br />
required: download, HTML Preview, or Live Edit. Web-based email attachments<br />
cannot be accessed through file type association.<br />
Integrating Web-Based Email <strong>Access</strong> with a Third-Party<br />
Portal<br />
If you are using the Web-based email interface included with <strong>Advanced</strong> <strong>Access</strong><br />
Control to provide users with access to their email, you can integrate this<br />
interface into any portal solution. For example, if you are using Microsoft<br />
SharePoint as your corporate portal or information aggregation point, you can<br />
display the Web-based email interface included with <strong>Advanced</strong> <strong>Access</strong> Control in<br />
the SharePoint portal.
188 <strong>Access</strong> <strong>Gateway</strong> <strong>Advanced</strong> <strong>Edition</strong> Administrator’s <strong>Guide</strong><br />
To integrate the Web-based email interface with a third-party portal<br />
1. Configure the Web-based email interface included with <strong>Advanced</strong> <strong>Access</strong><br />
Control. See “Providing Users with Secure Web-Based Email” on page 184<br />
for instructions about how to do this.<br />
2. Configure your portal product’s Web site viewer to display the Web-based<br />
email interface at http://servername/citrixfei/classic.asp, where servername<br />
is the name of a Web server running <strong>Advanced</strong> <strong>Access</strong> Control.<br />
Providing Users with Secure <strong>Access</strong> to Email Accounts<br />
Use <strong>Advanced</strong> <strong>Access</strong> Control to allow users to securely access their email<br />
accounts on Microsoft Exchange servers or Lotus Notes/Domino servers.<br />
Important: To securely connect to email accounts and synchronize email to<br />
client devices, users must have the Secure <strong>Access</strong> Client installed on their client<br />
device.<br />
When you configure this feature, roaming workers—whether connected over the<br />
Web or within the enterprise—can securely connect to their email accounts on the<br />
Exchange or Lotus Notes/Domino server and synchronize their locally installed<br />
email application with the data stored on the corporate email server. This allows<br />
users to work with their calendars, tasks, and contacts in real time when working<br />
online, and then to synchronize their folders in preparation for working offline.<br />
Use this feature if you want remote users with laptops to be able to securely<br />
access and synchronize email as they move between office workstations, laptops,<br />
and home workstations.<br />
Important: <strong>Advanced</strong> <strong>Access</strong> Control does not control access to any<br />
attachments users receive when they connect to their email accounts through the<br />
Secure <strong>Access</strong> Client. If you enable and configure the email synchronization<br />
feature, users can access any attachments they receive without policy-based<br />
restrictions.<br />
The basic steps involved in allowing users to work with and synchronize their<br />
email accounts to their client devices are:<br />
• Configure the email synchronization feature<br />
• Create a policy to allow users to use the email synchronization feature<br />
• Open the appropriate ports on the firewall between the <strong>Access</strong> <strong>Gateway</strong> and<br />
internal mail servers
Chapter 12 Providing Secure <strong>Access</strong> to Corporate Email 189<br />
Each of these steps is discussed in more detail below.<br />
To configure email synchronization<br />
1. In the console tree, select Email Synchronization and choose Configure<br />
email synchronization from Common Tasks.<br />
2. Select Enable Email Synchronization.<br />
3. Select the appropriate email server for your environment.<br />
• If you select Microsoft Exchange, click New to enter the NetBIOS<br />
name, IP address, or FQDN of your Exchange server. Add additional<br />
Exchange servers if users will be connecting to more than one server.<br />
When you add an Exchange server, <strong>Advanced</strong> <strong>Access</strong> Control<br />
connects to the specified host and determines the secondary port<br />
required for Messaging Application Programming Interface (MAPI).<br />
Because this information is stored and not dynamically updated,<br />
consider configuring your Exchange servers so that all MAPI ports<br />
remain static. If you do not configure your Exchange servers this<br />
way, you will need to reconfigure email synchronization in <strong>Advanced</strong><br />
<strong>Access</strong> Control each time the Exchange server restarts.<br />
• If you select Lotus Notes/Domino, enter the NetBIOS name, IP<br />
address, or FQDN of your Lotus Notes/Domino server. Port 1352 is<br />
used by default. Modify the port if necessary.<br />
Note: If you are using a TCP/IP-based email application other than<br />
Exchange or Notes/Domino, you can use network resources to provide the<br />
same level of functionality available with the email synchronization<br />
feature. For more information about configuring network resources, see<br />
“Creating Network Resources for VPN <strong>Access</strong>” on page 119.<br />
When you are done configuring email synchronization, you must create a policy<br />
that allows users to access this resource.<br />
To create a policy to allow email synchronization<br />
Create a policy to allow users to synchronize their email data to their client<br />
devices following the steps in “Creating <strong>Access</strong> Policies” on page 135.<br />
When you are done creating a policy to allow users to synchronize their email<br />
data to their client devices, you must configure your firewall ports to allow users<br />
to connect.
190 <strong>Access</strong> <strong>Gateway</strong> <strong>Advanced</strong> <strong>Edition</strong> Administrator’s <strong>Guide</strong><br />
To configure your firewall for email synchronization<br />
1. Open your firewall application.<br />
2. Set the port status as required for your environment. If the traffic between<br />
your email server and the <strong>Access</strong> <strong>Gateway</strong> is secured, the data runs over<br />
port 443.<br />
Enabling Users to Attach Files to Web-Based Email<br />
You can configure <strong>Advanced</strong> <strong>Access</strong> Control to allow users to attach documents<br />
to new email messages directly from Web resources and file shares. When you<br />
enable this feature, users can see and use the Send as attachment option from<br />
configured Web resources and file shares. In addition, users can send files as<br />
email attachments when using the Live Edit feature. When a user selects this<br />
option, the file is attached to the Web-based email interface configured for your<br />
environment.<br />
To configure Web email to support sending email attachments<br />
1. In the console tree, select Email and choose Configure Web email from<br />
Common Tasks.<br />
2. On the Enable Web-based Email page, select the Enable Send as<br />
Attachments for file shares check box.<br />
3. Additional configuration depends on the email application server selected.<br />
• Microsoft Exchange. Specify the NetBIOS name, IP address, or<br />
FQDN of your Microsoft Exchange server. <strong>Advanced</strong> <strong>Access</strong> Control<br />
uses the Microsoft Exchange server configuration information to<br />
determine the MAPI server.<br />
• Lotus Notes/Domino. Specify the name or IP address of the SMTP<br />
(Simple Mail Transfer Protocol) and LDAP (Lightweight Directory<br />
<strong>Access</strong> Protocol) servers.<br />
Note: If you are using Notes/Domino servers, ensure SMTP port relay<br />
outbound restrictions do not prevent users outside of the corporate network<br />
from sending emails. For example, you can configure Notes/Domino<br />
servers to allow all authenticated users to send outgoing email. Refer to<br />
your Notes/Domino product documentation for additional information<br />
about configuring SMTP port relay outbound restrictions.
Chapter 12 Providing Secure <strong>Access</strong> to Corporate Email 191<br />
4. Create a file share policy permitting the emailing of files as attachments.<br />
For more information about the email as attachment permission, see<br />
“Allowing Email Attachments” on page 139.<br />
Restricting File Attachment Types<br />
The Web-based email interface included with <strong>Advanced</strong> <strong>Access</strong> Control provides<br />
two levels of security for file attachments. The first level of security includes file<br />
types blocked by <strong>Advanced</strong> <strong>Access</strong> Control. The second level of security includes<br />
file types that can be downloaded only to the user’s client device and cannot be<br />
accessed using HTML Preview, Live Edit, or file type association.<br />
The default file types included in each level of security are defined in the table<br />
below.<br />
File Type<br />
Level 1 (Blocked File<br />
Types)<br />
Level 2 (Download Only<br />
File Types)<br />
.ade .adp .app .asx .bas .bat .chm .cmd .com .cpl .crt .csh<br />
.exe .fxp .hlp .hta .inf .ins .isp .js .jse .ksh .lnk .mda .mdb<br />
.mde .mdt .mdw .mdz .msc .msi .msp .mst .ops .pcd .pif<br />
.prf .prg .reg .scf .scr .sct .shb .shs .url .vb .vbe .vbs .wsc<br />
.wsf .wsh<br />
.ade .adp .asx .bas .bat .chm .cmd .com .cpl .crt .dcr .dir<br />
.exe .hlp .hta .htm .html .htc .inf .ins .isp .js .jse .lnk .mda<br />
.mdb .mde .mdz .mht .mhtml .msc .msi .msp .mst .pcd .pif<br />
.plg .prf .reg .scf .scr .sct .shb .shs .shtm .shtml .spl .stm<br />
.swf .url .vb .vbe .vbs .wsc .wsf .wsh .xml<br />
You can add and remove file types from either security levels by using Registry<br />
Editor. If a file type is added to both levels, it is treated as a Level 1 file type.<br />
Caution: Using Registry Editor incorrectly can cause serious problems that can<br />
require you to reinstall the operating system. <strong>Citrix</strong> cannot guarantee that<br />
problems resulting from incorrect use of Registry Editor can be solved. Use<br />
Registry Editor at your own risk. Make sure you back up the registry before you<br />
edit it.<br />
To modify file attachment type security lists<br />
1. In Registry Editor, find the following key:<br />
HKEY_LOCAL_MACHINE\SOFTWARE\<strong>Citrix</strong>\MSAM\FEI\FileExt<br />
2. Edit the NoActivations value to modify Level 1 (blocked) file types and the<br />
DownloadOnly value to modify Level 2 (download only) file types.
192 <strong>Access</strong> <strong>Gateway</strong> <strong>Advanced</strong> <strong>Edition</strong> Administrator’s <strong>Guide</strong><br />
Note: New file types must be separated by a new line with no additional<br />
spaces and contain the preceding dot.<br />
Enabling <strong>Access</strong> to Email on Small Form Factor Devices<br />
Using the Web-based email interface included with <strong>Advanced</strong> <strong>Access</strong> Control,<br />
you can provide email access to users of specific PDAs and other small form<br />
factor devices. For a list of supported small form factor devices, see “Client<br />
Requirements” on page 58.<br />
To allow users of small form factor devices to access their email, choose one of<br />
these options:<br />
• Configure the Web-based email interface included with <strong>Advanced</strong> <strong>Access</strong><br />
Control as the default Web-based email interface. If you configure the<br />
<strong>Advanced</strong> <strong>Access</strong> Control Web-based email interface as the default, all<br />
users access this interface for their Web-based email, regardless of the type<br />
of device from which they connect. See “Providing Users with Secure Web-<br />
Based Email” on page 184 for information about how to make the<br />
<strong>Advanced</strong> <strong>Access</strong> Control Web-based email interface the default interface.<br />
• Configure the Web-based email interface included with <strong>Advanced</strong> <strong>Access</strong><br />
Control to be displayed specifically to users connecting from small form<br />
factor devices. Use this configuration if you want users to see the Outlook<br />
Web <strong>Access</strong> interface when they connect from other device types.<br />
If you configure the Web-based email interface included with <strong>Advanced</strong><br />
<strong>Access</strong> Control to be displayed specifically to users connecting from small<br />
form factor devices, the logon point detects that the connection is from a<br />
small form factor device and automatically presents the <strong>Advanced</strong> <strong>Access</strong><br />
Control Web-based email interface.<br />
To configure the Web-based email interface included with <strong>Advanced</strong> <strong>Access</strong><br />
Control to be displayed specifically to users connecting from small form factor<br />
devices, follow the instructions below.<br />
Note:<br />
This feature is not available to Lotus iNotes/Domino Web <strong>Access</strong> users.
Chapter 12 Providing Secure <strong>Access</strong> to Corporate Email 193<br />
To configure the Web-based email interface for use with small form factor<br />
devices<br />
When configuring Web-based access to Exchange as described in “Providing<br />
Users with Secure Web-Based Email” on page 148, select one of the following<br />
options:<br />
• Email interface included with <strong>Advanced</strong> <strong>Access</strong> Control. Displays the<br />
email interface included with <strong>Advanced</strong> <strong>Access</strong> Control for all users,<br />
regardless of the type of connecting device's form factor. <strong>Advanced</strong> <strong>Access</strong><br />
Control detects the form factor of the connecting device and presents the<br />
appropriate interface for that connection. For example, <strong>Advanced</strong> <strong>Access</strong><br />
Control displays a small interface for users connecting with a small form<br />
factor device.<br />
• Microsoft Outlook Web <strong>Access</strong> and enable the Provide support for small<br />
form factor devices feature. <strong>Advanced</strong> <strong>Access</strong> Control detects the form<br />
factor of the connecting device and displays the email interface included<br />
with <strong>Advanced</strong> <strong>Access</strong> Control for users connecting with small form factor<br />
devices. Microsoft Outlook Web <strong>Access</strong> is provided for standard form<br />
factor devices such as workstations and home computers.<br />
Updating the Mapisvc.inf File<br />
If you are using Microsoft Exchange 2000 and you want to use the default Email<br />
Interface, install Microsoft Exchange System Management Tools before you<br />
install <strong>Advanced</strong> <strong>Access</strong> Control. Then, update the mapisvc.inf file. If you are<br />
using Microsoft Exchange 2003, you do not need to change the mapisvc.inf file.<br />
To update the mapisvc.inf file<br />
1. Save a copy of the mapisvc.inf file.<br />
2. Insert the following lines:<br />
[SERVICES]<br />
MSEMS=Microsoft Exchange Server<br />
[MSEMS]<br />
PR_DISPLAY_NAME=Microsoft Exchange Server<br />
Sections=MSEMS_MSMail_Section<br />
PR_SERVICE_DLL_NAME=emsui.dll<br />
PR_SERVICE_ENTRY_NAME=EMSCfg<br />
PR_RESOURCE_FLAGS=SERVICE_SINGLE_COPY<br />
WIZARD_ENTRY_NAME=EMSWizardEntry<br />
Providers=ems_dsa, ems_mdb_public, ems_mdb_private<br />
PR_SERVICE_SUPPORT_FILES=emsui.dll, emsabp.dll, emsmdb.dll<br />
[Default Services]<br />
MSEMS=Microsoft Exchange Server<br />
[EMS_MDB_public]
194 <strong>Access</strong> <strong>Gateway</strong> <strong>Advanced</strong> <strong>Edition</strong> Administrator’s <strong>Guide</strong><br />
PR_RESOURCE_TYPE=MAPI_STORE_PROVIDER<br />
PR_PROVIDER_DLL_NAME=EMSMDB.DLL<br />
PR_RESOURCE_FLAGS=STATUS_NO_DEFAULT_STORE<br />
66090003=06000000<br />
660A0003=03000000<br />
34140102=78b2fa70aff711cd9bc800aa002fc45a<br />
PR_DISPLAY_NAME=Public Folders<br />
PR_PROVIDER_DISPLAY=Microsoft Exchange Message Store<br />
[EMS_MDB_private]<br />
PR_PROVIDER_DLL_NAME=EMSMDB.DLL<br />
PR_RESOURCE_TYPE=MAPI_STORE_PROVIDER<br />
PR_RESOURCE_FLAGS=STATUS_PRIMARY_IDENTITY|STATUS_DEFAULT_STORE<br />
|STATUS_PRIMARY_STORE<br />
66090003=0C000000<br />
660A0003=01000000<br />
34140102=5494A1C0297F101BA58708002B2A2517<br />
PR_DISPLAY_NAME=Private Folders<br />
PR_PROVIDER_DISPLAY=Microsoft Exchange Message Store<br />
[EMS_DSA]<br />
PR_DISPLAY_NAME=Microsoft Exchange Directory Service<br />
PR_PROVIDER_DISPLAY=Microsoft Exchange Directory Service<br />
PR_PROVIDER_DLL_NAME=EMSABP.DLL<br />
PR_RESOURCE_TYPE=MAPI_AB_PROVIDER<br />
[MSEMS_MSMail_Section]<br />
UID=13DBB0C8AA05101A9BB000AA002FC45A<br />
66000003=01050000<br />
66010003=04000000<br />
66050003=03000000<br />
66040003=02000000<br />
3. Restart the <strong>Access</strong> <strong>Gateway</strong> Server COM+ application. For more<br />
information, see “Restarting COM+ Applications” on page 216.
CHAPTER 13<br />
Rolling Out <strong>Advanced</strong> <strong>Access</strong><br />
Control to Users<br />
The last step in deployment is providing users with the information and tools<br />
necessary to access corporate resources. This process includes determining if<br />
your implementation requires the distribution of client software and if so,<br />
developing a strategy for deploying this software. In addition, training and other<br />
forms of communication detailing how your deployment impacts the workplace<br />
assist users as they transition to their new environment.<br />
The topics in this section discuss the issues to consider when developing an<br />
overall plan for rolling out <strong>Access</strong> <strong>Gateway</strong> <strong>Advanced</strong> <strong>Edition</strong> to users.<br />
• “Developing a Client Software Deployment Strategy” on page 195<br />
• “Managing Client Software Using the <strong>Access</strong> Client Package” on page 200<br />
• “Downloading Client Software on Demand” on page 203<br />
• “Ensuring a Smooth Logon Experience with the Secure <strong>Access</strong> Client” on<br />
page 205<br />
• “Ensuring a Smooth Rollout” on page 208<br />
• “Browser Security Considerations” on page 209<br />
• “Customizing the Logon Error Message” on page 211<br />
Developing a Client Software Deployment Strategy<br />
Software deployment is the process of distributing and installing software on<br />
client devices. If your corporation already uses a software deployment solution,<br />
consider deploying <strong>Advanced</strong> <strong>Access</strong> Control clients using the same technique.<br />
However, if you need to develop a strategy, you must determine who is<br />
responsible for installing client software and then create a solution that supports<br />
this decision.
196 <strong>Access</strong> <strong>Gateway</strong> <strong>Advanced</strong> <strong>Edition</strong> Administrator’s <strong>Guide</strong><br />
The following sections discuss issues to consider when determining who is<br />
responsible for installing client software as well as deployment methods<br />
supporting these use cases.<br />
Determining Responsibility for Installing Client<br />
Software<br />
There are several methods of deploying client software ranging from automated<br />
solutions that download and install the software from a centralized location to<br />
posting an installation package to a network share and instructing users to<br />
manually install the software on their client device. Before you can determine<br />
how to deploy client software, you must determine who is responsible for<br />
installing the software on the client device.<br />
Depending on your corporate needs, you, support personnel, users, or a<br />
combination thereof may be responsible for this task. This decision is a result of<br />
several factors including:<br />
• User needs and administrative costs. Consider the needs of your users<br />
because their collective experience is critical to the adoption of access<br />
control in your corporation. If the needs of your users greatly outweigh the<br />
administrative costs associated with managing a deployment strategy,<br />
consider a plan that places the responsibility of installing client software on<br />
a team specializing in this area. Conversely, if the administrative costs<br />
associated with managing a deployment solution is too great for your<br />
organization, consider shifting this responsibility to individual users.<br />
• The technical abilities of your users. If your user base is not technically<br />
savvy, consider installing the software for them. In this scenario, a support<br />
department such as IT or Technical Support is responsible for installing the<br />
software. When deciding whether or not users should be responsible for<br />
their own installations, consider the possible support issues as well.<br />
Depending on the technical abilities of your users, the support costs<br />
associated with users installing their own software could justify the<br />
implementation of a centrally managed deployment strategy. However, if<br />
your users are technically savvy, it may be more efficient for you to post the<br />
software to a network share and allow users to install the software from this<br />
location.<br />
• Number of client devices in your corporation. Larger companies benefit<br />
from centrally managed deployment strategies because they tend to scale<br />
well and yield a higher return on investment as compared to manual<br />
solutions. For this reason, medium to larger sized corporations should<br />
consider using their Microsoft Active Directory infrastructure or a standard<br />
third party deployment tool such as Systems Management Server.
Chapter 13 Rolling Out <strong>Advanced</strong> <strong>Access</strong> Control to Users 197<br />
However, for smaller companies, the costs associated with planning and<br />
preparing an automated deployment could outweigh the benefits. These<br />
companies should consider alternative deployment methods such as posting<br />
client software to a network share or an on-demand deployment solution.<br />
Both of these methods are described in detail in later sections.<br />
• Corporate security requirements. If your corporation configures client<br />
devices so that users do not have installation rights on their machines, you<br />
must develop a strategy that allows someone with administrative rights to<br />
perform the installation. In this scenario, larger companies should consider<br />
a corporate deployment tool such as Systems Management Server. Smaller<br />
companies should consider posting client installation packages to a file<br />
share and having someone with administrative rights manually install the<br />
software on each client device.<br />
• Corporate management practices. If your organization maintains strong<br />
centralized control over client software deployment—for example, if you<br />
use Microsoft Systems Management Server to help control software<br />
distribution—you can more reliably update client devices. Therefore, if<br />
your goal is to ensure that all users have the most up-to-date software,<br />
allowing them to install their own client software is not a recommended<br />
option. Rather, a team dedicated to maintaining client software should be<br />
responsible for ensuring client software is installed and updated properly.<br />
• Cost factors. Consider the overall cost associated with each deployment<br />
option including planning, preparation, and training costs. In addition,<br />
determine if some of these costs are justifiable because of the return on<br />
investment over a period of time. For example, the return on investment of<br />
a centrally managed solution is usually much better than that of a manual<br />
solution over time.<br />
• <strong>Access</strong> to client devices. If your corporation supports remote access<br />
scenarios such as using an Internet kiosk to check email, you will not have<br />
the ability to install client software on these devices before users access the<br />
corporate network. In these cases, consider an on-demand deployment<br />
strategy where you configure <strong>Advanced</strong> <strong>Access</strong> Control so that client<br />
software is automatically downloaded to the client device only when<br />
required. However, if access to client devices is readily available, consider<br />
deploying the client software prior to the user accessing <strong>Advanced</strong> <strong>Access</strong><br />
Control.<br />
Weigh all of these factors when determining who should be responsible for<br />
installing the client software on the client device. Then, select the deployment<br />
solution that makes the most sense for your corporation.
198 <strong>Access</strong> <strong>Gateway</strong> <strong>Advanced</strong> <strong>Edition</strong> Administrator’s <strong>Guide</strong><br />
Supported Deployment Options<br />
<strong>Advanced</strong> <strong>Access</strong> Control supports the following client deployment options:<br />
Integration with enterprise software deployment tools. Deploy client software<br />
using a Microsoft Active Directory infrastructure or a standard third party MSI<br />
deployment tool such as Systems Management Server. If you use a tool that<br />
supports Windows Installer packages, you can use the <strong>Access</strong> Client package to<br />
create a single installation package containing the <strong>Advanced</strong> <strong>Access</strong> Control<br />
clients required for your environment. Then, use your client deployment tool to<br />
deploy and install the software on the appropriate client devices.<br />
Advantages of using a centralized deployment tool include:<br />
• Ability to adhere to corporate security requirements. For example, you can<br />
install client software without enabling software installation privileges for<br />
non-administrative users.<br />
• Control over software versions. You can deploy an updated version of client<br />
software to all users simultaneously.<br />
• Scalability. Easily scales to support additional users.<br />
• Positive user experience. You can deploy, test, and troubleshoot<br />
installation-related issues without involving users in this process.<br />
<strong>Citrix</strong> recommends this option when administrative control over the installation<br />
of client software is preferred and access to client devices is readily available.<br />
Network share point. Post installation packages on a network share point. For<br />
example, you can use the <strong>Access</strong> Client package to create an installation package<br />
containing the clients required for your environment and post it to a network<br />
share. In addition, the Server CD contains installation packages for certain client<br />
software. <strong>Citrix</strong> recommends posting installation packages to a share point when<br />
software is manually installed on client devices. For example, you can post client<br />
software installation packages to an FTP site for remote users responsible for<br />
installing client software on their home computers.<br />
On demand. Configure the deployment of client software only when required.<br />
Users connect to their network and clients are automatically downloaded on an<br />
“as needed” basis. This option is preferable when access to client devices is not<br />
readily available such as an Internet kiosk.<br />
You can combine deployment options to create your deployment strategy. For<br />
example, you can post installation packages on a network share point for users<br />
within the corporate network and also enable on-demand deployment of clients<br />
for those users connecting from an Internet kiosk.<br />
The table below summarizes the deployment options supported for each client.
Chapter 13 Rolling Out <strong>Advanced</strong> <strong>Access</strong> Control to Users 199<br />
Client Software<br />
Supported by<br />
<strong>Access</strong> Client<br />
package<br />
On-demand<br />
Secure <strong>Access</strong> Client Yes Yes Yes<br />
Endpoint Analysis Client Yes Yes Yes<br />
Live Edit Client Yes Yes No<br />
Client for Java No Yes No<br />
Web Client Yes Yes No<br />
Network Share<br />
Point<br />
Note: The Endpoint Analysis Client is available as a stand-alone MSI and EXE<br />
on the Server CD in the \Setup\EndpointAnalysisClient\lang directory. In<br />
addition, individual installation packages can be created for all client software<br />
components supported by <strong>Access</strong> Client package. For more information, see<br />
“Managing Client Software Using the <strong>Access</strong> Client Package” on page 200.<br />
Determining Which Clients to Deploy<br />
If your <strong>Advanced</strong> <strong>Access</strong> Control deployment does not require any client<br />
software on client devices, your deployment is considered to provide browseronly<br />
access. In this scenario, users need only a Web browser to access corporate<br />
resources. However, there are certain features that require client software on the<br />
user’s device. To determine if client software is required for your access strategy,<br />
use the matrix below. For additional information about feature-specific<br />
requirements, see “Feature Requirements” on page 46. For additional information<br />
about client software minimum requirements, see “Client Requirements” on page<br />
58.<br />
Note: Small form factor devices are not compatible with the <strong>Advanced</strong> <strong>Access</strong><br />
Control client software. Therefore, features requiring client software are not<br />
available on small form factor devices.
200 <strong>Access</strong> <strong>Gateway</strong> <strong>Advanced</strong> <strong>Edition</strong> Administrator’s <strong>Guide</strong><br />
Feature Client Software For more information, see...<br />
Verifying requirements on<br />
client devices<br />
Convenient editing and<br />
saving of remote files<br />
<strong>Access</strong> email accounts and<br />
synchronize email to client<br />
devices<br />
TCP access to services on<br />
corporate servers<br />
<strong>Access</strong>ing published<br />
applications through file type<br />
association<br />
Bypassing the Web proxy to<br />
access resources<br />
Endpoint Analysis<br />
Client<br />
“Verifying Requirements on Client<br />
Devices” on page 165<br />
Live Edit Client “Allowing Live Edit” on page 140<br />
Secure <strong>Access</strong><br />
Client<br />
Secure <strong>Access</strong><br />
Client<br />
<strong>Citrix</strong> Presentation<br />
Server Client for<br />
Java or Web Client<br />
Secure <strong>Access</strong><br />
Client<br />
“Providing Users with Secure <strong>Access</strong><br />
to Email Accounts” on page 188<br />
“Creating Network Resources for VPN<br />
<strong>Access</strong>” on page 119<br />
“Configuring File Type Association”<br />
on page 163<br />
“Bypassing URL Rewriting” on page<br />
144<br />
Managing Client Software Using the <strong>Access</strong> Client<br />
Package<br />
If you decide that you will control the deployment of client software, consider<br />
using the <strong>Access</strong> Client package to create a Windows Installer package of specific<br />
client software. After creating the package, you can deploy it using your<br />
Microsoft Active Directory infrastructure or a standard third party MSI<br />
deployment tool such as Systems Management Server.<br />
The <strong>Access</strong> Client package contains a number of the client-side pieces of the<br />
<strong>Citrix</strong> <strong>Access</strong> Suite, allowing you to quickly and easily deploy and maintain the<br />
client-side software to your users using one convenient Windows Installer<br />
package. After you deploy your client software, you can update your installations<br />
simply by creating and deploying an updated installation package using the latest<br />
version of the <strong>Access</strong> Client package.<br />
The <strong>Access</strong> Client package is available in the Download section of the <strong>Citrix</strong> Web<br />
site, www.citrix.com, and contains up-to-date client software and hotfixes for a<br />
number of the client-side pieces of the <strong>Citrix</strong> <strong>Access</strong> Suite.
Chapter 13 Rolling Out <strong>Advanced</strong> <strong>Access</strong> Control to Users 201<br />
Client Software Available for the <strong>Access</strong> Client<br />
Package<br />
<strong>Access</strong> Suite Component<br />
<strong>Citrix</strong> Presentation Server<br />
<strong>Access</strong> <strong>Gateway</strong><br />
<strong>Citrix</strong> Password Manager<br />
Client-Side Software<br />
Program Neighborhood, Program Neighborhood<br />
Agent, Web Client<br />
Secure <strong>Access</strong> Client, Live Edit Client, Endpoint<br />
Analysis Client<br />
<strong>Citrix</strong> Password Manager Agent<br />
Creating a Client Distribution Package<br />
You can run the <strong>Access</strong> Client package in administrative mode to select the<br />
client-side software pieces you want to package together. Enter the following<br />
command at a command prompt to run in administrative mode:<br />
msiexec.exe /a [path to msi file]<br />
Select your client components and optionally customize the installation process<br />
of each client. To create an installation package for a specific piece of client<br />
component, select only that client. Additionally, you can choose to reduce the<br />
overall size of the final distribution package by selecting the option to remove<br />
unused files.<br />
Note: Each client installation that includes a <strong>Citrix</strong> Presentation Server Client<br />
includes the Program Neighborhood Connection Center, allowing users to see<br />
information about their current ICA connections.<br />
Distributing and Installing Your Client Software<br />
Package<br />
After you create your client software package, you can make it available to your<br />
users on a network share point or distribute it using your Active Directory<br />
infrastructure.<br />
Client devices must meet the requirements of each client software component<br />
within your package. For example, if you attempt to install a package that<br />
includes the Web Client and the Secure <strong>Access</strong> Client on a device that does not<br />
meet the requirements for the Secure <strong>Access</strong> Client, only the Web client is<br />
installed.
202 <strong>Access</strong> <strong>Gateway</strong> <strong>Advanced</strong> <strong>Edition</strong> Administrator’s <strong>Guide</strong><br />
The <strong>Access</strong> Client package installs and upgrades all available clients, as specified<br />
when you build your software package. Every item included in your original<br />
client software package should be included in any subsequent upgrade packages<br />
you create.<br />
For example, if you create a software package that includes the Endpoint<br />
Analysis Client and the Web Client, subsequent upgrade packages must include<br />
both client software packages. If you create an upgrade package that includes<br />
only the Endpoint Analysis Client, the <strong>Access</strong> Client package uninstalls the Web<br />
Client.<br />
Important: The <strong>Gateway</strong> Client and <strong>Advanced</strong> <strong>Gateway</strong> Client are no longer<br />
supported by <strong>Advanced</strong> <strong>Access</strong> Control and therefore, are removed from the<br />
<strong>Access</strong> Client package. However, the <strong>Access</strong> Client package now includes the<br />
Secure <strong>Access</strong> Client, the client software component that replaces the <strong>Gateway</strong><br />
Client and <strong>Advanced</strong> <strong>Gateway</strong> Client. As a result, the <strong>Access</strong> Client package<br />
uninstalls the <strong>Gateway</strong> Client and <strong>Advanced</strong> <strong>Gateway</strong> Client from all client<br />
devices. If users require the functionality previously available with these clients,<br />
include the Secure <strong>Access</strong> Client in your package.<br />
Conversely, if you later want to add the Secure <strong>Access</strong> Client to your<br />
environment, rebuild your package to include the Endpoint Analysis, Web, and<br />
Secure <strong>Access</strong> Clients. When this installation package is run on client devices<br />
that have your original package installed, the Secure <strong>Access</strong> Client is installed,<br />
while the Endpoint Analysis and Web clients will simply be verified as installed<br />
and not changed in any way.<br />
To uninstall a client that was installed or upgraded using a Windows Installer<br />
package, users must run the Add/Remove Programs utility from the Control<br />
Panel or run the installer package again and select the Remove option.<br />
Important: To install the client software using the Windows Installer package,<br />
the Windows Installer Service must be installed on the client device. This service<br />
is present by default on Windows 2000 systems. To install clients on client<br />
devices running earlier versions of the Windows operating system, you must use<br />
the self-extracting executable or install the Windows Installer 2.0 Redistributable<br />
for Windows, available at http://www.microsoft.com/.<br />
For more information about the <strong>Access</strong> Client package, including a full list of<br />
included clients, see the Download section of the <strong>Citrix</strong> Web site at<br />
www.citrix.com.
Chapter 13 Rolling Out <strong>Advanced</strong> <strong>Access</strong> Control to Users 203<br />
Posting Client Software to a Share Point<br />
You can post available client software on a network share point so users or<br />
support personnel can install the client software at their convenience. You can use<br />
the <strong>Access</strong> Client package to create installation packages for each client software<br />
component or a single installation package containing all of your <strong>Advanced</strong><br />
<strong>Access</strong> Control clients following the instructions above. Alternatively, for the<br />
Endpoint Analysis Client, you can use the installation package available as an<br />
EXE or MSI in the \Setup\EndpointAnalysisClient\lang directory of the Server<br />
CD.<br />
Downloading Client Software on Demand<br />
You can configure client software so that it downloads and installs on the client<br />
device on an “as needed” basis. <strong>Advanced</strong> <strong>Access</strong> Control supports this type of<br />
deployment for the Secure <strong>Access</strong> Client, Endpoint Analysis Client, Web Client<br />
and Client for Java. Use this deployment option when non-corporate devices such<br />
as Internet kiosks are used to access the corporate network.<br />
On-demand deployment of the Secure <strong>Access</strong> Client is configured within<br />
connection policies. If a connection policy is configured to launch the Secure<br />
<strong>Access</strong> Client, <strong>Advanced</strong> <strong>Access</strong> Control detects whether the Secure <strong>Access</strong><br />
Client is already installed on the client device. If the Secure <strong>Access</strong> Client is<br />
detected, it is launched. If the Secure <strong>Access</strong> Client is not detected, it is<br />
downloaded to the client device and then launched. If the client software cannot<br />
be downloaded to the client device, <strong>Advanced</strong> <strong>Access</strong> Control attempts to<br />
connect to resources using browser-only access.<br />
Important: <strong>Access</strong> to Web applications configured to bypass the Web proxy,<br />
email synchronization, and network resources require the Secure <strong>Access</strong> Client.<br />
If you integrated <strong>Advanced</strong> <strong>Access</strong> Control with a farm running Presentation<br />
Server, you can specify which Presentation Server Client to deploy for each logon<br />
point. This allows you to configure the deployment of Presentation Server Clients<br />
based on specific access scenarios. For example, you could configure on-demand<br />
client downloads for the logon point available to users logging on over the<br />
Internet. However, you could disable this feature for the logon point available to<br />
users from an enclave within the corporate network.
204 <strong>Access</strong> <strong>Gateway</strong> <strong>Advanced</strong> <strong>Edition</strong> Administrator’s <strong>Guide</strong><br />
The requirements for installing on-demand clients include configuring the client<br />
browser to accept client software such as ActiveX controls, plug-ins, and Java<br />
applets. In addition, users running Windows XP or Windows 2000 must be<br />
members of the Power Users or Administrators group to install the software on<br />
their devices. For additional information about client software minimum<br />
requirements, see “Client Requirements” on page 58.<br />
You cannot configure the on-demand deployment of the Endpoint Analysis<br />
Client. Rather, <strong>Advanced</strong> <strong>Access</strong> Control determines if, based on policies<br />
associated with that logon point, an endpoint analysis scan is required. If a scan is<br />
required, <strong>Advanced</strong> <strong>Access</strong> Control detects if the Endpoint Analysis Client is<br />
present on the client device. If the client software is detected on the client device,<br />
the Endpoint Analysis Client performs the appropriate scans. However, if the<br />
software is not detected, users are prompted to download and install the Endpoint<br />
Analysis Client as an ActiveX control when running Internet Explorer or a plugin<br />
when running Netscape Navigator or Firefox.<br />
If users refuse to allow the Endpoint Analysis Client to install and scan the client<br />
device, they receive the same level of access they would if the policies associated<br />
with the scans were denied. This level can be limited or no access. Consider<br />
deploying the Endpoint Analysis Client in advance if you want to avoid the ondemand<br />
downloading of this client.<br />
Note: Some endpoint analysis information is cached on the client device. Users<br />
can empty this cache through the Manage Endpoint Analysis tool (Start ><br />
Programs > <strong>Citrix</strong> > Endpoint Analysis Client).<br />
To configure on-demand client deployment of Presentation Server Clients<br />
1. In the console tree, select the appropriate logon point and choose Edit<br />
Logon Point from Common Tasks.<br />
2. On the Clients page, select the clients you want to deploy to users ondemand<br />
from the options below.<br />
• Web Client (ActiveX or Netscape plug-in). Select this option if<br />
your users do not already have a Presentation Server Client installed<br />
on their client device.<br />
Select Use the Client for Java if the Web Client cannot be used to<br />
deploy the Client for Java if the Web Client cannot be used or the user<br />
chooses not to allow its download. In addition, you can configure the<br />
automated update of the Web Client at logon (available for ActiveX<br />
only). This option provides an automated method of updating client
Chapter 13 Rolling Out <strong>Advanced</strong> <strong>Access</strong> Control to Users 205<br />
software. Clear this option if you do not want to upgrade existing<br />
installations of the client on each user’s computer.<br />
• Client for Java. Deployed in applet mode, this client does not<br />
require the user to install any software. The user’s browser caches the<br />
Java applet for the duration of the browser session. Select the Client<br />
for Java as an alternative for users who cannot use the Web Client<br />
software.<br />
• None (use installed client). Select this option if you already<br />
deployed the required client software to client devices.<br />
To configure on-demand client deployment of Secure <strong>Access</strong> Client<br />
1. In the console tree, select Connection Policies.<br />
2. Double-click the connection policy you want to edit.<br />
3. On the Settings page, click Launch Secure <strong>Access</strong> Client and click Yes to<br />
allow this setting for the connection.<br />
See the <strong>Access</strong> <strong>Gateway</strong> Standard <strong>Edition</strong> Administrator’s <strong>Guide</strong> for additional<br />
information on configuring the deployment of the Secure <strong>Access</strong> Client.<br />
Ensuring a Smooth Logon Experience with the Secure<br />
<strong>Access</strong> Client<br />
If users do not have the Secure <strong>Access</strong> Client installed when they log on, they<br />
must download and install it. However, if the Secure <strong>Access</strong> Client does not<br />
install and connect to the <strong>Access</strong> <strong>Gateway</strong> promptly, users will experience<br />
difficulty in accessing the home page you designate for the logon point. To avoid<br />
this, you can perform the following tasks:<br />
• Enable the Web browser to redirect users to a URL outside of the internal<br />
network<br />
• Modify the browser delay setting<br />
• Modify the ticket lifetime setting
206 <strong>Access</strong> <strong>Gateway</strong> <strong>Advanced</strong> <strong>Edition</strong> Administrator’s <strong>Guide</strong><br />
Modifying the Logon Point Redirect URL<br />
When a user logs on to the <strong>Access</strong> <strong>Gateway</strong>, the Logon Agent verifies that the<br />
user is allowed to log on and, if required by policies, the user’s Web browser<br />
attempts to launch the Secure <strong>Access</strong> Client. Afterward, the Web browser<br />
redirects the user to the home page designated for the logon point. By default, the<br />
Web browser redirects the user to the SessionInit.aspx page using an internal<br />
URL after 10 seconds elapse. If the Secure <strong>Access</strong> Client does not launch<br />
successfully during this time, the user cannot access resources on the internal<br />
network.<br />
To ensure users can access resources in this case, you can enable the Web browser<br />
to redirect users to an external URL. When you do this, users are redirected to the<br />
SessionInit.aspx page using the URL for the <strong>Access</strong> <strong>Gateway</strong> appliance (for<br />
example, https://<strong>Access</strong><strong>Gateway</strong>FQDN).<br />
To modify the redirect URL<br />
1. In Windows Explorer, navigate to the logon point’s virtual directory. For<br />
example, C:\inetpub\wwwroot\<strong>Citrix</strong>LogonPoint\logonpointname, where<br />
logonpointname is the name of the logon point.<br />
2. Open the web.config file in a text editor and add the following line to the<br />
appSettings section:<br />
<br />
3. Repeat steps 1-2 for all logon points you want to modify.<br />
Modifying Browser Delay Settings<br />
When a user launches the Secure <strong>Access</strong> Client and logs on to the <strong>Access</strong><br />
<strong>Gateway</strong>, the user’s Web browser delays displaying the home page while the<br />
Secure <strong>Access</strong> Client establishes a connection with the <strong>Access</strong> <strong>Gateway</strong>. When<br />
using Mozilla Firefox or Netscape Navigator, the Secure <strong>Access</strong> Client connects<br />
after the default time period elapses. By default, this delay lasts 10 seconds. If the<br />
Secure <strong>Access</strong> Client does not connect within this time period, the Web browser<br />
will not display the home page unless the user refreshes the Web browser.<br />
To ensure the Secure <strong>Access</strong> Client has sufficient time to connect and the home<br />
page appears for Mozilla Firefox and Netscape Navigator, you can increase the<br />
time period that the Web browser delays displaying the home page. To do this,<br />
you modify the <strong>Advanced</strong><strong>Gateway</strong>ClientActivationDelay key of the logon point’s<br />
web.config file. If you choose to make this change on one server running<br />
<strong>Advanced</strong> <strong>Access</strong> Control, you must make the same change on all servers in your<br />
access server farm.
Chapter 13 Rolling Out <strong>Advanced</strong> <strong>Access</strong> Control to Users 207<br />
To modify browser delay settings<br />
1. In Windows Explorer, navigate to the logon point’s virtual directory. For<br />
example, C:\inetpub\wwwroot\<strong>Citrix</strong>LogonPoint\logonpointname, where<br />
logonpointname is the name of the logon point.<br />
2. Open the web.config file in a text editor and locate the following line:<br />
<br />
3. Change the key value to the length of time, in seconds, you want to allow<br />
the Secure <strong>Access</strong> Client to establish a connection with the <strong>Access</strong><br />
<strong>Gateway</strong>.<br />
4. Repeat steps 1-3 for all remaining servers running <strong>Advanced</strong> <strong>Access</strong><br />
Control.<br />
Modifying Ticket Lifetime Settings<br />
When a user launches the Secure <strong>Access</strong> Client and logs on to the <strong>Access</strong><br />
<strong>Gateway</strong>, the user’s Web browser receives a ticket from the <strong>Citrix</strong> Authentication<br />
Service which must be used within a certain period of time. The default time<br />
period is 85 seconds. When the ticket is used within this time period, the home<br />
page appears in the user’s Web browser. If the Secure <strong>Access</strong> Client does not<br />
connect within this time period, the ticket expires and the home page does not<br />
appear. The user must access the logon point again and receive a new ticket.<br />
To ensure the Secure <strong>Access</strong> Client has sufficient time to connect and tickets are<br />
presented promptly, you can increase the lifetime of tickets issued to users. To do<br />
this, you modify the Ticket Profile keys located in the web.config file of the<br />
<strong>Citrix</strong> Authentication Service. If you choose to make this change on one server<br />
running <strong>Advanced</strong> <strong>Access</strong> Control, you must make the same change on all servers<br />
in your access server farm.<br />
To modify the ticket lifetime settings<br />
1. In Windows Explorer, navigate to the <strong>Citrix</strong> Authentication Service Web<br />
directory (C:\inetpub\wwwroot\<strong>Citrix</strong>AuthService).<br />
2. Open the web.config file in a text editor and locate the following lines:<br />
<br />
<br />
3. Change the first numeric value in both keys to the length of time, in<br />
seconds, in which you want tickets to remain valid from the time of issue.<br />
4. Repeat steps 1-3 for all remaining servers running <strong>Advanced</strong> <strong>Access</strong><br />
Control.
208 <strong>Access</strong> <strong>Gateway</strong> <strong>Advanced</strong> <strong>Edition</strong> Administrator’s <strong>Guide</strong><br />
Ensuring a Smooth Rollout<br />
After your client software deployment strategy is implemented and tested, you<br />
are ready to provide users with the information they need to access corporate<br />
resources through <strong>Advanced</strong> <strong>Access</strong> Control. To ensure all users are aware of the<br />
upcoming deployment of <strong>Advanced</strong> <strong>Access</strong> Control, consider a formal method of<br />
communication such as posting information on your corporate intranet, training<br />
sessions, and email.<br />
If there are budgetary restrictions, determine if some of the costs of your<br />
deployment strategy actually improve the company’s bottom line. For example,<br />
the costs associated with user training could be justified if there is a significant<br />
savings as a result of fewer support calls.<br />
Topics to consider providing additional information to users include:<br />
• Client software. Depending on your client deployment strategy, users may<br />
need to install client software on their own device. In this scenario, provide<br />
users with the location of the file share from which they can access the<br />
installation packages. If you implemented an on-demand client software<br />
strategy, instruct users to accept these clients when prompted. In addition,<br />
inform users that failure to accept the installation of on-demand clients<br />
results in reduced functionality for that session.<br />
• Logon points. If users can access the corporate network from multiple<br />
logon points, you must provide users with the URLs for these logon points.<br />
For example, if you created two logon points—one for access from a<br />
network enclave and another for external access through the Internet—<br />
users will need the URLs for both logon points. Additional information<br />
about providing logon information to users is discussed in the next section.<br />
• Policy-based access. Inform users if you developed an access strategy that<br />
includes different levels of access to corporate resources based on factors<br />
such as endpoint analysis results, authentication type, or logon point.<br />
For example, you may create a policy that allows users to download a<br />
document when accessing it from within a network enclave and create<br />
another policy that denies this level of access when accessing the document<br />
from their home computer. Informing users of this type of access control<br />
reduces user confusion as well as unnecessary support calls.<br />
Providing Logon Information to Users<br />
Users can access a specific logon point by navigating to the following URL:<br />
https://<strong>Gateway</strong>ApplianceFQDN/<strong>Citrix</strong>LogonPoint/LogonPointName/
Chapter 13 Rolling Out <strong>Advanced</strong> <strong>Access</strong> Control to Users 209<br />
where <strong>Gateway</strong>ApplianceFQDN is the fully qualified domain name (FQDN) of<br />
the <strong>Access</strong> <strong>Gateway</strong> server on which you deployed the logon point and<br />
LogonPointName is the name of the logon point.<br />
For example, if the FQDN of the <strong>Access</strong> <strong>Gateway</strong> server is<br />
“companyserver.mydomain.com” and the logon point is “remote,” the URL for<br />
logging on is https://companyserver.mydomain.com/<strong>Citrix</strong>LogonPoint/remote.<br />
Alternatively, users can access the default logon point by navigating to the<br />
following URL:<br />
https://<strong>Gateway</strong>ApplianceFQDN/<br />
where <strong>Gateway</strong>ApplianceFQDN is the fully qualified domain name (FQDN) of<br />
the <strong>Access</strong> <strong>Gateway</strong> server on which you deployed the logon point.<br />
Browser Security Considerations<br />
Certain custom Web browser security settings can prevent users from accessing<br />
<strong>Advanced</strong> <strong>Access</strong> Control. Therefore, follow the guidelines below to ensure users<br />
can access the appropriate servers within your network.<br />
• For users to properly access corporate resources through <strong>Advanced</strong> <strong>Access</strong><br />
Control, the following browser settings must be enabled.<br />
• Cookies. <strong>Advanced</strong> <strong>Access</strong> Control uses per-session cookies that are<br />
not stored on disk. Therefore, third parties cannot access the cookies.<br />
Disallowing per-session cookies prevents connections to <strong>Advanced</strong><br />
<strong>Access</strong> Control. Users cannot log on to <strong>Advanced</strong> <strong>Access</strong> Control<br />
because logging on requires a session cookie.<br />
• File download. Disabling “File download” prevents the downloading<br />
of files from the corporate network, the launching of any seamless<br />
ICA sessions, and access to internal Web servers outside the access<br />
server farm.<br />
• Scripting. Disabling active scripting makes <strong>Advanced</strong> <strong>Access</strong><br />
Control inaccessible. Disabling Java applet scripting prevents users<br />
from launching published applications with the Client for Java.<br />
• Change the security settings only for zones that contain resources accessed<br />
through <strong>Advanced</strong> <strong>Access</strong> Control. If you fully trust the sites on your<br />
company’s intranet, you can set the Local Intranet zone security level to<br />
Low. If you do not fully trust the sites on your intranet, keep the Local<br />
Intranet zone set to Medium-Low or Medium.<br />
• Several browser security settings required to access <strong>Advanced</strong> <strong>Access</strong><br />
Control servers are disabled under the High security settings. Therefore, if
210 <strong>Access</strong> <strong>Gateway</strong> <strong>Advanced</strong> <strong>Edition</strong> Administrator’s <strong>Guide</strong><br />
the security level for the Local Intranet zone is set to High, customize the<br />
browser security settings as described in the next section.<br />
• If you want to keep the default security settings but also customize<br />
individual security settings of your <strong>Advanced</strong> <strong>Access</strong> Control servers, you<br />
can configure each server in the access server farm as a “trusted site.”<br />
Configuring servers as trusted sites lets you customize their security<br />
settings without affecting the Internet and Local Intranet settings.<br />
Important: If your access server farm requires SSL, make sure that SSL is<br />
required for all sites in the Trusted Site zone.<br />
Customizing Browser Security Settings<br />
The following table lists additional Internet Explorer browser security settings<br />
required for those deployment scenarios requiring client software. Most of these<br />
settings are available from the Security tab of the Internet Options dialog box.<br />
Deployment Scenario<br />
Required Settings<br />
Endpoint Analysis Client • Run ActiveX controls and plug-ins (Enable)<br />
• Script ActiveX controls marked safe for scripting<br />
(Enable)<br />
• File download (Enable)<br />
Live Edit Client • Run ActiveX controls and plug-ins (Enable)<br />
• Script ActiveX controls marked safe for scripting<br />
(Enable)<br />
• File download (Enable)<br />
Web Client • Run ActiveX controls and plug-ins (Enable)<br />
• Script ActiveX controls marked safe for scripting<br />
(Enable)<br />
• File download (Enable)<br />
• Do not save encrypted pages to disk (Disable)<br />
Client for Java • Java Permissions (High safety or Custom)<br />
If you select Custom, set the following options:<br />
• Run Unsigned Content (Run in sandbox)<br />
• Run Signed Content (Prompt or Enable)<br />
• Do not save encrypted pages to disk (Disable)<br />
• All Additional Signed Permissions must also be<br />
set to Prompt or Enable
Customizing the Logon Error Message<br />
Chapter 13 Rolling Out <strong>Advanced</strong> <strong>Access</strong> Control to Users 211<br />
Users may see an “<strong>Access</strong> Denied” page when attempting to access the logon<br />
page. This can occur if users do not meet the requirements in a policy controlling<br />
the Allow Logon permission or do not meet the requirements configured in logon<br />
point properties for displaying the logon page.<br />
You can modify the “<strong>Access</strong> Denied” page to provide users with troubleshooting<br />
information or redirect them to a different Web page that contains remedies for a<br />
specific problem that is detected. In addition, because each logon point is<br />
associated with its own “<strong>Access</strong> Denied” page, you can customize this message to<br />
accommodate the specific access scenarios associated with each logon point.<br />
For example, you can customize a logon point’s “<strong>Access</strong> Denied” page with<br />
frequently asked questions and technical support contact information. Another<br />
possible “<strong>Access</strong> Denied” page customization is to redirect users to a Web page<br />
containing links to client software installation packages.<br />
You can create and deploy a logon point for the sole purpose of testing your<br />
modifications to the “<strong>Access</strong> Denied” page. Then, when you are ready to<br />
incorporate the customized page into your production environment, copy the page<br />
to the appropriate location on the Logon Agent server.<br />
The “<strong>Access</strong> Denied” message is generated by an ASP.NET user control that can<br />
be modified using any text editor that supports ASCX files.<br />
To edit the “<strong>Access</strong> Denied” message<br />
1. On an <strong>Advanced</strong> <strong>Access</strong> Control server, navigate to:<br />
%systemdrive%:\Inetpub\wwwroot\<strong>Citrix</strong>logonpoint\logon point name<br />
where logon point name represents the name of the logon point associated<br />
with the page you want to customize.<br />
2. Make a backup copy of the disallowed.ascx file.<br />
3. Edit disallowed.ascx.<br />
For example, if you have a troubleshooting site named<br />
www.gotoassist.com, add the following syntax to the end of<br />
disallowed.ascx:<br />
Click here to<br />
launch GoToAssist<br />
Caution: Do not modify the logic contained in the page because doing so<br />
can yield undesirable results.
212 <strong>Access</strong> <strong>Gateway</strong> <strong>Advanced</strong> <strong>Edition</strong> Administrator’s <strong>Guide</strong><br />
4. Repeat Steps 1 - 3 to customize the “<strong>Access</strong> Denied” message for other<br />
logon points.<br />
5. Update logon page files on the <strong>Access</strong> <strong>Gateway</strong> as described in “Updating<br />
Logon Page Information” on page 93.
CHAPTER 14<br />
Managing Your <strong>Access</strong> <strong>Gateway</strong><br />
Environment<br />
After configuring the servers in your access server farm, you perform a variety of<br />
tasks to manage your deployment. These tasks help you ensure your deployment<br />
runs smoothly and efficiently.<br />
This section describes how to:<br />
• Administer your access server farm using multiple Consoles<br />
• Secure the <strong>Access</strong> Management Console with COM+<br />
• Add and remove farms and servers<br />
• Change the service account or database credentials<br />
• Change the server roles<br />
• Minimize downtime of your access server farm<br />
• Monitor user sessions<br />
Managing <strong>Access</strong> Server Farms Remotely<br />
You can use the <strong>Access</strong> <strong>Gateway</strong> Administration Tool and the <strong>Access</strong><br />
Management Console on remote workstations to manage your access server farm.<br />
You can install the Administration Tool from the <strong>Access</strong> <strong>Gateway</strong> Administration<br />
Portal. Use the <strong>Advanced</strong> <strong>Access</strong> Control Server CD to install the <strong>Access</strong><br />
Management Console.<br />
To download and install the Administration Tool<br />
1. In a Web browser, type the URL of the <strong>Access</strong> <strong>Gateway</strong> and enter your<br />
administrator credentials.<br />
2. In the <strong>Access</strong> <strong>Gateway</strong> Administration Portal, click Downloads.<br />
3. Under Administration, click Download <strong>Access</strong> <strong>Gateway</strong> Administration<br />
Tool Installer.
214 <strong>Access</strong> <strong>Gateway</strong> <strong>Advanced</strong> <strong>Edition</strong> Administrator’s <strong>Guide</strong><br />
4. Select a location to save the installation application and click Save. The<br />
installation tool is downloaded to your computer.<br />
5. After downloading the file, navigate to the location it was saved and then<br />
double-click the file.<br />
6. To install the Administration Tool, follow the instructions in the wizard.<br />
7. To start the Administration Tool, click Start > Programs > <strong>Citrix</strong> <strong>Access</strong><br />
<strong>Gateway</strong> Administration Tool > <strong>Citrix</strong> <strong>Access</strong> <strong>Gateway</strong> Administration<br />
Tool.<br />
8. In Username and Password, type the <strong>Access</strong> <strong>Gateway</strong> administrator<br />
credentials. The default user name and password are root and rootadmin.<br />
To install the <strong>Access</strong> Management Console<br />
1. Insert the Server CD or start AutoRun.exe from the CD image.<br />
2. Select Product Installations and <strong>Advanced</strong> <strong>Access</strong> Control to open<br />
Setup.<br />
3. Accept the license agreement and proceed to the Components Selection<br />
page.<br />
4. Select Management console and clear the selection of any other<br />
components selected by default.<br />
5. Proceed through the remainder of the wizard.<br />
Controlling <strong>Access</strong> by Multiple Consoles<br />
When a Console connects to an access server farm, other Console instances can<br />
actively manage the server farm at the same time. If any changes are made to the<br />
same configuration settings, <strong>Advanced</strong> <strong>Access</strong> Control writes the first change<br />
saved to the database based on the timestamp at which the change occurred. If<br />
two changes are saved simultaneously, the change with the earlier timestamp<br />
prevails.<br />
You are notified if an instance of the console connects to a farm and another<br />
instance is detected. If you make any configuration changes, they may be<br />
overridden depending on when each Console instance saves each change. Choose<br />
Yes to acknowledge and close the message.<br />
Important: Administering <strong>Advanced</strong> <strong>Access</strong> Control using multiple Console<br />
instances simultaneously can result in data corruption and inconsistent server<br />
performance. <strong>Citrix</strong> recommends you use only one Console instance at a time to<br />
administer access server farms.
Chapter 14 Managing Your <strong>Access</strong> <strong>Gateway</strong> Environment 215<br />
Using Groups in Policy Assignments<br />
It is generally good practice to assign policies to domain user groups or account<br />
authority groups only. If, however, you use the console on a remote workstation<br />
and assign the workstation’s local users to a policy, you may receive an error<br />
message when editing the policy from another Console. You can remove or edit<br />
such a policy using the console on the server running <strong>Advanced</strong> <strong>Access</strong> Control.<br />
Securing the <strong>Access</strong> Management Console Using COM+<br />
Depending on your organization’s needs, you may allow other administrators to<br />
manage your access server farm. Using COM+ role-based security, you can<br />
specify the users who can make changes to your access server farm using the<br />
<strong>Access</strong> Management Console.<br />
During installation, <strong>Advanced</strong> <strong>Access</strong> Control creates the following security roles<br />
for the <strong>Access</strong> <strong>Gateway</strong> Server COM+ application:<br />
• Administrators. Users in this role are allowed to make changes to the<br />
<strong>Advanced</strong> <strong>Access</strong> Control environment using the console.<br />
• Non Appliance Administrators. Users in this role are allowed to make<br />
changes to resources and policies only. Users assigned to this role are not<br />
allowed to modify gateway appliance settings. Users assigned to this role<br />
must not be assigned to the Administrators role as well. If the user is<br />
assigned to both roles, the Non Appliance Administrators role is not<br />
enforced.<br />
• System. This role includes the service account and other local accounts that<br />
require access to the <strong>Access</strong> <strong>Gateway</strong> Server COM+ application.<br />
If you add users to the Administrators or Non Appliance Administrators roles,<br />
they may have access to the API published by the application in addition to the<br />
console. Consider all risks carefully before adding other users to the<br />
Administrators role.<br />
Important: The accounts appearing in the System role are required for<br />
<strong>Advanced</strong> <strong>Access</strong> Control to function. You must also close the <strong>Access</strong><br />
Management Console before adding users to the Administrators or Non<br />
Appliance Users role. If these System accounts are modified or if the console is<br />
open when COM+ security is applied, your access server farm may stop<br />
functioning and you may lose data.<br />
To allow administrators to use the <strong>Access</strong> Management Console<br />
1. Close the <strong>Access</strong> Management Console if it is open.
216 <strong>Access</strong> <strong>Gateway</strong> <strong>Advanced</strong> <strong>Edition</strong> Administrator’s <strong>Guide</strong><br />
2. Click Start > Programs or All Programs > Administrative Tools ><br />
Component Services.<br />
3. In the console tree, expand Component Services > Computers > My<br />
Computer > COM+ Applications.<br />
4. Expand <strong>Access</strong> <strong>Gateway</strong> Library > Roles and select the role that is<br />
appropriate for the user(s) you want to add:<br />
• To allow administrators to access appliance and farm settings with<br />
the console, expand Administrators.<br />
• To allow administrators to access farm settings only, expand Non<br />
Appliance Administrators.<br />
5. Right-click Users and select New.<br />
6. Enter the user account(s) you want to add and click OK.<br />
7. Restart the <strong>Access</strong> <strong>Gateway</strong> Library COM+ application.<br />
8. Repeat steps 4-7 for the <strong>Access</strong> <strong>Gateway</strong> Server COM+ application.<br />
Restarting COM+ Applications<br />
Restart the <strong>Access</strong> <strong>Gateway</strong> Server COM+ application when:<br />
• You add users to the Administrators or Non Appliance Administrators role<br />
so they can make changes to your deployment using the <strong>Access</strong><br />
Management Console.<br />
• Components such as logon points or the Web proxy function incorrectly, as<br />
a preliminary troubleshooting measure.<br />
• You modify components that access the <strong>Access</strong> <strong>Gateway</strong> Server COM+<br />
application, such as Web email. For example, if you modify mapisvc.inf to<br />
enable Microsoft Exchange 2000 to work with the default Email Interface,<br />
you restart the <strong>Access</strong> <strong>Gateway</strong> Server COM+ application to ensure the<br />
modifications are recognized at runtime.<br />
To restart the <strong>Access</strong> <strong>Gateway</strong> Server COM+ application<br />
1. Click Start > Programs or All Programs > Administrative Tools ><br />
Component Services.<br />
2. From the Component Services window, expand Computers > My<br />
Computer > COM+ Applications.<br />
3. Right-click <strong>Access</strong> <strong>Gateway</strong> Server and select Shut down.<br />
4. Right-click <strong>Access</strong> <strong>Gateway</strong> Server and select Start.
Adding and Removing Farms<br />
Chapter 14 Managing Your <strong>Access</strong> <strong>Gateway</strong> Environment 217<br />
If your deployment consists of multiple access server farms, you can manage<br />
them using a single Console. To do this, you add the other access server farms to<br />
the console tree.<br />
To add access server farms<br />
1. In the console tree, select the <strong>Access</strong> <strong>Gateway</strong> node.<br />
2. Under Common Tasks, click Add access server farm.<br />
3. In the Server box, type the machine name or the IP address of any server in<br />
the farm you want to add.<br />
4. Click OK. The <strong>Access</strong> Management Console connects to the access server<br />
farm and displays the farm node in the console tree.<br />
Note: To manage multiple access server farms from Console instances running<br />
on other machines, you must add the farms to each Console.<br />
To remove access server farms<br />
1. In the console tree, expand the <strong>Access</strong> <strong>Gateway</strong> node and select the farm<br />
you want to remove.<br />
2. Under Common Tasks, click Remove farm.<br />
Adding and Removing <strong>Gateway</strong> Appliances<br />
To add gateway appliances to your access server farm, perform the following<br />
tasks:<br />
1. Install and configure the appliance as described in the Getting Started with<br />
<strong>Citrix</strong> <strong>Access</strong> <strong>Gateway</strong> Standard <strong>Edition</strong>.<br />
2. In the <strong>Access</strong> <strong>Gateway</strong> Administration Tool, enable the <strong>Advanced</strong> <strong>Access</strong><br />
Control to administer the appliances. For more information, see “Enabling<br />
<strong>Advanced</strong> <strong>Access</strong> Control” on page 80.<br />
3. In the console, run discovery.<br />
To remove gateway appliances from your access server farm, perform the<br />
following tasks:<br />
1. In the <strong>Access</strong> <strong>Gateway</strong> Administration Tool, disable gateway<br />
administration with the <strong>Advanced</strong> <strong>Access</strong> Control and remove all access<br />
server farm information.
218 <strong>Access</strong> <strong>Gateway</strong> <strong>Advanced</strong> <strong>Edition</strong> Administrator’s <strong>Guide</strong><br />
2. In the console, remove the gateway appliance.<br />
When you remove a gateway appliance from the console, you remove only the<br />
registration information from the access server farm database. If you do not<br />
remove all access server farm information from the <strong>Access</strong> <strong>Gateway</strong><br />
Administration Tool before removing the appliance from the console, the<br />
<strong>Advanced</strong> <strong>Access</strong> Control registers the appliance again and displays it in the<br />
<strong>Gateway</strong> Appliances node when you run discovery.<br />
To disable <strong>Access</strong> <strong>Gateway</strong> administration with the console<br />
1. Launch the <strong>Access</strong> <strong>Gateway</strong> Administration Tool and select the gateway<br />
appliance you want to remove.<br />
2. Click the <strong>Advanced</strong> Options tab and then clear the <strong>Advanced</strong> <strong>Access</strong><br />
Control - includes an access server farm check box.<br />
3. In Server running <strong>Advanced</strong> <strong>Access</strong> Control, remove the name of the<br />
server running <strong>Advanced</strong> <strong>Access</strong> Control.<br />
4. Click Submit to save your changes.<br />
5. Restart the <strong>Access</strong> <strong>Gateway</strong>.<br />
To remove a gateway appliance from the console<br />
1. In the console tree, expand <strong>Gateway</strong> Appliances and select the gateway<br />
appliance you want to remove.<br />
2. Click Remove appliance and then click Yes to remove the gateway<br />
appliance from the farm.<br />
Changing Service Account and Database Credentials<br />
You can change the credentials of the service account or SQL access account if<br />
either of these accounts is deleted, is disabled, or changes passwords. If the<br />
credentials are not changed, <strong>Advanced</strong> <strong>Access</strong> Control does not function.<br />
Use the Server Configuration utility to change the credentials of these accounts.<br />
You can run the Server Configuration utility at any time without interrupting farm<br />
operations. However, the console must be closed on the machine on which it is<br />
running. If the console is running remotely and the account credentials are<br />
changed, the console displays an error message. Close and reopen the console to<br />
correct the problem.<br />
The Server Configuration utility and the account information are stored on each<br />
server running <strong>Advanced</strong> <strong>Access</strong> Control. To use the Server Configuration utility,<br />
you must log on to the server as an administrator.
Chapter 14 Managing Your <strong>Access</strong> <strong>Gateway</strong> Environment 219<br />
To change account credentials<br />
1. On the server running <strong>Advanced</strong> <strong>Access</strong> Control, choose Start > Programs<br />
or All Programs > <strong>Citrix</strong> > <strong>Advanced</strong> <strong>Access</strong> Control > Server<br />
Configuration.<br />
2. Click Service Account to change the user name, password, or domain of<br />
the service account. For information about requirements for valid service<br />
accounts, see “Service Account Requirements” on page 44.<br />
3. Click Server Farm Information to change the farm database server, farm<br />
name, or database authentication method.<br />
Modifying Server Roles<br />
Each server running <strong>Advanced</strong> <strong>Access</strong> Control is assigned the HTML Preview<br />
server role by default. If you do not want all servers in your farm to perform this<br />
role, you can enable or disable it on a per-server basis.<br />
To modify server roles<br />
1. In the console tree, select Servers.<br />
2. Under Common Tasks, click Manage server roles.<br />
3. Select or clear the check boxes for each server you want to assign to or<br />
remove from the HTML Preview role.<br />
Removing Servers from the Farm<br />
When you remove servers from the farm, the services the server provided to your<br />
farm are no longer available. If you want to keep these services, ensure they are<br />
enabled on other servers in your farm.<br />
To remove servers from an access server farm<br />
1. Run discovery to ensure <strong>Advanced</strong> <strong>Access</strong> Control detects all servers in the<br />
farm.<br />
2. In the console tree, expand the Servers node.<br />
3. Select the server you want to remove.<br />
4. Under Common Tasks, click Remove server.
220 <strong>Access</strong> <strong>Gateway</strong> <strong>Advanced</strong> <strong>Edition</strong> Administrator’s <strong>Guide</strong><br />
Maintaining Availability of the <strong>Access</strong> Server Farm<br />
<strong>Advanced</strong> <strong>Access</strong> Control maintains all configuration, session, and user data for<br />
the access server farm in a SQL database on the database server. If the database<br />
server becomes unavailable, <strong>Advanced</strong> <strong>Access</strong> Control cannot retrieve data in<br />
response to user or server requests. If the <strong>Advanced</strong> <strong>Access</strong> Control server<br />
becomes unavailable, users cannot log on to the server or access resources. This<br />
section describes how you can maximize the availability of your access server<br />
farm.<br />
• Create a backup of the SQL database.<br />
After you create the initial backup, you should ensure the database is<br />
backed up regularly at appropriate intervals. Additionally, you should<br />
verify the data can be restored from the backups.<br />
• Cluster the database server.<br />
This allows another database server to continue farm operations in the<br />
event the first database server becomes unavailable. The clustered servers<br />
appear to <strong>Advanced</strong> <strong>Access</strong> Control as a single database server.<br />
• Cluster the <strong>Advanced</strong> <strong>Access</strong> Control server.<br />
As with the database server, clustering allows another <strong>Advanced</strong> <strong>Access</strong><br />
Control server to continue operations for an unavailable server. Users can<br />
continue to log on to the server and access resources.<br />
Exporting and Importing Configuration Data<br />
You can export and import your farm configuration data using the <strong>Access</strong><br />
Management Console. This can be helpful when, for example, you want to save<br />
the configuration data from a farm in a staging environment and copy it to a farm<br />
in a production environment.<br />
When you export your farm configuration, a .cab file is created which consists of<br />
compressed XML files containing the following data:<br />
• Global farm settings such as display order of home page applications,<br />
license server, and authentication profiles<br />
• Presentation Server farm settings<br />
• Network and Web resource settings<br />
• Logon point settings<br />
• Policy settings<br />
• Endpoint analysis settings
Chapter 14 Managing Your <strong>Access</strong> <strong>Gateway</strong> Environment 221<br />
• Continuous scan settings<br />
• <strong>Gateway</strong> appliance settings<br />
Data that is not exported includes:<br />
• <strong>Access</strong> server farm name<br />
• Data that is valid only when the <strong>Advanced</strong> <strong>Access</strong> Control server is<br />
running, such as user session data.<br />
• Server information such as computer names.<br />
After you export your farm configuration, you can import the .cab file to restore<br />
the configuration on another server running the same version of <strong>Advanced</strong><br />
<strong>Access</strong> Control.<br />
Before you export your farm configuration, be aware of the following conditions:<br />
• You can import only .cab files that were exported using the same version of<br />
<strong>Advanced</strong> <strong>Access</strong> Control. For example, if you export the configuration of<br />
a farm running Version 4.5 of <strong>Advanced</strong> <strong>Access</strong> Control, you can import<br />
the configuration data only on another <strong>Advanced</strong> <strong>Access</strong> Control server<br />
running Version 4.5. If you import the configuration data on a server<br />
running a different version of <strong>Advanced</strong> <strong>Access</strong> Control, the import fails.<br />
Note: If you want to import configuration data from a previous version of<br />
<strong>Advanced</strong> <strong>Access</strong> Control, you must first use the Migration Tool to prepare<br />
your data for import into a farm running Version 4.5. For more information<br />
about migrating to Version 4.5 from a previous version of <strong>Advanced</strong> <strong>Access</strong><br />
Control, see the <strong>Access</strong> <strong>Gateway</strong> <strong>Advanced</strong> <strong>Edition</strong> Upgrade <strong>Guide</strong>.<br />
• Incremental export or import of farm configuration data is not supported.<br />
You can export or import only entire farm configurations.<br />
• When you import farm configuration data, the existing farm configuration<br />
is deleted and replaced with the imported data.<br />
Important: Before you import farm configuration data, <strong>Citrix</strong> recommends<br />
creating a backup of the SQL database for the farm.<br />
To export your access server farm configuration<br />
1. From the console tree, select the farm node and then click Export Farm in<br />
Other Tasks.<br />
2. Enter the location where you want to create the .cab file.
222 <strong>Access</strong> <strong>Gateway</strong> <strong>Advanced</strong> <strong>Edition</strong> Administrator’s <strong>Guide</strong><br />
Monitoring Sessions<br />
When you click Next, the XML files are compressed into a .cab file and saved to<br />
the location you specified.<br />
To import your access server farm configuration<br />
1. From the console tree, select the farm node and then click Import Farm in<br />
Other Tasks.<br />
2. Enter the location of the .cab file you want to import.<br />
When you click Next, the .cab file is decompressed and the existing configuration<br />
data is replaced with the imported data.<br />
The <strong>Access</strong> <strong>Gateway</strong> <strong>Advanced</strong> <strong>Edition</strong> Session Viewer is a session monitoring<br />
tool that allows administrators to review user access to the access server farm and<br />
terminate user sessions.<br />
Note: You must have administrative privileges to run the Session Viewer. An<br />
<strong>Advanced</strong> <strong>Access</strong> Control session is not required to run the Session Viewer.<br />
Session Viewer displays data from the server on which you are logged or from<br />
other <strong>Advanced</strong> <strong>Access</strong> Control servers. This data includes:<br />
• Client IP address<br />
• User name used to log on<br />
• Installed clients<br />
• Logon point accessed and default home page<br />
• Name of the <strong>Advanced</strong> <strong>Access</strong> Control server the user is accessing<br />
When you select a session from the Sessions pane, the data for that session<br />
displays in the Session Values pane. You can sort sessions by clicking the column<br />
headings in the Sessions pane.<br />
To access the Session Viewer<br />
Click Start > All Programs > <strong>Citrix</strong> > <strong>Access</strong> <strong>Gateway</strong> > Session Viewer.<br />
To terminate sessions<br />
1. From the Sessions pane, select the user session(s) you want to terminate.<br />
2. Click Delete.
Chapter 14 Managing Your <strong>Access</strong> <strong>Gateway</strong> Environment 223<br />
If the user attempts to access resources after you terminate the session, an error<br />
page appears and the user must log on again.
224 <strong>Access</strong> <strong>Gateway</strong> <strong>Advanced</strong> <strong>Edition</strong> Administrator’s <strong>Guide</strong>
CHAPTER 15<br />
Auditing <strong>Access</strong> to Corporate<br />
Resources<br />
The event logging capabilities in <strong>Advanced</strong> <strong>Access</strong> Control ensure you collect the<br />
information needed to monitor access to corporate resources. Event logs allow<br />
you to:<br />
• Prove compliance with regulatory requirements<br />
• Prove compliance with internal, corporate-specific requirements<br />
• Take proactive measures to address existing vulnerabilities such as<br />
evaluating incidents circumventing intended access and modifying your<br />
access strategy to resolve these issues<br />
• Assist support personnel in troubleshooting issues related to accessing<br />
corporate resources<br />
Configuring Audit Logging<br />
You can configure <strong>Advanced</strong> <strong>Access</strong> Control to record specific user activities for<br />
auditing purposes. For example, you can monitor endpoint analysis scan results;<br />
successful logon attempts; and unsuccessful attempts to access resources such as<br />
Web email, file shares, and so on. Before configuring event log settings,<br />
determine the information you need to collect and enable logging only for the<br />
associated events. This approach ensures logging does not impact system<br />
performance or use unnecessary hard disk space. In addition, limiting logging to<br />
only the information relevant to the auditing process streamlines the evaluation of<br />
this data.<br />
The table below describes the events available for logging.
226 <strong>Access</strong> <strong>Gateway</strong> <strong>Advanced</strong> <strong>Edition</strong> Administrator’s <strong>Guide</strong><br />
Event<br />
Endpoint analysis scan results<br />
Logon page denied<br />
Logon allowed<br />
Logon denied<br />
User logged off<br />
Session timed out<br />
Web resources - HTML MIME<br />
type<br />
Web resources - other MIME<br />
type<br />
Web resources - image MIME<br />
type<br />
File shares<br />
Web email<br />
Resource access denied<br />
Description<br />
Logs all endpoint analysis scan results. Three events are generated for each scan.<br />
The first event contains the raw endpoint analysis data from the client device. The<br />
second event contains the scan results (true/false) based on analysis within<br />
<strong>Advanced</strong> <strong>Access</strong> Control. The third event contains the scan results (true/false)<br />
specific to the requirements for displaying the logon page.<br />
Logs an event when a logon page is not displayed to the user due to your<br />
configured requirements.<br />
Logs an event when a successful Windows NT authentication is passed to the<br />
domain controller. Events are not logged when a user sends valid credentials but is<br />
denied access due to policy restrictions.<br />
Logs an event when an unsuccessful Windows NT authentication is passed to the<br />
domain controller or when the Allow Logon policy denies a user access to the<br />
logon page.<br />
Logs an event when a user terminates a session.<br />
Logs an event when a session times out. The session time-out value is configured<br />
as a logon point setting.<br />
Logs an event for successful access to HTML content within a Web resource such<br />
as HTML and ASP pages.<br />
Logs an event for successful access to non-HTML content within a Web resource<br />
such as JavaScript, Flash, XML, and so on.<br />
Logs an event for successful access to images referenced within a Web resource<br />
such as a GIF or JPEG file.<br />
Logs an event for successful access to file shares or documents within a file share.<br />
Logs an event for successful access to Web-based email including Outlook Web<br />
<strong>Access</strong>, iNotes, and <strong>Advanced</strong> <strong>Access</strong> Control’s Web email interface. Outlook<br />
Web <strong>Access</strong> and iNotes use the same event ID (304) while <strong>Advanced</strong> <strong>Access</strong><br />
Control’s Web email interface uses event ID (306).<br />
Logs an event for unsuccessful access to any resource within an access server<br />
farm. For Web resources, only unsuccessful access to the HTML MIME type is<br />
logged. Unsuccessful access to other or image MIME types is not logged.<br />
Important: Audit log configuration is set at the access server farm level and<br />
applies to all resources within the farm. Therefore, if your access server farm is<br />
distributed across multiple servers, audit logs are written to each server within the<br />
farm.<br />
The general steps involved in configuring event logging are:
Chapter 15 Auditing <strong>Access</strong> to Corporate Resources 227<br />
• Specify the events to log for the access server farm. Use the <strong>Access</strong><br />
Management Console to specify the type of events logged by servers within<br />
an access server farm.<br />
• Configure log settings for each server within the farm. Use the Windows<br />
Event Viewer to configure log settings for each server including specifying<br />
the maximum log size, determining when to overwrite events, and so on.<br />
By default, the maximum size of the <strong>Citrix</strong>AGE Audit log is 5120KB and is<br />
retained for seven days before being overwritten. New events are not added<br />
if the maximum log size is reached and there are no events older than this<br />
period. If this configuration does not meet your auditing needs, consider<br />
increasing the size of the log file as well as modifying the event overwrite<br />
settings.<br />
• Consolidate event logs into a single view. Each server within an access<br />
server farm maintains its own event log. Use the Event Log Consolidator in<br />
<strong>Advanced</strong> <strong>Access</strong> Control to collect event log data from all servers within<br />
the farm and display this data in a single, consolidated view. After the data<br />
is collected by the Event Log Consolidator, you can perform additional<br />
analysis by running a variety of reports based on user access, resource<br />
access, and so on.<br />
To select events to be logged for an access server farm<br />
1. In the console tree, select the access server farm you want to audit and click<br />
Edit farm properties in Common Tasks.<br />
2. On the Event Logging page, select from among the auditing options<br />
described below. For detailed descriptions of these events, see the table in<br />
“Configuring Audit Logging” on page 225.<br />
• Endpoint analysis scan results<br />
• Allowed and denied access to resources (Web resources, file shares,<br />
and Web email)<br />
• Logon point data including logon page denial, logon denial, logon<br />
allowed, user log off, and session time-out<br />
Note: To generate session-based reports in the Event Log Consolidator,<br />
you must enable the “Logon allowed” event.<br />
To configure log settings for <strong>Advanced</strong> <strong>Access</strong> Control servers<br />
You must be logged on as an administrator or as a member of the Administrators<br />
group to configure <strong>Advanced</strong> <strong>Access</strong> Control auditing information within the<br />
Windows Event Viewer.
228 <strong>Access</strong> <strong>Gateway</strong> <strong>Advanced</strong> <strong>Edition</strong> Administrator’s <strong>Guide</strong><br />
After auditing is enabled and configured within <strong>Advanced</strong> <strong>Access</strong> Control, you<br />
can use the Windows Event Viewer to configure audit log settings including:<br />
• Specifying the maximum log size<br />
• Determining when to overwrite events<br />
Important: By default, the maximum size of the <strong>Citrix</strong>AGE Audit log is<br />
5120KB and is retained for seven days before being overwritten. New events are<br />
not added if the maximum log size is reached and there are no events older than<br />
this period. If this configuration does not meet your auditing needs, consider<br />
increasing the size of the log file as well as modifying the event overwrite<br />
settings.<br />
1. Open the Windows Event Viewer of a server running <strong>Advanced</strong> <strong>Access</strong><br />
Control.<br />
2. Select <strong>Citrix</strong>AGE Audit from the console tree.<br />
3. Configure logging properties as appropriate.<br />
4. Repeat this step for all servers in the farm.<br />
For help using the Windows Event Viewer, refer to the topic “Event Viewer” in<br />
the Windows online Help.<br />
To consolidate event logging results<br />
1. In the console tree, select <strong>Access</strong> <strong>Gateway</strong> and click View Events in<br />
Common Tasks.<br />
2. In the Event Log Consolidator, click File > Configure.<br />
3. In the Polling Interval box, specify the time interval (in seconds) at which<br />
the Event Log Consolidator collects audit log data from <strong>Advanced</strong> <strong>Access</strong><br />
Control servers.<br />
4. Under Available Farms, select the access server farm for which you want<br />
to view auditing data.<br />
5. Click File > Collect to begin polling <strong>Advanced</strong> <strong>Access</strong> Control servers.<br />
Important: Excessive logging and polling can impact a system’s performance.<br />
Therefore, avoid logging unnecessary events for an access server farm. In<br />
addition, avoid unnecessary polling of audit log data by the Event Log<br />
Consolidator.
Interpreting Audit Events<br />
Chapter 15 Auditing <strong>Access</strong> to Corporate Resources 229<br />
Audit information is written to the Windows Event Viewer and contains<br />
information specific to the audit event as described in the table below.<br />
Field<br />
DateTime<br />
UserName<br />
ServiceName<br />
Status<br />
Machine Name<br />
Session ID<br />
PolicyReference<br />
EPAReference<br />
Resource<br />
Data<br />
Description<br />
Date and time of the request.<br />
Name of the authenticated user accessing the resource.<br />
Name of the <strong>Advanced</strong> <strong>Access</strong> Control component logging<br />
the request.<br />
Status of the request (accepted, denied, or completed).<br />
Name of the server logging the event.<br />
Reference number assigned to a session upon successful user<br />
authentication and license validation. This number is used to<br />
track session events such as logon allowed, user logged off,<br />
and session timed out.<br />
Reference number for denied attempts. This number is also<br />
displayed to users when access is denied.<br />
Reference number for endpoint analysis scans. This number<br />
is referenced by endpoint analysis before a user is<br />
authenticated to associate a session ID with scan results.<br />
Name or URI (Uniform Resource Identifier) of the resource<br />
requested.<br />
Additional data specific to a message.<br />
Although logging is enabled at the access server farm level, each server maintains<br />
its own log file. To gather logging information from all servers within the farm<br />
into a single view, use the Event Log Consolidator.<br />
To view logging results<br />
1. In the console tree, select <strong>Access</strong> <strong>Gateway</strong> and click View Events in<br />
Common Tasks.<br />
2. Sort events or generate reports to assist in the evaluation of this data.
230 <strong>Access</strong> <strong>Gateway</strong> <strong>Advanced</strong> <strong>Edition</strong> Administrator’s <strong>Guide</strong><br />
Troubleshooting User <strong>Access</strong> to Resources<br />
There are a variety of reasons why a user may not be able to access a corporate<br />
resource ranging from failed endpoint analysis scans, incorrect authentication<br />
credentials, policy-based restrictions, and so on. Often, it is not possible for users<br />
to know why access was denied and therefore, they rely on support personnel for<br />
assistance in troubleshooting these issues.<br />
For each denial of access to a resource or failed endpoint analysis scan, a unique<br />
value is displayed in the user’s browser. This information is also written to the<br />
event log as the PolicyReference or EPAReference value, respectively. For this<br />
reason, consider instructing users to record reference numbers and provide this<br />
information to support personnel because it expedites the troubleshooting<br />
process. Support personnel can use this information to quickly search and identify<br />
the specific event and begin troubleshooting the problem. In addition, support<br />
personnel can use the table from the section “Interpreting Audit Events” on page<br />
195 as a resource when evaluating events.<br />
Performing Audit Log Maintenance<br />
Several third-party tools provide advanced maintenance of Windows event logs.<br />
For example, the Windows Event Viewer and Event Log Consolidator do not<br />
support automatic rotation of logs without overwriting existing log data. If your<br />
corporation requires archiving of log data on a regular basis, consider a thirdparty<br />
tool that automates this process.<br />
However, there may be situations when using the Event Log Consolidator or<br />
Windows Event Viewer to perform basic maintenance tasks is appropriate. For<br />
example, you may need to reimage a server within your access server farm. To<br />
ensure no audit data is lost, you can use the Windows Event Viewer to save the<br />
audit log prior to reimaging the server.<br />
The decision regarding how to manage and maintain audit logs depends on your<br />
corporate needs. Therefore, when determining how to manage audit data,<br />
evaluate the auditing needs of your corporation and ensure that your solution<br />
satisfies these needs.
APPENDIX A<br />
Glossary<br />
<strong>Access</strong> Client package. The tool administrators use to manage the distribution and<br />
upgrade of <strong>Access</strong> Suite clients. Allows administrators to quickly and easily<br />
deploy client-side software to end-users with one convenient Windows<br />
Installer package.<br />
<strong>Access</strong> <strong>Gateway</strong> Administration Desktop. A window where administrators can monitor<br />
<strong>Access</strong> <strong>Gateway</strong> network activity. Tools included in the Administration<br />
Desktop include the <strong>Citrix</strong> Real-Time Monitor, Ethereal Network Analyzer,<br />
xNetTools, My traceroute, fnetload, Gnome System Monitor, and the<br />
Workplace Switcher.<br />
<strong>Access</strong> <strong>Gateway</strong> Administration Portal. A Web-based interface for performing<br />
administration tasks for <strong>Access</strong> <strong>Gateway</strong> appliances. From the Administration<br />
Portal you can download other administration tools for remote use, such as the<br />
Administration Desktop and the <strong>Access</strong> <strong>Gateway</strong> Administration Tool.<br />
<strong>Access</strong> <strong>Gateway</strong> Administration Tool. A 32-bit management console downloaded from<br />
the Administration Portal and installed on a Windows computer in the secure<br />
network. The Administration Tool can administer individual settings for all<br />
gateway appliances in a cluster.<br />
<strong>Access</strong> <strong>Gateway</strong> Real-Time Monitor. A console window listing current users and their<br />
related information. You can close the VPN connection for any user from the<br />
Real-Time Monitor. The Real-Time Monitor is accessed using the<br />
Administration Desktop.<br />
<strong>Access</strong> Interface. The user-facing Web page that displays the available corporate<br />
resources, including URLs, email, and files.<br />
access policy. A policy that enforces configuration settings for user access under<br />
specified conditions. See also connection policy.<br />
access scenario. The access scenario includes all the information about the user and<br />
the user’s client device used to apply policies. Depending on the type of policy<br />
being evaluated, the access scenario can include the user identity, the client<br />
device, client device details discovered through endpoint analysis scans, the<br />
authentication method employed, the logon point used to enter the network,<br />
and so on.
232 <strong>Access</strong> <strong>Gateway</strong> <strong>Advanced</strong> <strong>Edition</strong> Administrator’s <strong>Guide</strong><br />
access server farm. A logical grouping of servers on which <strong>Advanced</strong> <strong>Access</strong> Control<br />
Services run. An access server farm consists of one or more networked<br />
computers that run <strong>Advanced</strong> <strong>Access</strong> Control components such as the Web<br />
Server, database server, and so on. These components work together to provide<br />
access to corporate resources such as Web sites, file shares, and email. See also<br />
server farm.<br />
accessible networks. The IP addresses of the computers in the secure network to<br />
which the <strong>Access</strong> <strong>Gateway</strong> is allowed to connect.<br />
action controls. The permissions that users are granted for working with files through<br />
<strong>Access</strong> <strong>Gateway</strong> <strong>Advanced</strong> <strong>Edition</strong> such as Download, Send as Email, and file<br />
type association.<br />
activation server. A server that performs file activation services such as HTML<br />
Preview, Download, and Live Edit. It houses the Activation Host Service and<br />
Activation Engine Service; the Activation Host Service acts as a “sandbox” for<br />
the Activation Engine Service to activate a file.<br />
activation services. A service that provides stateless load balanced file activation<br />
including HTML Preview, Download, and Live Edit.<br />
<strong>Advanced</strong> <strong>Access</strong> Control. Software components and features in <strong>Access</strong> <strong>Gateway</strong><br />
<strong>Advanced</strong> <strong>Edition</strong> which enable granular policy-based access control.<br />
<strong>Advanced</strong> <strong>Access</strong> Control allows you to control user access based on such<br />
factors as user location and authentication, endpoint analysis, and verification<br />
of the client device.<br />
Allow Logon. A permission (the ability to log on) that is controlled by policy. The<br />
Allow Logon permission is treated as a resource to enable administrators to<br />
add criteria for users to meet in addition to the usual authentication process.<br />
application policy. A policy that can be configured for any software program,<br />
including Web applications, when you are using the <strong>Access</strong> <strong>Gateway</strong><br />
appliance. Application policies allow you to restrict applications to a specified<br />
network path and to make access to the application dependent upon endpoint<br />
policies.<br />
authentication profile. An authentication profile contains configuration settings that<br />
define the authentication to be used with a logon point.<br />
authentication type. The type of authentication being used, such as RADIUS, LDAP,<br />
SafeWord, and so on.<br />
authorization rejection page. The user-facing Web page that displays when a client<br />
environment does not possess the baseline requirements for accessing<br />
corporate network resources.<br />
browser-only access. The ability to access corporate network resources without<br />
requiring any client-side software other than a Web browser.<br />
<strong>Citrix</strong> Activation System (CAS). The <strong>Citrix</strong> license management system available from<br />
a secure area of the <strong>Citrix</strong> Web site that allows customers to generate license<br />
files for <strong>Access</strong> Suite products. CAS stores a downloadable copy of all license<br />
files generated and can display a list of licenses registered to an organization.
Appendix A Glossary 233<br />
<strong>Citrix</strong> administrator. System administrator responsible for installing, configuring, and<br />
maintaining computers running any product in the <strong>Citrix</strong> <strong>Access</strong> Suite.<br />
<strong>Citrix</strong> XML Service. A Windows service that provides communication between <strong>Citrix</strong><br />
Presentation Server and <strong>Access</strong> <strong>Gateway</strong>, Web Interface, and some<br />
Presentation Server Clients.<br />
client device. Any hardware device used to access corporate resources.<br />
Client for Java. A Java applet that supports the launching and embedding of published<br />
applications.<br />
cluster. A group of like hardware components (such as <strong>Access</strong> <strong>Gateway</strong> appliances or<br />
<strong>Advanced</strong> <strong>Access</strong> Control servers) that can be managed as a single entity.<br />
condition. (1) In general terms, a condition is any configurable requisite for the<br />
enforcement of a policy. Policies can have multiple types of conditions, such<br />
as endpoint analysis or logon point or authentication conditions.<br />
(2) In endpoint analysis, a condition is a single required attribute of the client<br />
device evaluated during endpoint analysis, such as the operating system or<br />
browser being used. A rule is a set of conditions that are evaluated against the<br />
client device. If the client device meets all the conditions in a scan’s rule, the<br />
scan is applied and run on the client device.<br />
connection policy. A policy that allows Secure <strong>Access</strong> Client connections and applies<br />
settings to those connections. You must allow use of the Secure <strong>Access</strong> Client<br />
to establish connections to any network resource and for email<br />
synchronization, because these types of resources do not allow browser-only<br />
access.<br />
continuous scan. Scans of the client device that occur repeatedly throughout the<br />
session to ensure that the client device continues to meet requirements. The<br />
feature prevents, for example, users from changing the status of a client device<br />
requirement after establishing the connection. Types of continuous scans<br />
include file scans, process scans, and registry scans.<br />
continuous scan filter. A filter that defines the continuous scan requirements for a<br />
connection policy. A continuous scan verifies one item (a file, registry entry, or<br />
process) on the client device. The filter can include one or more continuous<br />
scans for verification. When associated with a connection policy, the filter<br />
defines all the requirements to be verified by continuous scans for the<br />
connection policy to take effect.<br />
device-specific presentation. The automatic display of content that is appropriate to<br />
the device when a user uses a non-PC device, such as a PDA.<br />
disconnected session. A client session in which the client is no longer connected to an<br />
application on <strong>Citrix</strong> Presentation Server, but the user’s applications are still<br />
running. A user can reconnect to a disconnected session. If the user does not<br />
do so within a specified time-out period, the server automatically terminates<br />
the session.
234 <strong>Access</strong> <strong>Gateway</strong> <strong>Advanced</strong> <strong>Edition</strong> Administrator’s <strong>Guide</strong><br />
email synchronization. A comparison of separate email account instances resulting in<br />
both instances containing the same information. This feature allows remote<br />
users to access email in real time when working online and synchronize their<br />
folders in preparation for working offline.<br />
email synchronization group. A list of email servers that can be accessed for email<br />
synchronization.<br />
enclave deployment. A deployment scenario in which a network is segmented or<br />
fragmented in a manner (such as with firewalls) that forces users to log on<br />
through a specific logon point.<br />
endpoint analysis. A process that scans a client device and detects information such as<br />
the presence and version level of operating system, antivirus, firewall, or<br />
browser software. Endpoint analysis can verify that the client device meets<br />
your requirements before allowing it to connect. This information can be<br />
included as a filter within a policy to determine the appropriate level of access<br />
to corporate resources. Endpoint analysis scans are run against the client<br />
device once, during logon. See also continuous scan.<br />
Endpoint Analysis Client. An ActiveX control or browser plug-in used to discover<br />
information about a device’s configuration (such as the operating system,<br />
antivirus pattern, and so on).<br />
Endpoint Analysis SDK. The software development kit that allows customers and<br />
partners to modify and create endpoint analysis packages.<br />
endpoint policy. An endpoint policy is a Boolean expression that defines the files,<br />
processes, or registry entries that must be on the client computer before users<br />
can connect to corporate resources through the <strong>Access</strong> <strong>Gateway</strong> appliance.<br />
You can create and use endpoint policies on the appliance only. If you are<br />
using <strong>Access</strong> <strong>Gateway</strong> <strong>Advanced</strong> <strong>Edition</strong>, this functionality is configured<br />
through the logon point properties, where you can specify the requirements to<br />
be met by the client device before the user is shown the logon page.<br />
endpoint requirement. A file, process, or registry entry that must be on the client<br />
device. An endpoint requirement is configured with <strong>Access</strong> <strong>Gateway</strong> Standard<br />
<strong>Edition</strong> administration and then used to create an endpoint policy that is then<br />
added to one or more user groups.<br />
endpoint resource. A file, process, or registry entry that must be on the client device to<br />
log on. In the <strong>Access</strong> <strong>Gateway</strong> Standard <strong>Edition</strong>, a group of endpoint resources<br />
is used to create an endpoint policy.<br />
file activation. The actions a user can take on a file including HTML Preview, Live<br />
Edit, downloading, opening in a published application through file type<br />
association, and sending the file as an email attachment.<br />
file scan. A type of continuous scan that validates a specified file on the client device.<br />
file share. A directory (UNC) on a file server that is shared among a group of users. In<br />
<strong>Access</strong> <strong>Gateway</strong> Standard <strong>Edition</strong>, file shares are one of the corporate resource<br />
types available to users when they are logged on in kiosk mode. In <strong>Access</strong><br />
<strong>Gateway</strong> <strong>Advanced</strong> <strong>Edition</strong>, file shares are available to users when an<br />
administrator publishes them to the <strong>Access</strong> Interface and configures policies<br />
allowing access.
Appendix A Glossary 235<br />
file type association. A method that allows a document to be opened with an<br />
application published in <strong>Citrix</strong> Presentation Server that is registered to open<br />
documents of that type.<br />
filter. Configured criteria, including endpoint analysis, logon point, and<br />
authentication type, that can be used by policies to determine access to<br />
corporate resources. A filter is a single named entity that can be used in<br />
multiple policies. A filter may include another filter as part of its criteria. An<br />
access policy may have only one filter, but each filter can be associated with<br />
multiple access policies.<br />
In addition, filters created in <strong>Access</strong> <strong>Gateway</strong> <strong>Advanced</strong> <strong>Edition</strong> can be used<br />
in <strong>Citrix</strong> Presentation Server, which extends the Smart<strong>Access</strong> capabilities to<br />
published applications.<br />
home page. The page the user sees after authentication. This page could be the default<br />
<strong>Access</strong> Interface, a third-party portal, or email access interface, such as iNotes<br />
or Outlook Web <strong>Access</strong>.<br />
HTML Preview. The name of the service that allows documents to be previewed in<br />
HTML rather than downloaded in their native format. This feature also refers<br />
to the role that an administrator can assign to a server for performing this<br />
service.<br />
Independent Computing Architecture (ICA). The architecture that <strong>Citrix</strong> uses to<br />
separate an application’s logic from its user interface. With ICA, only<br />
keystrokes, mouse clicks, and screen updates pass between the client and<br />
server on the network, while all the application’s logic executes on the server.<br />
intellectual property control. The protection of corporate intellectual property or<br />
sensitive information using features such as HTML Preview, file type<br />
association, and client drive mapping. The goal of intellectual property control<br />
is to prevent the exposure of sensitive corporate data.<br />
kiosk mode. Used in <strong>Access</strong> <strong>Gateway</strong> Standard <strong>Edition</strong> to describe a type of limited<br />
access to corporate resources from public computers, such as those found in<br />
airports or hotels.<br />
Live Edit. The feature that allows users to edit remote documents using the Live Edit<br />
Client. Users can conveniently edit and save documents without needing to<br />
download or upload them.<br />
Live Edit Client. The ActiveX control that integrates with a user’s local editing<br />
application to support the Live Edit feature.<br />
local users. Users who are created in <strong>Access</strong> <strong>Gateway</strong> Standard <strong>Edition</strong>. Local users<br />
are configured when they do not require authentication using other<br />
authentication types such as RADIUS, SafeWord, RSA SecurID, or LDAP. A<br />
realm for local authentication must be configured on the <strong>Access</strong> <strong>Gateway</strong><br />
appliance for local users to connect. Authentication credentials are checked<br />
against the local user list if the user name does not match the authentication<br />
server’s list of users.
236 <strong>Access</strong> <strong>Gateway</strong> <strong>Advanced</strong> <strong>Edition</strong> Administrator’s <strong>Guide</strong><br />
logon point. The URL from which users access corporate resources. The logon point<br />
settings determine access to server farms, <strong>Access</strong> Interface configuration, and<br />
other session-specific settings. In addition, a logon point can be used as a filter<br />
within policies.<br />
Microsoft SQL Server Desktop Engine (MSDE). A fully SQL Server-compatible data<br />
engine. SQL Server Express 2005, the newest version of MSDE, can be used<br />
in <strong>Access</strong> <strong>Gateway</strong> <strong>Advanced</strong> <strong>Edition</strong> for data storage in place of Microsoft<br />
SQL Server. See also SQL Server Express.<br />
network resource. A network resource defines subnets or servers on the corporate<br />
network that users can connect to through the <strong>Access</strong> <strong>Gateway</strong> using the<br />
Secure <strong>Access</strong> Client over specified ports. After defining network resources,<br />
you can create policies that control their user access and connection settings.<br />
pass-through authentication. The ability for <strong>Access</strong> <strong>Gateway</strong> to pass the user’s<br />
authentication information to another corporate resource requiring this<br />
information. Pass-through authentication is used for single sign-on to the Web<br />
Interface in an <strong>Access</strong> <strong>Gateway</strong> deployment.<br />
policy-based access control. The ability to grant granular access to users based on<br />
their access scenario.<br />
policy priority. A ranking system that allows you to prioritize policies to resolve<br />
conflicts when multiple policies apply to the same situation. The settings of a<br />
higher priority policy take precedence over conflicting settings in a lower<br />
priority policy.<br />
pre-authentication policy. A policy that allows users to log on if a set of scans validate<br />
the client device. Pre-authentication policies can be created only using the<br />
<strong>Access</strong> <strong>Gateway</strong> Administration Tool. If you are using <strong>Access</strong> <strong>Gateway</strong><br />
<strong>Advanced</strong> <strong>Edition</strong>, you can create a logon policy for similar functionality.<br />
Presentation Server Client. <strong>Citrix</strong> software that enables users from a variety of client<br />
devices to connect to computers running Presentation Server.<br />
process scan. A type of continuous scan that verifies that a specified process is<br />
running on the client device.<br />
published application. An application installed on a server or server farm that is<br />
configured for multiuser access from clients through <strong>Citrix</strong> Presentation<br />
Server.<br />
realm. A realm is used in <strong>Access</strong> <strong>Gateway</strong> Standard <strong>Edition</strong> to specify the logical area<br />
of access granted through a specified type of authentication. Realms are<br />
replaced in the <strong>Advanced</strong> <strong>Edition</strong> by authentication profile settings. The<br />
Default realm authenticates against the local user list on the <strong>Access</strong> <strong>Gateway</strong>.<br />
Additional realms for LDAP, SafeWord, RADIUS, and RSA SecurID can be<br />
created or can be used as the Default realm.<br />
registry scan. A type of continuous scan that validates a registry setting on the client<br />
device.<br />
resource group. A resource group combines multiple resources of differing types into<br />
one named resource so that policies can be applied to the aggregate.
Appendix A Glossary 237<br />
resources. The file shares, Web resources, email, and applications available through<br />
the <strong>Access</strong> <strong>Gateway</strong>.<br />
rule. In endpoint analysis, a rule is a set of conditions that define when to apply a<br />
scan and which property values to check. Multiple rules can apply to a single<br />
scan. The first rule of a scan is defined when you create the scan. After<br />
creating the scan, you can add more rules to make the scan apply to multiple<br />
scenarios.<br />
scan. A process that verifies specific properties of client devices connecting to your<br />
network, such as the installed version of an antivirus software product or<br />
verification that the device belongs to a required domain.<br />
scan output. A result of an endpoint analysis scan run on a connecting client device to<br />
detect or verify information about the client device. There are two types of<br />
scan outputs. One type is a property value that is detected and reported about<br />
the client device, such as the version number of an antivirus program running<br />
on the device. Another type is a simple Boolean (True or False) result<br />
indicating whether or not the client device passed the requirements of the scan.<br />
scan package. A package of code that allows administrators to configure endpoint<br />
analysis scans. Each scan package is designed to examine a set of properties<br />
for a specific software product. You can expand the default set of scan<br />
packages by importing new ones. <strong>Citrix</strong>, partners, or developers in your<br />
organization can develop additional scan packages using the Endpoint<br />
Analysis Software Development Kit (SDK).<br />
Secure <strong>Access</strong> Client. <strong>Citrix</strong> software used to connect users to network resources. In<br />
the Standard <strong>Edition</strong>, users access a secure URL to download the software and<br />
authenticate to the <strong>Access</strong> <strong>Gateway</strong> appliance. In the <strong>Advanced</strong> <strong>Edition</strong>,<br />
administrators create a connection policy to require use of the software when<br />
users access specific logon points. Users may download the software after they<br />
authenticate.<br />
Secure Sockets Layer (SSL). A standards-based security protocol for encryption,<br />
authentication, and message integrity. It is used to secure the communications<br />
between two computers across a public network, authenticate the two<br />
computers to each other based on a separate trusted authority, and ensure that<br />
the communications are not tampered with. SSL supports a wide range of<br />
ciphersuites. The most recent version of SSL is Transport Layer Security<br />
(TLS).<br />
server farm. A group of computers running <strong>Citrix</strong> Presentation Server and managed as<br />
a single entity, with some form of physical connection between servers and a<br />
database used for the farm’s data store. See also, access server farm.<br />
session reliability. Part of the collection of features that comprise SmoothRoaming,<br />
Session Reliability enables ICA sessions to remain active and on the user’s<br />
screen when network connectivity is interrupted. Session Reliability<br />
incorporates Common <strong>Gateway</strong> Protocol (CGP) which restores the user’s<br />
session quickly and transparently.<br />
small form factor device. A client device, such as a PDA, with limited display<br />
capabilities.
238 <strong>Access</strong> <strong>Gateway</strong> <strong>Advanced</strong> <strong>Edition</strong> Administrator’s <strong>Guide</strong><br />
Smart<strong>Access</strong>. A feature that allows organizations to control which resources users get<br />
access to, based on their access scenario, and what they can do with those<br />
resources when they get access. In addition, this functionality integrates with<br />
<strong>Citrix</strong> Presentation Server to give organizations this same level of granular<br />
control over published applications.<br />
SmoothRoaming. The ability to access information continuously across devices,<br />
locations, and networks. This feature includes Workspace Control, session<br />
reliability, and dynamic display reconfiguration.<br />
split DNS. A feature that enables failover to a user’s local DNS if the default remote<br />
DNS is unavailable.<br />
split tunneling. A feature enabling the client device to send only the traffic destined for<br />
the secured network through the VPN tunnel. With split tunneling, groupbased<br />
policies apply to the internal network interface only. For connections<br />
from inside of the firewall, group-based policies do not apply to traffic to<br />
external resources or resources local to the network; that traffic is not<br />
encrypted.<br />
SQL Server Express. The newest version of MSDE. See Microsoft SQL Server<br />
Desktop Engine (MSDE) for more information.<br />
Transport Layer Security (TLS). See Secure Sockets Layer (SSL).<br />
trusted. Refers to a user, service, or resource that is specifically allowed to access the<br />
corporate network.<br />
untrusted. Refers to a user, service, or resource that is specifically disallowed from<br />
accessing the corporate network.<br />
user groups. In <strong>Access</strong> <strong>Gateway</strong> Standard <strong>Edition</strong>, a user group consists of a<br />
collection of users, policies, and resources. User groups can be configured to<br />
correspond with user groups configured on authentication servers. All local<br />
users are automatically added to the Default user group. Users can also be<br />
added to other user groups you have configured.<br />
Web-based email. A method of receiving, composing, and sending email using a Web<br />
browser instead of a local email application.<br />
Web client. An ActiveX control that supports the launching and embedding of<br />
published applications.<br />
Web proxy. The URL rewriting component of <strong>Access</strong> <strong>Gateway</strong> <strong>Advanced</strong> <strong>Edition</strong>.<br />
Web resource. A set of URLs or Web applications that consists of virtual directory<br />
paths such as http://mycompany/mydocument. A Web resource is one of the<br />
corporate resources available to users through the <strong>Access</strong> <strong>Gateway</strong>.<br />
Web server. A computer that delivers Web pages to browsers and other files to<br />
applications using HyperText Transfer Protocol (HTTP).
APPENDIX B<br />
Scan Properties Reference<br />
Scan packages contain the software you need to create scans to detect information<br />
about client devices. When creating scans, you typically specify one or more<br />
property values that you’re looking for, such as an operating system version or<br />
service pack level. This reference topic lists the properties you can configure for<br />
<strong>Citrix</strong> scan packages.<br />
For information about creating scans, see “Creating Endpoint Analysis Scans” on<br />
page 166.<br />
Note: This topic is available from the online help system of any server running<br />
the <strong>Advanced</strong> <strong>Access</strong> Control software. If you need information about specific<br />
properties while creating scans, use your online help to locate this reference topic.<br />
Scan packages are organized alphabetically within the following groups by the<br />
type of product or properties being scanned:<br />
• “Antivirus Scan Packages” on page 240<br />
• “Browser Scan Packages” on page 245<br />
• “Firewall Scan Packages” on page 248<br />
• “Machine Identification Scan Packages” on page 253<br />
• “Miscellaneous Scan Packages” on page 255<br />
• “Operating System Scan Packages” on page 256
240 <strong>Access</strong> <strong>Gateway</strong> <strong>Advanced</strong> <strong>Edition</strong> Administrator’s <strong>Guide</strong><br />
Antivirus Scan Packages<br />
<strong>Citrix</strong> Scans for McAfee VirusScan<br />
Detects if the required version of McAfee VirusScan software (personal edition)<br />
is running on the client device.<br />
Supported Versions<br />
• At least up to VirusScan 2006 v.11.0.209<br />
Properties You Can Specify<br />
Property Name<br />
Minimum required build<br />
version<br />
Description/Format<br />
Note that this property is mislabelled and appears incorrectly<br />
as “Minimum required engine version.” Use format N.N,<br />
where N is an integer. You can find the build version number<br />
in the “About” information box for the installed application.<br />
Scan Outputs<br />
Scan Output Name<br />
Program Version<br />
Verified-McAfee-<br />
VirusScan<br />
Description<br />
This is the version of the key program executable file. The<br />
major and minor version numbers are the same as those<br />
displayed in the program user interface. The rest of the<br />
version number may be ignored when reported.<br />
This Boolean output indicates if the required minimum<br />
version of the application is running on the client device.<br />
<strong>Citrix</strong> Scans for McAfee VirusScan Enterprise<br />
Detects if McAfee VirusScan software (Enterprise edition) is running on the<br />
client device.<br />
Supported Versions<br />
• At least up to VirusScan Enterprise v.8.0i Pattern 4825
Appendix B Scan Properties Reference 241<br />
Properties You Can Specify<br />
Property Name<br />
Minimum required engine<br />
version<br />
Minimum required pattern<br />
file version number<br />
Description/Format<br />
Use format N.N. For example, 4.4. Note that the application<br />
user interface and registry may display the engine version<br />
number in different formats. For example, engine version 4.4<br />
may display in the user interface as 4400 and the same engine<br />
version may display in the registry as 4.4.00. However, in<br />
both cases, you should enter the “minimum required engine<br />
version” as 4.4 when you create a scan.<br />
Use format N, where N is an integer.<br />
Scan Outputs<br />
Scan Output Name<br />
Verified-McAfee-Virus-<br />
Scan-Enterprise<br />
Engine Version<br />
Pattern Version<br />
Description<br />
This Boolean output indicates if this application is running on<br />
the client device.<br />
Indicates the On-<strong>Access</strong> scan engine version running on the<br />
client device. If this product is not installed or is not<br />
executing, the version defaults to 0.0.0.0.<br />
Indicates the pattern file version running on the client device.<br />
If this product is not installed or is not executing, the version<br />
defaults to 0.<br />
<strong>Citrix</strong> Scans for Norton AntiVirus Personal<br />
Detects if Norton AntiVirus software (personal edition) is running on the client<br />
device.<br />
Supported Versions<br />
• At least up to Norton AntiVirus 2006 v.12.2.0.13 Pattern 2006 0809.018
242 <strong>Access</strong> <strong>Gateway</strong> <strong>Advanced</strong> <strong>Edition</strong> Administrator’s <strong>Guide</strong><br />
Properties You Can Specify<br />
Property Name<br />
Days between required<br />
virus scans<br />
Minimum required product<br />
version<br />
Minimum required pattern<br />
file version number<br />
Description/Format<br />
This is the number of days within which a full-system<br />
antivirus scan must have run. Zero (0) indicates that any or no<br />
scan is acceptable. Use an integer between 0 and 365.<br />
Use the format N.N.N, where N is an integer.<br />
Use the format YYYYMMDD.NNN, where YYYY is the<br />
four-digit year, MM is the two-digit month, DD is the twodigit<br />
day, and NNN is a three-digit integer.<br />
Scan Outputs<br />
Scan Output Name<br />
Verified-Norton-Antivirus<br />
Product version<br />
Pattern version<br />
Description<br />
Indicates if this application is running on the client device.<br />
Indicates the software version running on the client device. If<br />
this product is not installed or is not executing, the version<br />
defaults to 0.0.0.0.<br />
Indicates the pattern file version running on the client device.<br />
If this product is not installed or is not executing, the version<br />
defaults to 0.0.0.0.<br />
<strong>Citrix</strong> Scans for Symantec AntiVirus Enterprise<br />
Detects if Symantec AntiVirus Enterprise software is running on the client<br />
device.<br />
Supported Versions<br />
• At least up to Symantec AntiVirus Enterprise v10.0.0.359 Pattern 2006<br />
0809.018
Appendix B Scan Properties Reference 243<br />
Properties You Can Specify<br />
Property Name<br />
Minimum required product<br />
version<br />
Minimum required pattern<br />
file version number<br />
Description/Format<br />
Use the format N.N.N, where N is an integer.<br />
Use the format YYYYMMDD.NNN, where YYYY is the<br />
four-digit year, MM is the two-digit month, DD is the twodigit<br />
day, and NNN is a three-digit integer.<br />
Scan Outputs<br />
Scan Output Name<br />
Verified-Symantec-AV-<br />
Enterprise<br />
Product version<br />
Pattern version<br />
Description<br />
Indicates if this application is running on the client device.<br />
Indicates the software version running on the client device. If<br />
this product is not installed or is not executing, the version<br />
defaults to 0.0.0.0.<br />
Indicates the pattern file version running on the client device.<br />
If this product is not installed or is not executing, the version<br />
defaults to 0.0.0.0.<br />
<strong>Citrix</strong> Scans for Trend OfficeScan<br />
Detects if Trend OfficeScan antivirus software is running on the client device.<br />
Supported Versions<br />
• At least up to Version 7.3 Pattern 3.645.00<br />
Properties You Can Specify<br />
Property Name<br />
Minimum required product<br />
version<br />
Minimum required pattern<br />
file version number<br />
Description/Format<br />
Use the format N.N, where N is an integer.<br />
The three-digit short form of the pattern file version running<br />
on the client device. Use the format N, where N is an integer.<br />
For example, for version 2.763, 763 is the short form you<br />
enter.
244 <strong>Access</strong> <strong>Gateway</strong> <strong>Advanced</strong> <strong>Edition</strong> Administrator’s <strong>Guide</strong><br />
Scan Outputs<br />
Scan Output Name<br />
Verified-Trend-OfficeScan<br />
Product Version<br />
Pattern Version<br />
Description<br />
Indicates if this application is running on the client device.<br />
Indicates the software version running on the client device. If<br />
this product is not installed or is not executing, the version<br />
defaults to 0.0.0.0.<br />
Indicates the pattern file version running on the client device.<br />
If this product is not installed or is not executing, the version<br />
defaults to -1.<br />
<strong>Citrix</strong> Scans for Windows Security Center<br />
Antivirus<br />
Detects if the Windows Security Center reports that the client device is using<br />
antivirus software. There are no properties for you to specify in this scan beyond<br />
specifying the conditions under which the scan is applied.<br />
Note that accurate scan results require that antivirus software be monitored<br />
through the Windows Security Center. If an antivirus software product does not<br />
register properly with the Windows Security Center, it is possible for the scan to<br />
indicate incorrectly that the client device has no antivirus software enabled. Test<br />
to ensure that Windows Security Center correctly registers the antivirus software<br />
products you deem acceptable or check the Windows Security Center<br />
documentation for details of the products it supports.<br />
Supported Versions<br />
• Windows XP SP2 - Security Center<br />
Scan Outputs<br />
Scan Output Name<br />
Antivirus Enabled<br />
Description<br />
Indicates (True/False) if the Windows Security Center reports<br />
that the client device is using antivirus software.
Appendix B Scan Properties Reference 245<br />
Browser Scan Packages<br />
<strong>Citrix</strong> Scans for Browser Type<br />
Detects if specified browser software is being used to connect from the client<br />
device. You can scan for Microsoft Internet Explorer, Mozilla Firefox, Netscape<br />
Navigator, Safari, or other software.<br />
Scans from this package do not require client-side software to run on the client<br />
device. Scan outputs are determined by examining the communication sent by the<br />
user’s browser.<br />
Supported Versions<br />
• At least up to Microsoft Internet Explorer 6.0<br />
• At least up to Mozilla Firefox 1.5.06<br />
• At least up to Netscape Navigator 8.1<br />
• At least up to Safari 2.0<br />
Properties You Can Specify<br />
Property Name<br />
Expected browser type<br />
Description/Format<br />
This is the browser you want to check for on the client device.<br />
Select Microsoft Internet Explorer, Mozilla Firefox, Netscape<br />
Navigator, Safari, or Other.<br />
Scan Outputs<br />
Scan Output Name<br />
Verified - Browser Type<br />
Browser Type<br />
Description<br />
Indicates whether (True or False) the browser type you<br />
specified is being used to connect from the client device.<br />
Returns the type of the client browser. “Other” is returned if a<br />
browser other than Microsoft Internet Explorer, Mozilla<br />
Firefox, Netscape Navigator, or Safari is being used.<br />
<strong>Citrix</strong> Scans for Internet Explorer<br />
Detects if the specified version of the browser software exists on the client<br />
device.
246 <strong>Access</strong> <strong>Gateway</strong> <strong>Advanced</strong> <strong>Edition</strong> Administrator’s <strong>Guide</strong><br />
Supported Versions<br />
• At least up to Internet Explorer Version 6.0 Service Pack 2<br />
Properties You Can Specify<br />
Property Name<br />
Minimum required version<br />
Description/Format<br />
Use the format N.N.N.N, where N is an integer. However, you<br />
can specify a version as simple as N.N or as detailed as<br />
N.N.N.N (for example, 6.0.3790.1830).<br />
Scan Outputs<br />
Scan Output Name<br />
Product Version<br />
Verified-Internet-Explorer-<br />
Installed<br />
Verified-Internet-Explorer-<br />
Connecting<br />
Description<br />
The version of the key program executable file. The major<br />
and minor version numbers are the same as those displayed in<br />
the program user interface. The rest of the version number<br />
may be ignored when reported.<br />
This Boolean output indicates if the minimum or later<br />
required version of the application is running on the client<br />
device.<br />
This Boolean output indicates if the minimum or later<br />
required version of the application is being used to perform<br />
the connection.<br />
<strong>Citrix</strong> Scans for Internet Explorer Update<br />
Detects if the specified version (including update or hotfix version level) of the<br />
browser software exists on the client device.<br />
Supported Versions<br />
• At least up to Internet Explorer Version 6.0 SP2<br />
Properties You Can Specify<br />
Property Name<br />
Data Set<br />
Description/Format<br />
Provide the name of a data set file containing the specified<br />
updates or hotfix version levels required. See “Using Data<br />
Sets in Scans” on page 172 for more information.
Appendix B Scan Properties Reference 247<br />
Scan Outputs<br />
Scan Output Name<br />
Verified-Internet-Explorer-<br />
Patch<br />
Description<br />
Indicates if the updates specified in the data set are present on<br />
the client device.<br />
<strong>Citrix</strong> Scans for Mozilla Firefox<br />
Detects if the specified version of the Mozilla Firefox browser exists on the client<br />
device. The scan package uses the published Windows registry settings.<br />
Supported Versions<br />
• At least up to Firefox Version 1.5.06<br />
Properties You Can Specify<br />
Property Name<br />
Minimum required version<br />
Description/Format<br />
Use the format N.N.N.N, where N is an integer. However, you<br />
can specify a version as simple as N.N or as detailed as<br />
N.N.N.N (for example, 1.0.3.3).<br />
Scan Outputs<br />
Scan Output Name<br />
Product Version<br />
Verified-Mozilla-Firefox-<br />
Installed<br />
Verified-Mozilla-Firefox-<br />
Connecting<br />
Description<br />
The version of the key program executable file. The major<br />
and minor version numbers are the same as those shown in<br />
the program user interface. The rest of the version number<br />
may be ignored when reported.<br />
This Boolean output indicates if the minimum or later<br />
required version of the application is running on the client<br />
device.<br />
This Boolean output indicates if the minimum or later<br />
required version of the application is being used to perform<br />
the connection.<br />
<strong>Citrix</strong> Scans for Netscape Navigator<br />
Detects if the specified version of the Netscape Navigator browser exists on the<br />
client device. The scan package uses the published Windows registry settings.
248 <strong>Access</strong> <strong>Gateway</strong> <strong>Advanced</strong> <strong>Edition</strong> Administrator’s <strong>Guide</strong><br />
Supported Versions<br />
• At least up to Netscape Navigator Version 8.1<br />
Properties You Can Specify<br />
Property Name<br />
Minimum required version<br />
Description/Format<br />
Use the format N.N.N.N, where N is an integer. However,<br />
you can specify a version as simple as N.N or as detailed as<br />
N.N.N.N (for example, 8.0.3.3).<br />
Scan Outputs<br />
Scan Output Name<br />
Product Version<br />
Verified-Netscape-<br />
Navigator-Installed<br />
Verified-Netscape-<br />
Navigator-Connecting<br />
Description<br />
The version of the key program executable file. The major<br />
and minor version numbers are the same as those shown in<br />
the program user interface. The rest of the version number<br />
may be ignored when reported.<br />
This Boolean output indicates if the minimum or later<br />
required version of the application is running on the client<br />
device.<br />
This Boolean output indicates if the minimum or later<br />
required version of the application is being used to perform<br />
the connection.<br />
Firewall Scan Packages<br />
<strong>Citrix</strong> Scans for McAfee Desktop Firewall<br />
Detects if the specified version of the firewall software exists on the client device.<br />
Supported Versions<br />
• At least up to McAfee Desktop Firewall 8.5 Build 260
Appendix B Scan Properties Reference 249<br />
Properties You Can Specify<br />
Property Name<br />
Minimum required version<br />
number or combined<br />
version and build number<br />
Description/Format<br />
To specify the version number, use the format N.N, where N<br />
is an integer. To specify the version and build number, use the<br />
format N.N.NNN, where N is an integer.<br />
Scan Outputs<br />
Scan Output Name<br />
Version<br />
Verified-McAfee-Desktop-<br />
Firewall<br />
Description<br />
The version of the key program executable file. The major<br />
and minor version numbers are the same as those displayed in<br />
the program user interface. The rest of the version number<br />
may be ignored when reported.<br />
This Boolean output indicates if the required minimum<br />
version of the application is running on the client device.<br />
<strong>Citrix</strong> Scans for McAfee Personal Firewall Plus<br />
Detects if the specified version of the firewall software exists on the client device.<br />
Supported Versions<br />
• At least up to McAfee Personal Firewall Plus 2006 Version 7.1.113<br />
Properties You Can Specify<br />
Property Name<br />
Minimum required version<br />
number<br />
Description/Format<br />
N.N, where N is an integer.
250 <strong>Access</strong> <strong>Gateway</strong> <strong>Advanced</strong> <strong>Edition</strong> Administrator’s <strong>Guide</strong><br />
Scan Outputs<br />
Scan Output Name<br />
Version<br />
Verified-McAfee-Personal-<br />
Firewall-Plus<br />
Description<br />
The version of the key program executable file. The major<br />
and minor version numbers will be the same as those<br />
displayed in the program user interface. The rest of the<br />
version number may be ignored when reported.<br />
This Boolean output indicates if the required minimum<br />
version of the application is running on the client device.<br />
<strong>Citrix</strong> Scans for Microsoft Windows Firewall<br />
Detects if the specified version of the Microsoft Windows Firewall or Internet<br />
Connection Firewall (ICF) exists on the client device.<br />
Supported Versions<br />
The scan can detect the following firewalls on these operating systems:<br />
• Microsoft Windows XP Home and Professional: ICF<br />
• Microsoft Windows XP Home and Professional Service Pack 1: ICF<br />
• Microsoft Windows XP Home and Professional Service Pack 1: Windows<br />
Firewall<br />
• Microsoft Windows 2003: ICF<br />
Properties You Can Specify<br />
Property Name<br />
Windows Firewall without<br />
exceptions is required<br />
Description/Format<br />
Select True if you require Windows Firewall to be active<br />
without exceptions. Select False if you require ICF to be<br />
active on all connections or if you require Windows Firewall<br />
to be active (with exceptions). See “Adding Rules to Scans”<br />
on page 169 for an example showing how to add multiple<br />
rules with exceptions to a scan.<br />
Scan Outputs<br />
Scan Output Name<br />
Description<br />
Verified-Windows-Firewall This Boolean output indicates if the required minimum<br />
version of the application is running on the client device.
Appendix B Scan Properties Reference 251<br />
<strong>Citrix</strong> Scans for Norton Personal Firewall<br />
Detects if the specified version of Norton Personal Firewall exists on the client<br />
device.<br />
Supported Versions<br />
• At least up to Norton Personal Firewall 2006 Version 9.1.0.33<br />
Properties You Can Specify<br />
Property Name<br />
Minimum required version<br />
number<br />
Description/Format<br />
Use the format N.N, where N is an integer.<br />
Scan Outputs<br />
Scan Output Name<br />
Version<br />
Version-Norton-Personal-<br />
Firewall<br />
Description<br />
The version of the key program executable file. The major<br />
and minor version numbers are the same as those displayed in<br />
the program user interface. The rest of the version number<br />
may be ignored when reported.<br />
This Boolean output indicates if the required version of the<br />
application is running on the client device.<br />
<strong>Citrix</strong> Scans for Windows Security Center Firewall<br />
Detects if the Windows Security Center reports that the client device is using a<br />
firewall. The Windows Security Center allows you to monitor various security<br />
items on a client device running the Windows XP SP2 operating system. There<br />
are no properties for you to specify in this scan beyond specifying the conditions<br />
under which the scan is applied.<br />
Note that accurate scan results require that the firewall be monitored through the<br />
Windows Security Center on the client device. If a firewall product does not<br />
register properly with the Windows Security Center, it is possible for the scan to<br />
indicate incorrectly that the client device has no firewall enabled. Test to ensure<br />
that Windows Security Center correctly registers the firewall products you deem<br />
acceptable or check the Windows Security Center documentation for details of<br />
the products it supports.
252 <strong>Access</strong> <strong>Gateway</strong> <strong>Advanced</strong> <strong>Edition</strong> Administrator’s <strong>Guide</strong><br />
Supported Versions<br />
• Windows XP SP2 - Security Center<br />
Scan Outputs<br />
Scan Output Name<br />
Firewall Enabled<br />
Description<br />
Indicates if (True/False) the Windows Security Center reports<br />
that the client device is using a firewall.<br />
<strong>Citrix</strong> Scans for ZoneAlarm<br />
Detects if the specified version of the free ZoneAlarm firewall exists on the client<br />
device.<br />
Supported Versions<br />
• At least up to ZoneAlarm 2006 Version 6.5.731.00<br />
Properties You Can Specify<br />
Property Name<br />
Minimum required version<br />
number<br />
Description/Format<br />
Use the format N.N, where N is an integer.<br />
Scan Outputs<br />
Scan Output Name<br />
Version<br />
Verified-ZoneAlarm<br />
Description<br />
The version of the key program executable. The major and<br />
minor version numbers are the same as those displayed in the<br />
program user interface. The rest of the version number may<br />
be ignored when reported.<br />
This Boolean output indicates if the required minimum<br />
version of the application is running on the client device.<br />
<strong>Citrix</strong> Scans for ZoneAlarm Pro<br />
Detects if the specified version of the ZoneAlarm Pro firewall exists on the client<br />
device.
Appendix B Scan Properties Reference 253<br />
Supported Versions<br />
• At least up to ZoneAlarm 2006 Version 6.5.731.00<br />
Properties You Can Specify<br />
Property Name<br />
Minimum required version<br />
number<br />
Description/Format<br />
Use the format N.N, where N is an integer.<br />
Scan Outputs<br />
Scan Output Name<br />
Engine Version<br />
Verified-ZoneAlarm-Pro<br />
Description<br />
The version of the key program executable. The major and<br />
minor version numbers are the same as those displayed in the<br />
program user interface. The rest of the version number may<br />
be ignored when reported.<br />
This Boolean output indicates if the required minimum<br />
version of the application is running on the client device.<br />
Machine Identification Scan Packages<br />
<strong>Citrix</strong> Scans for Domain Membership<br />
Detects if the client device belongs to a specified domain.<br />
Properties You Can Specify<br />
Property Name<br />
A client domain name is<br />
required<br />
Domain name<br />
Description/Format<br />
True means the client device must belong to a named<br />
domain. False means the client device is not required to<br />
belong to a domain.<br />
A valid domain name. Workgroup names are not valid.
254 <strong>Access</strong> <strong>Gateway</strong> <strong>Advanced</strong> <strong>Edition</strong> Administrator’s <strong>Guide</strong><br />
Scan Outputs<br />
Scan Output Name<br />
Domain<br />
Verified-Domain<br />
Description<br />
The name of the domain that the client device belongs to. If a<br />
client domain name is not required, the output is “unknown.”<br />
Indicates if the client device belongs to the specified domain.<br />
<strong>Citrix</strong> Scans for MAC Address<br />
Detects the media access control (MAC) address for each network interface card<br />
(NIC) or network adapter on the client device and compares the address against a<br />
data set containing the list of group names mapped to valid MAC addresses.<br />
This scan requires you to create a double-column data set listing valid MAC<br />
addresses mapped to group names. The scan detects the network adapter (the first<br />
value or column in the data set) and maps that address to a group name (the<br />
second value or column in the data set). Scans use this mapping to verify to which<br />
group the client device belongs. The MAC addresses in the data set should be in<br />
the format NN:NN:NN:NN:NN:NN, such as 00:11:11:06:B3:E9. Note that you<br />
should use a colon (:) as the separator in this format rather than a hyphen (-).<br />
Important: This scan package treats data as case sensitive. Avoid creating<br />
conflicting entries that differ in case. For example, it is possible to create an entry<br />
for the same address and map it to two different groups. One entry might map the<br />
address 00:50:8b:e8:f9:28 to the Finance group. Another entry can map the same<br />
address with different case lettering, 00:50:8B:E8:F9:28, to the Sales group. Such<br />
entries make scan results unreliable.<br />
For more information about using data sets, see “Using Data Sets in Scans” on<br />
page 172.<br />
Properties You Can Specify<br />
Property Name<br />
Data set name<br />
Group name<br />
Description/Format<br />
Name of a data set file that maps each MAC address to a<br />
group name.<br />
Name of a group to which the NIC or network adapter must<br />
belong.
Appendix B Scan Properties Reference 255<br />
Scan Outputs<br />
Scan Output Name<br />
Group name<br />
Matched-MAC-Address<br />
Description<br />
Returns the group name associated with the MAC address of<br />
the client device network interface or adapter.<br />
This Boolean output indicates if the network interface or<br />
adapter belongs to the specified group of MAC addresses.<br />
Miscellaneous Scan Packages<br />
<strong>Citrix</strong> Bandwidth Scan<br />
Determines the connection bandwidth between the client and the <strong>Access</strong> <strong>Gateway</strong><br />
appliance. You can use the results of this scan in policies to determine, for<br />
example, whether published applications can be launched.<br />
This scan determines the bandwidth of a client’s connection by reading an image<br />
file and calculating the time it takes to read the file during the time the scan runs.<br />
The image file, citrix_bw.gif, is located in the themes/default/images folder of the<br />
logon point’s virtual directory. To change the size of this image file, overwrite this<br />
file with another of the same name.<br />
Note that the accuracy of scan results is affected by the time allotted for the scan<br />
to run as well as the size of the image file. For example, users on slow<br />
connections may experience prolonged logon times if the image file is 72 MB and<br />
the scan runs for 120 seconds. If the scan runs for 5 seconds, however, the correct<br />
bandwidth may not be calculated. Test to ensure there is a balance between the<br />
size of the image file and the time allotted for the scan to run so that users with<br />
high bandwidth and low bandwidth connections have similar logon experiences.<br />
Properties You Can Specify<br />
Property Name<br />
Desired Bandwidth<br />
Time<br />
Description/Format<br />
The level at which a connection is considered “high<br />
bandwidth.”<br />
The maximum length of time the scan is allowed to run.
256 <strong>Access</strong> <strong>Gateway</strong> <strong>Advanced</strong> <strong>Edition</strong> Administrator’s <strong>Guide</strong><br />
Scan Outputs<br />
Scan Output Name<br />
Bandwidth<br />
Description<br />
This Boolean output indicates if the client connection meets<br />
the specified bandwidth.<br />
Operating System Scan Packages<br />
<strong>Citrix</strong> Scans for Macintosh<br />
Detects whether or not the client device is running the Mac OS system software.<br />
Scans from this package do not require client-side software to run on the client<br />
device. Scan outputs are determined by examining the communication sent by the<br />
user’s browser.<br />
There are no properties for you to specify in this scan beyond specifying the<br />
conditions under which the scan is applied.<br />
Supported Versions<br />
• Mac OS X<br />
Scan Outputs<br />
Scan Output Name<br />
Client Is Macintosh<br />
Description<br />
Reports whether or not the client device is running Mac OS<br />
system software.<br />
<strong>Citrix</strong> Scans for Microsoft Windows Service Pack<br />
Detects if the operating system software on the client device is running at a<br />
required minimum service pack level.<br />
Properties You Can Specify<br />
Property Name<br />
Minimum required service<br />
pack<br />
Description/Format<br />
Select a Windows service pack version from the drop-down<br />
menu. Select None to detect a base, unpatched operating<br />
system version.
Appendix B Scan Properties Reference 257<br />
Scan Outputs<br />
Scan Output Name<br />
Service Pack<br />
Verified-Windows-Service-<br />
Pack<br />
Description<br />
Returns the service pack version running on the client device.<br />
This Boolean output indicates if the required minimum<br />
service pack level is met.<br />
<strong>Citrix</strong> Scans for Microsoft Windows Update<br />
Detects whether a set of specified operating system updates are installed on the<br />
client device.<br />
Note: This scan package requires you to create a single-column data set listing<br />
the update names you wish to detect.<br />
Properties You Can Specify<br />
Property Name<br />
Data set name<br />
Description/Format<br />
Name of a data set file that contains a single column list of<br />
updates appropriate for the detected operating system.<br />
Scan Outputs<br />
Scan Output Name<br />
Description<br />
Verified-Windows-Updates This Boolean output indicates if the updates specified in the<br />
data set file exist on the client device.
258 <strong>Access</strong> <strong>Gateway</strong> <strong>Advanced</strong> <strong>Edition</strong> Administrator’s <strong>Guide</strong>