Olympus Pearlcorder T1000.pdf
Olympus Pearlcorder T1000.pdf
Olympus Pearlcorder T1000.pdf

You also want an ePaper? Increase the reach of your titles
YUMPU automatically turns print PDFs into web optimized ePapers that Google loves.
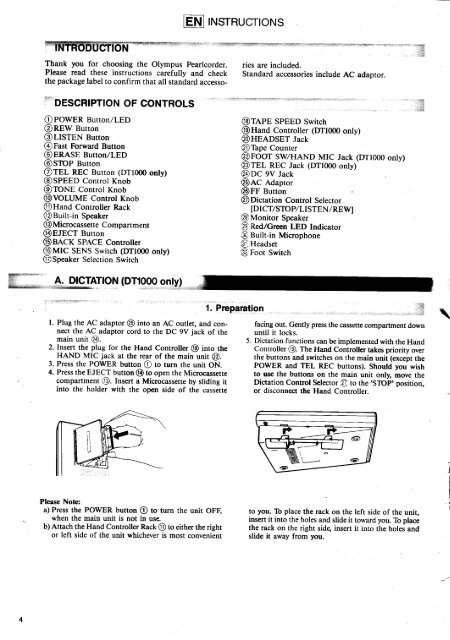
Thank you for choosing the <strong>Olympus</strong> <strong>Pearlcorder</strong>.<br />
Please read these instructions carefully and check<br />
the package label to confirm that all standard accesso-<br />
i"' bEScRtPTtoN<br />
oF coNTRoLs<br />
oPOWER Burton,/LED<br />
REW Button<br />
LISTEN Button<br />
Fast Forward Button<br />
ERASE Button,/LED<br />
STOP Button<br />
TEL REC Button (DTl000 only)<br />
SPEED Control Knob<br />
E Control I(nob<br />
VOruME Control Knob<br />
Hand Controller Rack<br />
Built-in Speaker<br />
Microcassette Companment<br />
A PIpTATION (DT1000 onty)<br />
l. Plug the AC adaptor @ into an AC outlet, and connect<br />
the AC adaptor cord to the DC 9V jack of the<br />
main unit @.<br />
2. Insert the plug for the Hand Controller @ into the<br />
HAND MIC jack at the rear of the main unit @.<br />
3. Press the POWER button @ to turn the unit ON.<br />
4. Press the EJECT button @ to open the Microcassette<br />
compartment @. Insert a Microcassette by sliding it<br />
into the holder with the open side of the cassette<br />
Please Note:<br />
a) Press the POWER button O to turn the unit OFF,<br />
when the main unit is not in use.<br />
b) Attach the Hand Controller Rack @ to either the right<br />
or left side of the unit whichever is most convenient<br />
EN rrusrRucloNs<br />
9ee!:r:ryii '€<br />
..*<br />
ries are included.<br />
Standard accessories include AC adaptor.<br />
@repn sPEED Switch<br />
@Hand Controller (DTl000 only)<br />
@HEADSET Jack<br />
@fap. Counter<br />
@FOOT SWHAND MIC Jack (DT1000 only)<br />
@rEl REC Jack (DTl000 only)<br />
@Dc 9v Jack<br />
@Ac adaptor<br />
@FF Button<br />
@Dictation Control Selector<br />
lD rcvsToP/LI STEN/REWI<br />
@Monitor Speaker<br />
@ ReOZCreen LED Indicator<br />
@ ruitt-in Microphone<br />
@ Headset<br />
@ Foot Switch<br />
1. Pnrpamtion<br />
:1X<br />
i':il1<br />
*i<br />
:it<br />
:r:';i<br />
facing out. Gently press the cassette compartrnent do\iln<br />
until it locks.<br />
5. Dictation functions can be implemented with the Hand<br />
Controller @. The Hand Controller takes priority over<br />
the buttons and switches on the main unit (except the<br />
POWER and TEL REC buttons). Should you wish<br />
to use the bunons on the main unit only, move the<br />
Dictation Control Selector @ to the .STOP' position,<br />
or disconnect the Hand Controller.<br />
to you. Ib place the rack on the left side of the unit.<br />
insert it into the holes and slide it toward you. To place<br />
the rack on the right sidg insert it into the holes and<br />
slide it away from you.<br />
@<br />
@<br />
\