Cercon clean GB - DeguDent
Cercon clean GB - DeguDent
Cercon clean GB - DeguDent

You also want an ePaper? Increase the reach of your titles
YUMPU automatically turns print PDFs into web optimized ePapers that Google loves.
Caution: The single-use filter bags must never be emptied<br />
and reused. Not only might this constitute<br />
a health hazard, but it would also impair the<br />
function of the unit.<br />
Caution: Do not use pressurized air to remove any dust<br />
present in the filtration chamber (20).<br />
Do not allow any foreign matter to enter the air intake<br />
open ing (26) because this might damage the vacuum<br />
motor.<br />
5. Insert the new filter bag snugly and check the filtration<br />
module (see Section 4.2).<br />
4.2 Inserting the filter bag<br />
(see Fig. 1 on page 5 and Figs. 6 and 7 on page 8 and 9)<br />
1. Fold new filter bag (11) as shown in Fig. 5 and insert into<br />
basket as shown (12).<br />
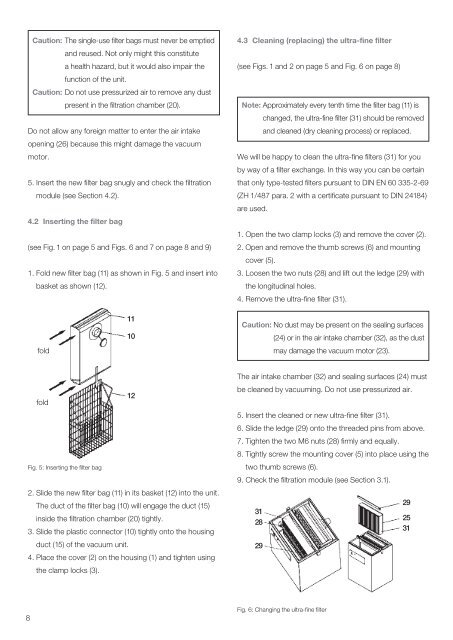
4.3 Cleaning (replacing) the ultra-fine filter<br />
(see Figs. 1 and 2 on page 5 and Fig. 6 on page 8)<br />
Note: Approximately every tenth time the filter bag (11) is<br />
changed, the ultra-fine filter (31) should be removed<br />
and <strong>clean</strong>ed (dry <strong>clean</strong>ing process) or replaced.<br />
We will be happy to <strong>clean</strong> the ultra-fine filters (31) for you<br />
by way of a filter exchange. In this way you can be certain<br />
that only type-tested filters pursuant to DIN EN 60 335-2-69<br />
(ZH 1/487 para. 2 with a certificate pursuant to DIN 24184)<br />
are used.<br />
1. Open the two clamp locks (3) and remove the cover (2).<br />
2. Open and remove the thumb screws (6) and mount ing<br />
cover (5).<br />
3. Loosen the two nuts (28) and lift out the ledge (29) with<br />
the longitudinal holes.<br />
4. Remove the ultra-fine filter (31).<br />
fold<br />
11<br />
10<br />
Caution: No dust may be present on the sealing surfaces<br />
(24) or in the air intake chamber (32), as the dust<br />
may damage the vacuum motor (23).<br />
12<br />
fold<br />
Fig. 5: Inserting the filter bag<br />
2. Slide the new filter bag (11) in its basket (12) into the unit.<br />
The duct of the filter bag (10) will engage the duct (15)<br />
inside the filtration chamber (20) tightly.<br />
3. Slide the plastic connector (10) tightly onto the housing<br />
duct (15) of the vacuum unit.<br />
4. Place the cover (2) on the housing (1) and tighten using<br />
the clamp locks (3).<br />
The air intake chamber (32) and sealing surfaces (24) must<br />
be <strong>clean</strong>ed by vacuuming. Do not use pressurized air.<br />
5. Insert the <strong>clean</strong>ed or new ultra-fine filter (31).<br />
6. Slide the ledge (29) onto the threaded pins from above.<br />
7. Tighten the two M6 nuts (28) firmly and equally.<br />
8. Tightly screw the mounting cover (5) into place using the<br />
two thumb screws (6).<br />
9. Check the filtration module (see Section 3.1).<br />
31<br />
28<br />
29<br />
29<br />
25<br />
31<br />
8<br />
Fig. 6: Changing the ultra-fine filter