Part 1: Cut Accurate Segments - Jim Rodgers' Designs in Wood
Part 1: Cut Accurate Segments - Jim Rodgers' Designs in Wood
Part 1: Cut Accurate Segments - Jim Rodgers' Designs in Wood

You also want an ePaper? Increase the reach of your titles
YUMPU automatically turns print PDFs into web optimized ePapers that Google loves.
<strong>Part</strong> 1: <strong>Cut</strong> <strong>Accurate</strong> <strong>Segments</strong><br />
Segmented<br />
Turn<strong>in</strong>g<br />
School<br />
By <strong>Jim</strong> Rodgers<br />
24 American <strong>Wood</strong>turner W<strong>in</strong>ter 2005
Repr<strong>in</strong>ted with permission<br />
American Association of <strong>Wood</strong>turners<br />
Ready to try your hand<br />
at segmented turn<strong>in</strong>g<br />
Fearful of failure<br />
If you’re ready to push forward,<br />
we want to help you get started.<br />
Jo<strong>in</strong> us for a series of three<br />
articles that will address the<br />
steps required: cutt<strong>in</strong>g accurate<br />
segments, design<strong>in</strong>g and plann<strong>in</strong>g<br />
the projects, and elim<strong>in</strong>at<strong>in</strong>g<br />
sources of errors.<br />
Like any other turn<strong>in</strong>g subject,<br />
there are many different and<br />
equally effective techniques. These<br />
articles will follow one approach<br />
—most of which can easily be<br />
modified or adapted.<br />
<strong>Cut</strong> segments accurately<br />
You probably possess the<br />
necessary turn<strong>in</strong>g skills. What<br />
you need is an accurate method<br />
for cutt<strong>in</strong>g the necessary segments<br />
and a plan for how to proceed.<br />
Before you can perform<br />
quality work, you must have the<br />
proper equipment to cut accurate<br />
segments. That requires more<br />
than a simple miter gauge for your<br />
tablesaw. Lack of cutt<strong>in</strong>g accuracy<br />
will result <strong>in</strong> additional time to<br />
clean up poor jo<strong>in</strong>ts and can even<br />
be dangerous to your f<strong>in</strong>gers.<br />
Tools and supplies<br />
I prefer the tablesaw because of its<br />
stability, precision, easy acceptance<br />
of fixtures, and operator safety.<br />
However, some turners rely on a<br />
compound mitersaw.<br />
To get started <strong>in</strong> segmented<br />
turn<strong>in</strong>g you will need:<br />
• A method for cutt<strong>in</strong>g r<strong>in</strong>g<br />
segments accurately. I prefer<br />
one cutt<strong>in</strong>g sled for each angle.<br />
• A sharp precision crosscut<br />
60– to 80-tooth carbide-tipped<br />
blade. Because blade stiffness is<br />
important, avoid th<strong>in</strong>-kerf blades.<br />
• A 6×48" belt sander with an<br />
80-grit belt for flatten<strong>in</strong>g r<strong>in</strong>gs and<br />
adjust<strong>in</strong>g segments.<br />
• A hold-down tool for safely<br />
cutt<strong>in</strong>g and sand<strong>in</strong>g small<br />
segments as shown on page 27.<br />
• A vernier caliper for sett<strong>in</strong>g and<br />
verify<strong>in</strong>g dimensions.<br />
• A straightedge for check<strong>in</strong>g fit<br />
and flatness.<br />
• Bright photo floods or a light<br />
source to highlight gaps.<br />
• Hose clamps for clamp<strong>in</strong>g r<strong>in</strong>gs<br />
snugly dur<strong>in</strong>g glu<strong>in</strong>g.<br />
• Glu<strong>in</strong>g supplies <strong>in</strong>clud<strong>in</strong>g a flat<br />
nonstick surface and rags.<br />
• Power tools for cutt<strong>in</strong>g<br />
accurately dimensioned stock: a<br />
planer, jo<strong>in</strong>ter, thickness sander—<br />
or a good friend who owns them.<br />
• A polyv<strong>in</strong>yl acetate (PVA)<br />
adhesive such as Titebond II. To<br />
ensure the best adhesion, pay<br />
attention to expiration dates.<br />
Number of<br />
segments<br />
Segment<br />
cutt<strong>in</strong>g angle<br />
6 30.00º<br />
8 22.50 º<br />
12 15.00º<br />
16 11.25º<br />
24 7.50º<br />
36 5º<br />
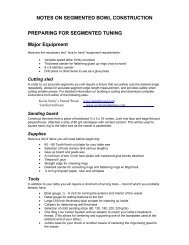
The language above is standard term<strong>in</strong>ology for build<strong>in</strong>g segmented r<strong>in</strong>gs. Make photocopies of this<br />
draw<strong>in</strong>g and chart, then post them near your workbench and tablesaw or compound mitersaw.<br />
Select the correct angle<br />
The angle for each segment is<br />
360 degrees divided by the<br />
number of segments planned. One<br />
half of that angle is cut from each<br />
segment edge. For example, a<br />
12-segment r<strong>in</strong>g conta<strong>in</strong>s twelve<br />
30-degree wedges cut 15 degrees<br />
on each edge:<br />
360 º ÷ 12 = 30º; 30º ÷ 2 = 15º)<br />
The most popular cuts are<br />
shown <strong>in</strong> the table above.<br />
Build a cutt<strong>in</strong>g sled<br />
To cut accurate segments, you<br />
will need a fixture that accurately<br />
cuts the desired angle repeatedly,<br />
allows for accurate segment edge<br />
length measurement, and provides<br />
safety when cutt<strong>in</strong>g smaller pieces.<br />
What separates commerical<br />
miter gauges from these sleds for<br />
segmented bowls is that your task<br />
is to measure the small piece cut<br />
off—not what’s left on the sled.<br />
woodturner.org<br />
25
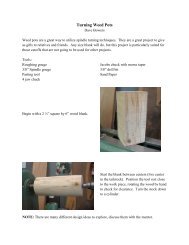
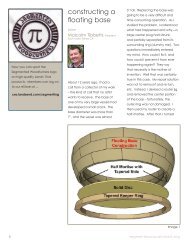
For each cutt<strong>in</strong>g angle, you’ll need to build a<br />
cutt<strong>in</strong>g sled like the one shown above. Note<br />
the measur<strong>in</strong>g tape adhered to the stop, which<br />
makes it easier to quickly measure segment<br />
edge length.<br />
For detailed <strong>in</strong>formation on<br />
build<strong>in</strong>g your own cutt<strong>in</strong>g sled,<br />
download <strong>in</strong>structions from one of<br />
the sources listed on page 29.<br />
For the best possible results<br />
from your sled, consider:<br />
• Us<strong>in</strong>g dense, solid, stable stock<br />
like ½- or ¾"-thick Baltic birch<br />
plywood or MDF.<br />
• Fitt<strong>in</strong>g a sled runner <strong>in</strong>to both<br />
miter slots carefully and tightly.<br />
If you want accurate jo<strong>in</strong>ts, there<br />
should be no wiggle room.<br />
• Us<strong>in</strong>g acrylic or ultra-high<br />
molecular density (UHMD) plastic,<br />
available from many woodwork<strong>in</strong>g<br />
mail-order sources (woodcraft.com<br />
and leevalley.com) for long-life<br />
accurate runners.<br />
• Add<strong>in</strong>g a measur<strong>in</strong>g tape to the<br />
stop, as shown above, which will<br />
save lots of time.<br />
• Mak<strong>in</strong>g a segment hold-down<br />
tool to keep your f<strong>in</strong>gers away<br />
from the blade as shown opposite.<br />
Calibrate the cutt<strong>in</strong>g sled<br />
You can build a sled for a fixed<br />
angle us<strong>in</strong>g either trigonometry or<br />
a protractor. Whichever method<br />
you choose, you will always have<br />
to perform a one-time calibration<br />
of the sled before you can cut<br />
segments accurately.<br />
Calibration is essential. But once<br />
completed and the sled is locked<br />
down, you’ll never need to repeat<br />
the process. If you use a calibrated<br />
miter gauge (Incra is one brand),<br />
the calibration process is similar.<br />
To perform the calibrations,<br />
purchase <strong>in</strong>expensive stock (I<br />
prefer poplar) that you can rip and<br />
crosscut cleanly. Ensure that the<br />
26 American <strong>Wood</strong>turner W<strong>in</strong>ter 2005
stock is flat with square edges.<br />
Rip the stock on your tablesaw<br />
to approximately 1½" wide; then<br />
crosscut it to approximately 16".<br />
With an accurate 90-degree<br />
square, check that your tablesaw<br />
blade is accurately set at<br />
90 degrees to the table.<br />
To cut your first test r<strong>in</strong>g with<br />
12 segments, set your sled to cut<br />
segments about 1½" <strong>in</strong> length; this<br />
will create a test r<strong>in</strong>g about 6" <strong>in</strong><br />
diameter. Take the time to cut the<br />
segments carefully. Hand-sand<br />
burrs or whiskers and assemble<br />
the r<strong>in</strong>g with a rubber band.<br />
Next, hold the r<strong>in</strong>g up to a<br />
bright light and carefully exam<strong>in</strong>e<br />
for gaps. If the r<strong>in</strong>g is perfect, you<br />
should quickly buy a lottery ticket<br />
because you are extremely lucky!<br />
Otherwise, you will need to adjust<br />
the sled’s angle and recut another<br />
test r<strong>in</strong>g.<br />
Is light visible on the outsideedge<br />
gaps The angle of the sled is<br />
too acute (too small). Increase the<br />
sled’s angle slightly.<br />
Is light visible on the <strong>in</strong>sideedge<br />
gaps The angle of the sled<br />
is too oblique (too large). Decrease<br />
the sled’s angle slightly.<br />
Adjust and repeat until no gaps<br />
appear <strong>in</strong> your segments. Don’t<br />
be discouraged if it takes five test<br />
r<strong>in</strong>gs to get a precise r<strong>in</strong>g. Once<br />
the angle is perfect, secure the<br />
sled’s fence with lots of screws<br />
so noth<strong>in</strong>g will move. (I have 10<br />
screws on my fence.)<br />
If you plan to build vessels with<br />
other than 12 segments, you’ll<br />
need to build a dedicated sled for<br />
each angle. I have built four sleds<br />
and use each of them regularly.<br />
Prep the wood<br />
You must prep stock from the<br />
lumber company so the faces<br />
are parallel and uniform and<br />
the ripped strips are straight.<br />
Most lumber companies sell S2S<br />
stock (surfaced two sides) to<br />
approximately 13 /16". Select stock<br />
from the same lot for uniformity,<br />
gra<strong>in</strong>, and color. Allow it to<br />
stabilize <strong>in</strong> your shop for five to<br />
seven days before process<strong>in</strong>g.<br />
Jo<strong>in</strong>t one face and one edge of<br />
the stock 90 degrees to each other,<br />
then make the second face parallel<br />
to the first and to the desired<br />
thickness. Prepare enough stock<br />
for the entire vessel at one time.<br />
Start<strong>in</strong>g with the widest r<strong>in</strong>g<br />
first, rip the wood to the required<br />
width. Then crosscut stock to the<br />
necessary length (I add 20 percent<br />
to the length for safe handl<strong>in</strong>g).<br />
Label each strip with the r<strong>in</strong>g<br />
number as you go.<br />
<strong>Cut</strong> the segments<br />
Recheck the tablesaw blade for<br />
squareness. Then us<strong>in</strong>g the cutt<strong>in</strong>g<br />
sled on your tablesaw, cut the<br />
segments to length. To get the best<br />
use of your wood stock, flip the<br />
wood over before cutt<strong>in</strong>g the next<br />
segment.<br />
Quick starts<br />
Can’t wait for the next journal to<br />
arrive <strong>in</strong> your mailbox At the AAW<br />
website (woodturner.org), follow the<br />
l<strong>in</strong>k for a draw<strong>in</strong>g, cut list, and basic<br />
<strong>in</strong>structions for the beg<strong>in</strong>ner project<br />
7¼×7¼" vessel shown above. This<br />
project is suitable for turn<strong>in</strong>g on any<br />
lathe with a 10" or larger sw<strong>in</strong>g.<br />
Bud Latven has developed<br />
segmented plans and kits that are<br />
sold through Craft Supplies, Packard<br />
<strong>Wood</strong>works, and <strong>Wood</strong>workers<br />
Supply. All Bowl Company plans<br />
conta<strong>in</strong> full-scale draw<strong>in</strong>gs and are<br />
rated from easy to difficult (1–5). The<br />
“Tulipwood Open” and “Segmented<br />
Bowl” are the easiest. Some of Bud’s<br />
plans are for more complicated<br />
designs but are a good way to learn<br />
about segmented tips and shortcuts.<br />
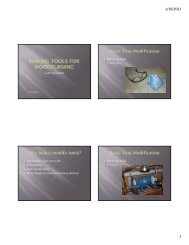
This homemade “f<strong>in</strong>ger saver” will help you hold segmented pieces <strong>in</strong><br />
place and safely retrieve them. The steel is made from a discarded Allen<br />
wrench modified with a ground tip.<br />
woodturner.org<br />
27
5. Do not glue a complete r<strong>in</strong>g.<br />
Instead, assemble the segments<br />
<strong>in</strong>to two half circles (<strong>in</strong> this case,<br />
six segments each).<br />
6. Place a 1 /8" to ¼" dowel between<br />
the two half circles and add the<br />
band clamp. The dowels keep all<br />
glued jo<strong>in</strong>ts tight by forc<strong>in</strong>g any<br />
gaps toward the two unglued<br />
jo<strong>in</strong>ts as shown at left.<br />
7. Lightly tighten the clamp while<br />
ensur<strong>in</strong>g the r<strong>in</strong>g rema<strong>in</strong>s flat. If<br />
you don’t tighten carefully, the<br />
clamp<strong>in</strong>g pressure will push the<br />
<strong>in</strong>side of the r<strong>in</strong>g upward.<br />
8. Wipe away the excess glue from<br />
both sides and tighten the clamp<br />
completely. I use a screwdriver and<br />
hand-tighten each clamp.<br />
9. When the glue is dry, remove<br />
the clamp and dowels. Then flatten<br />
the half r<strong>in</strong>g on a belt sander and<br />
glue the two halves together.<br />
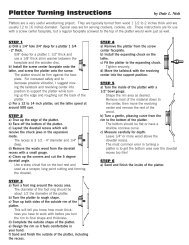
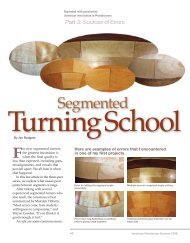
To ensure accuracy <strong>in</strong> your r<strong>in</strong>gs, follow good practices. As you cut segments with the tablesaw sled,<br />
number the pieces as shown above. After dry-fitt<strong>in</strong>g the pieces, glue only six adjo<strong>in</strong><strong>in</strong>g pieces separated<br />
by dowels. After the half r<strong>in</strong>gs dry, remove the dowels, flatten the half r<strong>in</strong>gs, and glue together the r<strong>in</strong>gs<br />
us<strong>in</strong>g the same band clamp. Add enough clamp pressure to create glue squeeze-out.<br />
Number each segment <strong>in</strong> order<br />
on its top face as shown above. I<br />
recommend cutt<strong>in</strong>g two or three<br />
spare pieces for each r<strong>in</strong>g.<br />
Dry-clamp each r<strong>in</strong>g us<strong>in</strong>g hose<br />
clamps. Hold the r<strong>in</strong>g up to light<br />
and check for gaps. Spend the<br />
time to make them fit now, or the<br />
f<strong>in</strong>al vessel will never look good.<br />
If necessary, readjust your cutt<strong>in</strong>g<br />
sled and cut new pieces.<br />
Glue segments <strong>in</strong>to r<strong>in</strong>gs<br />
Proper glu<strong>in</strong>g techniques are<br />
critical to the success of your<br />
project. You’ll draw on these steps:<br />
prepp<strong>in</strong>g the <strong>in</strong>dividual segments,<br />
assur<strong>in</strong>g a flat glue surface, and<br />
clamp<strong>in</strong>g effectively. Here are the<br />
steps that you should follow:<br />
1. Check each segment and<br />
hand-sand the faces with 220-grit<br />
sandpaper to remove any whiskers<br />
or loose fibers that might <strong>in</strong>terfere<br />
with the jo<strong>in</strong>t.<br />
2. Prepare a flat, glue-resistant<br />
surface. A heavily waxed,<br />
discarded cab<strong>in</strong>et door will be<br />
flat, and will be relatively easy to<br />
remove dried glue from it. Reserve<br />
this surface for your segmented<br />
projects.<br />
3. Test-fit the r<strong>in</strong>g segments with<br />
a hose clamp or rubber bands and<br />
check for good jo<strong>in</strong>ts.<br />
4. Butter the glue onto all contact<br />
surfaces. With your f<strong>in</strong>ger, remove<br />
lumps and debris from the glue.<br />
Assemble the vessel<br />
Your challenge is to get each r<strong>in</strong>g<br />
flat and centered when build<strong>in</strong>g<br />
the vessel. For solid construction,<br />
build a flatten<strong>in</strong>g stick from<br />
hardwood and 80-grit sandpaper<br />
as shown below.<br />
I recommend build<strong>in</strong>g vessels<br />
with two faceplates, each with<br />
attached hardwood glue blocks.<br />
Before you start add<strong>in</strong>g r<strong>in</strong>gs,<br />
true up each glue block on the<br />
lathe with a scraper or skew. With<br />
a bright light and a straightedge,<br />
check that the face is absolutely<br />
Make a flatten<strong>in</strong>g stick to dress the face of your<br />
r<strong>in</strong>gs. The stick shown above is made from a<br />
3×16" strip of 80-grit sandpaper adhered to the<br />
hardwood with 3M Type 77 adhesive.<br />
28 American <strong>Wood</strong>turner W<strong>in</strong>ter 2005
flat. Use the flatten<strong>in</strong>g stick to<br />
dress the face of the glue block.<br />
Center and glue the top r<strong>in</strong>g<br />
to one faceplate. Apply clamp<br />
pressure until glue squeezeout<br />
appears. Center and glue<br />
the bottom r<strong>in</strong>g (often a solid<br />
hardwood base) to the second<br />
faceplate.<br />
After the glue dries, true up the<br />
r<strong>in</strong>g face on the lathe as described<br />
above. Then dress the face with the<br />
flatten<strong>in</strong>g stick.<br />
Glue on another r<strong>in</strong>g as<br />
described above, but rotate the<br />
segment edge by one-half a<br />
segment. This will add a “bricklaid”<br />
pattern to your vessel.<br />
Turn the vessel<br />
After you assemble the two vessel<br />
halves, screw the base section to<br />
the headstock. With the tailstock,<br />
press the top section (still attached<br />
to a faceplate) aga<strong>in</strong>st the base and<br />
turn the exterior shape.<br />
Remove the top section and<br />
complete the <strong>in</strong>terior of the base<br />
section. Repeat this step with the<br />
top section, turn<strong>in</strong>g its <strong>in</strong>terior to<br />
match the wall thicknesses.<br />
Glue together the two sections.<br />
After the glue has set, part the<br />
neck section from the faceplate and<br />
complete the top of the vessel. Use<br />
a scraper to clean up the <strong>in</strong>terior<br />
glue l<strong>in</strong>e before part<strong>in</strong>g the base<br />
from the lathe.<br />
F<strong>in</strong>al sand and add f<strong>in</strong>ish.<br />
In the next issue, we will unfold the<br />
process for design<strong>in</strong>g and lay<strong>in</strong>g out<br />
segmented vessels.<br />
Other Resources<br />
Tutorials<br />
Tutorials are also available onl<strong>in</strong>e from Kev<strong>in</strong> Neely (turnedwood.com), who<br />
has probably taught more segmented turners than anyone, and Verified Software<br />
(verifiedsoftware.com/goodturns).<br />
<strong>Cut</strong>t<strong>in</strong>g sled<br />
In order to accurately cut segments you will need a fixture that cuts the desired<br />
angle repeatedly, allows for segment edge length measurement, and provides<br />
safety when cutt<strong>in</strong>g smaller pieces. For detailed <strong>in</strong>formation on build<strong>in</strong>g a cutt<strong>in</strong>g<br />
sled, download complete <strong>in</strong>structions for <strong>Jim</strong> Rodger’s sled from the AAW or for<br />
one of the other sleds available at:<br />
American Association of <strong>Wood</strong>turners (woodturner.org); sled shown on page 26<br />
Kev<strong>in</strong> Neely’s Turned <strong>Wood</strong> (turnedwood.com)<br />
Verified Software (verifiedsoftware.com/goodturns)<br />
Books<br />
Recently published books provide the most complete descriptions for the<br />
segmented-turn<strong>in</strong>g process:<br />
• The Art of Segmented <strong>Wood</strong> Turn<strong>in</strong>g, Malcolm Tibbetts, L<strong>in</strong>den Publish<strong>in</strong>g<br />
• <strong>Wood</strong>turn<strong>in</strong>g with Ray Allen, Ray Allen & Dale Nish, Fox Chapel Publish<strong>in</strong>g<br />
Other books available:<br />
• Segmented Turn<strong>in</strong>g, A Complete Guide, Ron Hampton, Guild of Master<br />
Craftsmen (2003)<br />
• Segmented Turn<strong>in</strong>g, A Good Start, Bill Kandler, Verified Software (2004)<br />
• Segmented Turn<strong>in</strong>g, William Smith, Schiffer Publish<strong>in</strong>g Ltd. (2002)<br />
• Lam<strong>in</strong>ated <strong>Designs</strong> <strong>in</strong> <strong>Wood</strong>, Clarence Rannefeld, Lark Books (1998)<br />
• Southwest Pottery – Anasazi to Zuni, Allen Hayes & John Blom, Northland<br />
Publish<strong>in</strong>g (1996)<br />
• F<strong>in</strong>e <strong>Wood</strong>work<strong>in</strong>g on Faceplate Turn<strong>in</strong>g, Taunton Press (1987)<br />
Videos<br />
There are a limited number of videos available:<br />
• Introduction to Segmented Turn<strong>in</strong>g, Curt Theobald, 307-245-3310,<br />
curttheobald.com<br />
• Segmented Patterns, Curt Theobald, 307-245-3310, curttheobald.com<br />
Software for segmented design and layout will accompany the next article<br />
<strong>in</strong> this series.<br />
<strong>Jim</strong> Rodgers (JLRodgers.com),<br />
a studio turner and demonstrator,<br />
is president of the Bay Area<br />
<strong>Wood</strong>turners Association. He lives <strong>in</strong><br />
Mart<strong>in</strong>ez, California.<br />
woodturner.org<br />
29