GBox Chemi installation new 1211 - Syngene
GBox Chemi installation new 1211 - Syngene
GBox Chemi installation new 1211 - Syngene

You also want an ePaper? Increase the reach of your titles
YUMPU automatically turns print PDFs into web optimized ePapers that Google loves.
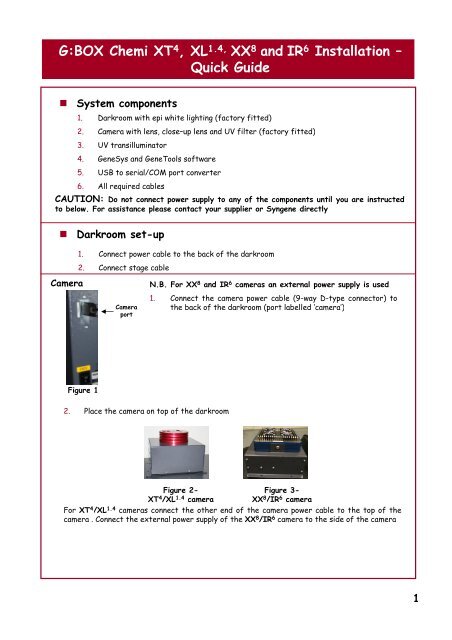
G:BOX <strong>Chemi</strong> XT 4 , XL 1.4, XX 8 and IR 6 Installation –<br />
Quick Guide<br />
Title<br />
• System components<br />
1. Darkroom with epi white lighting (factory fitted)<br />
2. Camera with lens, close–up lens and UV filter (factory fitted)<br />
3. UV transilluminator<br />
4. GeneSys and GeneTools software<br />
5. USB to serial/COM port converter<br />
6. All required cables<br />
CAUTION: Do not connect power supply to any of the components until you are instructed<br />
to below. For assistance please contact your supplier or <strong>Syngene</strong> directly<br />
• Darkroom set-up<br />
1. Connect power cable to the back of the darkroom<br />
2. Connect stage cable<br />
Camera<br />
N.B. For XX 8 and IR 6 cameras an external power supply is used<br />
Camera<br />
port<br />
1. Connect the camera power cable (9-way D-type connector) to<br />
the back of the darkroom (port labelled ‘camera’)<br />
Figure 1<br />
2. Place the camera on top of the darkroom<br />
Figure 2-<br />
XT 4 /XL 1.4 camera<br />
Figure 3-<br />
XX 8 /IR 6 camera<br />
For XT 4 /XL 1.4 cameras connect the other end of the camera power cable to the top of the<br />
camera . Connect the external power supply of the XX 8 /IR 6 camera to the side of the camera<br />
1
3. Using nuts and shake proof washers attach the<br />
camera to the top of the darkroom<br />
Nut and<br />
shake proof<br />
washer<br />
4. Attach the USB cable to the camera<br />
Lens port<br />
5. DO NOT attach the free end of the USB<br />
cable to USB 2 port on the PC until GeneSys<br />
software has been installed<br />
Figure 5<br />
Thread<br />
cables<br />
through<br />
hood<br />
6. Place the hood on top of the darkroom to<br />
cover the camera and lens assembly ensuring<br />
cables are not trapped (Figure 5)<br />
Darkroom lighting<br />
Micro- switch<br />
1. Turn on darkroom (switch at rear of G:BOX) and the stage<br />
cable needs to be plugged in at the back of darkroom<br />
2. Open the darkroom door and place a small object against<br />
the micro-switch which can be found at the rear of the<br />
sample tray, then push the top sample tray button at the<br />
same time as pressing the black button positioned 5cms<br />
below the round shiny door magnet, to raise the stage so<br />
that the transilluminator can be installed<br />
3. With the darkroom door open, slide the transilluminator between the runners located<br />
on each side. When the transilluminator is installed the micro-switch will be directly<br />
behind it<br />
4. Connect the flying mains lead in the darkroom into the input socket on the rear of<br />
the transilluminator. Make sure the power button on the front of the transilluminator<br />
is turned on and the power switch is set to 100 percent<br />
2
• PC set-up<br />
1. Set up the PC by attaching the monitor, keyboard and mouse into the appropriately<br />
labelled ports<br />
2. Connect electrical power leads to each component. Turn on the PC (if you purchased<br />
the PC directly from <strong>Syngene</strong> then all the following software steps below will have<br />
been done for you. You will however have to accept the Microsoft Windows TM<br />
operating system licence and plug in the camera and serial cable)<br />
Installing GeneSys software<br />
3. Insert the GeneSys CD and run the set-up program. Then follow the instructions on<br />
screen.<br />
4. Once installed plug in the camera to a high speed USB 2 port on the PC. The camera<br />
drivers should be automatically loaded. If a warning appears about the drivers being<br />
unsigned or unverified then choose to proceed with the <strong>installation</strong><br />
5. Connect the serial cable from the labelled port in the rear of the darkroom<br />
(‘Darkroom/PC’) directly to the serial port on the PC then proceed to step 6. If<br />
there is no serial port on the PC then use the supplied USB adapter<br />
N.B. GeneSys requires an OpenGL compatible graphics card with a resolution of at least<br />
1280x900 with true colour, with DPI set to normal size (96DPI)<br />
Installing GeneTools software<br />
6. If the CD does not auto-run then using Windows Explorer locate the<br />
InstallGeneTools.exe file on the CD<br />
7. Follow on-screen instructions to install and license GeneTools software. For<br />
hardware or network licensing you will have been supplied with a hardware key. For<br />
software licensing, each PC will need a media key (found on the CD insert)<br />
When using GeneSys software for the first time or when you have purchased additional<br />
accessories, (eg converter screens), you need to programme lighting, filters and<br />
accessories into GeneSys software<br />
• Load GeneSys software<br />
1. From the home page select the ‘View available hardware icon’<br />
2. To enter this information simply press if you have a touch screen monitor or click<br />
the appropriate buttons to select the hardware that you have with your system.<br />
Selected items will turn red.<br />
3. Ensure that you click “Save”<br />
S Y N G E N E<br />
CONTACT SYNGENE:<br />
EUROPE:<br />
USA:<br />
Tel: +44 (0)1223 727123 Tel: 800 686 4407/301 662 2863<br />
Email: support@syngene.com<br />
Email: support@syngene.com<br />
www.syngene.com<br />
GBCI<strong>1211</strong><br />
3<br />
A DIVISION OF THE SYNOPTICS GROUP