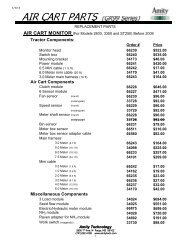
2450 Operator Manual - Amity Technology
2450 Operator Manual - Amity Technology
2450 Operator Manual - Amity Technology

You also want an ePaper? Increase the reach of your titles
YUMPU automatically turns print PDFs into web optimized ePapers that Google loves.
Field Preparations<br />
1. Loosen brace assemblies.<br />
<strong>2450</strong> SERIES OPERATING INSTURCTIONS<br />
2. Adjust soil sampler so that it is vertical<br />
from front to back as shown in Figure 11.<br />
FIGURE 13<br />
Figure 11<br />
3. Adjust sampler from left to right keeping it<br />
slightly beyond vertical to the outside as<br />
shown in Figure 14. This will compensate<br />
for any initial upward movement of the<br />
pickup when sampling. Tighten all<br />
adjusting bolts.<br />
4. Connect the power and ground cables to<br />
the battery. Be sure the red cable is to<br />
the positive terminal and the black cable<br />
is to the negative terminal.<br />
5. Be sure the power unit reservoir and<br />
hydraulic cylinder are full.<br />
Asdf<br />
Asdf<br />
Asfd<br />
Asf<br />
Figure 12<br />
Note: Three quarts of Dextron II<br />
automatic transmission fluid is required.<br />
(See Assembly Section). Fluid level<br />
should be approximately 1” below top of<br />
reservoir.<br />
6. Rephase hydraulic cylinder by fully raising<br />
and lowering hydraulic cylinder 3 or 4<br />
times. This will insure that no air is in the<br />
hydraulic system.<br />
7. For monitoring probe depth, mark the<br />
front side of the probe with red nail polish,<br />
paint or tape at the depth you want to<br />
sample.<br />
8. Set the outside rear view mirror to see<br />
bottom portion of sampler. When the red<br />
line meets the probe guide (bottom plate)<br />
the desired depth has been reached.<br />
9. Make sure the cylinder is fully raised and<br />
the sampler is adjusted for approximately<br />
10” to 12” of ground clearance before<br />
transporting (see Figure 13).