
You also want an ePaper? Increase the reach of your titles
YUMPU automatically turns print PDFs into web optimized ePapers that Google loves.
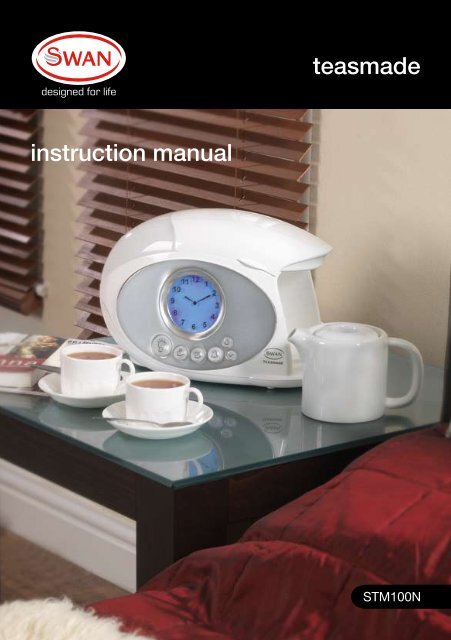
<strong>teasmade</strong><br />
<strong>instruction</strong> <strong>manual</strong><br />
STM100N
Thank you for purchasing this Swan TEASMADE.<br />
With this iconic product, you are joining a unique group of people – going back<br />
some 70 years or more – who just have to be woken with a nice, hot cup of tea<br />
in the morning – and who can blame you. Even if tea isn’t your thing and you<br />
prefer a cup of (that new fangled) coffee in the morning, not to worry.<br />
This modern, 21st century TEASMADE can make coffee too!<br />
But you can’t get the Internet on it – just yet.<br />
Please read all the <strong>instruction</strong>s carefully before using your Swan TEASMADE<br />
Important safeguards<br />
When using any electrical appliance, basic safety precautions should always be followed including<br />
the following:<br />
1. This appliance is for household use only. Read all <strong>instruction</strong>s carefully before using any appliance.<br />
2. Always ensure that the voltage on the rating label corresponds to the mains voltage in your home.<br />
3. Incorrect operation and improper use can damage the appliance and cause injury to the user.<br />
4. This appliance is not intended for use by persons (including children) with reduced physical,<br />
sensory or mental capabilities, or lack of experience and knowledge, unless they have been<br />
given supervision or <strong>instruction</strong> concerning use of the appliances by a person responsible for<br />
their safety. Children should be supervised to ensure that they do not play with the appliance.<br />
5. Check the power cord and plug regularly for any damage. If the cord or the plug is damaged,<br />
it must be replaced by the manufacturer or qualified person in order to avoid an electrical hazard.<br />
6. Do not use the appliance if it has been dropped or damaged in any way. In case of damage,<br />
take the unit in for examination and/or repair by an authorised service agent.<br />
7. Never immerse the unit in water or any other liquid for cleaning purposes.<br />
8. Remove the plug from the socket by gripping the plug. Do not pull on the cord to disconnect<br />
the appliance from the mains. Always unplug the unit when not in use, before cleaning<br />
or when adding or removing parts.<br />
9. The use of accessory attachments that are not recommended or supplied by the manufacturer<br />
may result in injuries, fire or electric shock.<br />
10. A short cord is provided to reduce the hazards resulting from becoming entangled<br />
in or tripping over a longer cord.<br />
11. Do not let the cord hang over the edge of a table or counter. Ensure that the cord<br />
is not in a position where it can be pulled on inadvertently.
12. Do not allow the cord to touch hot surfaces and do not place on or near a hot gas<br />
or electric burner or in a heated oven.<br />
13. Do not use the appliance on a gas or electric cooking top or over or near an open flame.<br />
14. Use of an extension cord with this appliance is not recommended. However, if it is necessary<br />
to use an extension lead, ensure that the lead is suited to the power consumption of the<br />
appliance to avoid overheating of extension cord, appliance or plug point. Do not place the<br />
extension cord in a position where it can be pulled on by children or animals or tripped over.<br />
15. This appliance is not suitable for outdoor use. Do not use the appliance for anything other<br />
than its intended use.<br />
16. Do not carry the appliance by the power cord.<br />
17. Do not leave the appliance unattended during use. Always unplug the unit when not<br />
in use or before cleaning.<br />
18. Always operate the appliance on a smooth, even, stable surface. Do not place the unit on a hot surface.<br />
19. Ensure that the unit is switched off after use.<br />
20. The manufacture does not accept responsibility for any damage or injury caused by improper<br />
or incorrect use, or for repairs carried out by unauthorised personnel.<br />
21. In case of technical problems, switch off the machine and do not attempt to repair it yourself.<br />
Return the appliance to an authorised service facility for examination, adjustment or repair.<br />
Always insist on the use of original spare parts. Failure to comply with the above mentioned<br />
precautions and <strong>instruction</strong>s, could affect the safe operation of this product.<br />
22. CAUTION: DO NOT OVER-FILL THIS PRODUCT<br />
23. NEVER ATTEMPT TO MOVE OR CLEAN THIS PRODUCT UNTIL IT HAS COMPLETELY COOLED<br />
24. DO NOT USE EXTERNAL AUTOMATIC TIMERS IN CONJUNCTION WITH THIS PRODUCT<br />
25 The filler cap should not be opened during the boiling cycle<br />
Operation guidelines<br />
It is important to ensure the<br />
correct plug adaptor is used<br />
when operating in a country<br />
not using the UK 13 Amp<br />
socket system. If in doubt,<br />
consult a qualified electrician.<br />
• Do not remove the teapot<br />
from the base during the<br />
filling cycle as scolding<br />
water will be ejected.<br />
• After filling the tank,<br />
ensure the cap is<br />
properly secured.<br />
Do not open the cap<br />
during the boiling cycle<br />
• After the tea making<br />
cycle is complete, wait<br />
a few minutes before<br />
removing the filler cap<br />
as it will be hot.
Before first use<br />
Reading Light<br />
Lid<br />
Remove all packaging from<br />
the product and connect to<br />
the 230-240V AC mains supply.<br />
1. Fill the ceramic jug with water<br />
to 1” (25mm) below top.<br />
2. Open the lid and remove the<br />
tank cap by turning it anti-clockwise<br />
3. Pour the water from the jug into<br />
the tank and replace the tank cap<br />
by turning it clockwise.<br />
4. Place the ceramic jug back on it’s stand<br />
on the TEASMADE, ensuring that it is<br />
resting firmly against the safety switch<br />
5. Press the TEA NOW button and wait<br />
6. In a few minutes the water in the tank will<br />
boil and be ejected into the pot. You will<br />
hear the traditional TEASMADE woosh!<br />
as the water is ejected from the tank<br />
into the ceramic pot.<br />
Clock<br />
Ceramic Jug<br />
7. Once this process is complete, discard the water from the pot. Your TEASMADE is now clean<br />
and ready to use. Fill ceramic jug to 1” (25mm) below top Always use jug to fill the tank.<br />
Your TEASMADE is now clean and ready to use.<br />
Setting the clock<br />
Insert the plug into the mains socket.<br />
The hands of the LCD clock will be at the<br />
12:00 position. The alarm set dot will also<br />
be at the 12:00 position.<br />
Let’s set the clock first:<br />
Press the CLOCK SET button to<br />
advance the clock hands to the right time.<br />
Each press will advance the clock 1 minute.<br />
To fast forward the clock press and HOLD<br />
the CLOCK SET button.<br />
Note: there is no am or pm setting.<br />
The TEASMADE uses a 12 hour clock.
Setting the alarm only<br />
The dot on the clock face indicates the alarm time. To set the alarm time press the ALARM SET<br />
button. Each press will advance the alarm time by 1 minute. To fast forward the alarm time, press<br />
and HOLD the ALARM SET button. Once you release the ALARM SET button, the clock will revert<br />
back to the current time and the alarm dot will be displayed.<br />
Note: there is no am or pm setting. The TEASMADE uses a 12 hour clock.<br />
Once the alarm time is set, press the ALARM button so that it lights up. The alarm is now set.<br />
Once the alarm time has been reached press the ALARM button to stop the beeps.<br />
MAKE SURE THE ALARM BUTTON IS LIT OR YOU MIGHT BE LATE FOR WORK!<br />
Setting for tea making and alarm<br />
Since the tea making process takes a few minutes, the alarm/tea making time must be set<br />
at least 10 minutes before the current time. Lift the cover and remove the filler cap by turning<br />
it anti-clockwise. Use the pot to fill the tank. Note: The pot holds exactly the amount of water<br />
the TEASMADE needs. Do not use any other vessel to fill the tank or there is a risk the tank<br />
will over flow and pose a scalding hazard.<br />
Replace the filler cap firmly by turning it clockwise. Put 2 tea bags (or 2 teaspoons of instant coffee)<br />
in the pot and replace the lid. Place the pot back into the TEASMADE so that it rests against the safety<br />
switch. Note: the tea making process will not work unless the pot is resting against the safety switch.<br />
Set the alarm time as detailed above only this time press the AUTOMATIC TEA button so<br />
that it lights up. Once the alarm time has been reached the alarm will sound and the clock face<br />
will flash. To stop the alarm either press the AUTOMATIC TEA button or simply remove the pot<br />
from the TEASMADE. Note: the tea making process begins about 5 mins before the alarm<br />
sounds. During the tea making process the TEA NOW button will illuminate briefly.<br />
Tea now!<br />
If you want the TEASMADE to make<br />
tea now, we have equipped it with a handy<br />
TEA NOW button! We hope you appreciate<br />
the thought and effort we put into naming that<br />
button. Fill the tank as described above, put<br />
2 tea bags (or 2 teaspoons of instant coffee)<br />
into the pot, place the pot back in the<br />
TEASMADE, ensuring it is resting against<br />
the safety switch. Press the TEA NOW button<br />
and the tea making process will begin. The<br />
cycle takes approximately 5 mins and finishes<br />
with the traditional TEASMADE woosh as<br />
the water is ejected into the pot from the tank.<br />
To interrupt the tea making cycle press the<br />
TEA NOW button again and the cycle will stop.<br />
If you require more tea, please wait a few minutes<br />
between cycles to allow the tank to cool.
Reading light<br />
To operate the reading light simply press<br />
the reading light button<br />
Reading<br />
light<br />
Tea<br />
now<br />
Automatic<br />
tea<br />
Alarm Alarm set Timer<br />
Cleaning and maintenance<br />
Ensure the product is unplugged from the mains and completely cooled before cleaning.<br />
The pot should be cleaned daily with warm soapy water, then rinsed with clean water.<br />
Do not leave water in the tank for long periods. Wait until the product has cooled before<br />
emptying the tank.<br />
The outside of the unit can be cleaned with a soft cloth moistened with a mild detergent solution.<br />
DO NOT USE CHEMICAL OR ABRASIVE CLEANERS. DO NOT IMMERSE THE UNIT IN WATER.<br />
Descaling <strong>instruction</strong>s<br />
Excessive lime scale build-up will hurt your precious TEASMADE!<br />
It is important to de-scale the product regularly in order to maintain best performance.<br />
Use a good de-scaling agent available from most supermarkets. Fill the tank using the<br />
pot and include the de-scaling agent. LEAVE THE FILLER CAP OFF on this occasion.<br />
Place the empty pot on it’s stand, ensuring it is in contact with the safety switch.<br />
Press the TEA NOW button. The water in the tank will boil.<br />
Note: With the filler cap off there will be an increased amount of steam so be careful.<br />
Once the water in the tank is boiling, press the TEA NOW button to switch it off.<br />
Carefully replace the filler cap and press the TEA NOW button once again. The water<br />
will be ejected into the pot. This will de-scale all the pipes and tubes inside the TEASMADE.<br />
Once de-scaling is complete, allow the unit to cool and rinse the tank and pot in clean water.<br />
To change the lightbulb<br />
1 Disonnect the product from the mains supply 3 Unscrew the bulb in anti-clockwise direction<br />
2 Remove the 2 screws from the lamp cover 4 Replace with bulb of same type: E14 15 Watts
UK Plug wiring <strong>instruction</strong>s<br />
The wires in the mains lead are coloured in accordance with the following code:<br />
BLUE NEUTRAL<br />
BROWN LIVE<br />
GREEN/YELLOW EARTH<br />
As the colours of the wire in the mains lead of this appliance may not correspond with the colour<br />
markings identifying the terminals on your plug, proceed as follows: The wire which is coloured<br />
BLUE must be connected to the terminal which is marked with the letter N or coloured black.<br />
The wire which is coloured BROWN must be connected to the terminal which is marked with the<br />
letter L or coloured red. The wire which is coloured GREEN/YELLOW must be connected to the<br />
terminal which is marked with the letter E or (earth symbol) and is coloured GREEN or GREEN/YELLOW.<br />
WARNING: THIS APPLIANCE MUST BE EARTHED<br />
Disposal of unit<br />
Disposal <strong>instruction</strong>s for Swan items in accordance with the WEEE directive.<br />
Appliances bearing the symbol shown here may not be disposed of in domestic<br />
rubbish. You are required to dispose of old electrical and electronic appliances<br />
like this separately. Please visit www.recyclemore.co.uk, or www.recylcenow.co.uk<br />
for access to information about the recycling of electrical items. The WEEE directive,<br />
introduced in August 2006, states that all electrical items must be recycled,<br />
rather than taken to landfill. Please arrange to take this appliance to your<br />
local Civic Amenity site for recycling, once it has reached the end of its life.<br />
Helpline<br />
01733 404703<br />
Too bright<br />
If the clock face is too bright, simple<br />
use the stickers provided to tone it down.<br />
Parts references:<br />
STM100-01: Ceramic pot<br />
STM100-02: Light bulb<br />
2 Year guarantee<br />
This product is guaranteed for two years from the date of original purchase.<br />
If any defect arises due to faulty materials or workmanship faulty products must<br />
be returned to place of purchase. Refunds or replacement is at the discretion of the store.<br />
The following conditions apply:<br />
· The product must be returned to the retailer with original proof of purchases.<br />
· The product must be installed and used in accordance with the <strong>instruction</strong><br />
contained in this <strong>instruction</strong> guide.<br />
· It must be used only for domestic purpose.<br />
· It does not cover wear and tear, damage, misuse or consumable parts.<br />
· Swan has no responsibility for incidental or consequential loss or damage.<br />
· Valid in the UK and Eire Only
Wakey, wakey!!<br />
We’re on<br />
Search ‘Swan Teasmade’<br />
Upload photos of your Teasmade<br />
to share with the rest of the gang<br />
Join the community!<br />
Visit<br />
www.swan-brand.co.uk<br />
for more great Swan products and history of the Swan Brand