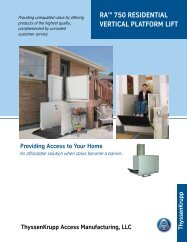
BUILDER - ThyssenKrupp Access
BUILDER - ThyssenKrupp Access
BUILDER - ThyssenKrupp Access

Create successful ePaper yourself
Turn your PDF publications into a flip-book with our unique Google optimized e-Paper software.
II<br />
<strong>BUILDER</strong><br />
Planning Guide<br />
for Residential Elevators<br />
ASME A17.1, Part V, Section 5.3<br />
March 28, 2011<br />
<strong>ThyssenKrupp</strong> <strong>Access</strong>
II<br />
<strong>BUILDER</strong><br />
Introduction<br />
This planning guide is designed to assist architects, contractors, home owners and elevator professionals in<br />
planning for a home elevator that meets the requirements of ASME A17.1 Part V Section 5.3.<br />
We strongly recommend you contact the codes authority having jurisdiction in the area(s) where the elevator<br />
will be installed. Become familiar with all requirements governing the installation and use of elevators in private<br />
residences. It is extremely important for you to know and adhere to all regulations concerning installation and<br />
use of elevators.<br />
IMPORTANT NOTICE:<br />
This Planning Guide provides nominal dimensions and specifications useful for INITIAL planning of an elevator<br />
project. BEFORE beginning actual construction, be sure to receive application drawings customized with<br />
specifications and dimensions for your specific project. Call 1-800-829-9760 to find a dealer in your area or visit<br />
our website, www.tkaccess.com and click on “Request Information”.<br />
Elevator configurations and dimensions are in accordance with our interpretation of the standards set forth by<br />
ASME A17.1 Part V Section 5.3. Please consult <strong>ThyssenKrupp</strong> <strong>Access</strong> or an authorized dealer in your area for<br />
more specific information pertaining to your project, including any deviation between referenced standards and<br />
those of any local codes or laws. Always contact local codes authorities for any variation to standards.<br />
The dimensions and specifications in this planning guide are subject to constant change (without notice) due to<br />
product enhancements and continually evolving codes and product applications.<br />
This elevator requires 230 VAC, single phase 60 Hz circuit with ground. Fused 20 amp circuit for counterweighted<br />
chain drive. A seperate 115 VAC, single phase 60 HZ circuit with ground fused 10 amp for light circuits.<br />
Steps of planning for a Lev ® II Home Elevator:<br />
1. Determine customer’s intention for use.<br />
2. Determine code requirements of site.<br />
3. Determine installation parameters of site.<br />
4. Determine the car type and hoistway size requirements.<br />
Contents<br />
Equipment for Lev II Builder residential elevator.................................................4<br />
Hoistway size requirements (pocketed gates).....................................................5<br />
Hoistway construction notes............................................................................6<br />
Typical counterweighted chain drive area construction details..............................7<br />
Optional drive unit area construction details with remote located controller............8<br />
Service <strong>Access</strong> Hatch.....................................................................................9<br />
Description of features............................................................................. 10-11<br />
Counterweighted chain drive overview............................................................ 12<br />
Page 2
EQUIPMENT FOR LEV II <strong>BUILDER</strong> RESIDENTIAL ELEVATOR<br />
This elevator meets the requirements of ASME A17.1<br />
Part V, Section 5.3 for a residential elevator.<br />
General:<br />
• Speed: 40 fpm (.20ms)<br />
• Minimum pit depth: 6"<br />
• Maximum travel: 50'<br />
• Maximum number of stops: 3<br />
(minimum 17" travel between stops)<br />
• Rated load: 950 lbs. (430 kg) (750 and 700 lbs. available)<br />
• Minimum overhead clearance 9'-0"<br />
Mechanical Equipment:<br />
• 230 VAC, 60 Hz, 20 amp single phase power supply with neutral and<br />
ground (4 wires)<br />
• Two #60 roller chains<br />
• Frequency controlled variable speed geared machine with counterweighted<br />
chain drive, 2 hp motor<br />
• Modular Dual 6 1 /4 lb. T-rail system<br />
• Sling assembly<br />
Car and Appointments:<br />
• 36" x 48" (12 ft 2 ) x 84" high car size<br />
• Light oak veneer wall with matching ceiling<br />
• Two recessed halogen lights<br />
• Wooden handrail to match wall panels<br />
• Unfinished plywood floor (with removable insert for 3 /4" thick finished<br />
floor by others)<br />
Options:<br />
• Remote located electrical controller<br />
• Matching wood veneer ceiling panel*<br />
• Metal handrail (brushed stainless steel)<br />
• Automatic car gate operator<br />
• Automatic hoistway door operator<br />
• GAL Type ‘N’ interlocks (requires additional hoistway space)<br />
• Buffer springs (requires 12" deep pit minimum)<br />
• Overhead Refuge Device<br />
• <strong>Access</strong> Hitch Switch<br />
Car Gate Upgrades:<br />
• Accordion car gate in choice of champagne, chalk, light oak,<br />
dark oak or white<br />
*Not available with melamine wall panels.<br />
Controls:<br />
• Programmable Logic Controller (PLC) with digital signal processor<br />
• Fully automatic operation<br />
• Car operating panel (brushed stainless steel)<br />
with LED floor position/diagnostic display and<br />
call acknowledgment<br />
• Hall stations (brushed stainless steel) with LED floor position/diagnostic<br />
display and call acknowledgment<br />
• Automatic car lighting with constant on switch<br />
• Automatic homing to a designated floor<br />
• Run stop switch<br />
• Emergency alarm button<br />
• Hoistway wiring with conduit (hall stations / interlocks)<br />
Safety Devices:<br />
• Slack chain safety device<br />
• Service switch for car light circuit<br />
• Service switch for elevator controller and drive<br />
• Upper and lower terminal limits<br />
• Final limits (2 upper, 1 lower)<br />
• Pit switch<br />
• Car top stop switch<br />
• Battery backup emergency light and alarm<br />
• Car gate safety switch<br />
• Electromechanical interlocks (for doors by others)<br />
Page 3
II<br />
<strong>BUILDER</strong><br />
Note: All dimensions are to inside finished walls.<br />
The tables on pages 5 illustrate standard pocket gates that allow a larger clear opening in the doorway.<br />
Note: All dimensions are to inside finished walls.<br />
Type 1 - Left Hand Car with Standard Pocket Gate<br />
Gate Stack - Rail Side<br />
Type 1 - Right Hand Car with Standard Pocket Gate<br />
Gate Stack - Rail Side<br />
Car<br />
Size Width Depth<br />
Center<br />
of Rail<br />
Center<br />
of Door<br />
Clear<br />
Opening<br />
36 x 48 52 3 /4" 55" 28 1 /2" 30 3 /4" 32 1 /8"<br />
Car<br />
Size Width Depth<br />
Center<br />
of Rail<br />
Center<br />
of Door<br />
Clear<br />
Opening<br />
36 x 48 52 3 /4" 55" 26 1 /2" 30 3 /4" 32 1 /8"<br />
Type 1 - Left Hand Car with Standard Pocket Gate<br />
Gate Stack - Opposite Rail<br />
Type 1 - Right Hand Car with Standard Pocket Gate<br />
Gate Stack - Opposite Rail<br />
Car Size<br />
Width<br />
Depth<br />
Center of<br />
Rail<br />
Center of<br />
Door<br />
Clear<br />
Opening<br />
36 x 48 56 1 /4" 55" 28 1 /2" 30 3 /4" 32 1 /8"<br />
Car<br />
Size Width Depth<br />
Center<br />
of Rail<br />
Center<br />
of Door<br />
Clear<br />
Opening<br />
36 x 48 56 1 /4" 55" 26 1 /2" 30 3 /4" 32 1 /8"<br />
Page 4
Hoistway Construction Notes<br />
• Also see Drive Unit Area Construction Details on pages 12 and 13.<br />
• A load bearing wall is required to sustain rail reactions.<br />
See Rail Reactions and Guide Rail Backing Construction below.<br />
• All points of the pit floor must be a minimum of 6" below the lower landing finished floor.<br />
• Pit floor construction should withstand a 3200 lb. impact load.<br />
• Hoistway sizes reflect running and access clearances only. Consult your local authority to assure compliance with state and<br />
local codes.<br />
• Minimum overhead clearance is 9'-0" above the top landing finished floor.<br />
• Due to limited clearances, it is imperative that the walls are square and plumb throughout the hoistway. The finished<br />
hoistway must be within 1 /4" tolerance from top to bottom.<br />
• Hoistway door provided by others. We recommend a 3'-0" x 6'‐8" door.<br />
• Hoistway is required to be free of all pipes, wiring and obstructions not related to the operation of the elevator.<br />
• Service access hatch is required in the controller / drive assembly area.<br />
• Building structure must provide for a means of a chain hoist for hoisting rail and elevator materials to the top of the hoistway<br />
during installation.<br />
• Controller to be mounted in a location from 32 to 104 degrees fahrenheit.<br />
Guide Rail Backing Construction Details:<br />
• Rail backing consists of<br />
two (2) rails, mounted 14"<br />
apart at center. Follow the<br />
instructions below for each<br />
separate rail.<br />
2x4<br />
2x8’s<br />
14"<br />
2x4<br />
2x4<br />
2x8’s<br />
• Laminate (2) 2x8’s and (2)<br />
2x4’s with glue and #8 x 2 1 /4"<br />
wood screws (minimum).<br />
• Overlap joints of the lumber<br />
as necessary for structural<br />
rigidity.<br />
• Guide rail backing must be<br />
tied to a horizontal structural<br />
member (header or floor<br />
plate) at top, bottom and a<br />
maximum of 10' between.<br />
Rail Reactions<br />
12"<br />
2½"<br />
2½"<br />
Space screws<br />
12" vertically<br />
and 2½" on<br />
each side of<br />
centerline of<br />
2x8<br />
12"<br />
2½"<br />
2½"<br />
2x4<br />
Wall<br />
Board<br />
-Shown<br />
partially<br />
R1 = 177 LBF.<br />
R2 = 351 LBF.<br />
Rail reactions are for static loading and do not include safety<br />
factors. Applicable safety factors must be considered in<br />
hoistway design.<br />
Wall attachment pull-out force is 265 LBF. per fastener.<br />
Page 5
II<br />
<strong>BUILDER</strong><br />
Typical Counterweight Chain Drive Unit Area Construction Details:<br />
2 pole 115V car<br />
light service switch<br />
2 pole 220V Unit<br />
Service Switch<br />
Drive Unit<br />
Drive Motor<br />
Electrical<br />
Controller<br />
Rail Tower<br />
Section Through Top of Hoistway<br />
†<br />
If the elevator controller is installed<br />
in a remote machine room, these<br />
items are to be provided in the<br />
machine room, near the controller.<br />
Construction Notes:<br />
• Minimum overhead clearance for standard car is 9'-0" above the<br />
top landing finished floor.<br />
• Light, light switch, receptacle, incoming electrical circuits and<br />
telephone jack to be located within 6 1 /2" of the hoistway door wall<br />
to avoid interference with wiring raceway (or may be located in<br />
ceiling).<br />
Page 6
Optional Counterweighted Chain Drive Unit Area Construction Details with<br />
Remote Located Electrical Controller:<br />
Manual Lowering<br />
Wheel Engagement<br />
Drive Unit<br />
Rail Tower<br />
Section thru Top of Hoistway at Drive Unit<br />
Requirements for Counterweighted Chain Drive Remote Located Electrical Controller:<br />
18 3 /16" wide x 15" high x 12" deep Remote<br />
Located Controller<br />
-attaches to wall (outside of hoistway)<br />
-must be located within 50' of the Drive<br />
Unit<br />
Plan View of Controller Area<br />
30" wide x 36" deep work space required<br />
in front of the Disconnects and the Elevator<br />
Controller as required by NEC<br />
Power Requirements:<br />
Dedicated 230 volt, single phase, 20** amp<br />
circuit with ground (3 wires) from lockable<br />
disconnect or non-G.F.I. circuit breaker.<br />
Dedicated 115 volt, 15 amp circuit from lockable<br />
fused disconnect for car lights.<br />
Telephone circuit.<br />
Page 7
II<br />
<strong>BUILDER</strong><br />
Service <strong>Access</strong> Hatch<br />
18" x 24" minimum hatch opening above the controller<br />
and drive assemblies<br />
-This is the recommended location of the access<br />
hatch. If sufficient attic space is not available, access<br />
through a wall must be provided. Cannot be through<br />
the rail wall (contact factory for alternatives).<br />
-Construction of access hatch and door is by others.<br />
-Door needs to be self closing and lockable.<br />
Plan View<br />
Page 8
Description of Features:<br />
Car Operating Panel<br />
Used to control the elevator from inside the car.<br />
• Automatic car controls; buttons illuminate when call is registered.<br />
• LED floor position display with system diagnostics that alerts the<br />
homeowner of complications that the control system may see.<br />
• Run stop switch.<br />
• Emergency alarm switch. Battery powered during power failure.<br />
• Battery backup emergency light, integrated into the top of the panel,<br />
illuminates during power failure.<br />
• In case of power failure, elevator continues and stops at the next lower<br />
landing if going down or stops and travels to the next lower landing.<br />
Elevator returns into service when power is restored.<br />
• Light switch to override the automatic car lights.<br />
• Optional key switch available to limit access to authorized persons.<br />
• Standard brushed stainless steel face.<br />
Hall Stations<br />
Used to call the elevator to your floor.<br />
• Automatic control.<br />
• LED floor position display with system diagnostics that alerts the<br />
homeowner of complications that the control system may see.<br />
• One provided for each floor level. Additional hall stations available for<br />
more than one opening per floor level.<br />
• Standard brushed stainless steel face.<br />
• Optional key switch available to limit access to authorized persons.<br />
Electrical Controller<br />
Controls the electrical operation of the elevator.<br />
• Located in the top of the hoistway near the drive unit.<br />
• Programmable Logic Controller (PLC) with digital signal processor allows<br />
for SoftStart and SoftStop technology.<br />
• Includes run/stop switch, automatic/remote switch and plug for<br />
construction/inspection pendant control.<br />
• Can be located in a remote machine room for areas that do not allow the<br />
electrical controller to be located inside the hoistway.<br />
Hoistway Door Interlocks<br />
Locks the hoistway door when the car is not there.<br />
• Surface mounted electromechanical interlock.<br />
• Can be opened with a special key from outside the hoistway in<br />
case of emergency or for servicing.<br />
Page 9
II<br />
<strong>BUILDER</strong><br />
Car Lights<br />
Two recessed halogen car lights provided.<br />
• Provided with stainless steel bezels.<br />
• Automatically turns on when gate or door is opened and turns off 5 minutes<br />
after the elevator is used.<br />
• Switch is provided on the car operating panel to provide constant on lights.<br />
• Separate battery backup emergency light is integrated in the car operating<br />
panel that illuminates during power failure.<br />
• As an option, wiring can be provided to the car top for connection to consumer<br />
provided lights.<br />
Automatic Car Gate Operator (optional)<br />
Automatically opens the car gate when car stops at a floor.<br />
• Mounts to top of car.<br />
• Closing speed slows the gate before full close.<br />
• If car is already at floor level, the gate automatically opens when the<br />
hoistway door is opened.<br />
• A door open button is provided on the car operating panel.<br />
Safety Devices<br />
• The elevator slows to a smooth stop.<br />
• Terminal limits. Stops the elevator if it overruns the normal limits at the<br />
top or bottom landing.<br />
• Final limits. A redundant safety feature if the elevator overruns the<br />
terminal limits at the top or bottom, the final limit stops the elevator and<br />
renders all automatic controls inoperable. If this happens, the elevator<br />
must be serviced to determine and correct the fault.<br />
• Pit switch and car top switch. Disables elevator for servicing purposes.<br />
• Interlocks. Hoistway doors remain locked when the car is not at that<br />
floor and prevent the elevator from running until all doors are closed.<br />
• Slack chain device. In the unlikely event that a drive chain would slacken<br />
or break, the device locks the car onto the T-rails, preventing the car<br />
from falling.<br />
• Car run stop switch. Located on car operating panel. Manual toggle<br />
switch disables elevator from inside car.<br />
Page 10
Counterweighted Chain Drive Overview<br />
Electrical controller<br />
-Can be located remotely within 50'<br />
Recessed lights<br />
Frequency controlled<br />
variable speed geared<br />
machine with<br />
counterweighted chain<br />
drive<br />
White ceiling panel<br />
Melamine, wood veneer, inset<br />
wood veneer wood walls<br />
Interlocking Wall System<br />
Car operating panel<br />
Plywood floor with removable<br />
insert for 3 /4" thick finished floor<br />
Modular rail system<br />
Floor selector magnet<br />
assembly<br />
Counterweights<br />
Wiring raceway for interlocks<br />
and hall stations<br />
Page 11
II<br />
<strong>BUILDER</strong><br />
0311-IM398<br />
Page 12<br />
<strong>ThyssenKrupp</strong> <strong>Access</strong> Manufacturing, LLC<br />
4001 East 138th Street<br />
Grandview, MO 64030-2837<br />
Phone: 816-763-3100<br />
Fax: 816-763-4467<br />
Sales: 800-669-9047<br />
www.tkaccess.com