P8/PV8 Maintenance Manual - Csidesigns.com
P8/PV8 Maintenance Manual - Csidesigns.com
P8/PV8 Maintenance Manual - Csidesigns.com

You also want an ePaper? Increase the reach of your titles
YUMPU automatically turns print PDFs into web optimized ePapers that Google loves.
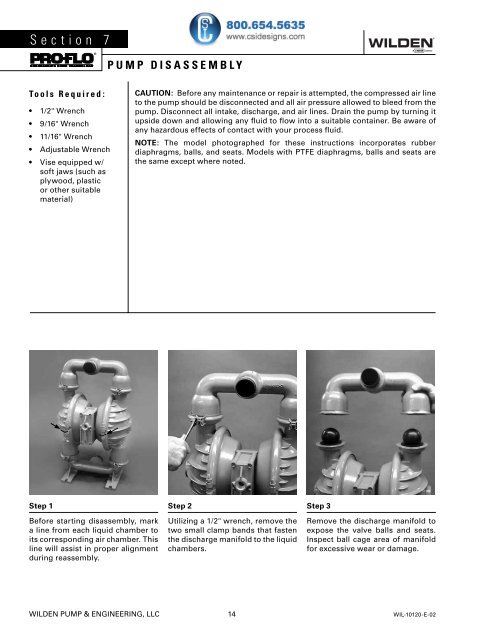
Section 7<br />
PUMP DISASSEMBLY<br />
Tools Required :<br />
• 1/2" Wrench<br />
• 9/16" Wrench<br />
• 11/16" Wrench<br />
• Adjustable Wrench<br />
• Vise equipped w/<br />
soft jaws (such as<br />
plywood, plastic<br />
or other suitable<br />
material)<br />
CAUTION: Before any maintenance or repair is attempted, the <strong>com</strong>pressed air line<br />
to the pump should be disconnected and all air pressure allowed to bleed from the<br />
pump. Disconnect all intake, discharge, and air lines. Drain the pump by turning it<br />
upside down and allowing any fluid to flow into a suitable container. Be aware of<br />
any hazardous effects of contact with your process fluid.<br />
NOTE: The model photographed for these instructions incorporates rubber<br />
diaphragms, balls, and seats. Models with PTFE diaphragms, balls and seats are<br />
the same except where noted.<br />
Step 1<br />
Before starting disassembly, mark<br />
a line from each liquid chamber to<br />
its corresponding air chamber. This<br />
line will assist in proper alignment<br />
during reassembly.<br />
Step 2<br />
Utilizing a 1/2" wrench, remove the<br />
two small clamp bands that fasten<br />
the discharge manifold to the liquid<br />
chambers.<br />
Step 3<br />
Remove the discharge manifold to<br />
expose the valve balls and seats.<br />
Inspect ball cage area of manifold<br />
for excessive wear or damage.<br />
WILDEN PUMP & ENGINEERING, LLC 14 WIL-10120-E-02