Dedicated to Rolls-Royce & Bentley Motorcars ... - Magazooms
Dedicated to Rolls-Royce & Bentley Motorcars ... - Magazooms
Dedicated to Rolls-Royce & Bentley Motorcars ... - Magazooms

You also want an ePaper? Increase the reach of your titles
YUMPU automatically turns print PDFs into web optimized ePapers that Google loves.
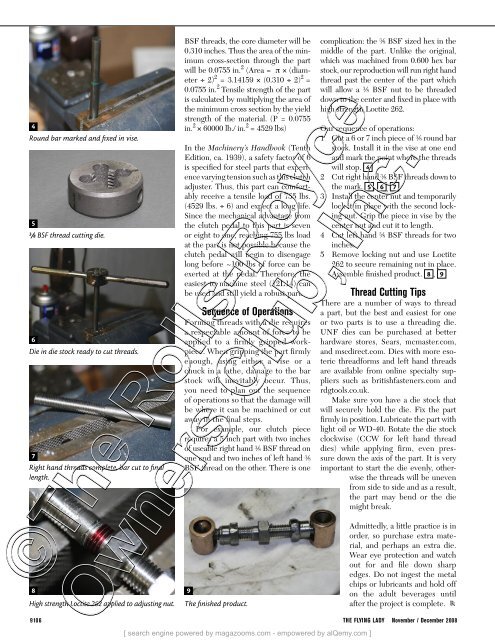
4<br />
Round bar marked and fixed in vise.<br />
5<br />
3/ 8 BSF thread cutting die.<br />
6<br />
Die in die s<strong>to</strong>ck ready <strong>to</strong> cut threads.<br />
7<br />
Right hand threads complete, bar cut <strong>to</strong> final<br />
length.<br />
8<br />
High strength Loctite 262 applied <strong>to</strong> adjusting nut.<br />
BSF threads, the core diameter will be<br />
0.310 inches. Thus the area of the minimum<br />
cross-section through the part<br />
will be 0.0755 in. 2 (Area = π × (diameter<br />
÷ 2) 2 = 3.14159 × (0.310 ÷ 2) 2 =<br />
0.0755 in. 2 Tensile strength of the part<br />
is calculated by multiplying the area of<br />
the minimum cross section by the yield<br />
strength of the material. (P = 0.0755<br />
in. 2 × 60000 lb./ in. 2 = 4529 lbs)<br />
In the Machinery’s Handbook (Tenth<br />
Edition, ca. 1939), a safety fac<strong>to</strong>r of 6<br />
is specified for steel parts that experience<br />
varying tension such as this clutch<br />
adjuster. Thus, this part can comfortably<br />
receive a tensile load of 755 lbs.<br />
(4529 lbs. ÷ 6) and expect a long life.<br />
Since the mechanical advantage from<br />
the clutch pedal <strong>to</strong> this part is seven<br />
or eight <strong>to</strong> one, reaching 755 lbs load<br />
at the part is not possible because the<br />
clutch pedal will begin <strong>to</strong> disengage<br />
long before ~100 lbs of force can be<br />
exerted at the pedal. Therefore, the<br />
easiest <strong>to</strong> machine steel (12L14) can<br />
be used and still yield a robust part.<br />
Sequence of Operations<br />
Forming threads with a die requires<br />
a respectable amount of force <strong>to</strong> be<br />
applied <strong>to</strong> a firmly gripped workpiece.<br />
When gripping the part firmly<br />
enough, using either a vise or a<br />
chuck in a lathe, damage <strong>to</strong> the bar<br />
s<strong>to</strong>ck will inevitably occur. Thus,<br />
you need <strong>to</strong> plan out the sequence<br />
of operations so that the damage will<br />
be where it can be machined or cut<br />
away in the final steps.<br />
For example, our clutch piece<br />
requires a 5 inch part with two inches<br />
of useable right hand 3 / 8 BSF thread on<br />
one end and two inches of left hand 3 / 8<br />
BSF thread on the other. There is one<br />
9<br />
The finished product.<br />
complication: the 3 / 8 BSF sized hex in the<br />
middle of the part. Unlike the original,<br />
which was machined from 0.600 hex bar<br />
s<strong>to</strong>ck, our reproduction will run right hand<br />
thread past the center of the part which<br />
will allow a 3 / 8 BSF nut <strong>to</strong> be threaded<br />
down <strong>to</strong> the center and fixed in place with<br />
high strength Loctite 262.<br />
Our sequence of operations:<br />
1 Cut a 6 or 7 inch piece of 3 / 8 round bar<br />
s<strong>to</strong>ck. Install it in the vise at one end<br />
and mark the point where the threads<br />
will s<strong>to</strong>p. 4<br />
2 Cut right hand 3 / 8 BSF threads down <strong>to</strong><br />
the mark. 5 , 6 , 7<br />
3 Install the center nut and temporarily<br />
lock it in place with the second locking<br />
nut. Grip the piece in vise by the<br />
center nut and cut it <strong>to</strong> length.<br />
4 Cut left hand 3 / 8 BSF threads for two<br />
inches.<br />
5 Remove locking nut and use Loctite<br />
262 <strong>to</strong> secure remaining nut in place.<br />
Assemble finished product. 8 , 9<br />
Thread Cutting Tips<br />
There are a number of ways <strong>to</strong> thread<br />
a part, but the best and easiest for one<br />
or two parts is <strong>to</strong> use a threading die.<br />
UNF dies can be purchased at better<br />
hardware s<strong>to</strong>res, Sears, mcmaster.com,<br />
and mscdirect.com. Dies with more esoteric<br />
threadforms and left hand threads<br />
are available from online specialty suppliers<br />
such as britishfasteners.com and<br />
rdg<strong>to</strong>ols.co.uk.<br />
Make sure you have a die s<strong>to</strong>ck that<br />
will securely hold the die. Fix the part<br />
firmly in position. Lubricate the part with<br />
light oil or WD-40. Rotate the die s<strong>to</strong>ck<br />
clockwise (CCW for left hand thread<br />
dies) while applying firm, even pressure<br />
down the axis of the part. It is very<br />
important <strong>to</strong> start the die evenly, otherwise<br />
the threads will be uneven<br />
from side <strong>to</strong> side and as a result,<br />
the part may bend or the die<br />
might break.<br />
Admittedly, a little practice is in<br />
order, so purchase extra material,<br />
and perhaps an extra die.<br />
Wear eye protection and watch<br />
out for and file down sharp<br />
edges. Do not ingest the metal<br />
chips or lubricants and hold off<br />
on the adult beverages until<br />
after the project is complete. <br />
©The ©The <strong>Rolls</strong>-<strong>Royce</strong><br />
<strong>Rolls</strong>-<strong>Royce</strong><br />
Owners Owners Club, Club, Inc. Inc.<br />
9106 THE FLYING LADY November / December 2008<br />
[ search engine powered by magazooms.com - empowered by alQemy.com ]