

AT8560™ AllTouch® Remote Control - MCV Broadband Guam
AT8560™ AllTouch® Remote Control - MCV Broadband Guam
AT8560™ AllTouch® Remote Control - MCV Broadband Guam

You also want an ePaper? Increase the reach of your titles
YUMPU automatically turns print PDFs into web optimized ePapers that Google loves.
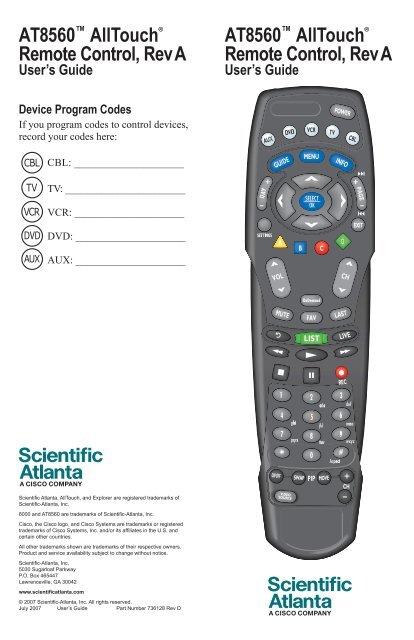
AT8560 AllTouch ®<br />
<strong>Remote</strong> <strong>Control</strong>, Rev A<br />
User’s Guide<br />
Device Program Codes<br />
If you program codes to control devices,<br />
record your codes here:<br />
CBL: _____________________<br />
TV: _______________________<br />
VCR: _____________________<br />
DVD: _____________________<br />
AUX: _____________________<br />
ScientiÞ c Atlanta, AllTouch, and Explorer are registered trademarks of<br />
ScientiÞ c-Atlanta, Inc.<br />
8000 and AT8560 are trademarks of ScientiÞ c-Atlanta, Inc.<br />
Cisco, the Cisco logo, and Cisco Systems are trademarks or registered<br />
trademarks of Cisco Systems, Inc. and/or its afÞ liates in the U.S. and<br />
certain other countries.<br />
All other trademarks shown are trademarks of their respective owners.<br />
Product and service availability subject to change without notice.<br />
ScientiÞ c-Atlanta, Inc.<br />
5030 Sugarloaf Parkway<br />
P.O. Box 465447<br />
Lawrenceville, GA 30042<br />
www.scientiÞ catlanta.com<br />
© 2007 ScientiÞ c-Atlanta, Inc. All rights reserved.<br />
July 2007 User’s Guide Part Number 736128 Rev D<br />
AT8560 AllTouch ®<br />
<strong>Remote</strong> <strong>Control</strong>, Rev A<br />
User’s Guide
In This Guide<br />
Welcome to the Ultimate <strong>Control</strong> Experience .......................................................... 2<br />
Important Information About Your <strong>Remote</strong> .............................................................. 2<br />
How Does a Universal <strong>Remote</strong> <strong>Control</strong> Work? ....................................................... 2<br />
Where Do I Start? .................................................................................................... 3<br />
Quick Reference ...................................................................................................... 4<br />
What Devices Can I <strong>Control</strong>? .................................................................................. 6<br />
What Devices Do I Want to <strong>Control</strong>? ....................................................................... 6<br />
Reassign Mode Keys ............................................................................................... 7<br />
Program the <strong>Remote</strong> to <strong>Control</strong> My Devices ........................................................... 8<br />
What If None of the Codes Work? ........................................................................... 9<br />
Which Code Worked? ............................................................................................ 10<br />
Change Power <strong>Control</strong> .......................................................................................... 11<br />
Change Volume <strong>Control</strong> ........................................................................................ 13<br />
Change Channel <strong>Control</strong> ....................................................................................... 14<br />
Change VCR/VOD Programming .......................................................................... 15<br />
Put It Back the Way I Got It ................................................................................... 16<br />
Change On Demand Programming ....................................................................... 17<br />
Code Tables ........................................................................................................... 19<br />
FCC Compliance ................................................................................................... 26<br />
1
Welcome to the Ultimate <strong>Control</strong> Experience<br />
Your new AT8560 AllTouch ® Universal <strong>Remote</strong> <strong>Control</strong> (remote) is a true universal<br />
remote, functioning as Þ ve remotes in one. As one example, you can use this remote to<br />
operate your TV, VCR, DVD player, set-top, and receiver.<br />
Important Information About Your <strong>Remote</strong><br />
Your remote is initially programmed to only operate your set-top. The Volume and Mute<br />
keys will not work until a TV code is programmed into the remote. You must program the<br />
remote to operate your TV, VCR, etc. See Program the <strong>Remote</strong> to <strong>Control</strong> My Devices<br />
to learn how to enter device codes and program your remote.<br />
How Does a Universal <strong>Remote</strong> <strong>Control</strong> Work?<br />
You tell the remote which type of device you want to operate using the Þ ve keys arched<br />
across the top of the remote. These keys, known as mode keys, are labeled CBL, TV,<br />
VCR, DVD, and AUX. Each mode key is associated with a speciÞ c device. As an<br />
example, if you want the remote to operate your TV, you simply press the TV key. Other<br />
keys you press on the remote thereafter should operate your TV. Want to switch the<br />
remote to operate a different device? Just press the mode key for the next device you<br />
want to operate. In this guide, you will learn which types of devices you can control and<br />
how to program the remote to control your speciÞ c devices.<br />
Note: Some remote keys may not operate in all modes. You can even program your<br />
remote to assign speciÞ c functions, such as channel control, to operate one device only.<br />
You will learn more about these advanced functions later in this guide.<br />
2
Where Do I Start?<br />
Before you begin using your remote, complete the following initial setup tasks.<br />
Install the Batteries<br />
The remote requires two AA batteries (alkaline recommended). A diagram in the battery<br />
compartment of the remote indicates proper placement of the batteries. When batteries<br />
are properly installed, the light on the remote blinks each time a key is pressed.<br />
Visit the Quick Reference<br />
Timing is often important when you program advanced features. Therefore, knowing where<br />
certain keys are on the remote gives you an edge in pressing the right key at the right time.<br />
Important Information About Power <strong>Control</strong><br />
ScientiÞ c Atlanta strongly recommends that you turn off your set-top every time you<br />
turn off your TV. To make this easier, you can program your remote to turn both devices<br />
on or off at the same time. After you program the remote to control your four favorite<br />
entertainment devices, see Change Power <strong>Control</strong> to learn more about programming<br />
your remote to control power for the TV and set-top at the same time.<br />
Find a Place to Store Your <strong>Remote</strong><br />
Keeping up with one remote is much easier than keeping up with Þ ve remotes. However,<br />
it is still a good idea to Þ nd a storage location for your remote. The AT8560 is not a toy. It<br />
should be kept out of the reach of children under the age of 6 years.<br />
3
Quick Reference<br />
Device <strong>Control</strong><br />
T13104<br />
Device <strong>Control</strong><br />
4<br />
Viewing and<br />
Browsing<br />
<strong>Control</strong><br />
Sound <strong>Control</strong><br />
DVR <strong>Control</strong><br />
DVD/VCR/VOD<br />
<strong>Control</strong><br />
Numeric Keys<br />
PIP <strong>Control</strong><br />
Video Source<br />
Powers on or off<br />
<strong>Control</strong>s AUX functions<br />
<strong>Control</strong>s DVD functions<br />
<strong>Control</strong>s VCR functions<br />
<strong>Control</strong>s TV functions<br />
<strong>Control</strong>s Cable mode functions<br />
ghi<br />
pqrs<br />
PIP<br />
abc<br />
jkl<br />
tuv<br />
Aspect<br />
def<br />
mno<br />
wxyz<br />
CH<br />
Viewing and Browsing <strong>Control</strong><br />
Displays the program guide<br />
Sound <strong>Control</strong><br />
Displays the Applications Menu<br />
or DVD Menu<br />
Displays channel and program<br />
information<br />
Navigates through the program<br />
guide by days<br />
Moves through selections<br />
Selects and deselects screen item<br />
Navigates through settings,<br />
program guide, or DVD chapters<br />
Displays the General Settings or<br />
Quick Settings menus<br />
Exits settings, menus, and guides<br />
Selects options in menus and<br />
the program guide<br />
Selects channel, up or down<br />
Views favorite channels<br />
Returns to last channel viewed<br />
Launches On Demand application<br />
Adjusts volume<br />
Mutes sound<br />
Note: These keys will not work until you<br />
program a TV code into the remote.
DVR <strong>Control</strong><br />
Replays the previous few<br />
seconds of a program<br />
Displays a list of programs<br />
that you have recorded, so<br />
that you can select one for<br />
viewing<br />
Displays live television<br />
programming<br />
DVD/VCR/VOD <strong>Control</strong><br />
Notes:<br />
• In DVD mode, these keys control<br />
your DVD or VCR.<br />
• These keys also control DVR<br />
functions.<br />
Rewinds DVD/VCR/VOD<br />
Plays DVD/VCR/VOD<br />
Fast forwards DVD/VCR/<br />
VOD<br />
Stops DVD/VCR/VOD<br />
Pauses DVD/VCR/VOD<br />
Records program<br />
Numeric Keys<br />
Enters channel numbers and<br />
remote codes (also enters<br />
your parental control PIN)<br />
Reserved for future use<br />
Sizes the picture for some<br />
high-deÞ nition television<br />
(HDTV) models<br />
PIP <strong>Control</strong><br />
Opens or closes the Picturein-Picture<br />
(PIP) window<br />
Video Source<br />
Swaps the contents of the<br />
PIP window and the main<br />
viewing screen so that the<br />
PIP window displays on<br />
the main screen<br />
Moves the PIP window<br />
to another location on<br />
the screen<br />
Selects the channels in the<br />
PIP window, up or down,<br />
and scrolls through DVD<br />
chapters<br />
Selects the video input<br />
source in TV mode or selects<br />
RF Bypass in CBL mode<br />
(where available)<br />
5
What Devices Can I <strong>Control</strong>?<br />
The mode keys arched across the top of the remote tell the remote which device you<br />
want to operate.<br />
Each mode key is associated with different groups of devices.<br />
You can use each mode key to control one of its associated devices:<br />
Mode Key Associated Devices<br />
CBL .........set-tops, HDTV tuners, and satellite devices<br />
TV ............TVs and HDTVs<br />
VCR .........VCRs, digital video recorders (DVRs), DVD players, and CD players<br />
DVD .........DVD players, CD players, VCRs, and DVRs<br />
AUX .........receivers, tuners, and Home Theatre in a Box (HTIB)<br />
Regarding Non-Responsive Modes<br />
The AT8560 is pre-programmed with the TV, VCR, and AUX keys set to an inactive<br />
(non-responsive) mode. After you program these keys on the remote control, you can<br />
return them to the non-responsive mode by using the speciÞ c non-responsive mode<br />
code found in the Code Tables, later in this guide.<br />
What Devices Do I Want to <strong>Control</strong>?<br />
To help you keep track of the devices you want to control, list the type of devices you<br />
have (including brand) in the following table. Then use the code tables at the end of this<br />
guide to locate the codes for your device. For example, look under TV Group if you need<br />
to program the remote to operate your TV. If you have two devices that use the same<br />
key, you must reassign the VCR, DVD, or the AUX key. The TV and CBL keys cannot<br />
be reassigned. Go to Reassign Mode Keys. Otherwise, go to Program the <strong>Remote</strong> to<br />
<strong>Control</strong> My Devices for additional instructions.<br />
6<br />
Mode Key Device Type Brand Codes<br />
Example: DVD DVD Sony 2066, 2193<br />
AUX<br />
DVD<br />
VCR<br />
TV<br />
CBL<br />
T11208
Reassign Mode Keys<br />
With the AT8560, you can reassign a mode key to operate a different device. For example, you<br />
can reassign the AUX key to operate a receiver, a tuner, or a Home Theatre in a Box system.<br />
You can reassign the AUX key, the VCR key, or the DVD key. However, the TV key and<br />
the CBL key cannot be reassigned. If you reassign a key, be sure you update the table<br />
found in the previous section.<br />
Reassigning Mode Keys (Program Code 9 9 2)<br />
1. Press and hold SELECT and CBL until all mode keys blink twice.<br />
2. Press 9 9 2. The CBL mode key blinks twice.<br />
3. Press the mode key associated with the type of device you want to control, and then<br />
press the mode key that you want to change. All mode keys blink three times.<br />
Some Common Examples<br />
• To program the AUX key to operate your VCR, press VCR and then AUX.<br />
• To program the VCR key to operate your TV, press TV and then VCR.<br />
4. When Þ nished, go to Program the <strong>Remote</strong> to <strong>Control</strong> My Devices.<br />
7
Program the <strong>Remote</strong> to <strong>Control</strong> My Devices<br />
Your remote is initially programmed to only operate your set-top. The Volume and Mute<br />
keys will not work until a TV code is programmed into the remote. If the remote provides<br />
only limited functionality for a device, you can look for a code that provides more<br />
functionality. Before you begin, make sure you know the brand name of the device you want<br />
to control.<br />
Note: Some remote keys may be assigned to operate one device type only. For example,<br />
volume control may be assigned to the TV only. If this is the case, you can reprogram<br />
power, volume, and channel control using procedures later in this guide.<br />
Assigning a Different Device Code to a Mode Key<br />
1. Find the codes for your brand of device in the appropriate setup code list at the end of<br />
this guide. For example, look under TV Group if you need to program the remote to<br />
operate your TV.<br />
2. Turn on your device.<br />
3. Press and hold SELECT and the appropriate mode key until all of the mode keys<br />
blink twice. For example, to set up the TV, press and hold SELECT and TV.<br />
Note: If you reassigned mode keys, you may, for example, press SELECT and VCR<br />
to program the VCR mode key with a TV code.<br />
4. Enter the Þ rst setup code for the device. All mode keys blink three times to indicate<br />
that the code entry was accepted.<br />
5. Point the remote at the device, and press POWER, PLAY , or to test the<br />
device.<br />
6. Did the device operate correctly?<br />
• If yes, write down the code that worked on the cover of this guide.<br />
You may need it again if the device code is accidentally erased.<br />
• If no, repeat these steps using a different setup code.<br />
Note: If none of the codes listed for your brand of device operate the device correctly,<br />
go to What If None of the Codes Work for instructions.<br />
7. Repeat this procedure for each mode key you want to program.<br />
8
What If None of the Codes Work?<br />
If none of the codes listed for your brand of device operate the device correctly, you can<br />
search through the code library for a valid code.<br />
Improving Your Reaction Time<br />
When you search the code library, you need to be ready to press SELECT as soon as the<br />
remote turns off your device. Therefore, make sure you are familiar with the location of<br />
the SELECT key before you begin this procedure.<br />
Sizing Up the Libraries<br />
The mode keys blink twice when the remote reaches the last code in a library. You<br />
do not need to count codes. However, knowing the size of each library will help you<br />
determine how long it will take to cycle through all of the codes in the library. Each<br />
library contains the following number of codes:<br />
• CBL mode: 45 • TV mode: 352 • DVD mode: 229<br />
• VCR mode: 122 • SAT mode: 53 • AUDIO mode: 133<br />
• CD mode: 26<br />
Searching the Code Library (Program Code 9 9 1)<br />
1. Turn on the device.<br />
2. Press and hold SELECT and the appropriate mode key (CBL, TV, VCR, DVD, or<br />
AUX) until the mode keys blink twice. For example, to search for a TV code, press<br />
and hold SELECT and TV at the same time.<br />
Note: If you reassigned mode keys, you may, for example, press SELECT and VCR<br />
to search for a TV code to assign to the VCR mode key.<br />
3. Press 9 9 1. The mode key you selected in step 2 blinks twice.<br />
4. Point the remote toward the device, and press PLAY . The remote<br />
automatically tests each code in its library, beginning with the most common codes.<br />
The mode key blinks once each time the remote transmits a new code. All mode keys<br />
blink three times when it reaches the last code.<br />
5. As soon as the device powers off, press SELECT.<br />
6. Verify the new code is correct by pressing POWER.<br />
7. Did the device power on again?<br />
• If yes, press SELECT to assign the code.<br />
• If no, complete the following steps:<br />
a) Turn the device on.<br />
b) Press or to step forward or back to the correct code.<br />
c) When the device turns off, press SELECT to assign the code.<br />
8. Go to Which Code Worked to identify the code that controls your device. After you<br />
identify the code, record the code in the space provided on the cover of this guide.<br />
9
Which Code Worked?<br />
Find out which code programmed the mode key to control your device.<br />
Finding the Code That Worked (Program Code 9 9 0)<br />
1. Press and hold SELECT and the appropriate mode key (CBL, TV, VCR, DVD, or<br />
AUX) until all mode keys blink twice.<br />
2. Press 9 9 0. The mode key you selected in step 1 blinks twice.<br />
3. Press 1 and then count the number of times the mode key blinks. The number of<br />
blinks indicates the Þ rst digit in the code. For example, 4 blinks indicates the Þ rst<br />
digit in the code is 4. If the mode key does not blink, the digit is 0.<br />
4. Press 2 and then count the number of times the mode key blinks. This number<br />
indicates the second number in the code.<br />
5. Press 3 and then count the number of times the mode key blinks. This number<br />
indicates the third number in the code.<br />
6. Press 4 and then count the number of times the mode key blinks. This number<br />
indicates the fourth number in the code.<br />
10<br />
Note: After all four numbers in the code are identiÞ ed, all mode keys blink three<br />
times.<br />
7. Record the code in the space provided on the cover of this guide. You may need it<br />
again if the device code is accidentally erased.
Change Power <strong>Control</strong><br />
Your remote is originally programmed in one of the following ways:<br />
• The remote controls power for only one device at a time. For example, in CBL mode<br />
the POWER key controls the set-top only. However, in TV mode, the POWER key<br />
controls the TV only.<br />
• The remote controls power for either one device or for multiple devices at once, based<br />
on the selected mode. For example, in CBL mode, the POWER key controls both the<br />
set-top and the TV at the same time.<br />
Before you change how the power control functions, try your remote to see how the<br />
power control currently works. When trying out your remote, keep in mind that the<br />
remote provides a temporary override for power control. For example, if you press the<br />
TV key and then the POWER key within 3 seconds, the remote turns on the TV only,<br />
regardless of the programmed power settings. To see how the remote was originally<br />
programmed, wait at least 5 seconds before pressing the POWER key after you press any<br />
mode key.<br />
Does your remote already control power for your set-top and TV at the same time?<br />
If not, ScientiÞ c Atlanta strongly recommends that you program the remote to turn off<br />
the set-top each time you turn off your TV. Turning off the set-top is especially important<br />
for high-end set-tops that contain hard drives for recording and storing<br />
TV programs and movies. Not only will you reduce wear and tear from the hard disk<br />
spinning constantly, but you’ll also conserve electricity. As long as the set-top remains<br />
plugged in, the set-top will receive programming updates, and, if applicable, record<br />
programs and movies.<br />
<strong>Control</strong>ling Power for Multiple Devices at Once (Program Code 9 9 8)<br />
1. Press and hold SELECT and CBL until all mode keys blink twice.<br />
2. Press 9 9 8. The CBL key blinks twice.<br />
3. Press the mode key for the Þ rst device in the group of devices you want to power on<br />
and off at once. The CBL key blinks twice.<br />
4. Press the mode key for the second device in your power group. The CBL key blinks<br />
twice.<br />
5. If you want the remote to control power for 3 or 4 devices at once, press the mode<br />
keys for the next devices you want to add to the power group. The CBL key blinks<br />
twice after each mode key is pressed.<br />
6. Press SELECT to save your power settings. All mode keys blink three times.<br />
11
Want An Example?<br />
If you want to control power for the TV and the set-top at the same time, you would do<br />
the following:<br />
1. Press and hold SELECT and CBL until all mode keys blink twice.<br />
2. Press 9 9 8. The CBL key blinks twice.<br />
3. Press TV. The CBL key blinks twice.<br />
4. Press CBL. The CBL key blinks twice.<br />
5. Press SELECT. All mode keys blink three times.<br />
In this example, the remote will function in the following ways:<br />
• When you are in TV mode or CBL mode, the POWER key controls both the set-top<br />
and the TV.<br />
• When you are in VCR mode, the POWER key controls the VCR device only.<br />
• When you are in AUX mode, the POWER key controls the auxiliary device only.<br />
<strong>Control</strong>ling Power for One Device at a Time (Program Code 9 9 8)<br />
1. Press and hold SELECT and CBL until all mode keys blink twice.<br />
2. Press 9 9 8. The CBL key blinks twice.<br />
3. Press SELECT to save your power settings. All mode keys blink three times.<br />
After you select a mode, the POWER key controls the device assigned to that mode.<br />
For example, in TV mode, the remote controls power for the TV only.<br />
Important Power Tips<br />
• ScientiÞ c Atlanta strongly recommends that you program the remote to turn off the<br />
set-top each time you turn off your TV.<br />
• When you turn off the set-top using the remote control, you are actually putting the<br />
set-top into a power saving mode. As long as the set-top remains plugged in, it will<br />
continue to receive programming updates and, if applicable, record programs and<br />
movies.<br />
• If your POWER key controls multiple devices at once, the remote returns to the CBL<br />
mode after the devices are powered on or off.<br />
• If your POWER key controls multiple devices at once, you can override this setting<br />
by pressing the desired mode key and then pressing POWER within 3 seconds. For<br />
example, if you press the VCR key and then the POWER key within 3 seconds, the<br />
remote turns just the VCR on or off, regardless of the programmed power settings.<br />
12
Change Volume <strong>Control</strong><br />
Your remote is originally programmed in one of the following ways:<br />
• The remote controls volume for one device, such as your TV, whether the remote is<br />
in TV, VCR, DVD, or CBL mode. The AUX mode always retains separate volume<br />
control.<br />
• The remote controls volume for different devices, depending on the mode key you<br />
press. For example, in CBL mode, the volume keys control the set-top. However, in<br />
TV mode, the volume keys control the TV.<br />
Try your remote to see how the volume control currently works. The volume keys<br />
include , and MUTE. If you want to change the volume control, complete the<br />
procedure that Þ ts your needs.<br />
<strong>Control</strong>ling Volume for One Device (Program Code 9 9 3)<br />
Note: If you want to assign volume control to a ScientiÞ c Atlanta set-top, complete<br />
the following prerequisite steps. Press SETTINGS to access the General Settings<br />
on-screen menu. Then, verify that the Audio: Volume <strong>Control</strong> setting is set to Variable.<br />
1. Press and hold SELECT and CBL until all mode keys blink twice.<br />
2. Press 9 9 3. The CBL key blinks twice.<br />
3. Press the mode key for the device the volume keys should control. For example, if<br />
you want to control volume through your TV, press TV. All mode keys blink three<br />
times.<br />
Notes:<br />
• The volume keys control only one device whether you are in CBL, TV, DVD, or VCR<br />
mode.<br />
• In AUX mode, the remote always controls volume for the device assigned to the AUX<br />
key.<br />
<strong>Control</strong>ling Volume for Different Devices (Program Code 9 9 3)<br />
1. Press and hold SELECT and CBL until all mode keys blink twice.<br />
2. Press 9 9 3. The CBL key blinks twice.<br />
3. Press SELECT. All mode keys blink three times.<br />
Result: After you press SELECT, the volume keys control the device assigned to that<br />
mode. For example, in TV mode, the volume keys control volume for the TV only.<br />
13
Change Channel <strong>Control</strong><br />
Your remote is originally programmed in one of the following ways:<br />
• The remote controls channels for a single device, such as the set-top, whether the<br />
remote is in CBL, VCR, DVD, or TV mode. The AUX mode always retains separate<br />
channel control.<br />
• The remote controls channels for different devices, depending on the mode key you<br />
press.<br />
Try your remote to see how the channel control currently works. The channel keys<br />
include , , Digits 0-9, LAST, and FAV. If you want to change the channel<br />
control, complete the procedure that Þ ts your needs.<br />
Tip: Consider programming the remote to control channels for just the set-top to ensure<br />
you do not accidentally tune off the proper channel for the TV (usually channel<br />
3 or 4).<br />
<strong>Control</strong>ling Channels For One Device (Program Code 9 9 7)<br />
1. Press and hold SELECT and CBL until all mode keys blink twice.<br />
2. Press 9 9 7. The CBL key blinks twice.<br />
3. Press the mode key associated with the device you want the channel keys to control.<br />
For example, if you want to assign channel control to your TV only, press TV. All<br />
mode keys blink three times.<br />
Notes:<br />
• The channel keys now always control the device associated with the mode you<br />
selected in this step, whether in TV, CBL, DVD, or VCR mode.<br />
• In AUX mode, the remote always controls channels for the device assigned to the<br />
AUX key.<br />
<strong>Control</strong>ling Channels For Different Devices (Program Code 9 9 7)<br />
1. Press and hold SELECT and CBL until all mode keys blink twice.<br />
2. Press 9 9 7. The CBL key blinks twice.<br />
3. Press SELECT. All mode keys blink three times.<br />
Result: After you press SELECT, the channel keys now control the device associated<br />
with the mode key you select. For example, in TV mode, the channel keys control the<br />
TV, but in CBL mode, the channel keys control the set-top.<br />
14
Change VCR/VOD Programming<br />
Your remote is originally programmed in one of the following ways:<br />
• The Rewind, Play, Fast Forward, Stop, Pause, and Record keys (the transport keys)<br />
are programmed, by default, to transmit the codes for the Explorer ® 8000 series<br />
Home Entertainment Server video-on-demand (VOD) or digital video recorder (DVR)<br />
functions when in Cable (CBL) mode.<br />
• The transport keys control different devices, depending on the mode key you press.<br />
You can choose to override the default settings for the transport keys so that the<br />
transport keys operate a different device when you have selected CBL mode.<br />
Try your remote to see how the transport keys currently work. If you want to change the<br />
settings for the transport keys, complete the procedure that Þ ts your needs.<br />
Changing VCR/VOD Programming (Program Code 9 9 9)<br />
1. Press and hold CBL and SELECT until all mode keys blink twice.<br />
2. Press 9 9 9. The CBL key blinks twice.<br />
3. Press the mode key (VCR or DVD) associated with the device you want the transport<br />
keys to now control. All mode keys blink three times.<br />
Results:<br />
• The transport keys now always control the device associated with the mode you<br />
selected in this procedure (DVD or VCR).<br />
• Pressing PLAY starts the VCR, the DVD, or the device that has been<br />
reassigned to AUX.<br />
• In AUX mode, the remote always controls channels for the device assigned to the<br />
AUX key.<br />
Restoring Default VCR/VOD Settings (Program Code 9 9 9)<br />
1. Press and hold CBL and SELECT until all mode keys blink twice.<br />
2. Press 9 9 9. The CBL key blinks twice.<br />
3. Press CBL. All mode keys blink three times.<br />
Result: The transport keys are restored to their default settings.<br />
Example: Pressing PLAY in CBL mode starts the DVR.<br />
15
Put It Back the Way I Got It<br />
Return speciÞ c advanced functions or all advanced functions back to their original<br />
settings. Choose the procedure that Þ ts your needs.<br />
Important: Your service provider may have programmed the dual power control feature<br />
for your convenience. Therefore, if you reset the power control, you may need<br />
to program the remote to control the power for the set-top and TV at the same time.<br />
Resetting Mode Keys (Program Code 9 9 2)<br />
You can reprogram the VCR key and the AUX key to operate in their original modes.<br />
1. Press and hold CBL and SELECT until all mode keys blink twice.<br />
2. Press 9 9 2. The CBL key blinks twice.<br />
3. Do one of the following:<br />
• If you are returning the VCR key to its original state, press VCR twice.<br />
• If you are returning the AUX key to its original state, press AUX twice.<br />
Result: All mode keys blink three times.<br />
4. Repeat this procedure if you want to return both keys to their original modes.<br />
Resetting Device Codes and Mode Keys (Program Code 9 7 7)<br />
Follow this procedure to return programmed device codes and mode keys to their original<br />
settings. This procedure erases device codes you programmed. In addition, this procedure<br />
returns all reassigned mode keys to their original operation.<br />
This reset procedure does not reset any changes you made to power, volume, or channel<br />
control.<br />
1. Press and hold SELECT and CBL until all mode keys blink twice.<br />
2. Press 9 7 7. All mode keys blink three times. Then, after a few seconds the CBL key<br />
blinks twice.<br />
Resetting Power, Volume, and Channel <strong>Control</strong> (Program Code 9 8 0)<br />
Follow this procedure to return power, volume, and channel control to their original<br />
settings. This reset procedure does not reset any device codes you programmed or affect<br />
mode key reassignments.<br />
1. Press and hold SELECT and CBL until all mode keys blink twice.<br />
2. Press 9 8 0. All mode keys blink three times.<br />
Resetting All Changes (Program Code 9 8 1)<br />
Follow this procedure to return the remote completely back to its original settings.<br />
1. Press and hold SELECT and CBL until all mode keys blink twice.<br />
2. Press 9 8 1. All mode keys blink three times. Then, after a few seconds the CBL key<br />
blinks twice.<br />
16
Change On Demand Programming<br />
The OnDemand key on the remote allows you to select various On Demand control<br />
sequences. By default, the OnDemand key sends On Demand requests in CBL mode only.<br />
However, you can also program the OnDemand key on the remote to send out an additional<br />
three- or four-digit number key sequence in order to select a speciÞ c channel on your settop.<br />
The On Demand control function is only programmable in CBL mode and it can be<br />
programmed to support all of the set-tops listed in this guide.<br />
Programming an On Demand Channel (Program Code 9 9 6)<br />
1. Press and hold CBL and SELECT until all mode keys blink twice.<br />
2. Press 9 9 6. The CBL key blinks twice.<br />
3. Press the number keys you want to program in the correct sequential order as follows<br />
pausing between pressing each key:<br />
• 1st Number Key<br />
• 2nd Number Key<br />
• 3rd Number Key<br />
• 4th Number Key<br />
Important! Each key is conÞ rmed with two blinks of the key that you press. Wait until<br />
the key blinks twice before pressing the next key.<br />
Example 1: To program channel “1024” into the remote, complete steps 1 and 2 of the<br />
preceding procedure and then carefully press 1 0 2 4 waiting until each key blinks<br />
twice before pressing the next key. Then go to step 4 of this procedure.<br />
Example 2: To program channel “100” into the remote, complete steps 1 and 2 of the<br />
preceding procedure and then carefully press 1 0 0 waiting until each key blinks twice<br />
before pressing the next key. Then go to step 4 of this procedure.<br />
Notes:<br />
• If you make an error, (for example, you press a non-numeric or non-select key), the<br />
LED displays a long blink.<br />
• Choosing only one or only two keys or more than four keys also generates an error.<br />
4. Press SELECT to end the On Demand programming sequence. All LEDs blink three<br />
times.<br />
Note: If the operation fails, the remote displays a long blink. A long blink also indicates<br />
a timeout has occurred. Repeat the procedure from step 1.<br />
17
Restoring Default On Demand Settings (Program Code 9 9 6)<br />
1. Press and hold CBL and SELECT until all mode keys blink twice.<br />
2. Press 9 9 6. The CBL LED blinks twice.<br />
3. Press SELECT to reset the On Demand control to the default code.<br />
18<br />
Notes:<br />
• If the procedure is successful, all LEDs blink three times.<br />
• If you make an error or if the procedure does not work, the LED displays a long<br />
blink. A long blink also indicates a timeout has occurred. Repeat the procedure from<br />
step 1.<br />
• After restoring the default On Demand settings, the OnDemand key will only send<br />
On Demand code in CBL mode.
Code Tables<br />
If the remote does not recognize your device, you can Þ nd codes for your device by<br />
brand. With combination devices (such as a TV with a built-in DVD player), you have<br />
separate codes for each device component. Therefore, for ease of use, the combination<br />
device codes are listed Þ rst. All other code tables are organized by devices assigned to<br />
each mode (CBL, TV, VCR, DVD, AUX).<br />
Combination Device Codes<br />
If you have a combination device, you may need to reassign the AUX key to operate one<br />
of the devices. See Reassign Mode Keys for more information. The following tables<br />
provide some examples of combination devices. If your combination device is not listed,<br />
simply look for the codes for each separate device.<br />
CBL Group: Cable, HDTV Tuner, and Satellite Devices<br />
(Non-Responsive Mode 0254)<br />
Cable Codes<br />
ScientiÞ c Atlanta 0000, 0001, 0002,<br />
0003, 0004, 0005,<br />
0027, 0046<br />
ABC 0010, 0025, 0027,<br />
0040<br />
Adelphia 0046<br />
Antronix 0029, 0030<br />
Archer 0030<br />
Cable Vision 0047<br />
Cabletenna 0029<br />
Cableview 0028<br />
Clearmaster 0044<br />
ClearMax 0044<br />
Comcast 0048, 0049<br />
Coolmax 0044<br />
Eastern 0031<br />
GC Electronics 0030<br />
GE 0010, 0025<br />
Gemini 0011<br />
General Instruments 0010, 0025, 0041,<br />
0048<br />
Goldstar 0042<br />
Hamlin 0037<br />
Hitachi 0010, 0025<br />
Jerrold 0010, 0011, 0025,<br />
0032, 0040, 0041<br />
Magnavox 0033<br />
Memorex 0034<br />
Motorola 0007, 0045, 0049,<br />
0050, 0051<br />
Movie Time 0035<br />
Multitech 0044<br />
NEC 0026<br />
NSC 0035<br />
Panasonic 0039<br />
Philips 0033<br />
Pioneer 0009, 0036, 0042,<br />
0043<br />
Proscan 0010, 0025<br />
Radio Shack 0044<br />
RCA 0028 0039, 0041<br />
Cable Codes<br />
Regal 0037<br />
Realistic 0030<br />
Regency 0031<br />
Rembrandt 0010, 0025<br />
Samsung 0036, 0042<br />
Signal 0011<br />
Signature 0010, 0025<br />
Sony 0047<br />
Sprucer 0039<br />
Starcom 0011, 0040<br />
Stargate 0011<br />
Starquest 0011<br />
Supermax 0044<br />
Time Warner 0052<br />
Tocom 0032<br />
Tristar 0044<br />
Tusa 0011<br />
TV86 0035<br />
Unika 0029, 0030<br />
United Cable 0040<br />
Universal 0029, 0030<br />
V2 0044<br />
View Star 0033, 0035<br />
Viewmaster 0044<br />
Vision 0044<br />
Vortex View 0044<br />
Zenith 0038<br />
Cable/DVR Codes<br />
Comcast 0008<br />
Director 0053<br />
General Instrument 0053, 0057<br />
Jerrold 0053, 0057<br />
Motorola 0008, 0053, 0054,<br />
0057, 0058<br />
Pioneer 0055<br />
ScientiÞ c Atlanta 0055<br />
Supercable 0056<br />
DSL Decoder Code<br />
RCA 0091<br />
DTV Decoder Code<br />
Sharp 0090<br />
HDTV Tuner Codes<br />
Panasonic 0021<br />
Philips 0022<br />
RCA 0017<br />
Satellite Device Codes<br />
Alphastar 0066<br />
Chaparral 0059<br />
DIRECTV 0089<br />
DISH Network 0016<br />
Dishnet 0013, 0065<br />
Drake 0060<br />
Echostar 0014, 0070<br />
GE 0012<br />
General Instruments 0061<br />
Hitachi 0068<br />
Hughes 0015, 0077, 0079,<br />
0089<br />
Hughes Network 0071, 0089<br />
Systems<br />
JVC 0067<br />
LG 0086<br />
Mitsubishi 0077<br />
Pansat 0087<br />
Philips 0074<br />
Primestar 0064<br />
Proscan 0012, 0078<br />
RCA 0012, 0072, 0075,<br />
0076<br />
Realistic 0062<br />
Samsung 0080, 0084<br />
Sony 0019, 0020, 0073,<br />
0081, 0082, 0083<br />
Toshiba 0085<br />
Uniden 0063, 0069<br />
Viewsat 0088<br />
19
Satellite/DVR Codes<br />
Dish Network 0095, 0097, 0098,<br />
System 0099<br />
Dishpro 0097, 0099<br />
Echostar 0097, 0098, 0099<br />
Expressvu 0097<br />
GOI 0097<br />
HTS 0097<br />
TV Codes<br />
Abex 1138<br />
Acer 1318<br />
Admiral 1001, 1139, 1159<br />
Aiko 1014<br />
Aiwa 1352<br />
Akai 1002<br />
Alleron 1040<br />
Amtron 1034<br />
Anam National 1003, 1034<br />
AOC 1004, 1005, 1006,<br />
1007, 1140, 1141,<br />
1153<br />
Apex 1180, 1184, 1186,<br />
1252, 1264, 1347<br />
Audiovox 1034<br />
Belcor 1004<br />
Bell & Howell 1001, 1042, 1062<br />
Benq 1302, 1303<br />
Bradford 1034<br />
Brillan 1271<br />
Brockwood 1004<br />
Broksonic 1181, 1187<br />
Candle 1004, 1006, 1008<br />
Carver 1000<br />
Celebrity 1002<br />
Citizen 1004, 1006, 1008,<br />
1014, 1034, 1062,<br />
1087, 1137, 1160<br />
Colortyme 1004, 1006, 1009<br />
Concerto 1004, 1006<br />
Contec/Cony 1010, 1011, 1012,<br />
1034<br />
Craig 1034<br />
Crosley 1000<br />
Crown 1034<br />
Curtis Mathes 1000, 1004, 1006,<br />
1013, 1042, 1053,<br />
1062, 1087, 1137,<br />
1160<br />
CXC 1034<br />
Daewoo 1004, 1005, 1006,<br />
1014, 1015, 1016,<br />
1103, 1137, 1151,<br />
1223, 1253<br />
Daytron 1004, 1006, 1137<br />
Dimensia 1053<br />
Dumont 1004, 1122<br />
Electroband 1002<br />
Electrohome 1002, 1003, 1004,<br />
1006, 1017, 1018<br />
20<br />
Satellite/DVR Codes<br />
Hughes 0092<br />
JVC 0097, 0098<br />
Philips 0092<br />
RCA 0092, 0093<br />
Samsung 0092<br />
Sony 0094, 0096<br />
TV Group: TVs, LCD TVs, Plasma TVs, and HDTVs<br />
(Non-Responsive Mode 1254)<br />
TV Codes<br />
Emerson 1004, 1006, 1010,<br />
1019, 1020, 1021,<br />
1022, 1023, 1024,<br />
1025, 1026, 1027,<br />
1028, 1029, 1030,<br />
1031, 1032, 1033,<br />
1034, 1035, 1036,<br />
1037, 1038, 1039,<br />
1040, 1042, 1062,<br />
1101, 1137, 1142,<br />
1143, 1152, 1168,<br />
1253<br />
Envision 1004, 1006<br />
ESA 1293<br />
Fisher 1041, 1042, 1043,<br />
1062, 1144<br />
Fujitsu 1040, 1313, 1314,<br />
1315, 1316<br />
Funai 1034, 1040<br />
Futuretech 1034<br />
Gateway 1237<br />
GE 1003, 1004, 1006,<br />
1018, 1044, 1045,<br />
1046, 1053, 1072,<br />
1132, 1133, 1134,<br />
1145, 1161, 1244,<br />
1260, 1356,<br />
Gibralter 1004, 1048, 1122<br />
Goldstar 1004, 1005, 1006,<br />
1010, 1017, 1047,<br />
1048, 1049, 1126,<br />
1127, 1137, 1138<br />
Grunpy 1034, 1040<br />
Hallmark 1004, 1006<br />
Harvard 1034<br />
Hitachi 1004, 1006, 1010,<br />
1011, 1012, 1050,<br />
1051, 1052, 1109,<br />
1110, 1111, 1112,<br />
1113, 1114, 1115,<br />
1116, 1117, 1118,<br />
1119, 1120, 1121,<br />
1143, 1154, 1166,<br />
1169, 1193, 1236,<br />
1245, 1248, 1257,<br />
1331, 1339, 1340<br />
IMA 1034<br />
InÞ nity 1000<br />
JBL 1000<br />
Satellite Receiver/Recorder Codes<br />
Philips 0023<br />
Zenith 0024<br />
TV Codes<br />
JC Penney 1004, 1005, 1006,<br />
1008, 1011, 1018,<br />
1044, 1045, 1048,<br />
1049, 1053, 1061,<br />
1072, 1086, 1087,<br />
1104, 1137, 1138,<br />
1145<br />
JCB 1002<br />
Jensen 1004, 1006<br />
JVC 1010, 1011, 1012,<br />
1045, 1051, 1054,<br />
1055, 1056, 1128,<br />
1129, 1146, 1168,<br />
1175, 1194, 1335,<br />
1336, 1362<br />
Kawasho 1002, 1004, 1006<br />
Kenwood 1004, 1006, 1017<br />
Kloss Novabeam 1034, 1057, 1058<br />
KTV 1034, 1059, 1137,<br />
1142<br />
LG 1005,<br />
Logik 1001<br />
Luxman 1004, 1006<br />
LXI 1000, 1006, 1042,<br />
1053, 1060, 1061,<br />
1062, 1145<br />
Magnavox 1000, 1004, 1006,<br />
1008, 1017, 1057,<br />
1058, 1063, 1064,<br />
1065, 1073, 1106,<br />
1107, 1108, 1258,<br />
1300, 1323, 1360<br />
Majestic 1001<br />
Marantz 1000, 1004, 1006,<br />
1050, 1066, 1317<br />
Megatron 1006, 1050<br />
Memorex 1001, 1005, 1006,<br />
1042, 1062<br />
MGA 1004, 1005, 1006,<br />
1017, 1018, 1043,<br />
1067, 1068<br />
Midland 1045, 1046, 1122,<br />
1137, 1138, 1145<br />
Minutz 1044<br />
Mitsubishi 1004, 1005, 1006,<br />
1017, 1018, 1043,<br />
1067, 1068, 1069,<br />
1102, 1195, 1206,<br />
1207, 1208, 1209,<br />
1326<br />
Montgomery Ward 1001<br />
Motorola 1003, 1139<br />
MTC 1004 1005, 1006,<br />
1087
TV Codes<br />
Multitech 1034<br />
Multivision 1070<br />
NAD 1006, 1060, 1061,<br />
1147, 1166<br />
NEC 1003, 1004, 1005,<br />
1006, 1009, 1319<br />
Nikko 1006, 1014<br />
NET-TV 1304, 1309<br />
NTC 1014<br />
Onwa 1034<br />
Optimus 1147, 1166<br />
Optonica 1079, 1139<br />
Orion 1031, 1152<br />
Panasonic 1003, 1045, 1136,<br />
1162, 1179, 1188,<br />
1192, 1203, 1211,<br />
1221, 1238, 1243,<br />
1246, 1261, 1278,<br />
1279, 1320, 1329,<br />
1330, 1337, 1338,<br />
1350, 1357<br />
Philco 1000, 1003, 1004,<br />
1005, 1006, 1008,<br />
1010, 1017, 1057,<br />
1058, 1063, 1065<br />
Philips 1000, 1003, 1004,<br />
1008, 1010, 1017,<br />
1057, 1058, 1063,<br />
1071, 1072, 1073,<br />
1074, 1201, 1212,<br />
1249, 1256, 1292,<br />
1351, 1360<br />
Philips Magnavox 1249, 1258<br />
Pilot 1004, 1137<br />
Pioneer 1004, 1006, 1075,<br />
1076, 1143, 1147,<br />
1166, 1216, 1218,<br />
1234, 1262, 1266,<br />
1321<br />
Plasmsync 1317<br />
Polaroid 1285, 1289, 1290,<br />
1291<br />
Portland 1004, 1005, 1006,<br />
1014, 1137<br />
Price Club 1087<br />
Prism 1045<br />
Proscan 1053, 1145, 1260<br />
Proton 1004, 1006, 1010,<br />
1077<br />
Pulsar 1004, 1122<br />
Quasar 1003, 1045, 1059,<br />
1078, 1162, 1357<br />
Radio Shack 1042, 1062<br />
Radio Shack/ 1004, 1006, 1010,<br />
Realistic 1034, 1042, 1053,<br />
1062, 1079, 1137,<br />
1138<br />
RCA 1003, 1004, 1005,<br />
1006, 1007, 1017,<br />
1053, 1080, 1081,<br />
1082, 1083, 1084,<br />
1085, 1105, 1143,<br />
1145, 1148, 1149,<br />
1151, 1155, 1163,<br />
1167, 1170, 1182,<br />
1190, 1198, 1202,<br />
1215, 1240, 1250,<br />
1265, 1342, 1348,<br />
1359<br />
TV Codes<br />
Realistic 1042, 1062<br />
Runco 1122<br />
Sampo 1004, 1006, 1137,<br />
1138, 1191, 1220,<br />
1305<br />
Samsung 1004, 1005, 1006,<br />
1010, 1013, 1017,<br />
1086, 1087, 1088,<br />
1137, 1305, 1138,<br />
1156, 1178, 1232,<br />
1275, 1276, 1277,<br />
1281, 1282, 1287,<br />
1311, 1312, 1332,<br />
1353<br />
Sansui 1152, 1185<br />
Sanyo 1004, 1041, 1042,<br />
1062, 1068, 1089,<br />
1090, 1135, 1144<br />
Scotch 1006<br />
Scott 1004, 1006, 1010,<br />
1020, 1031, 1034,<br />
1040<br />
Sears 1000, 1004, 1006,<br />
1011, 1012, 1017,<br />
1040, 1041, 1042,<br />
1043, 1053, 1055,<br />
1060, 1061, 1062,<br />
1091, 1092, 1144,<br />
1145, 1150, 1271<br />
Sharp 1004, 1006, 1010,<br />
1022, 1025, 1079,<br />
1093, 1094, 1095,<br />
1100, 1137, 1139,<br />
1197, 1241, 1259,<br />
1269, 1272, 1273,<br />
1280, 1283, 1344,<br />
1354, 1367<br />
Shogun 1004<br />
Signature 1001<br />
Simpson 1008<br />
Sony 1002, 1157, 1164,<br />
1165, 1174, 1176,<br />
1177, 1225, 1227,<br />
1229, 1231, 1247,<br />
1251, 1263, 1268,<br />
1270, 1274, 1306,<br />
1307, 1308, 1310,<br />
1324, 1328, 1333,<br />
1341, 1361<br />
Soundesign 1004, 1006, 1008,<br />
1034, 1040<br />
Squareview 1150<br />
SSS 1004, 1034<br />
Starlite 1034<br />
Supreme 1002<br />
Sylvania 1000, 1004, 1006,<br />
1008, 1017, 1057,<br />
1058, 1063, 1064,<br />
1065, 1073, 1096,<br />
1131, 1189, 1293,<br />
1349, 1358, 1366<br />
Symphonic 1029, 1034, 1150<br />
Tandy 1139<br />
Tatung 1003<br />
Technics 1045<br />
Techwood 1004, 1006, 1045<br />
TV Codes<br />
Teknika 1000, 1001, 1004,<br />
1005, 1006, 1008,<br />
1010, 1011, 1012,<br />
1014, 1034, 1040,<br />
1064, 1087, 1136,<br />
1137, 1162<br />
Telecaption 1097<br />
Thomson 1171<br />
TMK 1004 1006<br />
Toshiba 1042, 1060, 1061,<br />
1062, 1087, 1091,<br />
1097, 1098, 1130,<br />
1131, 1172, 1173,<br />
1183, 1286, 1317,<br />
1325, 1327, 1334,<br />
1345, 1346, 1355,<br />
1364, 1365<br />
Totevision 1137<br />
Universal 1044, 1072,<br />
Victor 1055, 1146<br />
Vidikron 1000<br />
Vidtech 1004, 1005, 1006<br />
Viewsonic 1284, 1288, 1294,<br />
1295, 1296, 1297,<br />
1298, 1299, 1300,<br />
1301, 1309<br />
Wards 1000, 1001, 1004,<br />
1005, 1006, 1017,<br />
1020, 1029, 1040,<br />
1044, 1053, 1057,<br />
1058, 1063, 1064,<br />
1072, 1073, 1079,<br />
1099<br />
White Westinghouse 1253<br />
Yamaha 1004, 1005, 1006,<br />
1017<br />
Zenith 1001, 1004, 1122,<br />
1123, 1124, 1125,<br />
1158, 1225, 1233,<br />
1235, 1239, 1242,<br />
1267, 1322, 1343,<br />
1363<br />
21
VCR/DVR Group: DVR, VCR, and PVR Devices<br />
(Non-Responsive Mode 2254)<br />
DVR/PVR Codes<br />
ABS 2269<br />
Alienware 2269<br />
CyberPower 2269<br />
Dell 2269<br />
DIRECTV 2263, 2266<br />
Dishnetwork 2186<br />
Dish Network System 2264, 2265<br />
Dishpro 2264<br />
Echostar 2037, 2264, 2265<br />
Expressvu 2264<br />
Gateway 2269<br />
GOI 2264<br />
Hewlett Packard 2269<br />
Howard Computers 2269<br />
HP 2269<br />
HTS 2264<br />
Hughes Network 2263, 2266<br />
Systems<br />
Humax 2263<br />
Hush 2269<br />
iBUYPOWER 2269<br />
JVC 2264, 2265<br />
Linksys 2269<br />
Media Center PC 2269<br />
Microsoft 2269<br />
Mind 2269<br />
Niveus Media 2269<br />
Northgate 2269<br />
Panasonic 2261, 2262<br />
Philips 2036, 2185, 2187,<br />
2263, 2266<br />
RCA 2258<br />
Replay TV 2178, 2188, 2192,<br />
2260, 2262<br />
Sonic Blue 2262<br />
Sony 2189 2259, 2267,<br />
2268, 2269<br />
Stack 9 2269<br />
Systemax 2269<br />
Tagar Systems 2269<br />
Tivo 2177, 2258, 2263,<br />
2267, 2268<br />
Toshiba 2190, 2269<br />
Touch 2269<br />
Viewsonic 2269<br />
Voodoo 2269<br />
Zenith 2191<br />
ZT Group 2269<br />
22<br />
VCR Codes<br />
Admiral 2035, 2047<br />
Adventura 2017<br />
Aiko 2018<br />
Aiwa 2017<br />
Akai 2002, 2003, 2004,<br />
2031, 2032<br />
American High 2014<br />
Asha 2009<br />
Audio Dynamics 2005, 2006<br />
Audiovox 2010<br />
Beaumark 2008, 2009<br />
Bell & Howell 2007<br />
Broksonic 2008, 2179, 2236<br />
Calix 2010<br />
Candle 2009, 2010, 2011,<br />
2012, 2013, 2045<br />
Canon 2014, 2015<br />
Capehart 2030<br />
Carver 2000<br />
CCE 2018, 2024<br />
Citizen 2009, 2010, 2011,<br />
2012, 2013, 2018,<br />
2045<br />
Colortyme 2005<br />
Colt 2024<br />
Craig 2009, 2010, 2016,<br />
2024<br />
Curtis Mathes 2005, 2009, 2012,<br />
2013, 2014, 2015,<br />
2025, 2046<br />
Cybernex 2009<br />
Daewoo 2011, 2017, 2018,<br />
2030, 2045<br />
Daytron 2030<br />
DBX 2005, 2006<br />
Dimensia 2025, 2046<br />
Dynatech 2017<br />
Electrohome 2010, 2019<br />
Electrophonic 2010<br />
Emerson 2002, 2008, 2010,<br />
2011, 2014, 2017,<br />
2019, 2026, 2032<br />
Fisher 2007, 2016, 2020,<br />
2021<br />
Fuji 2003, 2014<br />
Funai 2017, 2213<br />
Garrard 2017<br />
GE 2001, 2009, 2014,<br />
2015, 2025, 2046,<br />
2243<br />
Go Video 2038, 2044, 2184<br />
Goldstar 2005, 2010, 2013<br />
Gradiente 2017<br />
Harley Davidson 2017<br />
Harman Kardon 2000, 2005<br />
Harwood 2024<br />
Headquarter 2007<br />
Hi-Q 2016<br />
Hitachi 2022, 2023, 2029,<br />
2031<br />
VCR Codes<br />
Instant Replay 2014<br />
JC Penney 2005, 2006, 2007,<br />
2008, 2009, 2010,<br />
2014, 2015, 2022,<br />
2023, 2024, 2029<br />
JCL 2014<br />
Jensen 2022, 2023, 2031<br />
JVC 2005, 2006, 2007,<br />
2013, 2031, 2033,<br />
2039, 2221, 2226,<br />
2234, 2250, 2270<br />
Kenwood 2005, 2006, 2007,<br />
2012, 2013, 2031,<br />
2033<br />
KLH 2024<br />
Kodak 2010, 2014<br />
LG 2010<br />
Lloyd’s 2017<br />
Logik 2024<br />
LXI 2010<br />
Maganvox 2247<br />
Magnavox 2000, 2014, 2015,<br />
2028, 2230<br />
Magnin 2010<br />
Marantz 2000, 2005, 2006,<br />
2007, 2012, 2013,<br />
2014<br />
Marta 2010<br />
Matsushita 2014<br />
MEI 2014<br />
Memorex 2007, 2009, 2010,<br />
2014, 2016, 2017,<br />
2028, 2035, 2047,<br />
2212<br />
MGA 2019, 2026, 2032<br />
MGN Technology 2009<br />
Minolta 2022, 2023, 2029<br />
Mitsubishi 2019, 2022, 2023,<br />
2026, 2032, 2033,<br />
2222<br />
Montgomery Ward 2035, 2047<br />
Motorola 2014, 2035, 2047<br />
MTC 2009<br />
Multitech 2009, 2012, 2017,<br />
2024<br />
NEC 2005, 2006, 2007,<br />
2012, 2013, 2031,<br />
2033<br />
Nikko 2010<br />
Noblex 2009<br />
Olympus 2014<br />
Optimus 2010, 2035, 2047<br />
Optonica 2027<br />
Orion 2212<br />
Panasonic 2014, 2015, 2180,<br />
2217, 2219, 2237,<br />
2244<br />
Pentax 2012, 2022, 2023,<br />
2029<br />
Pentex Research 2013<br />
Philco 2014, 2015
VCR Codes<br />
Philips 2000, 2014, 2027,<br />
2176, 2224, 2240,<br />
2247<br />
Philips Magnavox 2224<br />
Pilot 2010<br />
Pioneer 2006, 2022, 2033<br />
Portland 2012, 2030, 2045<br />
Proscan 2001, 2025, 2046<br />
Protec 2024<br />
Pulsar 2028<br />
Quarter 2007<br />
Quartz 2007<br />
Quasar 2014, 2015, 2248<br />
Radio Shack 2010, 2027, 2047<br />
Radio Shack/Realistic 2007, 2009, 2010,<br />
2014, 2015, 2016,<br />
2017, 2019, 2020,<br />
2021, 2027, 2035<br />
Radix 2010<br />
Randex 2010<br />
RCA 2001, 2002, 2009,<br />
2014, 2022, 2023,<br />
2025, 2029, 2040,<br />
2046, 2183, 2216,<br />
2233, 2246<br />
Realistic 2007, 2009, 2010,<br />
2011, 2014, 2015,<br />
2016, 2017, 2019,<br />
2020, 2021, 2027,<br />
2035, 2047<br />
Ricoh 2034<br />
Runco 2028<br />
Samsung 2004, 2009, 2011,<br />
2041, 2235, 2241<br />
Sanky 2028, 2035, 2047<br />
DVD Group: CD and DVD Devices<br />
(Non-Responsive Mode 2254)<br />
CD Codes<br />
ADC 2166<br />
Aiwa 2151<br />
Akai 2167<br />
BOSE 2208<br />
Emerson 2152<br />
Fisher 2153<br />
GE 2169<br />
Hitachi 2154<br />
JVC 2155<br />
Kenwood 2156<br />
Marantz 2158<br />
Mitsubishi 2170<br />
Nakamichi 2172<br />
NEC 2157<br />
Onkyo 2159<br />
Panasonic 2160<br />
Pioneer 2161<br />
RCA 2162<br />
Sanyo 2175<br />
Sears 2168<br />
Sherwood 2173<br />
VCR Codes<br />
Sansui 2006, 2031, 2033,<br />
2212<br />
Sanyo 2007, 2009, 2016,<br />
2042<br />
Scott 2008, 2011, 2026<br />
Sears 2007, 2010, 2014,<br />
2016, 2020, 2021,<br />
2022, 2023, 2029<br />
Sharp 2019, 2027, 2035,<br />
2045, 2047, 2218,<br />
2225, 2242, 2257<br />
Shintom 2003, 2023, 2024<br />
Shogun 2009<br />
Signature 2035, 2047<br />
Singer 2014, 2024, 2034<br />
Sony 2003, 2181, 2211,<br />
2214, 2220, 2223,<br />
2231, 2249<br />
STS 2014, 2029<br />
Sylvania 2000, 2014, 2015,<br />
2017, 2026, 2182,<br />
2245, 2256<br />
Symphonic 2017, 2213<br />
Tandy 2007<br />
Tashiko 2010<br />
Tatung 2031<br />
Teac 2017, 2031<br />
Technics 2014<br />
Teknika 2010, 2014, 2017<br />
TMK 2009<br />
Toshiba 2011, 2020, 2022,<br />
2026, 2032, 2228,<br />
2229, 2232, 2238,<br />
2239 2252, 2253<br />
Totevision 2009, 2010<br />
CD Codes<br />
Sony 2163<br />
Teac 2174<br />
Technics 2164<br />
Toshiba 2171<br />
Yamaha 2165<br />
DVD Codes<br />
Aiwa 2057, 2070, 2348<br />
Alpine 2071<br />
Apex 2068, 2069, 2072,<br />
2073, 2199, 2205,<br />
2273, 2277, 2291,<br />
2344<br />
Audiovox 2204<br />
BOSE 2140<br />
Broksonic 2074, 2148, 2338<br />
Clarion 2075<br />
Classic 2076<br />
Coby 2370<br />
Daewoo 2077, 2294<br />
VCR Codes<br />
Unitech 2009<br />
Vector Research 2005, 2006, 2011,<br />
2012<br />
Victor 2006<br />
Video Concepts 2005, 2006, 2011,<br />
2012, 2032<br />
Videosonic 2009<br />
Wards 2000, 2009, 2010,<br />
2011, 2014, 2016,<br />
2017, 2019, 2022,<br />
2023, 2024, 2027,<br />
2029, 2035, 2047<br />
White Westinghouse 2213<br />
XR-1000 2014, 2017, 2024<br />
Yamaha 2005, 2006, 2007,<br />
2013, 2031<br />
Zenith 2003, 2028, 2034,<br />
2043, 2227, 2251<br />
DVD/DVR Codes<br />
Pioneer 2328<br />
RCA 2329<br />
Toshiba 2330, 2331, 2332<br />
HTIB Codes<br />
Denon 2365<br />
JVC 2360, 2362, 2364<br />
Koss 2358<br />
Onkyo 2366<br />
Panasonic 2354, 2357<br />
Philips 2361<br />
Pioneer 2359<br />
Sanyo 2368<br />
Sony 2353, 2355, 2356,<br />
2363<br />
Toshiba 2367<br />
DVD Codes<br />
Denon 2078, 2079, 2080,<br />
2081, 2276, 2299,<br />
2300, 2302, 2303,<br />
2365<br />
Emerson 2082, 2083<br />
Fisher 2084<br />
Funai 2083<br />
GE 2048, 2085, 2086<br />
Go Video 2141, 2147<br />
GPX 2087<br />
Harman/Kardon 2304<br />
Hitachi 2056, 2088, 2089,<br />
2090, 2091<br />
JVC 2050, 2058, 2092,<br />
2142, 2283, 2292,<br />
2308, 2336, 2360,<br />
2362, 2364<br />
Kenwood 2093, 2305<br />
KLH 2295<br />
Konka 2059, 2060, 2194<br />
Koss 2206, 2358<br />
Lasonic 2197<br />
23
DVD Codes<br />
Magnavox 2051, 2094, 2195<br />
Marantz 2301, 2307<br />
Memorex 2095<br />
Mintek 2096<br />
Mitsubishi 2052, 2293<br />
NAD 2082<br />
Nakamichi 2097<br />
Norcent 2098, 2099, 2370,<br />
2306<br />
Onkyo 2100, 2298, 2366<br />
Oritron 2114<br />
Panasonic 2061, 2101, 2102,<br />
2103, 2104, 2105,<br />
2106, 2200, 2276,<br />
2278, 2339, 2347,<br />
2354, 2357<br />
Philips 2051, 2067, 2107,<br />
2290, 2296, 2310,<br />
2342, 2361<br />
Pioneer 2053, 2108, 2109,<br />
2110, 2111, 2285,<br />
2359<br />
Proscan 2048, 2112<br />
Qwestar 2113, 2114<br />
24<br />
DVD Codes<br />
RCA 2048, 2049, 2115,<br />
2143, 2149, 2202,<br />
2203, 2279, 2288,<br />
2289, 2312, 2335,<br />
2345<br />
Sampo 2116<br />
Samsung 2117, 2118, 2119,<br />
2144, 2286, 2337<br />
Sansui 2120, 2196<br />
Sanyo 2062, 2121, 2145,<br />
2368<br />
ScientiÞ c Atlanta 2209, 2210<br />
Sharp 2122, 2123, 2198,<br />
2309, 2352<br />
Sherwood 2124<br />
Shinco 2318<br />
Sony 2054, 2063, 2064,<br />
2125, 2126, 2127,<br />
2128, 2129, 2215,<br />
2274, 2275, 2280,<br />
2281, 2282, 2284,<br />
2287, 2313, 2316,<br />
2317, 2333, 2355,<br />
2356, 2363<br />
Sylvania 2083, 2201, 2296,<br />
2346, 2351<br />
DVD Codes<br />
Teac 2130<br />
Technics 2131<br />
Techwood 2132<br />
Toshiba 2055, 2065, 2133,<br />
2134, 2135, 2150,<br />
2207, 2272, 2311,<br />
2314, 2315, 2334,<br />
2340, 2341, 2343,<br />
2349, 2350, 2367<br />
Yamaha 2136, 2137, 2138<br />
Zenith 2066, 2139, 2146,<br />
2297<br />
DVD Recorder Codes<br />
Apex Digital 2327<br />
Panasonic 2322<br />
Philips 2319, 2321, 2324,<br />
2325<br />
Pioneer 2323<br />
Sony 2320<br />
Yamaha 2326<br />
Portable DVD Codes<br />
CyberHome 2271<br />
Panasonic 2080<br />
AUX Group: Receivers, AmpliÞ ers, Tuners, Home Theatre in a Box (HTIB)<br />
(Non-Responsive Mode 3254)<br />
AmpliÞ er Codes<br />
Magnavox 3115<br />
Marantz 3038<br />
Parasound 3042<br />
Pioneer 3036<br />
Rotel 3113<br />
Soundmatters 3041<br />
Yamaha 3037, 3039, 3040<br />
Audio Cassette Codes<br />
Magnavox 3115<br />
Marantz 3115<br />
Audio System Code<br />
Kenwood 3119<br />
Car Receiver/Tuner Code<br />
Pioneer 3048<br />
HTIB Codes<br />
Aiwa 3079<br />
BOSE 3033<br />
Denon 3107, 3171<br />
JBL 3027<br />
JVC 3028, 3127, 3129<br />
Koss 3026, 3125<br />
Onkyo 3029, 3084, 3132<br />
Panasonic 3030, 3121, 3124<br />
Philips 3025, 3128<br />
Pioneer 3031, 3126<br />
RCA 3024<br />
Sanyo 3047<br />
HTIB Codes<br />
Sony 3021, 3054, 3120,<br />
3122, 3123, 3130<br />
Toshiba 3046<br />
Phono Codes<br />
Magnavox 3115<br />
Marantz 3115<br />
Receiver Code<br />
Sanyo 3047<br />
Receiver/AmpliÞ er Codes<br />
Yamaha 3039, 3040<br />
Receiver/Tuner Codes<br />
Aiwa 3000, 3001, 3002,<br />
3003, 3004, 3014,<br />
3020, 3077, 3079<br />
BOSE 3033, 3034<br />
Carver 3000<br />
Denon 3035, 3043, 3044,<br />
3072, 3073, 3080,<br />
3081, 3085, 3087,<br />
3089, 3093, 3094,<br />
3095, 3096, 3097,<br />
3099, 3102, 3107,<br />
3108, 3109, 3131<br />
Harman/Kardon 3000, 3013, 3091<br />
JBL 3013<br />
Jensen 3114<br />
JVC 3005, 3070, 3127,<br />
3129<br />
Kenwood 3006, 3057, 3058,<br />
3059, 3062, 3069<br />
Receiver/Tuner Codes<br />
Linn 3000<br />
Magnavox 3000, 3115<br />
Marantz 3000, 3112, 3115<br />
Mitsubishi 3101, 3111<br />
Onkyo 3015, 3063, 3064,<br />
3066, 3068, 3075,<br />
3076, 3078, 3083,<br />
3084, 3086, 3088,<br />
3090, 3092, 3098,<br />
3100, 3103, 3104,<br />
3105, 3106, 3110,<br />
3132<br />
Panasonic 3016, 3017, 3082,<br />
3117, 3121, 3124<br />
Philips 3000, 3128<br />
Pioneer 3012, 3053, 3055,<br />
3056, 3065, 3126<br />
RCA 3007, 3022, 3023,<br />
3032<br />
Rotel 3113<br />
Sansui 3000<br />
Sherwood 3019<br />
Sony 3008, 3009, 3018,<br />
3049, 3050, 3051,<br />
3052, 3054, 3061,<br />
3120, 3130<br />
Technics 3016, 3017, 3071,<br />
3074<br />
Toshiba 3046<br />
Wards 3000, 3012<br />
Yamaha 3010, 3011, 3012,<br />
3039, 3040, 3045,<br />
3060, 3067<br />
Zenith 3116
Tuner Codes<br />
Kenwood 3119<br />
Koss 3125<br />
Panasonic 3118<br />
Sony 3122, 3123<br />
Combo Code Group: Combination Devices<br />
DVD/VCR Combo Codes<br />
VCR DVD<br />
Broksonic 2236 2338<br />
Go Video 2038 2141<br />
2044 2147<br />
JVC 2039 2142<br />
2234 2336<br />
2270 2193<br />
Panasonic 2237 2339<br />
Philips 2176 2369<br />
2240 2342<br />
RCA 2040 2143<br />
2233 2335<br />
Samsung 2041 2144<br />
2235 2337<br />
Sanyo 2042 2145<br />
Sony 2181 2215<br />
2231 2333<br />
Toshiba 2232 2334<br />
2238 2340<br />
2239 2341<br />
Zenith 2043 2146<br />
HTIB (Audio/DVD Combo) Codes<br />
Audio DVD<br />
BOSE 3033 2374<br />
3131 2365<br />
JBL 3027 2375<br />
JVC 3028 2360<br />
3127 2362<br />
3129 2364<br />
Koss 3026 2376<br />
3125 2358<br />
Onkyo 3029 2371<br />
3132 2366<br />
Panasonic 3030 2372<br />
3121 2354<br />
3124 2357<br />
Philips 3025 2377<br />
3128 2361<br />
Pioneer 3031 2373<br />
3126 2359<br />
RCA 3024 2378<br />
Sanyo 3047 2368<br />
Sony 3120 2353<br />
3122 2355<br />
3123 2356<br />
3130 2363<br />
Toshiba 3046 2367<br />
Tuner/CD Combo Codes<br />
BOSE 2208, 3034<br />
TV/DVD Combo Codes<br />
TV DVD<br />
Aiwa 1352 2348<br />
Apex 1347 2344<br />
Broksonic 1181 2148<br />
Philips 1351 2296<br />
RCA 1182 2149<br />
1348 2345<br />
Sansui 1185 2196<br />
Sylvania 1349 2346<br />
Toshiba 1183 2150<br />
1345 2343<br />
1346 2343<br />
TV/DVD/TUNER Combo Codes<br />
TV DVD Tuner<br />
Panasonic 1350 2347 3118<br />
TV/DVD/VCR Combo Codes<br />
TV DVD VCR<br />
Panasonic 1188 2200 2180<br />
RCA 1190 2202 2183<br />
Sharp 1367 2352 2257<br />
Sylvania 1189 2201 2182<br />
1366 2351 2256<br />
Toshiba 1364 2349 2252<br />
1365 2350 2253<br />
TV/VCR Combo Codes<br />
TV VCR<br />
Broksonic 1187 2179<br />
GE 1356 2243<br />
JVC 1362 2250<br />
Magnavox 1360 2247<br />
Philips 1360 2247<br />
Quasar 1357 2248<br />
RCA 1359 2246<br />
Samsung 1353 2241<br />
Sharp 1354 2242<br />
Sony 1361 2249<br />
Sylvania 1358 2245<br />
Toshiba 1355 2253<br />
Zenith 1363 2251<br />
TV/VCR/Tuner Combo Codes<br />
TV VCR Tuner<br />
Panasonic 1357 2244 3117<br />
25
FCC Compliance<br />
United States FCC Compliance<br />
This device has been tested and found to<br />
comply with the limits for a Class B digital<br />
device, pursuant to part 15 of the FCC<br />
Rules. These limits are designed to provide<br />
reasonable protection against such interference<br />
in a residential installation. This equipment<br />
generates, uses, and can radiate radio<br />
frequency energy. If not installed and used in<br />
accordance with the instructions, it may cause<br />
harmful interference to radio communications.<br />
However, there is no guarantee that interference<br />
will not occur in a particular installation. If this<br />
equipment does cause harmful interference<br />
to radio or television reception, which can be<br />
determined by turning the equipment OFF and<br />
ON, the user is encouraged to try to correct the<br />
interference by one or more of the following<br />
measures:<br />
• Reorient or relocate the receiving antenna, if<br />
applicable.<br />
• Increase the separation between the<br />
equipment and receiver.<br />
• Connect the equipment into an outlet on a<br />
circuit different from that to which the receiver<br />
is connected.<br />
• Consult the cable company or an experienced<br />
radio/television technician for help.<br />
Any changes or modiÞ cations not expressly<br />
approved by ScientiÞ c-Atlanta, Inc., could void<br />
the user’s authority to operate the equipment.<br />
The information shown in the FCC Declaration<br />
of Conformity paragraph below is a requirement<br />
of the FCC and is intended to supply you with<br />
information regarding the FCC approval of<br />
this device. The phone numbers listed are for<br />
FCC-related questions only and not intended<br />
for questions regarding the connection or<br />
operation for this device. Please contact your<br />
cable service provider for any questions you<br />
may have regarding the operation or installation<br />
of this device.<br />
26<br />
Declaration of Conformity<br />
This device complies with Part 15 of FCC<br />
Rules. Operation is subject to the following two<br />
conditions:<br />
1) the device may not cause harmful<br />
interference, and 2) the device must accept any<br />
interference received, including interference that<br />
may cause undesired operation.<br />
AT8560 AllTouch <strong>Remote</strong> <strong>Control</strong>, Rev A<br />
Model: AT8560<br />
Manufactured by: ScientiÞ c-Atlanta, Inc.;<br />
5030 Sugarloaf Parkway;<br />
Lawrenceville, Georgia 30044; USA<br />
Telephone 770-236-1077<br />
Canada EMI Regulation<br />
This Class B digital apparatus complies with<br />
Canadian ICES-003.<br />
Cet appareil numérique de la class B est<br />
conforme à la norme NMB-003 du Canada.<br />
20060628FDC