Top Gun Park Flite Rookie Reviewed in RCMW - CML Distribution
Top Gun Park Flite Rookie Reviewed in RCMW - CML Distribution
Top Gun Park Flite Rookie Reviewed in RCMW - CML Distribution
Create successful ePaper yourself
Turn your PDF publications into a flip-book with our unique Google optimized e-Paper software.
Author: DAVID BRIAN TOYER COOPER | | Photographs: DAVID BRIAN TOYER COOPER/TONY / VAN VAN GEFFEN<br />
ROOKIE RTF<br />
TRAINER<br />
Scan the QR CODE<br />
generated at BeQRious.com<br />
with a Smartphone to<br />
watch the video!<br />
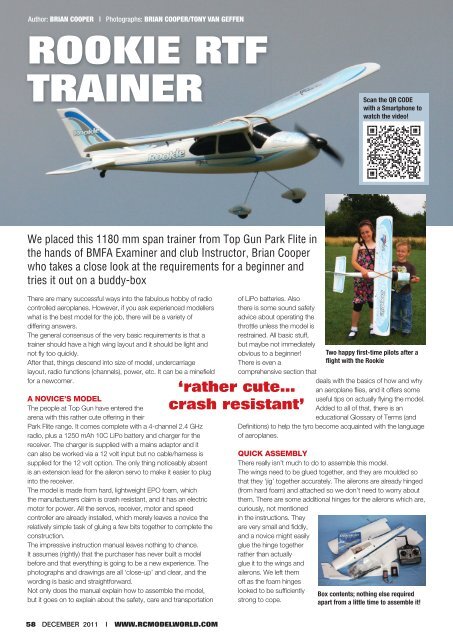
We placed this 1180 mm span tra<strong>in</strong>er from <strong>Top</strong> <strong>Gun</strong> <strong>Park</strong> <strong>Flite</strong> <strong>in</strong><br />
the hands of BMFA Exam<strong>in</strong>er and club Instructor, Brian Cooper<br />
who takes a close look at the requirements for a beg<strong>in</strong>ner and<br />
tries it out on a buddy-box<br />
There are many successful ways <strong>in</strong>to the fabulous hobby of radio<br />
controlled aeroplanes. However, if you ask experienced modellers<br />
what is the best model for the job, there will be a variety of<br />
differ<strong>in</strong>g answers.<br />
The general consensus of the very basic requirements is that a<br />
tra<strong>in</strong>er should have a high w<strong>in</strong>g layout and it should be light and<br />
not fl y too quickly.<br />
After that, th<strong>in</strong>gs descend <strong>in</strong>to size of model, undercarriage<br />
layout, radio functions (channels), power, etc. It can be a m<strong>in</strong>efi eld<br />
for a newcomer.<br />
A NOVICE’S MODEL<br />
The people at <strong>Top</strong> <strong>Gun</strong> have entered the<br />
arena with this rather cute offer<strong>in</strong>g <strong>in</strong> their<br />
<strong>Park</strong> <strong>Flite</strong> range. It comes complete with a 4-channel 2.4 GHz<br />
radio, plus a 1250 mAh 10C LiPo battery and charger for the<br />
receiver. The charger is supplied with a ma<strong>in</strong>s adaptor and it<br />
can also be worked via a 12 volt <strong>in</strong>put but no cable/harness is<br />
supplied for the 12 volt option. The only th<strong>in</strong>g noticeably absent<br />
is an extension lead for the aileron servo to make it easier to plug<br />
<strong>in</strong>to the receiver.<br />
The model is made from hard, lightweight EPO foam, which<br />
the manufacturers claim is crash resistant, and it has an electric<br />
motor for power. All the servos, receiver, motor and speed<br />
controller are already <strong>in</strong>stalled, which merely leaves a novice the<br />
relatively simple task of glu<strong>in</strong>g a few bits together to complete the<br />
construction.<br />
The impressive <strong>in</strong>struction manual leaves noth<strong>in</strong>g to chance.<br />
It assumes (rightly) that the purchaser has never built a model<br />
before and that everyth<strong>in</strong>g is go<strong>in</strong>g to be a new experience. The<br />
photographs and draw<strong>in</strong>gs are all ‘close-up’ and clear, and the<br />
word<strong>in</strong>g is basic and straightforward.<br />
Not only does the manual expla<strong>in</strong> how to assemble the model,<br />
but it goes on to expla<strong>in</strong> about the safety, care and transportation<br />
of LiPo batteries. Also<br />
there is some sound safety<br />
advice about operat<strong>in</strong>g the<br />
throttle unless the model is<br />
restra<strong>in</strong>ed. All basic stuff,<br />
but maybe not immediately<br />
obvious to a beg<strong>in</strong>ner!<br />
There is even a<br />
comprehensive section that<br />
‘rather cute…<br />
crash resistant’<br />
deals with the basics of how and why<br />
an aeroplane fl ies, and it offers some<br />
useful tips on actually fl y<strong>in</strong>g the model.<br />
Added to all of that, there is an<br />
educational Glossary of Terms (and<br />
Defi nitions) to help the tyro become acqua<strong>in</strong>ted with the language<br />
of aeroplanes.<br />
QUICK ASSEMBLY<br />
There really isn’t much to do to assemble this model.<br />
The w<strong>in</strong>gs need to be glued together, and they are moulded so<br />
that they ‘jig’ together accurately. The ailerons are already h<strong>in</strong>ged<br />
(from hard foam) and attached so we don’t need to worry about<br />
them. There are some additional h<strong>in</strong>ges for the ailerons which are,<br />
curiously, not mentioned<br />
<strong>in</strong> the <strong>in</strong>structions. They<br />
are very small and fi ddly,<br />
and a novice might easily<br />
glue the h<strong>in</strong>ge together<br />
rather than actually<br />
glue it to the w<strong>in</strong>gs and<br />
ailerons. We left them<br />
off as the foam h<strong>in</strong>ges<br />
looked to be suffi ciently<br />
strong to cope.<br />
Two happy first-time pilots after a<br />
flight with the <strong>Rookie</strong><br />
Box contents; noth<strong>in</strong>g else required<br />
apart from a little time to assemble it!<br />
58 DECEMBER 2011 | WWW.RCMODELWORLD.COM<br />
pp58-60_rookie RTF.<strong>in</strong>dd 58 1/11/11 14:45:50
PRODUCT REVIEW<br />
The stabiliser is glued <strong>in</strong>to the recess at the rear<br />
of the fuselage<br />
F<strong>in</strong> unit glues onto the tail seat and locks it all <strong>in</strong><br />
place<br />
Elevator and rudder pushrod lengths are<br />
adjustable for trimm<strong>in</strong>g<br />
The s<strong>in</strong>gle central aileron servo controls<br />
outboard dual cranks to the aileron control<br />
surfaces<br />
The only detail we need<br />
to concentrate on is<br />
thread<strong>in</strong>g the aileron<br />
pushrods <strong>in</strong>to the servo<br />
before fi nally br<strong>in</strong>g<strong>in</strong>g the two w<strong>in</strong>g halves together.<br />
The w<strong>in</strong>g is braced with a carbon tube spar, which is glued <strong>in</strong>to<br />
slots <strong>in</strong> the underside of the w<strong>in</strong>g.<br />
When the w<strong>in</strong>g is done, it can be fi tted to the fuselage, and it is<br />
then that we discover that the w<strong>in</strong>gs have mould<strong>in</strong>gs protrud<strong>in</strong>g<br />
on the underside, which ensures the w<strong>in</strong>g sits <strong>in</strong> exactly the right<br />
place; it is impossible to get it wrong!<br />
There is a plastic w<strong>in</strong>g-protector that goes on top of the w<strong>in</strong>g and<br />
helps to prevent the reta<strong>in</strong><strong>in</strong>g rubber bands from cutt<strong>in</strong>g <strong>in</strong>to the<br />
foam; very neat and very clever!<br />
The tailplane has similar ‘eng<strong>in</strong>eer<strong>in</strong>g’ to ensure it sits square to<br />
the w<strong>in</strong>g but it is advisable to ‘eyeball’ the th<strong>in</strong>g from the front to<br />
ensure that it lays level <strong>in</strong> relation to the w<strong>in</strong>gs.<br />
The fi n sits on top of the tailplane and this is the only component<br />
that could possibly be glued on a bit ‘wonky’; it needs to be<br />
upright and po<strong>in</strong>t<strong>in</strong>g absolutely straight down the centrel<strong>in</strong>e of<br />
the fuselage. The shape of the foam makes it obvious where it is<br />
supposed to be, but there is no ‘eng<strong>in</strong>eer<strong>in</strong>g’ to ensure its exact<br />
location and it is possible for the fi n to shift about before the glue<br />
takes effect.<br />
Aga<strong>in</strong>, the elevators and rudder are already attached courtesy of<br />
channels cut <strong>in</strong>to the hard foam. We need to attach the control<br />
horns and connect the control rods. The <strong>in</strong>structions expla<strong>in</strong> the<br />
control throws, etc.<br />
The (tail dragger) undercarriage is as simple as it gets. It is a s<strong>in</strong>gle<br />
piece of piano wire that has been bent to the right shape. It is<br />
held <strong>in</strong> place by simply push<strong>in</strong>g it <strong>in</strong>to a plastic ‘holder’ on the<br />
underside of the fuselage. It is quite hard to push it <strong>in</strong>, and it feels<br />
like it isn’t go<strong>in</strong>g to come out without a fi ght.<br />
The wheels are quite small and the undercarriage wire is a bit<br />
spr<strong>in</strong>gy, so operat<strong>in</strong>g from grass could be a challenge!<br />
The propeller and sp<strong>in</strong>ner simply fi t onto the threaded shaft of the<br />
Front battery access hatch removed to show<br />
the 180 Watt brushless ‘bell’ motor, and space<br />
provided<br />
‘elevators and rudder<br />
are already attached’<br />
The elevator and rudder servos are pre<strong>in</strong>stalled,<br />
with just a receiver to be added<br />
motor; very simple and easy.<br />
The last job, and probably the most<br />
daunt<strong>in</strong>g task for a beg<strong>in</strong>ner, is to fi t<br />
the enormous decals that decorate the<br />
model. The colour scheme is unusual and has the appearance<br />
of hav<strong>in</strong>g been scribbled on by a young child. Whilst this might<br />
sound a bit ‘off-putt<strong>in</strong>g’ the fi nished result actually works quite<br />
well.<br />
The decals are giant stickers, and some care is required to apply<br />
them without gett<strong>in</strong>g wr<strong>in</strong>kles <strong>in</strong> them.<br />
ROOKIE POWER<br />
The supplied LiPo battery lives under the ‘bonnet’ <strong>in</strong> front of the<br />
w<strong>in</strong>dscreen, and it (the bonnet) is held <strong>in</strong> place by a couple of<br />
small magnets.<br />
The <strong>in</strong>structions show where the balance po<strong>in</strong>t (Centre of Gravity)<br />
is located and it came out spot on. It was then discovered that<br />
there was a small amount of ballast weight already glued <strong>in</strong>to the<br />
nose. The manufacturers have left noth<strong>in</strong>g to chance here!<br />
The supplied radio transmitter is very basic, but it does the<br />
job. It has a switch and a knob that gives the transmitter the<br />
appearance of a 6-channel radio but it is only a 4-channel one.<br />
The extra switch is a useful safety ‘arm<strong>in</strong>g’ switch for the electric<br />
motor. The knob allows the ailerons and elevator throw to be<br />
adjusted <strong>in</strong> fl ight. If it feels too responsive, it can be turned down,<br />
and vice-versa.<br />
The only th<strong>in</strong>g miss<strong>in</strong>g is the option for a buddy-box. A buddybox<br />
(dual control) system is generally regarded as the norm for<br />
tra<strong>in</strong><strong>in</strong>g beg<strong>in</strong>ners to the hobby these days, but it can still be done<br />
without if needs be.<br />
LET’S GO FLYING!<br />
This is a fairly small model and it is extremely light so we waited<br />
for a day when the w<strong>in</strong>d had died down to about 5 mph before<br />
send<strong>in</strong>g the <strong>Rookie</strong> <strong>in</strong>to the sky.<br />
The grass at the club fi eld is short but it was still too much for<br />
WWW.RCMODELWORLD.COM | DECEMBER 2011<br />
59<br />
pp58-60_rookie RTF.<strong>in</strong>dd 59 1/11/11 14:46:42
ROOKIE Author: DAVID RTF TRAINER TOYER | Photographs: DAVID TOYER / TONY VAN GEFFEN<br />
An 11.1 Volt 1250 mA LiPo is supplied with a basic<br />
2-3 LiPo cell balance charger<br />
the undercarriage on the <strong>Rookie</strong>, so we had to hand-launch the<br />
model; no problem really. The motor was sent up to full power<br />
and the model was given a gentle throw <strong>in</strong>to the w<strong>in</strong>d.<br />
It began to climb away immediately and it was clearly happy be<strong>in</strong>g<br />
off the ground. The speed was slow and the control responses<br />
were <strong>in</strong> keep<strong>in</strong>g with a tra<strong>in</strong><strong>in</strong>g aeroplane of this size and type.<br />
It was very easy to control and the little <strong>Rookie</strong> gave plenty of<br />
th<strong>in</strong>k<strong>in</strong>g time dur<strong>in</strong>g turns, etc.<br />
It was deliberately fl own ‘badly’ to see what would happen and<br />
yes, it started to fall from the sky but, the speed at which it did it<br />
left plenty of time to correct it.<br />
The stall is virtually non-existent. The power was reduced to zero<br />
and the elevator gradually <strong>in</strong>creased to full up, but the model is so<br />
light, it just stops mov<strong>in</strong>g forward and then sits there wonder<strong>in</strong>g<br />
what to do next. Eventually, it beg<strong>in</strong>s to gently descend to earth,<br />
a bit like a harrier manoeuvre from a 3-D model, but a lot more<br />
gentle, and slow, and forgiv<strong>in</strong>g.<br />
This aeroplane is as un<strong>in</strong>timidat<strong>in</strong>g as it gets. It won’t do aileron<br />
rolls, ma<strong>in</strong>ly because the roll rate is not suffi ciently fast enough to<br />
accomplish the manoeuvre, but also because the ailerons seem<br />
to become totally <strong>in</strong>effective when the model becomes <strong>in</strong>verted.<br />
Hav<strong>in</strong>g said that, it WILL roll if the rudder is used as well, and a<br />
high entry speed is used.<br />
It is decidedly unhappy about fl y<strong>in</strong>g <strong>in</strong>verted. As mentioned earlier,<br />
the ailerons die when the model is upside down but there is also<br />
<strong>in</strong>suffi cient elevator power to hold the nose up. It will not sp<strong>in</strong>,<br />
ma<strong>in</strong>ly due to the fact that the model is too gentle at the stall.<br />
However, it can do loops.<br />
What this model does, and does quite well, is simply fl y around<br />
gently and <strong>in</strong> an unhurried state, and teaches the tyro pilot the<br />
basics of keep<strong>in</strong>g an aeroplane <strong>in</strong> the air.<br />
Land<strong>in</strong>g it is, as one would expect, a fairly straightforward affair.<br />
The power is reduced, and the model simply beg<strong>in</strong>s to gently<br />
glide down to the ground. We merely have to steer it to a chosen<br />
touchdown po<strong>in</strong>t.<br />
The undercarriage tends to dig <strong>in</strong> when the model lands and it<br />
br<strong>in</strong>gs the <strong>Rookie</strong> to a rather sudden stop, but the land<strong>in</strong>g speed<br />
is so low that it doesn’t cause any grief, it just looks a bit untidy.<br />
The <strong>Rookie</strong> is an ideal package for a<br />
beg<strong>in</strong>ner as it comes complete with a 2.4<br />
GHz transmitter<br />
A gentle push from a hand launch and the<br />
<strong>Rookie</strong> gets away nicely<br />
‘control responses were <strong>in</strong> keep<strong>in</strong>g with a<br />
tra<strong>in</strong><strong>in</strong>g aeroplane’<br />
I let some kids fl y it: these kids literally had only experienced a<br />
couple of goes on my larger tra<strong>in</strong>ers, and they were by no means<br />
‘ace’ pilots. They all managed to get on OK with the <strong>Rookie</strong>, even<br />
without a buddy-box, although the Tx had to be grabbed back a<br />
few times. They all said it was good fun!<br />
The model (package) has now been given away to the fi rst kid <strong>in</strong><br />
my area who showed a genu<strong>in</strong>e <strong>in</strong>terest <strong>in</strong> want<strong>in</strong>g to learn to fl y<br />
R/C models, and he has progressed well with it. <strong>RCMW</strong><br />
SPECIFICATION<br />
INFORMATION<br />
NAME:<br />
<strong>Rookie</strong> RTF Tra<strong>in</strong>er<br />
MANUFACTURER: <strong>Top</strong> <strong>Gun</strong> <strong>Park</strong> <strong>Flite</strong> Aircraft<br />
DISTRIBUTOR: <strong>CML</strong> <strong>Distribution</strong> Ltd<br />
PRICE UK: £133.19 (Mode 1 or Mode 2)<br />
MODEL TYPE: Electric Tra<strong>in</strong>er<br />
MOTOR:<br />
180 Watt Brushless ‘bell’ outrunner<br />
FLIGHT BATTERY: 3S 1250 mAh 3-cell LiPo (with charger)<br />
CONSTRUCTION: Moulded <strong>in</strong> durable EPO foam<br />
R/C FUNCTIONS<br />
Radio: 2.4 GHz, 4-channel (supplied)<br />
Three R/C 9 g FUNCTIONS<br />
servos fitted<br />
1: Ailerons<br />
2: Elevator<br />
SPECS<br />
WINGSPAN: 1180 mm (46½")<br />
WING AREA: 310 sq <strong>in</strong> (2.15 sq ft)<br />
WING LOADING: 10 oz/ sq ft<br />
LENGTH: 890 mm (35")<br />
WEIGHT: 21 oz (580 g) with LiPo battery<br />
DISLIKES<br />
• Flimsy wire undercarriage<br />
LIKES<br />
• Well manufactured<br />
• Scale appearance<br />
• Easy assembly<br />
• Very stable <strong>in</strong> flight<br />
• Perfect package for a novice pilot<br />
3: Throttle (ESC)<br />
4: Rudder<br />
SUMMING UP<br />
This is a model for calm days only. It is doubtful that it can handle<br />
w<strong>in</strong>ds above 10 mph. But it is a delightful and unassum<strong>in</strong>g little<br />
aeroplane on calm days. On warm days, it can catch a thermal<br />
and climb to the heavens. Without thermals, the model was<br />
landed after 8 m<strong>in</strong>utes and the 1250 mAh LiPo battery still had<br />
plenty of life left <strong>in</strong> it.<br />
CONTACTS<br />
<strong>CML</strong> DISTRIBUTION LTD<br />
WWW.<strong>CML</strong>DISTRIBUTION.CO.UK<br />
01527 575349<br />
WATCH THE VIDEO<br />
WWW.YOUTUBE.COM/WATCHV=6HLICHIWU90&FEAT<br />
URE=PLAYER_EMBEDDED#T=9S<br />
60 DECEMBER 2011 | WWW.RCMODELWORLD.COM<br />
pp58-60_rookie RTF.<strong>in</strong>dd 60 1/11/11 14:47:22


