create your style magazine poseidon reef bracelet - Beads Direct
create your style magazine poseidon reef bracelet - Beads Direct
create your style magazine poseidon reef bracelet - Beads Direct

You also want an ePaper? Increase the reach of your titles
YUMPU automatically turns print PDFs into web optimized ePapers that Google loves.
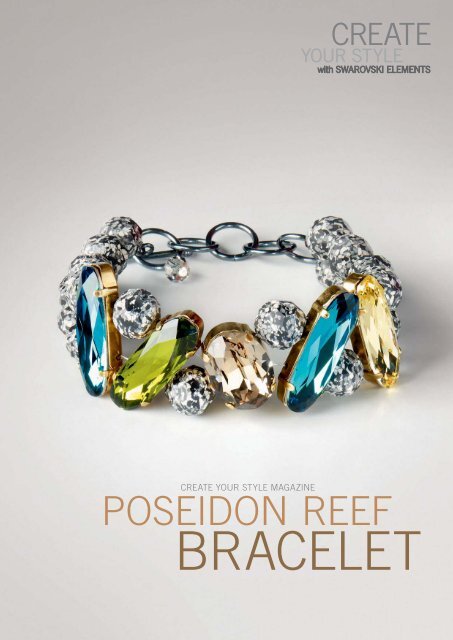
CREATE YOUR STYLE MAGAZINE<br />
POSEIDON REEF<br />
BRACELET
Stringing<br />
POSEIDON REEF BRACELET<br />
SWAROVSKI ELEMENTS<br />
Article Product Group Article No. Amount Size Color Color Code<br />
Fancy Stones 4120 1 pc. 18 x 13 mm Greige F 284<br />
Fancy Stones 4161 2 pcs. 27 x 9 mm Indicolite F 379<br />
Fancy Stones 4161 1 pc. 27 x 9 mm Jonquil F 213<br />
Fancy Stones 4161 1 pc. 27 x 9 mm Olivine F 228<br />
<strong>Beads</strong> 5000 1 pc. 6 mm Greige 284<br />
<strong>Beads</strong> 5000/B 20 pcs. 10 mm Marbled Black 653<br />
Supplies & Tools<br />
Supplies<br />
12x Crimping Bead, black, 2 mm,<br />
2x Crimping tube, black, 1 mm<br />
French wire, black, 2 cm<br />
1x Headpin, Silver<br />
1x Jump ring, black, 5 mm<br />
1x Jump ring, black, 6 mm<br />
5x Jump ring, black, 12 mm<br />
1x Setting: 4120/S H20,<br />
18 x 13 mm<br />
4x Setting: 4161/S H20,<br />
27 x 9 mm<br />
1x T clasp, black, 22 mm<br />
Tiger tail, gray, 0.3 mm, 70 cm<br />
Tools<br />
Chain nose pliers<br />
Crimping pliers<br />
Flat nose pliers<br />
Round nose pliers<br />
Side cutter<br />
Tweezers<br />
Level of design: INTERMEDIATE<br />
Have also a look at the text instruction at the last page!<br />
STEP 1<br />
Step 1<br />
Repeat:<br />
x3<br />
WWW.CREATE-YOUR-STYLE.COM<br />
2 /8
STEP 2<br />
Step 2<br />
0.3 mm<br />
35 cm x2<br />
STEP 3<br />
Step 3<br />
WWW.CREATE-YOUR-STYLE.COM<br />
3 /8
STEP 4<br />
Step 4<br />
0.5 cm x4<br />
3<br />
1/2<br />
1 2 3<br />
STEP 5<br />
Step 5<br />
Repeat step 4:<br />
WWW.CREATE-YOUR-STYLE.COM<br />
4 /8
3<br />
1/2<br />
1 2 3<br />
Repeat step:<br />
STEP 6<br />
Step 6<br />
WWW.CREATE-YOUR-STYLE.COM<br />
5 /8
STEP 7<br />
Step 7<br />
STEP 8<br />
WWW.CREATE-YOUR-STYLE.COM<br />
6 /8
STEP 9<br />
Step 9<br />
WWW.CREATE-YOUR-STYLE.COM<br />
7 /8
CREATE YOUR STYLE with SWAROVSKI ELEMENTS Magazine<br />
Poseidon Reef Bracelet<br />
STEP 1:<br />
STEP 2:<br />
STEP 3:<br />
STEP 4:<br />
STEP 5:<br />
STEP 6:<br />
STEP 7:<br />
STEP 8:<br />
STEP 9:<br />
Place the Fancy Stones from the SWAROVSKI ELEMENTS assortment into the settings and press the prongs<br />
gently with the tweezers so that the crystals are secure.<br />
Cut two 35 cm pieces of the tiger tail and string on the SWAROVSKI ELEMENTS you see in the illustration.<br />
Don’t go through the last hole of the fi rst and last setting. The crystals should be positioned in the middle of<br />
the tiger tail. Turn the <strong>bracelet</strong> over, slide a big Crimping Bead onto each end on the right side and fl atten the<br />
<strong>Beads</strong> with the chain nose pliers as shown in the illustration.<br />
Slide a small crimping tube, then a large Crimping Bead onto each end on the left side of <strong>bracelet</strong>. Push the<br />
small crimping tube slightly – it should be so fl at that you can put it under the metal of the setting as a space<br />
keeper – it shouldn’t be fi xed! Pull tight so that the Crimping <strong>Beads</strong> on the right side are also under the metal<br />
of the settings – then pull very tight, so that there is nearly no space between the settings as depicted in the<br />
illustration and fi x the <strong>bracelet</strong> by fl attening the larger Crimping <strong>Beads</strong> on the left side. Finally, string the tiger<br />
tail ends through the last hole of the fi rst and last setting. Turn the <strong>bracelet</strong> over and slide on the Swarovski<br />
Ceramic Bead art. 5000/B 10 mm Marbled Ivory as shown in the illustration.<br />
Cut four 0.5 cm pieces of French wire. Slide three Crimping <strong>Beads</strong> onto the shorter wire end on the right side,<br />
then slide on the French wire. Go through a 12 mm jump ring, back through the Crimping <strong>Beads</strong> and the last<br />
Swarovski Ceramic Bead. Pull tight and crimp the crimping tube as you see in the illustration. (Just crimp the<br />
Bead directly before the French wire – because the other two Crimping <strong>Beads</strong> are just space keepers, so the<br />
length of the wire on both ends will be the same.<br />
Repeat step 4 with the short string on the left side, using a 6 mm jump ring. On the shorter wire on the right<br />
side use just one crimping tube and the French wire. Then string the tiger tail through the 12 mm jump ring,<br />
back through the Crimping Bead and through the last three Swarovski Ceramic <strong>Beads</strong>, pull tight and crimp the<br />
Crimping Bead correctly as shown in the illustration. Finally, repeat this step with the remaining wire as shown<br />
in the illustration (you will be using just one crimping tube and the French wire and you will string the wire through<br />
the 6 mm jump ring).<br />
Open the 5 mm jump ring with the flat nose pliers, attach it onto the T clasp and close it over the 6 mm jump<br />
ring of the <strong>bracelet</strong> as you see in the illustration.<br />
Attach the remaining 12 mm jump rings onto the right side of the <strong>bracelet</strong> as shown in the illustration. Open and<br />
close the jump rings sideways with the flat nose pliers.<br />
Slide the Swarovski Bead art. 5000 Greige onto the headpin and bend the headpin with the flat nose pliers at a<br />
90 degree angle after the Bead. Form a loop with the round nose pliers; wrap the wire back twice as shown in<br />
the illustration and cut off any excess headpin wire.<br />
Open the last 12 mm jump ring of the extension chain, attach the beaded headpin and close the jump ring.<br />
WWW.CREATE-YOUR-STYLE.COM<br />
8 /8