Kaide KK-9502L Operating Instructions - BCL - SWL
Kaide KK-9502L Operating Instructions - BCL - SWL
Kaide KK-9502L Operating Instructions - BCL - SWL

Create successful ePaper yourself
Turn your PDF publications into a flip-book with our unique Google optimized e-Paper software.
<strong>Kaide</strong> <strong>KK</strong>-<strong>9502L</strong> <strong>Operating</strong> <strong>Instructions</strong><br />
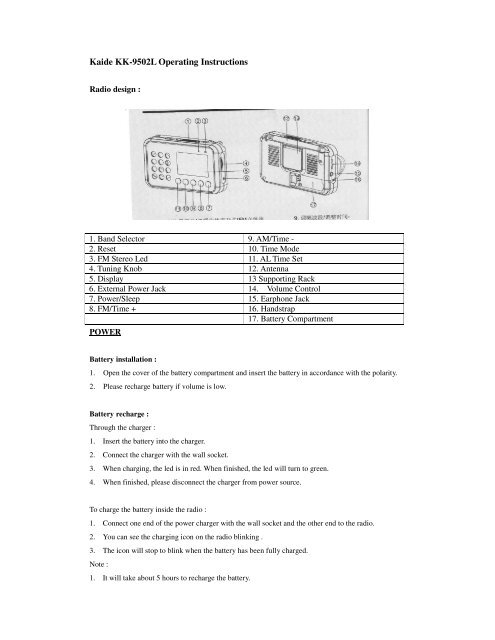
Radio design :<br />
1. Band Selector 9. AM/Time -<br />
2. Reset 10. Time Mode<br />
3. FM Stereo Led 11. AL Time Set<br />
4. Tuning Knob 12. Antenna<br />
5. Display 13 Supporting Rack<br />
6. External Power Jack 14. Volume Control<br />
7. Power/Sleep 15. Earphone Jack<br />
8. FM/Time + 16. Handstrap<br />
17. Battery Compartment<br />
POWER<br />
Battery installation :<br />
1. Open the cover of the battery compartment and insert the battery in accordance with the polarity.<br />
2. Please recharge battery if volume is low.<br />
Battery recharge :<br />
Through the charger :<br />
1. Insert the battery into the charger.<br />
2. Connect the charger with the wall socket.<br />
3. When charging, the led is in red. When finished, the led will turn to green.<br />
4. When finished, please disconnect the charger from power source.<br />
To charge the battery inside the radio :<br />
1. Connect one end of the power charger with the wall socket and the other end to the radio.<br />
2. You can see the charging icon on the radio blinking .<br />
3. The icon will stop to blink when the battery has been fully charged.<br />
Note :<br />
1. It will take about 5 hours to recharge the battery.
2. You cannot listen to the radio if you are charging the battery inside the radio.<br />
3. The charger works for battery recharge only. It cannot provide external power to the radio.<br />
RADIO LISTENING<br />
Power on/off :<br />
Short press the Power/Sleep button (7)to turn on the radio. You can turn off the radio by pressing the<br />
same button.<br />
Volume control :<br />
Under the radio mode, you can adjust the volume through the volume tuning knob (14).<br />
Band selection:<br />
Under the radio mode, press the FM (8) button to receive FM stations. Press the AM (9) button to<br />
receive AM stations. Then choose AM, SW 1-7 with the Band Selector (1).<br />
Search station :<br />
When you have selected the band, you can manual search the radio with the tuning knob (4) . You can<br />
watch the tuning icon on the display to assist the tuning.<br />
FM stereo:<br />
1. You can enjoy stereo FM reception with earphones.<br />
2. Move the Band Selector (1) to the FM Stereo position (right most) for stereo reception. The led<br />
indicator will turn on.<br />
3. You can turn to FM Mono (left most) by moving the Band Selector (1) also.<br />
Reset :<br />
You may need to use a needle to press the Reset (2) button if you encounter the following situations.<br />
1. The screen does not have any display.<br />
2. Buttons do not work.<br />
Backlight :<br />
You can press any key to turn on the backlight. It will stay on for a few seconds.<br />
USE OF ANTENNA<br />
1. AM : The built-in magnetic antenna inside the radio is used. Rotate body to get best reception.<br />
2. FM : Extend the antenna. Try different angles to get the best reception<br />
3. SW : Extend the antenna. Make the antenna vertical.
TIME SETTING<br />
The radio takes 24 hours system.<br />
1. Under the radio off mode, press the AL. Time Set (11) to cancel it if you see the alarm icon<br />
appeared on the display. (You can not set the clock if the alarm function has been turned on.)<br />
2. Press the Time Mode (10) button once, you will see the hour digit blinking. Press the Time+ (8) or<br />
the Time – (9) to adjust the hour.<br />
3. Press the Time Mode (10) again . You will see the minute digit blinking. Press the Time + (8) or<br />
the Time -(9) to adjust the minute.<br />
CALENDAR<br />
Year set :<br />
1. Press the Time Mode (10) button three times, you will see the Year blinking.<br />
2. Press the Time + (8) or the Time – (9) to set the year.<br />
Month set :<br />
1. Press the Time Mode (10) the fourth time, you will see the Month blinking.<br />
2. Press the Time + (8) or the Time – (9) to set the month.<br />
Day set :<br />
1. Press the Time Mode (10) the fifth time, you will see the Day blinking.<br />
2. Press the Time + (8) or the Time – (9) to set the day.<br />
WAKE-TO-RADIO<br />
Alarm time set :<br />
1. Under radio off mode, press the AL Time Set (11) button. You will see the alarm icon.<br />
2. Press the Time Mode (10) once. The hour digit will blink. Press the Time + (8) or the Time – (9) to<br />
adjust the hour.<br />
3. Press the Time Mode (10) second time. The minute digit will blink. Press the Time + (8) or the<br />
Time – (9) button to adjust the minute.<br />
Alarm on/off :<br />
1. Under radio off mode, press the AL Time Set (11) button. You will see the alarm icon.<br />
2. The radio will automatically turn on at the preset time.
3. The radio will automatically turn off in 90 minutes operation. You may turn off the radio anytime<br />
by press the Power button.<br />
SLEEP FUNCTION<br />
1. Under the radio off mode , long press Power/Sleep (7) button to turn on the radio. The sleep icon<br />
and “90” min will appear.<br />
2. Press Power/Sleep (11) button to adjust the sleep time in the following order :<br />
90-80-70-60-50-40-30-20-10- 0(cancel) . The radio will shut off at the preset time.<br />
3. You can turn off the radio by press the Power/Sleep (7) button if you would like to turn off the<br />
radio earlier.<br />
SPECIFICATIONS<br />
1. Frequency Range<br />
o FM 70 -108 MHz<br />
o AM 526.50 – 1606.5 KHz<br />
o SW 5.95 – 17.90 MHz<br />
2. SW Meter Ban<br />
o SW1 5.95-6.20 MHz<br />
o SW2 7.10 – 7.30 MHz<br />
o SW3 9.50 – 9.90 MHz<br />
o SW4 11.65-12.05 MHz<br />
o SW5 13.60-13.80 MHz<br />
o SW6 15.10-15.60 MHz<br />
o SW7 17.50-17.90 MHz<br />
3. Noise Limit Sensitivity<br />
o FM


![Andrea Borgnino IW0HK a.borgnino [at] gmail.com http://www ...](https://img.yumpu.com/43076438/1/184x260/andrea-borgnino-iw0hk-aborgnino-at-gmailcom-http-www-.jpg?quality=85)