ecologic 4 issue 1.indd - Roberts Radio
ecologic 4 issue 1.indd - Roberts Radio
ecologic 4 issue 1.indd - Roberts Radio
Create successful ePaper yourself
Turn your PDF publications into a flip-book with our unique Google optimized e-Paper software.
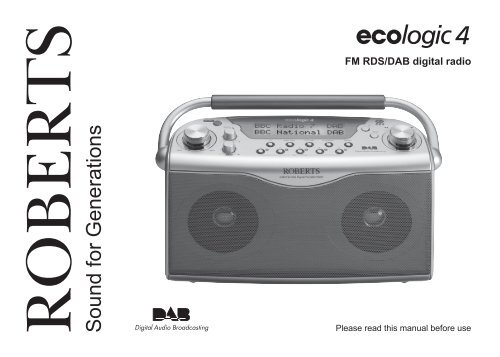
ROBERTS<br />
Sound for Generations<br />
FM RDS/DAB digital radio<br />
Please read this manual before use
Contents<br />
Controls ...............................................................................2<br />
Battery operation .................................................................3<br />
Mains operation ...................................................................3<br />
Operating your radio - DAB .................................................4<br />
Selecting a station - DAB ....................................................5<br />
Secondary services - DAB ..................................................6<br />
Display modes - DAB ...................................................... 7-8<br />
Finding new stations - DAB ................................................9<br />
Signal strength display - DAB ..............................................9<br />
Manual tuning - DAB .........................................................10<br />
Dynamic range control (DRC) settings - DAB ...................11<br />
Station order setup - DAB ........................................... 12-13<br />
Operating your radio - FM .................................................14<br />
Manual tuning - FM ...........................................................15<br />
Display modes - FM...........................................................16<br />
FM stereo/mono ................................................................16<br />
Presetting stations - DAB and FM .....................................17<br />
1<br />
Recalling a preset station - DAB and FM .........................18<br />
System reset .....................................................................19<br />
Headphone socket ............................................................20<br />
Line out socket ..................................................................20<br />
Display backlight ...............................................................20<br />
Software version ................................................................21<br />
General ..............................................................................22<br />
Specifi cations ....................................................................23<br />
Circuit features ..................................................................23<br />
Mains Supply .....................................................................24<br />
Notes .................................................................................25<br />
Guarantee .........................................................................26
Controls<br />
(Top)<br />
18<br />
1. Telescopic aerial (on rear)<br />
2. On/Off button<br />
3. Mains LED indicator<br />
4. Treble control<br />
5. Liquid crystal display (LCD)<br />
6. + 5 button<br />
If you need any further advice, please call our Technical Helpline on :-<br />
020 8758 0338 (Mon-Fri)<br />
1<br />
2 3 4 5 6 7 8 9 10<br />
11 12 13 14<br />
17 16<br />
7. Auto Tune button<br />
8. Headphone socket<br />
9. FM/DAB button<br />
10. Line out socket<br />
11. Info/Menu button<br />
12. Select button<br />
13. Tuning Up button<br />
14. Tuning Down button<br />
15. Tuning control<br />
16. Station presets<br />
17. Bass control<br />
18. Volume control<br />
15<br />
2
Battery operation<br />
1. Remove the Battery cover on the rear of the unit by pushing the<br />
battery door in and downwards.<br />
2. Insert six LR20 (D size) batteries into the spaces in the compartment.<br />
Take care to ensure all batteries are inserted with the correct polarity as<br />
shown inside the battery compartment. Replace the battery cover.<br />
3. Reduced power, distortion and a ‘stuttering’ sound are all signs that<br />
the batteries may need replacing.<br />
4. If the radio is not to be used for any extended period of time it is<br />
recommended that the batteries are removed from the radio.<br />
3<br />
We would recommend for economy that the <strong>ecologic</strong> 4 is used on<br />
the mains whenever possible with battery operation for occasional or<br />
stand-by use only.<br />
IMPORTANT: The batteries should not be exposed to excessive heat<br />
such as sunshine, fi re or the like. After use, disposable batteries should<br />
if possible be taken to a suitable recycling centre. On no account<br />
should batteries be disposed of by incineration.<br />
Mains operation<br />
1. Place your radio on a fl at surface.<br />
2. Plug the mains lead into the Socket located on the rear of your radio<br />
ensuring that the plug is pushed fully into the socket.<br />
3. Plug the other end of the mains lead into a wall socket and switch on<br />
the wall socket.<br />
IMPORTANT: The mains plug is used as the means of connecting the<br />
radio to the mains supply. The mains socket used for the radio must<br />
remain accessible during normal use. In order to disconnect the radio<br />
from the mains completely, the mains plug should be removed from<br />
the mains socket outlet completely.<br />
4. When the mains LED is on, it indicates that the radio is connected to<br />
and powered from the mains supply.
Operating your radio - DAB<br />
1. Fully extend the telescopic aerial.<br />
2. Press the On/Off button to switch on your radio. The display will show<br />
"Welcome to DAB" for a few seconds.<br />
3. If this is the fi rst time the radio is used a quick scan of the UK band<br />
III DAB channels will be carried out.<br />
4. During Autotune as each group of stations is detected the bottom<br />
line of the display will show a bargraph indicating progress of the<br />
Autotune.<br />
5. When the Autotune is complete the fi rst station (in numeric-alpha order<br />
0...9...A....Z) will be selected.<br />
6. If the station list is still empty after the Autotune you radio will display<br />
"No stations available".<br />
7. If no signals are found it may be necessary to relocate your radio to<br />
a position giving better reception.<br />
If you need any further advice, please call our Technical Helpline on :-<br />
020 8758 0338 (Mon-Fri)<br />
2<br />
4
Selecting a station - DAB<br />
1. The top line of the display shows the name of the station currently<br />
selected.<br />
2. Rotate the Tuning control or press the Up or Down buttons to scroll<br />
through the list of available stations.<br />
3. Press and release the Select button to select the station. The display<br />
may show "Now Tuning" while your radio fi nds the new station.<br />
4. Adjust the Volume and Tone controls to the required settings.<br />
5<br />
Note: If after selecting a station the display shows "Station not available"<br />
it may be necessary to relocate your radio to a position giving better<br />
reception.<br />
3<br />
2<br />
4<br />
2<br />
2<br />
4<br />
4
Secondary services - DAB<br />
1. Certain radio stations have one or more secondary services associated<br />
with them. If a station has a secondary service associated with it the<br />
display will show ">>" next to the station name on the station list. The<br />
secondary service will then appear immediately after the primary<br />
service as you rotate the Tuning control.<br />
2. To tune to the secondary service, press and release the Select button.<br />
Most secondary services do not broadcast continually and if the selected<br />
service is not available, the radio will retune to the associated primary<br />
service.<br />
If you need any further advice, please call our Technical Helpline on :-<br />
020 8758 0338 (Mon-Fri)<br />
2<br />
1<br />
6
Display modes - DAB<br />
Your radio has seven display modes:-<br />
1. Press the Info/Menu button to cycle through the various modes.<br />
a. Scrolling text Displays scrolling text messages such as<br />
artist/track name, phone in number etc.<br />
b. Program Type Displays the type of station being listened<br />
to e.g. Pop, Classic, News etc.<br />
c. Multiplex Name Displays the name of DAB multiplex to<br />
which the current station belongs.<br />
d. Time and date Displays current the time and date.<br />
7<br />
1<br />
a<br />
b<br />
c<br />
d
e. Frequency Displays the frequency of the DAB<br />
multiplex for the station listened to.<br />
f. Bit rate & audio type Displays the digital bit rate & audio type<br />
for the station being listened to.<br />
g. Signal Error Displays the signal error for the station<br />
being listend to.<br />
If you need any further advice, please call our Technical Helpline on :-<br />
020 8758 0338 (Mon-Fri)<br />
e<br />
f<br />
g<br />
8
Finding new stations - DAB<br />
As time passes new stations may become available. To fi nd new stations<br />
proceed as follows:-<br />
1. Press and release the AutoTune button, the display will show "Scanning".<br />
Your radio will perform a scan of the UK DAB frequencies. As<br />
new stations are found the station counter on the right-hand side of<br />
the display will increase and stations will be added to the list<br />
2. To carry out a full scan of the entire DAB band (band III) press and<br />
hold down the AutoTune button for more than 2 seconds and then<br />
release. The display will show "Scanning". As new stations are found<br />
the station counter on the right-hand side of the display will increase<br />
and stations will be added to the list<br />
Signal strength display - DAB<br />
1. Press and release the Select button to switch between the current<br />
information display and the signal strength indication.<br />
2. Position your radio and carefully angle the telescopic aerial for best<br />
reception using the signal strength display as a guide. Move your radio<br />
around and position so as to give maximum number of black rectangles<br />
on signal strength display. The clear unfi lled rectangle indicates the<br />
minimum signal level required for satisfactory reception.<br />
9<br />
1<br />
2<br />
1
Manual Tuning - DAB<br />
Manual tuning allows you to tune directly to the various band III DAB channels.<br />
UK DAB stations are currently located in the range 11B to 12D.<br />
1. Press and hold down the Info/Menu button and rotate the Tuning<br />
control or press the Up or Down buttons until the display shows<br />
"Manual Tune". Press and release the Select button.<br />
2. Rotate the Tuning control or press the Up or Down buttons to select<br />
the required DAB channel.<br />
3. Press and release the Select button. The open block in the signal<br />
strength graph shows you the minimum signal strength needed for<br />
good DAB reception. The signal blocks will go up and down showing<br />
the changing signal strength as you adjust the telescopic aerial or the<br />
radio position.<br />
4. Press and release the Select button to return to normal tuning<br />
mode.<br />
If you need any further advice, please call our Technical Helpline on :-<br />
020 8758 0338 (Mon-Fri)<br />
1,2<br />
1<br />
1<br />
1,2<br />
1,2<br />
3,4<br />
10
Dynamic Range Control (DRC) settings - DAB<br />
The DRC facility can make quieter sounds easier to hear when your radio<br />
is used in a noisy environment.<br />
1. Press the On/Off button to switch on your radio.<br />
2. Press and hold down the Info/Menu button and rotate the Tuning<br />
control or press the Up or Down buttons until the display shows<br />
"DRC value". Press and release the Select button to enter adjustment<br />
mode.<br />
3. Rotate the Tuning control or press the Up or Down buttons to select<br />
the required DRC setting (default is 0).<br />
DRC 0 DRC is switched off, Broadcast DRC will be ignored.<br />
DRC 1/2 DRC level is set to 1/2 that sent by broadcaster.<br />
DRC 1 DRC is set as sent by broadcaster.<br />
4. Press and release the Select button to confi rm the setting. The display<br />
will return to normal tuning mode.<br />
Note: Not all DAB broadcasts are able to use the DRC function. If the<br />
broadcast does not support DRC, then the DRC setting in the radio will<br />
have no effect.<br />
11<br />
2<br />
2,4<br />
1<br />
2,3<br />
2,3<br />
2,3
Station order setup - DAB<br />
This function enables you to choose how the stations are arranged when<br />
selecting a station. There are four options available - favourite station,<br />
alphanumeric, active station and prune stations.<br />
Note: Your radio default station order is numeric-alpha order.<br />
1. Press and hold in the Info/Menu button and rotate the Tuning control<br />
or press the Up or Down buttons until "Station order" appears on the<br />
display.<br />
2. Press and release the Select button.<br />
3. Rotate the Tuning control or press the Up or Down buttons to<br />
choose between favourite station, alphanumeric, active station and<br />
prune stations.<br />
4. Press and release the Select button to select the station order setting<br />
required.<br />
Favourite stations<br />
When this setting is switched on, after a period of time the most listened<br />
to stations will move to the top of the station list and will be marked with<br />
the heart symbol .<br />
Alphanumeric<br />
Rotate the Tuning control until "Alphanumeric" appears on the display.<br />
Your radio will now select stations in alphanumeric order (0....9....A....Z).<br />
If you need any further advice, please call our Technical Helpline on :-<br />
020 8758 0338 (Mon-Fri)<br />
1,3<br />
1<br />
2,4<br />
1,3<br />
1,3<br />
12
Active station<br />
When this setting is switched on the display will show only those that a<br />
signal can be found for.<br />
Prune stations<br />
Some DAB services may stop broadcasting or you may not be able to<br />
receive a station. Prune stations will delete the DAB stations from your<br />
station list that can no longer be received.<br />
When this feature is selected your radio will delete the stations that are<br />
not currently being received.<br />
13
Operating your radio - FM<br />
1. Carefully extend the telescopic aerial<br />
2. Press the On/Off button to switch on your radio. The radio will tune<br />
to the last selected radio station.<br />
3. Press the FM/DAB button to select the FM band.<br />
4. Press and release the Up button then press the Auto Tune button.<br />
Your radio will search in an upwards direction (low frequency to high<br />
frequency) and stop automatically when it fi nds a station of suffi cient<br />
strength.<br />
5. If RDS information is being received, then after a few seconds the<br />
display will update and show the radio station name.<br />
6. To fi nd other stations press the Auto Tune button as before.<br />
7. If you press and release the Down button then press the Auto Tune<br />
button, your radio will search in a downwards direction (high frequency<br />
to low frequency) and stop automatically when it fi nds a station of<br />
suffi cient strength.<br />
8. When the end of the waveband is reached your radio will recommence<br />
tuning from the opposite end of the waveband.<br />
9. Adjust the Volume and Tone controls to the required settings.<br />
10. To switch off your radio press the On/Off button.<br />
If you need any further advice, please call our Technical Helpline on :-<br />
020 8758 0338 (Mon-Fri)<br />
4<br />
7<br />
4,6,7<br />
2<br />
10<br />
9<br />
9<br />
9<br />
3<br />
14
Manual tuning - FM<br />
1. Press the On/Off button to switch on your radio.<br />
2. Press and release the FM/DAB button to select the FM band. Fully<br />
extend the Telescopic aerial.<br />
3. Rotate the Tuning control or press the Up or Down buttons to tune<br />
to a station. The frequency will change in steps of 50kHz.<br />
4. When the end of the waveband is reached the radio will recommence<br />
tuning from the opposite end of the waveband.<br />
5. Set the Volume control and Tone controls to the desired settings.<br />
6. To switch off your radio press the On/Off button.<br />
15<br />
1<br />
6<br />
3<br />
5<br />
3<br />
2<br />
3<br />
5<br />
5
Display modes - FM<br />
When listening in FM mode the bottom line of the display can be set to<br />
any of the following modes:-<br />
1. Press the Info/Menu button to cycle through the various modes.<br />
a. Scrolling text Displays scrolling text messages such as<br />
artist/track name, phone in number etc.<br />
b. Program Type Displays type of station being listened to<br />
e.g. Pop, Classic, News etc.<br />
c. Time and date Displays current time and date.<br />
d. Frequency Displays frequency of the station being<br />
listened to.<br />
FM Stereo/Mono<br />
1. If the FM radio station being received is weak some hiss may be audible.<br />
To reduce the hiss press and release in the Select button until the<br />
display shows "Mono", your radio will switch to mono mode.<br />
2. To return to stereo mode press and release in the Select button until<br />
the display shows "Auto", your radio will switch to stereo mode.<br />
If you need any further advice, please call our Technical Helpline on :-<br />
020 8758 0338 (Mon-Fri)<br />
1<br />
1,2<br />
a<br />
b<br />
c<br />
d<br />
16
Presetting stations - DAB and FM<br />
There are 10 memory presets for each of the 2 wavebands.<br />
1. Press the On/Off button switch on the radio.<br />
2. Tune to the required station as previously described.<br />
3. Press and hold down the required Preset button until the display<br />
shows e.g. Preset 1 saved. The station will be stored under the chosen<br />
preset button. Repeat this procedure for the remaining presets.<br />
4. Presets 6 to 10 are obtained by pressing and holding +5 button<br />
together with the Preset button 1 to 5. e.g preset 7 can be set by<br />
pressing and holding +5 button together with Preset button 2 until<br />
the display shows Preset 7 saved.<br />
5. Stations stored in preset memories may be overwritten by following<br />
the above procedure.<br />
17<br />
1<br />
3<br />
4<br />
4
Recalling a preset station - DAB and FM<br />
1. Press the On/Off button to switch on the radio.<br />
2. Select the required waveband by pressing the FM/DAB button.<br />
3. Momentarily press the required Preset button, your radio will tune to<br />
the station stored in preset memory.<br />
4. Presets 6 to 10 are obtained by pressing and holding +5 button and<br />
Preset button 1 to 5. e.g preset 7 can be recalled by pressing and<br />
holding +5 button followed by pressing Preset button 2.<br />
If you need any further advice, please call our Technical Helpline on :-<br />
020 8758 0338 (Mon-Fri)<br />
1<br />
3<br />
4<br />
4<br />
2<br />
18
System reset<br />
If your radio fails to operate correctly, or some digits on the display are<br />
missing or incomplete, if running on batteries fi rst check that the batteries<br />
are not exhausted. If you still suspect a problem with your radio please<br />
carry out the following procedure.<br />
1. In FM mode, press and hold down the Info/Menu button for 2 seconds.<br />
The display will show "SELECT Factory reset".<br />
2. In DAB mode, press and hold down the Info/Menu button and rotate<br />
the Tuning control or press the Up or Down buttons until the display<br />
shows "Select Factory reset".<br />
3. Press and release the Select button until the display shows "Press<br />
SELECT to confi rm reset".<br />
4. Press Select button again to confi rm system reset.<br />
5. A full reset will be performed all presets and station lists will be<br />
erased.<br />
6. After a system reset a scan of the DAB band will be performed.<br />
In case of malfunction due to electrostatic discharge, reset the product<br />
(reconnection of power source may be required) to resume normal<br />
operation.<br />
19<br />
If a problem persists our technical staff would be pleased to help<br />
offer any assistance on operating the radio. Our technical helpline<br />
number is 020 8758 0338.<br />
1,2<br />
3,4<br />
2<br />
2<br />
2
Headphone socket<br />
A 3.5mm Headphone Socket located on the rear of your radio is provided<br />
for use with either headphones or an earpiece. Inserting a plug automatically<br />
mutes the internal loudspeaker.<br />
IMPORTANT: Excessive sound pressure from earphones and headphones<br />
can cause hearing loss.<br />
Line out socket<br />
A 3.5mm Line out socket located on the rear of your radio is provided<br />
for connecting the audio signal to an external amplifi er. Inserting a line out<br />
audio cable will not mute the internal loudspeaker. Set the volume control<br />
to minimum if desired.<br />
Display backlight<br />
1. When your radio is powered by batteries the display backlight will<br />
be switched on for approximately 8 seconds when any button is<br />
pressed.<br />
2. When your radio is powered by AC mains the display backlight will<br />
always be switched on when the radio is switched to on.<br />
If you need any further advice, please call our Technical Helpline on :-<br />
020 8758 0338 (Mon-Fri)<br />
20
Software version<br />
The software display cannot be altered and is just for your reference.<br />
1. To view which software version your radio has press and hold in the<br />
Info/Menu button.<br />
2. Rotate the Tuning control or the Up and Down buttons until the<br />
software version shows on the display.<br />
21<br />
1<br />
2<br />
2<br />
2
General<br />
Do not allow this radio to be exposed to water, steam or sand. Do not leave<br />
your radio where excessive heat could cause damage such as in a parked<br />
car where the heat from the sun can build up even though the outside<br />
temperature may not seem too high. It is recommended that the DAB band<br />
be used wherever possible as better results in terms of quality and freedom<br />
from interference will usually be obtained than on the FM band.<br />
If you need any further advice, please call our Technical Helpline on :-<br />
020 8758 0338 (Mon-Fri)<br />
• The radio should not be exposed to dripping or splashing and that<br />
no objects fi lled with liquids such as vases, shall be placed on the<br />
radio.<br />
• It is recommended to operate the product such that there is a minimum<br />
distance (10cm recommended) to adjacent objects in order to ensure<br />
good ventilation.<br />
• The ventilation of the product should not be restricted by covering it or<br />
its ventilation openings with items such as newspapers, table-cloths,<br />
curtains etc.<br />
• No naked fl ame sources such as lighted candles should be placed on<br />
the product.<br />
• It is recommended to avoid using or storing the product at extremes<br />
of temperature. Avoid leaving the unit in cars, on window sills in direct<br />
sunlight etc.<br />
• The nameplate is located on the underside of your radio.<br />
22
Specifi cations<br />
Power Requirements<br />
Mains AC 230 volts, 50Hz only<br />
Batteries 6 x LR20 (D size)<br />
Battery Life<br />
Frequency Coverage<br />
23<br />
Up to 150 hours of listening for 4 hours<br />
a day at normal volume using alkaline<br />
cells.<br />
FM 87.5-108MHz<br />
DAB 174.928 - 239.200MHz<br />
Circuit Features<br />
Loudspeaker 2 x 79mm<br />
Output Power 3W<br />
Headphone socket 3.5mm dia<br />
Line out socket 3.5mm dia<br />
Aerial System FM Telescopic aerial<br />
DAB Telescopic aerial
Mains supply<br />
The radio will operate from a supply of AC 230 volts, 50Hz only.<br />
DO NOT cut off the mains plug from this equipment. If the plug fi tted is<br />
not suitable for the power points in your home or the cable is too short to<br />
reach a power point, then obtain an appropriate safety approved extension<br />
lead or adaptor. If in doubt consult your dealer.<br />
If nonetheless the mains plug is cut off, remove the fuse and dispose of<br />
the plug immediately to avoid a possible shock hazard by inadvertent<br />
connection to the mains supply.<br />
If this product is not supplied with a mains plug, or one has to be fi tted,<br />
then follow the instructions given below:<br />
IMPORTANT<br />
DO NOT make any connection to the larger terminal which is marked<br />
with the letter E or by the safety earth symbol or coloured Green or<br />
Green-and-yellow.<br />
The wires in the mains lead are coloured in accordance with the following<br />
codes :-<br />
BLUE - NEUTRAL BROWN - LIVE Fuse<br />
If you need any further advice, please call our Technical Helpline on :-<br />
020 8758 0338 (Mon-Fri)<br />
The wire coloured BLUE must be connected to the terminal marked N or<br />
coloured BLACK.<br />
The wire coloured BROWN must be connected to the terminal marked L<br />
or coloured RED.<br />
When replacing the fuse only a 3A ASTA approved to BS1362 type should<br />
be used and be sure to re-fi t the fuse cover.<br />
IF IN DOUBT - CONSULT A QUALIFIED ELECTRICIAN.<br />
Replacement fuse holders are available from <strong>Roberts</strong> <strong>Radio</strong> Technical<br />
Services at the address shown on the rear of this manual.<br />
24
Notes<br />
25
If you need any further advice, please call our Technical Helpline on :-<br />
020 8758 0338 (Mon-Fri)<br />
Guarantee<br />
This instrument is guaranteed for twelve months from the date of delivery to the original owner against failure due to faulty workmanship or component<br />
breakdown, subject to the procedure stated below. Should any component or part fail during this guarantee period it will be repaired or replaced free<br />
of charge.<br />
The guarantee does not cover:<br />
1. Damage resulting from incorrect use.<br />
2. Consequential damage.<br />
3. Receivers with removed or defaced serial numbers.<br />
N.B. Damaged or broken telescopic aerials will not be replaced under guarantee.<br />
Procedure:<br />
Any claim under this guarantee should be made through the dealer from whom the instrument was purchased. It is likely that your <strong>Roberts</strong>' dealer<br />
will be able to attend to any defect quickly and effi ciently, but should it be necessary the dealer will return the instrument to the company’s service<br />
department for attention. In the event that it is not possible to return the instrument to the <strong>Roberts</strong>' dealer from whom it was purchased, please contact<br />
<strong>Roberts</strong> <strong>Radio</strong> Technical Services at the address shown on the rear of this manual.<br />
26
Issue 1<br />
ROBERTS RADIO TECHNICAL SERVICES<br />
97-99 Worton Road<br />
Isleworth Middlesex<br />
TW7 6EG<br />
Technical Helpline :- 020 8758 0338 (Mon-Fri during offi ce hours)<br />
Website: http://www.robertsradio.co.uk<br />
© 2008 <strong>Roberts</strong> <strong>Radio</strong> Limited


