Magaya Software Accounting Manual
Magaya Software Accounting Manual
Magaya Software Accounting Manual

Create successful ePaper yourself
Turn your PDF publications into a flip-book with our unique Google optimized e-Paper software.
<strong>Magaya</strong><strong>Software</strong><br />
<strong>Accounting</strong><strong>Manual</strong><br />
Guideto<br />
Invoicing<br />
Payments<br />
Banking<br />
FinancialStatements<br />
andmore
<strong>Magaya</strong> <strong>Software</strong> <strong>Accounting</strong> <strong>Manual</strong><br />
Table of Contents<br />
1. How to Use this <strong>Manual</strong> . . . . . . . . . . . . . . . . . . . . . . . . . . . . . . . . . . . . . . . . . . . . . . . . 5<br />
Introduction . . . . . . . . . . . . . . . . . . . . . . . . . . . . . . . . . . . . . . . . . . . . . . . . . . . . . . . 5<br />
How this <strong>Manual</strong> is Organized . . . . . . . . . . . . . . . . . . . . . . . . . . . . . . . . . . . . . . . . 5<br />
Where to Find Help . . . . . . . . . . . . . . . . . . . . . . . . . . . . . . . . . . . . . . . . . . . . . . . . . 6<br />
2. <strong>Magaya</strong> <strong>Accounting</strong> System Overview . . . . . . . . . . . . . . . . . . . . . . . . . . . . . . . . . . . . 7<br />
Introduction . . . . . . . . . . . . . . . . . . . . . . . . . . . . . . . . . . . . . . . . . . . . . . . . . . . . . . . 7<br />
<strong>Accounting</strong> Folder Overview . . . . . . . . . . . . . . . . . . . . . . . . . . . . . . . . . . . . . . . . . . 8<br />
Configure your <strong>Accounting</strong> System . . . . . . . . . . . . . . . . . . . . . . . . . . . . . . . . . . . . 10<br />
3. <strong>Accounting</strong> Wizard . . . . . . . . . . . . . . . . . . . . . . . . . . . . . . . . . . . . . . . . . . . . . . . . . . . . 11<br />
<strong>Accounting</strong> Wizard Overview . . . . . . . . . . . . . . . . . . . . . . . . . . . . . . . . . . . . . . . . . 11<br />
Enter Information in the <strong>Accounting</strong> Wizard . . . . . . . . . . . . . . . . . . . . . . . . . . . . . 12<br />
Entering Opening Balances . . . . . . . . . . . . . . . . . . . . . . . . . . . . . . . . . . . . . . . . . . . 15<br />
4. Chart of Accounts . . . . . . . . . . . . . . . . . . . . . . . . . . . . . . . . . . . . . . . . . . . . . . . . . . . . . 19<br />
Introduction . . . . . . . . . . . . . . . . . . . . . . . . . . . . . . . . . . . . . . . . . . . . . . . . . . . . . . . 19<br />
Add to the Chart of Accounts . . . . . . . . . . . . . . . . . . . . . . . . . . . . . . . . . . . . . . . . . 20<br />
Actions in the Chart of Accounts . . . . . . . . . . . . . . . . . . . . . . . . . . . . . . . . . . . . . . . 22<br />
Configure Default Accounts . . . . . . . . . . . . . . . . . . . . . . . . . . . . . . . . . . . . . . . . . . 23<br />
Inventory Accounts . . . . . . . . . . . . . . . . . . . . . . . . . . . . . . . . . . . . . . . . . . . . . . . . . 24<br />
5. Items and Services . . . . . . . . . . . . . . . . . . . . . . . . . . . . . . . . . . . . . . . . . . . . . . . . . . . . . 25<br />
Introduction to Items and Services . . . . . . . . . . . . . . . . . . . . . . . . . . . . . . . . . . . . . 25<br />
Add Items and Services . . . . . . . . . . . . . . . . . . . . . . . . . . . . . . . . . . . . . . . . . . . . . . 26<br />
Actions Performed with Items and Services . . . . . . . . . . . . . . . . . . . . . . . . . . . . . . 28<br />
6. Accounts Receivable . . . . . . . . . . . . . . . . . . . . . . . . . . . . . . . . . . . . . . . . . . . . . . . . . . . 31<br />
Introduction to Accounts Receivable . . . . . . . . . . . . . . . . . . . . . . . . . . . . . . . . . . . . 31<br />
Create Invoices . . . . . . . . . . . . . . . . . . . . . . . . . . . . . . . . . . . . . . . . . . . . . . . . . . . . 32<br />
Actions for Invoices . . . . . . . . . . . . . . . . . . . . . . . . . . . . . . . . . . . . . . . . . . . . . . 38<br />
Import Invoices . . . . . . . . . . . . . . . . . . . . . . . . . . . . . . . . . . . . . . . . . . . . . . . . . . . . 42<br />
Print Invoices to a Fiscal Printer . . . . . . . . . . . . . . . . . . . . . . . . . . . . . . . . . . . . . . . 44<br />
Credit Memos . . . . . . . . . . . . . . . . . . . . . . . . . . . . . . . . . . . . . . . . . . . . . . . . . . . . . 47<br />
Enter Payments . . . . . . . . . . . . . . . . . . . . . . . . . . . . . . . . . . . . . . . . . . . . . . . . . . . . 49<br />
Actions for Payments . . . . . . . . . . . . . . . . . . . . . . . . . . . . . . . . . . . . . . . . . . . . . 55<br />
Customer Payment Terms . . . . . . . . . . . . . . . . . . . . . . . . . . . . . . . . . . . . . . . . . . . . 55<br />
Depositing Payments . . . . . . . . . . . . . . . . . . . . . . . . . . . . . . . . . . . . . . . . . . . . . . . . 60<br />
Actions for Deposits . . . . . . . . . . . . . . . . . . . . . . . . . . . . . . . . . . . . . . . . . . . . . . 63<br />
Refund Check . . . . . . . . . . . . . . . . . . . . . . . . . . . . . . . . . . . . . . . . . . . . . . . . . . . . . 63<br />
Customer Statements . . . . . . . . . . . . . . . . . . . . . . . . . . . . . . . . . . . . . . . . . . . . . . . . 66<br />
1
7. Accounts Payable . . . . . . . . . . . . . . . . . . . . . . . . . . . . . . . . . . . . . . . . . . . . . . . . . . . . . . 67<br />
Introduction to Accounts Payable . . . . . . . . . . . . . . . . . . . . . . . . . . . . . . . . . . . . . . 67<br />
Create Bills . . . . . . . . . . . . . . . . . . . . . . . . . . . . . . . . . . . . . . . . . . . . . . . . . . . . . . . 67<br />
Actions for Bills . . . . . . . . . . . . . . . . . . . . . . . . . . . . . . . . . . . . . . . . . . . . . . . . . . . . 70<br />
Bill Credits . . . . . . . . . . . . . . . . . . . . . . . . . . . . . . . . . . . . . . . . . . . . . . . . . . . . . . . . 73<br />
Bill Payments . . . . . . . . . . . . . . . . . . . . . . . . . . . . . . . . . . . . . . . . . . . . . . . . . . . . . . 75<br />
Pay Multiple Vendors . . . . . . . . . . . . . . . . . . . . . . . . . . . . . . . . . . . . . . . . . . . . . . . 77<br />
Vendor Refunds . . . . . . . . . . . . . . . . . . . . . . . . . . . . . . . . . . . . . . . . . . . . . . . . . . . . 80<br />
8. Banking . . . . . . . . . . . . . . . . . . . . . . . . . . . . . . . . . . . . . . . . . . . . . . . . . . . . . . . . . . . . . . 83<br />
Introduction to Banking in <strong>Magaya</strong> Explorer . . . . . . . . . . . . . . . . . . . . . . . . . . . . . 83<br />
Writing Checks . . . . . . . . . . . . . . . . . . . . . . . . . . . . . . . . . . . . . . . . . . . . . . . . . . . . 83<br />
Actions for Checks . . . . . . . . . . . . . . . . . . . . . . . . . . . . . . . . . . . . . . . . . . . . . . . . . 88<br />
Making Deposits . . . . . . . . . . . . . . . . . . . . . . . . . . . . . . . . . . . . . . . . . . . . . . . . . . . 93<br />
Bank Reconciliation . . . . . . . . . . . . . . . . . . . . . . . . . . . . . . . . . . . . . . . . . . . . . . . . . 96<br />
9. <strong>Accounting</strong> Reports . . . . . . . . . . . . . . . . . . . . . . . . . . . . . . . . . . . . . . . . . . . . . . . . . . . . 103<br />
Introduction to <strong>Accounting</strong> Reports . . . . . . . . . . . . . . . . . . . . . . . . . . . . . . . . . . . . 103<br />
Customize Reports . . . . . . . . . . . . . . . . . . . . . . . . . . . . . . . . . . . . . . . . . . . . . . . . . . 107<br />
Financial Reports . . . . . . . . . . . . . . . . . . . . . . . . . . . . . . . . . . . . . . . . . . . . . . . . . . . 110<br />
Profit & Loss Report . . . . . . . . . . . . . . . . . . . . . . . . . . . . . . . . . . . . . . . . . . . . . . . . 110<br />
Comparative Profit & Loss Reports . . . . . . . . . . . . . . . . . . . . . . . . . . . . . . . . . . 113<br />
Profit & Loss by Operations . . . . . . . . . . . . . . . . . . . . . . . . . . . . . . . . . . . . . . . . 116<br />
Shipment P&L Report . . . . . . . . . . . . . . . . . . . . . . . . . . . . . . . . . . . . . . . . . . . . . 117<br />
Balance Sheet . . . . . . . . . . . . . . . . . . . . . . . . . . . . . . . . . . . . . . . . . . . . . . . . . . . 117<br />
Statement of Cash Flows . . . . . . . . . . . . . . . . . . . . . . . . . . . . . . . . . . . . . . . . . . . 122<br />
Sales Reports . . . . . . . . . . . . . . . . . . . . . . . . . . . . . . . . . . . . . . . . . . . . . . . . . . . . . . 123<br />
Purchase Reports . . . . . . . . . . . . . . . . . . . . . . . . . . . . . . . . . . . . . . . . . . . . . . . . . . . 127<br />
Profit Reports Overview . . . . . . . . . . . . . . . . . . . . . . . . . . . . . . . . . . . . . . . . . . . . . 131<br />
Customer Profit Reports . . . . . . . . . . . . . . . . . . . . . . . . . . . . . . . . . . . . . . . . . . . 133<br />
Salesperson Profit Report . . . . . . . . . . . . . . . . . . . . . . . . . . . . . . . . . . . . . . . . . . 134<br />
Agent Profit Report . . . . . . . . . . . . . . . . . . . . . . . . . . . . . . . . . . . . . . . . . . . . . . . 135<br />
Other Reports . . . . . . . . . . . . . . . . . . . . . . . . . . . . . . . . . . . . . . . . . . . . . . . . . . . . . . 135<br />
Multicurrency Reports . . . . . . . . . . . . . . . . . . . . . . . . . . . . . . . . . . . . . . . . . . . . . . . 137<br />
10. Advanced <strong>Accounting</strong> Features . . . . . . . . . . . . . . . . . . . . . . . . . . . . . . . . . . . . . . . . . 139<br />
Setting <strong>Accounting</strong> Roles . . . . . . . . . . . . . . . . . . . . . . . . . . . . . . . . . . . . . . . . . . . . 140<br />
<strong>Accounting</strong> Configuration . . . . . . . . . . . . . . . . . . . . . . . . . . . . . . . . . . . . . . . . . . . 140<br />
Main <strong>Accounting</strong> Configuration Tab . . . . . . . . . . . . . . . . . . . . . . . . . . . . . . . . . 141<br />
<strong>Accounting</strong> Document Numbers Configuration . . . . . . . . . . . . . . . . . . . . . . . . . 144<br />
Cost Configuration . . . . . . . . . . . . . . . . . . . . . . . . . . . . . . . . . . . . . . . . . . . . . . . 145<br />
<strong>Accounting</strong> Integration Configuration . . . . . . . . . . . . . . . . . . . . . . . . . . . . . . . . 147<br />
Credit Limit Configuration . . . . . . . . . . . . . . . . . . . . . . . . . . . . . . . . . . . . . . . . . 148<br />
Miscellaneous <strong>Accounting</strong> Configurations . . . . . . . . . . . . . . . . . . . . . . . . . . . . . 149<br />
Additional Financial-related Configurations . . . . . . . . . . . . . . . . . . . . . . . . . . . 150<br />
Average Cost . . . . . . . . . . . . . . . . . . . . . . . . . . . . . . . . . . . . . . . . . . . . . . . . . . . . . . 151<br />
2
Configure Average Cost System-wide . . . . . . . . . . . . . . . . . . . . . . . . . . . . . . . . 151<br />
Configure Average Cost per Item . . . . . . . . . . . . . . . . . . . . . . . . . . . . . . . . . . . . 152<br />
Additional Configuration . . . . . . . . . . . . . . . . . . . . . . . . . . . . . . . . . . . . . . . . . . 153<br />
Sell Items and Create Invoices . . . . . . . . . . . . . . . . . . . . . . . . . . . . . . . . . . . . . . 154<br />
Specific Identification . . . . . . . . . . . . . . . . . . . . . . . . . . . . . . . . . . . . . . . . . . . . . 155<br />
Changing Costing Methods . . . . . . . . . . . . . . . . . . . . . . . . . . . . . . . . . . . . . . . . . 156<br />
Landed Cost Management . . . . . . . . . . . . . . . . . . . . . . . . . . . . . . . . . . . . . . . . . 156<br />
Configure Your <strong>Magaya</strong> System for Landed Costs . . . . . . . . . . . . . . . . . . . . . . 157<br />
Landed Costs in “Items & Services” . . . . . . . . . . . . . . . . . . . . . . . . . . . . . . . . . . 157<br />
Sales Taxes . . . . . . . . . . . . . . . . . . . . . . . . . . . . . . . . . . . . . . . . . . . . . . . . . . . . . . . 159<br />
Introduction to Sales Taxes . . . . . . . . . . . . . . . . . . . . . . . . . . . . . . . . . . . . . . . . . 159<br />
Steps: Add a Sales Tax Item . . . . . . . . . . . . . . . . . . . . . . . . . . . . . . . . . . . . . . . . 159<br />
Approve/Dispute Invoices . . . . . . . . . . . . . . . . . . . . . . . . . . . . . . . . . . . . . . . . . . . . 162<br />
Journal Entries . . . . . . . . . . . . . . . . . . . . . . . . . . . . . . . . . . . . . . . . . . . . . . . . . . . . . 164<br />
Introduction to Journal Entries . . . . . . . . . . . . . . . . . . . . . . . . . . . . . . . . . . . . . . 164<br />
Steps: Create a Journal Entry . . . . . . . . . . . . . . . . . . . . . . . . . . . . . . . . . . . . . . . 164<br />
Adjustments . . . . . . . . . . . . . . . . . . . . . . . . . . . . . . . . . . . . . . . . . . . . . . . . . . . . . . . 167<br />
Multiple Currencies . . . . . . . . . . . . . . . . . . . . . . . . . . . . . . . . . . . . . . . . . . . . . . . . . 168<br />
How to Set up Multicurrencies in your <strong>Magaya</strong> System . . . . . . . . . . . . . . . . . . 168<br />
Multicurrency Reports . . . . . . . . . . . . . . . . . . . . . . . . . . . . . . . . . . . . . . . . . . . . 174<br />
Relationship Between <strong>Accounting</strong> & Operations . . . . . . . . . . . . . . . . . . . . . . . . . . 176<br />
Accounts Receivable Special Procedures . . . . . . . . . . . . . . . . . . . . . . . . . . . . . . . . 179<br />
Processing Discounts <strong>Manual</strong>ly . . . . . . . . . . . . . . . . . . . . . . . . . . . . . . . . . . . . . 180<br />
Handling Bounced Checks . . . . . . . . . . . . . . . . . . . . . . . . . . . . . . . . . . . . . . . . . 181<br />
Processing Wire Transfer Fees . . . . . . . . . . . . . . . . . . . . . . . . . . . . . . . . . . . . . . 182<br />
Petty Cash Deposits . . . . . . . . . . . . . . . . . . . . . . . . . . . . . . . . . . . . . . . . . . . . . . 184<br />
Index<br />
3
1. HOW TO USE THIS MANUAL<br />
INTRODUCTION<br />
1. How to Use this <strong>Manual</strong><br />
Introduction<br />
Welcome to the <strong>Magaya</strong> <strong>Software</strong> <strong>Accounting</strong> <strong>Manual</strong>.<br />
This manual is designed to teach you how to perform accounting procedures in<br />
<strong>Magaya</strong> software and answer common accounting questions such as “How do I<br />
create an invoice” and “How do I add an account to the Chart of Accounts”<br />
<strong>Magaya</strong> software is designed for logistics providers, freight forwarders,<br />
N.V.O.C.C.’s, consolidators, forwarding agents, couriers, warehouse providers<br />
and others in the logistics industry. <strong>Magaya</strong> software contains a complete<br />
accounting system that integrates the accounting features with the operations<br />
features in the software.<br />
How this <strong>Manual</strong> is Organized<br />
This manual is designed to be task oriented. You can skip to any topic you need<br />
and get step-by-step procedures for all the accounting tasks performed in<br />
<strong>Magaya</strong> software. You can also click on any word in the Index to go to that topic.<br />
This manual is organized into the following topics:<br />
• An overview of the accounting system and accounting wizard (it is recommended<br />
you begin with the <strong>Accounting</strong> Wizard to set up your company’s<br />
accounting information such as fiscal year, home currency, and more)<br />
• How to use the Chart of Accounts<br />
• How to use the Items and Services<br />
• Accounts Receivable, including working with invoices, credit memos,<br />
receiving payments, and how to create a report of open invoices and aging<br />
AR<br />
• Accounts Payable, including creating and paying bills, bill credits and<br />
vendor refunds, and how to create a report of unpaid bills and aging AP<br />
5
WHERE TO FIND HELP<br />
• How to perform banking tasks such as how to write checks in <strong>Magaya</strong> software,<br />
how to make deposit tickets, and to reconcile the bank account<br />
• Reports include financial reports such as Profit and Loss, Balance Sheet,<br />
and Cash Flows; other reports you can make include sales and purchase<br />
reports, trial balance, transaction details, and more<br />
• Additional topics include working with the Tax Table, setting up your<br />
company divisions and document numbering in <strong>Magaya</strong> software,<br />
creating Journal Entries, working with multicurrencies, and more<br />
Customize <strong>Accounting</strong> features for your company:<br />
You can set up your <strong>Magaya</strong> system to customize and automate accounting<br />
procedures. For example:<br />
• Rates: Enter custom rates that apply to specific customers as well as<br />
general rates that apply to all your customers. You can also enter rates<br />
from your carriers so they are ready to use when creating shipments.<br />
• Recurring Invoices: Automate the creation of invoices for specific<br />
customers to save time each month and ensure all charges are included.<br />
• Enter commissions for salespeople and profit sharing rates for agents.<br />
To learn more, please see the <strong>Magaya</strong> <strong>Software</strong> Customization <strong>Manual</strong> available<br />
on the <strong>Magaya</strong>.com Training page.<br />
Where to Find Help<br />
If you have questions or need help, you can contact <strong>Magaya</strong> Corporation:<br />
Phone: (786) 845-9150<br />
Email: support@magaya.com<br />
<strong>Magaya</strong> software user manuals, video tutorials, and how-to tips are available to<br />
view or download from the <strong>Magaya</strong> website: www.magaya.com. Additional tips<br />
can be found in the <strong>Magaya</strong> Explorer dialog boxes and screens. To turn off the<br />
tips, go to the Maintenance folder > Configuration > General.<br />
Use of the <strong>Magaya</strong> software and its documentation are governed by the terms<br />
set forth in your license.<br />
Copyright © 2014 by <strong>Magaya</strong> Corporation. All rights reserved.<br />
6
2. <strong>Magaya</strong> <strong>Accounting</strong> System Overview<br />
2. MAGAYA ACCOUNTING SYSTEM OVERVIEW<br />
INTRODUCTION<br />
Introduction<br />
All <strong>Magaya</strong> products include a complete accounting system that is integrated<br />
with the operations features in the software. For example, when you add charges<br />
to a Warehouse Receipt or Shipment, the <strong>Magaya</strong> system transfers all the information<br />
so you can create bills, invoices, and other accounting transactions<br />
easily.<br />
The following diagram illustrates the accounting processes and the financial<br />
reports included in the <strong>Magaya</strong> system:<br />
The accounting system also includes financial reports such as the balance sheet<br />
and the profit and loss report that you can create in <strong>Magaya</strong> Explorer.<br />
There is an <strong>Accounting</strong> Wizard you can use when you first install the <strong>Magaya</strong><br />
software. This will help you set the beginning balance of all the accounts as of<br />
the date you start using the <strong>Magaya</strong> system. See Chapter 3 "<strong>Accounting</strong> Wizard"<br />
in this manual for details.<br />
7
ACCOUNTING FOLDER OVERVIEW<br />
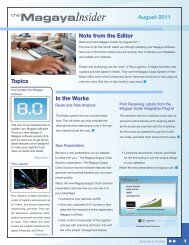
<strong>Accounting</strong> Folder Overview<br />
In the <strong>Magaya</strong> Explorer <strong>Accounting</strong> folder there is a list of functions to enable<br />
you to perform common accounting transactions such as create invoices, bills,<br />
payments, deposits, and checks and to enter rates:<br />
The following is a brief overview of the features in the <strong>Accounting</strong> folder (each<br />
of these topics is covered in detail throughout the <strong>Magaya</strong> <strong>Software</strong> <strong>Accounting</strong><br />
<strong>Manual</strong>):<br />
• Chart of Accounts: This is the general ledger accounts definition (where<br />
you enter the accounts definitions). It helps you keep track of your income<br />
and expenses by categorizing them by type. You can add accounts that are<br />
specific to your business. You can have one account such as “Documentation”<br />
for many different items such as the different types of documentation<br />
that you charge for, including EEI, air waybills, bill of lading, etc., or<br />
you can create an account for each one.<br />
• Items and Services: This shows codes for the services you provide such as<br />
ocean freight and the account name that service is associated with. You<br />
will use these items when creating and working with Accounts Receivable<br />
(AR) and Accounts Payable (AP) transactions.<br />
• Invoices (and Invoice List): These are your Accounts Receivable (AR)<br />
transactions. The following are types of AR transactions:<br />
– Add Invoice: this is for regular invoices<br />
– Add Credit Memo: this is for a refund. You send it to a customer if<br />
you overbilled them. It is also used for agents you owe money to; the<br />
credit memo is automatically generated during Liquidation.<br />
• Bills (and Bill List): These are your Accounts Payable (AP) transactions.<br />
The following are types of AP transactions:<br />
– Add Bill: for items that do not have bills such as the rent, salaries, etc.<br />
(you do not have to make a bill for these; it is optional)<br />
8
ACCOUNTING FOLDER OVERVIEW<br />
– Add Bill Credit: if you overpaid a vendor (or they overbilled you),<br />
then you make a record of the credit they give you. If you owe them<br />
a balance, you might deduct it from that balance. When you write<br />
the check, the <strong>Magaya</strong> software will subtract the credit. If they send<br />
you a refund check, you can create a Payment which will be a<br />
Vendor Refund.<br />
• Payments (and Payment List): When you receive payments from<br />
customers, the payments will be listed here. You can create a customer<br />
payment or a vendor refund here by selecting it from the dropdown arrow<br />
of the “Add” button. Types of payments you can make:<br />
– Customer Payment: Used to record what a customer pays<br />
– Vendor Refund: Used when a vendor sends you money (a refund,<br />
maybe they overcharged you)<br />
• Deposits (and Deposit List): This records your deposits to the bank. Types<br />
of deposits are:<br />
– Deposit Payment: to deposit a payment you received from a<br />
customer<br />
– Deposit: to deposit monies from any other source such as a loan<br />
• Checks (and Check List): This records the checks to make payments to<br />
your vendors. The following are the types of checks you can create:<br />
– Pay Bills (check): to pay regular bills<br />
– Check to Expense: to pay for items that you do not have bills for such<br />
as rent, salary, etc.<br />
– Refund Check: a check that you create to give your customer a<br />
refund<br />
– Pay Sales Tax: a check to pay sales taxes that you collect from<br />
Accounts Receivable (AR).<br />
These topics are explained throughout the <strong>Magaya</strong> <strong>Accounting</strong> <strong>Manual</strong>. To find<br />
any topic quickly in the PDF, go to the Index and click on the index word.<br />
For details on using rates and how to automate some accounting tasks, see the<br />
<strong>Magaya</strong> <strong>Software</strong> Customization <strong>Manual</strong>.<br />
Navigating: For any list, you can right-click on an entity or transaction to access<br />
a pop-up menu of options. The same menu is available from the Actions button<br />
in each list. You can also see open transactions for any customer, vendor, etc. by<br />
right clicking on the entity name in the Maintenance folder.<br />
9
CONFIGURE YOUR ACCOUNTING SYSTEM<br />
Configure your <strong>Accounting</strong> System<br />
When you first begin using <strong>Magaya</strong> software, we recommend that you enter<br />
accounting data to customize the system to your company’s needs. Start with<br />
the <strong>Accounting</strong> Wizard, which is explained in Chapter 3, and also see Chapter<br />
10 in the <strong>Accounting</strong> manual to review the accounting configuration menu.<br />
This will help you set up your document numbering system and how to make<br />
system-wide settings related to currency and more. Settings per customer are<br />
made in the Customer’s profile dialog box (in the Maintenance folder).<br />
<strong>Magaya</strong> Corporation also offers training in the software in general and specifically<br />
for accounting staff and managers, customizations of documents,<br />
importing your company’s previous accounting data, and more. Contact your<br />
<strong>Magaya</strong> Logistics Advisor for options and prices.<br />
10
3. ACCOUNTING WIZARD<br />
ACCOUNTING WIZARD OVERVIEW<br />
3. <strong>Accounting</strong> Wizard<br />
<strong>Accounting</strong> Wizard Overview<br />
The <strong>Accounting</strong> Wizard is designed to help you enter your company's<br />
accounting information into the <strong>Magaya</strong> system. This is an easy way to enter the<br />
beginning balances for accounts, customers, and vendors as of the date you start<br />
using the <strong>Magaya</strong> system.<br />
Setting up this information is usually done when <strong>Magaya</strong> software is first<br />
installed. If this wizard was not used then, it can be used now or at any time. It<br />
is recommended that you use this accounting wizard and the Startup Wizard. It<br />
is especially important if you will be working in more than one currency that<br />
you select the home currency to match the currency of your country in the<br />
Startup Wizard; home currency will affect tax transactions. The Startup Wizard<br />
is explained in the <strong>Magaya</strong> Cargo System Operations <strong>Manual</strong>.<br />
The <strong>Accounting</strong> Wizard helps you set up your:<br />
• Chart of Accounts (also called the general ledger)<br />
• Items and Services<br />
• Opening balances of your customers and vendors<br />
Each screen in the wizard contains instructions to help you work through the<br />
wizard. You can go forward and back in the screens to change information.<br />
When you finish the wizard, all the information is saved in your <strong>Magaya</strong> system.<br />
Additional setup of accounting related options can be done in the Maintenance<br />
> Configuration menu. See Chapter 10 of the <strong>Magaya</strong> <strong>Software</strong> <strong>Accounting</strong><br />
<strong>Manual</strong>.<br />
11
ENTER INFORMATION IN THE ACCOUNTING WIZARD<br />
Enter Information in the <strong>Accounting</strong> Wizard<br />
Go to the File menu and select “<strong>Accounting</strong> Wizard”.<br />
The Welcome screen opens:<br />
Click the "Next" button to start the wizard.<br />
Select the month that you want to assign as the beginning of your fiscal year.<br />
This is required to calculate earnings for the year. The system will use this<br />
month to automatically close the year.<br />
On the Chart of Accounts screen, add or edit accounts as needed. (The software<br />
provides a default list of accounts. It is recommended that this information be<br />
entered in the wizard so you can use the accounting features in the <strong>Magaya</strong> software.)<br />
Also enter opening balances for accounts that you need such as petty cash and<br />
bank. (For more details on entering opening balances, see the section "Enter<br />
Opening Balances".)<br />
12
ENTER INFORMATION IN THE ACCOUNTING WIZARD<br />
This is the wizard screen for the Chart of Accounts:<br />
• The opening balance is used by the system to create a journal entry that<br />
credits that account for the balance and debits the beginning balance<br />
equity account.<br />
• More details about the Chart of Accounts can be found in the chapter<br />
(topic) “Chart of Accounts”.<br />
On the Items and Services screen, add or edit the Items and Services as needed.<br />
(The software provides a default list of items and services. To add a new item or<br />
service, click the Add button. Existing items can be changed by using the Edit<br />
button.) This is the wizard screen for the Items and Services:<br />
13
ENTER INFORMATION IN THE ACCOUNTING WIZARD<br />
For more details on Items and Services, see the chapter (topic) "Items and<br />
Services".<br />
On the next screen, enter opening balances for forwarding agents. In the<br />
<strong>Magaya</strong> system, forwarding agents are considered “customers”. Add or edit<br />
opening balances by clicking on the Add or Edit buttons for:<br />
• Customers (this includes forwarding agents). When you enter the opening<br />
balance for a customer, the system will automatically create an invoice for<br />
the customer for that amount that will go to AR, and the line item will be<br />
assigned to the Items and Services for beginning balance income. The<br />
screenshot shows forwarding agents; the Customers screen functions the<br />
same way.<br />
• Vendors (this includes carriers, sales persons, and warehouse providers).<br />
The system will automatically create a bill and send it to AP, and the line<br />
in the bill will use the beginning balance expense.<br />
• The wizard screens for each of these functions the same way.<br />
Click the Finish button when you are done. Your information will be saved.<br />
After completing all the screens in the <strong>Accounting</strong> Wizard, you can modify and<br />
add to the information entered at any time by opening the <strong>Accounting</strong> folder or<br />
by returning to the <strong>Accounting</strong> Wizard.<br />
14
ENTERING OPENING BALANCES<br />
ENTER INFORMATION IN THE ACCOUNTING WIZARD<br />
Entering Opening Balances<br />
To enter opening balances in your <strong>Magaya</strong> software follow these steps.<br />
This procedure is recommended after using the <strong>Accounting</strong> Wizard to set up<br />
your accounting details.<br />
Before beginning the steps below, have a trial balance report that lists all your<br />
profit and loss accounts from your previous system so you can enter the data<br />
from it into your <strong>Magaya</strong> system. You may already have a report that you used<br />
to enter details in the <strong>Accounting</strong> Wizard; you can use the same report for this<br />
procedure.<br />
1) Create a Trial Balance Report in your <strong>Magaya</strong> system:<br />
• Go to the <strong>Accounting</strong> folder > Chart of Accounts<br />
• Click the Actions button and select Reports > Trial Balance<br />
• Find the opening balance income and expense<br />
This trial balance report displays all the data you entered in the<br />
<strong>Accounting</strong> Wizard.<br />
2) Create a Journal Entry in your <strong>Magaya</strong> system:<br />
15
ENTERING OPENING BALANCES<br />
ENTER INFORMATION IN THE ACCOUNTING WIZARD<br />
• Go to the <strong>Accounting</strong> folder > Chart of Accounts<br />
• Click the Actions button and select General Journal Entries.<br />
• Click the Add button to open a Journal Entry dialog box.<br />
3) Add the following items in the Journal Entry dialog box:<br />
• Click the Add button to activate a line in the detail table.<br />
• In the Account Name column, select Opening Balance Income.<br />
If there was a Debit in the Trail Balance, then enter the amount in<br />
the Credit column. This reverse is required for this step.<br />
• Click the Add button again, and in the Account Name column,<br />
select the Opening Balance Expense. If there was a Debit amount for<br />
this expense in your Trial Balance, enter the amount in the Credit<br />
column. This reverse is required for this step.<br />
4) Enter your other account names in the Journal Entry dialog box. For<br />
example, enter the debit and credit for the air freight income and cost.<br />
Continue to enter all your accounts. If you had an account in your<br />
previous system but it is not showing in the <strong>Magaya</strong> list of default<br />
accounts, you can create it: Click the Plus sign in the dropdown menu of<br />
the Account Name column and add the account.<br />
16
ENTERING OPENING BALANCES<br />
ENTER INFORMATION IN THE ACCOUNTING WIZARD<br />
5) To make the debit and credit totals equal, add the account “Opening<br />
Balance Equity” and enter the difference between the credit and debit<br />
amounts. If the debit is short, enter the difference in the Debit column. If<br />
the credit amount is short, enter the difference in the Credit column.<br />
6) Click OK in the Journal Entry dialog box to save.<br />
Now your the Debits and Credits are equal, and the opening balances are<br />
complete.<br />
17
ENTERING OPENING BALANCES<br />
ENTER INFORMATION IN THE ACCOUNTING WIZARD<br />
18
4. CHART OF ACCOUNTS<br />
INTRODUCTION<br />
4. Chart of Accounts<br />
Introduction<br />
The Chart of Accounts is a list of accounts in your general ledger. It helps you<br />
keep track of your income and expenses by categorizing them by type. Then you<br />
can generate reports to see the different types of income you are bringing in and<br />
what types of expenses you have.<br />
The <strong>Magaya</strong> system has many accounts in the Chart of Accounts folder by<br />
default. You can add accounts that are specific to your business. You can have<br />
one account such as “Documentation” for many different items such as the<br />
different types of documentation that you charge for, including EEI (formerly<br />
SED), air waybills, bill of lading, etc., or you can create one account for each.<br />
The following screenshot shows a close-up of the Chart of Accounts, highlighting<br />
the Air Freight Cost, Air Freight Income, and their account type.<br />
19
ADD TO THE CHART OF ACCOUNTS<br />
Add to the Chart of Accounts<br />
Step-by-Step Procedure:<br />
1) Go to the <strong>Accounting</strong> folder and click "Chart of Accounts".<br />
2) Click the “Add” button. A dialog box opens:<br />
Use the first dropdown menu to select a type of account. The Type<br />
“Accounts Receivable” displays by default. Choices are:<br />
• Accounts Receivable (AR): This is the money that is owed to you<br />
(considered an asset).<br />
• Accounts Payable: (AP) This is money that you owe (considered a<br />
liability).<br />
• Income: Defines where money comes from.<br />
20
ADD TO THE CHART OF ACCOUNTS<br />
• Expense: Used to define what you are spending money on.<br />
• Cost of Good Sold: Use this to determine the cost of the items you<br />
sell.<br />
• Bank: Use this account for checking and savings transactions,<br />
money market accounts and petty cash.<br />
• Undeposited Funds: Money you hold to deposit later.<br />
• Fixed Assets: For equipment or furniture that will not be converted<br />
to cash within one year.<br />
• Other Assets: Use this account designation for any asset that cannot<br />
be classified as Fixed or Current.<br />
• Other Current Assets: For notes receivable that are due within one<br />
year, inventory value, etc.<br />
• Long Term Liability: Accounts that are due over a long period of<br />
time such as a mortgage, over one year.<br />
• Other Current Liability: Due within one year. Examples are sales tax.<br />
• Equity: The net worth of the company.<br />
• Credit Card: Create one “Credit Card” account per card to track<br />
business expenses paid for with the credit card. (You will also need<br />
to add the credit card company as a Vendor in the Maintenance<br />
folder.)<br />
3) Enter the account name and number.<br />
4) Select a parent account as needed. This allows for grouping accounts in<br />
reports (such as all freight accounts grouped together or all documentation,<br />
etc.)<br />
5) Options: Add any notes as needed. The “Inactive” box is available if you<br />
do not want to use this account in the future.<br />
21
ACTIONS IN THE CHART OF ACCOUNTS<br />
Actions in the Chart of Accounts<br />
The Actions button in the Chart of Accounts screen gives you many options.<br />
The following actions can be performed by clicking on the Actions button:<br />
• Other Reports: This option generates reports by name, type, account<br />
number, currency, parent account, or by type code.<br />
• Reports: This option offers the same list of reports as the “Reports” menu<br />
option on the top <strong>Magaya</strong> Explorer toolbar such as Profit & Loss, Balance<br />
Sheet, taxes, General Ledger menu, and more.<br />
• Transaction Listing: This enables you to see a list of transactions when<br />
you click on an asset or liability in the list. (This option is grayed out if you<br />
select income or expense.)<br />
• Reconcile: Use this option to reconcile the Bank Account. A screen opens,<br />
showing deposits and credits, checks and debits, balance totals and more.<br />
You have the option to add, edit, or delete transactions.<br />
• Replace Account: Use this to replace an account of the same type. The<br />
account will be replaced in any transactions where it has been used. This<br />
22
CONFIGURE DEFAULT ACCOUNTS<br />
is useful if an account has been duplicated or used incorrectly. After the<br />
account is replaced, you can disable or delete the old one.<br />
• General Journal Entries: This shows you a list of general journal entries.<br />
To learn how to add a new journal entry, see Chapter 10 in the <strong>Magaya</strong><br />
<strong>Software</strong> <strong>Accounting</strong> <strong>Manual</strong>, the topic "Journal Entries".<br />
• Divisions: This shows a list of divisions, if your company has divisions.<br />
For details on how to set up divisions, see the Divisions topic in the<br />
<strong>Magaya</strong> <strong>Software</strong> Customization <strong>Manual</strong>.<br />
• Tax Table: This shows a list of sales taxes (for merchandise you sell, not<br />
services). For details on how to add sales tax to your <strong>Magaya</strong> system, see<br />
the topic "Sales Taxes".<br />
• Choose Columns: Use this to select the columns you want to see.<br />
• Import (and Export): Use these options to send data from the <strong>Magaya</strong><br />
database or bring data into the <strong>Magaya</strong> database in XML or CSV formats.<br />
To view more details for an account, click the “Detail” button to open the<br />
Details panel.<br />
Configure Default Accounts<br />
Default accounts can be defined for AR, AP, and banking. Then the system uses<br />
these accounts when new transactions are created. If a default is not set up, the<br />
system uses the account present in the last equivalent transaction.<br />
To set up default accounts, go to Maintenance > Configuration > <strong>Accounting</strong>.<br />
Find the option “Configure default accounts.”<br />
23
INVENTORY ACCOUNTS<br />
Click the “Accounts” button. A dialog box opens.<br />
Select the default accounts from the dropdown menus. These are system-wide<br />
settings. To set your preferences for specific customers, go to the Maintenenace<br />
> Customers list. For more details on the Configuration menu, please see<br />
Chapter 10 of the <strong>Magaya</strong> <strong>Software</strong> <strong>Accounting</strong> <strong>Manual</strong>.<br />
Inventory Accounts<br />
If you buy and sell inventory, you can manage the accounting in <strong>Magaya</strong>.<br />
The software includes accounts for inventory, sales income, and cost of goods<br />
sold. You can also choose the costing method for inventory, either by average<br />
cost or by exact price per item which you specify. The accounting is shown in<br />
the Adjustments tab of invoices and in the Balance Sheet.<br />
Landed costs for freight can also be managed in the system.<br />
For details, see the sections in the <strong>Magaya</strong> <strong>Software</strong> <strong>Accounting</strong> <strong>Manual</strong> for<br />
Landed Costs, Average Cost, and <strong>Accounting</strong> Configuration. How to create and<br />
manage Purchase Orders and Sales Orders is included in the <strong>Magaya</strong> Supply<br />
Chain Solution Operations <strong>Manual</strong>. To customize and automate your<br />
accounting processes, please see the <strong>Magaya</strong> <strong>Software</strong> Customization <strong>Manual</strong>.<br />
24
5. ITEMS AND SERVICES<br />
INTRODUCTION TO ITEMS AND SERVICES<br />
5. Items and Services<br />
Introduction to Items and Services<br />
The “Items and Services” list in <strong>Magaya</strong> Explorer shows all the items and<br />
services your business buys and sells such as documentation services, freight<br />
services, crating fees, and more. Items and Services are used for sales reports<br />
such as how much ocean freight you sold or purchased, etc.<br />
<strong>Magaya</strong> software comes with a predefined list of items and services that will<br />
cover the needs of a standard logistics provider. You can modify it or add more<br />
to it based on your specific needs.<br />
Items and services are used in Accounts Payable and Accounts Receivable.<br />
When you use an item or service in an invoice, the line in the invoice will affect<br />
the account that this item applies to by adding or subtracting from it whether it<br />
is an invoice or a credit. The account will show in the Profit and Loss report.<br />
25
ADD ITEMS AND SERVICES<br />
Add Items and Services<br />
To add an item or a service to your <strong>Magaya</strong> system, follow these steps.<br />
1) Click on the Add button in the Items and Services subfolder. A dialog box<br />
opens:<br />
2) Select the type of item (or service). When you select a Type, it will not be<br />
an income or expense until you also select the Account type. Types of<br />
items and services available from the dropdown are:<br />
• Other: Use this for items (or services) that cannot be classified as<br />
Freight or as one of the other types listed.<br />
• Freight: Use this for freight items (or services) such as Ocean<br />
Freight or Air Freight.<br />
• Valuation: When you use this type to create an item, this value<br />
(value of the cargo) will appear on air waybills.<br />
• Tax: This is used for taxes such as duty taxes, and the amount will<br />
appear in air waybills.<br />
26
ADD ITEMS AND SERVICES<br />
• Other Freight: Use for items (or services) that relate to freight but<br />
are not actual freight such as Fuel Surcharge cost and income.<br />
• Inventory: Use this for items that you keep in your inventory and<br />
sell. If you select “Inventory” then the “Assets Account” and “Inventory<br />
Item” dropdowns will be available.<br />
3) For the “Tax Code” field, select a sales tax to apply to the item or service.<br />
(To set up the sales tax, go to Chart of Accounts, Actions button, Tax<br />
Table.)<br />
4) Enter a description of the item. The “Code” field will fill in automatically<br />
based on the description.<br />
5) Select an account the item (or service) will refer to in the general ledger<br />
(select the account you want when you run your income statement to see<br />
this item reflected in, depending on how detailed you want your income<br />
statement to be). The item (or service) will be income, expense or cost of<br />
goods sold depending on what account it is related to. For example a<br />
storage fee is assigned to a Cost of Services account. Ground Freight<br />
Income is assigned to a Ground Freight Income account.<br />
6) Enter a price. If you want to have the price calculated, use the “Tariff”<br />
button. For details on using the Tariff dialog box, see Chapter 2 in the<br />
<strong>Magaya</strong> <strong>Software</strong> Customization <strong>Manual</strong>.<br />
7) If you check the box to indicate this is a resale item, the fields below the<br />
checkbox will become available:<br />
• The checkbox “Create related resale item automatically” is used if<br />
you want your <strong>Magaya</strong> system to automatically create a resale item<br />
when either a manual expense or income charge is created.<br />
• Income Item (or Expense Item): If you selected an Income Account,<br />
then this field will be “Income Item”.<br />
• Preferred Vendor: This may be grayed out.<br />
• Assets Account: For purchasing inventory and reselling it. (This will<br />
be activated when you select the Type as “Inventory”).<br />
• Inventory Item: Select from the items in the dropdown or add a new<br />
item. (This will be activated when you select the Type as “Inventory”).<br />
This pulls from information from the Inventory Item Definitions<br />
that are located in the Warehousing folder.<br />
8) Click the OK button when done. The item (or service) now appears in the<br />
list.<br />
27
ACTIONS PERFORMED WITH ITEMS AND SERVICES<br />
Actions Performed with Items and Services<br />
To make reports based on the Items and Services, use the Actions button and<br />
select “Reports” from the pop-up menu.<br />
The following sales and purchase reports are available:<br />
The reports will be generated using the transactions for the items and services.<br />
Other Actions available from the Actions button include the option to choose<br />
the columns you want in the list, and to import or export the data in or out of<br />
the <strong>Magaya</strong> system.<br />
Replace Item: You can find and replace any existing item of the same type, and<br />
the system will update all the transactions that have that item in it. When you<br />
open the dialog box from the Actions menu, select the items to find and replace:<br />
28
ACTIONS PERFORMED WITH ITEMS AND SERVICES<br />
The Find and Replace feature is useful if an item has been duplicated or not used<br />
correctly. After the item is replace, you can choose to disable or delete the old<br />
item.<br />
The Items and Services list can be filtered by using the Standard or Advanced<br />
Filter. For details on filters, see Chapter 5 in the <strong>Magaya</strong> Cargo System Operations<br />
<strong>Manual</strong>.<br />
When using items and services in transactions, you can change the priority of<br />
charges so they display in the order you want in documents. See Chapter 6<br />
“Warehouse Receipts” of the <strong>Magaya</strong> Cargo System Operations <strong>Manual</strong> for full<br />
details on working with charges.<br />
For more details on working with inventory and resale items, see the section<br />
“Add Resale Items” in Chapter 7 of the <strong>Magaya</strong> Supply Chain Solution Operations<br />
<strong>Manual</strong>.<br />
29
ACTIONS PERFORMED WITH ITEMS AND SERVICES<br />
30
6. ACCOUNTS RECEIVABLE<br />
INTRODUCTION TO ACCOUNTS RECEIVABLE<br />
6. Accounts Receivable<br />
Introduction to Accounts Receivable<br />
Accounts Receivable (AR) is money owed to you in outstanding invoices. The<br />
sections of this topic will explain how to create the following transactions in<br />
<strong>Magaya</strong> software:<br />
• Invoices<br />
• Credit Memos<br />
• Payments<br />
• Deposits<br />
• Refunds<br />
All of these transactions are created by using a dialog box that transfers all the<br />
data into the document forms. The data is also saved in your <strong>Magaya</strong> system so<br />
you can create reports and more.<br />
<strong>Magaya</strong> Explorer offers AR reports to show which customers are overdue (aging<br />
reports), open (unpaid) invoices, and sales reports.<br />
31
CREATE INVOICES<br />
Create Invoices<br />
To create invoices in <strong>Magaya</strong> Explorer, follow these steps.<br />
1) In the Invoice (document or list), click on the Add button. Select “Add<br />
Invoice” from the pop-up menu.<br />
The Invoice dialog box opens. On the first tab, enter details of the transaction.<br />
Enter details in the Events, Attachments, Notes tab, and Internal<br />
Notes tabs as needed. Events and any attached documents or photographs<br />
32
CREATE INVOICES<br />
will be visible to customers in the interactive online tracking tool, <strong>Magaya</strong><br />
LiveTrack.<br />
Note: When working in the Document view, you can quickly see the status<br />
of the invoice by looking at the symbol in the document toolbar next to the<br />
navigation arrows:<br />
The List view also has a Status column which indicates if an invoice is open<br />
or paid. Other columns can be added via the Actions button.<br />
2) Enter information in the Invoice dialog box:<br />
• The Invoice number fills in automatically. For information on<br />
setting up the numbering of invoices, see the topic "<strong>Accounting</strong><br />
Configuration Menu".<br />
33
CREATE INVOICES<br />
• Select the customer that you are invoicing from the “Apply to” dropdown<br />
menu. The customer’s address and Payment Terms (if set) are<br />
filled in from their profile.<br />
• Select “Accounts Receivable” for the Account field. If you are<br />
working in multiple currencies, there will be at least one account<br />
available in the dropdown for each currency. To make the invoice in<br />
one of those currencies, select it from the dropdown list. For information<br />
on setting up your <strong>Magaya</strong> system to work with multiple<br />
currencies, see the topic "Multicurrencies".<br />
• The Transaction Date is set to today’s date.<br />
• When you select the payment terms, the Due Date field will update<br />
automatically. If you have pre-defined payments terms for your<br />
system or for this customer, the Payment Terms field will fill in automatically.<br />
34
CREATE INVOICES<br />
• Add Charges: Click the “Add” button in the Invoice dialog box to<br />
add charges to this invoice. A new dialog box opens:<br />
The Type you apply pulls information from the Items and Services<br />
list. The Type dropdown list for invoices will show you only Items<br />
and Services that refer to Income accounts.<br />
Add a description (optional). Additional information can be added<br />
in the Notes tab. Remember: Any notes you add will appear in the<br />
invoice for the customer to see.<br />
The Tax Code pulls from the Sales Tax Table.<br />
Enter the Quantity and Price. The Amount will be calculated automatically.<br />
The Unit can be a word such as “pounds”, “lbs”, or “each”.<br />
The Unit field is optional.<br />
Click the OK button. The charge fills in on the line in the Invoice<br />
dialog box. You can add as many charges to the invoice as needed by<br />
using the Add button. The totals are calculated.<br />
• If you need to edit a charge, select the line item for the charge and<br />
click the Edit button. To remove (delete) a charge, select the line<br />
item for the charge and click the Remove button.<br />
35
CREATE INVOICES<br />
• To add an Account line to an invoice, click the “Accounts” tab.<br />
This can be useful if you need to re-issue an invoice because a<br />
customer had non-sufficient funds (NSF) and their check bounced.<br />
Another example is if you want to offer a customer a discount. For<br />
details, see the section “Accounts Receivable Special Procedures” in<br />
Chapter 10.<br />
• If this invoice is related to a transaction such as a shipment or a WR,<br />
a button for that transaction will appear on the invoice dialog box.<br />
View the transaction by clicking the button.<br />
A periodic invoice will display a “History” button that will show all<br />
related transactions.<br />
36
CREATE INVOICES<br />
3) Click OK when you are finished entering all the information for this<br />
invoice. The data is transferred into an invoice form, and it is saved in your<br />
<strong>Magaya</strong> database.<br />
The invoice form can be changed by clicking the Actions button and<br />
choosing “Select Template”.<br />
In the dialog box, you can choose different templates and link them to this<br />
37
ACTIONS FOR INVOICES<br />
transaction or set the template as the default.<br />
If you click the “New” or “Copy” buttons, the <strong>Magaya</strong> Document Designer<br />
opens. This program is used for customizing templates. See the <strong>Magaya</strong><br />
<strong>Software</strong> Customization <strong>Manual</strong> for details.<br />
You print this invoice from the document view or print multiple invoices<br />
the list view.<br />
Actions for Invoices<br />
The Actions button for Invoices provides many features. You can access<br />
Actions while you are in the Invoice document view or in the Invoices List view.<br />
Hover over the Actions button and click the arrow on the side of the button.<br />
38
ACTIONS FOR INVOICES<br />
The following Actions are available from the Document view:<br />
The Actions button in the Invoices List view contains these options plus more:<br />
The Cargo Reports relate the operations and accounting information in the<br />
<strong>Magaya</strong> system, enabling you to see reports such as how much you have billed<br />
for certain ports or destination agents.<br />
Sales Reports that can be created are:<br />
39
ACTIONS FOR INVOICES<br />
• Open Invoices: View a report of open invoices. When the report opens,<br />
you can modify the report by choosing what columns to view, change the<br />
date range, filter the list, save or export it.<br />
• Open Invoices by Date: To view invoices that were open as of that date,<br />
regardless whether the invoice was paid after that date.<br />
• A/R Aging Reports: Select a report that shows details itemized or a<br />
summary to view what is overdue.<br />
• Invoice Details: A list of all invoices, including the detailed, itemized lines<br />
for each invoice.<br />
Other Actions button options:<br />
• Export the list to QuickBooks® or PeachTree® (Sage) accounting software<br />
programs to export the invoices you have filtered and to save them on<br />
your computer (or other directory) in a file format that can be opened in<br />
those applications.<br />
• Import invoices into your <strong>Magaya</strong> system: First format the data into CSV<br />
in a spreadsheet or plain text file. See an example in the section “Import<br />
Invoices.”<br />
• Go to a Document when you click on an invoice.<br />
• Print a batch of invoices that you have in a filtered list. In the printing<br />
wizard screen, there are options to select printers and templates.<br />
• Exclude the invoice from tracking online<br />
40
ACTIONS FOR INVOICES<br />
• Approve/Dispute an invoice (this option is available from the Actions<br />
button in the Invoices List or if you right-click on an invoice in the list.<br />
To approve or dispute invoices, the customer profile must have this Web<br />
Track access configured; see Chapter 10, “Advanced <strong>Accounting</strong><br />
Features”.)<br />
Click the button to either approve or dispute. Enter the reason in the<br />
dialog box.<br />
The comment appears in the Events tab for the transaction.<br />
• Receive payment for an invoice that you have clicked on. A dialog box<br />
opens. See the section .<br />
• For details in using the online payments option, see Chapter 9 in the<br />
<strong>Magaya</strong> <strong>Software</strong> Communications <strong>Manual</strong>.<br />
• Void a transaction you have selected.<br />
• Save as Recurrent: This will convert the selected invoice into a Recurrent<br />
Invoice that can be charged to the customer every month (or time period<br />
you set). Steps for creating recurrent invoices are in the <strong>Magaya</strong> <strong>Software</strong><br />
Customization <strong>Manual</strong>.<br />
• Copy an invoice.<br />
• To view a list of recurrent invoices, use the Actions button and select<br />
“Recurrent Invoices”.<br />
41
IMPORT INVOICES<br />
• Open Transactions: This options creates a list of all open transactions.<br />
Change the date range to see the time period you choose, or customize the<br />
list via the Actions button > Choose Columns.<br />
Other options in the Invoices List enable you to choose the columns or view the<br />
History of an invoice by selecting the invoice and the History option in the<br />
Actions button list.<br />
All of the above actions are also available when you right-click on a transaction<br />
in the list.<br />
To view more details about an invoice, select it and click the “Detail” button in<br />
the list view. This gives you more information in one glance.<br />
Import Invoices<br />
To import invoices into your <strong>Magaya</strong> system, first format the data into a<br />
Comma Separated Value (CSV) file. This can be done in a spreadsheet or a plain<br />
text file. Certain data is mandatory and other fields are optional. Create these<br />
fields as columns in the CSV file.<br />
Mandatory fields:<br />
• Entity name (the customer or vendor name)<br />
• Transaction number (such as the invoice number)<br />
42
IMPORT INVOICES<br />
• Date of the transaction (in contrast, the due date is optional)<br />
• AR/AP Account (which account the transaction is assigned to such as<br />
Accounts Receivable; if you need to learn more about accounts, please see<br />
Chapter 4 in the <strong>Magaya</strong> <strong>Software</strong> <strong>Accounting</strong> <strong>Manual</strong>)<br />
• Charge count<br />
• Quantity (For example, this invoice includes a Documentation charge and<br />
a Packaging charge, then it has two charges in this invoice)<br />
• Charge Name (for example, Documentation or Packaging)<br />
• Unit price (the price for one of the charge)<br />
• Amount (the total of the charges for this line: The Amount must equal the<br />
Quantity multiplied by the Unit price. For example, if you have one Documentation<br />
fee which costs $50, then the Amount must be 1 x 50, which is<br />
50 in this example.)<br />
Optional fields:<br />
The following data for these columns is optional:<br />
• Due Date<br />
• Notes<br />
• Charge Description<br />
Steps to Import Invoices into your <strong>Magaya</strong> system:<br />
1) Go to the Invoices list.<br />
2) Click Actions > Import. A dialog box opens.<br />
Extra Info: The columns in this dialog box are the same as the columns in<br />
your Invoices list. To change them, close this dialog box and make the<br />
changes to the columns in the list first (via the Actions button > Choose<br />
Columns). Then open this dialog box again.<br />
3) Click the “Import CSV” button in the dialog box.<br />
4) Browse to the file location on your computer or network, and click OK to<br />
import it. Verify the data in the Invoices List.<br />
43
PRINT INVOICES TO A FISCAL PRINTER<br />
Here is an example of two invoices and one credit memo imported:<br />
Options: To make changes to an invoice before it’s imported, select it in the list<br />
to highlight it and click “Edit.”<br />
Click “Save” and close the dialog box. The invoices are now saved to your<br />
Invoices List where you can work with them.<br />
If you experience any errors during importing, verify the columns in the CSV<br />
or text file.<br />
Print Invoices to a Fiscal Printer<br />
Fiscal printers are often used in countries in Latin America and other regions to<br />
collect tax revenue data. Your <strong>Magaya</strong> system can be configured to print<br />
invoices to a fiscal printer by selecting the printer model, etc. in the Configuration<br />
menu.<br />
To print an invoice to the fiscal printer, go to the document view of the invoice,<br />
select “Print > Print with Fiscal Printer.”<br />
The system verifies to determine if the invoice was already. If the invoice was<br />
already printed, then an error message will display. The system will ask you to<br />
confirm that you want to print because after it is printed, the invoice cannot be<br />
deleted (unless an admin configures the system to allow it). The charge must use<br />
the defined tax rates. See the Configuration menu > Fiscal Printer.<br />
44
PRINT INVOICES TO A FISCAL PRINTER<br />
Tax Rates: The charges in the invoice must have tax rates that match the tax<br />
rates of your fiscal printer.<br />
A record of the printing is now displayed in a new tab on the Invoice dialog box:<br />
Also view what has been printed by choosing the columns “Fiscal Transaction<br />
Number” and “Print Time” for the Invoices List.<br />
45
PRINT INVOICES TO A FISCAL PRINTER<br />
Close of Day: To close a fiscal session and print a report of all the operations that<br />
took place during this day, go to “<strong>Accounting</strong>” on the top menu and select<br />
“Close of Day” from the dropdown menu.<br />
To cancel an invoice printed to the fiscal printer, enable the option in the<br />
Configuration menu. Then create a credit memo. A credit memo can be created<br />
for an invoice in a partial amount. If more than one credit memo is created for<br />
this, then the total amount cannot exceed the amount of that invoice. To create<br />
this credit memo, go to the Invoice List, right-click and select “Create Credit<br />
Memo.” This option will only display if the invoice was printed via the fiscal<br />
printer. This credit memo can be printed or edited to cancel only certain charges<br />
in it. To see all the transactions related to a credit memo, click the “Detail”<br />
button on the List. You cannot delete an invoice that was fiscally printed and<br />
included in a shipment.<br />
To search for a fiscally printed invoice, use the Quick Find option and select<br />
“Invoice” as the transaction type and enter the fiscal transaction number.<br />
46
CREDIT MEMOS<br />
Credit Memos<br />
Credit Memos are issued if you overbilled a customer or if you need to give a<br />
discount after creating an invoice. (Note: Discounts can also be created another<br />
way; see Chapter 10, section “Accounts Receivable Special Procedures”.)<br />
Follow the steps below to create a Credit Memo.<br />
1) Go to Invoices (document or list view) and click the Add button. Select “Add<br />
Credit Memo.”<br />
47
CREDIT MEMOS<br />
A dialog box opens with the following tabs: the first tab is used for all the credit<br />
memo transaction details; the others are for Events, Attachments, Notes, and<br />
Internal Notes.<br />
• The fields in this dialog box are the same as in the Invoice dialog box. See<br />
the Invoices section for details. Reminder: All amounts will be treated a<br />
negative (a subtraction) for the selected accounts and items.<br />
When a credit memo has been paid to the customer (either in a check or credit<br />
on a balance), the status will be updated in the Invoices List. You can also see the<br />
status on the toolbar similar to the Invoices.<br />
When you enter this transaction, it will show a negative (deduction) in<br />
Accounts Receivable.<br />
48
ENTER PAYMENTS<br />
Enter Payments<br />
A Payment is a check or credit card payment that you receive from a customer.<br />
This process creates a record of the payment in your <strong>Magaya</strong> system. To create<br />
a Payment:<br />
1) Go to <strong>Accounting</strong> > Payments.<br />
2) Click the Add button and select “Customer Payment.”<br />
49
ENTER PAYMENTS<br />
Or, right-click from the List view and select “Receive Payment.”<br />
A dialog box opens.<br />
3) Enter the information you need in the payment transaction dialog box:<br />
50
ENTER PAYMENTS<br />
• The A/R Account of “Accounts Receivable” is selected by default.<br />
You can select a different A/R account. For example, if you are<br />
working in multicurrency and select an A/R account with another<br />
currency, this payment will be made in that currency, and that A/R<br />
account will be updated with this payment transaction.<br />
51
ENTER PAYMENTS<br />
• Select the customer who is making the payment. When you select<br />
the customer, you will see any outstanding invoices or credit memos<br />
for them. The checkbox to show open invoices is checked by default.<br />
If payment terms were set for this customer on their profile (or set<br />
system-wide in the Configuration menu), then any applicable<br />
discount will display.<br />
The “Suggested Discount” is the amount calculated by the system.<br />
The “Discount” is the actual discount applied. Click the “Apply<br />
Discounts” button to accept the suggested discount and apply it.<br />
When you click the “Apply Discount” button, the screen is updated<br />
and the button is grayed out. (A discount can only be applied one<br />
52
ENTER PAYMENTS<br />
time per invoice. The invoice must have a remaining balance of zero<br />
to qualify for the discount.)<br />
Option: <strong>Manual</strong>ly type a discount amount in the “Discount” column.<br />
The “Accounts” tab displays the discount. The account that the<br />
discount is applied to can be changed on that tab if needed.<br />
To apply a discount manually for a customer that does not have<br />
payment terms set, see the section “Accounts Receivable Special<br />
Procedures” in Chapter 10.<br />
• Additional fields on the Payment dialog box:<br />
Select the bank account to deposit the payment. The checkbox next<br />
to the “Deposit to” field is not checked by default. If you leave it<br />
unchecked, the money will be sent to the Undeposited Funds<br />
account in your <strong>Magaya</strong> system to hold until you go to the bank with<br />
all the deposits. (Then you will create a “Deposit Payment” transaction<br />
in the Deposits subfolder).<br />
• Enter the check number from the check that the customer sent you.<br />
• The date will be filled in with today’s date. It can be changed as<br />
needed.<br />
• Enter the amount of the payment. If there are outstanding invoices,<br />
the payment amount will be deducted from the total. You can also<br />
click on the Invoices in the list to apply the payment.<br />
• Enter a memo (note) as needed.<br />
• Click on the invoice to be paid. A checkmark appears in the<br />
checkbox and the Amount Due changes to Amount Paid. To enter a<br />
partial payment, click in the “Amount Paid” table cell of the invoice<br />
and type in the amount paid.<br />
53
ENTER PAYMENTS<br />
• Click the OK button when done. All the information is saved, and a<br />
Payment document is created automatically.<br />
The Payments List will be updated and display the new transaction.<br />
Overpayment: You can enter an amount that is larger than what is listed<br />
in the Invoices screen. A notice will appear, as shown in this example:<br />
This example shows an overpayment of $271.15. Click “Yes” if you want<br />
to accept the payment, or click “No” if you need to make a change. The<br />
difference will remain as a credit for that customer.<br />
The next time you accept a payment from this customer, the credit will<br />
appear in the list. The amount can be applied to future invoices, or you can<br />
create a refund check.<br />
Advanced Payment: Enter the amount in the “Amount” field and click<br />
“OK”. The amount will show as a “Payment” and will be available as a<br />
credit toward future invoices.<br />
Wire Transfer Fees: See the section “Accounts Receivable Special Procedures”<br />
in Chapter 10.<br />
54
ACTIONS FOR PAYMENTS<br />
Actions for Payments<br />
The Actions button in Payments (list view or document view) enables you to<br />
create reports and more.<br />
Reports can be created by account number, name, currency, etc. Reports can be<br />
configured with different fonts and more.<br />
To view a payment, select it and choose the “Go to Document” option.<br />
To see undeposited funds, click on this option. A list opens of funds that have<br />
not been taken to the bank yet.<br />
You can also choose the columns you want in your list, export or import data,<br />
and view the history of a transaction.<br />
These actions are also available when you right-click on a transaction in the list.<br />
View more details about a Payment by selecting it and clicking the “Detail”<br />
button.<br />
Customer Payment Terms<br />
The system includes a set of default payment terms and a way to define your<br />
own payment terms. The terms can be used in transactions such as Quotations,<br />
POs, Invoices, etc. (This feature is available in <strong>Magaya</strong> software version 9.3 and<br />
higher.)<br />
Payment terms can be set system-wide or per customer. You can use them to<br />
offer discounts to customers who pay early. Then the discount will be applied<br />
automatically and show in Invoices.<br />
55
CUSTOMER PAYMENT TERMS<br />
If you had an account in your Chart of Accounts set up to handle discounts, you<br />
can still use it. If not, the system now includes one called “Customers<br />
Discounts.”<br />
Below are the options for setting up payment terms:<br />
Define your own payment terms (optional):<br />
Go to Maintenance > Configuration > Payment Terms<br />
56
CUSTOMER PAYMENT TERMS<br />
Note: Only users with permissions can access this configuration.<br />
1) To create your own payment term, click the “Add” button. A dialog box<br />
opens.<br />
2) The “Description” field is optional. If you do not fill it in, the system will<br />
based on the other fields.<br />
3) The Net Due (days) field is the number of days when the transaction is<br />
due.<br />
4) Enter the Discount percentage (optional) and the number of days when<br />
the discount will be given. In this example, the customer will receive a 5%<br />
discount if they pay within 15 days. Or, the total is due in 60 days.<br />
Now this payment term will be available to use. Discounts are also shown on the<br />
Profit & Loss report.<br />
System-wide Payment Terms Setup:<br />
If you want to create system-wide payment terms for all customers, enter it in<br />
the <strong>Accounting</strong> Configuration menu.<br />
57
CUSTOMER PAYMENT TERMS<br />
This payment term will be applied to every new customer that is created. It will<br />
also be the default payment term for every new invoice created, unless you<br />
already have set up a customer’s payment term.<br />
1) Go to Maintenance > Configuration > <strong>Accounting</strong>.<br />
On the “Main” tab, select the dropdown menu for “Default payment terms<br />
for.”<br />
This setting will apply to all customers.<br />
58
CUSTOMER PAYMENT TERMS<br />
2) Click the “Accounts” button to configure the default accounts. A dialog<br />
box opens.<br />
3) Select the accounts to use for A/R, A/P, checks, deposits, and discounts for<br />
customers and vendors.<br />
If you had an account defined for discounts, you can still use it.<br />
59
DEPOSITING PAYMENTS<br />
Set up Payment Terms per Customer:<br />
1) To assign a payment term to a customer, open their profile and click the<br />
“Pmt. Terms” tab.<br />
2) Select the payment term from the dropdown menu.<br />
3) Click OK to save the setup. These terms will be applied to this customer’s<br />
invoices automatically, and the due date will be set based on the terms. (It<br />
can be changed at any time.)<br />
Depositing Payments<br />
Deposits of payments that you get from customers can be created in the<br />
Deposits List or document view. There are two types of deposits:<br />
• Deposit Payment: Use this option when you are depositing money from<br />
the Undeposited Funds account.<br />
• Deposit: Use this when you are making the type of deposit such as if you<br />
receive a loan from a bank. See the topic "Banking" for details.<br />
To deposit a payment:<br />
60
DEPOSITING PAYMENTS<br />
Click on the Add button and select “Deposit Payment”:<br />
A dialog box opens.<br />
• Select the bank account that the deposit will go to.<br />
• The date will be filled in with today’s date.<br />
• Add a memo (note) as needed.<br />
• The checkbox to show all undeposited funds will be checked by default if<br />
the deposit you are making is new (not existing). If the list is too long,<br />
uncheck the box to see only the deposits related to the transaction you are<br />
working on.<br />
61
DEPOSITING PAYMENTS<br />
• In the list of Payments, click in the checkbox of the transactions you want<br />
to deposit. The text will change from “No” to “Yes”.<br />
• Click the OK button when done. A deposit ticket is ready:<br />
62
ACTIONS FOR DEPOSITS<br />
The payment is now considered deposited according to your <strong>Magaya</strong><br />
accounting system. If you are receiving payments from customers online,<br />
deposit those payments just as any other deposit.<br />
Actions for Deposits<br />
The Actions button for Deposits can be accessed from the document view or list<br />
view for the following options:<br />
• Reports: By account name, memo, etc.<br />
• Go to Document: The Deposit appears in the viewing pane.<br />
• Void Deposit: This will void the transaction but not delete it, so there is a<br />
record of the void in the Transactions log.<br />
• Print Batch: This will print the transactions you have filtered.<br />
• Choose Columns: A dialog box opens with options to include or exclude<br />
columns and rearrange them.<br />
• Export: A dialog box opens where you can select the location (folder) to<br />
export data.<br />
• History: A dialog box opens showing any transactions related to the transaction<br />
you have selected.<br />
View more details about a Deposit by selecting it and clicking the “Detail”<br />
button.<br />
Refund Check<br />
There are two different types of refunds you can create in <strong>Magaya</strong> Explorer:<br />
The “Refund Check” function is located in Checks (list and document view).<br />
Use this when a customer overpaid you and you will write them a check for the<br />
amount. In order to issue a Refund Check, a credit must exist for that customer<br />
either as a Credit Memo or as an advanced payment or an overpayment.<br />
A “Vendor Refund” is available in Payments. Use this when you receive a refund<br />
from a vendor. For details on vendor refunds, see the topic "Accounts Payable".<br />
Follow the steps below to create a Refund Check.<br />
63
REFUND CHECK<br />
In Checks, click on the Add button and select “Refund Check”.<br />
A dialog box opens.<br />
• Select the A/R Account. This will pull from the Chart of Accounts. If you<br />
are working in multicurrency, select the account for the proper currency<br />
64
REFUND CHECK<br />
for this check. This screenshot shows the dropdown list with the Euro<br />
(EUR) and Venezuelan Bolivar (VEB) included in the list:<br />
• Select the Bank Account that you are using to pay the refund.<br />
• Select the company that you are creating a refund check for.<br />
• Enter a Memo if needed.<br />
• Check the box to show all non refunded credits.<br />
• In the Credits list, click on the credit you are working with or enter in the<br />
amount for each credit.<br />
• Enter the refund amount in the Amount field.<br />
• Click the OK button.<br />
A refund check will appear in the viewing pane.<br />
65
CUSTOMER STATEMENTS<br />
Customer Statements<br />
To view, print or email a statement for a customer, right-click on their name in<br />
the Customer list (in the Maintenance folder). Select the Statement option.<br />
Select multiple customers at once to print or email a batch.<br />
66
7. ACCOUNTS PAYABLE<br />
INTRODUCTION TO ACCOUNTS PAYABLE<br />
7. Accounts Payable<br />
Introduction to Accounts Payable<br />
Accounts Payable (AP) are bills from your vendors that you need to pay. The<br />
sections of this topic explain how to create the following transactions in <strong>Magaya</strong><br />
Explorer:<br />
• Bills<br />
• Bill Credits<br />
• Bill Payments<br />
• Vendor Refunds<br />
To see a list of unpaid bills, use the Actions button in the Bills list. For information<br />
on how to create reports of unpaid bills and aging AP, see Chapter 9,<br />
section “Purchase Reports”.<br />
Create Bills<br />
To create a bill, go to Bills (the document or list view) in the <strong>Accounting</strong> folder<br />
in <strong>Magaya</strong> Explorer. Bills are often created for telephone expenses, marketing,<br />
etc.<br />
67
CREATE BILLS<br />
Click on the Add button and select “Add Bill”.<br />
A dialog box opens. It has three tabs: Bill, Notes, Internal Notes.<br />
• On the Bill tab, the transaction number fills in automatically, but you may<br />
override this and enter the actual bill number from the vendor.<br />
• Select the Account to the “Accounts Payable” account you need for this<br />
bill. If you are working in multiple currencies, there will be at least one<br />
68
CREATE BILLS<br />
account available in the dropdown for each currency. To make the bill in<br />
one of those currencies, select it from the dropdown list. For information<br />
on setting up your <strong>Magaya</strong> system to work with multiple currencies, see<br />
the topic "Multicurrencies".<br />
• Select the vendor. The address will fill in automatically. If you need to<br />
change the address for this transaction, click the “Change” button and<br />
enter the new information. If you have set payment terms for this vendor<br />
or your system, the terms will display here and set the due date. (Extra<br />
Info: Payment terms are set in the Vendor’s profile or Configuration ><br />
Payment Terms.)<br />
• The Transaction Date fills in automatically with today’s date. (Enter the<br />
date of the bill if needed.)<br />
• The Due Date is filled in automatically based on the terms for this vendor.<br />
Change the due date if needed.<br />
• Click on the “Add” button to add charges to the bill. A dialog box opens:<br />
The “Type” selected will pull information from the Items and Services list<br />
(which will show only Items and Services that refer to expense (or COGS)<br />
accounts for this dropdown menu).<br />
The description is optional. Additional information can be added in the<br />
Notes tab. Any notes you add will appear in the invoice for the customer<br />
to see.<br />
Enter the quantity and price. The amount is calculated automatically.<br />
Units is optional (examples are: “pounds”, “lbs”, “each”, etc.).<br />
Click the OK button. The information is saved in the Bill transaction. You<br />
can add as many charges as needed to the Bill.<br />
69
ACTIONS FOR BILLS<br />
On the Bill screen, enter any Notes or Internal Notes as needed by clicking on<br />
the tabs.<br />
Click the OK button when done. The bill will be updated in the Bills List and the<br />
document.<br />
Configuration Note: If you sell inventory and want to be able to create bills<br />
before inventory items are received, set this option in Configuration ><br />
Purchasing.<br />
Ensure the box is unchecked to allow the system to create bills for POs only after<br />
all inventory is received. In contrast, if this box is checked, then you will not be<br />
able to make bills until after receiving the items.<br />
Actions for Bills<br />
When you are viewing a bill, you can click on the Actions button to pay the bill,<br />
void it, save it as a recurring bill, select a template or view the history. Each of<br />
these will be explained in this section. First let’s look at the Actions button menu<br />
from the document view:<br />
70
ACTIONS FOR BILLS<br />
When you access the Actions button from the list view, you see these options<br />
plus the following:<br />
The Actions list is also available when you select a bill and right-click on it.<br />
The following is a list of all the Actions:<br />
• Create Cargo Reports: Select a bill, click on the Actions button, and click<br />
on the “Cargo Reports” option. Select the type of cargo report you need.<br />
The Cargo Reports relate the operations and accounting information in<br />
the <strong>Magaya</strong> system, enabling you to see reports such as how much you<br />
have billed for certain ports or destination agents.<br />
• Create Purchase Reports: Use this option to create reports of all unpaid<br />
bills or unpaid bills as of a certain date. Other options are create an aging<br />
accounts payable (in detail or a summary) report and a Bill Detail report.<br />
The report opens in the viewing pane. You can adjust the columns in the<br />
reports, save a report, filter the information, or export the report data.<br />
• Export the data in the bill list to QuickBooks® or PeachTree® accounting<br />
software programs to export the bills you have filtered and to save them<br />
on your computer (or other directory) in a file format that can be<br />
imported in those applications.<br />
• To view a bill, select the document to highlight it and select “Go to Document”.<br />
• Print a batch of bills you filtered.<br />
• Pay a bill: A dialog box opens. For information on filling in the fields, see<br />
the section “Create Bills.”<br />
71
ACTIONS FOR BILLS<br />
• Void a transaction: Select the bill and click on this option to void a transaction.<br />
• Save as Recurrent: This is useful to create a recurring bill based on the bill<br />
you are viewing if it is a bill you need to pay each month. A wizard walks<br />
you through the steps. See details in the <strong>Magaya</strong> <strong>Software</strong> Customization<br />
<strong>Manual</strong>, Chapter 2. Also find steps for periodic billing there too.<br />
• Recurrent Bills: This will display a list of recurrent bills.<br />
• Open Transactions: This opens a list of open transactions. Set the date<br />
range as needed in the list.<br />
• Choose columns in the list.<br />
• Import or Export data into or out of <strong>Magaya</strong> database<br />
• History: This opens a list of any transactions related to the one selected.<br />
To pay more than one vendor, see the section “Pay Multiple Vendors”.<br />
Note: Users of the <strong>Magaya</strong> Supply Chain Solution can create bills from Purchase<br />
Orders for more than one vendor. See Chapter 9 on Purchase Orders in the<br />
<strong>Magaya</strong> Supply Chain Solution Operations <strong>Manual</strong>.<br />
If a PO is created with landed costs, the charges will be prorated. When the bill<br />
is created from the PO, the landed costs will be added to the asset account. Learn<br />
more about landed costs in the topic “Landed Costs” included in the <strong>Magaya</strong><br />
<strong>Software</strong> <strong>Accounting</strong> <strong>Manual</strong>.<br />
To view more details about a bill, select it and click the “Detail” button.<br />
Purchase a Fixed Asset:<br />
72
BILL CREDITS<br />
When you purchase a fixed asset, you can create a bill for it. For example, when<br />
purchasing a vehicle for your company, enter a bill which goes to Assets for your<br />
company.<br />
Make payments just as you would for any other payments such as for a loan or<br />
to pay a credit card by using the Check to Expense. Depreciation is recorded<br />
using Journal Entries.<br />
Bill Credits<br />
A Bill Credit is a credit from a vendor. The credit may be the result of an overpayment<br />
you made to the vendor or if they overbilled you. (If they send you a<br />
refund check, you will create a Vendor Refund in the Payments List.)<br />
The following steps explain how to process a Bill Credit in <strong>Magaya</strong> Explorer.<br />
73
BILL CREDITS<br />
In Bills (document or list view), click on the Add button and select “Bill Credit”.<br />
A dialog box opens. There are the following tabs: Credit, Notes, and Internal<br />
Notes. The date and transaction number are filled in automatically.<br />
This screen is the same as the Bill screen. See the steps in the section "Create<br />
Bills" to fill the fields of the Bill Credit. Please note that the bill credit will be<br />
subtracted from Accounts Payable and will show as a negative in the AP.<br />
74
BILL PAYMENTS<br />
Bill Payments<br />
To pay bills, go to the Checks list (or document view) and click on the “Add”<br />
button. Select “Pay Bills (Check)”.<br />
Use this option to create a check for a bill such as telephone bills or freight bills,<br />
etc.<br />
• Select the A/P Account for this bill. (If you are working in multicurrency<br />
and select an A/P account with another currency, this payment will be<br />
75
BILL PAYMENTS<br />
made in that currency, and that A/P Account will be updated with this<br />
payment transaction.)<br />
• Enter the check number. (For information on setting up the numbering of<br />
checks, see the topic "<strong>Accounting</strong> Configuration Menu"“<strong>Accounting</strong><br />
Configuration Menu”.)<br />
• Select the Bank Account to use for this check. If you have a credit card set<br />
up in the Chart of Accounts, you can select it here also. (The balance for<br />
the bank account selected is displayed on the bottom of the dialog box.)<br />
• The date is filled in automatically.<br />
• Select who to pay the check to (“Pay to the Order of”). If there are any<br />
existing credits or discounts to apply, the amount will be displayed at the<br />
bottom of the screen. (If the vendor offered you a discount, and you<br />
entered it on the Bill, it will display here.)<br />
• Add a memo as needed.<br />
• Check the box to show all open bills in the Bills List. If there are multiple<br />
bill, select the one you want to pay.<br />
• Enter the amount paid in the “Amount” field.<br />
• Click the OK button when done. The check will display in the viewing<br />
pane. To print a check, click the “Print” button. For more details, see the<br />
section “Actions for Checks.”<br />
76
PAY MULTIPLE VENDORS<br />
Pay Multiple Vendors<br />
From the Checks List, you can pay multiple vendors. Select the option from the<br />
“Add” button. A wizard opens:<br />
Select the bank account you want to use to pay the vendors.<br />
The options are checked by default to make the checks payable to the parent<br />
accounts and to generate check numbers automatically.<br />
Go to the next screen.<br />
77
PAY MULTIPLE VENDORS<br />
Select the bills to pay. A checkmark appears for each bill as you select it:<br />
In the next screen, if there are any bill credits, select the credits to apply:<br />
78
PAY MULTIPLE VENDORS<br />
In the next screen, the system shows you the checks it will create for you:<br />
In the last screen of the wizard, click the “Create Checks” button to let the<br />
system create the checks. The screen shows the progress of the system as it<br />
creates the checks:<br />
79
VENDOR REFUNDS<br />
If any bills are not valid, a check will not be created by the wizard. This may<br />
happen if someone else in your company is paying that bill at the same time that<br />
you are running this wizard.<br />
Click “Finish” when done. The checks paid will appear in your Checks List. You<br />
can print the checks as usual.<br />
Vendor Refunds<br />
A “Vendor Refund” is available in the Payments subfolder. Use this when you<br />
receive a refund from a vendor. To be able to receive a refund check from a<br />
vendor, you need to have a bill credit for that vendor in the system.<br />
Go to Payments (in the document or list view) and click on the Add button.<br />
80
VENDOR REFUNDS<br />
A dialog box opens. (It is similar to the Payments screen.)<br />
• Select the A/P Account for this vendor refund. If you are working in<br />
multicurrency and select an A/P account with another currency, this<br />
payment will be made in that currency, and that A/P account will be<br />
updated with this refund transaction.<br />
• Enter their check number.<br />
• Select the Bank Account to deposit for this refund check.<br />
• Select the vendor name.<br />
• The date is filled in automatically with today’s date.<br />
• Check the box to show all nonrefunded credits.<br />
• Enter a memo if needed.<br />
• Enter the refund amount in the “Amount” cell, or select from the credits<br />
in the list. In the Credits list, you can click on the line for “Amount Paid”<br />
and enter the amount.<br />
• Click the OK button. The refund will be displayed in the viewing pane.<br />
81
VENDOR REFUNDS<br />
82
8. BANKING<br />
INTRODUCTION TO BANKING IN MAGAYA EXPLORER<br />
8. Banking<br />
Introduction to Banking in <strong>Magaya</strong> Explorer<br />
<strong>Magaya</strong> Explorer offers accounting features to handle your banking needs such<br />
as:<br />
• Writing checks (to pay expenses and sales tax)<br />
• Making deposits<br />
• Bank reconciliation<br />
Writing Checks<br />
There are different types of checks that you can create. From the Add button (in<br />
the document view or list view) you can choose the following:<br />
The rest of this topic will explain the following check writing tasks:<br />
• Checks to Expense: This is to pay expenses such as office supplies or other<br />
expenses that you do not receive a bill from the vendor.<br />
83
WRITING CHECKS<br />
• Pay Sales Tax: This is to write a check to a tax agency, department, or<br />
authority to pay sales tax you collected on invoices.<br />
The following types of checks are explained in the topics indicated:<br />
• Pay multiple vendors: Use this option to write checks to multiple<br />
vendors. See the “Accounts Payable” chapter for details.<br />
• To Pay Bills (Check): This is to pay outstanding bills. See the topic in<br />
Accounts Payable: "Bill Payments".<br />
• Refund Check: This is to refund money to a customer. See the topic in<br />
Accounts Receivable: "Refund Check".<br />
Check to Expense: Use this option to create a check for an expense such as office<br />
supplies for your business.<br />
• Select the bank account you will use for this check. If you are working in<br />
multiple currencies, there will be at least one account available in the<br />
dropdown for each currency. To write a check in one of those currencies,<br />
select it from the dropdown list. For information on setting up your<br />
<strong>Magaya</strong> system to work with multiple currencies, see the topic "Multicurrencies".<br />
The current balance for the selected bank account is displayed on<br />
the bottom of the screen.<br />
• The check number is filled in automatically based on the last check used<br />
for the selected bank account. For information on setting up the<br />
numbering of checks, see the topic "<strong>Accounting</strong> Configuration Menu".<br />
• Select who to pay (“Pay to the order of”).<br />
84
WRITING CHECKS<br />
• The date is filled in automatically. It can be changed if needed.<br />
• Click the Add button, and a line in the Detail table will be created and<br />
highlighted:<br />
a) Click on the first cell in the table under the column “Account Name”.<br />
When you click on the Account Name, a dropdown menu will appear.<br />
Select the account for this line.<br />
b) Click on the Amount cell in the table and type in the amount for this<br />
detail.<br />
c) Click on the Description cell of the table and enter a description.<br />
d) Click on the Entity field if this line relates to a customer, and select the<br />
customer from the dropdown. Otherwise the Entity field is optional.<br />
• You can add as many details to the check as needed by clicking the Add<br />
button again and following the same process. The total amount will<br />
increase with each detail you add.<br />
• Click the OK button when done. The check will display in the viewing<br />
pane.<br />
85
WRITING CHECKS<br />
If you pay expenses with a credit card, enter the information as shown:<br />
Note: In order to pay with a credit card, you must have a credit card account set<br />
up in the Chart of Accounts.<br />
Select the credit card from the “Bank Account” dropdown.<br />
Use this method when you do not have a bill; for example, you went to Office<br />
Depot, bought office supplies, and paid for them with a credit card. When you<br />
return to work, you update your <strong>Magaya</strong> Explorer with the transaction.<br />
When the credit card statement arrives in the mail and you need to pay it, use<br />
this same method: Check to Expense. Select the bank account you want to use<br />
to pay it, and select the credit card company as the “Pay to the order of”. When<br />
you add the item in the dialog box, the Account Name will be the credit card.<br />
This transaction creates a record of what you paid and what account it went to.<br />
86
WRITING CHECKS<br />
Pay Sales Tax: Use this to write a check to the tax agency such as state or county<br />
to pay taxes you have collected in invoices for goods sold.<br />
• Select the Bank Account that you will use to pay this tax. The current<br />
balance for that bank account is displayed.<br />
• The date and check number are filled in automatically.<br />
• Select the tax agency that you are paying the sales tax to (“Pay to the order<br />
of”).<br />
• Add a memo as needed.<br />
87
ACTIONS FOR CHECKS<br />
• Check the box to show balances due for that tax authority (if the box is not<br />
checked already). Any taxes due for the selected agency will show in the<br />
table:<br />
a) The first column shows if the tax is paid or unpaid. When you click on<br />
it to pay it, the field changes to “Paid” and a checkmark appears in the box.<br />
b) The Name column shows the name of the tax agency.<br />
c) The Code is the tax code.<br />
d) The Balance is the balance outstanding for that tax agency.<br />
e) The Credit column shows a credit if one exists. You will have a credit if<br />
you have paid sales taxes when you make purchases. That credit will show<br />
here.<br />
e) Amount due is the total due.<br />
f) Enter Amount Paid.<br />
• The discount field below the totals is for a percent of the total taxes due.<br />
This amount is determined by the tax authority.<br />
• Click the OK button when done. The check will display in the viewing<br />
pane.<br />
Actions for Checks<br />
To view the actions available in the software for checks, click the arrow on the<br />
side of the Actions button. The options from the document view are:<br />
• To void a transaction<br />
• Save as a recurring transaction (only for “Checks to Expense”) you can<br />
also copy an expense check<br />
• Select a template: Use this to choose the template that matches your<br />
pre-printed checks. Be sure to check the box to link the template to the<br />
current transaction. You can also set the template as the default for all<br />
checks (optional).<br />
Printing on Pre-Printed Checks: Before printing, select the template as<br />
noted above, and then click the “Options” button on the menu above the<br />
check document. Select “Print fields only”. This will print the data in the<br />
88
ACTIONS FOR CHECKS<br />
check fields such as the date and amount. It will not print the lines (which<br />
are already on your pre-printed checks).<br />
If you do not have pre-printed checks to use in your printer, you will need<br />
a font for the account number and routing number; this is not provided<br />
by <strong>Magaya</strong> Corporation, but we do provide customizations to the<br />
89
ACTIONS FOR CHECKS<br />
template of the check and other documents. Contact <strong>Magaya</strong> for details<br />
and prices.<br />
The default size for printing is letter size paper. One check will print per<br />
page with two stubs below the check on that page.<br />
Print Multiple Checks: To print a batch of checks, select them from the<br />
Checks List and right-click to select the option “Batch Print” from the<br />
pop-up menu.<br />
A wizard opens. It enables printing of the checks selected from the list, and<br />
has the option to select different templates for checks.<br />
• View the history related to this transaction<br />
The options from the list view include:<br />
• Other Reports: Create reports by account number, etc.<br />
• Reports: See the details of checks. The report opens in a list that you can<br />
customize the date range you want to view.<br />
• Go to the document (the check).<br />
90
ACTIONS FOR CHECKS<br />
• Void a check: To void a selected check. This retains a record of the void.<br />
• Print a batch of checks: First filter the Checks List.<br />
Then click the arrow on the side of the Print button and select “Print<br />
Batch.”<br />
Follow the prompts in the batch printing wizard. It will print the filtered<br />
list of checks using the template assigned to each check. The printer that<br />
the checks will be sent to is shown in the screen. To change the printer,<br />
click the “Configure” button next to the Printer field.<br />
Option: The screen also includes an option to print additional templates.<br />
To use this option, select the template from the list. You can select a<br />
91
ACTIONS FOR CHECKS<br />
printer for each template by clicking the “Configure” button next to the<br />
list of other document templates.<br />
• Additional menu choices from the Actions button for the Checks List:<br />
Save as Recurrent: To convert to the selected check into a recurrent check<br />
to be paid every month or other time period you set.<br />
• Recurrent Checks: Displays a list of recurring checks.<br />
• Choose columns for the Checks List.<br />
• Export data from <strong>Magaya</strong> Explorer.<br />
92
MAKING DEPOSITS<br />
• History: View related transactions.<br />
To view more details about a check, select it and click the Detail button.<br />
Making Deposits<br />
A Deposit refers to making a deposit of funds such as a loan that you receive, in<br />
contrast to making deposits of customers’ payments for invoices. Deposits can<br />
be created in the Deposits List or document view in <strong>Magaya</strong> Explorer. There are<br />
two types of deposits:<br />
• Deposit a Payment: Use this option when you are depositing money from<br />
the Undeposited Funds account. See the topic in Accounts Receivable:<br />
"Depositing Payments".<br />
• Deposit: Use this option when you are making a deposit into your bank<br />
account such as for a loan you have received.<br />
93
MAKING DEPOSITS<br />
To make a deposit, click on the Add button and select “Deposit”:<br />
A dialog box opens:<br />
• Select the bank account for this deposit.<br />
• Add a memo as needed.<br />
• Click the Add button to add the deposit. The line in the Detail table is<br />
created and highlighted.<br />
94
MAKING DEPOSITS<br />
• Click on a line in the Details table, and a line will highlighted:<br />
a) Click on the table cell “Account Name”. This activates a dropdown<br />
menu. Select the account related to this line in the deposit (for this<br />
example, Small Business Administration loan).<br />
b) Enter the amount of the deposit by clicking in the cell under “Amount”.<br />
c) Type in a description by clicking in the “Description” cell.<br />
d) If there is an entity (or customer) related to this line in the deposit, enter<br />
it by clicking on the “Entity” cell to activate the dropdown menu. If not,<br />
the Entity field can be left blank.<br />
You can add as many lines as needed by clicking the Add button again and<br />
following the above steps. The total amount will increase with each detail you<br />
add.<br />
Click the OK button. A Deposit ticket is created.<br />
95
BANK RECONCILIATION<br />
Bank Reconciliation<br />
To perform a bank reconciliation, go to Chart of Accounts, select the bank<br />
account to reconcile, click on the Actions button and select “Reconcile”.<br />
The reconciliation screen opens. In this screen you can reconcile the account<br />
activity to match the statement from the bank.<br />
96
BANK RECONCILIATION<br />
If you click the “Leave” button, your work will be saved, and you can return to<br />
the screen at any time. The “Done” button is to be used after completing the<br />
reconciliation.<br />
Set the Statement Date: The Statement Date is the date that the bank statement<br />
was issued.<br />
If you have used this reconciliation screen before, the opening balance for this<br />
month will be the same as the end balance from the previous month.<br />
If this is the first time you are performing a reconciliation in <strong>Magaya</strong> Explorer,<br />
the opening balance will be zero. To add an opening balance, create a Journal<br />
Entry and then clear it in the Transaction Listing so it appears in the reconciliation:<br />
in the Chart of Accounts list, click the “Actions” button, and select<br />
“Transaction Listing”. Right-click on the transaction and select “Clear/Unclear<br />
Transaction” from the pop-up menu. Then return to the reconciliation screen.<br />
Enter the Statement Ending Balance: Use the balance that is listed on your<br />
statement.<br />
Place a checkmark in each transaction in the list as you match it with the bank<br />
statement. The status in the “Cleared” column will change from No to Yes:<br />
97
BANK RECONCILIATION<br />
To place a checkmark in all the transactions, click on the “Mark All” button. To<br />
uncheck all the transactions, click on the “Unmark All” button:<br />
As you check the transactions, the total number of Cleared Transactions will be<br />
updated on the bottom of the screen:<br />
Add: Use the Add button to add a transaction that is listed in the statement but<br />
not in this screen.<br />
Edit: Use the Edit button to change a transaction. Click on the transaction to<br />
select it. Click the Edit button. A dialog box opens that will look different,<br />
depending on the transaction selected. Modify it and click OK.<br />
Print: Click to print the Deposits or the Checks. These can be printed separately.<br />
Delete: If a transaction is not in your statement, select the transaction to delete,<br />
and click the Delete button.<br />
The Uncleared Balance must be zero to complete the reconciliation. If you click<br />
the “Done” button when the Uncleared Balance is not zero, the system will give<br />
you a notice and not complete the reconciliation. You can leave and return to<br />
the reconciliation screen at any time and your work will be saved. When you<br />
click the “Leave” button, the reconciliation screen closes.<br />
When you are done with the reconciliation and you click the Done button, the<br />
system will ask if you want to print the statement. You can print it now or print<br />
the bank reconciliation from the Reports option from the Actions button in the<br />
Chart of Accounts at a later time.<br />
98
BANK RECONCILIATION<br />
To view transaction amounts in the home currency and the applied exchange<br />
rate (if working with multiple currencies), right-click on a transaction in the<br />
“Deposits and Other credits” section of the Reconciliation screen. Select<br />
“Choose Columns”.<br />
In the dialog box, check the options “Amount (USD)” and “Exchange Rate”.<br />
This adds the columns to your Reconciliation screen.<br />
99
BANK RECONCILIATION<br />
If there is an error to fix after reconciling, you can go to the Transaction Listing<br />
for the bank account (in the Chart of Accounts) and clear (or unclear) the transaction<br />
there.<br />
Select Transaction Listing from the Actions button (in the Chart of Accounts<br />
for the bank account). The list opens. In the list you can right-click on a transaction<br />
and choose to clear it:<br />
Undo a Bank Reconciliation: A bank reconciliation can be rolled back if<br />
needed. All the cleared transactions will be changed back to the status of<br />
“Unclear” all at once, instead of one at a time. From the Chart of Accounts list,<br />
right-click on the bank account, and select “View Reconciliations” from the<br />
100
BANK RECONCILIATION<br />
menu. Right-click the desired reconciliation and select "Undo Reconciliation"<br />
from the pop-up menu.<br />
101
BANK RECONCILIATION<br />
102
9. ACCOUNTING REPORTS<br />
INTRODUCTION TO ACCOUNTING REPORTS<br />
9. <strong>Accounting</strong> Reports<br />
Introduction to <strong>Accounting</strong> Reports<br />
<strong>Magaya</strong> Explorer offers accounting reports, including:<br />
• Financial Reports: Standard financial reports such as Profit and Loss<br />
reports and Balance Sheets<br />
• Sales Reports: These reports provide information about sales by item or<br />
by customer, about open invoices and aging Accounts Receivable<br />
• Purchases: These reports provide information about purchased items,<br />
carriers, and vendors, about unpaid bills, and aging Accounts Payable<br />
• Multicurrency Reports: View any gain or loss by doing business in<br />
multiple currencies<br />
Overview of <strong>Accounting</strong> Reports<br />
You can access reports in different ways in <strong>Magaya</strong> Explorer. Many financial<br />
reports are available from the Reports option on the top menu:<br />
• Each report type has a submenu with additional options.<br />
103
OVERVIEW OF ACCOUNTING REPORTS<br />
• You can also access reports that were saved.<br />
You can also find many reports by using the Actions button in any <strong>Accounting</strong><br />
list such as the Invoices List, Payments List, Bill List, Deposit and Check Lists to<br />
see reports specific to each of these types of accounting transactions. The<br />
Actions button in the Chart of Accounts (shown below) and in Items and<br />
Services also gives you access to many financial reports:<br />
You can customize the reports by changing the columns and the currency by<br />
using the Actions button, or filter the report with the Filter button.<br />
The date range can be changed using the date fields at the top of the list. Click<br />
the Refresh button to see changes.<br />
Reports can be created to show the employee who created certain accounting<br />
transactions such as invoices and bills.<br />
After you customize a report, you can save it. When you open a saved report, it<br />
will display with all the customized features saved.<br />
To save a report, click on the “Save” button when you are viewing the report.<br />
104
OVERVIEW OF ACCOUNTING REPORTS<br />
A dialog box opens with fields filled in, but you can change them as needed.<br />
The “Save As” option allows you to keep the original format of a report and to<br />
save a copy of it by another name. Then you can make changes to the second<br />
report without having to start all over to build it.<br />
To view saved reports, go to the Reports option on the top of <strong>Magaya</strong> Explorer<br />
and select “Saved Reports”. A dialog box opens, showing the list of any saved<br />
reports.<br />
In a report you can double-click on a transaction to view its details:<br />
To go to a document, right-click on the transaction and select “Go to”. To<br />
return to the report, click on the Back button. Note: Only a user with Administrative<br />
rights or the creator of a report can delete a saved report.<br />
Tabs:<br />
You can switch between views of reports and lists. Similar to tabbed browsing<br />
available on Internet Explorer and some other web browsers, the tabs in your<br />
<strong>Magaya</strong> Explorer enable you to switch between views.<br />
105
OVERVIEW OF ACCOUNTING REPORTS<br />
For example, when you are viewing a list such as the Invoices List, and you want<br />
to also view a report, now you can view both in tabs. Previously you had to close<br />
a report to return to the list view. Now you can switch between both.<br />
When you are viewing a report, you can double-click on a line item in a report<br />
to drill down for more details. For example, run an Income statement (P&L<br />
report) and double-click on a line item. The item will open in a tab.<br />
106
CUSTOMIZE REPORTS<br />
Customize Reports<br />
You can enhance and customize the format of reports. Change the font, color,<br />
size, etc. of the different elements in the report such as company name, title,<br />
subtitle, columns headers, rows, etc.<br />
Steps:<br />
1) Click the “Configure” button on the bottom toolbar in the Document<br />
view.<br />
A dialog box opens with three tabs: Header Info, Fonts, and Numbers. The<br />
Header Info tab displays your company name, the report title, and<br />
sub-title; you can change any of these as needed.<br />
2) Click the “Fonts” tab. Select the element you want to customize such as the<br />
Header – Company Name. Make changes to the font and click OK.<br />
Other custom options on the “Numbers” tab:<br />
• Display whole numbers or numbers divided by 1000<br />
• Output numbers using the thousand separators, for example: 1,000,000.00<br />
107
CUSTOMIZE REPORTS<br />
• Display negative values in red or in parenthesis<br />
Steps to Customize Numbers:<br />
1) Click the “Numbers” tab in configuration dialog box:<br />
2) Check the options you want to use, and click OK to save the changes.<br />
Select Additional Columns in Fixed Reports:<br />
Additional columns can be selected in all fixed reports pre-created in the system<br />
such as adding the "Shipment Name" or "Port of Origin" column to an Open<br />
Invoices report.<br />
Steps:<br />
1) Click the Actions button, and select “Choose Columns”.<br />
2) In the dialog box that opens, select the column you want, or click the “Add<br />
Column” button to open a new dialog box with more choices.<br />
Change Column Names on Reports:<br />
108
CUSTOMIZE REPORTS<br />
You can change the column names in any report, including those that are<br />
created by the system.<br />
Steps:<br />
1) Open the “Choose Columns” dialog box.<br />
2) Click on the column name. Then type the new name, and click OK to save.<br />
You can also set the default columns to a report that the user modified to bring<br />
the report to its original status: Click on the Actions button and select “Set<br />
Default Columns”.<br />
Before this new version, the system would overwrite the first report. This new<br />
feature is especially useful when you want to create another report that is similar<br />
to the first one; now you do not have to start from scratch to build it.<br />
You can add Credit and Debit columns to any “Detailed” report by selecting the<br />
Actions > Choose Columns.<br />
109
FINANCIAL REPORTS<br />
Financial Reports<br />
Financial Reports are Profit and Loss, Balance Sheet, and Statement of Cash<br />
Flow. The following explains each report.<br />
Profit & Loss Report<br />
Proft & Loss report show your income (also called revenue or sales), costs,<br />
expenses, and profitability for a time period. The reports can be created in<br />
summary format or a detailed view.<br />
Profit and Loss reports, also called “Income Statements,” show how well the<br />
company is performing.<br />
110
PROFIT & LOSS REPORT<br />
This is an example of a summary view of the Profit and Loss statement:<br />
• To create a report, set the date range, and click the Refresh button.<br />
• The creation date of the report displays on the top of the report. The<br />
creation date will be today’s date.<br />
• The Income section shows income from freight and other sources.<br />
• The Cost section shows Cost of Goods Sold such as freight costs. (Note:<br />
Freight costs can be included in Landed Costs. See the section “Landed<br />
Cost Management” for details.)<br />
111
PROFIT & LOSS REPORT<br />
• The Gross Profit shows total income minus total cost.<br />
• The Expense section shows expenses such as rent, salary, utilities,<br />
discounts and other fees you paid for services such as an accountant.<br />
• The Net Income total is listed on the bottom and shows the company’s<br />
profit after all expenses have been paid. It is the Gross Profit minus the<br />
total expense.<br />
Double-click on a number in the report to view its details.<br />
The detailed Profit and Loss Report shows more information such as the itemized<br />
cost, income, and expense:<br />
You can see any transaction in this report by double-clicking on it.<br />
112
COMPARATIVE PROFIT & LOSS REPORTS<br />
To filter the report, click the “Filter” button and select the option: Standard or<br />
Advanced. The Standard filter for report transactions has the options shown in<br />
the screenshot:<br />
Comparative Profit & Loss Reports<br />
To see profit and loss information from more than one period of time, follow<br />
these steps:<br />
1) Go to Reports > Financial Reports and select Profit & Loss (by summary<br />
only)<br />
2) Click the Configure button.<br />
113
COMPARATIVE PROFIT & LOSS REPORTS<br />
3) In the dialog box that opens, click the “Columns” tab. Select from the<br />
following:<br />
Type of Columns: By Month, Quarter, Fiscal Quarter, Year, Fiscal Year.<br />
Select one of these to view the time periods to view columns. The other<br />
dropdown “Type of Analysis” is optional.<br />
You can also include an analysis of the time periods:<br />
Type of Analysis: Previous Period, Previous Year, Year to Date. The analysis<br />
option can show a percent change or the amount of change.<br />
114
COMPARATIVE PROFIT & LOSS REPORTS<br />
4) Click OK to view the report. This example shows a comparative Profit &<br />
Loss report by month with the percent change as compared to the<br />
previous month:<br />
The report can also be saved. To view saved reports, go to the Reports menu and<br />
select “Saved Reports”. In the dialog box that opens, double-click on the report<br />
name to open it.<br />
115
PROFIT & LOSS BY OPERATIONS<br />
Profit & Loss by Operations<br />
This is a unique report only available in <strong>Magaya</strong> software. It lets you see the<br />
profitability of your business from a different angle. When you use the<br />
accounting features in <strong>Magaya</strong> with operations, each operations transaction will<br />
have several accounting transactions such as bills and invoices related to it.<br />
This report will list each operations transaction for the time period with the<br />
associated income, expense, and profit coming from the related accounting<br />
transactions. Here is an example of a Profit and Loss report by operations:<br />
• The date range of the report is displayed on the top. This is the date of the<br />
operations, not of the accounting transactions. For example the report will<br />
show invoices for the operation transactions whether they fall into this<br />
period or not.<br />
• The operations are on the left and the transaction numbers are listed<br />
under each type of operation. The income, expense, and profit columns<br />
show the amounts for each transaction and the totals.<br />
116
SHIPMENT P&L REPORT<br />
• The detailed report by operations shows all the accounting transactions<br />
that are related to each operation transaction:<br />
• The Income, Expenses, and Profit are also shown in columns with totals<br />
at the bottom.<br />
• The customer name (or vendor), number, and associated account (such as<br />
Accounts Receivable or Accounts Payable) are displayed.<br />
• The miscellaneous income and expenses are displayed. This will show any<br />
accounting transaction that is not associated with an operations transaction.<br />
Shipment P&L Report<br />
In the Shipment List, select a shipment and click the “Detail” button. Select<br />
“Profit & Loss” from the dropdown menu.<br />
Balance Sheet<br />
The Balance Sheet shows total assets, liabilities, and equity. It provides a snapshot<br />
of your business capital (how much it owns and how much it owes) as of a<br />
certain date.<br />
This report answers questions such as:<br />
• “How much debt does the company have”<br />
• “How much money needs to be collected from customers”<br />
This report is cumulative; it will show the figures from the first day of your business<br />
until the end date of the report.<br />
117
BALANCE SHEET<br />
If you sell inventory, the costing method you choose for your <strong>Magaya</strong> system<br />
will affect the balance sheet. For details see the section “Average Cost” in the<br />
<strong>Magaya</strong> <strong>Software</strong> <strong>Accounting</strong> <strong>Manual</strong>.<br />
To generate a balance sheet, select it from the Reports menu:<br />
118
BALANCE SHEET<br />
The following is an example of a summary Balance Sheet report:<br />
119
BALANCE SHEET<br />
• The Assets section summarizes current and fixed assets such as Accounts<br />
Receivable, bank accounts, cash, etc. If you own inventory items, they will<br />
show here as assets.<br />
• The Liabilities section summarizes current liabilities such as Accounts<br />
Payable, loans, credit cards, etc.<br />
• The Equity section shows the equity for the company (total assets minus<br />
total liabilities). The Retained Earnings line is from the Net Income of the<br />
previous years (it is money reinvested into the company). In <strong>Magaya</strong> software,<br />
the closing of the year is done automatically. The Net Income line is<br />
from the beginning of the current fiscal year up to the report end date.<br />
In the Balance Sheet summary view, you can compare time periods to analyze<br />
difference between months or between fiscal periods. Click the Configure<br />
button and go to the Columns tab to set the report period.<br />
120
BALANCE SHEET<br />
A detailed Balance Sheet shows the transactions for the selected period for each<br />
account:<br />
• The columns of the report show the transaction type, date and number,<br />
the customer or vendor name, the accounts, the balance, and more.<br />
• If an invoice or other accounting transaction has more than one account<br />
included in it, the word “-MANY-” will display in the Account column.<br />
• Each account will show a beginning balance that accumulates the activity<br />
before the period. After that, you will see the transactions for the period<br />
and then the ending balance as of the end date of the period.<br />
If you sell inventory, and choose the Average Cost method of costing the items,<br />
the average will appear in the Balance Sheet.<br />
For more details on this costing method, see the topic “Average Cost” in the<br />
<strong>Magaya</strong> <strong>Software</strong> <strong>Accounting</strong> <strong>Manual</strong>.<br />
121
STATEMENT OF CASH FLOWS<br />
Statement of Cash Flows<br />
This report shows a summary of how much cash is coming in (actual received)<br />
and going out of your business (amount paid out) over a period of time. The<br />
following shows a sample of a cash flow report:<br />
• The summary of net income from operating activities for the time period<br />
is listed first. This shows actual cash that has come in and what you have<br />
spent. It does not show what you have invoiced customers, only what is<br />
received (or spent).<br />
122
SALES REPORTS<br />
• The Investing section shows cash used (spent) for investing in assets and<br />
the proceeds from the sale of other businesses, equipment, making or<br />
collecting loans, or long-term assets. Any changes to these accounts (gains<br />
or losses) will show here. This example shows zero investing because this<br />
cargo company is not buying or selling any businesses, etc.<br />
• The Financing section shows cash you paid or that you received from<br />
issuing and/or borrowing of funds or other outside financing activities.<br />
For example if your company has stock and you sell it, the cash brought in<br />
by that sale would show on this part of the report. Also, paying back a bank<br />
loan shows as a use of cash flow. This example shows zero because this<br />
cargo company is not issuing stock, etc.<br />
• The Cash section shows the net cash increase for the period, and the cash<br />
at the beginning and end of the period.<br />
Sales Reports<br />
Sales Reports show sales by item, customer, and agent. Other report options<br />
under this menu are to create a report of open invoices and of aging accounts.<br />
123
SALES REPORTS<br />
By Item: Shows the totals of sales by item and shows the Cost of Goods Sold<br />
(COGS) for items you resell. View a summary or a detailed report. The detailed<br />
report shows the invoices or other transactions associated with each item. The<br />
following is part of a summary, highlighting the columns:<br />
By Customer: Shows the sales amount per customer and the percentage that<br />
each customer represents of the total sales. You can view a summary or a<br />
detailed report:<br />
By Agent: This report is similar to the customer report, but this show the agents.<br />
This report is very useful for a logistics provider that works with several agents.<br />
The reports can be viewed as a summary or as a detailed report.<br />
All Sales: View all the sales (in a summary or a detailed report). This report<br />
looks similar to the customer report.<br />
124
SALES REPORTS<br />
Compare Sales: The sales reports can be configured to show a comparison of a<br />
customer by month, or other options. Here is an example:<br />
Click the “Configure” button on the bottom toolbar of the report to open the<br />
“Configure Report” dialog box. Click the “Columns” tab and set the comparison<br />
terms you want to see:<br />
Open Invoices: Shows invoices that are open (not yet paid).<br />
• Shows the invoice date and number, how many days it is overdue, the<br />
original amount and any amount paid, and a transaction reference.<br />
Aging A/R: View past due Accounts Receivable (money your customers owe to<br />
your company) in a summary or a detailed report. In this summary, the time<br />
period that the account is overdue is in columns across the top, showing what is<br />
125
SALES REPORTS<br />
current, then what is between 1 and 30 days overdue, 31 to 60 days, etc. See the<br />
example below:<br />
The Detailed report of Aging A/R shows invoices and other transactions that are<br />
overdue as of today. The report is organized in time periods of 30 days to show<br />
how long the accounts are overdue.<br />
The detail report is organized in time period similar to the summary report. The<br />
most current is listed first, then any accounts between 1 and 30 days old, to the<br />
oldest. It shows the status of aging accounts as of today:<br />
The Aging reports by date show late receivables (or payables) by a specific date<br />
without including payments posted after the end date of the report. These<br />
reports can be configured to use the transaction date or due date to calculate the<br />
aging of each transaction.<br />
If a customer has reached their credit limit (as set in their profile), you can put<br />
their cargo “On Hold” in the Commidity List or in the WR List by<br />
right-clicking.<br />
126
PURCHASE REPORTS<br />
Purchase Reports<br />
Purchases Reports show purchases by item, carrier, and vendor, and other<br />
reports show unpaid bills and aging A/P.<br />
127
PURCHASE REPORTS<br />
The Purchase Report by Item shows what you have purchased, the amount,<br />
and what percent that amount represents of your total purchases.<br />
• In the summary by purchase item report, the air freight cost represents<br />
75.2% of the total purchases.<br />
• In the detailed report, the accounting transactions related to the purchases<br />
are shown.<br />
128
PURCHASE REPORTS<br />
Reports by Carrier (detail and summary) show the carriers, the amount you<br />
have purchased from them, and the percent that amount represents:<br />
• In the summary report, the largest percent of purchases was from Crown<br />
Shipping (61.2%) for this time period.<br />
• In the detailed report, the accounting transactions related to the purchases<br />
are shown.<br />
The Purchases by Vendor reports show what you purchased (or paid) to a<br />
vendor such as the telephone company or vendors who provided services to<br />
you. The summary and detail reports look similar to the reports by carrier.<br />
The report of All Purchases shows the purchases you have made from all<br />
vendors, carriers, etc.<br />
The Unpaid Bills report shows the name of the vendor, the date, transaction<br />
number, a reference, the due date and number of days old, and the amount due:<br />
• Bills and credits are included in the Unpaid Bills report.<br />
Comparative Reports: Purchasing summary reports can be configured to<br />
compare time periods such as month by month or one quarter compared to<br />
129
PURCHASE REPORTS<br />
another. Click the “Configure” button on the bottom of the report view, and<br />
select the “Columns” tab to set the elements.<br />
Aging A/P Reports provide information on overdue accounts. Note: If a transaction<br />
was paid and you run a report before the date of payment, the transaction<br />
will not show as aging. To see what was open, use the Open Invoices report.<br />
130
PROFIT REPORTS OVERVIEW<br />
Profit Reports Overview<br />
Profit Report are available by Customer, by Salesperson, or by Agent.<br />
131
PROFIT REPORTS OVERVIEW<br />
You can create and customize any report. Click the “Configure” button in the<br />
bottom toolbar to open the following dialog box:<br />
• On the Header Info tab, edit the report title, subtitle, or dates as needed.<br />
• On the Profit by Entity tab, select which transactions to include. They are<br />
all on by default. The Charges from the checked transactions are gathered<br />
together for the report.<br />
Other options: Select which costs to include (agent profit share, sales<br />
persons commissions) or exclude. If the agent is part of your company but<br />
in another division, you can exclude their costs and see the profit.<br />
Uncheck the boxes to see the profit before these costs are taken out of the<br />
profit.<br />
The report can sort by profit or by entity name. If your database in larger,<br />
you can set up the report to show only the entities that bring in 80% of the<br />
profit, the most active companies that bring in the larger percent of your<br />
profits.<br />
To include invoices and bills in the report, check the box. If not, the report<br />
will gather profits from operations transactions only. No invoices created<br />
manually will be included.<br />
To include only liquidated operations, check the box.<br />
• On the Fonts tab, select font type and properties.<br />
• On the Numbers tab, select options to display numbers.<br />
132
CUSTOMER PROFIT REPORTS<br />
Customer Profit Reports<br />
The Customer Profit Report allows you to know the margins that each customer<br />
is contributing to the overall profit of the company.<br />
The report displayed here sorts the customers (also called Clients) according to<br />
profit amount. The customer who contributes the higher profits appears at the<br />
top of the list:<br />
You can customize the sort order with the Configuration button.<br />
Double-click on a Customer name, and the dialog box for their profile opens.<br />
Double-click on any number in the list to see the details; they will open in a new<br />
tab, preserving your first report and the list so you can see them all.<br />
When analyzing the profitability of Sales Orders, the other cost charges on<br />
related Purchase Orders are considered.<br />
Prorating of Costs:<br />
The <strong>Magaya</strong> system prorates the costs for the Houses and shows them in the<br />
profit report Expense column. Even though the Shipment Profit screen does not<br />
show the costs, the system prorates them for the report. The Expense in the<br />
report is all the costs such as the freight, documentation, etc., that are pro-rated<br />
across the entire shipment. (The Profit screen is available from the Profit button<br />
on the Shipment Toolbar.)<br />
133
SALESPERSON PROFIT REPORT<br />
Salesperson Profit Report<br />
This report allows you to know the margins that each salesperson is contributing<br />
to the overall profit of the company. This screenshot shows the detailed<br />
view of the transactions for the salespeople. The other tabs here are the salesperson<br />
list and the summary profit report for the sales people.<br />
134
AGENT PROFIT REPORT<br />
Agent Profit Report<br />
The Agent Profit Report allows shows the margins that each forwarding agent<br />
is contributing to the overall profit of the company. We can see a summary, the<br />
details of the transactions, or the charges.<br />
Other Reports<br />
Other Reports show transaction details, trial balance, details of checks, invoices<br />
and bills, daily journal, sales tax and more.<br />
135
OTHER REPORTS<br />
Transaction Detail: To see transactions details for a specific account in the<br />
Chart of Accounts, select the account and use the Actions button. To see transaction<br />
details for all accounts in the Chart of Accounts, use the Reports menu<br />
from the top toolbar.<br />
Trial Balance: A list of the accounts showing the balance for each. The total for<br />
the Debit column should equal the total in the Credit column. This report is<br />
used by accountants to match credits and debits:<br />
General Ledger: This report displays all general ledger accounts balance and<br />
transaction detail by account during the selected time frame.<br />
Check Detail: Lists the checks written, the type of transaction, the check<br />
number, customer or vendor name, amount, and each line included in the<br />
check. Use this to see a detailed view of your expenses:<br />
Invoice Detail: Lists the invoices for the time period selected, the type of transaction,<br />
the invoice number, and other information. The report looks similar to<br />
the Check Detail report.<br />
Bill Detail: Lists the bills for the time period selected, the type of transaction,<br />
the bill number, and other information. The report looks similar to the Check<br />
Detail report.<br />
136
MULTICURRENCY REPORTS<br />
Daily Journal: This report shows all transactions in a selected date range.<br />
Sales Tax Liability: Summary or detailed report. This shows the tax authority<br />
name, the tax rate, the amount of sales that period, the amount of the sales tax<br />
collected during that period and the previous period, and the sales tax liability.<br />
When you use the Actions button in the Chart of Accounts, you can select a<br />
report for:<br />
• Missing Checks: This report is available when you select a bank account.<br />
Multicurrency Reports<br />
The Multicurrency Reports show any gain or loss from business done in<br />
different currencies.<br />
You must have multiple currencies turned on in your <strong>Magaya</strong> system and transactions<br />
conducted in those currencies in order to have any information appear<br />
in one of these reports. If the exchange rate does not change or you do not<br />
update it in <strong>Magaya</strong> Explorer, no changes will be reflected in the reports.<br />
There are two types of Multicurrency Reports available:<br />
• Realized Gains and Losses: This report shows transactions that have a<br />
gain or loss that became realized (actual) because a payment was received<br />
for an invoice that had a currency rate change or because you paid a bill<br />
that had a currency rate change.<br />
For example, you invoice a customer for 250 Euros when the Euro was<br />
1.75. They pay the 250 Euros due, but the value of the Euro has decreased<br />
to 1.60 on the date you make the deposit. The report will show a realized<br />
gain for that account. If the Euro did not change, the report will not show<br />
anything.<br />
The columns in the Realized Report show:<br />
– The Type of transaction such as Payment or Bill Payment<br />
– The date of the transaction<br />
– The transaction number<br />
137
MULTICURRENCY REPORTS<br />
– The Entity associated with that transaction such as the company that<br />
you paid the check to<br />
– The Original Amount column shows the amount that the transaction<br />
was originally set in<br />
– The Realized Amount column shows that actual paid amount<br />
– The Exchange Rate column shows you the rate of the currency<br />
– The Gain/Loss column shows the amount gained or loss in your<br />
home currency<br />
• Unrealized Gains and Losses: This report shows the balances for your<br />
accounts in different currencies. When you pay a bill or receive a payment<br />
for one of these currencies, the balance of that bank account, AR, or AP<br />
will reflect the result of the transaction.<br />
The columns in the Unrealized Report show the following for the AP, AR,<br />
and bank account for each currency:<br />
– The account name for each currency<br />
– The current balance shows the amount in AP, AR, and the bank<br />
account<br />
– The Balance column shows the amount in your home currency<br />
– The Adjusted Balance shows the previous, original balance before a<br />
change<br />
– The Exchange Rate column shows you the rate of the currency<br />
– The Gain/Loss column shows the amount gained or loss in your<br />
home currency<br />
138
10. ADVANCED ACCOUNTING FEATURES<br />
10. Advanced <strong>Accounting</strong> Features<br />
Introduction:<br />
The following sections will explain advanced accounting features available in<br />
<strong>Magaya</strong> Explorer. The features are:<br />
• Configuration: Set up of some accounting options<br />
• Costing Methods: Average cost and specific identification<br />
• Sales Taxes: How to define sales taxes in the tax table and how to use them<br />
• Approving/Disputing invoices<br />
• Journal Entries: How to create journal entries<br />
• Adjustments<br />
• Multicurrencies: How to work with multiple currencies<br />
• The relationship between operations and accounting procedures<br />
• Accounts Receivable special procedures (bounced checks, etc.)<br />
139
ACCOUNTING CONFIGURATION<br />
SETTING ACCOUNTING ROLES<br />
Setting <strong>Accounting</strong> Roles<br />
Roles can grant (or deny) permissions to employees. The system contains many<br />
roles, including ones related to accounting tasks.<br />
Set roles by right-clicking an employee name > Roles. In the list, click the Add<br />
button. Select roles from the dialog box.<br />
<strong>Accounting</strong> Configuration<br />
Introduction:<br />
140
ACCOUNTING CONFIGURATION<br />
MAIN ACCOUNTING CONFIGURATION TAB:<br />
Many accounting features are set up or changed in the Maintenance folder<br />
under Configuration > <strong>Accounting</strong>:<br />
These settings are configured by an administrator or manager with admin rights<br />
in the <strong>Magaya</strong> system.<br />
Here is a brief overview of the accounting-related options that can be configured<br />
from this menu:<br />
• Setting document numbers such as consecutive numbers in accounting<br />
documents such as invoices and bills<br />
• Configure how to export or import data between QuickBooks and your<br />
<strong>Magaya</strong> system<br />
• How your system manages Credit Limits for customers<br />
• Other settings: To generate charges automatically, date to close<br />
accounting, transaction due dates, set currencies, set fiscal year, set periodic<br />
invoicing, setting sales tax and default payment accounts<br />
Main <strong>Accounting</strong> Configuration Tab:<br />
The following settings are configured on the main tab of this menu:<br />
Close <strong>Accounting</strong> Date:<br />
141
ACCOUNTING CONFIGURATION<br />
MAIN ACCOUNTING CONFIGURATION TAB:<br />
Click the checkbox “<strong>Accounting</strong> will be closed on or before” to activate the date<br />
option to set the closing date of your accounting. Select a date using the calendar<br />
dropdown. As a result, users will not be able to enter or modify any transaction<br />
done before this date. Update this date as needed after each period.<br />
You can also require a password to access editing of accounting transactions<br />
from previous years, before the date set in the calendar dropdown above.<br />
Select Default Payment Terms:<br />
Use this option to set payment terms system-wide for all customers. The system<br />
will use this in invoices and calculate the due date automatically.<br />
To set payment terms per customer, set them in the Customer’s profile. For<br />
details, see Chapter 6 in the <strong>Magaya</strong> <strong>Software</strong> <strong>Accounting</strong> <strong>Manual</strong>.<br />
Note: The system will carry over your settings any time you update your <strong>Magaya</strong><br />
system to the newest version of <strong>Magaya</strong> software.<br />
142
ACCOUNTING CONFIGURATION<br />
MAIN ACCOUNTING CONFIGURATION TAB:<br />
Additional configurations on the Main tab:<br />
Currency:<br />
Select your home currency. Note: This option is active only if there are no<br />
existing accounting transactions. It is recommended that home currency be set<br />
up in the Startup Wizard. To update a currency rate, click the button on open<br />
the currency list. For information on working with multiple currencies, see the<br />
section “Multicurrencies.”<br />
Reverse Exchange Rate:<br />
If you work with currencies that convert to very small amounts, you may want<br />
to work with the reverse rate. Check the box for this option, and your <strong>Magaya</strong><br />
system will calculate the rate for you. Leave unchecked for the direct exchange<br />
rate.<br />
Fiscal Year:<br />
This sets the starting month for the fiscal year. If you used the <strong>Accounting</strong><br />
Wizard to set up your <strong>Magaya</strong> software, the date displays here. The system will<br />
use this month as the beginning of the new fiscal year to automatically calculate<br />
the retained earnings of the previous year.<br />
Configure Liquidation Options:<br />
These options can be set for outgoing and incoming shipments separately. For<br />
details on liquidating shipments, see the Shipments chapter in the <strong>Magaya</strong><br />
Cargo System Operations <strong>Manual</strong>.<br />
143
ACCOUNTING CONFIGURATION<br />
ACCOUNTING DOCUMENT NUMBERS CONFIGURATION<br />
Configure Default Accounts:<br />
To set default accounts for the following transactions, click the “Accounts”<br />
button. In the dialog box, make selections.<br />
Save your settings.<br />
<strong>Accounting</strong> Document Numbers Configuration<br />
Check the boxes in this section to set consecutive numbering for Invoices,<br />
Credit Memos, Bills, Credits, Checks, and Journal Entries.<br />
144
ACCOUNTING CONFIGURATION<br />
COST CONFIGURATION<br />
You can add prefixes and suffixes to the numbers: Click the “Set” button. In the<br />
dialog box that opens, enter the information you want to display for the specific<br />
accounting document.<br />
Save your settings.<br />
Note: To set document numbers for operations and sales documents such as<br />
Warehouse Receipts, Sales Orders and Bookings, please see the Configuration<br />
setting for Document Numbers.<br />
Cost Configuration<br />
This tab contains settings for inventory costing methods and landed costs.<br />
This setting affects the invoicing, the accounts for Inventory Assets, for Cost of<br />
Goods Sold, and the balance sheet. This is an advanced accounting function. We<br />
recommend that you ensure you understand how this will change your<br />
accounting system before making any changes here.<br />
Default Costing Method:<br />
145
ACCOUNTING CONFIGURATION<br />
COST CONFIGURATION<br />
Select the default inventory costing method your company uses: by specific<br />
identification or by average cost for new items added to your system. This<br />
setting is global for your whole <strong>Magaya</strong> system. Individual costing methods can<br />
be set on each inventory item definition if you want to set only at the item level,<br />
not apply one method system-wide.<br />
• Specific Identification: When items are sold according to the Specific<br />
Identification cost method, creating an Invoice for the items will cause the<br />
system to remove the exact amount that was assigned to the Asset account.<br />
• Average Cost: When items are sold according to the Average Cost<br />
method, creating an Invoice for the items will cause the system to remove<br />
an average amount from the Assets account and transfer it to the Cost of<br />
Goods Sold Account. This averages out the costs of the items bought at<br />
different prices perhaps at different times or from different suppliers.<br />
For details on costing methods, please see the section “Average Cost” in the<br />
<strong>Magaya</strong> <strong>Software</strong> <strong>Accounting</strong> <strong>Manual</strong>.<br />
Landed Cost:<br />
The Landed Cost setting generates asset adjustments for the additional charges<br />
found in Purchase Orders (PO) when the PO’s are billed. When you check this<br />
option, also decide how to prorate the charges, by cost or by pieces. Save.<br />
Next, go to the “Items & Services” list.<br />
- Select the service charge such as Inland Freight Cost, and double-click to open<br />
it.<br />
- On the tab “Landed Cost,” check the box to include this non-inventory charge<br />
in Landed Cost. (Note: This tab only appears when configured to activate it.)<br />
What will happen: When a PO is created with this Inland Freight charge, the<br />
charge will be distributed across the items in the list. See the PO dialog box to<br />
view how the costs are prorated. Tip: Right-click in the Commodities screen of<br />
the PO to choose the columns if needed to view them.<br />
When a PO with charges for landed costs is billed, the Bill for the other charges<br />
will also contain an asset adjustment.<br />
146
ACCOUNTING CONFIGURATION<br />
ACCOUNTING INTEGRATION CONFIGURATION<br />
This will also affect your Balance Sheet and Trial Balance in your <strong>Magaya</strong><br />
system.<br />
For details on landed costs, please see the section “Landed Cost Management”<br />
in the <strong>Magaya</strong> <strong>Software</strong> <strong>Accounting</strong> <strong>Manual</strong>.<br />
<strong>Accounting</strong> Integration Configuration<br />
You can exchange accounting data between your <strong>Magaya</strong> system and Quickbooks.<br />
First, configure your system and prepare your data. Also see the section<br />
“Import Invoices” in the <strong>Magaya</strong> <strong>Software</strong> <strong>Accounting</strong> <strong>Manual</strong>.<br />
To include Account Definitions when exporting to QuickBooks®, click this<br />
option in the Configuration menu:<br />
This will include the Account Definition from the Chart of Accounts in the<br />
output saved from <strong>Magaya</strong> Explorer and to be used in QuickBooks. It is important<br />
to make sure your accounts have the same names in both <strong>Magaya</strong> and in<br />
QuickBooks to avoid duplicates.<br />
To include customers and vendors when exporting from <strong>Magaya</strong> to Quick-<br />
Books, check the box. This will create the name in QuickBooks. Again, verify<br />
that the entity names are the same in both <strong>Magaya</strong> and QuickBooks. This<br />
options is disabled if you have multicurrencies turned on in your <strong>Magaya</strong><br />
system. If you have the entity name in QuickBooks already, you will not need to<br />
check this box.<br />
Check the box if you want to include Inventory Charge Definitions as Inventory<br />
Items when exporting to QuickBooks.<br />
Extra Info: <strong>Magaya</strong> software can also integrate with other programs such as for<br />
managing purchase orders. If you need this functionality, please discuss the<br />
<strong>Magaya</strong> API with your Logistics Management Advisor.<br />
147
ACCOUNTING CONFIGURATION<br />
CREDIT LIMIT CONFIGURATION<br />
Credit Limit Configuration<br />
To select the actions you want to take with customers who exceed the credit<br />
limit, use the options listed in this section of the Configuration menu. You can<br />
select just one, two, or all the options:<br />
After you set a credit limit, the system will alert a user when a customer has<br />
reached their credit limit. For example, if you check the option “Do not release<br />
the cargo”, the system will not let you release any cargo. If you select “Do not<br />
accept more bookings (online also)” then the system will not let any bookings<br />
be made for that customer. A notice will appear to tell the user the credit limit<br />
has been reached.<br />
The amount of the credit limit can be set in the Customer profile on the<br />
Payment Terms (Pmt Terms) tab.<br />
148
ACCOUNTING CONFIGURATION<br />
MISCELLANEOUS ACCOUNTING CONFIGURATIONS<br />
Miscellaneous <strong>Accounting</strong> Configurations<br />
This screen include various settings:<br />
Periodic Invoices: To invoice periodically means that all charges generated for<br />
a customer will be accumulated in a single invoice as the end of the period (week<br />
or month). For any customer that you set this option for, the system will add<br />
charges to one invoice. To invoice customers periodically, click one of the<br />
options:<br />
• Do not apply<br />
• Weekly (Fridays)<br />
• Monthly (this option enables you to set up to five dates in a month to<br />
invoice customers)<br />
The option you set here becomes the default in the system. To change a setting<br />
for a specific customer, go to that customer’s profile and make the change on the<br />
“Pmt Terms” tab.<br />
The “Periodic Invoices” option can also be set up in the Payment Terms (“Pmt<br />
Terms”) tab of any Customer profile. In that screen, you can determine per<br />
customer how to apply the periodic invoice, customizing how the period<br />
invoices are handled for an individual customer.<br />
Sales Tax: To keep the sales tax for purchases you make and hold it as sales tax<br />
credit, check this box. This will apply when you are paying your sales tax. For<br />
example, You create a check to pay sales tax. The check is payable to the tax<br />
authority or agency such as the state or county. The total that you will pay will<br />
149
ACCOUNTING CONFIGURATION<br />
ADDITIONAL FINANCIAL-RELATED CONFIGURATIONS<br />
reflect the deduction of sales taxes you already paid when you made purchases<br />
that required sales tax.<br />
Expense Items on Invoices: The option to “Allow to add expense items on<br />
invoices” will include expenses in a customer’s invoice. This is not recommended<br />
according to many accounting best practices. This option is off by<br />
default.<br />
Other Settings:<br />
To exclude new invoices from being viewed online, check the box.<br />
To enable the system to automatically generate recurrent transactions, check<br />
the box.<br />
Override the division of generated accounting transactions with the division of<br />
the source operation.<br />
Additional Financial-related Configurations<br />
<strong>Magaya</strong> software includes additional configuration options related to other<br />
financial aspects of running your business. The configuration of these options<br />
is explained in the <strong>Magaya</strong> <strong>Software</strong> Customization <strong>Manual</strong>. Here are some of<br />
the features available, depending on which <strong>Magaya</strong> software your company is<br />
using and if you sell inventory:<br />
• Automatic Charge Generation: to include charges automatically in transactions<br />
• Fiscal Printer: for use in Panama<br />
• Sales: for sales orders and inventory commissions<br />
• Purchasing: for billing purchase orders<br />
• Online Payments: to enable your customers to pay online<br />
• Payment Terms: to define payment terms for customers and vendors<br />
• XML Transformations: used for converting invoices, etc. from another<br />
system<br />
• JavaScript: create your own code for custom transactions such as calculating<br />
rates<br />
Tip: Set up some System Alerts to notify you when certain events occur such as<br />
when an online payment is received from a customer. Explore the Configuration<br />
options to determine which ones suit your operations so you get the most<br />
150
AVERAGE COST<br />
CONFIGURE AVERAGE COST SYSTEM-WIDE<br />
from your <strong>Magaya</strong> software. See the user manuals and other training materials<br />
for steps.<br />
Average Cost<br />
The cost of an inventory item can be defined as “specific” or as “average.”<br />
<strong>Magaya</strong> software enables configuring your system for either costing method. It<br />
can be set system-wide or per item.<br />
The Average Cost method calculates the average cost for inventory items (in<br />
contrast to a specific identification method). The <strong>Magaya</strong> system calculates the<br />
average of all the inventory items you have purchased. Every time you sell an<br />
item, the system will add the amount to your "Cost of Goods Sold" account and<br />
deduct from the Inventory Account for that item.<br />
This topic explains average cost, a method that is helpful when assessing the<br />
profit of selling your inventory. Sections in this topic include:<br />
• How to configure average cost system-wide and per item<br />
• How to create a resale item as an “average cost” method item<br />
• Purchase items and create bills<br />
• Sell items and invoice them<br />
• See the purchases and sales on the Balance Sheet<br />
Configure Average Cost System-wide<br />
Go to Maintenance > Configuration > <strong>Accounting</strong>.<br />
Click the “Cost” tab.<br />
151
AVERAGE COST<br />
CONFIGURE AVERAGE COST PER ITEM<br />
The first item is used to select the costing method. This example shows<br />
“average.”<br />
By selecting this configuration option, this costing method will apply<br />
system-wide. (If you want to set the costing method per item, see the section<br />
“Average Cost per Item.”)<br />
Configure Average Cost per Item<br />
This section explains how to define the costing method of an item at the Inventory<br />
Item Definition level, not system-wide.<br />
The costing method of regular inventory items and resale inventory items can<br />
be defined. For a regular inventory item, select the costing method on the<br />
<strong>Accounting</strong> tab of the Inventory Item Definition dialog box.<br />
152
AVERAGE COST<br />
ADDITIONAL CONFIGURATION<br />
For a resale item, select the costing method on the dialog box:<br />
Additional Configuration<br />
Extra Info: If you want your <strong>Magaya</strong> system to create bills before items are<br />
received, set this option in Configuration > Purchasing:<br />
Ensure the box is unchecked to allow the system to create bills for POs only after<br />
all inventory is received. In contrast, if this box is checked, then you will not be<br />
able to make bills until after receiving the items.<br />
153
AVERAGE COST<br />
SELL ITEMS AND CREATE INVOICES<br />
Choose Columns: Go to the Inventory Item Definitions List and choose the<br />
following columns to see the Total Purchase Cost and Average Purchase Cost.<br />
The totals in these columns will changes as items are purchased and sold.<br />
Extra Info: The system can switch between costing methods and display the<br />
average instantly when the method is changed. See the section “Changing<br />
Costing Methods” before making changes to ensure you fully understand how<br />
this will affect your system and the accounting.<br />
Sell Items and Create Invoices<br />
In this section, we look at how to use the items created with the average cost<br />
method by placing the items in a Sales Order (SO) and creating an invoice.<br />
Note: When you purchased the items, the system records the purchase price of<br />
the items, regardless of the costing method used (average or specific method).<br />
1. Create the SO and add the items to the Commodity tab.<br />
2. Create the invoice from the Actions button. See the Adjustments tab of the<br />
invoice to see how the average amount is removed from the asset account and<br />
transferred to the account for the cost of goods sold. This invoice Adjustment<br />
tab example shows the average is $105 for items purchased at $100 and $110.<br />
The two lines show the asset account and the cost account.<br />
154
AVERAGE COST<br />
SPECIFIC IDENTIFICATION<br />
The Inventory Item Definitions List and the Balance Sheet reflect the new totals.<br />
To see the Balance Sheet, click “Reports” from the menu at the top of your<br />
<strong>Magaya</strong> Explorer screen.<br />
The amounts are shown in the Balance Sheet’s Inventory Assets section,<br />
including the bill for each vendor and the invoice for the customer:<br />
Specific Identification<br />
An alternative costing method is “Specific Identification,” which is used to keep<br />
track of the exact cost of each item of inventory that is purchased and sold for<br />
each specific item. The exact cost is subtracted from your inventory assets<br />
account for the item sold. This will be displayed on the Adjustments tab of the<br />
invoice.<br />
Your <strong>Magaya</strong> system can be configured to the costing method of “Specific Identification”<br />
in the Configuration > <strong>Accounting</strong> menu to apply the setting<br />
system-wide.<br />
To apply the costing method per item, go to the Inventory Item Definition<br />
dialog box, and select the method on the <strong>Accounting</strong> tab (or in the wizard for a<br />
resale item).<br />
155
LANDED COST MANAGEMENT<br />
CHANGING COSTING METHODS<br />
If your system is set to FIFO, the system will fill an order by taking the first item<br />
and record the price for that specific item.<br />
Changing Costing Methods<br />
Changing the costing method affects the invoicing, the accounts for Inventory<br />
Assets, for Cost of Goods Sold, and the balance sheet. This is an advanced<br />
accounting function. We recommend that you ensure you understand how this<br />
will change your accounting system before changing from Average Cost to<br />
Specific Identification and visa versa.<br />
If an “Average Cost” item is invoiced, there may be a balance left in the asset<br />
account when changing that item to “Specific Identification.” To correct the<br />
balance, create a Journal Entry to transfer the balance left in the asset account to<br />
the item’s cost of goods sold account. For details on creating journal entries, see<br />
the section “Journal Entries” in Chapter 10 “Advanced <strong>Accounting</strong> Features” in<br />
the <strong>Magaya</strong> <strong>Software</strong> <strong>Accounting</strong> <strong>Manual</strong>.<br />
Landed Cost Management<br />
Landed Costs are all the costs of items such as transportation costs, duties and<br />
taxes, in addition to the cost of the item itself.<br />
156
LANDED COST MANAGEMENT<br />
CONFIGURE YOUR MAGAYA SYSTEM FOR LANDED COSTS<br />
Configure Your <strong>Magaya</strong> System for Landed Costs<br />
Go to Maintenance > Configuration > <strong>Accounting</strong>. Click the “Cost” tab.<br />
Click the checkbox to activate the Landed Cost options. When you check this<br />
option, also decide how to prorate the charges, by cost or by pieces.<br />
The Landed Cost setting automatically prorates the costs and creates the asset<br />
adjustments for additional charges found in Purchase Orders (PO) when the bill<br />
is created from the PO. If you bill a third party, instead of the main vendor, the<br />
landed costs are also updated. If items are added or removed, the system updates<br />
the landed costs.<br />
Save the configuration.<br />
Landed Costs in “Items & Services”<br />
To use landed costs, you must tell the system which item in the Items & Services<br />
list will calculate landed costs:<br />
• Go to the “Items & Services” list.<br />
• Select the service charge such as Inland Freight Cost, and double-click to<br />
open it.<br />
157
LANDED COST MANAGEMENT<br />
LANDED COSTS IN “ITEMS & SERVICES”<br />
• On the tab “Landed Cost,” check the box to include this non-inventory<br />
charge in Landed Cost. (Note: This tab only appears when configured to<br />
activate it.)<br />
What will happen: When a PO is created with this Inland Freight charge, the<br />
charge will be distributed (prorated) across the items in the list. See the PO<br />
dialog box to view how the costs are prorated. Tip: Right-click in the Commodities<br />
screen of the PO to choose the columns if needed to view them. The column<br />
“Other Costs” means costs non-inventory costs.<br />
Remember: Only costs that are defined as Landed will be included as Landed. Be<br />
sure the services or items in your Items & Services list are marked as Landed.<br />
When a PO with charges for landed costs is billed, the Bill for the other charges<br />
will also contain an asset adjustment. The charges for landed costs will be added<br />
to the inventory asset account. When selling, the landed cost charges will be<br />
deducted from the inventory asset account (in addition to the inventory items).<br />
View the details in the Inventory Item Definitions List (choose the columns for<br />
average landed cost, total landed cost, and average additional cost).<br />
This will also affect your Balance Sheet and Trial Balance in your <strong>Magaya</strong><br />
system.<br />
158
SALES TAXES<br />
INTRODUCTION TO SALES TAXES<br />
Sales Taxes<br />
Introduction to Sales Taxes<br />
The Tax Table shows the sales tax you have set up in <strong>Magaya</strong> Explorer. You can<br />
add sales tax entries to the tax table. The Tax Table is in the Chart of Accounts,<br />
under the Actions button.<br />
After you add a Tax Item, it can be added to an Item or Service. This will automatically<br />
include the tax when the item is used in an Invoice or Bill.<br />
Follow the steps below to add a new tax item.<br />
Steps: Add a Sales Tax Item<br />
1) Go to the Chart of Accounts.<br />
2) Click on the Actions button and select “Tax Table.” A table opens. (If you<br />
have not added any items, the table will be blank.)<br />
159
SALES TAXES<br />
STEPS: ADD A SALES TAX ITEM<br />
3) Click on the Add button. A dialog box opens:<br />
• Enter a code for the tax item. It can be any combination of letters and/or<br />
numbers.<br />
• Enter a description of the tax item, for example “Miami Dade County<br />
Sales Tax” or “Colombian Tax”.<br />
• Select the tax authority from the dropdown. This is where the taxes will be<br />
collected. If you need to add it, click on the plus sign. The tax authority is<br />
considered a “Vendor” so the vendor dialog box opens.<br />
• Enter the percent for the tax such as 15%. (Enter the number only, not the<br />
percent symbol.)<br />
160
SALES TAXES<br />
STEPS: ADD A SALES TAX ITEM<br />
• To group taxes, click on the checkbox. The dialog box changes to include<br />
a table:<br />
• Click on the Add button. Another dialog box opens. In that dialog box is<br />
a list of taxes you already set up (if you have set up some taxes). Select a tax<br />
from the list to assign it to that group. Click the OK button to return to the<br />
Tax Item dialog box.<br />
• Click the OK button when you are done.<br />
The tax is added to the Tax Table.<br />
To automatically include the tax in an item or service, go to the Items and<br />
Services folder, select the item (or service), and select the tax from the Tax Code<br />
dropdown.<br />
How to Use Sales Taxes in Invoices and Bills: When you select the tax in an<br />
invoice or bill, the tax amount will be calculated based on the tax percentage of<br />
the tax item and will be added to the total. The amount of the charges will be<br />
161
APPROVE/DISPUTE INVOICES<br />
APPROVE/DISPUTE INVOICES<br />
listed, and the tax amount will be shown separately. Then a total that includes<br />
the charges and the tax will display. This is the charges screen from the invoice:<br />
Change a Tax Rate:<br />
If a tax rate has been used in a transaction, the tax cannot be deleted from the<br />
system. To change it, create a new one with the same code and enter the<br />
different rate. The system will make the original rate inactive. Create the tax rate<br />
in the Chart of Accounts > Actions > Tax Table.<br />
Approve/Dispute Invoices<br />
Approve/Dispute Invoices<br />
To approve or dispute invoices, first configure this option for the customer:<br />
• Go to Maintenance > Customers and right-click on the customer’s name<br />
in the list. From the pop-up menu select “Allow Tracking.” A dialog box<br />
opens.<br />
162
APPROVE/DISPUTE INVOICES<br />
APPROVE/DISPUTE INVOICES<br />
• Click the Tracking tab in the Web Track User dialog box. Click the option<br />
“Approve/Dispute Invoices” to make a checkmark appear in the box.<br />
Click “OK” to save the setting for this customer.<br />
• To approve or dispute an invoice in your <strong>Magaya</strong> system, go to the<br />
Invoices List. Click the Actions button (alternate: right-click on an invoice<br />
in the list), and select “Approve/Dispute Transaction.”<br />
• Enter the reason in the dialog box.<br />
The comment appears in the Events tab for the transaction.<br />
Online Approve/Dispute Option: You can give your customers permissions to<br />
approve or dispute invoices online. Please see Chapter 9 in the <strong>Magaya</strong> <strong>Software</strong><br />
Communications <strong>Manual</strong> for details on giving your customers the option to pay<br />
invoices online.<br />
163
JOURNAL ENTRIES<br />
INTRODUCTION TO JOURNAL ENTRIES<br />
Journal Entries<br />
Introduction to Journal Entries<br />
Journal Entries are used to track nonroutine transactions such as depreciation<br />
or sale of an asset. When you create Journal Entries in <strong>Magaya</strong> Explorer, they<br />
are saved in a list that you can sort and filter.<br />
Steps: Create a Journal Entry<br />
1. Go to the Chart of Accounts and click the “Actions” button.<br />
2. Select “General Journal Entries”. A list opens.<br />
164
JOURNAL ENTRIES<br />
STEPS: CREATE A JOURNAL ENTRY<br />
3. Click on the Add button. A dialog box opens.<br />
The date field displays today’s date. Change the date if needed. Enter an Entry<br />
number.<br />
4. In the dialog box, follow these steps:<br />
• Click on the Add button to add a new line to the journal entry. A line in<br />
the table will be highlighted. The line has columns (these are also called<br />
“fields” because when you click on them, they become active and you can<br />
enter information).<br />
• The first column in the line is “Account Name”. This is the account that<br />
you will apply the line to. The field becomes a dropdown menu. Select the<br />
account from the dropdown.<br />
• The second column is “Debit” where you add the amount you will deduct.<br />
• The third column is “Credit” where you add the amount that you will add.<br />
• The “Description” column is used to add a description (optional). This is<br />
a text field.<br />
165
JOURNAL ENTRIES<br />
STEPS: CREATE A JOURNAL ENTRY<br />
• The “Entity” is a customer, vendor, etc. that is related to this journal entry.<br />
Click on the field to activate the dropdown menu. This information will<br />
appear when you list the transactions for this entity or customer.<br />
• “Currency” is set when you set up your <strong>Magaya</strong> system (changes can be<br />
made in the Maintenance > Configuration). Each line can be in a different<br />
currency if you select an account that is in a different currency, but the<br />
amount shown in the Debit and Credit columns are shown in home<br />
currency:<br />
• “Exchange Rate” is used to enter the exchange rate if you create this<br />
journal entry in another currency. This is the exchange rate between the<br />
currency you have selected and the home currency that your <strong>Magaya</strong><br />
system is set up with.<br />
• The sum of all the Debits must be equal to the sum of all the Credits to<br />
keep the entry in balance. The system will not let you add an Entry that is<br />
not in balance.<br />
5. Click the OK button. The entry will be added to the list and posted to the<br />
appropriate accounts.<br />
Actions for Journal Entries:<br />
In the General Journal Entries list, click the Actions button to make a copy of a<br />
journal entry, create reports, print an entry or a batch, choose columns, or<br />
import or export data.<br />
Other options for journal entries:<br />
166
ADJUSTMENTS<br />
• Reverse a journal entry (useful when changing credits by debits and vice<br />
versa)<br />
• Display total of debits and credits in the screen of the journal entry<br />
• Set up consecutive numbers for journal entries in the Maintenance ><br />
Configuration > <strong>Accounting</strong> menu<br />
• Select the template when printing a journal entry<br />
To view more details about a journal entry, select it and click the “Detail”<br />
button.<br />
Adjustments<br />
The Adjustments tab reflects transactions that keep your accounts in balance.<br />
The information on the Adjustments tab is Read Only.<br />
It also shows the cost of inventory (asset), and then when you sell it, the sale will<br />
show in the Adjustments tab as a deduction from the assets and it is converted<br />
to the cost of goods sold.<br />
For example, when you purchase an item for your inventory, you create a PO.<br />
From that PO, you create a Bill. When a customer purchases that item, you<br />
create a SO and an Invoice for the customer. The cost and income will show on<br />
the Adjustments tab of the invoice.<br />
Another use of the Adjustments tab is to show adjusted gains and losses for<br />
currency exchanges. If you are using multiple currencies, you will see the difference<br />
between the rate on the day your created the invoice and the rate on the day<br />
the customer paid the invoice. When you receive the payment and update the<br />
167
MULTIPLE CURRENCIES<br />
HOW TO SET UP MULTICURRENCIES IN YOUR MAGAYA SYSTEM<br />
exchange rate in the Payment dialog box, the Adjustment tab will show the<br />
difference in rates.<br />
When you change the rate in the dialog box, the system will ask you if you want<br />
to save the change (so it will be reflected for all transactions using that currency<br />
that you create after this one).<br />
If you add an adjustment to an accounting transaction on the Accounts tab of a<br />
transaction dialog box, it will appear on the “Adjustments” tab of that transaction<br />
such as the invoice dialog box. This one shows the bank fee for a NSF:<br />
Multiple Currencies<br />
How to Set up Multicurrencies in your <strong>Magaya</strong> System<br />
This section will explain how to set up your <strong>Magaya</strong> system to work with<br />
multiple currencies, how to activate existing currencies from the Currency List<br />
168
MULTIPLE CURRENCIES<br />
HOW TO SET UP MULTICURRENCIES IN YOUR MAGAYA SYSTEM<br />
or add new ones to it, how to enter a transaction in a different currency, and<br />
how to work with Multicurrencies Reports.<br />
Steps:<br />
You can set up multicurrencies two ways in <strong>Magaya</strong> Explorer: 1) in the Startup<br />
Wizard or 2) in the Maintenance > Configuration > <strong>Accounting</strong> screen:<br />
Select the Home Currency. Be aware this option is active only if there are no<br />
existing accounting transactions. It is recommended that home currency be set<br />
up in the Startup Wizard; steps for using the wizard are explained in the <strong>Magaya</strong><br />
Cargo System Operations <strong>Manual</strong>.<br />
When you check the box “Use Multicurrency”, the system will activate the use<br />
of more than one currency in your accounting system. Be aware this option<br />
cannot be reversed if there are existing accounting transactions in different<br />
currencies in the system. The transactions would need to be deleted before the<br />
system will allow you to reverse this option. You must click the “Save” button<br />
before you activate individual currencies.<br />
Reverse Exchange Rate: If you work with currencies that convert to very small<br />
amounts, you may want to work with the reverse rate. Check the box for this<br />
option, and your <strong>Magaya</strong> system will calculate the rate for you. Leave unchecked<br />
for the direct exchange rate.<br />
169
MULTIPLE CURRENCIES<br />
HOW TO SET UP MULTICURRENCIES IN YOUR MAGAYA SYSTEM<br />
How to Activate Individual Currencies:<br />
To activate specific currencies in your <strong>Magaya</strong> system, go to the same screen<br />
used to select your home currency (in the Maintenance folder > Configuration<br />
> <strong>Accounting</strong>).<br />
Click the “Currency List” button. A dialog box opens:<br />
Click on a currency such as the Euro or peso and click on the Edit button (or<br />
double-click on the currency). A dialog box opens:<br />
Verify that the exchange rate is current and correct. If you update the exchange<br />
rate, also update the date field to reflect today’s date.<br />
Check the box “This currency is active” to activate the currency.<br />
Click OK. A checkmark will appear in the Currency List, indicating that<br />
currency is active. Close that dialog box when you are done activating curren-<br />
170
MULTIPLE CURRENCIES<br />
HOW TO SET UP MULTICURRENCIES IN YOUR MAGAYA SYSTEM<br />
cies. Click Save again in the configuration screen. An A/R, A/P, and bank<br />
account will be created automatically for the activated currency.<br />
How to Add a New Currency to the Currency List:<br />
• Click on the Currency List button.<br />
• Click on the Add button.<br />
• Enter the currency name and code. The symbol is optional.<br />
• Enter the current exchange rate and today’s date.<br />
• Click on the checkbox “This currency is active”.<br />
• Click the OK button. The currency is now available in your system.<br />
How to Manage Exchange Rates:<br />
171
MULTIPLE CURRENCIES<br />
HOW TO SET UP MULTICURRENCIES IN YOUR MAGAYA SYSTEM<br />
To change the exchange rate of a currency, select the currency and click on the<br />
Edit button (or double-click on the currency). A dialog box opens:<br />
• Enter the updated exchange rate in the Exchange Rate field.<br />
• Select today’s date.<br />
• Click the OK button to save the changes.<br />
You can also manage exchange rates while you are working in a transaction.<br />
This is the most efficient method of managing the exchange rates because the<br />
system will update the exchange rate table for you based on the modifications<br />
you make in a transaction.<br />
For example, if you are working on a shipment and modify the exchange rate,<br />
the system will ask if you want this modification to be saved in the Currency List<br />
and to update the rate for all transactions. If you only want to use this currency<br />
for this transaction, click No. If you want to save the change, click Yes. This will<br />
update the Currency List and you will not have to go to that list to update it. It<br />
will update automatically.<br />
How to Enter an Operations Transaction in a Different Currency:<br />
172
MULTIPLE CURRENCIES<br />
HOW TO SET UP MULTICURRENCIES IN YOUR MAGAYA SYSTEM<br />
When you are working in an operations transactions such as Pickup Orders,<br />
Warehouse Receipts, Shipment, etc., the charge can be set to any currency activated<br />
in your <strong>Magaya</strong> system:<br />
When you liquidate an operations transaction that has charges in multiple<br />
currencies, separate invoices will be generated for each currency.<br />
The currency in a shipment can be defined by using the Actions button. The<br />
currency of the shipment is used as the currency of the Invoice or Credit Memo<br />
generated for the agent in the liquidation.<br />
How to Enter an <strong>Accounting</strong> Transaction in a Different Currency:<br />
173
MULTIPLE CURRENCIES<br />
MULTICURRENCY REPORTS<br />
When you create an invoice, you can set the currency by selecting the AR<br />
account. That will define the currency for this invoice:<br />
When you create an accounting transaction in a currency that is different from<br />
your home currency, you can also change the exchange rate of that currency in<br />
the dialog box.<br />
If you enter an exchange rate that is different from the one set in the Currency<br />
List, the system will ask you if you want to save this new rate and update the rate.<br />
If you just want to use this currency for this transaction, click No. If you want to<br />
save the change, click Yes. This will update the Currency List and you will not<br />
have to go to that list to update it. It will update automatically.<br />
Multicurrency Reports<br />
You can view payments by currency by clicking on the Actions button in the<br />
Payments List and selecting Reports. Then choose “By currency”.<br />
174
MULTIPLE CURRENCIES<br />
MULTICURRENCY REPORTS<br />
When you are viewing a report, you can change the currency of that report by<br />
using the Actions button:<br />
The currency will change and the totals will be updated automatically in the new<br />
currency.<br />
You can see a report of gains and losses due to working in multicurrencies by<br />
going to the top toolbar in <strong>Magaya</strong> Explorer and selecting the Reports menu.<br />
The reports available show realized and unrealized gains and losses.<br />
See the section “Multicurrency Reports” on in the “<strong>Accounting</strong> Reports” topic<br />
for more details.<br />
175
RELATIONSHIP BETWEEN ACCOUNTING & OPERATIONS<br />
MULTICURRENCY REPORTS<br />
Relationship Between <strong>Accounting</strong> & Operations<br />
<strong>Magaya</strong> Explorer links operations transactions with accounting functions in the<br />
following ways:<br />
1) Charges can be entered as you add operations transactions to your<br />
<strong>Magaya</strong> system.<br />
The system uses the Items and Services that you defined in the Items and<br />
Services list (under the <strong>Accounting</strong> folder) to fill in the charge dropdown<br />
in the charge screen.<br />
176
RELATIONSHIP BETWEEN ACCOUNTING & OPERATIONS<br />
MULTICURRENCY REPORTS<br />
2) The charges entered in an operations transaction such as a Cargo Release<br />
(CR) are used to create Invoices and Bills during the Liquidation process.<br />
To liquidate the charges in a CR, click on the Generate button.<br />
Liquidation of CRs, WRs, shipments, and other transactions is explained<br />
in the <strong>Magaya</strong> Cargo System Operations <strong>Manual</strong>.<br />
3) Each operations transaction can have a list of accounting transactions<br />
(Invoices and Bills) related to it. For each operations transaction, you can<br />
click on the Actions button and select the Transaction Listing.<br />
177
RELATIONSHIP BETWEEN ACCOUNTING & OPERATIONS<br />
MULTICURRENCY REPORTS<br />
4) Each accounting transaction (Invoices and Bills) has a list of operations<br />
transactions related to it. For most of the Invoices and Bills, there is only<br />
one related transaction. The exception is for Periodic Invoices which will<br />
often have more than one related transaction. Then you will see a<br />
“History” button.<br />
In this screenshot, this Invoice is related a Shipment. To view the details<br />
of the Shipment, click on the Shipment button. To go to the Shipment,<br />
click on the arrow button.<br />
You can also view the History of an accounting transaction when you are<br />
in the list view such as the Invoices List or Bills List. Select the transaction<br />
and click on the Actions button. You can also go to the document from the<br />
Actions button.<br />
178
ACCOUNTS RECEIVABLE SPECIAL PROCEDURES<br />
MULTICURRENCY REPORTS<br />
Accounts Receivable Special Procedures<br />
This topic explains how to perform the following accounting procedures using<br />
features in <strong>Magaya</strong> software version 9.3 (released in January 2014):<br />
1) Process a discount for a customer<br />
2) Handle bounced checks<br />
3) Process wire transfer fees<br />
4) Make petty cash deposits<br />
Former workarounds for previous versions of the software are not needed in<br />
version 8.0.<br />
179
ACCOUNTS RECEIVABLE SPECIAL PROCEDURES<br />
PROCESSING DISCOUNTS MANUALLY<br />
Processing Discounts <strong>Manual</strong>ly<br />
How to add a discount manually to an invoice:<br />
1) Begin by creating the invoice as you normally would by filling in the fields<br />
and adding the charges.<br />
2) In the Invoice dialog box, click the “Accounts” tab (next to the “Charges”<br />
tab).<br />
3) Click the Add button. Select a discount expense account.<br />
4) In the line, click the column “Account Name,” and select the expense<br />
account for discounts. Note: In <strong>Magaya</strong> software 9.3 and higher, the<br />
system includes a default “Discount Account.”<br />
In the “Amount” column, click the space and enter a minus sign and the<br />
number; for example, to offer a $1,000.00 discount, enter -1000.00 in the<br />
column.<br />
The Description and Entity columns are optional.<br />
180
ACCOUNTS RECEIVABLE SPECIAL PROCEDURES<br />
HANDLING BOUNCED CHECKS<br />
The total will be updated automatically. Click the Close or OK button to save.<br />
Note: You can set payment terms for a customer for a customer in their profile.<br />
For details, see the section “Set Customer Payment Terms” in Chapter 6 of the<br />
<strong>Magaya</strong> <strong>Software</strong> <strong>Accounting</strong> <strong>Manual</strong>.<br />
Handling Bounced Checks<br />
Handling bounced checks in your <strong>Magaya</strong> system requires two transactions:<br />
One records the bank fee, and another creates a new invoice.<br />
Scenario: You have already received the payment, but the check bounced due to<br />
non-sufficient funds (NSF).<br />
1) Create a Check to Expense:<br />
When you receive the bounced check from the bank, make a “Check to<br />
Expense” to record the bank fee.<br />
Make the check payable to the bank for the NSF fee amount ($20.00).<br />
2) Now create another Invoice: Click the “Accounts” tab of the Invoice dialog<br />
box as shown here:<br />
181
ACCOUNTS RECEIVABLE SPECIAL PROCEDURES<br />
PROCESSING WIRE TRANSFER FEES<br />
Include the amount that you will charge your customer to cover the fee that the<br />
bank charged you ($25.00), and the amount that the customer paid in the check<br />
that bounced ($1,500.00) that needs to be subtracted from the bank.<br />
The “Bank Service Fee” is the income account in the Chart of Accounts for bank<br />
service charges such as this bounced check fee of 20.00. This example shows a<br />
fee of $5.00 added for processing.<br />
Processing Wire Transfer Fees<br />
When you receive a payment via wire transfer, the customer sends the full<br />
amount, but the bank charges you a fee for the wire transfer. There are two<br />
options to process this:<br />
1) The payment that you receive will show the fee; or,<br />
2) process the payment in full and create a Check to Expense for the wire<br />
transfer fee.<br />
182
ACCOUNTS RECEIVABLE SPECIAL PROCEDURES<br />
PROCESSING WIRE TRANSFER FEES<br />
The choice depends on how your bank charges you. The following example<br />
shows how to process option 1:<br />
1) In the Payment dialog box, click the invoices that you want to apply the<br />
payment to.<br />
Note: Click the checkbox to show open invoices.<br />
2) Click the “Accounts” tab (next to the Invoices tab).<br />
183
ACCOUNTS RECEIVABLE SPECIAL PROCEDURES<br />
PETTY CASH DEPOSITS<br />
3) Click the “Add” button, and add the information on the line:<br />
Account Name (Bank Service Charges), Amount (this is the wire transfer<br />
fee that the bank charged you; this example shows -25.00), and a description<br />
(this is optional, but this example shows “Wire Transfer Fee”.<br />
The total amount received must equal the amount paid ($2200.00 minus<br />
the fee of $25.00 = $2175.00).<br />
Click OK to save.<br />
Petty Cash Deposits<br />
Use the Petty Cash account in your <strong>Magaya</strong> system to keep track of petty cash.<br />
This can be done when making deposits from customers who pays you cash by<br />
184
ACCOUNTS RECEIVABLE SPECIAL PROCEDURES<br />
PETTY CASH DEPOSITS<br />
depositing some of the cash in the Bank Account and assigning a small amount<br />
to the Petty Cash account.<br />
1) Go to Deposits, and select “Deposit Payment”. In the dialog box, select the<br />
payments that you want to deposit.<br />
185
ACCOUNTS RECEIVABLE SPECIAL PROCEDURES<br />
PETTY CASH DEPOSITS<br />
2) Click the “Accounts” tab (next to the Payments tab).<br />
3) Click the Add button, and add the information: Select the Petty Cash<br />
account, and enter the amount ($-50.00).<br />
If you do not enter a minus sign, the amount of the petty cash will not be<br />
deducted from the Deposit total. This example shows the total deposited<br />
in the bank account is $6400.81 because we subtracted the $50.00 that you<br />
keep in petty cash.<br />
186
Index<br />
A<br />
<strong>Accounting</strong> and Operations relationship 176<br />
<strong>Accounting</strong> configuration 141<br />
<strong>Accounting</strong> reports 103<br />
<strong>Accounting</strong> roles and permissions 140<br />
<strong>Accounting</strong> Wizard 11<br />
Accounts Payable 67<br />
Accounts Receivable 31<br />
Adjustments 167<br />
Administrator role 141<br />
Advanced payment 54<br />
Aging AR report 40<br />
AP 67<br />
API, integrations 147<br />
AR 31<br />
Assets 120<br />
purchase a fixed asset 73<br />
Assets, inventory 120<br />
Average Cost 151<br />
Average Cost, configure per item 152<br />
Average Cost, configure system-wide 151<br />
Average Cost, items in a Sales Order 154<br />
B<br />
Balance Sheet 117<br />
Average Costing method of inventory 121<br />
Bank reconciliation 96, 101<br />
Banking 83<br />
Bill Credit 73<br />
Bill Payments 75<br />
Bills 67<br />
periodic 72<br />
recurrent 72<br />
Bounced checks 181<br />
Bounced checks, re-issue invoice 36<br />
C<br />
Cargo reports 39<br />
billing 71<br />
Cash 122<br />
Charges<br />
set priority 29<br />
Chart of Accounts 19<br />
Add to 20<br />
Check numbering 76<br />
Checks 83<br />
check to expense 84<br />
check to pay sales tax 87<br />
pre-printed 88<br />
print batch 91<br />
reports 90<br />
save as recurrent 92<br />
select template 88<br />
void 88<br />
Clear or unclear transaction 100<br />
Closing date 142<br />
Compare purchasing reports 129<br />
Compare sales reports 125<br />
Cost of Goods Sold 124<br />
in the P&L report 111<br />
Costing<br />
Inventory configuration 146<br />
Costing methods, how to change 156<br />
Costs, prorating 133<br />
Credit card, receive customer payment 49<br />
Credit Card, set up in Chart of Accounts 21<br />
Credit Card, to pay expenses 86<br />
Credit card, use to pay expenses 86<br />
Credit limit 148<br />
Credit Memo 47<br />
Currency<br />
add a 170<br />
Customer Payment 49<br />
D<br />
Daily Journal 137<br />
Default accounts 23<br />
Deposit 60, 93<br />
void 63<br />
Deposit payment 53, 60, 93<br />
Deposit ticket 62<br />
Discount 180<br />
Discount, applied to payment 52<br />
Divisions 23<br />
Due date, set 142<br />
E<br />
Equity 120<br />
Exchange Rate<br />
reverse 143, 169<br />
1
set up or change 172<br />
F<br />
FIFO 156<br />
Fiscal printer 44<br />
Fiscal Year<br />
set or change 143<br />
G<br />
General Ledger 22<br />
Gross Profit 112<br />
H<br />
Home currency 169<br />
I<br />
Income Statement 110<br />
Inventory 27<br />
Inventory, overview of accounts 24<br />
Invoice<br />
approve or dispute 41, 162, 163<br />
exclude from tracking online 40<br />
numbering 33<br />
open invoices 40<br />
status 33<br />
Invoices 32<br />
Items and Services 25<br />
add new 26<br />
resale item 27<br />
J<br />
Journal Entries 164<br />
L<br />
Landed cost configuration 146, 157<br />
Landed costs in a PO 72<br />
Liabilities 120<br />
M<br />
Multicurrencies<br />
working with 168<br />
Multicurrency 137<br />
N<br />
Non-sufficient funds (NSF) 181<br />
Numbering, of accounting transactions 144<br />
O<br />
Online payments 41<br />
Open transactions 9, 42<br />
Opening balances 14<br />
Overpayment 54<br />
P<br />
Pay bills 75<br />
Pay sales tax 86<br />
Payment 49<br />
deposit 60<br />
partial 53<br />
Payment Terms 55<br />
Payment terms, system-wide setting 142<br />
Peachtree 40<br />
Periodic Invoices<br />
set up 149<br />
Print checks 88<br />
Profit and Loss report 110<br />
Purchase fixed asset 73<br />
Purchase Reports 127<br />
Purchase reports 71<br />
Q<br />
QuickBooks 40<br />
set up 147<br />
R<br />
Realized Gains and Losses 137<br />
Reconcile bank account 96<br />
Reconcile bank, view multiple currencies 99<br />
Refund Check 63<br />
Replace Account 22<br />
Replace Item 28<br />
Reports<br />
aging AR 125<br />
bill detail 136<br />
by agent 124<br />
by sales 124<br />
check detail 136<br />
compare Balance Sheet 120<br />
compare Profit & Loss 113<br />
customize 107<br />
invoice detail 136<br />
missing checks 137<br />
multicurrency 137<br />
2
open invoices 125<br />
sales tax liability 137<br />
save 104<br />
tabs 105<br />
transaction detail 136<br />
trial balance 136<br />
unpaid bills 129<br />
Resale item automated 27<br />
S<br />
Sales Order, average cost items 154<br />
Sales Reports 123<br />
Sales reports 39<br />
Sales Tax<br />
set up 149<br />
Sales tax 87<br />
Shipment profit & loss 117<br />
Specific Identification of inventory 155<br />
T<br />
Tax item<br />
add a 159<br />
Tax table 159<br />
Tax, change or replace 162<br />
Training, in accounting software tasks 10<br />
Transaction Listing 100<br />
U<br />
Undeposited funds<br />
show all 61<br />
Undo 101<br />
Unpaid bills report 71<br />
Unrealized Gains and Losses 138<br />
Updating <strong>Magaya</strong> software, settings saved 142<br />
V<br />
Vendor refund 80<br />
Vendors<br />
pay multiple 77<br />
Void a bill 72<br />
W<br />
Wire transfer fee 182<br />
3