Double Layering Fitting Instructions - Curtain Poles
Double Layering Fitting Instructions - Curtain Poles
Double Layering Fitting Instructions - Curtain Poles

Create successful ePaper yourself
Turn your PDF publications into a flip-book with our unique Google optimized e-Paper software.
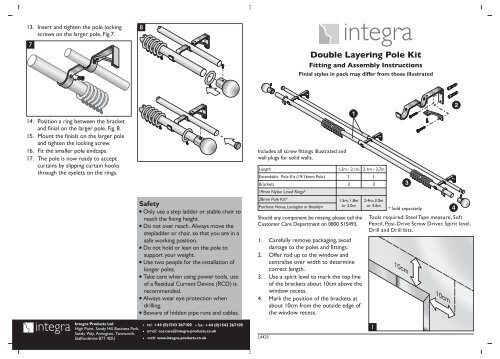
13. Insert and tighten the pole locking<br />
screws on the larger pole, Fig.7.<br />
7<br />
8<br />
<strong>Double</strong> <strong>Layering</strong> Pole Kit<br />
<strong>Fitting</strong> and Assembly <strong>Instructions</strong><br />
Finial styles in pack may differ from those illustrated<br />
14. Position a ring between the bracket<br />
and finial on the larger pole, Fig. 8.<br />
15. Mount the finials on the larger pole<br />
and tighten the locking screw.<br />
16. Fit the smaller pole endcaps.<br />
17. The pole is now ready to accept<br />
curtains by slipping curtain hooks<br />
through the eyelets on the rings.<br />
Safety<br />
Only use a step ladder or stable chair to<br />
reach the fixing height.<br />
Do not over reach. Always move the<br />
stepladder or chair, so that you are in a<br />
safe working position.<br />
Do not hold or lean on the pole to<br />
support your weight.<br />
Use two people for the installation of<br />
longer poles.<br />
Take care when using power tools, use<br />
of a Residual Current Device (RCD) is<br />
recommended.<br />
Always wear eye protection when<br />
drilling.<br />
Beware of hidden pipe runs and cables.<br />
Includes all screw fittings illustrated and<br />
wall plugs for solid walls.<br />
Length 1.2m - 2.1m 2.1m - 3.7m<br />
Extendable Pole Kit (19/16mm Pole) 1 1<br />
Brackets 3 3<br />
19mm Nylon Lined Rings*<br />
28mm Pole Kit* 1.5m, 1.8m<br />
Purchase Nexus, Lexington or Brooklyn or 2.0m<br />
Should any component be missing, please call the<br />
Customer Care Department on 0800 515493.<br />
1. Carefully remove packaging, avoid<br />
damage to the poles and fittings.<br />
2. Offer rod up to the window and<br />
centralise over width to determine<br />
correct length.<br />
3. Use a spirit level to mark the top line<br />
of the brackets about 10cm above the<br />
window recess.<br />
4. Mark the position of the brackets at<br />
about 10cm from the outside edge of<br />
the window recess.<br />
1<br />
2.4m, 3.0m<br />
or 3.6m<br />
3<br />
* Sold separately<br />
Tools required: Steel Tape measure, Soft<br />
Pencil, Posi-Drive Screw Driver, Spirit level,<br />
Drill and Drill bits.<br />
4<br />
2<br />
Integra Products Ltd<br />
High Point, Sandy Hill Business Park,<br />
Sandy Way, Amington, Tamworth,<br />
Staffordshire B77 4DU<br />
tel: +44 (0)1543 267100 fax: +44 (0)1543 267105<br />
email: cus.care@integra-products.co.uk<br />
web: www.integra-products.co.uk<br />
L4425<br />
1
5. Position the brackets on the wall and<br />
mark the two holes on the wall and<br />
drill the holes, Fig. 2.<br />
6. Using the wall plugs and screws<br />
provided fix the brackets securely<br />
using the top screw only, Fig. 3.<br />
Alternative wall fixings should be<br />
used where necessary.<br />
2<br />
8. Extend the smaller diameter pole to<br />
the correct width and place in the<br />
brackets, Fig. 5.<br />
9. Centralise the pole and tighten the<br />
pole locking screws.<br />
5<br />
3<br />
7. Fit the bracket stay and fix the<br />
bottom bracket screw to the wall,<br />
Fig. 4.<br />
10. Extend the large diameter pole to the<br />
correct width. Slide on an equal<br />
number of curtain rings on each half<br />
of the pole as required, Fig. 6.<br />
=<br />
Allow for a ring at each end between the<br />
finial and bracket.<br />
For curtains without curtain hooks slide<br />
the curtain onto each half of the pole.<br />
Additional rings are available as an<br />
accessory for the 19 and 28mm pole.<br />
6<br />
=<br />
4<br />
11. Drop the pole into the brackets and<br />
centralise over the window.<br />
12. Reposition the pole on the brackets.<br />
2<br />
3