Instruction manual - Blaser USA
Instruction manual - Blaser USA
Instruction manual - Blaser USA

Create successful ePaper yourself
Turn your PDF publications into a flip-book with our unique Google optimized e-Paper software.
5. Operation<br />
5. Operation<br />
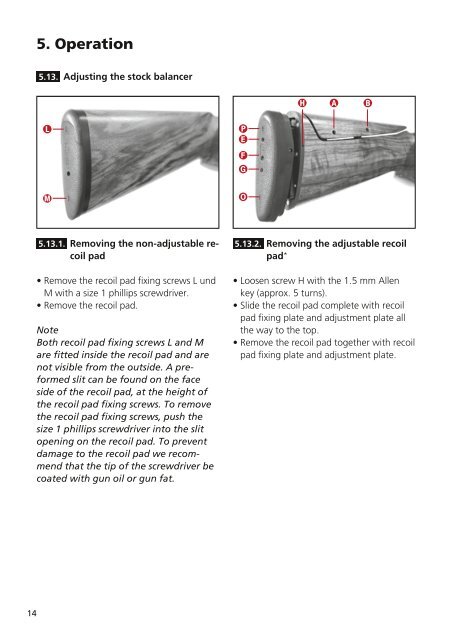
5.13. Adjusting the stock balancer<br />
Spacer disk<br />
Laminated disk spring<br />
Balancer weights<br />
Balancer<br />
5.13.4. Adjusting the weight<br />
distribution<br />
• Loosen the fixing screws N on the<br />
balancer weight with the 2 mm Allen key.<br />
• Turn the balancer weight to desired<br />
position.<br />
• Tighten the fixing screws N on the<br />
balancer weight with the 2 mm Allen key.<br />
5.13.1. Removing the non-adjustable recoil<br />
pad<br />
• Remove the recoil pad fixing screws L und<br />
M with a size 1 phillips screwdriver.<br />
• Remove the recoil pad.<br />
Note<br />
Both recoil pad fixing screws L and M<br />
are fitted inside the recoil pad and are<br />
not visible from the outside. A preformed<br />
slit can be found on the face<br />
side of the recoil pad, at the height of<br />
the recoil pad fixing screws. To remove<br />
the recoil pad fixing screws, push the<br />
size 1 phillips screwdriver into the slit<br />
opening on the recoil pad. To prevent<br />
damage to the recoil pad we recommend<br />
that the tip of the screwdriver be<br />
coated with gun oil or gun fat.<br />
5.13.2. Removing the adjustable recoil<br />
pad*<br />
• Loosen screw H with the 1.5 mm Allen<br />
key (approx. 5 turns).<br />
• Slide the recoil pad complete with recoil<br />
pad fixing plate and adjustment plate all<br />
the way to the top.<br />
• Remove the recoil pad together with recoil<br />
pad fixing plate and adjustment plate.<br />
5.13.3. Removing the stock balancer<br />
• Loosen the balancer using the 5 mm Allen<br />
key. Ensure that the muzzle is pointing<br />
down and resting on a non-slip surface.<br />
• Remove the balancer.<br />
ATTENTION:<br />
After loosening the balancer, the stock is<br />
no longer secured. Handling the gun now,<br />
could result in the stock removing which<br />
could cause damage to the gun or stock.<br />
Note<br />
After removing the balancer, the stock<br />
washer and spring washer are no longer<br />
secured on the stock connecting rod.<br />
Hold the gun with the muzzle pointing<br />
down to avoid losing the stock and<br />
spring washers.<br />
Note<br />
To avoid damaging the threaded rod,<br />
please ensure when tightening the fixing<br />
screws N that you are screwing them<br />
down onto the flat side of the rod and<br />
not directly onto the thread.<br />
Note<br />
The balancer is as a rule, fitted with one<br />
balancer weight.<br />
Depending on the stock weight, barrel<br />
weight and/or personal preference the<br />
balancer can be set with one weight,<br />
two weights or even without any<br />
weights.<br />
When using one or two weights, the<br />
fine adjustments of balance are made<br />
through turning the weights in the<br />
needed direction until the desired<br />
balance is achieved.<br />
14 *not available in the US<br />
15