Pajama Pants - Texas 4-H and Youth Development - Texas A&M ...
Pajama Pants - Texas 4-H and Youth Development - Texas A&M ...
Pajama Pants - Texas 4-H and Youth Development - Texas A&M ...

You also want an ePaper? Increase the reach of your titles
YUMPU automatically turns print PDFs into web optimized ePapers that Google loves.
SUPPLIES<br />
NEEDED<br />
Tape measure<br />
Rotary cutter <strong>and</strong><br />
cutting mat or<br />
scissors to cut<br />
fabric<br />
Pattern paper (I use<br />
butcher paper<br />
2.5 or more yards<br />
fabric (see Page 2<br />
to determine how<br />
much fabric you<br />
will need)<br />
Thread to match<br />
fabric background<br />
3/4" elastic<br />
(enough to fit<br />
around your waist)<br />
<strong>Pajama</strong> <strong>Pants</strong><br />
Overview<br />
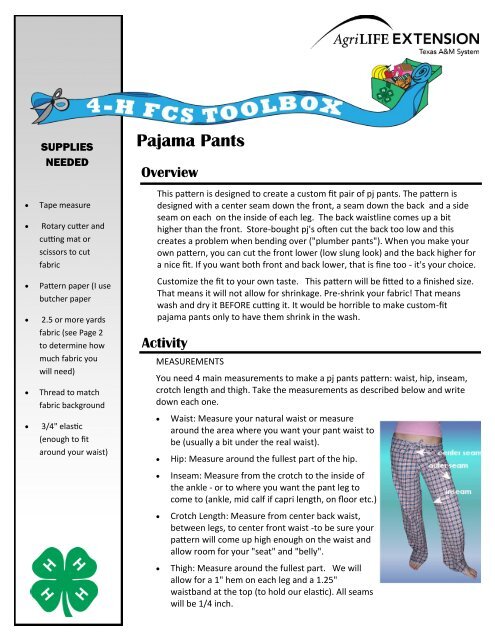
This pattern is designed to create a custom fit pair of pj pants. The pattern is<br />
designed with a center seam down the front, a seam down the back <strong>and</strong> a side<br />
seam on each on the inside of each leg. The back waistline comes up a bit<br />
higher than the front. Store-bought pj's often cut the back too low <strong>and</strong> this<br />
creates a problem when bending over ("plumber pants"). When you make your<br />
own pattern, you can cut the front lower (low slung look) <strong>and</strong> the back higher for<br />
a nice fit. If you want both front <strong>and</strong> back lower, that is fine too - it's your choice.<br />
Customize the fit to your own taste. This pattern will be fitted to a finished size.<br />
That means it will not allow for shrinkage. Pre-shrink your fabric! That means<br />
wash <strong>and</strong> dry it BEFORE cutting it. It would be horrible to make custom-fit<br />
pajama pants only to have them shrink in the wash.<br />
Activity<br />
MEASUREMENTS<br />
You need 4 main measurements to make a pj pants pattern: waist, hip, inseam,<br />
crotch length <strong>and</strong> thigh. Take the measurements as described below <strong>and</strong> write<br />
down each one.<br />
<br />
<br />
Waist: Measure your natural waist or measure<br />
around the area where you want your pant waist to<br />
be (usually a bit under the real waist).<br />
Hip: Measure around the fullest part of the hip.<br />
<br />
<br />
<br />
Inseam: Measure from the crotch to the inside of<br />
the ankle - or to where you want the pant leg to<br />
come to (ankle, mid calf if capri length, on floor etc.)<br />
Crotch Length: Measure from center back waist,<br />
between legs, to center front waist -to be sure your<br />
pattern will come up high enough on the waist <strong>and</strong><br />
allow room for your "seat" <strong>and</strong> "belly".<br />
Thigh: Measure around the fullest part. We will<br />
allow for a 1" hem on each leg <strong>and</strong> a 1.25"<br />
waistb<strong>and</strong> at the top (to hold our elastic). All seams<br />
will be 1/4 inch.
Objectives<br />
Activity<br />
MAKE A PAJAMA PANT PATTERN<br />
4-H members will be<br />
able to:<br />
Create a pair of<br />
pajama pants<br />
Create a custom fit<br />
pattern<br />
Cut out a pattern<br />
Determine the<br />
grain of the fabric<br />
1. Measure your waist, hips, inseam, crotch length <strong>and</strong> thigh.<br />
2. Write down the measurements.<br />
3. Create your pattern. Following the<br />
pattern example, draw your pattern.<br />
You will need two pattern pieces:<br />
front <strong>and</strong> back. See "Altering" below<br />
for directions on making changes to<br />
this pattern. NOTE: The front <strong>and</strong><br />
back will sewn together at the inseam<br />
<strong>and</strong> outer seam; therefore, these<br />
measurements MUST BE EQUAL. In<br />
my example, the outer seam of BOTH<br />
the front <strong>and</strong> back measure 40". The<br />
inseams measure 28". The back<br />
center seam measures<br />
13.5" (vertically) <strong>and</strong> the front center<br />
seam measures 12" (vertically). As<br />
stated above, the back center seam<br />
rides higher at the waist. The curve of<br />
the back center seam is more<br />
pronounced than that of the front. It<br />
goes from 9.5" at the top point to 13.5" at the crotch point - a difference of<br />
4". The front center seam curve is only 2.25". This allows for the curve<br />
around the buttocks. It also makes the pant waist come in at the small of<br />
the back, creating a nice fit.
Activity<br />
ALTERING THE PATTERN<br />
This pattern fits a size 8-10, or hips: 39"; waist 29"; thigh 21"; inseam 27". Using my drawing as a guide, draw your<br />
pattern. Use the same general shape as my pattern pieces; just add or delete from the size as needed. The person I<br />
made this pattern for had a thigh measurement of 21". This pattern will create a pant leg of 25" around the fullest<br />
part at the top of the leg. This allows for some extra room in the leg. The front pattern measures 12.5" across the<br />
widest part of the top of the leg <strong>and</strong> the back pattern measures 13.5" across. 1/2" is used for the two seam<br />
allowances (each side's seam allowance is 1/4"), so the finished measurement will be 12+13=25". Let's say you<br />
need a finished inseam of 33" (6" longer than our pattern) <strong>and</strong> your thigh measures 25" (4" larger than our model).<br />
You will need to add 2" to both the front <strong>and</strong> back pattern at the area of the thigh <strong>and</strong> 6" to the inseam. Note that<br />
the hem width remains the same (10").<br />
If you wish to change the shape of the leg, draw the new shape. For<br />
example, if you wish to have flare legs that are 4" wider at the<br />
bottom, simple add 2" to the outsides of both the front <strong>and</strong> back<br />
pattern pieces as shown below right. To keep the flare even, I added<br />
2" to both the inseam side <strong>and</strong> the outer seam side. Doing this to<br />
both the front <strong>and</strong> back piece would add a total of 8" to the bottom<br />
circumference of the leg.<br />
Remember that the outside seam <strong>and</strong> the inseam MUST be equal<br />
between the front <strong>and</strong> back pieces. This is because the front <strong>and</strong><br />
back pieces are stitched together at the inseam <strong>and</strong> the outer seam.<br />
Activity<br />
CONSTRUCTION DIRECTIONS<br />
Lay the pattern on a hard surface to determine how much fabric you will need. If the fabric is directional, you might<br />
need more fabric. Otherwise, you can flip the pattern so that it uses minimum fabric. Fold the fabric right sides<br />
together, lengthwise, <strong>and</strong> cut through BOTH layers. I used 45" wide fabric (our 100% cotton, quilt quality fabric<br />
from our online store). I needed 2.5 yards (this allowed for shrinkage).<br />
NOTE: The straight, double-ended arrow represents straight of grain. The straight of grain contains no stretch. In<br />
our example, there is more stretch across the width of the fabric (no stretch along its length). The straight of grain<br />
runs the length of the fabric. This means that the arrow must be exactly parallel to the edge of the fabric. Draw your<br />
arrow on your pattern so that it is exactly perpendicular to the bottom leg edge. This is how you keep your pattern<br />
piece straight on the fabric. Measure the distance from the end of each arrow to the edge of the fabric to be sure<br />
your pattern piece is straight. Laid out correctly, your finished product will have some stretch across the seat (even<br />
non-stretch fabric has some give, <strong>and</strong> less stretch vertically. This is very important<br />
Educational programs of the <strong>Texas</strong> AgriLife Extension Service are open to all people without regard to race, color, sex, disability, religion, age, or national<br />
origin. The <strong>Texas</strong> A&M University System, U.S. Department of Agriculture, <strong>and</strong> the County Commissioners Courts of <strong>Texas</strong> Cooperating.
Activity<br />
Pin the front pieces together at the front center seam, keeping them right sides together. Using a<br />
1/4" seam allowance, stitch the front pieces together at the center seam. Repeat with the back<br />
pieces. See example on the right<br />
Lay out your pajama back <strong>and</strong> pajama front. Pin the front to the<br />
back, right sides together, along the outer seam. Using a 1/4"<br />
seam allowance, stitch the front to the back at the outer seams.<br />
Pin the front to the back, right sides together, along the inseams. Using a 1/4"<br />
seam allowance, stitch the front to the back at the inseams. There are two<br />
methods for this. One is to start stitching at the center <strong>and</strong> stitch down one leg,<br />
then stitch down the other leg. The second method is to start at the bottom of one<br />
pant leg, stitch up to the center <strong>and</strong> then down the other pant leg. Either one<br />
works, but if you are a beginner it might be better to use the first method.<br />
Educational programs of the <strong>Texas</strong> AgriLife Extension Service are open to all people without regard to race, color, sex, disability, religion, age, or national<br />
origin. The <strong>Texas</strong> A&M University System, U.S. Department of Agriculture, <strong>and</strong> the County Commissioners Courts of <strong>Texas</strong> Cooperating.
Activity (Construction Directions Cont.)<br />
HEM LEGS & ADD ELASTIC TO WAIST Serge or zig-zag around the bottom of each pant leg. Turn under each pant<br />
leg 1/4" <strong>and</strong> press. Turn under 1/4" again <strong>and</strong> press. Machine stitch around close to folded edge of hem. If you<br />
prefer, you can h<strong>and</strong> stitch the hem rather than machine stitch.<br />
Serge or zig-zag stitch around the raw edge of the waist. Turn under<br />
1/4" <strong>and</strong> press. Turn under 1" <strong>and</strong> press. On the BACK of the pants,<br />
place two pins approximately 1.5" apart. Stitch around the pants,<br />
near the folded edge of the hem, leaving the area between the pins<br />
open. Remove pins. You have now created the casing for the waist<br />
elastic.<br />
Cut 3/4" elastic 3" shorter than your waist measurement. If the<br />
elastic is very stiff, cut it closer to your waist measurement. Make a<br />
small mark on each end of the elastic, on the same side. This way, if<br />
the elastic turns while you are pulling it through the casing, you will know it. Run a safety pin through one end of<br />
the elastic. Use the safety pin to hold onto while you<br />
feed the elastic through the casing. Feeling under the<br />
fabric, push the safety pin with one h<strong>and</strong> <strong>and</strong> pull it<br />
with the other until the elastic is all the way around<br />
the casing. Be carefully that the second end of the<br />
elastic is not pulled up into the casing. Remove the<br />
safety pin <strong>and</strong> stitch the two ends of the elastic<br />
together by laying one over the<br />
top of the other as shown to the right (check your marks first to be sure the elastic has not<br />
twisted). Stitch securely. Pull the waist open, stretching the elastic. This will pull the loose,<br />
stitched end into the casing. Adjust gathers. Stitch the casing opening closed.<br />
Reflection<br />
Questions for 4-H members:<br />
<br />
<br />
What is the value of creating your pattern<br />
How will you use this information in the future.<br />
Application<br />
<strong>Youth</strong> will be able to apply pattern making skills when constructing a garment.<br />
Resources/Authors<br />
Source: http://www.craft<strong>and</strong>fabriclinks.com/pj/pajama_pattern.html<br />
Donna White, Erath County<br />
Educational programs of the <strong>Texas</strong> AgriLife Extension Service are open to all people without regard to race, color, sex, disability, religion, age, or national<br />
origin. The <strong>Texas</strong> A&M University System, U.S. Department of Agriculture, <strong>and</strong> the County Commissioners Courts of <strong>Texas</strong> Cooperating.