L4.7 Manual PDF - Laser Reference
L4.7 Manual PDF - Laser Reference
L4.7 Manual PDF - Laser Reference

Create successful ePaper yourself
Turn your PDF publications into a flip-book with our unique Google optimized e-Paper software.
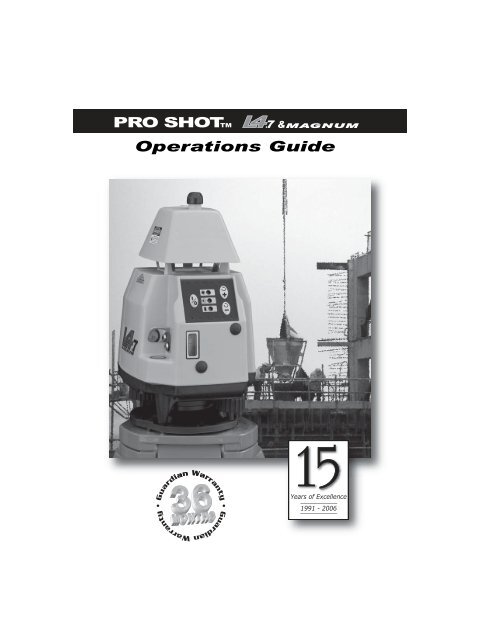
PRO SHO TM<br />
Operations Guide<br />
&<br />
Years of Excellence<br />
1991 - 2006
Introduction<br />
Thank you for purchasing a Pro ShotTM <strong>L4.7</strong> or <strong>L4.7</strong> MAGNUM laser system.<br />
You now have the best performing, most accurate laser available, for all your<br />
projects.<br />
Pro ShotTM laser models <strong>L4.7</strong> or <strong>L4.7</strong> MAGNUM are rugged, reliable, high<br />
quality products, backed by the industry leading Guardian 36 month<br />
warranty. Warranty details are printed in the back of this manual.<br />
Please take the time to thoroughly read this manual. It contains vital<br />
information on how to safely get the most from your investment in laser<br />
technology.<br />
Contents<br />
Getting Started ..................................................................... 1<br />
Controls and Displays • <strong>L4.7</strong> ................................................ 2<br />
Controls and Displays • <strong>L4.7</strong> MAGNUM .................................. 3<br />
Safety • <strong>L4.7</strong> and <strong>L4.7</strong> MAGNUM ............................................. 4<br />
Initial Setup Guidelines ........................................................ 6<br />
Level Setup .......................................................................... 7<br />
Vertical and Layout Setup .................................................... 8<br />
Plumb and Layout Setups • <strong>L4.7</strong> MAGNUM ............................ 9<br />
Applications .......................................................................... 10<br />
Accessories ........................................................................ 11<br />
R7 Receiver ....................................................................... 12<br />
R8 Receiver ....................................................................... 13<br />
Checking & Adjusting Calibration ...................................... 14<br />
Maintenance and Troubleshooting .................................... 16<br />
Guardian Warranty and Specifications ............................ 17
Getting Started<br />
1<br />
Case contents (will vary - may be ordered with different accessories<br />
and larger case)<br />
<strong>Manual</strong>, placard, operator cards<br />
<strong>Laser</strong> transmitter<br />
Receiver<br />
Battery charger (optional)<br />
C-cell batteries<br />
Battery installation<br />
Always follow recycling<br />
directives for electronic waste<br />
1 Release battery door<br />
with 1/4 turn of screw<br />
counter-clockwise<br />
2 Install batteries according<br />
to the instructions molded on<br />
the battery holder<br />
CHARGE ONLY<br />
RECHARGEABLE<br />
BATTERIES<br />
Charging jack for<br />
rechargeable batteries.<br />
(see pg. 11 for information)<br />
3 Secure battery door<br />
with 1/4 turn of screw<br />
clockwise
• <strong>L4.7</strong><br />
Note:<br />
7<br />
7<br />
Power indicator • Displays a green light when the laser is powered on<br />
Leveling limit indicator • If the laser is powered on, but is not level enough<br />
to automatically compensate, the limit indicator will flash, the rotating prisim<br />
will not spin and no laser beam will be projected.<br />
Low battery indicator • Displays a red light when the batteries need to be<br />
replaced
<strong>L4.7</strong> MAGNUM<br />
Note: The <strong>L4.7</strong> MAGNUM<br />
laser beam must be rotating<br />
with the rotation speed set<br />
to maximum when using<br />
a receiver.<br />
9<br />
Power Indicator • Displays a green light when the laser is powered on.<br />
9<br />
Leveling limit indicator • If the laser is powered on, but is not level enough<br />
to automatically compensate, the limit indicator will flash, the rotating prisim<br />
will not spin and no laser beam will be projected.<br />
Battery indicator • A red light indicates the batteries need to be replaced.
Safety • <strong>L4.7</strong> and MAGNUM<br />
<strong>L4.7</strong><br />
Note: The <strong>L4.7</strong> transmitter is a class II laser under the 1993 IEC 825-1 laser<br />
safety standard and the revised edition of the European norm EN60825.<br />
The <strong>L4.7</strong> laser conforms to applicable EC directives regarding RFI and EMI.<br />
The <strong>L4.7</strong> complies with FDA performance standards 21 CFR sub-chapter J.
Safety • <strong>L4.7</strong> and MAGNUM<br />
5<br />
Caution and certification label locations - <strong>L4.7</strong> MAGNUM<br />
Warning, Class IIIa label for lasers<br />
sold in the U.S. and Canada<br />
Warning, Class 3R labels for lasers<br />
sold where IEC standards apply<br />
LASER LIGHT<br />
DO NOT STARE INTO BEAM<br />
OR VIEW DIRECTLY WITH<br />
OPTICAL INSTRUMENTS<br />
CLASS 3R LASER PRODUCT<br />
Serial / CDRH / EC compliance<br />
<strong>Laser</strong><br />
Light is emitted<br />
from this aperture<br />
AVOID EXPOSURE<br />
Aperture<br />
warning<br />
Manufactured by: <strong>Laser</strong> <strong>Reference</strong>, Inc.<br />
151 Martinvale Lane • San Jose, CA 95119<br />
Serial No.<br />
This product complies with FDA<br />
standards 21 CFR subchapter J<br />
X 000000<br />
Note: The <strong>L4.7</strong> MAGNUM transmitter is a class 3R laser under the 1993 IEC<br />
825-1 laser safety standard and revised edition of EN60825. The <strong>L4.7</strong><br />
MAGNUM laser conforms to applicable EC directives regarding RFI and EMI.<br />
The <strong>L4.7</strong> MAGNUM complies with FDA standards 21 CFR sub-chapter J.<br />
LASER LIGHT<br />
DO NOT STARE INTO BEAM<br />
OR VIEW DIRECTLY WITH<br />
OPTICAL INSTRUMENTS<br />
CLASS 3R LASER PRODUCT<br />
LASER LIGHT<br />
DO NOT STARE INTO BEAM<br />
CLASS 2 LASER PRODUCT<br />
<strong>L4.7</strong> MAGNUM<br />
(IEC) (U.S./CAN)<br />
A warning placard is included<br />
with each laser and it can be<br />
attached to the carrying case<br />
and the case placed in a visible<br />
location near where the laser<br />
is being used to meet job site<br />
posting requirements.<br />
<strong>L4.7</strong><br />
(IEC) (U.S./CAN)<br />
DANGER<br />
LASER LIGHT - AVOID<br />
DIRECT EYE EXPOSURE<br />
DIODE
Initial Setup Guidelines<br />
6<br />
Calibration should be checked from time to time.<br />
Although the <strong>L4.7</strong> and MAGNUM are calibrated at the factory and are very<br />
rugged lasers, it is well worth the effort to check calibration before you first<br />
use them (after shipping) and then from time to time to ensure that you are<br />
doing the highest quality work possible. Always check calibration if the laser<br />
has been handled roughly. See "checking / adjusting calibration" page 14.<br />
Check your setup.<br />
Outdoors: Although not required, it is good jobsite practice when using any<br />
laser or optical instrument to check your setup from time to time. Use<br />
engineered benchmarks on the jobsite to assure that your setup is correct<br />
and matches the design of the job. On very large sites, or where accuracy is<br />
critical, taking a few minutes to verify the elevation marks you have been<br />
given to work from makes sense. Even engineered benchmarks may not be<br />
perfect and enough verification must be done to be confident you are<br />
properly set up. If there are not suitable benchmarks on the site, you can set<br />
your own by driving stakes and recording their elevations, or by marking the<br />
laser beam height on stable objects such as telephone poles, concrete walls,<br />
etc. The benchmarks should be 90 0 apart for greatest accuracy. Having<br />
benchmarks to check is of great value for jobs where setups need to match<br />
day after day. If you will only be using the setup for a brief time, this may not<br />
be needed.<br />
Indoors: The same logic applies, if you will need to setup the laser more<br />
than once for a particular operation, make reference marks, preferably 90 0<br />
apart, along the plane of beam travel once you have set the laser up either<br />
horizontally or vertically. Check your setup from time to time using the marks<br />
as a guide. Use the marks as a guide for later setups.<br />
Work as close to the laser as possible.<br />
You can work up to 750 feet (230 meters) away from the <strong>L4.7</strong> with the R7<br />
receiver, or 1000 feet (305 meters) away from the <strong>L4.7</strong> MAGNUM with the<br />
R8 receiver. As with all instruments, however, the further away you work, the<br />
more any error can add up. Set the laser in a safe place, as close to your<br />
work as possible for best results.<br />
Maintain your equipment.<br />
Keeping tripod and mount hardware tight, and being sure grade rods are in<br />
good condition, can prevent errors and performance problems.
Be sure to read the “Initial setup guidelines section (pg6).<br />
Using the two leveling knobs, center the bubble in the circular level vial (see<br />
procedure on pages 2 or 3 if you have any difficulty). Facing the laser control<br />
panel and looking down at the circular level vial, when you turn either leveling<br />
screw clockwise, the bubble will move toward that leveling screw. Once the<br />
bubble is centered, start the laser by pressing the power (0/1) button.<br />
If a large site is being worked, the laser can be setup in the middle of the site,<br />
covering a total diameter of: <strong>L4.7</strong> - 1500ft (460m) or <strong>L4.7</strong> MAGNUM - 2000ft<br />
(610m) with their system receiver.<br />
Periodically check your setup against existing benchmarks, or set and check<br />
your own benchmarks.
• Check the vertical vial and<br />
your benchmarks regularly to<br />
be sure your work is accurate.<br />
The <strong>L4.7</strong> and <strong>L4.7</strong> MAGNUM<br />
are designed for vertical<br />
alignment up to two stories<br />
high.<br />
Shown on optional W1 mount<br />
see page 11 for accessories.<br />
Note: The <strong>L4.7</strong> MAGNUM laser beam must be rotating with<br />
the rotation speed set to maximum when using a receiver.
<strong>L4.7</strong> MAGNUM<br />
To transfer a point from floor to ceiling,<br />
use the optional P1 plumb plate.<br />
• Set the P1 over the point<br />
• Set the <strong>Laser</strong> on the P1<br />
• Rough level the laser<br />
• Switch the laser on<br />
• A plumb beam is projected from the<br />
top of the laser, directly over the point.<br />
When the <strong>L4.7</strong> MAGNUM is<br />
in vertical mode, it projects a vertical<br />
plane of light and a simultaneous fixed<br />
beam at 90º to the rotating plane.<br />
Refer to page 8 for complete instructions on aligning the vertical plane of light.<br />
The 90º beam provides a convenient way to define right angle intersections<br />
for interior layout.
Both <strong>L4.7</strong> models provide a precise<br />
reference for level alignment jobs<br />
such as:<br />
Along with the ability to project a level<br />
reference plane, both <strong>L4.7</strong> models have<br />
a built-in, manually leveled vial, for<br />
aligning the plane of light vertically. The<br />
optional W1 mount is used for this<br />
application.<br />
The vertical plane can be used for:
Accessories 11<br />
W1 Wall and Vertical mount<br />
The is an available option to allow vertical<br />
setups for layout work or plumbing walls<br />
or posts in a plane. The W1 is also<br />
designed to mount on T-bar wall angle<br />
for suspended ceiling work.<br />
See page 9 for vertical setup information.<br />
P1 Plumb Plate<br />
The P1 allows quick and easy setups for<br />
getting the <strong>L4.7</strong> MAGNUM over a point<br />
to transfer points from floor to ceiling.<br />
See page 9 for setup information.<br />
B40 Rechargeable Battery Kit<br />
The B40 kit provides four industrial grade Ni-Mh<br />
rechargeable batteries and a charger that plugs<br />
into the charging jack at the rear of the laser.<br />
The NiMh batteries typically last 60 hours in<br />
the <strong>L4.7</strong> or 30 hours in the <strong>L4.7</strong> MAGNUM.<br />
A full recharge takes about 20 hours.<br />
!<br />
CHARGE ONLY<br />
RECHARGEABLE<br />
BATTERIES
R7 Receiver • Standard with <strong>L4.7</strong><br />
12<br />
The R7 is a high performance receiver designed for maximum compatibility<br />
with Pro Shot lasers. Featuring adjustable accuracy and tone settings, front<br />
and rear displays, 5 channel front LCD display and universal rod clamp.<br />
Rear LED height display<br />
5 channel LCD height display<br />
Low battery<br />
Tone selection<br />
High, Low,<br />
On grade<br />
Indications<br />
Accuracy<br />
selection<br />
Accuracy adjustment<br />
Tone adjustment<br />
Power on/off<br />
R7 Receiver specifications<br />
Reception Height .............. 2 inches (50mm)<br />
Reception Angle ............... 120 degrees<br />
Standard mode accuracy .. ±1/16 in. (±1.6mm) nominal<br />
Coarse mode accuracy ..... ±1/8 in. (±3.2mm) nominal<br />
Ultra-fine mode accuracy .. ±1/64 in. (±.4mm) nominal<br />
Power Supply ................... 9 volt battery<br />
Battery life (alkaline) ........ >60 hours continuous<br />
Automatic Shut Off ........... After 12 min. (no laser strikes)<br />
Environmental .................. Sealed against dust and water<br />
Rotation compatibility ........ 250 to 850rpm<br />
Warranty .......................... Guardian warranty - 36 months
R8 Receiver • Standard with <strong>L4.7</strong> MAGNUM<br />
The R8 offers maximum performance to compliment the <strong>L4.7</strong><br />
MAGNUM. Adjustable accuracy and tone settings, front and rear<br />
LCD displays, 5 channel height information and a universal rod<br />
clamp make the R8 very flexible.<br />
Rear LCD display<br />
Accuracy adjustment<br />
Tone adjustment<br />
Power on/off<br />
5 channel LCD display<br />
Power on<br />
Low battery<br />
High, Low, On grade<br />
Backlight on<br />
Tone selection<br />
Accuracy selection<br />
Note: The <strong>L4.7</strong> MAGNUM laser beam must be rotating with<br />
the rotation speed set to maximum when using a receiver.<br />
R8 Receiver specifications<br />
Reception Height .............. 2 inches (50mm)<br />
Reception Angle ............... 90 degrees<br />
Standard mode accuracy .. ±1/16 in. (±1.6mm) nominal<br />
Coarse mode accuracy ..... ±1/8 in. (±3.2mm) nominal<br />
Ultra-fine mode accuracy .. ±1/32 in. (±1mm) nominal<br />
Power Supply ................... 2 AA batteries<br />
Battery life (alkaline) ........ >70 hours continuous<br />
Automatic Shut Off ........... After 30 min. (no laser strikes)<br />
Environmental .................. Sealed against dust and water<br />
Adjustable tone volume .... High / Low / Off<br />
Warranty .......................... Defects coverage - 24 months
Although the <strong>L4.7</strong> and MAGNUM are calibrated at the factory and are very<br />
rugged lasers, it is well worth the effort to check calibration before you first<br />
use them (after shipping) and then from time to time to ensure that you are<br />
doing the highest quality work possible. Always check calibration if the laser<br />
has been handled roughly or dropped.
Maintenance And Troubleshooting<br />
16<br />
Calibration • There is no set interval for calibrating the <strong>L4.7</strong> or MAGNUM, but<br />
calibration should be checked from time to time in order to ensure that the<br />
highest possible quality of work is being done. Calibration should always be<br />
checked if the laser has been handled roughly or shipped.<br />
Batteries • Occasionally remove the batteries and check the contacts for<br />
corrosion. Alkaline batteries will last far longer than carbon batteries. when<br />
using rechargeable batteries, be careful not to charge alkaline or carbon<br />
batteries. The Ni-Mh batteries in the optional factory kit need to be charged<br />
after about 60 hours (<strong>L4.7</strong>) or 30 hours (MAGNUM) of use. Never run the<br />
laser from the charger unless there are rechargeable batteries installed.<br />
Keep a spare set of batteries in the carrying case to avoid down time.<br />
<strong>Laser</strong> output windows • Regularly check the output windows for dust and dirt.<br />
Dust can be removed with a camera brush or clean compressed air.<br />
Control panel and exterior • Clean the control panel and the other exterior<br />
surfaces of the laser with a soft damp cloth.<br />
Caution • Never store the laser in a carrying case that is wet inside. Moisture<br />
can get inside the laser this way. Should this happen, remove the battery<br />
cover and place the laser in a warm area until it is completely dry.<br />
Troubleshooting<br />
The laser will not operate, there is no obvious damage • If the low battery<br />
indicator is on, or you suspect the batteries may be dead, replace the<br />
batteries. Check the battery contacts to be sure that they are clean.<br />
The receiver shows an on-grade at two different heights • Check the jobsite<br />
for windows or mirrored surfaces that might be reflecting the laser and<br />
causing the other reading. Check for others on the site using a rotary laser.<br />
The laser was knocked over • Visually check the optics for damage. Inspect<br />
the laser for any other physical damage. Use the receiver to check that the<br />
laser is transmitting. Check the calibration and adjust as needed. Check to<br />
see that the laser displays the "limit" light when the circular level vial bubble<br />
moves approximately half way outside the circle.<br />
The laser only works at short distances • Check the output windows for<br />
heavy dust or moisture. Remove dust with a camera brush or blow off gently<br />
with clean compressed air. Allow moisture to dry.<br />
The receiver does not indicate "on grade" at long distance • Be sure you are<br />
within the max distance specification from the laser. Check the windows that<br />
surround the rotating mirror on the laser for dust or moisture. Remove dust<br />
with a camera brush or blow off gently with clean compressed air. Allow<br />
moisture to dry.
Warranty<br />
17<br />
Guardian 36 month warranty coverage<br />
The <strong>L4.7</strong> or <strong>L4.7</strong> MAGNUM laser transmitters, and the R7 receiver, are<br />
warranted for thirty-six (36) months from the date of new equipment<br />
purchase from an authorized dealer. The R8 receiver is warranted for 24<br />
months. During the warranty period, <strong>Laser</strong> <strong>Reference</strong>, or its authorized<br />
service center, will repair or replace, at <strong>Laser</strong> <strong>Reference</strong>'s sole discretion,<br />
laser transmitters or receivers, free of charge, (except for transportation<br />
costs) if the products are found by <strong>Laser</strong> <strong>Reference</strong>, or its authorized service<br />
center, to be defective in either materials or workmanship. The Guardian<br />
36 month warranty also covers the internal leveling mechanism and internal<br />
optics against damage from any cause. Maintaining the calibration of the<br />
product is not the responsibility of <strong>Laser</strong> <strong>Reference</strong> or its authorized service<br />
centers. If service is needed, the product(s) must be sent FREIGHT<br />
PREPAID to the nearest authorized service center or to <strong>Laser</strong> <strong>Reference</strong>.<br />
Specifications<br />
Accuracy ...............................<br />
<strong>L4.7</strong> Range receiver) ............<br />
MAGNUM Range (receiver) ....<br />
Rotational Coverage .............<br />
Self-Leveling Range ..............<br />
Vertical Capability .................<br />
Power Supply ........................<br />
Run Time on New Batteries ..<br />
Automatic Shut-off ..............<br />
Rechargeable Batteries .......<br />
Environmental .......................<br />
Rotation Speed .....................<br />
Operating Temp. (ambient) ...<br />
Storage Temperature ............<br />
Safety - <strong>L4.7</strong> ..........................<br />
Safety - MAGNUM ..................<br />
Height ....................................<br />
Weight ...................................<br />
±7 arc seconds (±1mm per 30m)<br />
(±.040" per 100')<br />
750' rad./1500' dia. (230m/460m)<br />
1000' rad./ 2000' dia. (305m/610m)<br />
360 degrees<br />
±10 arc minutes<br />
Built-in vial, optional mount<br />
Four C-Cell batteries<br />
<strong>L4.7</strong>: 110 hours (alkaline)<br />
MAGNUM: 50 hours (alkaline)<br />
If off-level for more than 3 min.<br />
Optional kit (NiMh)<br />
Dust and water resistant (IP55)<br />
<strong>L4.7</strong>: 600rpm / MAGNUM: 0 to 450rpm<br />
+14ºf to +122ºf (-10ºc to +50ºc)<br />
-40ºf to +140ºf (-40ºc to +60ºc)<br />
CDRH Class II • IEC 825-1 Class 2<br />
CDRH Class IIIa • IEC 825-1 Class 3R<br />
9in (23cm)<br />
4.1lbs (1.86kg)
California • USA<br />
<strong>Laser</strong> <strong>Reference</strong>, Inc.<br />
151 Martinvale Lane<br />
San Jose, CA 95119 • USA<br />
Toll Free (USA)<br />
Telephone<br />
Fax<br />
Web<br />
Email<br />
+1.800.238.0685<br />
+1.408.361.0220<br />
+1.408.361.3180<br />
www.proshotlaser.com<br />
sales@proshotlaser.com<br />
laser.com<br />
Customer information<br />
<strong>Laser</strong> Serial number _____________________________<br />
Receiver S/N __________________________________<br />
Date of purchase _______________________________<br />
Version 4.0<br />
Part No. 010-9060