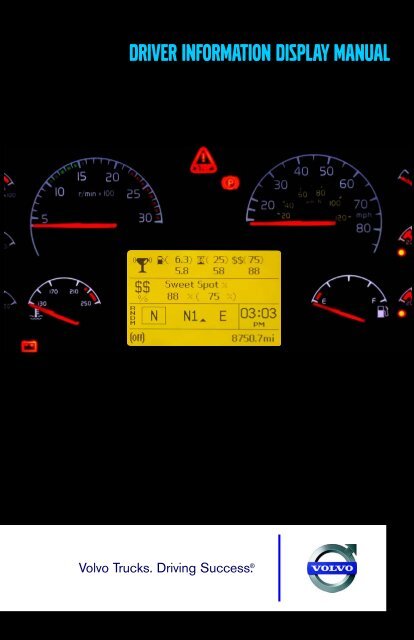
Volvo Driver Information Display System - Westside Motorcoach
Volvo Driver Information Display System - Westside Motorcoach
Volvo Driver Information Display System - Westside Motorcoach

You also want an ePaper? Increase the reach of your titles
YUMPU automatically turns print PDFs into web optimized ePapers that Google loves.
Table of Contents<br />
i<br />
Foreword . . . . . . . . . . . . . . . . . . . . . . . . . . . . . . . . . . . . . . . . . . 1<br />
Safety <strong>Information</strong> . . . . . . . . . . . . . . . . . . . . . . . . . . . . . . . . 2<br />
Labels . . . . . . . . . . . . . . . . . . . . . . . . . . . . . . . . . . . . . . . 2<br />
<strong>Driver</strong> <strong>Information</strong> <strong>Display</strong> (DID) . . . . . . . . . . . . . . . . . . . . . . . 3<br />
Stalk Switch Control Lever. . . . . . . . . . . . . . . . . . . . . . . . . . 3<br />
Stalk Switch Functions . . . . . . . . . . . . . . . . . . . . . . . . . 4<br />
Selecting a Menu . . . . . . . . . . . . . . . . . . . . . . . . . . . . . . 4<br />
Changing Settings . . . . . . . . . . . . . . . . . . . . . . . . . . . . . 6<br />
Basic Level Instrument Cluster DID . . . . . . . . . . . . . . . . . . 6<br />
Basic Menus . . . . . . . . . . . . . . . . . . . . . . . . . . . . . . . . . . 7<br />
Digital Gauges . . . . . . . . . . . . . . . . . . . . . . . . . . . . . . . . 8<br />
<strong>Display</strong> Settings . . . . . . . . . . . . . . . . . . . . . . . . . . . . . . . 8<br />
Time/Date . . . . . . . . . . . . . . . . . . . . . . . . . . . . . . . . . . . 8<br />
Aftertreatment Status . . . . . . . . . . . . . . . . . . . . . . . . . . . 9<br />
Setup . . . . . . . . . . . . . . . . . . . . . . . . . . . . . . . . . . . . . . 13<br />
Mid-Level and High-Level Instrument Cluster DID . . . . . 14<br />
Mid-Level and High-Level DID Menus . . . . . . . . . . . 15<br />
Driving Menus . . . . . . . . . . . . . . . . . . . . . . . . . . . . . . . 16<br />
Digital Gauges in the DID (High and Mid Level<br />
Cluster Only) . . . . . . . . . . . . . . . . . . . . . . . . . . . . . . . . 17<br />
Fuel Data . . . . . . . . . . . . . . . . . . . . . . . . . . . . . . . . . . . 22<br />
Time/Distance . . . . . . . . . . . . . . . . . . . . . . . . . . . . . . . 27<br />
Aftertreatment . . . . . . . . . . . . . . . . . . . . . . . . . . . . . . . 30<br />
<strong>Volvo</strong> Link . . . . . . . . . . . . . . . . . . . . . . . . . . . . . . . . . . 35<br />
<strong>Display</strong> . . . . . . . . . . . . . . . . . . . . . . . . . . . . . . . . . . . . . 36<br />
Vehicle Messages . . . . . . . . . . . . . . . . . . . . . . . . . . . . 40<br />
Reset . . . . . . . . . . . . . . . . . . . . . . . . . . . . . . . . . . . . . . . 41<br />
Non-Driving/Stationary Menu . . . . . . . . . . . . . . . . . . . 42<br />
<strong>Display</strong> Setting . . . . . . . . . . . . . . . . . . . . . . . . . . . . . . . 43<br />
Vehicle Settings . . . . . . . . . . . . . . . . . . . . . . . . . . . . . . 50<br />
Diagnostics . . . . . . . . . . . . . . . . . . . . . . . . . . . . . . . . . . 54<br />
Vehicle Data . . . . . . . . . . . . . . . . . . . . . . . . . . . . . . . . 58<br />
Datalog . . . . . . . . . . . . . . . . . . . . . . . . . . . . . . . . . . . . . 60<br />
Tire Pressure <strong>System</strong> . . . . . . . . . . . . . . . . . . . . . . . . . . 69<br />
Password . . . . . . . . . . . . . . . . . . . . . . . . . . . . . . . . . . . 70<br />
<strong>Display</strong> Symbols . . . . . . . . . . . . . . . . . . . . . . . . . . . . . . . . 73<br />
Alarm, Check and <strong>Information</strong> Symbols . . . . . . . . . . . 73
ii<br />
Table of Contents<br />
Status Symbols . . . . . . . . . . . . . . . . . . . . . . . . . . . . . . . . . . 80<br />
Other Symbols . . . . . . . . . . . . . . . . . . . . . . . . . . . . . . . 81<br />
Messages . . . . . . . . . . . . . . . . . . . . . . . . . . . . . . . . . . . . . . 82<br />
General . . . . . . . . . . . . . . . . . . . . . . . . . . . . . . . . . . . . . 82<br />
Stop Message . . . . . . . . . . . . . . . . . . . . . . . . . . . . . . . . 82<br />
Warning Message . . . . . . . . . . . . . . . . . . . . . . . . . . . . 83<br />
<strong>Information</strong> Message . . . . . . . . . . . . . . . . . . . . . . . . . . 84<br />
Stop, Check, Info Symbols and Associated Icons . . . . 85<br />
Acknowledging Messages . . . . . . . . . . . . . . . . . . . . . . 87<br />
Examples of Fault Symbols and Text . . . . . . . . . . . . . 87<br />
Examples of Symbol and Value . . . . . . . . . . . . . . . . . . 89<br />
Index . . . . . . . . . . . . . . . . . . . . . . . . . . . . . . . . . . . . . . . . . . . . . 91
Foreword 1<br />
FOREWORD<br />
This manual contains information concerning the safe operation of your<br />
vehicle. It is extremely important that this information is read and understood<br />
before the vehicle is operated. Please keep this manual in the vehicle at all<br />
times.<br />
It is important that this manual stays with the vehicle when it is sold.<br />
Important safety information must be passed on to the new customer.<br />
Illustrations in this manual are used for reference only and may differ slightly<br />
from the actual vehicle, however, key components addressed in the manual are<br />
represented as accurately as possible.<br />
All information, illustrations and specifications contained in this manual are<br />
based upon the latest product information available at the time of publication.<br />
<strong>Volvo</strong> Trucks North America reserves the right to make changes at any time or<br />
to change specifications or design without notice and without incurring<br />
obligation.<br />
The National Highway Traffic Safety Administration (NHTSA) and <strong>Volvo</strong><br />
Trucks North America should be informed immediately if you believe that the<br />
vehicle has a defect that could cause a vehicle accident, injury or death.<br />
Contact NHTSA by calling the Auto Safety Hotline at 1 (888) 327-4236, by<br />
writing to NHTSA, U.S. Department of Transportation, Washington, DC<br />
20590, by TTY at 1 (800) 424-9153, or visit their website at<br />
www.nhtsa.dot.gov.<br />
<strong>Volvo</strong> Trucks North America<br />
Greensboro, NC USA<br />
Order number: PV776-21012748<br />
©<strong>Volvo</strong> Group North America, Inc. 2008 All rights reserved.<br />
No part of this publication may be reproduced, stored in retrieval system, or<br />
transmitted in any forms by any means, electronic, mechanical, photocopying,<br />
recording or otherwise, without the prior written permission of <strong>Volvo</strong> Trucks<br />
North America.
2 Foreword<br />
SAFETY INFORMATION<br />
IMPORTANT: Before driving this vehicle, be certain that you have read<br />
and that you fully understand each and every step of the driving and<br />
handling information in this manual. Be certain that you fully understand<br />
and follow all safety warnings. It is extremely important that this<br />
information is read and understood before the vehicle is operated.<br />
IT IS IMPORTANT THAT THE FOLLOWING INFORMATION BE READ,<br />
UNDERSTOOD AND ALWAYS FOLLOWED.<br />
The following types of advisories are used throughout this manual:<br />
Danger indicates an unsafe practice that could result in death or serious<br />
personal injury. Serious personal injury is considered to be permanent<br />
injury from which full recovery is NOT expected, resulting in a change in<br />
life style.<br />
Warning indicates an unsafe practice that could result in personal injury.<br />
Personal injury means that the injury is of a temporary nature and that<br />
full recovery is expected.<br />
Caution indicates an unsafe practice that could result in damage to the<br />
product.<br />
Note indicates a procedure, practice, or condition that must be followed in<br />
order for the vehicle or component to function in the manner intended.<br />
Labels<br />
Danger, Warning, Caution and Advisory labels are placed in various locations<br />
of the vehicle to alert drivers and service technicians about situations that may<br />
lead to personal injury or equipment damage. In the event that a label is<br />
damaged or missing the label must be replaced. Contact your authorized<br />
<strong>Volvo</strong> Truckdealer for assistance regarding labels.
<strong>Driver</strong> <strong>Information</strong> <strong>Display</strong> (DID) 3<br />
DRIVER INFORMATION DISPLAY (DID)<br />
STALK SWITCH CONTROL LEVER<br />
The stalk switch control lever is used to interact with the DID. The lever is<br />
located on the right-hand side of the steering wheel.
4 <strong>Driver</strong> <strong>Information</strong> <strong>Display</strong> (DID)<br />
Stalk Switch Functions<br />
<br />
<br />
<br />
<br />
The Esc or Escape button is used to return to the previous menu or<br />
display, or to cancel a setting or operation.<br />
The Enter button is used to display a list of menus, open a menu, and<br />
select a chosen value.<br />
The Up arrow is used to scroll up through a menu and to increase<br />
numerical values.<br />
The Down arrow is used to scroll down through a menu and to decrease<br />
numerical values.<br />
In key off mode, press Enter to display the time and odometer for 30 seconds.<br />
Selecting a Menu<br />
The following drawing is the current condition screen. This is what is<br />
displayed when starting the truck and also while driving.<br />
Current Conditions Screen
<strong>Driver</strong> <strong>Information</strong> <strong>Display</strong> (DID) 5<br />
1. Press the Enter button to display the available menus.<br />
2. Use the up and down arrows to scroll through the list of menus.<br />
3. Press the Enter button to open the selected menu.<br />
4. Press the Esc button to return to the previous menu or display, or to<br />
cancel a setting or operation.
6 <strong>Driver</strong> <strong>Information</strong> <strong>Display</strong> (DID)<br />
Changing Settings<br />
1. The up and down arrows increase and decrease set values.<br />
2. Press the Enter button to confirm the choice and move to the next<br />
position.<br />
3. Press the Esc button to return to the previous position, or to cancel a<br />
setting or operation.<br />
BASIC LEVEL INSTRUMENT CLUSTER DID<br />
The basic <strong>Driver</strong> <strong>Information</strong> <strong>Display</strong> (DID) is located in the center of the<br />
basic level instrument cluster. The DID displays digital gauges, main menus<br />
and sub-menus that provide necessary and important information to the<br />
vehicle operator. The information available to the operator depends on vehicle<br />
configuration.<br />
There are two sections of display information in the basic DID:<br />
Top — Menus and gauges<br />
Bottom — Odometer<br />
The default display is clock and odometer. Press the Enter button to display<br />
the menu.
<strong>Driver</strong> <strong>Information</strong> <strong>Display</strong> (DID) 7<br />
1. Menus and gauges 2. Odometer<br />
Basic Menus<br />
Depending on vehicle configuration, some menus may not be available.<br />
The following menus are available with the basic DID.<br />
Digital Gauges<br />
— Outside Temperature<br />
— Distance to Destination<br />
<strong>Display</strong> Settings<br />
— Contrast<br />
— Backlight<br />
Time/Date<br />
Aftertreatment<br />
— Initiate REGEN<br />
— ATS Status<br />
— Cancel REGEN<br />
Setup<br />
— Language<br />
— Distance<br />
— Temperature
8 <strong>Driver</strong> <strong>Information</strong> <strong>Display</strong> (DID)<br />
Digital Gauges<br />
1. Outside Temperature<br />
2. Distance to Destination<br />
<strong>Display</strong> Settings<br />
1. Contrast<br />
2. Backlight<br />
Time/Date
<strong>Driver</strong> <strong>Information</strong> <strong>Display</strong> (DID) 9<br />
Aftertreatment Status<br />
The Aftertreatment status submenus provide information about the conditions<br />
required for performing a regeneration. The status can be OK (regeneration<br />
allowed), CHECK (regeneration not allowed) or N/A (not applicable). When<br />
ATS Status is selected, the following submenus are available.<br />
To perform a parked regeneration, the clutch pedal must not be depressed, the<br />
service brake must not be engaged and a PTO must not be engaged or the PTO<br />
must be able to operate above the minimum engine speed required.
10 <strong>Driver</strong> <strong>Information</strong> <strong>Display</strong> (DID)<br />
To perform a parked regeneration, the accelerator pedal must not be<br />
depressed, the transmission must be in the neutral position and the vehicle<br />
speed must not be above zero.<br />
To perform a parked regeneration, the park brake must be engaged and there<br />
can be no active fault codes. The system will time-out if the duty cycle is<br />
inadequate to support an automatic regeneration or if there is a problem that is<br />
preventing regeneration. Attempt to perform a parked regeneration or take the<br />
vehicle to a <strong>Volvo</strong> Truck dealer for a service regeneration.
<strong>Driver</strong> <strong>Information</strong> <strong>Display</strong> (DID) 11<br />
Temporary lockout prevents performing a regeneration when a regeneration is<br />
not needed. Permanent lockout prevents performing a regeneration when a<br />
condition exists that requires vehicle service. Take the vehicle to a <strong>Volvo</strong><br />
Truck dealer. A minimum engine temperature of 35°C (95°F) is required for<br />
regeneration.
12 <strong>Driver</strong> <strong>Information</strong> <strong>Display</strong> (DID)<br />
A minimum exhaust temperature of 250°C (482°F) is required for<br />
regeneration. The minimum vehicle speed for an automatic regeneration is<br />
40 km/h (25 mph). When Disable REGEN is selected in the Cancel REGEN<br />
submenu, regeneration is inhibited. Select Enable REGEN to allow<br />
regeneration.
Setup<br />
1. Language<br />
<strong>Driver</strong> <strong>Information</strong> <strong>Display</strong> (DID) 13<br />
2. Distance<br />
3. Temperature
14 <strong>Driver</strong> <strong>Information</strong> <strong>Display</strong> (DID)<br />
MID-LEVEL AND HIGH-LEVEL INSTRUMENT CLUSTER<br />
DID<br />
Depending on vehicle configuration, some menus may not be available.<br />
The <strong>Driver</strong> <strong>Information</strong> <strong>Display</strong> (DID) is located in the center of the mid-level<br />
and high-level instrument clusters. It displays digital gauges, main menus and<br />
sub-menus that provide necessary and important information to the vehicle<br />
operator.<br />
The information available to the operator depends on vehicle configuration,<br />
and whether the vehicle is in operation or parked. Certain functions are<br />
password-protected and are not shown until the correct password is entered.<br />
See “Password” on page 70.<br />
There are three sections of display information in the DID:<br />
Top — Messages and available menus<br />
Middle — Favorite display<br />
Bottom — Current status and odometer<br />
1. Messages and Available Menus<br />
2. Clock<br />
3. Odometer<br />
4. Favorite <strong>Display</strong><br />
5. Current Status
<strong>Driver</strong> <strong>Information</strong> <strong>Display</strong> (DID) 15<br />
The top section displays messages, selected digital gauges, and the available<br />
DID menus. The favorite display, clock, odometer and current status are<br />
always visible. The current status section provides status information required<br />
at all times.<br />
DID, example screen view:<br />
1. Indicates First of Six Available<br />
Menus (varies by menu)<br />
2. Clock<br />
3. Odometer<br />
4. Favorite <strong>Display</strong><br />
5. Current Status Icon(s)<br />
6. Messages and Available Menus<br />
Mid-Level and High-Level DID Menus<br />
There are Driving and Non-Driving menus. Several sub-menus are<br />
password-protected while the vehicle is parked. The Non-Driving menu is<br />
accessible only when the vehicle is parked.
16 <strong>Driver</strong> <strong>Information</strong> <strong>Display</strong> (DID)<br />
Driving Menus<br />
Gauges<br />
— Current Gear Position (Automated Transmission)<br />
— Outside Temperature<br />
— Temperature Engine Oil<br />
— Temperature Transmission<br />
— Battery Voltage<br />
— Axle Temperature (Front/Rear)<br />
— Air Suspension (Front/Rear)<br />
— <strong>Volvo</strong> Link Compass<br />
Fuel Data<br />
— Instantaneous Gallons per Hour<br />
— Trip Fuel Used<br />
— Distance to Empty<br />
— Fuel Economy<br />
— Idle Percent<br />
— Sweet Spot/Performance Bonus<br />
— Sweet Spot Percentage<br />
— Road Speed Limit<br />
Time/Distance<br />
— Time and Date<br />
— Alarm Clock<br />
— Distance to Destination<br />
— Average Trip Speed<br />
— Estimated Time of Arrival (ETA)<br />
Aftertreatment<br />
— Request Parked REGEN<br />
— ATS Status<br />
— Cancel REGEN
<strong>Driver</strong> <strong>Information</strong> <strong>Display</strong> (DID) 17<br />
<br />
<br />
<br />
<br />
<strong>Volvo</strong> Link<br />
— Read Message<br />
— Send Message<br />
— Other Info<br />
<strong>Display</strong><br />
— Black Panel<br />
— Favorite <strong>Display</strong><br />
— Backlight<br />
— Favorite <strong>Display</strong> Setting<br />
— Night/Day<br />
Vehicle Messages<br />
Reset<br />
Digital Gauges in the DID (High and Mid Level Cluster Only)<br />
There are several gauges in the Gauges menu. The number of gauges your<br />
vehicle is programmed with depends on the equipment level of the vehicle.<br />
The gauges are used to view current status of important functions in the<br />
vehicle.<br />
All gauges are programmed into the instrument cluster and are therefore<br />
visible only in the DID.<br />
Current Gear Position (Automated Transmission)<br />
Outside Temperature<br />
Engine Oil Temperature<br />
Transmission Temperature<br />
Battery Voltage<br />
Front and Rear Axle Temperature<br />
Front and Rear Suspension Pressure<br />
<strong>Volvo</strong> Link Compass
18 <strong>Driver</strong> <strong>Information</strong> <strong>Display</strong> (DID)<br />
1. Current Gear Position (Automated Transmission)<br />
When the vehicle is equipped with an automated transmission, the current<br />
transmission gear position is always displayed in the favorites display section.<br />
The current gear position gauge is standard with automated transmissions.<br />
N = Neutral<br />
R = Reverse<br />
Forward Gear = 1–18 (varies with type of transmission)
<strong>Driver</strong> <strong>Information</strong> <strong>Display</strong> (DID) 19<br />
2. Outside Temperature<br />
The outside temperature gauge is optional.<br />
3. Engine Oil Temperature<br />
The engine oil temperature is displayed as illustrated.
20 <strong>Driver</strong> <strong>Information</strong> <strong>Display</strong> (DID)<br />
4. Transmission Oil Temperature<br />
5. Battery Voltage
<strong>Driver</strong> <strong>Information</strong> <strong>Display</strong> (DID) 21<br />
6. Front and Rear Axle Temperature<br />
7. Front and Rear Suspension Pressure
22 <strong>Driver</strong> <strong>Information</strong> <strong>Display</strong> (DID)<br />
8. <strong>Volvo</strong> Link Compass<br />
Fuel Data<br />
The Fuel Data menu provides information on the fuel consumption of the<br />
vehicle in various situations. For example, how much fuel has been used, how<br />
much fuel is remaining, how much fuel is remaining before refueling the<br />
vehicle.<br />
Instantaneous Gallons Per Hour<br />
Trip Fuel Used<br />
Distance to Empty<br />
Fuel Economy<br />
Idle Percent<br />
Sweet Spot/Performance Bonus<br />
Sweet Spot Percentage<br />
Road Speed Limit
<strong>Driver</strong> <strong>Information</strong> <strong>Display</strong> (DID) 23<br />
1. Instantaneous Gallons Per hour<br />
2. Trip Fuel Used
24 <strong>Driver</strong> <strong>Information</strong> <strong>Display</strong> (DID)<br />
3. Distance to Empty<br />
4. Fuel Economy
5. Idle Percent<br />
<strong>Driver</strong> <strong>Information</strong> <strong>Display</strong> (DID) 25<br />
6. Sweet Spot/Performance Bonus<br />
For information about sweet spot data, refer to Performance Bonus Guide in<br />
the vehicle operator's manual.
26 <strong>Driver</strong> <strong>Information</strong> <strong>Display</strong> (DID)<br />
7. Sweet Spot Percentage<br />
For information about sweet spot data, refer to Performance Bonus Guide in<br />
the vehicle operator's manual.<br />
8. Road Speed Limit
Time/Distance<br />
<strong>Driver</strong> <strong>Information</strong> <strong>Display</strong> (DID) 27<br />
The time and date can be set in the Time/Distance menu. The alarm clock can<br />
also be set from this menu. Following the alarm clock menu is the Distance to<br />
Destination selection, which allows the operator see the distance since the last<br />
reset. Average trip speed is also shown. By specifying the distance to your<br />
destination, the vehicle can calculate the estimated time of arrival (ETA).<br />
Time and Date<br />
<br />
<br />
<br />
<br />
Alarm Clock<br />
Distance to Destination<br />
Average Trip Speed<br />
Estimated Time of Arrival (ETA)<br />
1. Time and Date
28 <strong>Driver</strong> <strong>Information</strong> <strong>Display</strong> (DID)<br />
2. Alarm Clock<br />
3. Distance to Destination
<strong>Driver</strong> <strong>Information</strong> <strong>Display</strong> (DID) 29<br />
4. Trip Average Speed<br />
5. Estimated Time of Arrival (ETA)
30 <strong>Driver</strong> <strong>Information</strong> <strong>Display</strong> (DID)<br />
Aftertreatment<br />
For additional information about the aftertreatment system, refer to the vehicle<br />
operator's manual.<br />
The Aftertreatment menu allows the operator to request a parked regeneration,<br />
check the status of the aftertreatment system, and cancel a regeneration.<br />
Aftertreatment Menu
<strong>Driver</strong> <strong>Information</strong> <strong>Display</strong> (DID) 31<br />
Aftertreatment Status<br />
The Aftertreatment status submenus provide information about the conditions<br />
required for performing a regeneration. The status can be OK (regeneration<br />
allowed), CHECK (regeneration not allowed) or N/A (not applicable). When<br />
ATS Status is selected, the following submenus are available.<br />
To perform a parked regeneration, the clutch pedal must not be depressed, the<br />
service brake must not be engaged and a PTO must not be engaged or the PTO<br />
must be able to operate above the minimum engine speed required.
32 <strong>Driver</strong> <strong>Information</strong> <strong>Display</strong> (DID)<br />
To perform a parked regeneration, the accelerator pedal must not be<br />
depressed, the transmission must be in the neutral position and the vehicle<br />
speed must not be above zero.<br />
To perform a parked regeneration, the park brake must be engaged and there<br />
can be no active fault codes. The system will time-out if the duty cycle is<br />
inadequate to support an automatic regeneration or if there is a problem that is<br />
preventing regeneration. Attempt to perform a parked regeneration or take the<br />
vehicle to a <strong>Volvo</strong> Truck dealer for a service regeneration.
<strong>Driver</strong> <strong>Information</strong> <strong>Display</strong> (DID) 33<br />
Temporary lockout prevents performing a regeneration when a regeneration is<br />
not needed. Permanent lockout prevents performing a regeneration when a<br />
condition exists that requires vehicle service. Take the vehicle to a <strong>Volvo</strong><br />
Truck dealer. A minimum engine temperature of 35°C (95°F) is required for<br />
regeneration.
34 <strong>Driver</strong> <strong>Information</strong> <strong>Display</strong> (DID)<br />
A minimum exhaust temperature of 250°C (482°F) is required for<br />
regeneration. The minimum vehicle speed for an automatic regeneration is<br />
40 km/h (25 mph). When Disable REGEN is selected in the Cancel REGEN<br />
submenu, regeneration is inhibited. Select Enable REGEN to allow<br />
regeneration.
<strong>Volvo</strong> Link<br />
<strong>Driver</strong> <strong>Information</strong> <strong>Display</strong> (DID) 35<br />
Main Menu<br />
Start-Up Menu<br />
For information about the <strong>Volvo</strong> Link <strong>System</strong>, refer to the <strong>Volvo</strong> Link <strong>System</strong><br />
Operator’s Manual.
36 <strong>Driver</strong> <strong>Information</strong> <strong>Display</strong> (DID)<br />
<strong>Display</strong><br />
The operator can adjust the display in the <strong>Display</strong> menu. The entire display<br />
can be blacked out for night driving. The display brightness level is adjustable.<br />
The Favorite <strong>Display</strong> function allows the operator to select up to three<br />
different gauges to be displayed at the same time. Night/Day can be selected<br />
to provide a light or dark background.<br />
<br />
<br />
<br />
<br />
<br />
Black Panel<br />
Favorite <strong>Display</strong><br />
Backlight<br />
Favorite <strong>Display</strong> Setting<br />
Night/Day<br />
1. Black Panel<br />
The screen and the entire display is completely dark, except the speedometer<br />
and tachometer. The black panel mode can be exited by pressing the Esc<br />
button.
2. Favorite <strong>Display</strong><br />
<strong>Driver</strong> <strong>Information</strong> <strong>Display</strong> (DID) 37<br />
This section is for viewing your selection only. To choose your favorite<br />
selection, go to Favorite <strong>Display</strong> Setting (item #4 on page 39).<br />
If Favorite <strong>Display</strong> is selected, the DID will always display the selected<br />
gauges.
38 <strong>Driver</strong> <strong>Information</strong> <strong>Display</strong> (DID)<br />
3. Backlight<br />
To increase or decrease the backlight setting, press the up and down arrows on<br />
the stalk switch.
<strong>Driver</strong> <strong>Information</strong> <strong>Display</strong> (DID) 39<br />
4. Favorite <strong>Display</strong> Setting<br />
Select Favorite <strong>Display</strong> Setting to choose the gauges displayed on the DID.<br />
5. Night/Day<br />
Use the Night/Day menu to choose a dark background with light text and<br />
images or a light background with dark text and images.
40 <strong>Driver</strong> <strong>Information</strong> <strong>Display</strong> (DID)<br />
Vehicle Messages<br />
Vehicle Messages appear in the DID depending on the number of faults the<br />
vehicle has at any given time.<br />
Windshield Washer Fluid Low Message<br />
If there are no messages, the following screen is displayed.
<strong>Driver</strong> <strong>Information</strong> <strong>Display</strong> (DID) 41<br />
Reset<br />
When the Reset menu is open, pressing and holding down the Enter button for<br />
more than 1 second resets the following functions:<br />
Instantaneous gallons per hour<br />
Trip fuel used<br />
Distance to empty
42 <strong>Driver</strong> <strong>Information</strong> <strong>Display</strong> (DID)<br />
Non-Driving/Stationary Menu<br />
<br />
<br />
<br />
<strong>Display</strong> Setting<br />
— Language<br />
— Units<br />
— Time/Date<br />
— <strong>Display</strong> Light<br />
— Change Password<br />
Vehicle Settings (<strong>Volvo</strong> engines only)<br />
— Fleet Limits<br />
— Fleet ID<br />
— Water in Fuel (if equipped)<br />
Diagnostics<br />
— Fault Diagnostics<br />
— Cluster Self Test<br />
— Part Number
<strong>Driver</strong> <strong>Information</strong> <strong>Display</strong> (DID) 43<br />
<br />
<br />
<br />
<br />
Vehicle Data (<strong>Volvo</strong> Engines Only)<br />
— Oil Level<br />
— Maintenance Data<br />
Data Log<br />
— Vehicle ID<br />
— Sweet Spot Data<br />
— Total Data<br />
— Trip Data<br />
— Reset Trip Data<br />
Tire Pressure <strong>System</strong><br />
— Tire Pressure<br />
— Tire Temperature<br />
Password<br />
— Enter Password<br />
<strong>Display</strong> Setting
44 <strong>Driver</strong> <strong>Information</strong> <strong>Display</strong> (DID)<br />
The <strong>Display</strong> Setting menu is used to change languages and units. The<br />
password, time and date can also be changed. The backlight and contrast of<br />
the display screen can be adjusted.<br />
Language<br />
Units<br />
Time/Date<br />
<br />
<br />
<strong>Display</strong>/Adjust<br />
Change Password<br />
1. Language
2. Units<br />
Distance<br />
Fuel Consumption<br />
Temperature<br />
<strong>Driver</strong> <strong>Information</strong> <strong>Display</strong> (DID) 45<br />
Distance<br />
Fuel Consumption
46 <strong>Driver</strong> <strong>Information</strong> <strong>Display</strong> (DID)<br />
Temperature<br />
3. Time/Date<br />
The Time/Date menu has two sub-menus:<br />
Clock Format<br />
Date Format<br />
Clock Format
<strong>Driver</strong> <strong>Information</strong> <strong>Display</strong> (DID) 47<br />
Date Format
48 <strong>Driver</strong> <strong>Information</strong> <strong>Display</strong> (DID)<br />
4. <strong>Display</strong> Light<br />
The <strong>Display</strong> Light menu has three sub-menus:<br />
Contrast<br />
Backlight<br />
Night/Day<br />
Use the Night/Day menu to choose a dark background with light text and<br />
images or a light background with dark text and images.<br />
<strong>Display</strong> Light Menu
<strong>Driver</strong> <strong>Information</strong> <strong>Display</strong> (DID) 49<br />
Contrast<br />
Backlight
50 <strong>Driver</strong> <strong>Information</strong> <strong>Display</strong> (DID)<br />
5. Change Password<br />
This menu is only accessible if the correct password is entered. The default<br />
password from <strong>Volvo</strong> is 0000.<br />
Vehicle Settings<br />
The Vehicle Settings menu allows fleet owners to set targets for vehicle<br />
operation regarding maximum engine speed, maximum road speed, and fuel<br />
consumption.<br />
This area is password protected.<br />
1. Fleet Limits<br />
The Fleet Limits menu has three sub-menus:<br />
RPM Limit<br />
Speed Limit<br />
Fuel Target
<strong>Driver</strong> <strong>Information</strong> <strong>Display</strong> (DID) 51<br />
RPM Limit
52 <strong>Driver</strong> <strong>Information</strong> <strong>Display</strong> (DID)<br />
Speed Limit<br />
Fuel Target
2. Fleet ID<br />
<strong>Driver</strong> <strong>Information</strong> <strong>Display</strong> (DID) 53<br />
This menu can only be accessed if the correct password has been entered.<br />
The owner can enter the Fleet ID of the vehicle in this menu if required. Data<br />
registered in the engine control unit is then registered for this ID. Enter the<br />
new Fleet ID using the up and down arrows. Enter one number at a time<br />
followed by pressing the Enter button. 13 characters must be entered, blank<br />
characters are entered in unused positions. The ignition key must be turned off<br />
and back on to update the fleet ID.
54 <strong>Driver</strong> <strong>Information</strong> <strong>Display</strong> (DID)<br />
3. Drain Water in Fuel (if equipped)<br />
Press the Enter button to request drain the water in the fuel.<br />
Diagnostics<br />
The Diagnostics menu enables fault tracing on the control units in the vehicle<br />
to check for faults. Instrument tests are available to check the telltales, gauges,<br />
display and speaker. The part number of a control unit can be identified in the<br />
part number menu.
<strong>Driver</strong> <strong>Information</strong> <strong>Display</strong> (DID) 55<br />
1. Fault Diagnostics<br />
A list of the control units on the vehicle is displayed in the Fault Diagnostics<br />
menu.<br />
2. Cluster Self Test<br />
There are four sub-menus available:<br />
Telltales test<br />
Gauge test<br />
<strong>Display</strong> test<br />
Speaker test
56 <strong>Driver</strong> <strong>Information</strong> <strong>Display</strong> (DID)<br />
The following table describes the tests. To cancel a test, press the Esc button.<br />
Telltales Test<br />
Gauge Test<br />
<strong>Display</strong> Test<br />
Speaker Test<br />
Telltales illuminate for approximately five seconds.<br />
The indicators move forwards and backwards<br />
between the end positions. They do not show any<br />
particular value. This is just a check to confirm that<br />
the indicators move, and to make sure the operators<br />
are working.<br />
The entire display lights up until the Esc button is<br />
pressed.<br />
The sound is activated and at the same time, the<br />
name of the selected sound is shown in the DID<br />
screen.<br />
3. Part Number<br />
A list of the control units on the vehicle is displayed in the Part Number menu.
<strong>Driver</strong> <strong>Information</strong> <strong>Display</strong> (DID) 57<br />
Airbag ECU Used as an Example
58 <strong>Driver</strong> <strong>Information</strong> <strong>Display</strong> (DID)<br />
Vehicle Data<br />
General Diagnostic Communication Error<br />
The engine oil level and Maintenance Data can be checked in the Vehicle Data<br />
menu.<br />
1. Oil Level (<strong>Volvo</strong> engines only)<br />
For information about engine oil, refer to the Operator's Manual Vehicle<br />
Maintenance.<br />
The vehicle is equipped with an electronic oil level sensor. The bar marked<br />
MIN and MAX shows the engine oil level. The number in the middle indicates<br />
the difference between the MIN and MAX level.
<strong>Driver</strong> <strong>Information</strong> <strong>Display</strong> (DID) 59<br />
2. Maintenance Data
60 <strong>Driver</strong> <strong>Information</strong> <strong>Display</strong> (DID)<br />
Datalog<br />
1. Vehicle ID<br />
Communication Error
2. Sweet Spot Data<br />
<strong>Driver</strong> <strong>Information</strong> <strong>Display</strong> (DID) 61<br />
For information about sweet spot data, refer to Performance Bonus Guide in<br />
the vehicle operator's manual.
62 <strong>Driver</strong> <strong>Information</strong> <strong>Display</strong> (DID)<br />
3. Total Data<br />
Totals indicate the accumulated engine values that have been logged during<br />
the lifetime of the engine ECU. Six different totals are stored.
<strong>Driver</strong> <strong>Information</strong> <strong>Display</strong> (DID) 63<br />
4. Trip Data<br />
Some menus are not available with the Cummins ISX engine.<br />
There are 14 different trip data values stored.<br />
The trip data must be reset before each measurement, see “5. Reset Trip Data”<br />
on page 67.
64 <strong>Driver</strong> <strong>Information</strong> <strong>Display</strong> (DID)
<strong>Driver</strong> <strong>Information</strong> <strong>Display</strong> (DID) 65
66 <strong>Driver</strong> <strong>Information</strong> <strong>Display</strong> (DID)
<strong>Driver</strong> <strong>Information</strong> <strong>Display</strong> (DID) 67<br />
5. Reset Trip Data<br />
This menu can only be accessed if the correct password has been entered.
68 <strong>Driver</strong> <strong>Information</strong> <strong>Display</strong> (DID)<br />
Successful Reset
<strong>Driver</strong> <strong>Information</strong> <strong>Display</strong> (DID) 69<br />
Tire Pressure <strong>System</strong><br />
1. Tire Pressure<br />
Unsuccessful Reset
70 <strong>Driver</strong> <strong>Information</strong> <strong>Display</strong> (DID)<br />
2. Tire Temperature<br />
Password<br />
Certain functions are password-protected and there are a number of passwords<br />
for the display. It is also possible to disable the password protection for<br />
functions, which is useful when the owner is the operator. Contact your local<br />
<strong>Volvo</strong> dealer to set this function.<br />
1. Password<br />
This password must be changed to prevent unauthorized access to the menus.<br />
These passwords give the user access to all password-protected functions. See<br />
“5. Change Password” on page 50 to change the password.<br />
The following menus are password-protected and marked with a key symbol<br />
in the menus:<br />
Fleet Limits<br />
Fleet ID<br />
Reset (applies to a number of functions)
<strong>Driver</strong> <strong>Information</strong> <strong>Display</strong> (DID) 71<br />
When the ignition key has been in the stop position for more than 60 seconds<br />
or the batteries have been disconnected, the password must be entered again in<br />
order to access all the functions.<br />
No functions should be password-protected:<br />
To make all menus available without password you must go to Password and<br />
press the Enter button.<br />
You can also go to a password-protected menu and press the Enter button. A<br />
password entry box is displayed.<br />
1. Select the Password menu.<br />
2. The password consists of a four-digit number, 0000–9999, that is<br />
scrolled forward using the up and down arrows on the control lever, one<br />
number at a time, followed by pressing the Enter button. The display<br />
shows the following:<br />
Press the Enter button when the correct password has been entered.<br />
If the ignition key has been in the stop position for more than 60 seconds or<br />
the batteries have been disconnected, the password must be entered again in<br />
order to access all the functions.<br />
3. If an incorrect password is entered, the user is returned to point 2.<br />
Re-enter the password using the up and down arrows, followed by the<br />
Enter button on the control stalk as in point 2.
72 <strong>Driver</strong> <strong>Information</strong> <strong>Display</strong> (DID)
<strong>Driver</strong> <strong>Information</strong> <strong>Display</strong> (DID) 73<br />
DISPLAY SYMBOLS<br />
Alarm, Check and <strong>Information</strong> Symbols<br />
Symbol<br />
Meaning<br />
Coolant temperature<br />
Coolant level<br />
Engine oil pressure<br />
Engine Oil level<br />
Engine oil temperature<br />
High engine oil temperature<br />
Fault in preheating<br />
Engine temperature too low for engine brake<br />
(VEB)
74 <strong>Driver</strong> <strong>Information</strong> <strong>Display</strong> (DID)<br />
Symbol<br />
Meaning<br />
Air filter restriction<br />
Engine idle shut down<br />
Transmission oil temperature<br />
High transmission oil temperature<br />
Transmission malfunction<br />
Low brake pressure or ABS<br />
Air dump<br />
Air suspension pressure<br />
Air suspension pressure warning
<strong>Driver</strong> <strong>Information</strong> <strong>Display</strong> (DID) 75<br />
Symbol<br />
Meaning<br />
Wheel spin<br />
Anti-spin temporarily disengaged<br />
5th wheel unlocked<br />
Stop<br />
Voltage meter<br />
Voltage warning<br />
SRS<br />
Low level washer fluid<br />
Fault in main beam
76 <strong>Driver</strong> <strong>Information</strong> <strong>Display</strong> (DID)<br />
Symbol<br />
Meaning<br />
Interaxle lock<br />
Differential lock<br />
Fault in brake light<br />
Fault in blinkers<br />
Caution, freezing conditions<br />
Fuel level<br />
Outside temperature<br />
Air application
<strong>Driver</strong> <strong>Information</strong> <strong>Display</strong> (DID) 77<br />
Symbol<br />
Meaning<br />
Parking Brake engaged<br />
Axle Temperature<br />
Engine speed<br />
Intake manifold pressure<br />
Instantaneous/average fuel economy (liters/<br />
100km)<br />
Instantaneous/average fuel economy (km/liter)<br />
Instantaneous/average fuel economy (mpg)<br />
Instantaneous/average fuel economy (liters/hour)<br />
Leg fuel (liter)
78 <strong>Driver</strong> <strong>Information</strong> <strong>Display</strong> (DID)<br />
Symbol<br />
Meaning<br />
Leg fuel (gallon)<br />
Trip data (km)<br />
Trip data (miles)<br />
Average speed (km/h)<br />
Average speed (mph)<br />
Estimated time of arrival<br />
Estimated time of arrival<br />
Safety Belts Reminder<br />
Performance Bonus Guide
<strong>Driver</strong> <strong>Information</strong> <strong>Display</strong> (DID) 79<br />
Symbol<br />
Meaning<br />
Water in fuel<br />
Aftertreatment Regeneration<br />
High Exhaust <strong>System</strong> Temperature
80 <strong>Driver</strong> <strong>Information</strong> <strong>Display</strong> (DID)<br />
STATUS SYMBOLS<br />
Status symbols are displayed at the bottom of the Mid Level and High Level<br />
instrument cluster DID screens.<br />
Symbol<br />
Meaning<br />
Preheating active or preheating fault<br />
Alarm clock activated<br />
Message active<br />
MI<br />
KM<br />
PTO<br />
CC<br />
Odometer, miles<br />
Odometer, kilometers<br />
Power take-off active<br />
Cruise Control active<br />
Engine brake position 1<br />
Engine brake position 2<br />
Engine brake position 6<br />
Axle suspension pressure, front
<strong>Driver</strong> <strong>Information</strong> <strong>Display</strong> (DID) 81<br />
Symbol<br />
Meaning<br />
Axle suspension pressure, rear<br />
Distance to empty<br />
ABS malfunction trailer<br />
ABS malfunction tractor<br />
Water in fuel priming<br />
Water in fuel draining<br />
Other Symbols<br />
There are various other symbols for the other menus which are not explained<br />
here. Refer to the sections on the different menus for explanations of those<br />
symbols.
82 <strong>Driver</strong> <strong>Information</strong> <strong>Display</strong> (DID)<br />
MESSAGES<br />
General<br />
There are three types of messages:<br />
Stop<br />
Warning<br />
<strong>Information</strong><br />
Stop, warning, and information messages are displayed automatically with<br />
their associated symbols. Above the display are three lamps (for stop warning,<br />
or information messages) used to draw the attention of the operator whenever<br />
necessary. If the engine is running when a stop message comes on, a buzzer is<br />
also activated.<br />
More than one message can be active at the same time. A displayed message<br />
can be replaced by a new message provided the new message has a higher<br />
priority. i.e.: The displayed message is the highest priority.<br />
Only fault codes that have a direct impact on vehicle operation are displayed.<br />
All fault codes are stored in the appropriate ECU for access by service<br />
technicians.<br />
Stop Message<br />
Failure to stop and take necessary action when the STOP message light is<br />
on can result in automatic engine shutdown and loss of power steering<br />
assist. This can result in vehicle accident, personal injury or death.<br />
In the event of a serious fault, the red STOP light comes on; the buzzer will<br />
also activate if the engine is on. An illuminated STOP message light signifies<br />
a serious problem has been detected, and the operator must respond<br />
immediately to the problem.<br />
This lamp ON means the vehicle must be safely pulled off the road and<br />
stopped. In some instances, the engine must be switched off immediately.
<strong>Driver</strong> <strong>Information</strong> <strong>Display</strong> (DID) 83<br />
In some cases preventive action may be taken by the engine ECU to protect<br />
the engine.<br />
Example 1: if oil pressure or coolant level drops too low, the engine is forced<br />
to low idle and when the vehicle speed is zero, the engine shuts down.<br />
Example 2: with excessive coolant temperature, the engine will gradually<br />
reduce power output to 50%. This telltale always activates the buzzer.<br />
The engine may be restarted after the key is turned off and then back on.<br />
However, it will only operate for 30 seconds unless the problem is resolved.<br />
The engine could be forced to low idle within 30 seconds from when the light<br />
comes on. Pull off the road as soon as possible without creating a safety<br />
hazard.<br />
If an engine problem is allowed to persist, serious damage to the engine may<br />
occur. Always repair the cause of the problem before operating the vehicle<br />
again.<br />
See “Stop, Check, Info Symbols and Associated Icons” on page 85 for other<br />
telltales that trigger the STOP message light.<br />
Warning Message<br />
The CHECK warning message lights up when there is a specified fault the<br />
operator should be aware of. Air pressure is low and remaining air volume<br />
may not be sufficient for repeated braking. The emergency brakes my<br />
engage, causing a wheel lockup, loss of vehicle control. This can cause the<br />
vehicle to become a hazard to vehicles behind it.<br />
Bring the vehicle to a controlled stop. Failure to follow these precautions<br />
can result in loss of braking control, serious personal injury, vehicle<br />
accident or death.
84 <strong>Driver</strong> <strong>Information</strong> <strong>Display</strong> (DID)<br />
This lamp ON means that there is a specified fault that must be checked at the<br />
next stop.<br />
If there is an electrical or mechanical problem, the CHECK warning light<br />
comes on and a default message appears in the DID.<br />
See “Stop, Check, Info Symbols and Associated Icons” on page 85 for other<br />
telltales that trigger the CHECK warning light.<br />
<strong>Information</strong> Message<br />
This indicator light ON means there is a new information message.<br />
The INFO indicator light comes on when there is a new information message<br />
or an abnormal status is detected by the electronic control unit. A telltale, text<br />
or both are shown in the DID in addition to the INFO light. For certain<br />
telltales, a reference value is also shown.<br />
Make sure the indicated fault is checked at the next stop once the INFO<br />
indicator come on.<br />
See “Stop, Check, Info Symbols and Associated Icons” on page 85 for other<br />
telltales that trigger the INFO indicator.
<strong>Driver</strong> <strong>Information</strong> <strong>Display</strong> (DID) 85<br />
Stop, Check, Info Symbols and Associated Icons<br />
Symbols and Associated Icons<br />
Icons <strong>Display</strong>ed
86 <strong>Driver</strong> <strong>Information</strong> <strong>Display</strong> (DID)
<strong>Driver</strong> <strong>Information</strong> <strong>Display</strong> (DID) 87<br />
Acknowledging Messages<br />
A fault message is acknowledged by pressing the Esc button after which the<br />
display returns to the same status that existed before the fault occurred. All<br />
messages can be acknowledged. Acknowledged but inactive messages are<br />
displayed again when the ignition key is turned to the START position or they<br />
can be read in the menu.<br />
<strong>Information</strong> or Warning Messages: <strong>Information</strong> and warning messages can<br />
be acknowledged using the “Esc” button. This warning stays acknowledged<br />
until the next time the ignition key is turned to the START position.<br />
Exceptions: The message can be displayed again if the fault is corrected and<br />
then becomes active again.<br />
Example: If the transmission fluid temperature is too high, a message will be<br />
activated automatically. The operator acknowledges this message using the<br />
Esc button. If the temperature then drops to a normal level temporarily and<br />
then increases again to an excessive level, the warning will activate again.<br />
Stop Message: The buzzer and a STOP message can be acknowledged using<br />
the Esc button, but may become active again 10 seconds after the last<br />
acknowledgment. The STOP symbol will be illuminated the whole time.<br />
Examples of Fault Symbols and Text<br />
Factory–Installed Equipment When Stationary<br />
The stop, warning, or info symbol comes on and the information message is<br />
shown on the display (for more information on the fault, see “1. Fault<br />
Diagnostics” on page 55). A warning tone will be heard if the engine is<br />
running when a stop message is activated. The message contains information<br />
about the location of the fault where the fault has occurred:
88 <strong>Driver</strong> <strong>Information</strong> <strong>Display</strong> (DID)<br />
Non-Factory-Installed Equipment<br />
If a coach builder or customer has retrofitted equipment that is connected to<br />
the data link, the following symbols may be displayed:<br />
MID (Message IDentifier) = control unit
<strong>Driver</strong> <strong>Information</strong> <strong>Display</strong> (DID) 89<br />
Examples of Symbol and Value<br />
<strong>Information</strong>, warning or stop symbol comes on and another symbol and value<br />
is displayed. Example of warning message:<br />
Warning, Freezing Conditions<br />
The Freezing conditions message is activated when the outside temperature<br />
drops below 35°F or increases from a lower temperature to 28°F. Press the<br />
Esc button to acknowledge the warning. The warning is cancelled when the<br />
temperature drops below 26°F or rises to 37°F.
90 Notes
Index 91<br />
A<br />
Acknowledging Messages . . . . . . . . . . . . . . . . . . . . . . . . . . . . . . . . . 87<br />
Aftertreatment . . . . . . . . . . . . . . . . . . . . . . . . . . . . . . . . . . . . . . . .9, 30<br />
Alarm Clock . . . . . . . . . . . . . . . . . . . . . . . . . . . . . . . . . . . . . . . . . . . . 28<br />
B<br />
Backlight . . . . . . . . . . . . . . . . . . . . . . . . . . . . . . . . . . . . . . . . 8, 38, 49<br />
Battery Voltage . . . . . . . . . . . . . . . . . . . . . . . . . . . . . . . . . . . . . . . . . 20<br />
Black Panel . . . . . . . . . . . . . . . . . . . . . . . . . . . . . . . . . . . . . . . . . . . . 36<br />
C<br />
Change Password . . . . . . . . . . . . . . . . . . . . . . . . . . . . . . . . . . . . . . . 50<br />
Changing Settings . . . . . . . . . . . . . . . . . . . . . . . . . . . . . . . . . . . . . . . . 6<br />
Clock Format . . . . . . . . . . . . . . . . . . . . . . . . . . . . . . . . . . . . . . . . . . . 46<br />
Cluster Self Test . . . . . . . . . . . . . . . . . . . . . . . . . . . . . . . . . . . . . . . . 55<br />
Contrast . . . . . . . . . . . . . . . . . . . . . . . . . . . . . . . . . . . . . . . . . . . . .8, 48<br />
Current Gear Position . . . . . . . . . . . . . . . . . . . . . . . . . . . . . . . . . . . . 18<br />
D<br />
Datalog. . . . . . . . . . . . . . . . . . . . . . . . . . . . . . . . . . . . . . . . . . . . . . . . 60<br />
Date Format . . . . . . . . . . . . . . . . . . . . . . . . . . . . . . . . . . . . . . . . . . . . 46<br />
Diagnostics . . . . . . . . . . . . . . . . . . . . . . . . . . . . . . . . . . . . . . . . . . . . 54<br />
DID, Basic Level . . . . . . . . . . . . . . . . . . . . . . . . . . . . . . . . . . . . . . . . . 6<br />
DID, Mid and High Level . . . . . . . . . . . . . . . . . . . . . . . . . . . . . . . . . . 14<br />
<strong>Display</strong> . . . . . . . . . . . . . . . . . . . . . . . . . . . . . . . . . . . . . . . . . . . . . . . . 36<br />
<strong>Display</strong> Light . . . . . . . . . . . . . . . . . . . . . . . . . . . . . . . . . . . . . . . . . . . 48<br />
<strong>Display</strong> Setting . . . . . . . . . . . . . . . . . . . . . . . . . . . . . . . . . . . . . . . . . . 43<br />
Distance . . . . . . . . . . . . . . . . . . . . . . . . . . . . . . . . . . . . . . . . . . . .13, 45<br />
Distance to Destination . . . . . . . . . . . . . . . . . . . . . . . . . . . . . . . . .8, 28<br />
Distance to Empty . . . . . . . . . . . . . . . . . . . . . . . . . . . . . . . . . . . . . . . 24<br />
<strong>Driver</strong> <strong>Information</strong> <strong>Display</strong>, Basic Level . . . . . . . . . . . . . . . . . . . . . . . . 6<br />
<strong>Driver</strong> <strong>Information</strong> <strong>Display</strong>, Mid and High Level. . . . . . . . . . . . . . . . . 14<br />
Driving Menus . . . . . . . . . . . . . . . . . . . . . . . . . . . . . . . . . . . . . . . . . . 16<br />
E<br />
Engine Oil Temperature. . . . . . . . . . . . . . . . . . . . . . . . . . . . . . . . . . . 19<br />
Estimated Time of Arrival (ETA) . . . . . . . . . . . . . . . . . . . . . . . . . . . . 29
92 Index<br />
F<br />
Fault Diagnostics . . . . . . . . . . . . . . . . . . . . . . . . . . . . . . . . . . . . . . . .55<br />
Favorite <strong>Display</strong> . . . . . . . . . . . . . . . . . . . . . . . . . . . . . . . . . . . . . . . . .37<br />
Favorite <strong>Display</strong> Setting . . . . . . . . . . . . . . . . . . . . . . . . . . . . . . . . . . .39<br />
Fleet ID . . . . . . . . . . . . . . . . . . . . . . . . . . . . . . . . . . . . . . . . . . . . . . . .53<br />
Fleet Limits . . . . . . . . . . . . . . . . . . . . . . . . . . . . . . . . . . . . . . . . . . . . .50<br />
Front and Rear Axle Temperature . . . . . . . . . . . . . . . . . . . . . . . . . . .21<br />
Fuel Consumption. . . . . . . . . . . . . . . . . . . . . . . . . . . . . . . . . . . . . . . .45<br />
Fuel Economy. . . . . . . . . . . . . . . . . . . . . . . . . . . . . . . . . . . . . . . . . . .24<br />
G<br />
Gear Position Current. . . . . . . . . . . . . . . . . . . . . . . . . . . . . . . . . . . . .18<br />
I<br />
Idle Percent. . . . . . . . . . . . . . . . . . . . . . . . . . . . . . . . . . . . . . . . . . . . .25<br />
<strong>Information</strong> Messages . . . . . . . . . . . . . . . . . . . . . . . . . . . . . . . . . . . .82<br />
Instantaneous Gallons Per Hour. . . . . . . . . . . . . . . . . . . . . . . . . . . . .23<br />
Instrument Cluster, Basic Level . . . . . . . . . . . . . . . . . . . . . . . . . . . . . .6<br />
Instrument Cluster, Mid and High Level . . . . . . . . . . . . . . . . . . . . . . .14<br />
L<br />
Language . . . . . . . . . . . . . . . . . . . . . . . . . . . . . . . . . . . . . . . . . . 13, 44<br />
M<br />
Messages . . . . . . . . . . . . . . . . . . . . . . . . . . . . . . . . . . . . . . . . . . . . . .82<br />
N<br />
Night/Day . . . . . . . . . . . . . . . . . . . . . . . . . . . . . . . . . . . . . . . . . . 39, 49<br />
O<br />
Oil Level . . . . . . . . . . . . . . . . . . . . . . . . . . . . . . . . . . . . . . . . . . . . . . .58<br />
Outside Temperature . . . . . . . . . . . . . . . . . . . . . . . . . . . . . . . . . . 8, 19<br />
P<br />
Part Number . . . . . . . . . . . . . . . . . . . . . . . . . . . . . . . . . . . . . . . . . . . .56<br />
Password . . . . . . . . . . . . . . . . . . . . . . . . . . . . . . . . . . . . . . . . . . . . . .70
Index 93<br />
R<br />
Reset (Driving Mode DID) . . . . . . . . . . . . . . . . . . . . . . . . . . . . . . . . . 41<br />
Reset Trip Data . . . . . . . . . . . . . . . . . . . . . . . . . . . . . . . . . . . . . . . . . 67<br />
Road Speed Limit . . . . . . . . . . . . . . . . . . . . . . . . . . . . . . . . . . . . . . . 26<br />
S<br />
Selecting a Menu . . . . . . . . . . . . . . . . . . . . . . . . . . . . . . . . . . . . . . . . . 4<br />
Stalk Switch Control Lever. . . . . . . . . . . . . . . . . . . . . . . . . . . . . . . . . . 3<br />
Stop Messages . . . . . . . . . . . . . . . . . . . . . . . . . . . . . . . . . . . . . . . . . 82<br />
Suspension Pressure. . . . . . . . . . . . . . . . . . . . . . . . . . . . . . . . . . . . . 21<br />
Sweet Spot Data . . . . . . . . . . . . . . . . . . . . . . . . . . . . . . . . . . . . . . . . 61<br />
Sweet Spot Percentage . . . . . . . . . . . . . . . . . . . . . . . . . . . . . . . . . . . 26<br />
Sweet Spot/Performance Bonus . . . . . . . . . . . . . . . . . . . . . . . . . . . . 25<br />
T<br />
Temperature . . . . . . . . . . . . . . . . . . . . . . . . . . . . . . . . . . . . . . . .13, 45<br />
Time and Date . . . . . . . . . . . . . . . . . . . . . . . . . . . . . . . . . . . . . . . . . . 27<br />
Time/Date . . . . . . . . . . . . . . . . . . . . . . . . . . . . . . . . . . . . . . . . . . . . . . 8<br />
Time/Distance . . . . . . . . . . . . . . . . . . . . . . . . . . . . . . . . . . . . . . . . . . 27<br />
Total Data . . . . . . . . . . . . . . . . . . . . . . . . . . . . . . . . . . . . . . . . . . . . . 62<br />
Transmission Oil Temperature. . . . . . . . . . . . . . . . . . . . . . . . . . . . . . 20<br />
Trip Average Speed . . . . . . . . . . . . . . . . . . . . . . . . . . . . . . . . . . . . . . 29<br />
Trip Data . . . . . . . . . . . . . . . . . . . . . . . . . . . . . . . . . . . . . . . . . . . . . . 63<br />
Trip Fuel Used . . . . . . . . . . . . . . . . . . . . . . . . . . . . . . . . . . . . . . . . . . 23<br />
U<br />
Units. . . . . . . . . . . . . . . . . . . . . . . . . . . . . . . . . . . . . . . . . . . . . . . . . . 45<br />
V<br />
Vehicle ID. . . . . . . . . . . . . . . . . . . . . . . . . . . . . . . . . . . . . . . . . . . . . . 60<br />
Vehicle Messages . . . . . . . . . . . . . . . . . . . . . . . . . . . . . . . . . . . . . . . 40<br />
Vehicle Settings . . . . . . . . . . . . . . . . . . . . . . . . . . . . . . . . . . . . . . . . . 50<br />
<strong>Volvo</strong> Link Compass . . . . . . . . . . . . . . . . . . . . . . . . . . . . . . . . . . . . . 22<br />
W<br />
Warning Messages . . . . . . . . . . . . . . . . . . . . . . . . . . . . . . . . . . . . . . 82<br />
Warning, Freezing Conditions . . . . . . . . . . . . . . . . . . . . . . . . . . . . . . 89
<strong>Volvo</strong> Trucks North America<br />
P.O. Box 26115 Greensboro, NC 27402-6115<br />
<strong>Volvo</strong> Trucks Canada, Ltd.<br />
5600A Cancross Court, Mississauga, Ontario L5R 3E9<br />
http://www.volvotrucks.volvo.com<br />
PV776-21012748 10.2008 © <strong>Volvo</strong> Group North America, Inc. 2008. All Rights Reserved.