Read the Full Article (PDF, 1.2 MB) - Datacolor
Read the Full Article (PDF, 1.2 MB) - Datacolor
Read the Full Article (PDF, 1.2 MB) - Datacolor

Create successful ePaper yourself
Turn your PDF publications into a flip-book with our unique Google optimized e-Paper software.
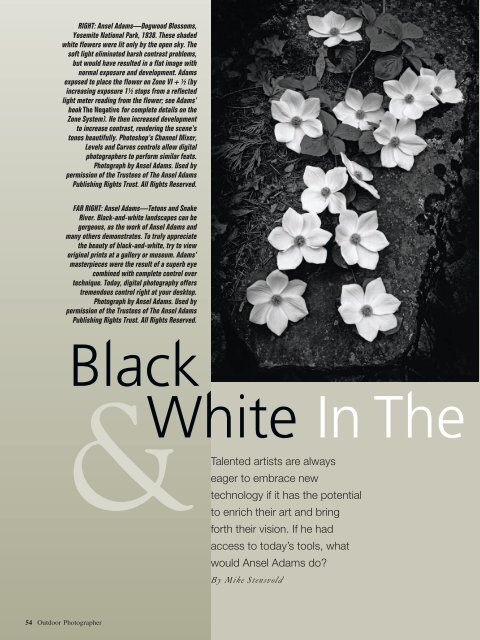
RIGHT: Ansel Adams—Dogwood Blossoms,<br />
Yosemite National Park, 1938. These shaded<br />
white flowers were lit only by <strong>the</strong> open sky. The<br />
soft light eliminated harsh contrast problems,<br />
but would have resulted in a flat image with<br />
normal exposure and development. Adams<br />
exposed to place <strong>the</strong> flower on Zone VI + ½ (by<br />
increasing exposure 1½ stops from a reflected<br />
light meter reading from <strong>the</strong> flower; see Adams’<br />
book The Negative for complete details on <strong>the</strong><br />
Zone System). He <strong>the</strong>n increased development<br />
to increase contrast, rendering <strong>the</strong> scene’s<br />
tones beautifully. Photoshop’s Channel Mixer,<br />
Levels and Curves controls allow digital<br />
photographers to perform similar feats.<br />
Photograph by Ansel Adams. Used by<br />
permission of <strong>the</strong> Trustees of The Ansel Adams<br />
Publishing Rights Trust. All Rights Reserved.<br />
FAR RIGHT: Ansel Adams—Tetons and Snake<br />
River. Black-and-white landscapes can be<br />
gorgeous, as <strong>the</strong> work of Ansel Adams and<br />
many o<strong>the</strong>rs demonstrates. To truly appreciate<br />
<strong>the</strong> beauty of black-and-white, try to view<br />
original prints at a gallery or museum. Adams’<br />
masterpieces were <strong>the</strong> result of a superb eye<br />
combined with complete control over<br />
technique. Today, digital photography offers<br />
tremendous control right at your desktop.<br />
Photograph by Ansel Adams. Used by<br />
permission of <strong>the</strong> Trustees of The Ansel Adams<br />
Publishing Rights Trust. All Rights Reserved.<br />
54 Outdoor Photographer<br />
&<br />
White In The<br />
Black<br />
Talented artists are always<br />
eager to embrace new<br />
technology if it has <strong>the</strong> potential<br />
to enrich <strong>the</strong>ir art and bring<br />
forth <strong>the</strong>ir vision. If he had<br />
access to today’s tools, what<br />
would Ansel Adams do?<br />
By Mike Stensvold
Digital Age<br />
More than 20 years since his passing, Ansel Adams is probably still <strong>the</strong> most widely known<br />
black-and-white outdoor photographer. He didn’t shoot digitally because digital imaging as<br />
we know it didn’t exist in those days. But I think <strong>the</strong> legendary black-and-white master would<br />
be quite interested in digital imaging were he in his shooting prime today. Adams was all for any<br />
technology that could increase his control over <strong>the</strong> image-making process, and digital imaging<br />
certainly does that. With film, Adams could adjust <strong>the</strong> exposure in camera to control <strong>the</strong> dark areas of <strong>the</strong> image,<br />
adjust development to control <strong>the</strong> light areas, and <strong>the</strong>n control <strong>the</strong> lightness or darkness of <strong>the</strong> overall print via <strong>the</strong><br />
enlarger exposure, control overall contrast by choosing <strong>the</strong> printing paper grade, and dodge and burn to make local<br />
areas of <strong>the</strong> print brighter or darker. He couldn’t watch <strong>the</strong> film develop, he had to watch <strong>the</strong> print develop by <strong>the</strong><br />
light of a dim safelight, and he had to wait for <strong>the</strong> print to wash and dry before he could see what he had.<br />
With digital imaging, you can adjust brightness and darkness, overall contrast and local contrast, in precise and<br />
repeatable increments, and even apply colored-filter effects and see <strong>the</strong> results on screen in real time—no waiting,<br />
no wasted paper, no smelly chemicals (Adams, <strong>the</strong> environmentalist, would appreciate that) and no dark required.<br />
March 2007 55
Here’s <strong>the</strong> original color shot of a<br />
great blue heron ordering breakfast.<br />
Photo by Mike Stensvold.<br />
The final black-and-white image is much stronger than a straight desaturated image.<br />
Visualization<br />
Along with his celebrated technical expertise, Adams was<br />
renowned for his creative eye. No matter what camera or<br />
medium you use, you need good subjects in good light, interestingly<br />
composed.<br />
Adams imagined what each print would look like before<br />
he exposed his film. He exposed, processed and printed his<br />
negatives to present to <strong>the</strong> viewer what he saw and felt that<br />
made him take <strong>the</strong> shot in <strong>the</strong> first place. This is one key to<br />
understanding Adams’ work: visualization—seeing <strong>the</strong> image<br />
in his mind’s eye before he made <strong>the</strong> shot.<br />
Okay, you saw something that moved you to make a photograph.<br />
How do you turn <strong>the</strong> image on your memory card<br />
into what Adams termed an expressive print that shows <strong>the</strong><br />
viewer what you saw and felt when you shot it? Let’s look at<br />
how you can apply a little Ansel to your digital photography.<br />
Adams shot mainly in black-and-white because that’s how<br />
he “saw” images and because black-and-white offered him<br />
56 Outdoor Photographer<br />
Clicking on <strong>the</strong> Red<br />
channel gives a result<br />
similar to shooting <strong>the</strong><br />
original image through<br />
a red filter—still not<br />
quite right.<br />
more control over his images than color. Today, digital imaging<br />
offers <strong>the</strong> advantage of tremendous control over both<br />
black-and-white and color images.<br />
Getting Black-And-White<br />
You can get black-and-white digital images by shooting<br />
<strong>the</strong>m that way in-camera or by converting color images to<br />
monochrome in <strong>the</strong> computer via your image-editing software.<br />
Shooting in monochrome mode, you’re working in blackand-white<br />
from <strong>the</strong> start, and <strong>the</strong> images you see on <strong>the</strong> camera’s<br />
LCD monitor will be in black-and-white, making it easier<br />
to think in black-and-white. This can be a useful way of learning<br />
to see black-and-white images.<br />
If you shoot RAW images ra<strong>the</strong>r than JPEGs, you’ll have<br />
more and better material to work with in <strong>the</strong> computer, including<br />
richer tonality in highlights and dark tones. You can doubleprocess<br />
a RAW image, once for <strong>the</strong> highlights and once for<br />
<strong>the</strong> dark areas, <strong>the</strong>n combine <strong>the</strong> two perfectly registered images
Using <strong>the</strong> Channel Mixer, you can adjust <strong>the</strong> lightness and darkness of<br />
<strong>the</strong> red, green and blue tones individually. Here, moving <strong>the</strong> Red slider to<br />
+66%, <strong>the</strong> Green slider to +20% and <strong>the</strong> Blue slider to +28% resulted in<br />
a better black-and-white image.<br />
Moving <strong>the</strong> middle of <strong>the</strong> curve up slightly brightened <strong>the</strong> midtones and<br />
moving <strong>the</strong> bottom portion down slightly produced richer dark tones.<br />
in Photoshop to get a greater range of detail. And RAW images<br />
can be processed to color or black-and-white—you’re not locked<br />
in to one or <strong>the</strong> o<strong>the</strong>r. Adams would have shot RAW.<br />
If you choose to shoot your black-and-white digital images<br />
in color, <strong>the</strong>re are some advantages. You can use different colorto-monochrome<br />
conversion techniques to achieve different<br />
results and even do multiple conversions. You also can apply<br />
infinite color filtration after <strong>the</strong> fact (see <strong>the</strong> Filters sidebar).<br />
If you’re shooting in <strong>the</strong> RAW format and using <strong>the</strong> camera<br />
manufacturer’s RAW converter, simply select Monochrome<br />
in <strong>the</strong> conversion software. Doing so is effectively <strong>the</strong> same<br />
as shooting images in monochrome mode in-camera. If you’re<br />
using a third-party RAW converter, <strong>the</strong> color-to-monochrome<br />
conversion process is more complicated, but often gives you<br />
more control. I prefer to do <strong>the</strong> color-to-monochrome conversion<br />
in Photoshop, after converting <strong>the</strong> RAW image to<br />
TIFF format in <strong>the</strong> RAW converter.<br />
In Photoshop, <strong>the</strong> simplest conversion methods are changing<br />
<strong>the</strong> mode to Grayscale (Image > Mode > Grayscale) or moving<br />
<strong>the</strong> saturation slider all <strong>the</strong> way to <strong>the</strong> left (Image > Adjustments<br />
> Hue/Saturation). These methods offer very little flexibility<br />
and are rarely <strong>the</strong> best ways to convert color images.<br />
A better method is to use <strong>the</strong> Channels palette. Click on<br />
<strong>the</strong> Red, Green and Blue channels individually to see which<br />
Calibrating Your System<br />
If you want your prints to look like what you see on your screen,<br />
make sure your monitor and printer are properly calibrated in terms<br />
of color rendition and contrast. This is easily done with a colorcalibrating<br />
device such as <strong>Datacolor</strong> ColorVision Spyder2 Suite,<br />
Pantone Huey or X-Rite Eye-One. Follow <strong>the</strong> easy instructions that<br />
accompany <strong>the</strong> device and calibrate regularly every few months.<br />
Moving <strong>the</strong> top-left Levels slider to <strong>the</strong> right produced a better black<br />
tone. The top-right slider was left where it was to avoid blowing out<br />
<strong>the</strong> highlights.<br />
Black-and-White Inkjet Printing<br />
Not long ago, you pretty much had to use special black-andwhite<br />
inks to make excellent black-and-white prints with an<br />
inkjet printer, and this is still <strong>the</strong> way to go with older printers. In<br />
fact, a number of photographers have a second printer dedicated<br />
to black-and-white printing.<br />
With more and better inks, smaller ink droplets and better drivers,<br />
today’s inkjet photo printers from Canon, Epson and HP—especially<br />
<strong>the</strong> larger-format models—do an excellent job with black-and-white.<br />
These devices can turn out full-tonal-range prints with no colorcasts<br />
(unless you deliberately create a toned print).<br />
While any self-respecting aspiring Ansel Adams will do his or her<br />
own printing, <strong>the</strong>re are some excellent digital labs out <strong>the</strong>re for those<br />
who choose to have someone else make <strong>the</strong>ir prints. Check out<br />
“Working With A Lab” (Jan./Feb. 2007) on <strong>the</strong> OP Website, www.<br />
outdoorphotographer.com.<br />
looks best. If one looks <strong>the</strong> way you want, go to Image ><br />
Mode > Grayscale. This method mimics <strong>the</strong> effects of shooting<br />
a black-and-white image through a red, green or blue filter<br />
(see <strong>the</strong> Filters sidebar).<br />
Probably <strong>the</strong> most versatile way to convert color images to<br />
black-and-white is by using <strong>the</strong> Channel Mixer (Image > Adjustments<br />
> Channel Mixer, <strong>the</strong>n click <strong>the</strong> Monochrome box). This<br />
provides lots of control over <strong>the</strong> resulting tones, but requires a<br />
lot of playing. Remember that <strong>the</strong> Red channel makes red<br />
tones lighter as <strong>the</strong> slider is moved to <strong>the</strong> right and darker as<br />
it’s moved to <strong>the</strong> left; likewise for <strong>the</strong> Green and Blue channels.<br />
A good rule of thumb is to make sure <strong>the</strong> percentages of<br />
red, green and blue combined equal 100 percent, although some<br />
images might work better with a higher combined percentage<br />
(for a brighter image) or a lower combined percentage (for a<br />
darker image). The new Photoshop CS3’s Channel Mixer even<br />
includes black-and-white presets to get you started.<br />
Handy Digital Darkroom Tools<br />
Photoshop contains lots of tools, but you only need a few<br />
of <strong>the</strong>m to optimize a black-and-white photograph. Here are<br />
<strong>the</strong> best ones to use.<br />
Levels. Generally, it’s best to begin work on a digital image<br />
by setting its black and white points using <strong>the</strong> Levels control.<br />
This is especially important for black-and-white. Adams said in<br />
his book The Print that “…a note of pure white or solid black<br />
can serve as a ‘key’ to o<strong>the</strong>r values…but <strong>the</strong>re is no reason why<br />
<strong>the</strong>y must be included in all images, any more than a composition<br />
for <strong>the</strong> piano must include <strong>the</strong> full range of <strong>the</strong> eightyeight<br />
notes of <strong>the</strong> keyboard.” In short, set <strong>the</strong> black and white<br />
points to suit <strong>the</strong> image you visualized when you shot <strong>the</strong> photo.<br />
A good starting point for Levels (Image > Adjustments ><br />
Levels) is to move <strong>the</strong> upper left and right sliders in to <strong>the</strong><br />
March 2007 57
edges of <strong>the</strong> histogram to turn <strong>the</strong> brightest and darkest pixels<br />
in <strong>the</strong> image pure white and pure black. Press <strong>the</strong> Alt/Option<br />
key as you do this to see where <strong>the</strong> blacks and whites actually<br />
are in <strong>the</strong> image. The Levels histogram is a good reference,<br />
but your eye should remain <strong>the</strong> ultimate arbiter: Do what<br />
looks right. Most images work best if <strong>the</strong>y include a pure black<br />
tone and a pure white tone, but some don’t.<br />
Curves. Adams used different developers and development<br />
techniques to adjust <strong>the</strong> midtones and contrast of his<br />
images. In Photoshop, this is best done with <strong>the</strong> Curves control<br />
(Image >Adjustments > Curves). Moving <strong>the</strong> middle of<br />
<strong>the</strong> curve up makes <strong>the</strong> midtones lighter, while moving it<br />
down makes <strong>the</strong> middle tones darker.<br />
If you click on <strong>the</strong> lower portion of <strong>the</strong> curve, you can adjust<br />
that separately: Moving it down makes <strong>the</strong> dark tones darker,<br />
moving it up makes <strong>the</strong> dark tones lighter. Likewise, click on<br />
<strong>the</strong> upper portion of <strong>the</strong> curve, and you can move that portion<br />
Filters<br />
When you shoot a scene in color, <strong>the</strong> colors make or break <strong>the</strong> shot. When you shoot<br />
in black-and-white, <strong>the</strong> black, white and gray tones make or break <strong>the</strong> shot. In<br />
black-and-white, those lovely red roses that stood out so dramatically from those green<br />
leaves in real life will blend toge<strong>the</strong>r as middle gray tones in <strong>the</strong> photo. As a digital blackand-white<br />
photographer, you can examine <strong>the</strong> monochrome image on your camera’s<br />
LCD monitor right after you shoot it and see if <strong>the</strong> tones of different-colored objects merge.<br />
Ansel Adams, like most black-and-white landscape photographers, used colored filters<br />
to separate tones in his images. Digital photographers can do <strong>the</strong> same—in fact, a<br />
number of digital cameras have built-in digital colored filters.<br />
The basic concept behind using colored filters for black-and-white photography is that<br />
a filter will lighten tones of its own and similar colors and darken tones of its complementary<br />
color in <strong>the</strong> resulting photograph. The most popular colored filters used by blackand-white<br />
outdoor photographers include yellow, red and green.<br />
Yellow and red filters render a blue sky darker than it would appear in an unfiltered<br />
shot, which is useful when you want white cloud buildups to stand out strongly against<br />
a dark sky. A red filter renders red flowers lighter and green leaves darker, which is handy<br />
for shots of foliage, where <strong>the</strong> red flowers and green leaves, both reflecting about <strong>the</strong><br />
same amount of light, would appear about <strong>the</strong> same shade of gray in an unfiltered photo<br />
(you also could use a green filter to get darker flowers against lighter leaves).<br />
58 Outdoor Photographer<br />
Black-and-white<br />
conversion via Photoshop’s<br />
Channel Mixer.<br />
Original color landscape.<br />
Photo by Rob Sheppard.<br />
up to make <strong>the</strong> light tones lighter or down to make <strong>the</strong>m darker.<br />
You can click multiple times on <strong>the</strong> curve itself to add anchor<br />
points, but one in <strong>the</strong> middle of <strong>the</strong> curve and one at <strong>the</strong> middle<br />
of <strong>the</strong> lower section and <strong>the</strong> upper section usually will suffice.<br />
A tip: A little movement of <strong>the</strong> curve goes a long way.<br />
Shadow/Highlight. This control (Image > Adjustments ><br />
Shadow/Highlight) can bring out amazing amounts of detail in<br />
underexposed dark areas and overexposed bright ones. It can<br />
help open dark midtones if used carefully. The default Shadow<br />
setting of 50 percent is usually too strong; try 30 percent as a<br />
starting point.<br />
Layers. Photoshop’s layers and layer masks are features<br />
Adams would have loved. Layers allow you to make each<br />
change to your image independent of o<strong>the</strong>r changes and make<br />
it easy to keep track of <strong>the</strong>m. Even more important, layers let<br />
you make changes nondestructively, without affecting <strong>the</strong><br />
image’s pixels. None of <strong>the</strong> changes you make is applied to<br />
<strong>the</strong> image pixels until you flatten <strong>the</strong> image<br />
(Layer > Flatten Image) when you’re done;<br />
thus, <strong>the</strong>re’s only one change applied to <strong>the</strong><br />
pixels instead of lots of changes individually.<br />
Adjustment layers (Layer > New Adjustment<br />
Layer) let you do Levels, Curves and<br />
o<strong>the</strong>r corrections. Duplicate Layers (Layer ><br />
Duplicate Layer) allow you to do just about<br />
anything without affecting <strong>the</strong> original pixels.<br />
A good layer workflow might be:<br />
� Open <strong>the</strong> original image and save it as<br />
a TIFF or PSD working copy.<br />
� Create a Levels adjustment layer (Layer<br />
> New Adjustment Layer > Levels) and set<br />
<strong>the</strong> black and white points.<br />
� Create a Curves adjustment layer and<br />
adjust <strong>the</strong> middle tones.<br />
� Use Photoshop’s Dodge and Burn tools<br />
to adjust local contrast or do it via additional<br />
layers and layer masks, as described below.
Original photograph of<br />
paintbrush scene. Photo by<br />
Rob Sheppard.<br />
Using Photoshop’s Channel<br />
Mixer to do <strong>the</strong> conversion<br />
allows <strong>the</strong> photographer to<br />
adjust each primary color’s<br />
gray rendition individually,<br />
resulting in a black-and-white<br />
image with more impact.<br />
Software For B&W<br />
The camera manufacturers’ RAW-conversion software provides<br />
basic conversion capabilities and sometimes more—Nikon’s Capture<br />
NX is a good example. Current versions of Photoshop and Photoshop<br />
Elements come with Adobe’s versatile Camera Raw RAW-image<br />
converter, and it also can be purchased as a stand-alone. O<strong>the</strong>r good<br />
RAW converters can be found in Apple’s Aperture, Phase One’s Capture<br />
One, DxO’s Optics Pro, Digital Light & Color’s Picture Window<br />
and <strong>the</strong> B/W Conversion Filters in Nik Software’s Color Efex Pro 2.0.<br />
There’s also a number of plug-ins for Photoshop (and applications<br />
that use Photoshop-compatible plug-ins) that provide blackand-white<br />
photographers with useful tools. Among <strong>the</strong>m are Alien<br />
Skin’s Exposure, B/W Styler for Windows from The Plug-In Site and<br />
Black & White Studio from Power Retouche.<br />
Layer Masks. Layer masks let you apply changes to selected<br />
portions of an image ra<strong>the</strong>r than <strong>the</strong> entire image. When you<br />
create an adjustment layer, Photoshop automatically creates<br />
a corresponding layer mask. Layer masks make it easy to<br />
do what Adams did by dodging and burning. For example,<br />
to darken a specific area of <strong>the</strong> image, create a Brightness/<br />
Contrast adjustment layer (Layer > New Adjust-<br />
ment Layer > Brightness/Contrast) and move<br />
<strong>the</strong> brightness layer to <strong>the</strong> left to a setting of<br />
-20 or -25. This turns <strong>the</strong> whole image darker.<br />
Painting black on a layer mask conceals or<br />
hides <strong>the</strong> layer’s effect, so <strong>the</strong> adjustment isn’t<br />
applied to those areas. Painting white on <strong>the</strong><br />
layer mask reveals <strong>the</strong> effect below, so <strong>the</strong><br />
layer’s adjustment is applied to those areas of<br />
<strong>the</strong> image. In our example, you can fill <strong>the</strong><br />
darkening layer with black to hide its effect<br />
(Edit > Fill, choose Black) and <strong>the</strong>n use a white<br />
Brush tool to paint over (reveal) <strong>the</strong> areas where<br />
you want <strong>the</strong> effect (darkening) to be applied.<br />
We don’t have room to go deeply into layer<br />
masks, but you can learn all about <strong>the</strong>m at <strong>the</strong><br />
OP Website (www.outdoorphotographer.com).<br />
Resources<br />
Adobe<br />
(800) 833-6687<br />
www.adobe.com<br />
Alien Skin Software<br />
(888) 921-SKIN<br />
www.alienskin.com<br />
Apple Computer<br />
(800) MY-APPLE<br />
www.apple.com<br />
Canon<br />
(800) OK-CANON<br />
www.usa.canon.com<br />
<strong>Datacolor</strong> ColorVision<br />
(800) 554-8688<br />
www.colorvision.com<br />
Finishing Touches<br />
Once you have <strong>the</strong> tones of <strong>the</strong> image as you want <strong>the</strong>m,<br />
<strong>the</strong>re’s one more step Adams considered important. You want<br />
to keep <strong>the</strong> viewer’s eye in <strong>the</strong> frame, and bright areas near<br />
<strong>the</strong> edges draw <strong>the</strong> eye out of <strong>the</strong> frame. So Adams burned in<br />
<strong>the</strong> edges of his prints, darkening <strong>the</strong>m.<br />
You can do this in Photoshop. An easy way is to create a<br />
Brightness/Contrast Adjustment layer, darken <strong>the</strong> entire layer<br />
by moving <strong>the</strong> Brightness slider to a minus number (again,<br />
-20 or -25 is a good starting point) and fill <strong>the</strong> layer with<br />
black to hide <strong>the</strong> darkening. Then, using a large, soft brush,<br />
paint white over <strong>the</strong> edges of <strong>the</strong> image, revealing <strong>the</strong> layer’s<br />
darkening effect. OP<br />
For more details on producing digital images, check out<br />
OP Editor Rob Sheppard’s book Outdoor Photographer<br />
Landscape and Nature Photography with Photoshop CS2,<br />
which provides information for <strong>the</strong> digital nature photographer,<br />
including a whole chapter entitled “What Would<br />
Ansel Do?”<br />
Digital Light & Color<br />
(617) 489-8858<br />
www.dl-c.com<br />
DxO<br />
www.dxo.com<br />
Epson<br />
(800) GO-EPSON<br />
www.epson.com<br />
Hewlett-Packard (HP)<br />
(800) 752-0900<br />
www.hp.com<br />
Nikon<br />
(800) NIKON-UX<br />
www.nikonusa.com<br />
Nik Software<br />
(619) 725-3150<br />
www.niksoftware.com<br />
Pantone<br />
(201) 935-5500<br />
www.pantone.com<br />
Phase One<br />
www.phaseone.com/photo<br />
The PlugIn Site<br />
www.<strong>the</strong>pluginsite.com<br />
Power Retouche<br />
www.powerretouche.com<br />
X-Rite<br />
(914) 347-3300<br />
www.xritephoto.com<br />
OP ON THE WEB<br />
WWW.OUTDOORPHOTOGRAPHER.COM<br />
See: “Shooting Digital For B&W” (Sept. ’06)<br />
March 2007 59