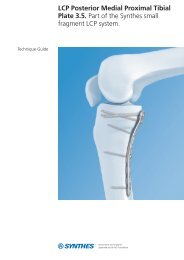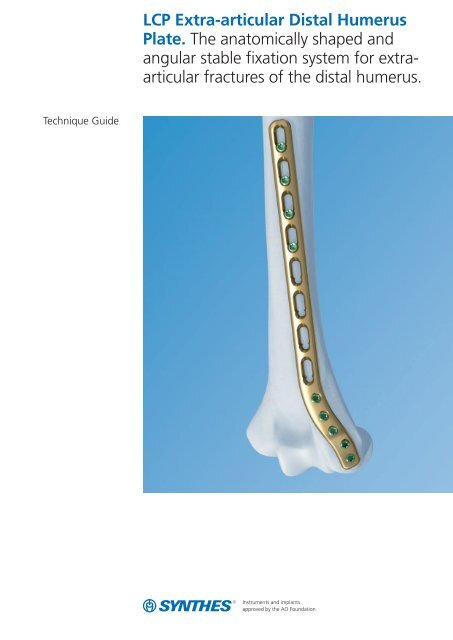
LCP Extra-articular Distal Humerus Plate. The anatomically shaped ...
LCP Extra-articular Distal Humerus Plate. The anatomically shaped ...
LCP Extra-articular Distal Humerus Plate. The anatomically shaped ...

You also want an ePaper? Increase the reach of your titles
YUMPU automatically turns print PDFs into web optimized ePapers that Google loves.
Technique Guide<br />
<strong>LCP</strong> <strong>Extra</strong>-<strong>articular</strong> <strong>Distal</strong> <strong>Humerus</strong><br />
<strong>Plate</strong>. <strong>The</strong> <strong>anatomically</strong> <strong>shaped</strong> and<br />
angular stable fixation system for extra<strong>articular</strong><br />
fractures of the distal humerus.
Table of Contents<br />
Introduction<br />
<strong>LCP</strong> <strong>Extra</strong>-<strong>articular</strong> <strong>Distal</strong> <strong>Humerus</strong> <strong>Plate</strong> 2<br />
AO Principles 4<br />
Indications 5<br />
Surgical Technique<br />
Preparation and Approach 6<br />
Surgical Technique 8<br />
Implant Removal 16<br />
Product Information<br />
Implants 17<br />
Instruments 18<br />
Sets 19<br />
Synthes Biomaterials Overview 20<br />
Bibliography 21<br />
Image intensifier control<br />
Warning<br />
This description alone does not provide sufficient background for direct use of<br />
the product. Instruction by a surgeon experienced in handling this product is<br />
highly recommended.<br />
Reprocessing, Care and Maintenance of<br />
Synthes Instruments<br />
For general guidelines, function control and dismantling of multi-part instruments,<br />
please refer to: www.synthes.com/reprocessing<br />
Synthes 1
<strong>LCP</strong> <strong>Extra</strong>-<strong>articular</strong> <strong>Distal</strong> <strong>Humerus</strong><br />
<strong>Plate</strong>. <strong>The</strong> <strong>anatomically</strong> <strong>shaped</strong> and<br />
angular stable fixation system for extra<strong>articular</strong><br />
fractures of the distal humerus.<br />
Indications<br />
– <strong>Extra</strong>-<strong>articular</strong> fractures of the<br />
distal humerus<br />
– Malunions of the distal humerus<br />
– Non-unions of the distal humerus<br />
Features and Benefits<br />
Tapered end minimizes<br />
soft tissue irritation<br />
Hole density is increased<br />
distally and 3.5 mm<br />
locking screws are<br />
accepted<br />
Elongated combi-holes<br />
accept 3.5 mm screws<br />
and facilitate plate<br />
positioning<br />
Two most distal screw<br />
holes angled toward the<br />
capitellum and trochlea<br />
Undercuts reduce<br />
impairment of<br />
blood supply<br />
Thickness of the plate is<br />
based on <strong>LCP</strong> 4.5/5.0,<br />
narrow, and allows<br />
stand-alone application<br />
2 Synthes <strong>LCP</strong> <strong>Extra</strong>-<strong>articular</strong> <strong>Distal</strong> <strong>Humerus</strong> <strong>Plate</strong> Technique Guide
Anatomically pre-contoured <strong>LCP</strong><br />
selection for the distal humerus<br />
<strong>LCP</strong> <strong>Extra</strong>-<strong>articular</strong> <strong>Distal</strong><br />
<strong>Humerus</strong> <strong>Plate</strong><br />
Primary Indication<br />
– <strong>Extra</strong>-<strong>articular</strong> fractures of the distal<br />
humerus<br />
Features<br />
– <strong>Plate</strong> thickness based on <strong>LCP</strong> 4.5/5.0,<br />
narrow<br />
– Optimized angles of distal screw<br />
holes<br />
– Tapered plate end near the joint<br />
– Increased hole density in the distal<br />
part<br />
Portfolio<br />
– <strong>Plate</strong>s in six lengths: 4, 6, 8, 10, 12<br />
or 14 <strong>LCP</strong> combi-holes in the shaft<br />
<strong>LCP</strong> <strong>Distal</strong> <strong>Humerus</strong> <strong>Plate</strong>s<br />
Primary Indication<br />
– Intra-<strong>articular</strong> fractures of the distal<br />
humerus, especially for osteoporotic<br />
bone<br />
– Supracondylar fractures of the distal<br />
humerus<br />
Features<br />
– 90° plating technique possible<br />
– Small distal screws for multiple<br />
fixation options for the distal block<br />
– Position and compression device<br />
available<br />
– Aiming block for easy and correct<br />
screw insertion<br />
Portfolio<br />
– Dorsolateral plates with or without<br />
support<br />
– All plates in five lengths: 3, 5, 7, 9 or<br />
14 combi-holes in the shaft<br />
<strong>LCP</strong> Metaphyseal <strong>Distal</strong> Medial<br />
<strong>Humerus</strong> <strong>Plate</strong><br />
Primary Indication<br />
– Juxta-<strong>articular</strong> distal humerus<br />
fractures<br />
Features<br />
– Notches on plate shaft<br />
– Tapered plate end near the joint<br />
– Aiming block for easy and correct<br />
screw insertion<br />
– Increased hole density for improved<br />
anchorage<br />
Portfolio<br />
– One plate for left and right<br />
– <strong>Plate</strong> in five lengths: 7, 9, 11, 13 or<br />
15 combi-holes<br />
<strong>LCP</strong> Locking Compression <strong>Plate</strong><br />
Angular stable fixation of fragments<br />
regardless of bone quality<br />
Minimised risk of primary and<br />
secondary loss of reduction, even under<br />
high dynamic loading<br />
Reduced impairment of periosteal<br />
blood supply due to the limited plate<br />
contact<br />
Good purchase also in osteoporotic<br />
bone and in multifragment fractures<br />
<strong>LCP</strong> combi-hole<br />
Intraoperative choice between compression<br />
and angular stable locking<br />
With standard screws:<br />
interfragmental or dynamic-axial<br />
compression<br />
With locking screws:<br />
stable plate-screw connection without<br />
loss of reduction, regardless of plate<br />
modelling<br />
Synthes 3
AO Principles<br />
In 1958, the AO formulated four basic principles, which have<br />
become the guidelines for internal fixation. 1 <strong>The</strong>se principles,<br />
as applied to the <strong>LCP</strong> <strong>Extra</strong>-<strong>articular</strong> <strong>Distal</strong> <strong>Humerus</strong> <strong>Plate</strong>,<br />
are:<br />
Anatomic Reduction<br />
Multiple combi-holes and plate lengths provide fixation options<br />
for various fracture patterns. Precontoured plates assist<br />
reduction of metaphysis segment to diaphysis.<br />
May be used in combination with the medial distal humerus<br />
plate for intra-<strong>articular</strong> distal humerus fractures.<br />
Stable Fixation<br />
Locking screws create a fixed-angle construct, providing<br />
angular stability.<br />
Preservation of Blood Supply<br />
Limited-contact plate design reduces plate-to-bone contact,<br />
limiting vascular trauma and insult to bone.<br />
Early, Active Mobilization<br />
Early mobilization per standard AO technique creates an environment<br />
for bone healing, expediting a return to optimal<br />
function.<br />
1<br />
Müller ME, Allgöwer M, Schneider R, Willenegger H (1995) Manual of Internal<br />
Fixation. 3rd, expanded and completely revised ed. 1991. Berlin, Heidelberg,<br />
New York: Springer<br />
4 Synthes <strong>LCP</strong> <strong>Extra</strong>-<strong>articular</strong> <strong>Distal</strong> <strong>Humerus</strong> <strong>Plate</strong> Technique Guide
Indications<br />
– <strong>Extra</strong>-<strong>articular</strong> fractures of the distal humerus<br />
– Malunions of the distal humerus<br />
– Non-unions of the distal humerus<br />
Synthes 5
Preparation and Approach<br />
1<br />
Preoperative planning<br />
Complete the preoperative radiographic assessment and prepare<br />
the preoperative plan. Use the x-ray template for <strong>LCP</strong><br />
<strong>Extra</strong>-<strong>articular</strong> <strong>Distal</strong> <strong>Humerus</strong> <strong>Plate</strong> (Art. No. 034.000.552<br />
for right and for left humerus) to determine the length of the<br />
plate and the position of the screws.<br />
2<br />
Position patient<br />
Positioning is by surgeon preference. However, the lateral<br />
decubitus position is frequently chosen. <strong>The</strong> arm is rested on<br />
a padded bar allowing elbow flexion of 120°.<br />
6 Synthes <strong>LCP</strong> <strong>Extra</strong>-<strong>articular</strong> <strong>Distal</strong> <strong>Humerus</strong> <strong>Plate</strong> Technique Guide
3<br />
Approach<br />
Possible approaches include a triceps split approach or a posterolateral<br />
approach; where the triceps are elevated off the<br />
back of the humerus from lateral to medial. <strong>Distal</strong>ly, this is<br />
the posterior side of a standard Kocher approach. Proximally,<br />
one can identify the radial nerve in the manner described by<br />
Gerwin et al. 2<br />
Caution: If the plate is long, the radial nerve needs to be<br />
elevated off the back of the humerus and the plate placed<br />
underneath. Also consider the nerve when inserting screws.<br />
Otherwise, the ulnar nerve rarely needs to be identified by<br />
more than palpation and almost never needs to be isolated<br />
or elevated with these fractures.<br />
An olecranon osteotomy is not necessary for plate placement.<br />
2<br />
Gerwin, Michelle, et al. “Alternative Operative Exposures of the Posterior Aspect<br />
of the Humeral Diaphysis. With Reference to the Radial Nerve.” <strong>The</strong> Journal of<br />
Bone and Joint Surgery 78:1690-5 (1996)<br />
Synthes 7
Surgical Technique<br />
1<br />
Reduce fracture and fix temporarily<br />
Use pointed forceps for temporary fixation in restoring the<br />
anatomy. Ensure that forceps will not interfere with subsequent<br />
plate placement.<br />
2<br />
Determine plate length<br />
Choose a plate length that offers sufficient fixation proximal<br />
to the fracture.<br />
8 Synthes <strong>LCP</strong> <strong>Extra</strong>-<strong>articular</strong> <strong>Distal</strong> <strong>Humerus</strong> <strong>Plate</strong> Technique Guide
3<br />
Position plate on the bone<br />
Optional instruments<br />
329.020 Bending Iron for LC-DCP 4.5 and<br />
DCP 4.5, length 250 mm (2)<br />
329.300 Bending Press, length 400 mm<br />
Position the plate so that the shaft portion of the plate is located<br />
centrally on the posterior aspect of the bone while the<br />
distal end curves along the back of the lateral column. Ensure<br />
that the plate is at a safe distance from the olecranon<br />
fossa so that complete elbow extension is not impeded.<br />
<strong>The</strong> position of the plate should allow distal screw insertion<br />
through the lateral flange to reach far into the trochlea.<br />
Due to varying patient anatomy, slight bending may be necessary.<br />
Contour plate as needed using the bending irons or<br />
the plate-bending press.<br />
Synthes 9
Surgical Technique<br />
4<br />
Preliminary fixation and compression<br />
Instruments<br />
323.360 Universal Drill Guide 3.5<br />
310.250 Drill Bit 2.5 mm, length 110/85 mm,<br />
2-flute, for Quick Coupling<br />
311.431 Handle with Quick Coupling<br />
314.030 Screwdriver Shaft, hexagonal, small,<br />
2.5 mm<br />
314.020 Screwdriver, hexagonal, small,<br />
with Holding Sleeve<br />
After reducing the fracture, apply the plate and insert a nonlocking<br />
screw through the center of the DCU portion of an<br />
elongated combi-hole proximal to the fracture.<br />
Use the 2.5 mm drill bit through the 3.5 mm universal drill<br />
guide to predrill the bone. For the neutral position, press the<br />
drill guide down in the non-threaded hole.<br />
Use the depth gauge to determine screw length.<br />
Select and insert a 3.5 mm cortex screw of appropriate<br />
length. Do not completely tighten the screw. Make any final<br />
adjustments to plate placement. Manually tighten the screw<br />
to maintain the plate placement and compress the plate to<br />
the bone.<br />
10 Synthes <strong>LCP</strong> <strong>Extra</strong>-<strong>articular</strong> <strong>Distal</strong> <strong>Humerus</strong> <strong>Plate</strong> Technique Guide
5<br />
Insert two most distal locking screws<br />
1<br />
Instruments<br />
323.027 <strong>LCP</strong> Drill Sleeve 3.5, for Drill Bits 2.8 mm<br />
323.055 Centering Sleeve for Kirschner Wire<br />
1.6 mm, length 70 mm<br />
292.160 Kirschner Wire 1.6 mm with trocar tip,<br />
length 150 mm<br />
323.060 PHILOS Direct Measuring Device for<br />
Kirschner Wire 1.6 mm<br />
310.284 <strong>LCP</strong> Drill Bit 2.8 mm with Stop, length<br />
165 mm, 2-flute, for Quick Coupling<br />
314.030 Screwdriver Shaft, hexagonal, small,<br />
2.5 mm<br />
or<br />
314.116 Screwdriver Shaft Stardrive 3.5, T15<br />
511.770/773 Torque Limiter, 1.5 Nm<br />
397.705/ Handle for Torque Limiter /Handle with<br />
311.431 Quick Coupling<br />
Insert the centering sleeve into the <strong>LCP</strong> drill sleeve (1).<br />
Insert the <strong>LCP</strong> drill sleeve assembly into the most distal locking<br />
hole until fully seated.<br />
Insert a 1.6 mm K-wire through the centering sleeve and drill<br />
to the desired depth.<br />
Verify the K-wire placement under image intensification to<br />
determine if final screw placement will be acceptable.<br />
This wire should be at or slightly distal to the equator of the<br />
capitellum for plate placement to be correct.<br />
Important: <strong>The</strong> K-wire position represents the final position<br />
of the locking screw. Confirm that the K-wire does not enter<br />
the joint.<br />
Synthes 11
Surgical Technique<br />
Measure for screw length by sliding the tapered end of the<br />
direct measuring device over the K-wire down to the centering<br />
sleeve (2).<br />
2<br />
Remove the direct measuring device, K-wire and 1.6 mm<br />
centering sleeve, leaving the threaded drill sleeve in place (3).<br />
Under image intensification, use the 2.8 mm drill bit to<br />
predrill for the screw.<br />
Remove the threaded drill sleeve.<br />
3<br />
12 Synthes <strong>LCP</strong> <strong>Extra</strong>-<strong>articular</strong> <strong>Distal</strong> <strong>Humerus</strong> <strong>Plate</strong> Technique Guide
Select a locking screw with the appropriate length.<br />
Insert the locking screw with the appropriate screwdriver<br />
shaft (hexagonal or Stardrive recess) mounted on the 1.5 Nm<br />
torque limiter (4).<br />
4<br />
Insert the screw manually or by power until a click is heard. If<br />
a power tool is used, reduce speed when screwing the head<br />
of the locking screw into the plate.<br />
Repeat this process for the second most distal locking<br />
screw (5).<br />
Tip: If additional compression of the distal fragment to the<br />
plate is needed, insert a 4.0 mm cancellous screw prior to<br />
inserting the locking screws. This screw may be inserted into<br />
one of the proximal locking holes in the head of the plate<br />
(but not one of the two most distal holes). After fixation with<br />
locking screws through the remaining holes, this screw can<br />
be replaced with a locking screw.<br />
5<br />
Synthes 13
Surgical Technique<br />
6<br />
Insert locking screws<br />
1<br />
Instruments<br />
323.027 <strong>LCP</strong> Drill Sleeve 3.5, for Drill Bits 2.8 mm<br />
310.284 <strong>LCP</strong> Drill Bit 2.8 mm with Stop, length<br />
165 mm, 2-flute, for Quick Coupling<br />
319.010 Depth Gauge for Screws 2.7 to 4.0 mm,<br />
measuring range up to 60 mm<br />
314.030 Screwdriver Shaft, hexagonal, small,<br />
2.5 mm<br />
or<br />
314.116 Screwdriver Shaft Stardrive 3.5, T15<br />
511.770/773 Torque Limiter, 1.5 Nm<br />
397.705/ Handle for Torque Limiter/Handle with<br />
311.431 Quick Coupling<br />
Insert locking screws into the remaining head holes.<br />
Determine where locking screws will be used in the shaft<br />
portion of the plate. Working from the fracture up the shaft,<br />
insert locking screws into the desired holes until desired fixation<br />
is achieved.<br />
2<br />
Insert the <strong>LCP</strong> drill sleeve into the locking portion of the<br />
combi-hole until fully seated (1).<br />
Use the 2.8 mm drill bit to drill to the desired depth (2).<br />
Remove the drill guide.<br />
Use the depth gauge to determine screw length.<br />
14 Synthes <strong>LCP</strong> <strong>Extra</strong>-<strong>articular</strong> <strong>Distal</strong> <strong>Humerus</strong> <strong>Plate</strong> Technique Guide
Select a locking screw with the appropriate length.<br />
Insert the locking screw with the appropriate screwdriver<br />
shaft (Hexagonal or Stardrive recess) mounted on the 1.5 Nm<br />
torque limiter (3).<br />
3<br />
Insert the screw manually or by power until a click is heard. If<br />
a power tool is used, reduce speed when screwing the head<br />
of the locking screw into the plate.<br />
7<br />
Insert bone graft (optional)<br />
If desired, fill any bone defect with autogenous bone graft<br />
or bone graft substitute. When using bone graft substitute,<br />
follow the manufacturer’s directions for use.<br />
Synthes 15
Implant Removal<br />
Instruments<br />
314.030 Screwdriver Shaft, hexagonal, small,<br />
2.5 mm<br />
or<br />
314.116 Screwdriver Shaft Stardrive 3.5, T15<br />
309.521 <strong>Extra</strong>ction Screw<br />
311.430 Handle with Quick Coupling<br />
To remove the plate, first unlock all the screws with the<br />
screwdriver. Remove the plate in a second step since it could<br />
otherwise rotate while unlocking the last screw, which can<br />
cause soft tissue damage.<br />
If a screw cannot be removed with the screwdriver, use the<br />
handle with quick-coupling to insert the conical extraction<br />
screw into the screw head, and unscrew the screw in a<br />
counter-clockwise direction.<br />
Important: For problem-free removal of an implant, the<br />
proper instruments must be available.<br />
16 Synthes <strong>LCP</strong> <strong>Extra</strong>-<strong>articular</strong> <strong>Distal</strong> <strong>Humerus</strong> <strong>Plate</strong> Technique Guide
Implants<br />
<strong>LCP</strong> <strong>Extra</strong>-<strong>articular</strong> <strong>Distal</strong> <strong>Humerus</strong> <strong>Plate</strong>s<br />
Right Left Holes Length (mm)<br />
0X.104.004 0X.104.024 4 122<br />
0X.104.006 0X.104.026 6 158<br />
0X.104.008 0X.104.028 8 194<br />
0X.104.010 0X.104.030 10 230<br />
0X.104.012 0X.104.032 12 266<br />
0X.104.014 0X.104.034 14 302<br />
All plates and screws are also available sterile packed.<br />
For sterile implants add suffix “S” to article number.<br />
X = 2: stainless steel<br />
X = 4: titanium<br />
Screws used with the <strong>LCP</strong> <strong>Extra</strong>-<strong>articular</strong> <strong>Distal</strong><br />
<strong>Humerus</strong> <strong>Plate</strong><br />
X12.102–124<br />
Locking Screw Stardrive 3.5 mm,<br />
length 12–60 mm, self-tapping<br />
X13.012–060<br />
Locking Screw 3.5 mm,<br />
length 12–60 mm, self-tapping,<br />
with hexagonal recess<br />
X04.814–860<br />
Cortex Screw 3.5 mm,<br />
length 12–60 mm, self-tapping,<br />
with hexagonal recess<br />
Stardrive<br />
Hexagonal<br />
Synthes 17
Instruments<br />
<strong>The</strong> <strong>LCP</strong> <strong>Extra</strong>-<strong>articular</strong> <strong>Distal</strong> <strong>Humerus</strong> <strong>Plate</strong> is compatible<br />
with 3.5 <strong>LCP</strong> instruments and standard small-fragment<br />
instruments. In addition to the 3.5 <strong>LCP</strong> instruments, this<br />
instrument is also required:<br />
323.055 Centering Sleeve for Kirschner Wire<br />
1.6 mm, length 70 mm,<br />
for Nos. 323.027 and 323.054<br />
18 Synthes <strong>LCP</strong> <strong>Extra</strong>-<strong>articular</strong> <strong>Distal</strong> <strong>Humerus</strong> <strong>Plate</strong> Technique Guide
Sets<br />
Modular tray for the <strong>LCP</strong> <strong>Extra</strong>-<strong>articular</strong> <strong>Distal</strong><br />
<strong>Humerus</strong> <strong>Plate</strong>s<br />
68.104.010 Tray for <strong>LCP</strong> <strong>Distal</strong> Humeral <strong>Plate</strong>s,<br />
extra<strong>articular</strong>, for Vario Case<br />
Modular small fragment instrument trays<br />
68.122.013 Modular Small Fragment Basic Instrument<br />
Tray<br />
68.122.019 Modular Small Fragment Bending<br />
Instrument Tray<br />
68.122.014 Modular Small Fragment Reduction<br />
Instrument Tray<br />
68.122.015 Modular Small Fragment Screw Insertion<br />
Tray<br />
Also available:<br />
Modular tray for <strong>LCP</strong> Elbow <strong>Plate</strong>s 3.5/2.7<br />
68.104.005 Tray for <strong>LCP</strong> Elbow <strong>Plate</strong>s 3.5/2.7,<br />
for Vario Case<br />
Synthes 19
Synthes Biomaterials Overview<br />
Synthetic and allogenic bone replacement<br />
materials have the advantage of<br />
uniform quality, unlimited availability<br />
and absence of potential complications<br />
at a donor site.<br />
Additionally, the application of synthetic<br />
and allogenic bone graft substitutes<br />
reduces the duration of the surgery.<br />
Synthes offers a wide range of synthetic<br />
biomaterial products in different<br />
application forms and with distinct biological<br />
properties:<br />
chronOS<br />
chronOS Perfusion Concept<br />
chronOS Inject<br />
Osteoconductive, resorbable, synthetic Enhancing chronOS with biological factors Injectable remodelling<br />
Norian SRS<br />
DBX*<br />
Injectable stability<br />
Osteoinductive power<br />
*Facilitated through Synthes<br />
Furthermore a comprehensive portfolio<br />
of allograft products is available in<br />
selected countries.<br />
For more detailed information about a<br />
specific product or availability of allografts<br />
please contact your local Synthes<br />
representative.<br />
20 Synthes <strong>LCP</strong> <strong>Extra</strong>-<strong>articular</strong> <strong>Distal</strong> <strong>Humerus</strong> <strong>Plate</strong> Technique Guide
Bibliography<br />
Levy JC “An alternative method of osteosynthesis for distal<br />
humeral shaft fractures.” J Orthop Trauma. 2005 Jan;<br />
19(1):43-7<br />
Gerwin, Michelle, et al. “Alternative Operative Exposures<br />
of the Posterior Aspect of the Humeral Diaphysis. With Reference<br />
to the Radial Nerve.” <strong>The</strong> Journal of Bone and Joint<br />
Surgery 78:1690-5 (1996)<br />
McCormack R.G. “Fixation of fractures of the shaft of the<br />
humerus by dynamic compression plate or intramedullary<br />
nail. A prospective, randomised trial.” J Bone Joint Surg Br.<br />
2000 Sep; 82(7):1085-6<br />
Müller ME, Allgöwer M, Schneider R, Willenegger H (1995)<br />
Manual of Internal Fixation. 3rd, expanded and completely<br />
revised ed. 1991. Berlin, Heidelberg, New York:Springer<br />
Schemitsch EH “Biomechanical evaluation of methods of<br />
internal fixation of the distal humerus.” J Orthop Trauma.<br />
1994 Dec; 8(6):468-75<br />
Synthes 21
Synthes GmbH<br />
Eimattstrasse 3<br />
CH-4436 Oberdorf<br />
www.synthes.com<br />
All technique guides are available as PDF files at<br />
www.synthes.com/lit<br />
Ö036.000.786öAAàä<br />
0123<br />
036.000.786 SE_207657 AA 30080067 © 02/2009 Synthes, Inc. or its affiliates All rights reserved Synthes and Stardrive are trademarks of Synthes, Inc. or its affiliates