
You also want an ePaper? Increase the reach of your titles
YUMPU automatically turns print PDFs into web optimized ePapers that Google loves.
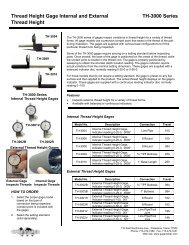
TH-3000 Series<br />
External Thread Height Gage<br />
OPERATION MANUAL
External Thread Height Gage Operation Manual<br />
Model TH-3000<br />
©2014 <strong>Gagemaker</strong>, LP<br />
2 Copyright © 2014 <strong>Gagemaker</strong>. All rights reserved
External Thread Height Gage Operation Manual<br />
Model TH-3000<br />
Contents<br />
Introduction<br />
Technical Support 5<br />
Product Information and Updates 5<br />
Parts List<br />
TH-3001R, TH-3002R Model Gages Parts List 6<br />
TH-3001V Model Gage Parts List 7<br />
TH-3002B, TH-3003B Model Gages Parts List 8<br />
Setup Procedures<br />
External TH-3000 Gages Setup Chart 9<br />
TH-3000 Gage Bore Limitation Chart 9<br />
Zeroing the External TH-3000 Gage 10<br />
Operating Procedures<br />
Inspecting Parts 13<br />
Care and Maintenance<br />
Replacing the Indicator 14<br />
Replacing the Contact Point 16<br />
Maintenance Tips 18<br />
Warranty Information 18<br />
Copyright © 2014 <strong>Gagemaker</strong>. All rights reserved 3
External Thread Height Gage Operation Manual<br />
Model TH-3000<br />
4 Copyright © 2014 <strong>Gagemaker</strong>. All rights reserved
External Thread Height Gage Operation Manual<br />
Model TH-3000<br />
Congratulations! Your decision to purchase a <strong>Gagemaker</strong> product above all others on the market<br />
demonstrates your confidence in our quality and workmanship.<br />
To ensure the high performance and operation of our product, we urge you to use the included reference<br />
materials. They contain important information for proper setup and use of the equipment. Also, we<br />
recommend that you follow the care and maintenance tips in this manual to keep the equipment working<br />
in top condition.<br />
If your questions have not been addressed in our reference materials, contact your local<br />
representative or a customer service representative at 713-472-7360.<br />
Introduction<br />
The TH-3000 series of gages inspect variations in external thread height of a variety of thread forms. All<br />
three gage models, TH-3001, TH-3002, and TH-3003 use a precision contact point which seats in the<br />
thread of the part during inspection. The gages are supplied with various base configurations to fit the<br />
particular thread form being inspected. It is important to select the proper thread height gage model for<br />
your particular application (refer to the TH-3000 External Gages Selection and Setup Chart in this<br />
manual).<br />
Before inspecting parts, some of the TH-3000 gages require zeroing on a setting standard. Once<br />
zeroed, the anvil of the gage is positioned on the crests of the thread, while the contact point is located<br />
in the thread root. The gage is properly positioned by sweeping to obtain the shortest depth location<br />
reading. The gage’s indicator reports actual variations from the nominal setting dimension. These<br />
gages are supplied with a balanced indicator dial, normally reading 0-25-0 or 0-50-0.<br />
For those models that do not require a setting standard, the gage is preset on any flat surface and then<br />
applied to the product. The actual thread height displays on the gage’s indicator. These gages are<br />
supplied with a continuous reading indicator dial, normally reading 0 -100.<br />
The external thread height gages are primarily designed for inspection of external threads; however, on<br />
larger diameter products (4 ½” and larger), where the entire gage will fit inside the part, the external<br />
gage will also inspect internal threads (refer to the System Components, TH-3000 External Gages<br />
Selection and Setup Chart, and the TH-3000 Gage Bore Limitation Chart in this manual for more<br />
information).<br />
Technical Support<br />
Phone: 713-472-7360<br />
Hours: Monday – Friday 8AM – 5PM (CST)<br />
Product Information and Updates<br />
Visit our web site at: www.gagemaker.com<br />
Copyright © 2014 <strong>Gagemaker</strong>. All rights reserved 5
External Thread Height Gage Operation Manual<br />
Model TH-3000<br />
Parts List<br />
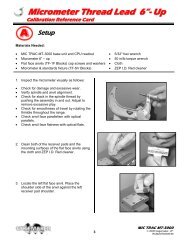
Take some time to become familiar with all the parts that make up the TH-3000 gages by<br />
reviewing the labeled diagram below. The part names are important for understanding the<br />
operating instructions.<br />
TH-3001R, 3002R Model Gages<br />
This model can also<br />
inspect internal<br />
diameters of parts 4 ½”<br />
and larger<br />
Item Description Part Number Qty Item Description Part Number Qty<br />
1 Indicator TH-3001R (Continuous) 802i 1 5 Contact point T501 1<br />
1 Indicator TH-3002R (Balanced) 1512SRGA 1 6 Centering sleeve T502 1<br />
2 Indicator clamp 21RZA065 1 7 Anvil 4-2-803 1<br />
3 Flat stem adapter P500 1 8 Cap screw #6-32 x .312 1<br />
4 Spring 8-0-544 1 9 Binder nut 4-0-310 1<br />
6 Copyright © 2014 <strong>Gagemaker</strong>. All rights reserved
External Thread Height Gage Operation Manual<br />
Model TH-3000<br />
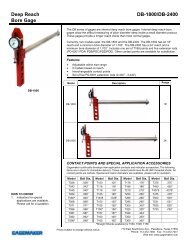
TH-3001V Model Gage<br />
Item Description Part Number Qty<br />
1 Indicator (Model TH-3001R) 802i 1<br />
Indicator (Model TH-3001R)<br />
801i<br />
2 Indicator clamp 21RZA065 1<br />
3 Contact point T500C 1<br />
4 Anvil T502 1<br />
5 Cap screw #6-32 x .312 1<br />
6 Binder nut 4-0-310 1<br />
Copyright © 2014 <strong>Gagemaker</strong>. All rights reserved 7
External Thread Height Gage Operation Manual<br />
Model TH-3000<br />
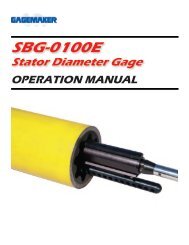
TH-3002B, TH-3003B Model Gages<br />
Item Description Part Number Qty<br />
1 Indicator 1513SRGA 1<br />
2 Indicator clamp 21RZA065 1<br />
3 Contact point T072 1<br />
4 Anvil (Model TH-3002B) 4-2-802 1<br />
4 Anvil (Model TH-3003B) 4-2-849 1<br />
5 Cap screw #6-32 x .312 1<br />
6 Binder nut 4-0-310 1<br />
8 Copyright © 2014 <strong>Gagemaker</strong>. All rights reserved
External Thread Height Gage Operation Manual<br />
Model TH-3000<br />
Set Up Procedures<br />
TH-3000 External Gages Selection and Setup Chart<br />
The chart below shows each API connector and the corresponding Thread Height Gage, Contact Point,<br />
and Setting Standard Model Numbers. Before beginning the setup, locate the type of thread you are<br />
measuring and determine the proper contact point and setting standard to use for your application.<br />
API 8 & 10 Round<br />
Thread Type<br />
API 11½ V (Line Pipe)<br />
Gage<br />
Model Number.<br />
Contact Point<br />
Model Number<br />
Setting Standard<br />
Model Number<br />
TH-3001R T501 N/A<br />
TH-3002R T501 1014<br />
TH-3001V T500C N/A<br />
TH-3002V T500C 1015<br />
API Buttress, ¾” TPF TH-3002B* T072 1017<br />
API Buttress, 1” TPF TH-3003B* T072 1018<br />
Drill Pipe, V-0.032, 2 TPF TH-3000RSC T034 10322-RS<br />
Drill Pipe, V-0.038, 2 TPF TH-3000RSC T072 10382-RS<br />
Drill Pipe, V-0.038, 3 TPF TH-3000RSC T072 10383-RS<br />
Drill Pipe, V-0.040, 3 TPF TH-3000RSC T034 10403-RS<br />
Drill Pipe, V-0.050, 2 TPF TH-3000RSC T044 10502-RS<br />
Drill Pipe, V-0.050, 3 TPF TH-3000RSC T044 10503-RS<br />
Drill Pipe, V-0.055, 1.5 TPF TH-3000RSC T072 10551.5-RS<br />
Drill Pipe, V-0.076, 1.5 TPF TH-3000RSC T044 10761.5-RS<br />
2” TPF H-90 (90-V-0.050) TH-3000RSC T072 10H90-2<br />
3” TPF H-90 (90-V-0.050) TH-3000RSC T072 10H90-3<br />
1¼” TPF H-90 (90-V-0.084) TH-3000RSC T072 SL-H90<br />
* These models are primarily external thread height gages; however, they can also function as internal thread<br />
height gages when used on large diameter parts measuring 4 1/2” and greater (see below).<br />
TH-3000 Gage Bore Limitation Chart<br />
The chart below provides the minimum size requirements for the TH-3000 gages when used as internal<br />
gages to inspect larger diameter parts, where the entire gage will fit inside the part.<br />
Gage Model Number<br />
Minimum Bore Limits<br />
TH-3002B, TH3003B 2.930”<br />
TH-3001R, TH3002R 3.400”<br />
TH-3001V, TH3002V 3.230”<br />
Copyright © 2014 <strong>Gagemaker</strong>. All rights reserved 9
External Thread Height Gage Operation Manual<br />
Model TH-3000<br />
Zeroing the External Thread Height Gage<br />
Materials Needed:<br />
TH-3000 thread height gage<br />
Setting standard<br />
!<br />
External thread height gage models TH-3001R and TH-3002R are preset on any flat surface and<br />
then applied to the product. All other models with balanced dials require zeroing on a setting<br />
standard.<br />
1. For Models TH-3001R and TH-3002R:<br />
place the gage on a flat surface.<br />
For all other models with balanced dials:<br />
place the contact point into the square notch<br />
of the setting<br />
standard.<br />
2. Rock the gage back and forth to locate the<br />
shortest depth location.<br />
10 Copyright © 2014 <strong>Gagemaker</strong>. All rights reserved
External Thread Height Gage Operation Manual<br />
Model TH-3000<br />
Zeroing the External Thread Height Gage (continued)<br />
3. Align indicator needle with zero.<br />
4. Place the contact point back into the square<br />
notch and rock the gage back and forth to<br />
verify zero.<br />
5. Place the contact point in the V notch and<br />
rock the gage back and forth to re-verify zero.<br />
Copyright © 2014 <strong>Gagemaker</strong>. All rights reserved 11
External Thread Height Gage Operation Manual<br />
Model TH-3000<br />
Zeroing the External Thread Height Gage (continued)<br />
6. Tighten the indicator clamp.<br />
12 Copyright © 2014 <strong>Gagemaker</strong>. All rights reserved
External Thread Height Gage Operation Manual<br />
Model TH-3000<br />
Operating Procedures<br />
Inspecting Parts<br />
Materials Needed:<br />
TH-3000 thread height gage<br />
Part<br />
Inspection report<br />
1. Place the contact point into the thread and<br />
push down on the gage until the body rests on<br />
the crests of the thread.<br />
2. Rock the gage back and forth to locate the<br />
shortest depth location. Repeat in two other<br />
locations on the part.<br />
3. Record findings on the inspection report.<br />
4. Verify repeatability by periodically placing the<br />
gage on the standard.<br />
Copyright © 2014 <strong>Gagemaker</strong>. All rights reserved 13
External Thread Height Gage Operation Manual<br />
Model TH-3000<br />
Care and Maintenance<br />
Replacing the Indicator<br />
Materials Needed:<br />
TH-3000 thread height gage<br />
Indicator<br />
7/64” hex wrench<br />
1. Using a 7/64” hex wrench, loosen the cap<br />
screw on the TH-3000 gage.<br />
2. Remove the indicator from the gage.<br />
3. Remove the flat stem adapter from the old<br />
indicator.<br />
4. Insert the flat stem adapter into the new<br />
indicator.<br />
14 Copyright © 2014 <strong>Gagemaker</strong>. All rights reserved
External Thread Height Gage Operation Manual<br />
Model TH-3000<br />
Replacing the Indicator (continued)<br />
5. Insert the indicator into the TH-3000 gage body<br />
and tighten the cap screw.<br />
6. Turn the indicator dial to until the needle aligns<br />
with zero.<br />
Copyright © 2014 <strong>Gagemaker</strong>. All rights reserved 15
External Thread Height Gage Operation Manual<br />
Model TH-3000<br />
Replacing the Contact Point<br />
Materials Needed:<br />
TH-3000 thread height gage<br />
Contact point (T501 and/or T502)<br />
7/64” hex wrench<br />
1. Using a 7/64” hex wrench, loosen the cap<br />
screw on the TH-3000 gage.<br />
2. Remove the indicator from the gage.<br />
3. Remove the spring, contact point, and<br />
centering sleeve from the TH-3000 gage body.<br />
4. Insert the new contact point into the centering<br />
sleeve and assemble the gage.<br />
16 Copyright © 2014 <strong>Gagemaker</strong>. All rights reserved
External Thread Height Gage Operation Manual<br />
Model TH-3000<br />
Replacing the Contact Point (continued)<br />
5. Insert the indicator into the TH-3000 gage body<br />
and tighten the cap screw.<br />
6. Turn the indicator dial to until the needle aligns<br />
with zero.<br />
Copyright © 2014 <strong>Gagemaker</strong>. All rights reserved 17
External Thread Height Gage Operation Manual<br />
Model TH-3000<br />
Maintenance Tips<br />
Keep all unprotected metal surfaces coated with light oil.<br />
Avoid dropping the gage or subjecting it to any vibration or impact.<br />
Keep the gage dry and away from any machine coolant spray.<br />
Do not force the movement of any of the mechanical parts. The mechanics are designed to move<br />
freely.<br />
Keep the indicator face clean.<br />
Warranty Information<br />
<strong>Gagemaker</strong> warrants its products to be free from defects in material and workmanship under normal operating<br />
conditions for 12 months from the date of shipment. This warranty is limited to repairing, or at <strong>Gagemaker</strong>’s option,<br />
replacing any product which is proven to have been defective at the time it was shipped and/or suffered damage<br />
during shipping; provided buyer has given <strong>Gagemaker</strong> written notice of any such claimed defect within 15 days of<br />
receipt. Any defective product must be properly packed and shipped to the <strong>Gagemaker</strong> factory in Pasadena, Texas<br />
USA. This warranty applies to all products when used in a normal industrial environment. Any unauthorized<br />
tampering, misuse or neglect will make this warranty null and void. Under no circumstances will <strong>Gagemaker</strong> or any<br />
affiliate have any liabilities for loss or for any indirect or consequential damages. The foregoing warranties are in<br />
lieu of all other warranties expressed or implied, including but not limited to, the implied warranties of<br />
merchantability and fitness for a particular purpose.<br />
Products Requiring Repair or Calibration Return Process<br />
1. Prior to sending any products to <strong>Gagemaker</strong>, please call 713-472-7360 and request a Returned<br />
Material Authorization (RMA) number from Sales.<br />
2. Include a Purchase Order or work instructions with the returned product.<br />
3. Return to: <strong>Gagemaker</strong> LP<br />
712 East Southmore Ave.<br />
Pasadena, TX 77502-110<br />
18 Copyright © 2014 <strong>Gagemaker</strong>. All rights reserved
External Thread Height Gage Operation Manual<br />
Model TH-3000<br />
Maintenance Tips<br />
Keep all unprotected metal surfaces coated with light oil.<br />
Avoid dropping the gage or subjecting it to any vibration or impact.<br />
Keep the gage dry and away from any machine coolant spray.<br />
Do not force the movement of any of the mechanical parts. The mechanics are designed to move<br />
freely.<br />
Keep the indicator face clean.<br />
Warranty Information<br />
<strong>Gagemaker</strong> warrants its products to be free from defects in material and workmanship under normal operating<br />
conditions for 12 months from the date of shipment. This warranty is limited to repairing, or at <strong>Gagemaker</strong>’s option,<br />
replacing any product which is proven to have been defective at the time it was shipped and/or suffered damage<br />
during shipping; provided buyer has given <strong>Gagemaker</strong> written notice of any such claimed defect within 15 days of<br />
receipt. Any defective product must be properly packed and shipped to the <strong>Gagemaker</strong> factory in Pasadena, Texas<br />
USA. This warranty applies to all products when used in a normal industrial environment. Any unauthorized<br />
tampering, misuse or neglect will make this warranty null and void. Under no circumstances will <strong>Gagemaker</strong> or any<br />
affiliate have any liabilities for loss or for any indirect or consequential damages. The foregoing warranties are in<br />
lieu of all other warranties expressed or implied, including but not limited to, the implied warranties of<br />
merchantability and fitness for a particular purpose.<br />
Products Requiring Repair or Calibration Return Process<br />
4. Prior to sending any products to <strong>Gagemaker</strong>, please call 713-472-7360 and request a Returned<br />
Material Authorization (RMA) number from Sales.<br />
5. Include a Purchase Order or work instructions with the returned product.<br />
6. Return to: <strong>Gagemaker</strong> LP<br />
712 East Southmore Ave.<br />
Pasadena, TX 77502-110<br />
Copyright © 2014 <strong>Gagemaker</strong>. All rights reserved 19
<strong>Gagemaker</strong>, LP, P.O. Box 87709, Houston, Texas 77287-7709<br />
712 East Southmore Ave., Pasadena, Texas 77502<br />
Phone: 713-472-7360<br />
Fax: 713-472-7241<br />
Web site: www.gagemaker.com