SEL-700G Instruction Manual
SEL-700G Instruction Manual
SEL-700G Instruction Manual

Create successful ePaper yourself
Turn your PDF publications into a flip-book with our unique Google optimized e-Paper software.
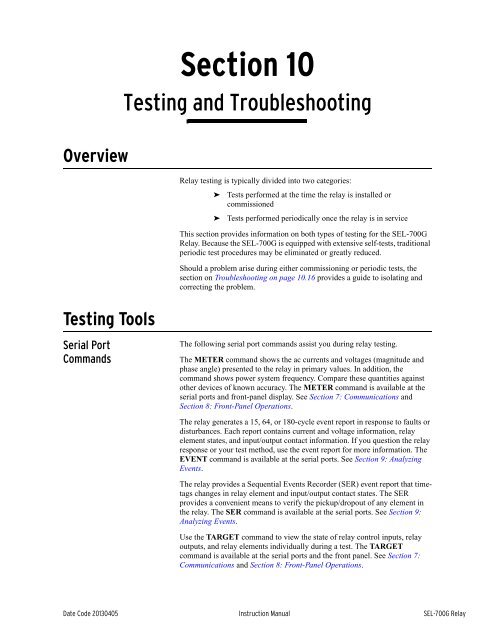
Section 10<br />
Testing and Troubleshooting<br />
<strong>Instruction</strong> <strong>Manual</strong><br />
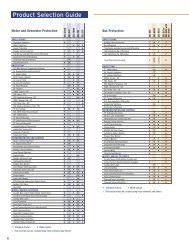
Overview<br />
Relay testing is typically divided into two categories:<br />
➤<br />
➤<br />
Tests performed at the time the relay is installed or<br />
commissioned<br />
Tests performed periodically once the relay is in service<br />
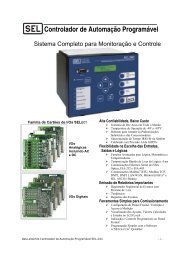
This section provides information on both types of testing for the <strong>SEL</strong>-<strong>700G</strong><br />
Relay. Because the <strong>SEL</strong>-<strong>700G</strong> is equipped with extensive self-tests, traditional<br />
periodic test procedures may be eliminated or greatly reduced.<br />
Should a problem arise during either commissioning or periodic tests, the<br />
section on Troubleshooting on page 10.16 provides a guide to isolating and<br />
correcting the problem.<br />
Testing Tools<br />
Serial Port<br />
Commands<br />
The following serial port commands assist you during relay testing.<br />
The METER command shows the ac currents and voltages (magnitude and<br />
phase angle) presented to the relay in primary values. In addition, the<br />
command shows power system frequency. Compare these quantities against<br />
other devices of known accuracy. The METER command is available at the<br />
serial ports and front-panel display. See Section 7: Communications and<br />
Section 8: Front-Panel Operations.<br />
The relay generates a 15, 64, or 180-cycle event report in response to faults or<br />
disturbances. Each report contains current and voltage information, relay<br />
element states, and input/output contact information. If you question the relay<br />
response or your test method, use the event report for more information. The<br />
EVENT command is available at the serial ports. See Section 9: Analyzing<br />
Events.<br />
The relay provides a Sequential Events Recorder (SER) event report that timetags<br />
changes in relay element and input/output contact states. The SER<br />
provides a convenient means to verify the pickup/dropout of any element in<br />
the relay. The SER command is available at the serial ports. See Section 9:<br />
Analyzing Events.<br />
Use the TARGET command to view the state of relay control inputs, relay<br />
outputs, and relay elements individually during a test. The TARGET<br />
command is available at the serial ports and the front panel. See Section 7:<br />
Communications and Section 8: Front-Panel Operations.<br />
Date Code 20130405 <strong>Instruction</strong> <strong>Manual</strong> <strong>SEL</strong>-<strong>700G</strong> Relay
10.2<br />
Testing and Troubleshooting<br />
Testing Tools<br />
Low-Level Test<br />
Interface<br />
NOTE: The <strong>SEL</strong>-RTS Relay Test<br />
System consists of the <strong>SEL</strong>-AMS<br />
Adaptive Multichannel Source and<br />
<strong>SEL</strong>-5401 Test System Software.<br />
The <strong>SEL</strong>-<strong>700G</strong> has a low-level test interface on the 4 ACI/3 AVI current/<br />
voltage card, 1 ACI neutral current card, or 3 ACI current card (Slot Z) and<br />
3 ACI/4 AVI current/voltage card, 2 AVI voltage card, 3 ACI current card, or<br />
3 ACI/2 AVI current/voltage card (Slot E). You can test the relay in either of<br />
two ways: conventionally by applying ac signals to the relay inputs or by<br />
applying low magnitude ac voltage signals to the test interface on the printed<br />
circuit boards.<br />
You can use the <strong>SEL</strong>-RTS Low-Level Relay Test System to provide signals to<br />
test the relay. Figure 10.1 shows the Test Interface connectors. Figure 10.2<br />
shows the Cable C<strong>700G</strong> connection between an <strong>SEL</strong>- RTS test system and the<br />
<strong>SEL</strong>-<strong>700G</strong>.<br />
Connector J2 on Slot Z Card<br />
GND GND GND GND GND GND GND<br />
o2 o4<br />
o6<br />
o8<br />
o10 o12 o14<br />
o1 o3<br />
o5<br />
o7<br />
o9<br />
o11 o13<br />
IAX IBX ICX VAX VBX VCX IN<br />
4 ACI/3 AVI Card<br />
GND GND GND GND GND GND GND<br />
o2 o4<br />
o6<br />
o8<br />
o10 o12 o14<br />
o1 o3<br />
o5<br />
o7<br />
o9<br />
o11 o13<br />
IN<br />
1 ACI Card<br />
Connector J2 on Slot E Card<br />
GND GND GND GND GND GND GND<br />
o2 o4<br />
o6<br />
o8<br />
o10 o 12 o 14<br />
o1 o3<br />
o5<br />
o 7 o 9 o 11 o 13<br />
IAY IBY ICY VAY VBY VCY VS<br />
3 ACI/4 AVI Card<br />
GND GND GND GND GND GND GND<br />
o2 o4<br />
o6<br />
o8<br />
o10 o 12 o 14<br />
o1 o3<br />
o 5 o 7 o 9 o 11 o 13<br />
IAY IBY ICY VN VS<br />
3 ACI/2 AVI Card<br />
GND GND GND GND GND GND GND<br />
o2 o4<br />
o6<br />
o8<br />
o10 o12 o14<br />
o1 o3<br />
o5<br />
o7<br />
o9<br />
o11 o13<br />
IAX IBX ICX<br />
3 ACI Card<br />
GND GND GND GND GND GND GND<br />
o2 o4<br />
o6<br />
o8<br />
o10 o 12 o 14<br />
o1 o3<br />
o 5 o 7 o 9 o 11 o 13<br />
IAY IBY ICY<br />
3 ACI Card<br />
Figure 10.1<br />
Low-Level Test Interface (J2)<br />
GND GND GND GND GND GND GND<br />
o2 o4<br />
o6<br />
o8<br />
o10 o 12 o 14<br />
o1 o3<br />
o 5 o 7 o 9 o 11 o 13<br />
VN VS<br />
2 AVI Card<br />
NOTE: The <strong>SEL</strong>-<strong>700G</strong> relay can have<br />
as many as 14 analog input channels.<br />
The <strong>SEL</strong>-AMS has only as many as<br />
12 analog input channels. This is the<br />
reason for C<strong>700G</strong> cable complexity.<br />
To AMS<br />
Numbers on connectors<br />
represent AMS channels<br />
Connector A<br />
1 • • • • • 7<br />
Connector B<br />
8 • • • 12<br />
Connector C<br />
1 • • • • 6<br />
Connector D<br />
7 8 • • • 12<br />
Figure 10.2<br />
To <strong>SEL</strong>-<strong>700G</strong><br />
C<strong>700G</strong> Ribbon Cable Connector Diagram<br />
To <strong>SEL</strong>-<strong>700G</strong><br />
<strong>SEL</strong>-<strong>700G</strong> Relay <strong>Instruction</strong> <strong>Manual</strong> Date Code 20130405
Testing and Troubleshooting<br />
Testing Tools<br />
10.3<br />
Table 10.1 shows how to use the C<strong>700G</strong> cable for measuring the necessary<br />
quantities. For example, using C<strong>700G</strong> Connection Options No. 2 with<br />
connector C on Slot Z and D on Slot E, align channel 1 with IAX and CH#7<br />
with IBY on the 4ACI/3AVI and 3AC1/4AVI boards, respectively. Alignment<br />
can be changed to get the necessary quantities. Table 10.2 shows the signal<br />
scale factor information the AMS Relay Test System <strong>SEL</strong>-5401 Software uses<br />
for the calibrated inputs.<br />
Table 10.1<br />
Cable C<strong>700G</strong> Connection Options a<br />
Connectors<br />
Slot<br />
Z<br />
E<br />
Card<br />
Connector<br />
(J2)<br />
Signals b<br />
IAX<br />
C<strong>700G</strong><br />
Connector<br />
Cable C<strong>700G</strong> Connection Options<br />
No. 1 No. 2 No. 3 No. 4<br />
AMS<br />
CH#<br />
1<br />
C<strong>700G</strong><br />
Connector<br />
AMS<br />
CH#<br />
C<strong>700G</strong><br />
Connector<br />
AMS<br />
CH#<br />
C<strong>700G</strong><br />
Connector<br />
IBX 2 2 2 1<br />
ICX 3 3 3 2<br />
VAX A 4 C 4 C 4 C 3<br />
VBX 5 5 5 4<br />
VCX 6 6 6 5<br />
IN 7 — — 6<br />
IAY<br />
8<br />
—<br />
7<br />
7<br />
IBY 9 7 8 8<br />
ICY 10 8 9 9<br />
VAY B 11 D 9 D 10 D 10<br />
VBY 12 10 11 11<br />
VCY or VN — 11 12 12<br />
VS — 12 — —<br />
1<br />
1<br />
AMS<br />
CH#<br />
—<br />
a Only the commonly used connection options are shown; additional connections are possible.<br />
b All possible signals are shown; available signals depend on the card type plugged into the slot (see Table 1.1 for details).<br />
Table 10.2 Resultant Scale Factors for Inputs (Sheet 1 of 2)<br />
Channel<br />
Label<br />
Circuit Board and<br />
Connector<br />
Nominal Input<br />
Scale Factor<br />
(A/V or V/V)<br />
IAX J2 on Slot Z card 5 A/1 A 106.14/21.23<br />
IBX J2 on Slot Z card 5 A/1 A 106.14/21.23<br />
ICX J2 on Slot Z card 5 A/1 A 106.14/21.23<br />
VAX J2 on Slot Z card 250 V 218.4<br />
VBX J2 on Slot Z card 250 V 218.4<br />
VCX J2 on Slot Z card 250 V 218.4<br />
IN J2 on Slot Z card 5 A/1 A 106.14/21.23<br />
IAY J2 on Slot E card 5 A/1 A 106.14/21.23<br />
IBY J2 on Slot E card 5 A/1 A 106.14/21.23<br />
ICY J2 on Slot E card 5 A/1 A 106.14/21.23<br />
VAY J2 on Slot E card 250 V 218.4<br />
VBY J2 on Slot E card 250 V 218.4<br />
Date Code 20130405 <strong>Instruction</strong> <strong>Manual</strong> <strong>SEL</strong>-<strong>700G</strong> Relay
10.4<br />
Testing and Troubleshooting<br />
Testing Tools<br />
Table 10.2 Resultant Scale Factors for Inputs (Sheet 2 of 2)<br />
Channel<br />
Label<br />
Circuit Board and<br />
Connector<br />
Nominal Input<br />
Scale Factor<br />
(A/V or V/V)<br />
VCY J2 on Slot E card 250 V 218.4<br />
VN J2 on Slot E card 250 V 218.4<br />
VS J2 on Slot E card 250 V 218.4<br />
Access the low-level test interface connectors by using the following<br />
procedure.<br />
! CAUTION<br />
The relay contains devices sensitive<br />
to Electrostatic Discharge (ESD).<br />
When working on the relay with the<br />
front panel removed, work surfaces<br />
and personnel must be properly<br />
grounded or equipment damage may<br />
result.<br />
NOTE: You can use the 14-pin<br />
connectors of the <strong>SEL</strong>-RTS ribbon<br />
cable C<strong>700G</strong>. The connectors are not<br />
keyed; refer to Table 10.1: Cable C<strong>700G</strong><br />
Connection Options.<br />
Step 1.<br />
Loosen the mounting screws and the ground screw on the back<br />
and remove the back cover.<br />
Step 2. Remove the 4 ACI/3 AVI, 1 ACI, or 3 ACI board from Slot Z.<br />
Step 3.<br />
Locate the 16-pin jumper assembly J3 on the board and move<br />
the four jumpers from CT to AMS positions.<br />
CT position (normal) jumpers are between 1-2, 5-6, 9-10 and<br />
13-14 pin numbers.<br />
AMS position (test) jumpers are between 3-4, 7-8, 11-12 and<br />
15-16 pin numbers.<br />
Step 4.<br />
Locate the 14-pin connector J2 on the board. It has four<br />
jumpers on pins 1-2, 3-4, 5-6, 13-14. Please remove these<br />
jumpers and save them for restoring the relay to normal<br />
operation after test.<br />
Step 5.<br />
Step 6.<br />
Step 7.<br />
Connect the low-level signal connector of the C<strong>700G</strong> cable to<br />
J2, as shown in Figure 10.1 and Figure 10.2 (for example,<br />
ribbon cable C<strong>700G</strong> connector of <strong>SEL</strong>-RTS Test System).<br />
Insert the 4 ACI/3 AVI, 1 ACI, or 3 ACI board back into its<br />
Slot Z.<br />
Remove the 3 ACI/4 AVI, 2 AVI, 3 ACI, or 3 ACI/2 AVI board<br />
board from Slot E.<br />
Locate jumper assembly J3 and change it from CT (normal<br />
position) to AMS (low-level test position) as described in<br />
Step 3.<br />
<strong>SEL</strong>-<strong>700G</strong> Relay <strong>Instruction</strong> <strong>Manual</strong> Date Code 20130405
Testing and Troubleshooting<br />
Commissioning Tests<br />
10.5<br />
Step 8.<br />
Locate the 14-pin connector J2 on the board.<br />
It has four jumpers on pins 1-2, 3-4, 5-6, 13-14. Please remove<br />
these jumpers and save them for restoring the relay to normal<br />
operation after test.<br />
Connect the low-level signal connector of the C<strong>700G</strong> cable to<br />
J2, as shown in Figure 10.1 and Figure 10.2 (for example,<br />
ribbon cable C<strong>700G</strong> connector of <strong>SEL</strong>-RTS Test System).<br />
Step 9. Insert the board back into Slot E.<br />
Refer to the <strong>SEL</strong>-RTS <strong>Instruction</strong> <strong>Manual</strong> for additional detail.<br />
When simulating a delta PT connection, DELTAY_m := DELTA (m = X or Y),<br />
with the low-level test interface referenced in Figure 10.1, apply the following<br />
signals:<br />
➤<br />
➤<br />
➤<br />
Apply low-level test signal VAB to Pin VA.<br />
Apply low-level test signal –VBC (equivalent to VCB) to<br />
Pin VC.<br />
Do not apply any signal to pin VB.<br />
Commissioning Tests<br />
<strong>SEL</strong> performs a complete functional check and calibration of each <strong>SEL</strong>-<strong>700G</strong><br />
before it is shipped. This helps to ensure that you receive a relay that operates<br />
correctly and accurately. Commissioning tests confirm that the relay, control<br />
signal inputs, and control outputs are properly connected.<br />
The following connection tests help you enter settings into the <strong>SEL</strong>-<strong>700G</strong> and<br />
verify that the relay is properly connected. Brief functional tests ensure that<br />
the relay settings are correct. It is unnecessary to test every element, timer, and<br />
function in these tests. Modify the procedure as necessary to conform to your<br />
standard practices. Use the procedure at initial relay installation; you should<br />
not need to repeat it unless major changes are made to the relay electrical<br />
connections.<br />
Required Equipment ➤ The <strong>SEL</strong>-<strong>700G</strong>, installed and connected according to your<br />
protection design<br />
➤<br />
➤<br />
➤<br />
➤<br />
➤<br />
A PC with serial port, terminal emulation software, and serial<br />
communications cable<br />
<strong>SEL</strong>-<strong>700G</strong> Settings Sheets with settings appropriate to your<br />
application and protection design<br />
The ac and dc elementary schematics and wiring diagrams for<br />
this relay installation<br />
A continuity tester<br />
A protective relay ac test source<br />
➢ Minimum: single-phase voltage and current with phase<br />
angle control<br />
➢ Preferred: three-phase voltage and current with phase<br />
angle control<br />
Date Code 20130405 <strong>Instruction</strong> <strong>Manual</strong> <strong>SEL</strong>-<strong>700G</strong> Relay
10.6<br />
Testing and Troubleshooting<br />
Commissioning Tests<br />
Connection Tests Step 1. Remove control voltage and ac signals from the <strong>SEL</strong>-<strong>700G</strong> by<br />
opening the appropriate breaker(s) or removing fuses.<br />
Step 2.<br />
Step 3.<br />
Step 4.<br />
Step 5.<br />
Step 6.<br />
Step 7.<br />
Step 8.<br />
Isolate the relay contact assigned to be the TRIP output.<br />
Verify correct ac and dc connections by performing point-topoint<br />
continuity checks on the associated circuits.<br />
Apply ac or dc control voltage to the relay.<br />
After the relay is energized, the front-panel green ENABLED LED<br />
should illuminate.<br />
Use the appropriate serial cable (<strong>SEL</strong> cable C234A or<br />
equivalent) to connect a PC to the relay.<br />
Start the PC terminal emulation software and establish<br />
communication with the relay.<br />
Refer to Section 7: Communications for more information on<br />
serial port communications.<br />
Set the correct relay time and date by using either the frontpanel<br />
or serial port commands (TIME hh:mm:ss and DATE<br />
mm/dd/yy commands).<br />
Using the SET, SET P, SET G, SET L, and SET R serial port<br />
commands, enter the relay settings from the settings sheets for<br />
your application.<br />
If you are connecting an external <strong>SEL</strong>-2600 RTD Module or<br />
<strong>SEL</strong>-2664 Field Ground Module, follow the substeps below;<br />
otherwise continue with Step 9.<br />
a. Connect the fiber-optic cable to the RTD module or<br />
field ground module fiber-optic output.<br />
b. Plug the relay end of the fiber-optic cable into the relay<br />
fiber-optic Rx input (Port 2). For an <strong>SEL</strong>-2600<br />
application, use Port 2; for an <strong>SEL</strong>-2664 application,<br />
use Port 3.<br />
Step 9. Verify the relay ac connections.<br />
Step 10. Connect the ac test source current or voltage to the appropriate<br />
relay terminals.<br />
NOTE: Make sure that the current<br />
transformer secondary windings are<br />
shorted before they are disconnected<br />
from the relay.<br />
a. Disconnect the current transformer and voltage<br />
transformer (if present) secondaries from the relay prior<br />
to applying test source quantities.<br />
b. If you set the relay to accept phase-to-ground voltages<br />
[DELTAY_m := WYE (m = X or Y)], set the current<br />
and/or voltage phase angles as shown in Figure 10.3.<br />
c. If you set the relay to accept delta voltages<br />
[(DELTAY_m := DELTA (m = X or Y)], set the current<br />
and/or voltage phase angles as shown in Figure 10.4.<br />
<strong>SEL</strong>-<strong>700G</strong> Relay <strong>Instruction</strong> <strong>Manual</strong> Date Code 20130405
Testing and Troubleshooting<br />
Commissioning Tests<br />
10.7<br />
V C<br />
V B<br />
+120˚<br />
+120˚<br />
V A<br />
V A<br />
V B<br />
PHROT := ABC<br />
–120˚<br />
V C<br />
–120˚<br />
PHROT := ACB<br />
When setting PHROT := ABC, set angle V A = angle I A = 0˚<br />
set angle V B = angle I B = —120˚<br />
set angle V C = angle I C = 120˚<br />
When setting PHROT := ACB, set angle V A = angle I A = 0˚<br />
set angle V B = angle I B = 120˚<br />
set angle V C = angle I C = —120˚<br />
Figure 10.3<br />
Three-Phase Wye AC Connections<br />
60˚<br />
V AB<br />
V CB<br />
V CB<br />
60˚<br />
V AB<br />
PHROT := ABC<br />
PHROT := ACB<br />
Figure 10.4<br />
When setting PHROT := ABC, set angle I A = 0˚<br />
set angle I B = —120˚<br />
set angle I C = 120˚<br />
set angle V AB = +30˚<br />
set angle V CB = +90˚<br />
When setting PHROT := ACB, set angle I A = 0˚<br />
set angle I B = 120˚<br />
set angle I C = —120˚<br />
set angle V AB = —30˚<br />
set angle V CB = —90˚<br />
Three-Phase Open-Delta AC Connections<br />
Step 11. Apply rated current (1 A or 5 A).<br />
If the relay is equipped with voltage inputs, apply rated voltage<br />
for your application.<br />
Step 12. Use the front-panel METER > Fundamental function or serial port<br />
METER command to verify that the relay is measuring the<br />
magnitude and phase angle of both voltage and current<br />
correctly, taking into account the relay PTRX, PTRY, PTRS,<br />
Date Code 20130405 <strong>Instruction</strong> <strong>Manual</strong> <strong>SEL</strong>-<strong>700G</strong> Relay
10.8<br />
Testing and Troubleshooting<br />
Commissioning Tests<br />
PTRN, CTRX, CTRY, or CTRN (the settings are model<br />
dependent) settings and the fact that the quantities are<br />
displayed in primary units.<br />
If you are using a current transformer for the neutral, apply a<br />
single-phase current to the IN terminal. Do not apply voltage.<br />
Step 13. Verify that the relay is measuring the magnitude and phase<br />
angle correctly.<br />
The expected magnitude is (applied current) • (CTRN). The<br />
expected phase angle is zero (0).<br />
Step 14. Verify control input connections. Using the front-panel<br />
MAIN>Targets>Row 49 function, check the control input status in<br />
the relay (IN101 or IN102).<br />
As you apply rated voltage to each input, the position in<br />
Row 49 corresponding to that input should change from zero<br />
(0) to one (1).<br />
Step 15. Verify output contact operation:<br />
a. For each output contact, set the input to logical 1. This<br />
causes the output contact to close. For example, setting<br />
OUT101 = 1 causes the output OUT101 contact to close.<br />
b. Repeat the process for all contact outputs.<br />
Make sure that each contact closure does what you<br />
want it to do in the annunciation, control, or trip circuit<br />
associated with that contact closure.<br />
Step 16. Perform the protection element tests you want. Perform only<br />
enough tests to prove that the relay operates as intended;<br />
exhaustive element performance testing is not necessary for<br />
commissioning.<br />
Step 17. Connect the relay for tripping duty.<br />
Step 18. Verify that any settings changed during the tests performed in<br />
Step 15 and Step 16 are changed back to the correct values for<br />
your application.<br />
Step 19. Use the serial port commands in Table 10.3 to clear the relay<br />
data buffers and prepare the relay for operation.<br />
This prevents data generated during commissioning testing<br />
from being confused with operational data collected later.<br />
Table 10.3<br />
Serial Port Commands That Clear Relay Data Buffers<br />
Serial Port Command<br />
LDP C<br />
SER R<br />
SUM R<br />
Task Performed<br />
Clears Load Profile Data<br />
Resets Sequential Events Record buffer<br />
Resets Event Report and Summary Command buffers<br />
Step 20. When it is safe to do so, energize the equipment/bus.<br />
<strong>SEL</strong>-<strong>700G</strong> Relay <strong>Instruction</strong> <strong>Manual</strong> Date Code 20130405
Testing and Troubleshooting<br />
Commissioning Tests<br />
10.9<br />
Step 21. Verify the following ac quantities by using the front-panel<br />
METER > Fundamental or serial port METER command.<br />
➢<br />
➢<br />
Phase current magnitudes should be nearly equal.<br />
Phase current angles should be balanced, have proper<br />
phase rotation, and have the appropriate phase<br />
relationship to the phase voltages.<br />
Step 22. If your relay is equipped with voltage inputs, check the<br />
following:<br />
➢ Phase voltage magnitudes should be nearly equal.<br />
➢ Phase voltage phase angles should be balanced and<br />
have proper phase rotation.<br />
The <strong>SEL</strong>-<strong>700G</strong> is now ready for continuous service.<br />
Functional Tests<br />
Phase Current Measuring Accuracy<br />
Step 1.<br />
Connect the current source to the relay, as shown in<br />
Figure 10.5.<br />
IA<br />
Z01<br />
IAX<br />
<strong>SEL</strong>-<strong>700G</strong><br />
Z02<br />
Current<br />
IB<br />
Z03<br />
Test<br />
Source<br />
IBX<br />
2.0 • I XNOM<br />
Z04<br />
IC<br />
Z05<br />
ICX<br />
IN<br />
Z06<br />
Figure 10.5 CTRX Current Source Connections<br />
Step 2. Using the front-panel SET/SHOW or the serial port SHO<br />
command; record the CTRX and PHROT setting values.<br />
Step 3. Set the phase current angles to apply balanced three-phase<br />
currents in accordance with the PHROT setting. Refer to<br />
Figure 10.3.<br />
Step 4. Set each phase current magnitude equal to the values listed in<br />
Column 1 of Table 10.4. Use the front panel to view the phase<br />
current values. The relay should display the applied current<br />
magnitude times the CTRX setting.<br />
Table 10.4 CTRX Phase Current Measuring Accuracy a<br />
Expected A–Phase B–Phase C–Phase<br />
|I| Applied<br />
(A secondary) b Reading Reading Reading Reading<br />
CTRX x |I| (A primary) (A primary) (A primary)<br />
0.2 • I XNOM<br />
0.9 • I XNOM<br />
a The displayed quantities are model dependent.<br />
b I XNOM = rated secondary amps (1 or 5).<br />
Date Code 20130405 <strong>Instruction</strong> <strong>Manual</strong> <strong>SEL</strong>-<strong>700G</strong> Relay
10.10<br />
Testing and Troubleshooting<br />
Commissioning Tests<br />
Step 5. Use Figure 10.6 and Table 10.5 to repeat Step 1 through Step 4.<br />
IA<br />
E01<br />
IAY<br />
<strong>SEL</strong>-<strong>700G</strong><br />
E02<br />
Current<br />
IB<br />
E03<br />
Test<br />
Source<br />
IBY<br />
2.0 • I YNOM<br />
E04<br />
IC<br />
E05<br />
ICY<br />
IN<br />
E06<br />
Figure 10.6 CTRY Current Source Connections<br />
Table 10.5 CTRY Phase Current Measuring Accuracy a<br />
Expected A–Phase B–Phase C–Phase<br />
|I| Applied<br />
(A secondary) b Reading Reading Reading Reading<br />
CTRY x |I| (A primary) (A primary) (A primary)<br />
0.2 • I YNOM<br />
0.9 • I YNOM<br />
a The displayed quantities are model dependent.<br />
b I YNOM = rated secondary amps (1 or 5).<br />
Power and Power Factor Measuring Accuracy<br />
Wye-Connected Voltages<br />
Perform the following steps to test wye-connected voltages:<br />
Step 1. Connect the current source to the relay, as shown in Figure 10.5<br />
or Figure 10.6.<br />
Step 2.<br />
Connect the voltage source to the relay, as shown in<br />
Figure 10.7. Make sure that DELTAY_m := WYE<br />
(m = X or Y).<br />
VA<br />
09<br />
Voltage<br />
Test<br />
Source<br />
VB<br />
VC<br />
10<br />
11<br />
<strong>SEL</strong>-<strong>700G</strong><br />
Slot E or Z<br />
VN<br />
12<br />
Figure 10.7<br />
Step 3.<br />
Wye Voltage Source Connections<br />
Using the front-panel SET/SHOW or the serial port SHOW<br />
command, record the CTRm, PTRm, and PHROT setting<br />
values.<br />
<strong>SEL</strong>-<strong>700G</strong> Relay <strong>Instruction</strong> <strong>Manual</strong> Date Code 20130405
Testing and Troubleshooting<br />
Commissioning Tests<br />
10.11<br />
Step 4.<br />
Apply the current and voltage quantities shown in Column 1 of<br />
Table 10.6.<br />
Values are given for PHROT := ABC and PHROT := ACB.<br />
Step 5.<br />
Use the front-panel METER function or the serial port MET<br />
command to verify the results.<br />
Table 10.6<br />
Power Quantity Accuracy—Wye Voltages a<br />
Applied Currents and<br />
Voltages b<br />
Real Power<br />
(kW)<br />
Reactive Power (kVAR)<br />
Power Factor<br />
(pf)<br />
PHROT := ABC<br />
Expected:<br />
Expected:<br />
Expected:<br />
IAm =2.5 <br />
IBm =2.5 146<br />
3Pm =3 • 2.5 • 67 • 0.899<br />
• CTRm • PTRm/1000<br />
3Qm =3 • 2.5 • 67 • 0.438<br />
• CTRm • PTRm/1000<br />
pf = 0.90 lag<br />
ICm =2.5 +94<br />
VAm = 67 0<br />
VBm = 67 120<br />
VCm = 67 +120<br />
Measured: Measured: Measured:<br />
PHROT := ACB<br />
Expected:<br />
Expected:<br />
Expected:<br />
IAm =2.5 26<br />
IBm =2.5 +94<br />
3Pm =3 • 2.5 • 67 • 0.899<br />
• CTRm • PTRm/1000<br />
3Qm =3 • 2.5 • 67 • 0.438<br />
• CTRm • PTRm/1000<br />
pf = 0.90 lag<br />
ICm =2.5 146<br />
VAm = 67 0<br />
VBm = 67 120<br />
VCm = 67 120<br />
Measured: Measured: Measured:<br />
a The displayed quantities are model dependent.<br />
b m = X or Y.<br />
Delta-Connected Voltages<br />
Perform the following steps to test delta-connected voltages:<br />
Step 1. Connect the current source to the relay, as shown in Figure 10.5<br />
or Figure 10.6.<br />
Step 2.<br />
Connect the voltage source to the relay, as shown in<br />
Figure 10.8. Make sure that DELTAY_m := DELTA<br />
(m = X or Y).<br />
VA<br />
09<br />
Voltage<br />
Test<br />
Source<br />
VB<br />
VC<br />
10<br />
11<br />
<strong>SEL</strong>-<strong>700G</strong><br />
(Slot E or Z)<br />
VN<br />
12<br />
Figure 10.8<br />
Step 3.<br />
Delta Voltage Source Connections<br />
Using the front-panel SET/SHOW or the serial port SHOW<br />
command, record the CTRm, PTRm, and PHROT setting<br />
values.<br />
Date Code 20130405 <strong>Instruction</strong> <strong>Manual</strong> <strong>SEL</strong>-<strong>700G</strong> Relay
10.12<br />
Testing and Troubleshooting<br />
Periodic Tests (Routine Maintenance)<br />
Step 4.<br />
Apply the current and voltage quantities shown in Column 1 of<br />
Table 10.7.<br />
Values are given for PHROT := ABC and PHROT := ACB.<br />
Step 5.<br />
Use the front-panel METER or the serial port MET command to<br />
verify the results.<br />
Table 10.7<br />
Power Quantity Accuracy—Delta Voltages a<br />
Applied Currents and<br />
Voltages b<br />
Real Power<br />
(kW)<br />
Reactive Power<br />
(kVAR)<br />
Power Factor<br />
(pf)<br />
PHROT := ABC<br />
Expected:<br />
Expected:<br />
Expected<br />
IAm =2.5 –26<br />
IBm =2.5 –146<br />
3Pm = 1.732 • 2.5 • 120<br />
• 0.899 • CTRm • PTRm/1000<br />
3Qm = 1.732 • 2.5 • 120<br />
• 0.438 • CTRm • PTRm/1000<br />
pf = 0.90 lag<br />
ICm =2.5 +94<br />
VABm = 120 +30<br />
VBCm =120 +90<br />
Measured: Measured: Measured:<br />
PHROT := ACB<br />
Expected:<br />
Expected:<br />
Expected:<br />
IAm =2.5 26<br />
IBm =2.5 +94<br />
3Pm = 1.732 • 2.5 • 120<br />
• 0.899 • CTRm • PTRm/1000<br />
3Qm = 1.732 • 2.5 • 120<br />
• 0.438 • CTRm • PTRm/1000<br />
pf = 0.90 lag<br />
ICm =2.5 146<br />
VABm = 120 30<br />
VBCm =120 90<br />
Measured: Measured: Measured:<br />
a The displayed quantities are model dependent.<br />
b m = X or Y.<br />
Periodic Tests (Routine Maintenance)<br />
Because the <strong>SEL</strong>-<strong>700G</strong> is equipped with extensive self-tests, the most<br />
effective maintenance task is to monitor the front-panel messages after a selftest<br />
failure. In addition, each relay event report generated by a fault should be<br />
reviewed. Such reviews frequently reveal problems with equipment external to<br />
the relay, such as instrument transformers and control wiring.<br />
The <strong>SEL</strong>-<strong>700G</strong> does not require specific routine tests, but your operation<br />
standards may require some degree of periodic relay verification. If you need<br />
or want to perform periodic relay verification, the following checks are<br />
recommended.<br />
Table 10.8<br />
Test<br />
Relay Status<br />
Meter<br />
Periodic Relay Checks<br />
Description<br />
Use the front-panel STATUS or serial port STATUS command to verify that the relay self-tests have not detected<br />
any WARN or FAIL conditions.<br />
Verify that the relay is correctly measuring current and voltage (if included) by comparing the relay meter readings<br />
to separate external meters.<br />
Control Input<br />
Contact Output<br />
Using the front-panel MAIN > Targets > Row 49 function, check the control input status in the relay. As you apply<br />
rated voltage to each input, the position in Row 49 corresponding to that input should change from zero (0) to one<br />
(1).<br />
For each output contact, set the input to Logic 1. This causes the output contact to close. For example, setting<br />
OUT101 := 1 causes the output OUT101 contact to close.<br />
Repeat the process for all contact outputs. Make sure that each contact closure does what you want it to do in the<br />
annunciation, control, or trip circuit associated with that contact closure.<br />
<strong>SEL</strong>-<strong>700G</strong> Relay <strong>Instruction</strong> <strong>Manual</strong> Date Code 20130405
Testing and Troubleshooting<br />
Self-Test<br />
10.13<br />
Self-Test<br />
The <strong>SEL</strong>-<strong>700G</strong> runs a variety of self-tests. The relay takes the following<br />
corrective actions for out-of-tolerance conditions (see Table 10.9):<br />
➤<br />
➤<br />
➤<br />
➤<br />
➤<br />
Protection Disabled: The relay disables protection and control<br />
elements and trip/close logic. All output contacts are deenergized.<br />
The ENABLED front-panel LED is extinguished.<br />
ALARM Output: Two Relay Word bits, HALARM and<br />
SALARM, signal self-test problems. SALARM is pulsed for<br />
software programmed conditions, such as settings changes,<br />
access level changes, and three consecutive unsuccessful<br />
password entry attempts. HALARM is pulsed for hardware<br />
self-test warnings. HALARM is continuously asserted (set to<br />
logical 1) for hardware self-test failures. You can configure a<br />
diagnostic alarm as explained in Section 4: Protection and<br />
Logic Functions. In the Alarm Status column of Table 10.9,<br />
Latched indicates that HALARM is continuously asserted, Not<br />
Latched indicates that HALARM is pulsed for five seconds,<br />
and NA indicates that HALARM is not asserted.<br />
The relay generates automatic STATUS reports at the serial<br />
port for warnings and failures (ports with setting AUTO = Y).<br />
The relay displays failure messages on the relay LCD display<br />
for failures.<br />
For certain failures, the relay will automatically restart as many<br />
as three times. In many instances, this will correct the failure.<br />
The failure message might not be fully displayed before<br />
automatic restart occurs. Indication that the relay restarted will<br />
be recorded in the Sequential Events Recorder (SER).<br />
Table 10.9 Relay Self Tests (Sheet 1 of 3)<br />
Use the serial port STATUS command or front-panel to view relay self-test<br />
status. Based on the self-test type, issue the STA C command as directed in<br />
the Corrective Actions column. Contact <strong>SEL</strong> if this does not correct the problem.<br />
Self Test Description Normal<br />
Range<br />
Protection<br />
Disabled<br />
on Failure<br />
Alarm<br />
Status<br />
Auto<br />
Message<br />
on Failure<br />
Front Panel<br />
Message<br />
on Failure<br />
Corrective<br />
Action<br />
Watchdog Timer Periodic resetting<br />
(1/32 cycle)<br />
Yes<br />
Deenergized<br />
No<br />
No<br />
Mainboard FPGA (power up)<br />
Fail if mainboard Field Programmable Gate<br />
Array does not accept program or the version<br />
number is incorrect<br />
Mainboard FPGA (run time)<br />
Fail on lack of data acquisition interrupts or on<br />
detection of a CRC error in the FPGA code<br />
GPSB (back-plane) communications<br />
Fail if GPSB is busy on entry to processing<br />
interval<br />
Yes Latched Yes Status Fail<br />
FPGA Failure<br />
Yes Latched Yes Status Fail<br />
FPGA Failure<br />
Yes Latched Yes Status Fail<br />
GPSB Failure<br />
Automatic restart a<br />
Automatic restart a<br />
STA C<br />
Date Code 20130405 <strong>Instruction</strong> <strong>Manual</strong> <strong>SEL</strong>-<strong>700G</strong> Relay
10.14<br />
Testing and Troubleshooting<br />
Self-Test<br />
Table 10.9 Relay Self Tests (Sheet 2 of 3)<br />
Self Test Description Normal<br />
Range<br />
Protection<br />
Disabled<br />
on Failure<br />
Alarm<br />
Status<br />
Auto<br />
Message<br />
on Failure<br />
Front Panel<br />
Message<br />
on Failure<br />
Corrective<br />
Action<br />
Front-Panel HMI (power up)<br />
Fail if ID registers do not match expected or if<br />
FPGA programming is unsuccessful<br />
No<br />
Not<br />
Latched<br />
Yes NA STA C<br />
External RAM (power up)<br />
Performs a read/write test on system RAM<br />
External RAM (run time)<br />
Performs a read/write test on system RAM<br />
Internal RAM (power up)<br />
Performs a read/write test on system CPU RAM<br />
Internal RAM (run time)<br />
Performs a read/write test on system CPU RAM<br />
Code Flash (power up)<br />
<strong>SEL</strong>BOOT qualifies code with a checksum<br />
Data Flash (power up)<br />
Checksum is computed on critical data<br />
Data Flash (run time)<br />
Checksum is computed on critical data<br />
Critical RAM (settings)<br />
Performs a checksum test on the active copy of<br />
settings<br />
Critical RAM (run time)<br />
Verify instruction matches FLASH image<br />
I/O Board Failure<br />
Check if ID register matches part number<br />
DeviceNet Board Failure<br />
DeviceNet card does not respond in three<br />
consecutive 300 ms time out periods<br />
Slot Z Board (power up)<br />
Fail if ID register does not match part number<br />
Yes Latched No No<br />
Yes Latched Yes Status Fail<br />
RAM Failure<br />
Yes Latched No No<br />
Yes Latched Yes Status Fail<br />
RAM Failure<br />
NA NA NA NA<br />
Yes Latched Yes Status Fail<br />
Non_Vol Failure<br />
Yes Latched Yes Status Fail<br />
Non_Vol Failure<br />
Yes Latched Yes Status Fail<br />
CR_RAM<br />
Failure<br />
Yes Latched Yes Status Fail<br />
CR_RAM<br />
Failure<br />
Yes Latched Yes Status Fail<br />
Card [C|D|E]<br />
Failure<br />
NA NA NA COMMFLT<br />
Warning<br />
Yes Latched Yes Status Fail<br />
CT Card Fail<br />
Automatic restart a<br />
Automatic restart a<br />
Automatic restart a<br />
Automatic restart a<br />
Slot Z Board A/D Offset Warn<br />
Measure dc offset at each input channel<br />
–50 mV to<br />
+50 mV<br />
No<br />
Not<br />
Latched<br />
No<br />
Slot E Board (power up)<br />
Fail if ID register does not match part number<br />
Yes Latched Yes Status Fail<br />
Card E Fail<br />
Slot E Board A/D Offset Warn<br />
Measure dc offset at each input channel<br />
–50 to<br />
+50 mV<br />
No<br />
Not<br />
Latched<br />
No<br />
+0.9 V Fail<br />
Monitor +0.9 V power supply<br />
+1.2 V Fail<br />
Monitor +1.2 V power supply<br />
0.855 to<br />
0.945 V<br />
1.152 to<br />
1.248 V<br />
Yes Latched Yes Status Fail<br />
+0.9 V Failure<br />
Yes Latched Yes Status Fail<br />
+1.2 V Failure<br />
<strong>SEL</strong>-<strong>700G</strong> Relay <strong>Instruction</strong> <strong>Manual</strong> Date Code 20130405
Testing and Troubleshooting<br />
Self-Test<br />
10.15<br />
Table 10.9 Relay Self Tests (Sheet 3 of 3)<br />
Self Test Description Normal<br />
Range<br />
Protection<br />
Disabled<br />
on Failure<br />
Alarm<br />
Status<br />
Auto<br />
Message<br />
on Failure<br />
Front Panel<br />
Message<br />
on Failure<br />
Corrective<br />
Action<br />
+1.5 V Fail<br />
Monitor +1.5 V power supply<br />
+1.8 V Fail<br />
Monitor +1.8 V power supply<br />
+3.3 V Fail<br />
Monitor +3.3 V power supply<br />
+5 V Fail<br />
Monitor +5 V power supply<br />
+2.5 V Fail<br />
Monitor +2.5 V power supply<br />
+3.75 V Fail<br />
Monitor +3.75 V power supply<br />
–1.25 V Fail<br />
Monitor -1.25 V power supply<br />
–5 V Fail<br />
Monitor -5 V power supply<br />
1.35 to<br />
1.65 V<br />
1.71 to<br />
1.89 V<br />
3.07 to<br />
3.53 V<br />
4.65 to<br />
5.35 V<br />
2.32 to<br />
2.68 V<br />
3.48 to<br />
4.02 V<br />
–1.16 to<br />
–1.34 V<br />
–4.65 to<br />
–5.35 V<br />
Yes Latched Yes Status Fail<br />
+1.5 V Failure<br />
Yes Latched Yes Status Fail<br />
+1.8 V Failure<br />
Yes Latched Yes Status Fail<br />
+3.3 V Failure<br />
Yes Latched Yes Status Fail<br />
+5 V Failure<br />
Yes Latched Yes Status Fail<br />
+2.5 V Failure<br />
Yes Latched Yes Status Fail<br />
+3.75 V Failure<br />
Yes Latched Yes Status Fail<br />
–1.25 V Failure<br />
Yes Latched Yes Status Fail<br />
–5 V Failure<br />
Clock Battery<br />
Monitor Clock Battery<br />
2.3 to<br />
3.5 V<br />
No<br />
Not<br />
Latched<br />
Yes<br />
Clock Chip<br />
Unable to communicate with clock or fails time<br />
keeping test<br />
No<br />
Not<br />
Latched<br />
Yes<br />
Clock Chip RAM<br />
Clock chip static RAM fails<br />
No<br />
Not<br />
Latched<br />
Yes<br />
External RTD (<strong>SEL</strong>-2600)<br />
Fail if no comm, or the external RTD module<br />
reports open RTDs, shorted RTDs, a power<br />
supply failure<br />
External Field Ground Module (<strong>SEL</strong>-2664)<br />
Communications status<br />
Module status<br />
CID (Configured IED Description) file (access)<br />
Failure to Access/Read CID File<br />
Exception Vector<br />
CPU Error<br />
a Contact <strong>SEL</strong> if failure returns.<br />
NA NA No RTD Failure<br />
NA NA No OK/FAIL<br />
No NA No Status Fail<br />
CID File Failure<br />
Yes Latched NA Vector nn<br />
Relay Disabled<br />
Automatic restart a<br />
Date Code 20130405 <strong>Instruction</strong> <strong>Manual</strong> <strong>SEL</strong>-<strong>700G</strong> Relay
10.16<br />
Testing and Troubleshooting<br />
Troubleshooting<br />
Troubleshooting<br />
Table 10.10<br />
Troubleshooting<br />
Symptom/Possible Cause<br />
The relay ENABLED front-panel LED is dark.<br />
Input power is not present or a fuse is blown.<br />
Self-test failure<br />
Diagnosis/Solution<br />
Verify that input power is present. Check fuse continuity.<br />
View the self-test failure message on the front-panel display.<br />
The relay front-panel display does not show characters.<br />
The relay front panel has timed out.<br />
The relay is de-energized.<br />
The relay does not accurately measure voltages or currents.<br />
Wiring error<br />
Incorrect PTRX, PTRY, PTRS, PTRN , CTRX, CTRY,<br />
or CTRN setting<br />
Voltage neutral terminal (N) is not properly grounded.<br />
Press the ESC pushbutton to activate the display.<br />
Verify input power and fuse continuity.<br />
Verify input wiring.<br />
Verify instrument transformer ratios, connections, and associated settings.<br />
Verify wiring and connections.<br />
The relay does not respond to commands from a device connected to the serial port.<br />
Cable is not connected.<br />
Cable is not the correct type.<br />
The relay or device is at an incorrect baud rate or has<br />
another parameter mismatch.<br />
The relay serial port has received an XOFF, halting<br />
communications.<br />
Verify the cable connections.<br />
Verify the cable pinout.<br />
Verify device software setup.<br />
Type to send the relay XON and restart communications.<br />
The relay does not respond to faults.<br />
The relay is improperly set.<br />
Improper test source settings<br />
Current or voltage input wiring error<br />
Failed relay self-test<br />
Verify the relay settings.<br />
Verify the test source settings.<br />
Verify input wiring.<br />
Use the front-panel RELAY STATUS function to view self-test results.<br />
Factory Assistance<br />
We appreciate your interest in <strong>SEL</strong> products and services. If you have<br />
questions or comments, please contact us at:<br />
Schweitzer Engineering Laboratories, Inc.<br />
2350 NE Hopkins Court<br />
Pullman, WA 99163-5603 U.S.A.<br />
Tel: +1.509.332.1890<br />
Fax: +1.509.332.7990<br />
Internet: www.selinc.com or www.selindustrial.com<br />
Email: info@selinc.com<br />
<strong>SEL</strong>-<strong>700G</strong> Relay <strong>Instruction</strong> <strong>Manual</strong> Date Code 20130405