user manual - Paintball Solutions
user manual - Paintball Solutions
user manual - Paintball Solutions

You also want an ePaper? Increase the reach of your titles
YUMPU automatically turns print PDFs into web optimized ePapers that Google loves.
<strong>user</strong> <strong>manual</strong><br />
TM<br />
TM<br />
www.diablopaintball.com<br />
.68 CALIBER ELECTRONIC PAINTBALL MARKER<br />
Meets or exceeds ASTM standards.
TABLE OF CONTENTS:<br />
Page<br />
Topic(s)<br />
1 Warning and Rules<br />
Safe Marker Handling<br />
2 Warranty Information<br />
3 Welcome<br />
4 Initial Assembly<br />
6 Parts Key<br />
7 Exploded Diagram<br />
8 Battery Installation<br />
9 Attaching Feeder/Hopper<br />
Attaching Propellant Source<br />
10 Chronographing<br />
Loading <strong>Paintball</strong>s<br />
11 De-Gassing<br />
12 Maintenance<br />
13 Storage<br />
14 Trouble Shooting Guide<br />
15 Notes<br />
17 Warranty Registration<br />
WARNING: This is not a toy. Misuse may cause serious<br />
injury or death. Eye protection designed specifically for paintball<br />
must be worn by the <strong>user</strong> and persons within range. Recommend<br />
18 years of age or older to purchase. Persons under 18 years of<br />
age must have adult supervision. READ OWNER’S MANUAL<br />
BEFORE USING.<br />
1.<br />
2.<br />
3.<br />
4.<br />
5.<br />
6.<br />
7.<br />
8.<br />
9.<br />
10.<br />
11.<br />
12.<br />
13.<br />
RULES OF SAFE MARKER HANDLING<br />
Treat every marker as if it were loaded.<br />
Never look down the barrel of a paintball marker.<br />
Keep your finger off the trigger until ready to shoot.<br />
Never point the marker at anything you don’t wish to<br />
shoot.<br />
Keep the marker on safe until ready to shoot.<br />
Keep the barrel blocking device in/on the marker’s muzzle<br />
when not shooting.<br />
Always remove paintballs and propellant source before<br />
disassembly.<br />
After removing propellant source, point marker in safe<br />
direction and discharge until marker is degassed.<br />
Store the marker unloaded and de-gassed in a secure<br />
place.<br />
Follow warnings listed on propellant source for handling<br />
and storage.<br />
Do not shoot at fragile objects such as windows.<br />
Every person within range must wear eye, face and ear<br />
protection designed specifically to stop paintballs and<br />
meeting ASTM standard F1776.<br />
Always measure your marker’s velocity before playing<br />
paintball and never shoot at velocities in excess of<br />
91.44 meters (300 feet) per second.<br />
PAINTBALL<br />
www.diablopaintball.com<br />
.68 CALIBER ELECTRONIC PAINTBALL MARKER<br />
Meets or exceeds ASTM standards.<br />
1.
WARRANTY INFORMATION<br />
STANDARD WARRANTY:<br />
The manufacturer warranties to the original customer that this<br />
product is free from defects in material and workmanship under<br />
normal use and service for a period of 90 days from the original<br />
date of purchase by the initial owner/purchaser. The manufacturer<br />
agrees to repair or replace (at its discretion) any product within a<br />
reasonable period of time. This warranty does not cover: o-rings,<br />
scratches, nicks, normal wear and tear of parts, any modifications<br />
or normal fading of anodizing or damage caused by dropping or<br />
hitting of the product. This warranty shall not apply if it is shown by<br />
the manufacture that the consumer caused the defect or malfunction<br />
because of misuse. This warranty only covers original factory<br />
parts. Any modifications or tampering of original factory parts will<br />
not be covered by this warranty. Warranty work can only be conducted<br />
by the manufacture technicians and or authorized technicians.<br />
If product needs to be repair, package it carefully and send it<br />
together with your name, address, phone number and a brief<br />
description of the malfunction to:<br />
<strong>Paintball</strong> <strong>Solutions</strong><br />
570 Mantua Blvd<br />
Sewell, NJ 08080<br />
welcome<br />
...Thank you, for purchasing this Mongoose <strong>Paintball</strong><br />
Marker. The Mongoose represents the culmination of a great deal<br />
of research by the Diablo <strong>Paintball</strong> staff along with input from players<br />
such as you. The Mongoose is designed to deliver many<br />
advent at a reasonable price. With its 21 ball per second cycling<br />
rate, the Mongoose is one of the fastest markers available at any<br />
price. The Vise Grip Feed Neck, Quik-Strip Delrin bolt, vertical<br />
expansion chamber, ported barrel and inline regulator are all features<br />
usually available on much pricier markers or only through a<br />
great deal of after-market expense. We believe that the affordability<br />
of a reliable, feature packed marker will improve your playing experience<br />
and winning percentage. While winning isn’t everything, it<br />
sure beats the alternative!<br />
Play hard, play safe, play to win!<br />
EXTENDED WARRANTY:<br />
By returning the enclosed warranty registration card or registering<br />
your warranty on-line at www.paintballsolutions.com,<br />
within fifteen days of purchase, the warranty will automatically<br />
be extended to one year.<br />
PAINTBALL<br />
www.diablopaintball.com<br />
.68 CALIBER ELECTRONIC PAINTBALL MARKER<br />
2. 3.<br />
Meets or exceeds ASTM standards.
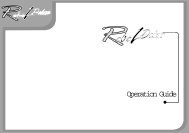
Numbers shown in parentheses following part names correspond to the<br />
numbers on the Parts key located on the centerfold pages of this <strong>manual</strong>.<br />
INITIAL ASSEMBLY<br />
1. Screw Barrel (23) hand tight into the Main Body (34) making sure the<br />
Barrel O-Ring (16) is properly seated between the Barrel and the<br />
Main Body to prevent the Barrel from vibrating loose during rapid firing.<br />
2. Screw Volumizer (26) hand tight into the Vertical ASA (33) making<br />
sure a Multi-use O-Ring (16) is properly seated between the Volumizer<br />
and the Vertical ASA to properly seal this connection.<br />
3. Screw Velocity Adjuster (12) into the Hammer Plug (24) approximately<br />
2 complete turns.<br />
4. Insert the Barrel Plug into the end of the Barrel (23).<br />
LED OPERATIONS<br />
Powering up<br />
1. Make sure that you and anyone within range are wearing eye protection<br />
designed specifically for paintball.<br />
2. Point the marker in a safe direction<br />
3. Make sure the barrel blocking device is properly installed.<br />
4. Press and hold Command Button 5 seconds until LEDs light up. LEDs<br />
will light in order and then turn off in reverse order. The marker is now<br />
on but in Safe mode.<br />
Turning off the Safety<br />
1. Make sure that you and anyone within range are wearing eye protection<br />
designed specifically for paintball.<br />
2. Point the marker in a safe direction<br />
3. Make sure the barrel blocking device is properly installed.<br />
4. With LEDs lighting in order and then turning off in reverse order, press<br />
and release Command Button.<br />
Turning Off the Eyes<br />
1. Point the marker in a safe direction<br />
2. Make sure the barrel blocking device is properly installed.<br />
3. With the marker powered up and off Safe, press and release Command Button.<br />
4. The top LED (green) will go out, this indicates that the marker's antichop<br />
eyes are off.<br />
Note: You will need to turn the eyes off to allow cycling of the marker without<br />
paintballs.<br />
CAUTION: DO NOT use the anti-chop eyes as a safety device.<br />
Turning on the Eyes<br />
1. Point the marker in a safe direction<br />
2. Make sure the barrel blocking device is properly installed.<br />
3. With the marker powered up and off Safe, press and release Command<br />
Button.<br />
4. The top LED (green) will turn on, this indicates that the marker's antichop<br />
eyes are on.<br />
Note: You will need to turn the eyes off to allow cycling of the marker without<br />
paintballs.<br />
CAUTION: DO NOT use the anti-chop eyes as a safety device.<br />
Preparing to Change Rate-of-Fire<br />
1. Make sure that you and anyone within range are wearing eye protection<br />
designed specifically for paintball.<br />
2. Point the marker in a safe direction<br />
3. Make sure the barrel blocking device is properly installed.<br />
4. Using a Phillips head screw driver, remove the tournament cover to the<br />
Adjustment Button.<br />
CAUTION: The marker is now ready to fire.<br />
PAINTBALL<br />
www.diablopaintball.com<br />
.68 CALIBER ELECTRONIC PAINTBALL MARKER<br />
4. 5.<br />
Meets or exceeds ASTM standards.
PARTS KEY:<br />
Part Number<br />
1<br />
2<br />
3<br />
4<br />
5<br />
6<br />
7<br />
8<br />
9<br />
10<br />
11<br />
12<br />
13<br />
14<br />
16<br />
17<br />
19<br />
20<br />
21<br />
22<br />
23<br />
24<br />
25<br />
26<br />
28<br />
Part Name<br />
Hammer<br />
Main Spring<br />
Recoil Pad<br />
Spring Strut<br />
Quick Strip Pin<br />
A. Cotter Pin<br />
Gas Valve<br />
Cup Seal<br />
Valve Spring<br />
Valve Gas Plug<br />
Valve Stop Pin<br />
Vertical Feed Neck<br />
A. ClampFeed Adjustment<br />
Velocity Adjuster<br />
A. Anti-Vibration O-Ring<br />
B. Locking Set Screw<br />
Ball Detent<br />
Tank Adapter<br />
A. Regulator Adjustment Screw<br />
Multi-Use O-ring<br />
Grip Frame Pin Set<br />
Bottomline Screws<br />
Grip Panel Screws<br />
Grip Frame Screws<br />
Vertical ASA Screw<br />
Barrel<br />
Hammer Plug<br />
Gas Line<br />
A. Macro Line Fittings<br />
Low Pressure Chamber<br />
Bolt<br />
PAINTBALL TM<br />
26<br />
16<br />
33<br />
16<br />
25A<br />
25<br />
.68 CALIBER ELECTRONIC PAINTBALL MARKER<br />
Meets or exceeds ASTM standards.<br />
16<br />
32<br />
25A<br />
TM<br />
23<br />
16<br />
8<br />
20<br />
7<br />
16<br />
R4<br />
36<br />
13<br />
6<br />
16<br />
E10<br />
58<br />
32<br />
20<br />
R1<br />
R2<br />
E03<br />
17<br />
16<br />
21<br />
17<br />
R3<br />
11A<br />
11<br />
13<br />
22<br />
E02<br />
42<br />
14A<br />
E9<br />
E11<br />
36 20<br />
34<br />
5<br />
37<br />
5A<br />
38<br />
28A<br />
16<br />
9<br />
16<br />
Part Number<br />
28<br />
29<br />
30<br />
32<br />
33<br />
34<br />
35<br />
36<br />
37<br />
38<br />
40<br />
42<br />
R1<br />
R2<br />
R3<br />
R4<br />
E1<br />
E2<br />
E3<br />
*E4<br />
E5<br />
*E6<br />
*E7<br />
**E8<br />
E9<br />
E10<br />
E11<br />
Name<br />
A. Connecting Pin<br />
B. Set Screw<br />
C. Spring<br />
D. Ball Bearing<br />
Drop Forward<br />
Drop Forward Screws<br />
Gas-Thru<br />
Vertical ASA<br />
Main Body<br />
Grip Frame<br />
Grip Panels<br />
Electronic Sear<br />
Sear Spring<br />
Trigger<br />
0-1200 PSI Gauge<br />
Regulator Drive Pin<br />
Beveled Washers<br />
Regulator Piston<br />
Regulator Cap<br />
Wiring Harness/ Trigger Switch<br />
Solenoid<br />
Circuit Board<br />
On/ Off Switch Screws<br />
Solenoid Set Screws<br />
Circuit Board Screws<br />
Battery Lead<br />
LCD Screen<br />
Eye Set<br />
Left Eye Cover<br />
Right Eye Cover<br />
* Not Shown In Schematic / ** In LCD Version Only<br />
Barrel Plug included.<br />
(Actual design may vary.)<br />
28<br />
E05<br />
28D<br />
28C<br />
28B<br />
16<br />
1<br />
2<br />
35<br />
3<br />
21<br />
4<br />
30<br />
24<br />
14<br />
12A<br />
12<br />
12B<br />
19<br />
6.<br />
7.
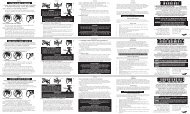
Adjusting the Rate-of-Fire<br />
1. Point the marker in a safe direction<br />
2. Make sure the barrel blocking device is properly installed.<br />
3. Press and release the Adjustment Button to change the rate of fire (see<br />
table 1 for LED representation of firing rates).<br />
Eyes On/Off<br />
20 BPS<br />
16 BPS<br />
12 BPS<br />
10 BPS<br />
8 BPS<br />
6 BPS<br />
Table 1<br />
Turning On the Safety (powering down the marker)<br />
1. Make sure that you and anyone within range are wearing eye protection<br />
designed specifically for paintball.<br />
2. Point the marker in a safe direction<br />
3. Make sure the barrel blocking device is properly installed.<br />
4. Press and hold Command Button 5 seconds until all LEDs go off.<br />
5. The marker is now OFF.<br />
BATTERY INSTALLATION<br />
1. Find the On/Off switch located on the left side of the marker just above<br />
the Left Grip Panel (36).<br />
2. Make sure the switch is in the “Off” position which is toward the rear of<br />
the marker.<br />
3. Using a screwdriver remove the three Grip Panel Screws (20) from the<br />
left side (side facing you if the barrel is pointing to your left) of the Grip<br />
Panel (36).<br />
4. Install 9 volt battery.<br />
5. Push the On/Off switch forward towards the “On” position.<br />
6. Confirm that the LED light located on the grip is lit to signify that the<br />
battery is good and properly installed.<br />
7. Push the On/Off switch forward towards the “Off” position.<br />
8. Replace Grip Panel using the three Grip Panel Screws, being careful not<br />
to pinch the wires leading to the battery connector and those leading to<br />
the circuit board.<br />
ATTACHING PROPELLANT SOURCE<br />
1. Confirm that Barrel Plug is properly installed.<br />
2. Cock the marker by pulling the Bolt Pull Pin (28A) in the rearward<br />
direction until it “clicks” into place. This compresses the Main Spring (2)<br />
and allows the Valve Stem/Seal (7) to properly seat.<br />
3. Confirm that the On/Off switch is in the “Off” position<br />
4. Point the marker downward and in a safe direction.<br />
5. Place the leading end of the propellant cylinder threads into the<br />
threaded interface of the Tank Adapter (14).<br />
6. Without pushing, twist the propellant cylinder in a clockwise direction<br />
and allow the cylinder threads to “draw” it into the Tank Adapter.<br />
DO NOT force the cylinder which could cause cross threading.<br />
7. Screw the propellant cylinder completely in until it is firmly seated.<br />
ATTACHING FEEDER/ HOPPER<br />
Due to the extremely high rate of fire capability of this marker, we highly recommend the<br />
use of a motorized hopper such as the Diablo TSA or Empire Reloader B.<br />
1. Confirm that Barrel Plug is properly installed and the On/Off<br />
switch is in the “Off” position<br />
2. Twist the Clamp Feed Adjustment (11A) in a counter-clockwise<br />
direction until it is loose but do not remove. If accidentally<br />
removed, screw back on one complete turn.<br />
3. Press neck of Feeder/Hopper into the Vertical Feed Neck (11)<br />
until completely seated.<br />
PAINTBALL<br />
www.diablopaintball.com<br />
.68 CALIBER ELECTRONIC PAINTBALL MARKER<br />
8. 9.<br />
Meets or exceeds ASTM standards.
4. Orient the Feeder/Hopper so that the lid is facing the rear of the<br />
marker and the Feeder/Hopper is parallel to the Main Body (34).<br />
5. Twist Vise Ring in a clockwise direction until it fits snugly against<br />
the Feeder/Hopper neck.<br />
LOADING PAINTBALLS<br />
The performance of your marker is directly related to the quality of paintballs used. We<br />
highly recommend Diablo paintballs to give you satisfaction and success on the playing<br />
field.<br />
1. Confirm that Barrel Plug is properly installed and the On/Off<br />
switch is in the “Off” position.<br />
2. Point marker in a safe direction and load paintballs in the<br />
Feeder/Hopper. If you are using a non-motorized hopper, be sure<br />
to leave some room in the hopper for the balls to feed properly.<br />
CHRONOGRAPHING<br />
Never operate your marker without first checking the velocity and confirming<br />
that you are firing below that required on the field of play. At no time<br />
should the marker fire paintballs in excess of 300 feet per second. Higher<br />
velocities are not only potentially dangerous, they often result in a substantial<br />
increase in paintballs broken in the<br />
marker.<br />
1. Confirm that Barrel Plug is properly installed, the On/Off switch is<br />
in the “Off” position and the Bolt Pull Pin is cocked to the rear.<br />
2. Using a 5/64 hex key make sure the Locking Set Screw (12B) is<br />
backed out without removing it.<br />
3. Make sure that you and anyone within range is wearing eye<br />
protection designed specifically for paintball.<br />
4. While pointing the paintball marker in a safe direction, remove the<br />
barrel plug and move the On/Off switch to the “On” position.<br />
5. Point the marker over the chronograph and in a safe direction.<br />
6. Pull the trigger and observe the reading on the chronograph.<br />
7. To increase the velocity, turn the Velocity Adjuster (12) clockwise.<br />
8. To decrease the velocity, turn the Velocity Adjuster counter-clock<br />
wise.<br />
9. Once the desired velocity has been reached, use the 5/64 hex<br />
key to turn the Locking Set Screw in until it binds against the<br />
Hammer Plug. This will prevent the velocity adjuster from moving<br />
during play and is required on most playing fields.<br />
10. Move the On/Off switch to the “Off” position.<br />
11. Insert Barrel Plug<br />
12. Proceed to playing field.<br />
13. Keep the On/Off switch in the “Off” position and barrel plug in<br />
place until ready to play and instructed to remove the barrel plug<br />
by a playing field staff member.<br />
DE-GASSING<br />
1. Make sure that you and anyone within range is wearing eye<br />
protection designed specifically for paintball.<br />
2. Set the On/Off switch to the “Off” position.<br />
3. Point the marker in a safe direction<br />
4. If you are using a motorized feeder, turn it off.<br />
5. Twist the Clamp Feed Adjustment (11A) in a counter-clockwise<br />
direction until loose.<br />
6. Invert the marker so that the hopper/feeder is upside down so<br />
that paint balls are no longer feeding into the marker.<br />
7. Remove the hopper/feeder from the marker.<br />
8. Twisting the barrel in a counter-clockwise direction, remove it<br />
from the marker.<br />
9. While pointing the paintball marker in a safe direction, move the<br />
On/Off switch to the “On” position.<br />
PAINTBALL<br />
www.diablopaintball.com<br />
.68 CALIBER ELECTRONIC PAINTBALL MARKER<br />
10. 11.<br />
Meets or exceeds ASTM standards.
10. Pull the trigger and allow the marker to cycle to confirm the<br />
absence of paintballs in the marker’s breech. If a ball discharges,<br />
repeat until no more paintballs come out of the marker.<br />
WARNING: When removing the cylinder from the marker, it could<br />
fly off with enough force to kill if the valve unscrews from the cylinder.<br />
LOOK at valve when removing cylinder. STOP if valve starts to<br />
unscrew from the tank. Screw it back on and take it to a trained person<br />
for repair.<br />
11. Unscrew the propellant cylinder approximately one complete<br />
revolution.<br />
12. Pull the trigger until the marker fails to recock (if this takes more<br />
than 10 shots, unscrew the cylinder an additional 1/2 turn and<br />
repeat).<br />
13. Remove (See Warning Above) the propellant cylinder.<br />
MAINTENANCE<br />
Bolt<br />
1. Pull the Bolt Pull Pin (28A) upwards until it “clicks”.<br />
2. Pull the Bolt Pull Pin rearward until the Bolt (28) comes out of the back<br />
of the Main Body (34).<br />
3. Clean the bolt thoroughly to include rinsing in warm water if needed.<br />
4. Lubricate the bolt with non-corrosive lubricant such as Empire Lube or<br />
Empire Oil.<br />
5. Return the bolt to the rear of the Main Body making sure to put the open<br />
end in first.<br />
6. Slide the bolt forward until the Bolt Pull Pin lines up with the hole in the<br />
top of the Hammer (1).<br />
7. Press the Bolt Pull Pin downward until it clicks in place.<br />
Cleaning/ Lubricating/ Assembly<br />
1. De-gas the marker according to previous directions.<br />
2. Wipe all outer surfaces with a clean soft cloth or paper towel.<br />
3. DO NOT submerge marker in water or cleaning solutions.<br />
This may destroy the circuit board and will void your warranty.<br />
4. Remove and service Bolt as previously instructed.<br />
5. Remove the Retainer Clip from the end of the Quik Strip Pin (5).<br />
6. While maintaining some pressure on the back of the Hammer<br />
Plug (24), pull out the Quik Strip Pin.<br />
7. Remove the Main Spring (2), Recoil Pad (3), Spring Strut (4)<br />
and Hammer Plug (24) from the marker.<br />
8. Using a 1/8” hex wrench remove both Grip Frame Screws (21)<br />
from the Grip Frame (35). NOTE that these are located on the<br />
trigger frame and NOT on the Main Body.<br />
9. Pull the Trigger Frame away from the Main Body.<br />
10. Remove the Hammer (1) from the rear of the Main Body.<br />
11. Lubricate the Hammer with a non-corrosive lubricant such as<br />
Empire Lube or Empire Oil.<br />
12. Replace the Hammer with the open end facing rearward and<br />
the flat side down.<br />
13. Insert the Bolt (28) in the top of the Main Body.<br />
14. Line up the hole in the bolt with that in the Hammer and push<br />
the Bolt Pull Pin downward until the two are linked together. This will<br />
prevent the Hammer from rotating during assembly.<br />
15. Place the Main Spring (2), Recoil Pad (3), Spring Strut (4) and<br />
Hammer Plug (24) back in the marker.<br />
16. While holding the Hammer Plug in place replace the Quik Strip<br />
Pin (5) and secure with the R-Clip (5A).<br />
STORAGE:<br />
Always turn off the marker, remove the hopper/feeder, all paintballs and propellant<br />
source and place it in a secure location where it cannot be accessed by<br />
unauthorized persons.<br />
PAINTBALL<br />
www.diablopaintball.com<br />
12.<br />
.68 CALIBER ELECTRONIC PAINTBALL MARKER<br />
13.<br />
Meets or exceeds ASTM standards.
TROUBLE SHOOTING GUIDE:<br />
NOTES ON MONGOOSE:<br />
Symptom Cause Cure<br />
Does not Fire Not Cocked Cock the Bolt Pull<br />
Pin (28A) to the rear.<br />
Not On<br />
Bad Battery<br />
Out of Gas<br />
Turn Switch “On”<br />
Replace Battery<br />
Refill or Replace<br />
Propellant Source<br />
Leaks air down Barrel Bad Cup Seal (7) Replace Cup Seal (7)<br />
Leaks Air From Bad Bottle O-Ring Replace Bottle O-Ring<br />
ASA/Bottle<br />
Interface<br />
Does Not Re-cock Low on Gas Refill or Replace<br />
Propellant Source<br />
Goes “Full Auto” Sear Not Catching Tighten Grip Frame<br />
Screws (21)<br />
Low on Gas<br />
Bad Striker O-Ring<br />
Refill or Replace<br />
Propellant Source<br />
Replace Multi-use<br />
O-Ring (16) located<br />
on front of Striker<br />
Excessive Ball Low Quality <strong>Paintball</strong>s Use better <strong>Paintball</strong>s<br />
Breakage<br />
Such as Diablo Brand<br />
Ball Chopping<br />
Use motorized feeder<br />
Such as Diablo TSA<br />
When in doubt, thoroughly clean and lubricate the marker.<br />
Many marker function problems are caused by excessive<br />
dirt or lack of lubrication.<br />
14.<br />
15.
NOTES ON MONGOOSE:<br />
WARRANTY REGISTRATION:<br />
To assist us in providing the best customer service possible and to increase your<br />
warranty from 90 days to one year at no additional cost Complete and mail this to:<br />
<strong>Paintball</strong> <strong>Solutions</strong><br />
570 Mantua Blvd.<br />
Sewell, NJ 08080<br />
Or register online at www.paintballsolutions.com<br />
Name: ____________________________________________________<br />
Address:<br />
__________________________________________________________<br />
__________________________________________________________<br />
City: _____________________ State:________<br />
Zip: ______________<br />
Country: ________________________________<br />
Email Address: _____________________________________________<br />
Serial Number (located on left side of marker):____________________<br />
Date of Purchase: ___________________________________________<br />
Place of Purchase:<br />
_________________________________________________<br />
_________________________________________________<br />
_________________________________________________<br />
_________________________________________________<br />
_________________________________________________<br />
16.<br />
PAINTBALL<br />
www.diablopaintball.com<br />
.68 CALIBER ELECTRONIC PAINTBALL MARKER<br />
Meets or exceeds ASTM standards.<br />
17.