Warning Order - Wasatch Front Historical Gaming Society
Warning Order - Wasatch Front Historical Gaming Society
Warning Order - Wasatch Front Historical Gaming Society

You also want an ePaper? Increase the reach of your titles
YUMPU automatically turns print PDFs into web optimized ePapers that Google loves.
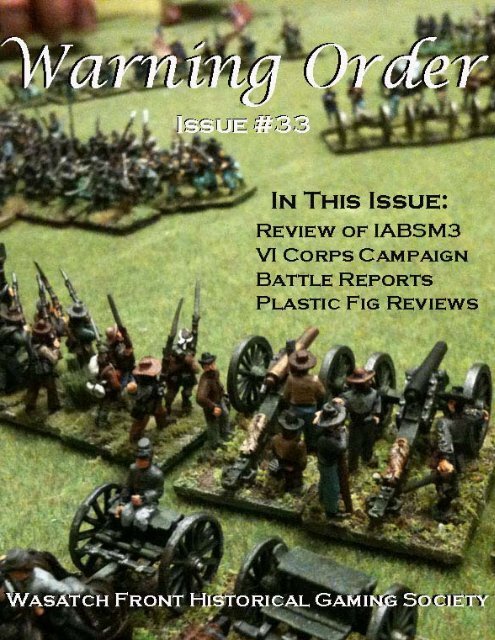
Issue #33<br />
Summer/Fall 2012<br />
IABSM3: A Review<br />
WASATCH FRONT HISTORICAL GMAING SOCIETY<br />
<strong>Warning</strong> <strong>Order</strong><br />
For one reason or another<br />
I’ve had a fascination with<br />
WW2 skirmish games. It<br />
started back in the 70s<br />
when I used my Airfix and<br />
Atlantic 1/72nd scale figures/vehicles<br />
with Angriff<br />
rules. From there it progressed<br />
to the WRG 1925-<br />
50 skirmish rules (does<br />
anyone still remember<br />
those) and over the last<br />
two decades I’ve tried various<br />
other sets. These were<br />
very clockwork like rules<br />
with an IGOUGO system<br />
and pretty straightforward.<br />
The rules sets in the<br />
late 80s and 90s included<br />
Arc of Fire, Battleground,<br />
and more that added complexity,<br />
but with a large<br />
group bogged down. They<br />
were good rules, but playing<br />
with 7-8 players and a<br />
few squads each could<br />
easily take 6-8 hours per<br />
game! We needed to find<br />
something fast playing,<br />
produced some chaos, and<br />
that would allow us to use<br />
vehicles without bogging<br />
the game down into too<br />
much detail.<br />
I purchased a set of I<br />
Ain’t Been Shot Mum<br />
(IABSM) from a company<br />
called Too Fat Lardies, or<br />
TFL as they are affectionately<br />
known. The rules at<br />
that time were pretty basic<br />
and despite a few questions<br />
Inside this issue:<br />
Arnhem area BKC2 Battle Report 6<br />
Red Dragon/Green Crescent Game Review 8<br />
Fireforge Games Teutonic Knights Review 11<br />
VI Corps at Chancellorsville Mini-Campaign 12<br />
WMA Battle Report 20<br />
BKC2 East <strong>Front</strong> Battle Report 24<br />
GDB Three Night Slugfest Battle Report 26<br />
here and there, they<br />
were easy to figure<br />
out. Our fist game<br />
was a huge success<br />
and with only three<br />
of us playing we<br />
couldn’t wait to try it<br />
out with the rest of<br />
the group. However,<br />
when we played it<br />
with our full group it<br />
was met with less<br />
than enthusiastic<br />
success. The reasons<br />
for this were probably<br />
many, but they<br />
included a wide variety<br />
of gamers who<br />
had differing ideas<br />
about WW2 skirmishing,<br />
wanted more<br />
detail, Flames of War was<br />
just getting popular so why<br />
try something new, and so<br />
on.<br />
From there we moved<br />
on to other sets, but when<br />
we played Sharp Practice,<br />
which uses a similar system<br />
to IABSM, we noticed<br />
that some things had been<br />
changed and for the better.<br />
So, when IABSM3 recently<br />
came out I figured it was<br />
time to get back into WW2<br />
skirmish actions and armed<br />
with several boxes of Plastic<br />
Soldier Company WW2<br />
Russians, I ordered the<br />
IABSM3 package which<br />
included the cards and tokens<br />
for the game.<br />
Since I have access to<br />
a good color printer I chose<br />
the PDF route, then had a<br />
local print shop add a comb<br />
binding along with vinyl<br />
covers. In my opinion this<br />
definitely saves on costs,<br />
plus you have a PDF of the<br />
rules for quick access or if<br />
you have to print off any<br />
charts and/or tables.<br />
The first question naturally<br />
is, “What exactly is<br />
IABSM” It definitely is a<br />
set of rules for WW2 skirmish<br />
actions, but at the<br />
high end. By that I mean<br />
you’re not talking about<br />
two squads attacking a<br />
position defended by a fire<br />
team and two MGs, but<br />
rather a large (cont. on p3)<br />
Special points of interest:<br />
Review of the new IABSM3 rules.<br />
Several reviews of plastic figure sets as well<br />
as some 1/48th armor kits.<br />
Battle reports for GDB, BKC2, WMA, and<br />
F&F games.<br />
Editorial on new rules sets and regular<br />
features.
IABSM3: A Review (cont.)<br />
(cont. from p.2) battle with<br />
multiple platoons of infantry<br />
and armor. In fact, going<br />
through one of the scenario<br />
books (sold separately)<br />
for the early Eastern<br />
<strong>Front</strong> shows many scenarios<br />
with upwards of 70-80 infantry<br />
and 6-10 vehicles a<br />
side! This is definitely a<br />
change from the earliest<br />
version of the rules that I<br />
originally tried and almost<br />
at the operational end of the<br />
skirmishing spectrum. It<br />
may also explain why there<br />
are so many pictures of<br />
15mm figures and vehicles throughout<br />
the rules as in 25mm playing some of the<br />
scenarios isn’t going to be cheap!<br />
The good thing for the gamer is that<br />
these rules can be used with any figure<br />
scale and whatever basing you are currently<br />
using. You can lose single figures<br />
if they are based that way, or just mark<br />
the casualties on a stand if you have multiple<br />
figures based on one stand. Vehicles<br />
should be individually based and<br />
most of the scenarios operate with platoons<br />
of 3-5 vehicles, so once again,<br />
15mm scale would seem to be the ideal<br />
choice, but it will play just as well in any<br />
other scale.<br />
For your money you do get a quite<br />
sizeable book. Checking in at 106 pages<br />
for the PDF version it certainly isn’t trying<br />
to short change the buyer! The rules<br />
are very easy to read and the layout really<br />
helps with learning the system. There is<br />
nothing here that many gamers haven’t<br />
already seen before, so complexity is<br />
definitely not an issue. There are numerous<br />
examples in this version, so they’ve<br />
learned their lessons well and these are of<br />
immense help to the gamer. I would go<br />
so far to say that if you just went through<br />
the book and only read the examples of<br />
play you would probably get a good idea<br />
of how the system works.<br />
The rules are written in an easy to<br />
understand style. Not quite as old fashioned/folksy<br />
as Black Powder/Hail Caesar,<br />
but it’s obvious that these guys are<br />
gamers and are talking to gamers, so<br />
don’t expect any type of SPI case by case<br />
rulings in the book. My<br />
biggest complaint is that<br />
the drop shadow on the<br />
bold text on some pages<br />
and objects on the examples<br />
of play have a lot of<br />
bleed/fuzziness to them.<br />
I’m not sure if was just<br />
that they were trying to be<br />
too clever, too artistic, or<br />
it didn’t come out right in<br />
the end, but in future versions<br />
it needs to be<br />
dropped. It doesn’t detract<br />
from the ideas that<br />
are presented, but it’s just<br />
one of those little annoying<br />
things that gets to you after awhile.<br />
The other annoying little thing is that<br />
yes, another set of rules that focuses on<br />
Normandy for the orders of battle that<br />
come with the rules. No, there’s no Russians,<br />
North Africa, early war French, but<br />
there are Americans, Germans, and British<br />
orders of battle in this set of rules. I<br />
realize that there was a lot of fighting in<br />
the Normandy area and it was one of the<br />
few times in 1944-5 where German units<br />
were close to their actual TO&E strength,<br />
but what if you wanted these rules to play<br />
early Eastern <strong>Front</strong> with your Germans<br />
and Russians Yup, you’re in trouble.<br />
You’ll need to buy one of the scenario<br />
books (only a few have been converted to<br />
the IABSM3 format), so there will be an<br />
additional cost to those gamers who don’t<br />
want to play Normandy battles. Again, I<br />
don’t understand why rules designers<br />
can’t include just generic OBs for other<br />
nations’ units so that gamers can at least<br />
use the rules once<br />
they’ve bought them<br />
instead of having to wait<br />
for additional supplements<br />
or purchase extra<br />
products.<br />
OK, on to the rules<br />
themselves and an analysis<br />
of the systems that<br />
they use. IASBM is a<br />
card driven game with<br />
basically one card put<br />
into a deck per platoon<br />
along with one card per<br />
Big Man. If you’re familiar<br />
with any of the<br />
TFL rules they use a concept called Big<br />
Men where one figure can activate a<br />
number of units when their card is drawn<br />
or the unit can activate when its own card<br />
is drawn. This essentially gives the player/side<br />
two chances to get their units activated<br />
during a turn. Big Men can get<br />
units to move, direct fire, remove Shock<br />
points (another central theme to the rulesexplained<br />
later), and should be seen as<br />
the heroes of WW2 movies that you often<br />
see in film! Additional cards can be added<br />
per scenario for armor platoons, forward<br />
observers, anti-tank units, human<br />
waves, and much, much more. Gamers<br />
can tailor certain cards to scenario objectives<br />
or to represent a higher quality<br />
force, so there is basically no limit to<br />
what can be done with scenarios.<br />
Basically, cards are drawn until you<br />
hit a Tea Break card, which ends the turn.<br />
Our group uses two of these cards, so<br />
when the second Tea Break card is drawn<br />
that ends the turn. The drawing of the<br />
first one tends to provide some anxiety<br />
for the players to get as much done as<br />
possible as they know the end of the turn<br />
could be just around the corner!<br />
Another concept you see in several<br />
TFL rules is Blinds. Blinds are markers<br />
(usually 3-4 inch ovals) that mark where<br />
a unit or dummy unit may be on the<br />
board. It’s a simple and very effective<br />
way to simulate hidden movement without<br />
a lot of record keeping. There is a<br />
card for the Blinds and the spotting rules,<br />
while pretty thorough, are easy to use.<br />
We’ve found that the Blinds add greatly<br />
to the game without taking up any extra<br />
time.<br />
Firing is pretty straightforward,<br />
with each unit rolling<br />
a number of dice corresponding<br />
to how many actions<br />
they wish to use for<br />
firing, the cover of the enemy<br />
unit, what weapons<br />
they’re using, etc., then roll<br />
on a table checking it against<br />
the three range bands. This<br />
produces a number result<br />
along with possible pin or<br />
suppression effects. The<br />
firer then rolls a number of<br />
D6s equal to (cont. on p.22)<br />
Page 3<br />
WARNING ORDER
The Tide at Sunrise<br />
If you’re looking for<br />
interesting games on<br />
unusual topics, then The<br />
Tide at Sunrise from<br />
MMP will definitely suit<br />
you. The game covers<br />
the Russo-Japanese War<br />
of 1904-5, from the initial<br />
Japanese incursions<br />
to where Russian reinforcements<br />
have built up<br />
to a point that there will<br />
probably be a massive battle towards the<br />
end of the game near Mukden as it was<br />
historically.<br />
In terms of components you get a<br />
beautiful 22 x 34 map with several of the<br />
necessary tables and record tracks in the<br />
unused corners of the map. The counters<br />
are also well done, with graphics of infantry,<br />
artillery, and cavalry for the combat<br />
units along with well drawn ships for<br />
the ship counters. If<br />
you’ve seen any of<br />
the counters for the<br />
Avalanche Press<br />
naval series of<br />
games then these<br />
will compare favorably<br />
to those. The<br />
rules are in full<br />
color with several<br />
examples, so again,<br />
MMP has produced a quality product and<br />
the last several games I have purchased<br />
from them have been at this high level.<br />
The one thing that was truly baffling,<br />
however, is that you get 40+ beautiful<br />
ship counters, markers for maneuver, hits,<br />
spotting, etc., but there were no naval<br />
rules in the game! Yes, I was<br />
as amazed as I’m sure a lot of<br />
gamers were when they<br />
flipped through the rules trying<br />
to figure out what to do<br />
with the ships and assorted<br />
accompanying counters.<br />
MMP did release an optional<br />
set of naval rules, but I cannot<br />
ever recall seeing anything<br />
like this in the 35+ years I’ve<br />
been in the hobby.<br />
The rules are pretty standard<br />
in terms of movement and<br />
combat, although the combat<br />
results table can be bloody at times.<br />
The sequence of play is pretty easy<br />
to understand and gamers should be<br />
able to set up a game pretty quickly.<br />
The first turn or two will take some<br />
getting use to, especially the replacement/reinforcement<br />
phase, but<br />
after that the turns fly by.<br />
In the basic game the siege of<br />
Port Arthur and the naval rules are<br />
done with a few dice rolls at the<br />
beginning of the turn. This will<br />
determine if the Russian fleet sorties,<br />
how many transport points the Japanese<br />
can spend that turn to bring in reinforcements,<br />
and where the Japanese can land<br />
or ship their forces. If you play with the<br />
optional naval rules then you actually<br />
fight a fleet battle, which may add or<br />
subtract from the Japanese victory point<br />
total. My advice is that for the first game<br />
or two use the simplified/abstract naval<br />
system as using the optional<br />
naval system will add at least<br />
another hour to the length of<br />
time it takes to play the game.<br />
In my opinion the crux of<br />
the game is the use of reinforcement<br />
points (for the Russians)<br />
or transport points (for<br />
the Japanese). In both cases<br />
this determines what units will<br />
be able to come into the game<br />
as reinforcements. You also need to set<br />
aside points for units that become disrupted<br />
(basically having lost a step) to bring<br />
them back up to full strength. This can<br />
be a real balancing act and will probably<br />
take a few plays to get it right. The Russians<br />
have some tough choices on the<br />
Game Review<br />
first few turns in that they need to set<br />
aside points for the Port Arthur area as<br />
once it gets cut off you cannot allocate<br />
any replacements to units there. Each<br />
unit has a cost printed on a table on the<br />
map, so bringing in two brigades instead<br />
of a division will be one of the choices<br />
that needs to be made each turn.<br />
In the first turn the Japanese begin<br />
with a short blitzkrieg against the Russian<br />
defenders, followed by on the second turn<br />
cutting off Port Arthur from the main rail<br />
line. From there it becomes a race to see<br />
if the Japanese can take Port Arthur and<br />
hold off the Russian forces that are shipping<br />
in via Siberia and the Far East. Both<br />
sides have so many options in terms of<br />
where to defend, what types of units<br />
should be brought in, etc., that the game<br />
should have very good replay value. I’ve<br />
played face to face once and solitaire<br />
twice, with both games going around just<br />
over three hours, so it’s ideal for a one<br />
night gaming session.<br />
Overall, this is a pretty good game on<br />
an unusual topic. Even if you know nothing<br />
about the period it is pretty<br />
easy to get into and see what is<br />
going on with the era and the<br />
system itself. The rules are pretty<br />
basic, there are some interesting<br />
concepts, and by adding in<br />
the optional naval rules you can<br />
add more detail and complexity.<br />
For a 3-4 hour two player game<br />
it is surprisingly fast playing and<br />
there’s not much down time. I<br />
think MMP did a good job here,<br />
but the missing naval rules is<br />
still a mystery to me on how that<br />
happened. Still, try this game if<br />
you get a chance.<br />
ISSUE #33<br />
Page 4
Plastic Soldier Company 28mm Russians<br />
Miniatures Review<br />
When we decided to get back into<br />
WW2 skirmish gaming with IABSM3,<br />
we were looking for a new period as the<br />
1944-5 U.S. vs. Germans was getting a<br />
little stale. Since I still had a load of<br />
1/48th early war German armor the most<br />
obvious opponent would be 1941-2 Russians.<br />
I looked around for deals on<br />
28mm Russian WW2 figs and while there<br />
are quite a few available, the cost to do<br />
several platoons with heavy weapons<br />
would be prohibitive.<br />
I then came across some threads on<br />
TMP for some new 15mm plastic kits/<br />
figs so I went to the Plastic Soldier<br />
Company site. Not only do they have<br />
an ever growing line of 15mm plastics,<br />
they have several offerings in 28mm. I<br />
saw that they had three Russian boxed<br />
sets; infantry, heavy weapons, and antitank<br />
guns. I ordered the anti-tank gun<br />
set and decided I would try this small<br />
set before buying any of the others.<br />
The anti-tank boxed set is very interesting<br />
in that you get a variety of parts to<br />
make either two 45mm anti-tank guns or<br />
two 76mm infantry guns. The set also<br />
comes with eight crew in a variety of<br />
poses. The figures are hard plastic,<br />
sculpted reasonably well with average<br />
faces, and need very little assembly. The<br />
guns were quick to put together although<br />
I had to do an online search for some<br />
45mm AT gun images to determine<br />
where one of the parts actually went as<br />
the instructions were a bit unclear.<br />
All in all, it was a very<br />
good little boxed set that<br />
produced two good looking<br />
45mm At guns with eight<br />
crew. The figures and guns<br />
painted up quickly, so this<br />
whetted my appetite to try<br />
some of their other offerings.<br />
The next set I ordered was the Russian<br />
infantry boxed set. You get 57 hard<br />
plastic miniatures on several sprues.<br />
There is a wide assortment of officers,<br />
infantry in helmets, infantry in soft hats,<br />
figures with SMGs, and several LMG<br />
teams. As with the 45mm AT gun set,<br />
the assembly required for most of the<br />
figures is minimal, with a few optional<br />
heads, rifle poses, etc., that have to be<br />
glued to various figures. These are in no<br />
way, shape, or form similar to the Victrix<br />
plastic figures where it could take 15-20<br />
minutes per figure, but some figures<br />
might only need a head glued on while<br />
others need the arms attached.<br />
You do get three LMGs with one figure<br />
firing and one loading, pus you get<br />
the same figures standing up carrying the<br />
weapon/ammo, which was a nice touch.<br />
The figures are carrying the standard<br />
Russian “sack of stuff” rather than a<br />
backpack that most countries had and a<br />
few have blanket rolls. All figures have<br />
belts and canteens, but beyond that the<br />
equipment is kept to a minimum, which<br />
in my opinion makes these figures very<br />
easy to paint up.<br />
As with most plastic boxed sets<br />
in any scale you do get some weird<br />
poses or figures that you probably<br />
won’t use, but there<br />
are enough of them to<br />
make several squads<br />
anyway, so it’s not as<br />
if these posed will<br />
prevent you from<br />
quickly crating a platoon<br />
of 40-50 men.<br />
Overall I thought that<br />
these figs were great<br />
bang for the buck and painted up quickly.<br />
Not as detailed or impressive as comparable<br />
metal figs, but they look great on the<br />
tabletop.<br />
Finally, I bought the Russian heavy<br />
weapons boxed set. This set has a wide<br />
variety of things in it that feature two anti<br />
-tank rifles, two HMGs, two 50mm mortars,<br />
and two 81mm mortars. As with the<br />
LMGs in the infantry set, the HMGs and<br />
ATRs come with firing and travelling<br />
figures, which is naturally a great idea for<br />
skirmish games.<br />
The HMGs are a bit fiddly to assemble,<br />
but as with the other boxed sets there<br />
is nothing here that will take longer than<br />
a few minutes. There is a wide variety of<br />
crew poses that can be used with most of<br />
the weapons.<br />
Overall, there isn’t too much to complain<br />
about. The sculpting on the faces,<br />
inability to exchange arms/weapons, and<br />
lack of “personality” type figures are<br />
nuisances, but they don’t detract from the<br />
overall value. So, for basically $80-85<br />
(depending upon where you buy these) I<br />
was able to build two 45mm AT guns w/<br />
crews, two HMGs w/crews, two 50mm<br />
mortars w/crews, two 81mm mortars w/<br />
crews, two ATR teams, plus about five<br />
infantry squads with some leftover figs.<br />
Not too bad!<br />
ISSUE #33<br />
Page 5
BKC2: Arnhem Area<br />
One of the complaints we sometimes<br />
get in our group is that we don’t focus on<br />
infantry during our WW2 BKC2 battles.<br />
Mark set out to remedy this by setting up<br />
a scenario that would not only focus on<br />
the infantry, but one side would have no<br />
vehicles whatsoever!<br />
The setting was in the Arnhem area<br />
during Operation Market Garden. A British<br />
para battalion has seized a village, but<br />
German forces control the village on the<br />
other side of the board. A second British<br />
para battalion would be coming on in a<br />
randomly determined area and try to seize<br />
control of the second village. The Germans<br />
started with an understrength infantry<br />
battalion holding one of the villages<br />
and they would have some mechanized<br />
forces coming on later.<br />
The British paras were rated as very<br />
good troops with an above average command<br />
rating. The Germans, however,<br />
were a mixed lot, consisting of some SS<br />
troops, but also a lot of training battalions<br />
and inexperienced forces.<br />
The Germans would definitely<br />
have the edge in<br />
numbers, mobility, and<br />
being able to determine<br />
where they would attack.<br />
The British paras had the<br />
huge advantage of being in<br />
good defensive positions on<br />
one end of the board.<br />
However, they would have<br />
to attack across some open<br />
ground to take the second<br />
village.<br />
The game started out<br />
well for the British as the<br />
second para battalion moved onto the<br />
board quickly and towards the<br />
village, taking up shelter in a large<br />
wooded area. The Germans<br />
moved on some infantry and started<br />
slowly moving towards the<br />
woods towards the British held<br />
village. The Germans also brought<br />
up some infantry guns and positioned<br />
them to support the attack<br />
towards the woods. Seeing the<br />
numbers coming at the woods, the<br />
British pulled back into the town<br />
and hunkered down, waiting for<br />
the attack.<br />
Here’s where things started to<br />
fall apart for the British attack on the<br />
second village. There was a series of<br />
command rolls that were failed by the<br />
British paras when they tried to launch a<br />
major assault. Instead of the entire battalion<br />
plus its support units going in at the<br />
same time, the units went in piecemeal<br />
Battle Report<br />
and were hit hard by the German defenders.<br />
After a few turns the British were<br />
right back where they started.<br />
On the other side of the board the<br />
Germans moved into the woods and began<br />
to engage the paras. Several firefights<br />
erupted on the outskirts of the village,<br />
but for the time being the British<br />
were holding on pretty easily.<br />
Then the Germans brought on their<br />
mech forces and decided to attack the<br />
British held village. The panzergrenadiers<br />
rolled up and dismounted to begin<br />
their attack while the Stugs and other<br />
armor set up support positions. The British<br />
began shifting around their reserves to<br />
meet this new threat. Two of the 6lb. AT<br />
guns began to engage the German armor<br />
as the Germans began to set up their attack.<br />
This prompted the other British<br />
para battalion to try a second attack on<br />
the German held town. (cont. on p.7)<br />
Page 6<br />
NEWSLETTER TITLE
BKC2: Arnhem Area (cont.)<br />
Battle Report<br />
The British once again tried to<br />
emerge from the woods and were met by<br />
an artillery barrage and the fire from the<br />
German defenders. The attack quickly<br />
bogged down as the British command<br />
rolls failed several times with the flanking<br />
forces. The British paras, however,<br />
continued the attack and actually started<br />
to make some headway.<br />
On the other side of the board, the<br />
British had knocked out some of the German<br />
armor and scores some successes on<br />
the panzergrenadiers. However, the British<br />
were slowly being cut down and had<br />
to abandon a section of the village. Three<br />
of the four British AT guns were knocked<br />
out, but the Germans failed several command<br />
rolls at crucial times, saving the<br />
British defenders from coordinated attacks.<br />
The Germans finally got into<br />
some close combat and cleared the approaches<br />
to the village and the outer section<br />
of buildings, but at a heavy cost.<br />
Back to the other side where the British<br />
paras, despite heavy odds, were now<br />
on the outskirts of the village and pushing<br />
to actually take it from the Germans.<br />
There were a series of desperate attacks<br />
by both sides with some critical die rolls<br />
that were watched with interest by all<br />
players, which shows you how important<br />
they were in the game! In the end the<br />
Germans held onto the village and the<br />
British paras fell back once again. Both<br />
sides were nearing the 50% loss threshold<br />
and had been worn down by the fighting.<br />
The Germans were gaining the upper<br />
hand in the other village as well. They<br />
had cleared two sides of the village and<br />
were making moves to bring overwhelming<br />
firepower down on the remaining<br />
defenders. The British moved to consolidate<br />
positions as they still held half of the<br />
village, but the end was in sight. With<br />
half of the village now in German hands<br />
and with no hope of seizing the other<br />
village the game was declared a German<br />
victory.<br />
A great scenario with lots of action,<br />
that proves you don’t need a lot of armor<br />
to have fun with WW2 gaming. Also,<br />
keeping the forces fairly small makes<br />
everyone focus on what they have, learn<br />
the rules for infantry combat, and players<br />
are less likely to “throw away” units. It<br />
was so much fun that we are now thinking<br />
of doing a Market Garden campaign!<br />
VOLUME 1, ISSUE 1<br />
Page 7
Red Dragon/Green Crescent<br />
Game Review<br />
I have always had a lovehate<br />
relationship with<br />
magazine wargames.<br />
They always sound so<br />
appealing in the ads, but<br />
once they arrive, get set<br />
up and played, they usually<br />
end up going on Ebay<br />
or in the trade pile. That’s<br />
usually because they are<br />
under-developed, there’s<br />
not much time for playtesting,<br />
and because of the limitations on<br />
counters/maps, things that the game<br />
needs have a tendency to get left out.<br />
Over the last ten years I’ve probably purchased<br />
well over thirty magazine games<br />
and have kept only a handful. One of<br />
those I did keep was a modern warfare<br />
offering called Red Dragon Rising. Despite<br />
the garish colors of the map and a<br />
few rules problems, it was a fun game<br />
that had fantastic replay value. I was<br />
pleasantly surprised that there would be a<br />
newer version that would include the<br />
Indian Ocean and Persian Gulf areas<br />
called Red Dragon/Green Crescent that<br />
would be the first issue in a new magazine/game<br />
series called Modern War.<br />
Overview<br />
Red Dragon/Green Crescent (RDGC) is a<br />
theater level game focusing on naval and<br />
air operations from the Persian Gulf to<br />
the Western Pacific. The game assumes<br />
an attack by the People’s Republic of<br />
China (PRC) along with Pakistan and<br />
Iran (depending upon scenario) on the<br />
United States and its allies. There are<br />
ground units, but they are usually marine<br />
brigades, special forces, etc., that would<br />
be used to seize control of islands or port<br />
areas. Major ground<br />
combat, such as a<br />
second Korean War,<br />
is handled abstractly.<br />
The players are in the<br />
role of commanding a<br />
wide variety of naval<br />
and air assets, from<br />
carriers to surface<br />
action groups to<br />
squadrons of aircraft<br />
across vast expanses<br />
of the world’s seas.<br />
The game features an<br />
interesting sequence<br />
of play that focuses on random<br />
events and the “Op” or Operations,<br />
where players get to choose from a<br />
list of actions. This definitely enhances<br />
the replay value of the game<br />
and produces enough chaos where<br />
the players need to not only react to<br />
their opponent’s moves, but to a<br />
constantly changing global situation.<br />
Components<br />
The single map of East Asia that was in<br />
Red Dragon has been expanded to two<br />
maps with the second map reaching all<br />
the way to the Persian Gulf. Also, the<br />
Red Dragon map has been<br />
turned ninety degrees to fit<br />
both maps together. The<br />
color choices for the map<br />
are interesting, but they<br />
work and the sea areas, islands,<br />
etc., are clearly<br />
marked. I do take issue with<br />
the large holding boxes<br />
(could have been used for random event<br />
listings), the colors used for the Op lists<br />
(kind of annoying to read), and the set up<br />
listings again should have been replaced<br />
by the random event listings. Random<br />
Events and Ops drive the game, so they<br />
should have been clearly listed on the<br />
map if there was room. Failing that, why<br />
not use the extra room for a turn track<br />
and/or victory point track Also, the<br />
stacking numbers for some island groups<br />
are missing and there’s a box with what<br />
the numbers on the counters mean, but it<br />
looks like there was space for a counter<br />
graphic to go in the middle, but there’s<br />
nothing there.<br />
The counters are well<br />
done, with units representing<br />
CVs,<br />
groups of surface<br />
ships, squadrons of<br />
aircraft, and ground<br />
forces that would be<br />
used in this setting.<br />
My set of counters<br />
was difficult to<br />
punch and in the end<br />
I ended up using an<br />
X-Acto knife to cut<br />
the strips, then<br />
clipped them. Each<br />
counter is rated for anti-ground, anti-ship,<br />
ASW, and anti-air with nice silhouettes<br />
for the aircraft. A large number of counters<br />
have 2016 or 2021 listed on the backs<br />
of the counters and they are used for the<br />
future scenarios set in those years. My<br />
only complaint with the counters is that<br />
some shouldn’t be in there such as the<br />
UK CVL (there are no British light carriers<br />
left) and Australian F-111 (they’re<br />
now in reserve). Also, where are the<br />
Saudi MRCA Tornados, US F-22s, and<br />
Australian F-18s There’s actually quite<br />
a few questions about the orders of battle,<br />
but for game purposes the counters supplied<br />
work.<br />
Now we get to the rules. If you’ve<br />
played Red Dragon then getting into<br />
RDGC will be pretty easy. There are<br />
some new Ops, a variety of different scenarios<br />
for the Persian Gulf, India-<br />
Pakistani wars, Indian Ocean campaigns,<br />
and then the combined campaign. About<br />
30 minutes of reading will get you up to<br />
speed, then you can set up units and<br />
begin play. If you’re new to the system, I<br />
think you could be in trouble. The rules<br />
are pretty haphazard and spread out all<br />
over the place. Many of them are in the<br />
Ops or random events explanations, so<br />
you’ll need to look through quite a few at<br />
times to figure out what’s going on for<br />
things like special forces, mines, longrange<br />
intercepts, etc. Some examples of<br />
play would really help here such as a first<br />
turn run through and this game is crying<br />
out for professionally done set-up cards<br />
for the scenarios as well as a reference<br />
card for combat/special situations.<br />
Game Play<br />
Probably the greatest praise for wargame<br />
designers is saying that their game works,<br />
and in this case it is true. RDGC<br />
works…as a game, not as a simulation of<br />
modern combat. Each turn begins with<br />
the player rolling to see if there is a random<br />
event. On a 1 or a 2 the player rolls<br />
Page 8<br />
NEWSLETTER TITLE
Red Dragon/Green Crescent (cont.)<br />
Game Review<br />
again and consults the event listings for<br />
the effect. These range from countries<br />
dropping out of the war, reinforcements<br />
needing to be sent elsewhere, revolts, and<br />
much more. This is one of the strong<br />
points in the game that keeps players<br />
guessing and increases the replay value of<br />
the game. Then players choose an Op<br />
from the list as their action for the turn.<br />
Ops can be moving a group of units from<br />
a land base out to sea, long range strikes<br />
by TU-22s or B-2s, air attacks on enemy<br />
bases, calling for reinforcements, hyper<br />
war chit draws, and much, much more. In<br />
fact, this new version has added even<br />
more Op actions than the original Red<br />
Dragon Rising so that choosing one can<br />
be difficult. Movement and combat are<br />
done by areas with forces being able to<br />
usually move one area per Op. This is<br />
also one of them main challenges for<br />
players in that they can only choose one<br />
Op per turn. You have so many units,<br />
tasks, needs, etc., that choosing just one<br />
is difficult to say the least.<br />
I think at this point I need to clarify what<br />
I think is one of the<br />
huge problems with<br />
the game in terms<br />
of simulating modern<br />
warfare. The<br />
problem is being<br />
able to only choose<br />
one Op per turn.<br />
That’s right. If you<br />
are expecting to<br />
move a Japanese<br />
fleet into a sea area<br />
while moving a US<br />
fleet in from another to<br />
conduct a joint operation<br />
against enemy forces during<br />
that turn with airstrikes<br />
coming in from<br />
Okinawa or another base<br />
you are sadly mistaken.<br />
Likewise, if you have a<br />
carrier that’s damaged<br />
and spends two turns<br />
moving to a base and one<br />
turn getting repaired, all<br />
of your forces in the theater<br />
sit around for three<br />
turns doing nothing. You<br />
can argue that players<br />
should never choose to do<br />
that, but then that means a damaged carrier<br />
just sits around in the same sea area<br />
waiting to be finished off This problem<br />
becomes even more apparent when playing<br />
the combined game. Some forces<br />
literally just sit in the same sea area for<br />
the entire game as you get only one Op<br />
per side (or one Op per map in the combined<br />
game). Also, it looks weird that the<br />
U.S. can’t move forces around the globe<br />
all at the same time. I’ve had games<br />
where carrier battle groups haven’t<br />
moved the entire game as there were too<br />
many other pressing needs for the ops<br />
during my turn. My guess is that in real<br />
life the U.S. and its allies could probably<br />
do ten Ops per turn every turn (however,<br />
it wouldn’t be much of a game), but the<br />
one Op that you do get creates some unusual<br />
situations.<br />
Fortunately, the one Op per turn works on<br />
the game level. It drives the decision<br />
making process and constantly forces<br />
both players to reassess their actions.<br />
Setting up a combined fleet operation or<br />
amphibious assault can take several Ops,<br />
so you might<br />
need to give<br />
up the initiative<br />
somewhere<br />
else on<br />
the board.<br />
There are a<br />
bewildering<br />
array of Op<br />
choices,<br />
which again,<br />
gives the<br />
game tremendous<br />
replay value. Combat is done by<br />
having each player match up their units<br />
and rolling a D6, needing the listed number<br />
or under for each strength. Combat is<br />
simultaneous, quick, and deadly. Units<br />
die off in large numbers and its not uncommon<br />
in some games to see little left<br />
of the Taiwanese and Chinese forces,<br />
with quite a few units from other nations<br />
in the dead pile.<br />
Scenarios & Campaigns<br />
Having played all of the various scenarios<br />
and campaigns, I thought it would be of<br />
interest to other gamers to list my<br />
thoughts on each. There are three force<br />
levels for each scenario or campaign;<br />
Current, 2016, and 2021.<br />
Persian Gulf: This would be a good<br />
training scenario as there are no random<br />
events and it is only ten Ops long. The<br />
Iranians only chance is to get hot with the<br />
dice as they are hopelessly outclassed,<br />
particularly in the Current scenario.<br />
India-Pakistani: Again, probably good<br />
for training scenarios or teaching new<br />
players the system. The Pakistanis are<br />
outclassed in the air and at sea, even with<br />
the 2021 force levels. Their only chance<br />
as with the above scenario is to get some<br />
good dice rolls and hope for the best.<br />
Red Dragon Rising: In my opinion this is<br />
the best game in the package. The action<br />
starts with a massive pre-game Chinese<br />
strike on Taiwan and things go fast and<br />
furious from there. The Chinese side has<br />
VOLUME 1, ISSUE 1<br />
Page 9
Red Dragon/Green Crescent (cont.)<br />
Game Review<br />
several paths to victory, so different<br />
options can be tried out<br />
and each Op can mean victory or<br />
defeat.<br />
Green Crescent campaign: This<br />
campaign covers the Indian<br />
Ocean and Persian Gulf. Because<br />
of logistical constraints the<br />
Chinese can never have more<br />
than eight units total on this map.<br />
The campaign basically comes<br />
down to how fast can the Chinese<br />
player get the Iranians and<br />
Pakistanis on their side. If they<br />
can’t (and I had several games<br />
where they did nothing) then the<br />
U.S. side will simply overwhelm<br />
any opposition on the Indian Ocean map.<br />
The scenarios and campaign on this map<br />
are hard to judge as so much depends on<br />
getting the right random events. At times<br />
it feels like the system is going beyond its<br />
limits as the Chinese side only seems to<br />
have a chance if certain things break their<br />
way.<br />
Red Dragon/Green Crescent campaign:<br />
This actually qualifies as a two-map<br />
“mini-monster” as there are a lot of units<br />
on the table. Unfortunately, this campaign<br />
has the same problems that the<br />
Green Crescent campaign has, except<br />
now it’s complicated by the fact that each<br />
side only gets one Op per turn per map<br />
for use across two maps with many, many<br />
units! In the end it seems like you’re<br />
playing the Red Dragon Rising scenario<br />
with a bunch of nice looking units sitting<br />
around on another map.<br />
Replay Value<br />
Simply put, off the charts. With the large<br />
number of random events, multiple Ops<br />
to choose from, and several paths to victory<br />
for the Chinese player, this is a game<br />
that can be played over and over. One of<br />
my friends and I once did three games in<br />
just under three hours! Once<br />
you know the system you<br />
can get through the turns<br />
pretty quickly. Not only<br />
that, certain events can end<br />
the game well short of the 30<br />
Op limit. I’ve played about<br />
a dozen games of Red Dragon<br />
Rising along with several<br />
of the others in<br />
the combined<br />
game and there’s<br />
been numerous<br />
surprises along<br />
the way, ranging<br />
from Taiwan<br />
dropping out on<br />
the first two turns<br />
(makes things really difficult<br />
for the U.S. player) to a massive<br />
Russian-Japanese sea<br />
battle that saw both fleets get<br />
cut down to almost nothing.<br />
The great thing about RDGC<br />
is that you never know what’s<br />
just around the corner.<br />
Summary<br />
Despite some small issues with components<br />
and the rules, this game is worth<br />
playing. The Red Dragon side of the<br />
game is what you’re spending the<br />
money for and it is a very good<br />
game. Both sides have a ton of options,<br />
there’s a lot of action, and if<br />
things go really wrong you can<br />
quickly set it up and play it again.<br />
We’ve had some tremendous battles<br />
and a lot of fun along the way.<br />
However, when you add in the second<br />
map and units, I’m not sure<br />
what it is adding to the overall game.<br />
Because of the op limitations expressed<br />
above, you simply have too<br />
many units that need to do too many<br />
things, but the players are limited to<br />
doing just one thing per turn. Something<br />
is not right here and while it<br />
succeeds as a game, I’m not sure<br />
that it succeeds as an accurate portrayal<br />
of modern naval and air combat. I’m<br />
sure many players are going to think at<br />
some point, “So, I’m moving some heavy<br />
U.S. ground units from the holding box in<br />
a convoy to help Taiwan, so for the next<br />
several turns everything else I own across<br />
that map has to sit still” Yes, it does and<br />
that is a problem that may be too high of<br />
a hurdle for some gamers to get over.<br />
Again, however, RDGC succeeds in its<br />
game play. The random events, chaotic<br />
nature of combat, and large number of<br />
choices through Ops and various units<br />
that you can use each turn makes this into<br />
a challenging game. I think more effort,<br />
development, and playtesting needed to<br />
go into the combined game as there are a<br />
number of issues for the Indian Ocean/<br />
Persian Gulf map. Overall, a good, but<br />
not great start for Modern War magazine.<br />
Page 10<br />
NEWSLETTER TITLE
Fireforge Games Teutonic Knights<br />
Review<br />
Fireforge Games is a relatively new<br />
entrant into the plastic miniatures arena.<br />
Their first releases have focused on<br />
mounted knights and sergeants with<br />
promises of more releases that will deal<br />
with foot troops. With all of the current<br />
releases by Warlord, Perrys, Wargames<br />
Factory, Victrix, and more, you would<br />
think that there might not be much room<br />
for more plastic boxed sets, especially for<br />
an era such as medieval where there is a<br />
massive selection of metal figures.<br />
Depending upon where you purchase<br />
the Teutonic Knights boxed set<br />
you’ll probably end up paying around<br />
$35-40. For this you get twelve mounted<br />
knights on several sprues. The knights<br />
definitely have a Teutonic flavor suited<br />
for the wars in Eastern Europe, especially<br />
with the horned helmets. However, the<br />
variety of heads and a few cuts of the<br />
knife will produce a heavily armored<br />
mounted force for most medieval settings.<br />
I had to paint up a few units for a<br />
playtest of some forthcoming medieval<br />
rules and we had chosen the Crusades<br />
era, so I decided to do a unit of Hospitallers.<br />
After reading up on the subject the<br />
flowing cloaks and armor would do nicely<br />
for a Hospitaller force in the all black<br />
clothing worn during the Crusades.<br />
The horses come as a four piece affair<br />
with two separate halves, a head, and a<br />
tail. This gives some flexibility in the<br />
poses and on the positive side all of the<br />
horses in the unit won’t look the same as<br />
with some manufacturers. If you have<br />
the time there are some opportunities for<br />
kit bashing to make some unique poses if<br />
you so desire. The horses come with full<br />
barding, although a few of the horse<br />
heads have no barding, which again gives<br />
some variety to the finished unit.<br />
The figures themselves<br />
also offer a variety<br />
of helmets and weapons.<br />
They are simple figures,<br />
with a torso, separate<br />
heads, one separate arm<br />
with a weapon, heads, and<br />
shields. You will actually<br />
spend more time cutting<br />
them from the sprue and<br />
cleaning any excess plastic<br />
from the sprue than<br />
you will assembling them.<br />
Assembly is pretty basic<br />
and you can create several<br />
knights in no time at all.<br />
The cloaks can be a bit<br />
tricky to look right on the<br />
figure, but it’s just a few extra moments<br />
of your time.<br />
There are a large variety of weapons<br />
that include swords,<br />
maces, flails, axes,<br />
and spears/lances.<br />
Coupled with the<br />
various sized shields<br />
you can create a unit<br />
that will definitely<br />
not have that<br />
“everything is the<br />
same” look. I painted<br />
the shields separately<br />
then glued<br />
them on to the finished<br />
figures.<br />
The figures paint<br />
up quickly and look<br />
very good once finished.<br />
The horses have that same problem<br />
that most plastic figure sets have and<br />
that is it is hard to tell where the folds on<br />
the barding ends and where the actual<br />
horse begins. However, most of that is<br />
on the underside of the horse or in areas<br />
that you won’t notice, so it is a small<br />
problem.<br />
Overall, this is a very good boxed set.<br />
The figures look good, assemble quickly,<br />
and any complaints are so small that it<br />
really isn’t worth discussing. I’m looking<br />
forward to more releases by this company<br />
and hope for their continued success!<br />
VOLUME 1, ISSUE 1<br />
Page 11
VI Corps at Chancellorsville<br />
Battle Report<br />
I was going through<br />
some of my old Battlefields<br />
magazines and<br />
found a three part Fire &<br />
fury mini-campaign focusing<br />
on Sedgewick’s<br />
VI Corps at Chancellorsville.<br />
The VI Corps held<br />
the extreme flank of the<br />
army and was definitely<br />
one of the better led formations<br />
at that time of the war. VI Corps<br />
did cross the river and attack the Confederate<br />
positions in an attempt to distract or<br />
draw off forces that could be used against<br />
the main Union army. When utter disaster<br />
hit the Union army it was forced to<br />
withdraw back across the river under<br />
pressure which ended the campaign.<br />
This mini-campaign was basically<br />
three scenarios in a row where the results<br />
of each one influenced the next scenario.<br />
The campaign is pretty<br />
reasonable in that only<br />
about a corps of infantry<br />
and several batteries are<br />
needed for both sides,<br />
making this an attainable<br />
project even for smaller<br />
gaming groups. It’s ideal<br />
for 3-4 players and we<br />
were able to finish in two,<br />
four hour gaming sessions.<br />
The action begins at<br />
Maryes Heights with one<br />
Confederate brigade and<br />
some artillery trying to hold<br />
back a massive tide of blue<br />
coming down the road. The<br />
objective is for the Confederates<br />
to hold on as long as<br />
possible, which for the game<br />
to go on for several turns<br />
would take a good deal of<br />
luck! The scenario is played<br />
on a 2x2 board, so setting up<br />
and play time is just under<br />
an hour.<br />
In our refight the Confederates<br />
held for a few turns, but were<br />
then overwhelmed. How quick the victory<br />
is, however, influenced the next battle<br />
which was at Salem Church. The Confederates<br />
had two infantry brigades deployed<br />
plus some artillery near the center<br />
of the board. Part of a division with three<br />
brigades would be entering in several<br />
turns behind them as reinforcements.<br />
The position wasn’t the best for defensive<br />
purposes, but it wasn’t that bad either.<br />
The Union forces would have to come<br />
down the road, then spend<br />
time deploying for the attack.<br />
Again, time was of the<br />
essence. The Confederates<br />
were trying to hold out until<br />
nightfall if possible. The<br />
longer that they held out<br />
meant a few more turns for<br />
them to attack in the third<br />
and final scenario. The<br />
Union was pretty much right<br />
on schedule after the first<br />
battle and started their first<br />
division down the road at<br />
the start of the game. A few hours later<br />
the second division showed up and the<br />
battle was on.<br />
The first division drove in on the<br />
waiting Confederate forces. The Union<br />
artillery rolled great on their first few<br />
shots and forced the Confederate artillery<br />
to retreat. The first few assaults, however,<br />
did not fare as well, despite one of the<br />
Confederate brigades rolling a low on<br />
ammo result. By the end of the first few<br />
hours the Confederates were holding their<br />
position, but trouble was definitely brewing<br />
in the shape of more (cont. on p.13)<br />
Page 12<br />
NEWSLETTER TITLE
VI Corps at Chancellorsville (cont.)<br />
Battle Report<br />
(cont. from p.12) Union reinforcements<br />
coming down the road. The Confederates<br />
slowly gave ground, trying to not end up<br />
being driven from the field too early and<br />
awaiting reinforcements..<br />
The first crisis came when after holding<br />
the church area against repeated assaults,<br />
one Union attack finally succeeded<br />
and drove the Confederate brigade holding<br />
that area back. On the other flank<br />
trying to hold off the two attacking Union<br />
brigades for several turns was finally<br />
wearing down the other Confederate brigade<br />
and it began to give ground as well.<br />
Both brigades had lost several stands and<br />
things were looking bleak when the third<br />
Union division arrived.<br />
Just as the Union gained control of<br />
the church and the surrounding area and<br />
the Confederate brigades were down to<br />
half strength, three fresh Confederate<br />
infantry brigades with two batteries of<br />
artillery arrived to bolster<br />
the defense. They set up<br />
guarding the road exit and<br />
then pushed forward.<br />
They were immediately<br />
met by the advancing<br />
Union troops and a second<br />
full fledged battle<br />
erupted.<br />
The Confederates<br />
were trying to hold out for<br />
as long as possible to give<br />
themselves more time for<br />
the third scenario, but the<br />
pressure was just too<br />
great. The Union players did a great job<br />
of cycling fresh units forward and then<br />
massed their guns for an attack on the<br />
center. The Confederate forces did some<br />
damage, but in the end it was only a matter<br />
of time. First one brigade broke followed<br />
quickly by another. The road exit<br />
was cleared and the Union had their second<br />
victory.<br />
The Union in this scenario<br />
did slightly better than average,<br />
which meant for the final scenario<br />
which occurred near Bank’s<br />
Ford the Confederates would be<br />
pressed for time. Each side was<br />
able to choose two divisions for<br />
the final scenario. The third Union<br />
division was assumed to be<br />
guarding one of the flanks and<br />
was off board. The third Confederate<br />
division was also assumed<br />
to be off board. We quickly set<br />
up the board, put the forces out,<br />
checked the OBs one more time, read the<br />
special rules for the scenario, and then<br />
started the first turn.<br />
It was only during the approach<br />
march where the Confederate players, me<br />
included, saw how difficult this was going<br />
to be. The terrain was brutal, with the<br />
streams and roads covered by hills and<br />
forests, setting up definite avenues of<br />
approach that the Union forces<br />
had covered well. Although<br />
the Confederates had<br />
numbers, time was against<br />
them as the game began at<br />
3pm and darkness would fall<br />
at 8:30, ending the campaign.<br />
At the start of the game it<br />
looked like it would take the<br />
Confederate forces until 8:30<br />
to get to the crossroads even<br />
without any enemy forces on<br />
the board! (cont. on p.14)<br />
VOLUME 1, ISSUE 1<br />
Page 13
VI Corps at Chancellorsville (cont.)<br />
Battle Report<br />
(cont. from p.13) The attack went in on<br />
two flanks and was immediately met by<br />
artillery fire from three batteries well<br />
positioned on the plantation in the middle<br />
of the board. The Confederate artillery<br />
was silenced for several turns in a row<br />
and was eventually forced back. The<br />
Confederate columns desperately tried to<br />
close the distance, but a series of traffic<br />
jams emerged as they tried to deploy in<br />
the rough terrain for an attack.<br />
Two Union brigades that were positioned<br />
on the flanks moved forward for a<br />
counterattack and became engaged for<br />
several turns. In the end this helped the<br />
Confederate attack as it removed two<br />
enemy brigades that could potentially be<br />
used as reserves or fresh units for the<br />
defense in the middle of the board. With<br />
the terrain being as difficult as it was to<br />
move through, these two brigades were<br />
effectively taken out of the game.<br />
Seeing that the defenders were now<br />
outnumbered the Confederates, particularly<br />
Early’s division with its huge brigades,<br />
surged forward. They hit the Union<br />
brigade in the center and collapsed it<br />
after a brief battle, then surged forward to<br />
the base of the hill near the plantation. A<br />
second Confederate attack on the plantation<br />
itself was thrown back with the<br />
Southern forces taking several stand losses.<br />
A second attack in that area failed as<br />
well, then there was a series of bad command<br />
rolls that brought the entire attack<br />
on that flank to a standstill.<br />
In the end it wasn’t needed as Early’s<br />
troops continued to roll forward. A desperate<br />
stand by some artillery batteries<br />
slowed the attack down for a turn, but<br />
they were then overwhelmed. The Union<br />
was now pulling troops out of the plantation<br />
area and trying to reorganize the<br />
defenses. The problem was that the terrain<br />
that was holding up the attack was<br />
now preventing them from reinforcing<br />
threatened areas. One more push from<br />
Early’s division saw the end for the Union<br />
position and the Confederate forces<br />
seized the crossroads and the road, cutting<br />
off the rest of the VI Corps and winning<br />
the mini-campaign.<br />
Three battles in two nights was great!<br />
The fact that each battle influenced the<br />
next was also very well received by the<br />
group and we had a lot of fun with this. I<br />
think it also inspired us to paint more<br />
forces for this period and to dust off some<br />
older campaigns for future attempts. We<br />
also used some optional rules such as<br />
2D6 instead of a D10 and limiting the out<br />
of ammo rules which worked out very<br />
well. All in all, a great mini-campaign!<br />
Page 14<br />
NEWSLETTER TITLE
The Cult of the New Runs Amok<br />
Editorial<br />
I was asked the other<br />
day if I was going to get<br />
the new WW2 rules from<br />
Warlord Games When I<br />
said, “Why”, there was<br />
an uncomfortable moment<br />
of silence. I fully expected<br />
statements about<br />
how it was designed by<br />
Warlord Games, the same people who<br />
produced Black Powder/Hail Caesar, it’s<br />
a professionally done book, or just that<br />
it’s new. That anyone would question<br />
why a gamer wouldn’t want to buy the<br />
newest set of rules was never seen as a<br />
possibility. The question really should<br />
be, however, does it contain anything that<br />
you haven’t seen before<br />
I’ve discussed the proliferation of<br />
rules and what I’ve termed the fracturing<br />
of the hobby, but now we seem to have<br />
entered into a new era. This era has at its<br />
core a solid base of gamers who will only<br />
play the newest set of rules. There’s always<br />
been the gamers who have had to<br />
buy the latest things and we’ve all known<br />
them, but recently it has started to dictate<br />
what they and others actually play. After<br />
all Flames of War is now ancient history,<br />
correct Time to move on. Playing a set<br />
of rules that is only a few years old is<br />
unheard of. Or how about Disposable<br />
Heroes Who plays that set of rules anymore<br />
Yes, it seems like it came out just<br />
yesterday, but our group got its copies<br />
about two years ago and it seems like<br />
they were produced in the 18th century!<br />
We must move forward into the gaming<br />
unknown and relish the cult of the new!<br />
However, take a step back and look at<br />
things objectively. Yes, it’s great that<br />
another company can afford to produce<br />
and put out another set of rules, but do I<br />
really need them What is in them that is<br />
so innovative, so fresh and unique that I<br />
should put all of my other WW2 rules up<br />
on Ebay and focus on this one new set of<br />
rules I’ve been in the hobby for well<br />
over three decades and have seen every<br />
kind of activation system, IGOUGO set<br />
up, modifiers for firing, etc., so what is<br />
there that could possibly be new How<br />
many times can you reinvent gaming<br />
systems for anti-tank fire A Sherman or<br />
Tiger is just that, both should have basically<br />
relative stats in game terms compared<br />
to history and other games. Are<br />
they giving the Shermans thicker armor<br />
or better guns than Tigers Of course<br />
not, so what is so innovative that you<br />
need these rules<br />
The answer of course is that they<br />
are new. The current trend in gaming is<br />
that you should only play new rules.<br />
Any gaming system over two years old<br />
is “dead” and shouldn’t be paid any attention<br />
to. If it’s new they have to be good,<br />
right Why would a company waste<br />
time, energy, and financial resources to<br />
produce a set of rules if they weren’t<br />
innovative or good Yes, that is what<br />
passes for critical thinking in the hobby<br />
today.<br />
The same applies<br />
for other eras as well.<br />
People have tried to<br />
get me to look at<br />
Field of Glory Napoleonics,<br />
saying it<br />
revolutionizes the era<br />
and it will get you<br />
playing the period<br />
again. I’m already<br />
playing the period with Age of Eagles<br />
and most recently we did some Napoleonic<br />
skirmishing with Sharp Practice.<br />
I’ve played FOGR and have watched a<br />
few games of FOG Ancients, so I know<br />
what their approach is. A mind numbing<br />
rulebook with a billion exceptions, modifiers,<br />
etc., based off of a set of ancient<br />
rules that owes its heritage to the old<br />
WRG sets. Some people love that kind<br />
of thing and I can tolerate it, but just because<br />
it’s new or recently released<br />
doesn’t mean I have to fall down on my<br />
knees and worship the authors for enlightening<br />
my Napoleonic gaming!<br />
Has it ever occurred to anyone that<br />
there are some really, really good sets of<br />
rules that are older than one or two years<br />
If you say yes then you probably belong<br />
to that group of gamers referred to as<br />
grognards. Yes, those people actually<br />
still play The Sword and the Flame, Fire<br />
& Fury, General de Brigade, Age of Eagles,<br />
and other relics of rules that should<br />
be entombed in museums. There’s no<br />
room in this new world of gaming for<br />
those kinds of people! Cast them out!<br />
How can these other companies survive if<br />
we all don’t conform and buy every new<br />
set of rules that comes out and blindly<br />
cheer them on<br />
Basically, the historical gaming hobby<br />
is rapidly running out of ideas. Now<br />
that’s not to say that there aren’t any<br />
great miniatures (the quality and availability<br />
continue to astound me), or that the<br />
quality of rules has not improved, because<br />
they continue to impress. Rather,<br />
how many ways can you simulate a Napoleonic<br />
square at 1:20, 1:33, or 1:50<br />
scales How many ways can you set up a<br />
firing chart for a Sherman to shoot at a<br />
Tiger D6 D10 D20 Or how about a<br />
novel concept of 2D6 Yes, they’ve all<br />
been tried before. I also play boardgames<br />
and frankly, a lot of the games that have<br />
recently come out (Combat Commander<br />
and Fighting Formations are two examples)<br />
are far more innovative than most<br />
miniatures rules I’ve seen lately.<br />
Technology is definitely one of the<br />
culprits here. Companies can get rules<br />
from the concept stage to fully published<br />
in record time. Add to it the ability to get<br />
the info out to forums, blogs, web pages,<br />
etc., in a few minutes and the gamer faces<br />
an unrelenting barrage of new rules, figures,<br />
terrain, and accessories. While this<br />
is great for the gamer I think that sometimes<br />
gamers need to step back and reassess<br />
things. Are the rules any good Do<br />
you really need those new French fusiliers<br />
even though you have 500 unpainted<br />
ones sitting on a shelf How many times<br />
will you use that $250 model of the Alamo<br />
Instead, everyone jumps right in and<br />
declares whatever set of rules or figure<br />
lines that have just come out the next<br />
greatest thing for the hobby.<br />
Recently a gamer on TMP was bemoaning<br />
the fact that there weren’t<br />
enough games like Flames of War that<br />
had dedicated web sites, forums, and he<br />
could go anywhere in the country and<br />
find opponents. Well, guess what It’s<br />
only going to get worse! Rule sets are<br />
coming out faster than ever and the odds<br />
of you finding someone in your same<br />
town/city, let alone the country who plays<br />
the same set of rules you have is getting<br />
slimmer by the moment. As for me, I’m<br />
back to painting units for Fire & Fury and<br />
The Sword and the Flame!<br />
VOLUME 1, ISSUE 1<br />
Page 15
Field Commander: Rommel<br />
Game Review<br />
When you’re a<br />
boardgamer as I am it can<br />
be tough to find opponents<br />
at times, so you<br />
spend a lot of time playing<br />
games solitaire.<br />
Since I’m also a miniatures<br />
gamer I usually<br />
have a board game set up<br />
somewhere for when I<br />
need a break from painting<br />
figures. Although<br />
there have been a number of solitaire<br />
board wargames over the years, they usually<br />
fall into two categories. The first is<br />
that they are so simple that they end up as<br />
a 50/50 dice fest that just blows an hour<br />
of your time. The second, for games like<br />
Victory Games’ Carrier is that they are so<br />
complex that you have to devote a part of<br />
your life to learning how to play them!<br />
Dan Verssen Games has a number of<br />
solitaire offerings, so I had the chance to<br />
play two of them recently. The first is<br />
Field Commander: Rommel, which is<br />
part of the Field Commander series of<br />
games. This game features three of Rommel’s<br />
campaigns, from France 1940 to<br />
defending Normandy in 1944 from the<br />
Allied invasion.<br />
Inside the box you get three small<br />
maps, a rule book, and counters for all<br />
three games. The rules are easier to comprehend<br />
than most solitaire games of this<br />
scale and the maps are well done. I will<br />
admit that I am not a fan of the counters,<br />
however. All of them, Germans, British,<br />
French, and U.S. are all done in white.<br />
There are national colors on the side of<br />
the counter, but I found this to be annoying<br />
during play.<br />
The good thing about this game is<br />
that you can set up one of the campaigns,<br />
briefly skim through the rules,<br />
then play a sample turn to get the hang<br />
of things. In this way you can quickly<br />
figure out how the system works and<br />
then you’re off and running. The one<br />
thing that I’ve found about playing<br />
solitaire specific games is that it is<br />
usually about repetition. You do the<br />
same things over and over again as<br />
these types of games usually have a<br />
“system” to simulate an opponent.<br />
Once you figure that out the turns can go<br />
by pretty fast.<br />
FC Rommel follows such a system.<br />
The player refits German units, conducts<br />
battles, then acquires<br />
supply, then brings<br />
on reinforcements.<br />
After that the player<br />
conducts the Allied<br />
side of the turn<br />
which follows a<br />
similar sequence,<br />
then checks the victory<br />
conditions.<br />
Supply in this<br />
game is everything<br />
and we’re not talking supply lines as in<br />
most games. Supply here refers to the<br />
ability to have units move more than<br />
one area, refit damaged units, purchase<br />
additional battle plans, and bring<br />
in reinforcement and/or units back<br />
from the dead pile. The Germans get<br />
their supplies in several ways while the<br />
Allies obtain theirs through rolls on a<br />
table that can result in supplies and/or<br />
additional units.<br />
The movement system is by area and<br />
more than likely units will not be moving<br />
long distances. The battle system is<br />
where you get to see the solitaire system<br />
for this game at work. Both sides get a<br />
variable number of what are called battle<br />
plans. These consists of airstrikes, AT<br />
guns, artillery, etc., and are basically<br />
extra die rolls to inflict damage on enemy<br />
units, take away hits, offset other plans,<br />
and more. They cost anywhere from 1-4<br />
points each per plan, so the player needs<br />
to choose carefully while the Allies plans<br />
are randomly drawn. Combat is then<br />
done by a series of die rolls which can be<br />
modified by certain battle plans. Units<br />
can take two hits before being eliminated<br />
and combat lasts for one round unless<br />
certain battle plans are selected.<br />
In my experience combat is pretty<br />
bloody, especially when you are dealing<br />
with multiple units in the same area or<br />
each side gets a large number of battle<br />
plans. Surviving units then get to draw<br />
chits for experience, which increases their<br />
attack and defense strengths, or gives<br />
their side extra battle plans. Several elite<br />
units in one area for combat can inflict<br />
some serious damage on an enemy force.<br />
Naturally, the Allies, being played by<br />
the system, have to have some kind of<br />
artificial intelligence for movement.<br />
Each turn an operations<br />
chit is drawn and either<br />
an operation (think of an<br />
offensive) is launched or<br />
more units get added to<br />
the pool for a future operation.<br />
Then, units are<br />
designed to either stay in<br />
areas to defend them or<br />
they must move forward.<br />
In my view, this is the<br />
weak link in the game<br />
system and can create<br />
some suicidal attacks by the Allies at<br />
times and units can move in a haphazard<br />
way. Still, it works for a solitaire game<br />
and realistically speaking, there’s only so<br />
many ways that you can do this.<br />
The campaigns are difficult to win<br />
and the system is unrelenting in that at<br />
least in my plays Allied units continue to<br />
reappear from the dead pile and it gets to<br />
a point where you can see the Germans<br />
have no chance. At times it’s hard to tell<br />
if you’re playing the system or the system<br />
is playing you. There are some novel<br />
concepts in this game such as the battle<br />
system, but the Allied movement and<br />
randomness of the reinforcements/<br />
supplies for the Allies keeps the game<br />
moving up and down in wild swings at<br />
times.<br />
Overall, this is a solitaire game that<br />
delivers several hours of good gameplay.<br />
With three campaigns there is some variety<br />
and the combat system definitely adds<br />
another level of randomness to the game.<br />
I’m not sure if it will see a lot of plays in<br />
the future for me, but it is one of the better<br />
solitaire games that I own.<br />
Page 16<br />
NEWSLETTER TITLE
Phantom Leader<br />
I was always a fan of<br />
GMT’s Thunderbolt/Apache<br />
Leader, which was a solitaire<br />
system of modern combat<br />
where the player commanded<br />
a force of AH-64s and A-<br />
10s. The game was very<br />
challenging and took some<br />
time to get right as the rules<br />
weren’t the easiest to navigate.<br />
I eventually sold it as<br />
it seemed I had played the game out and<br />
had exhausted the randomness that can<br />
sometimes make solitaire games fun.<br />
Phantom Leader is one of a series of<br />
games that is very similar to Thunderbolt/<br />
Apache Leader. Published by Dan Verssen<br />
Games, the Leader series are solitaire<br />
games based off of several historical and<br />
near-future conflicts. Phantom Leader<br />
focuses on the air campaigns over Vietnam<br />
in the late 60s and early 70s.<br />
The components<br />
are pretty good, with<br />
several campaign<br />
cards for USN and<br />
USAF forces for operations<br />
such as Rolling<br />
Thunder. There is<br />
also a tactical display<br />
card where the target<br />
is set, plus room for<br />
the defenders and attacking aircraft that is<br />
divided up into zones that regulate movement<br />
during combat. The cards are broken<br />
down into three types; target cards<br />
which show an illustration of the target,<br />
types of defenses, victory points, etc.,<br />
plus event cards and aircraft cards. The<br />
cards are well done and you get a<br />
wide variety of aircraft to conduct<br />
the campaigns with. There are also<br />
numerous counters for keeping<br />
track of things during games, including<br />
aircraft counters, armament,<br />
campaign status, etc. Finally,<br />
there is a color rule book that is<br />
fairly easy to use and fortunately it<br />
includes a sample turn of play<br />
which is very helpful.<br />
As I’ve mentioned before<br />
when reviewing solitaire games is<br />
that it seems easier to just get one<br />
set up and work through the sequence<br />
of play to figure out the<br />
system. Solitaire games usually<br />
feature a lot of repetition, so<br />
once you figure out how things<br />
work the turns go by pretty<br />
fast. Thankfully, the rule book<br />
was written in just this kind of<br />
format, so the best option is to<br />
follow the steps in the rules<br />
while playing your first game.<br />
You first start by choosing<br />
a campaign and the length of<br />
the campaign. This can be as short<br />
as four days (playable in a few<br />
hours) to long campaigns that could<br />
take you weeks to play out. You<br />
select the campaign map, choose your<br />
aircraft and pilot quality, then you can<br />
also enter this information on a log sheet<br />
to keep track of your squadron’s progress<br />
through the campaign. I use the term<br />
squadron loosely as you get to choose<br />
from a variety of aircraft. It’s not unusual<br />
to have several F-<br />
4s, some A-7s, and<br />
maybe a few A-4s as<br />
your campaign<br />
force.<br />
Next you select a<br />
random target card<br />
and place the defenders,<br />
which are<br />
randomly drawn.<br />
These can consist of<br />
everything from<br />
infantry units all the<br />
way up to SA-2<br />
sites. Then comes the fun part which is<br />
arming your aircraft and there are counters<br />
for AIM-7s, CBUs, guided weapons,<br />
AGM-45s, and<br />
more. The<br />
aircraft are<br />
then positioned<br />
on the<br />
tactical display<br />
and the combat<br />
phase is then<br />
ready to begin.<br />
You also draw<br />
three event<br />
cards for each<br />
mission that<br />
can affect the<br />
defenses, the<br />
coordination<br />
of your attack,<br />
Game Review<br />
and more. One is drawn after takeoff,<br />
one while over the target, and then a final<br />
card when egressing back home.<br />
As with any solitaire game combat is<br />
often the most complicated phase of the<br />
game and this applies for Phantom Leader.<br />
It’s not too difficult, but you must<br />
go through a number of steps for air<br />
combat, defenders firing, moving<br />
closer to the target, suppression, and<br />
then dropping ordnance. This is also<br />
definitely where the randomness of<br />
solitaire games can bite you. Several<br />
good rolls by the NVA defenders and<br />
you may as well start your campaign<br />
all over again!<br />
After combat pilots accumulate<br />
stress, the player gets victory points,<br />
pilots can go up in experience, and<br />
you prepare for the next mission.<br />
Phantom Leader does a good job in having<br />
the player manage their assets, assigning<br />
certain aircraft to missions, and<br />
arming aircraft for the<br />
variety of missions.<br />
Overall, this is far<br />
superior to most solitaire<br />
games in that the players<br />
get a lot of choices in<br />
how to perform their<br />
missions. There is a wide variety of targets,<br />
length of campaigns, and the event<br />
cards give the game very high replay<br />
value which means that the solitaire player<br />
can keep coming back to this game<br />
time and time again. There is a lot of<br />
randomness and at times you don’t feel<br />
like you’re in control of anything, but this<br />
is better than most solitaire games.<br />
VOLUME 1, ISSUE 1<br />
Page 17
Memoirs of a Miniatures & Board Wargamer Pt. 20<br />
At some point in every<br />
gamer’s life you will probably<br />
be asked to participate in a<br />
“big” game. By that I mean<br />
more than five or six players,<br />
double to triple the number of<br />
figures that you regularly<br />
would use, and it generally<br />
takes some planning as well as<br />
preparation to pull the game<br />
off. Over the last three and a half decades<br />
I’ve been involved with a number of<br />
these “big” games. Some have been<br />
spectacular successes while others turned<br />
into dismal failures. The importance,<br />
however, regardless if they were good or<br />
not, is that the memories of these types of<br />
games seem to live forever.<br />
If you were gaming back in the early<br />
80s then you certainly know about Starfleet<br />
Battles. Not only did it consume all<br />
of our gaming time for several years, but<br />
I made a lot of friends and had some<br />
great memories. Yes, with all of the<br />
supplements it became a nightmare,<br />
but we did manage to pull off several<br />
campaigns. In one of the biggest<br />
battles that I ever saw, we had 36<br />
Kzinti ships go up against 40+<br />
Klingon ships and we used miniatures!<br />
We put together enough maps<br />
for a 6x10 board, got out all the ship<br />
control sheets, organized sides, and<br />
got down to playing.<br />
We had about ten players as I remember<br />
and when both forces got into the<br />
middle of the board it was pure chaos.<br />
All I recall is after eight hours of playing<br />
time both sides withdrew with heavy<br />
losses. It was around 3AM when we quit<br />
and then we went out to get something to<br />
eat afterwards. It was a huge battle, there<br />
were lots of rules questions, and it took a<br />
long time to prepare and play, but it was<br />
one of the best things I will remember<br />
about the game.<br />
Quite a few of us loved GW’s<br />
Space Hulk and when it first came out<br />
we played the hell out of it. At one of<br />
the only gaming conventions that<br />
we’ve had here in SLC, Utah, I ran<br />
(with help) a monster sized Space<br />
Hulk game. Using map boards from<br />
six sets of games we formed a giant<br />
ship and then set out a few hundred<br />
painted miniatures for a series of battles<br />
that ran for a few days. The game<br />
played pretty fast, even at this scale and a<br />
good time was had by all. I do remember<br />
that it took forever to get the miniatures<br />
painted and trying to coordinate the painting<br />
to be done in time for the con almost<br />
gave me a heart attack!<br />
Back in the 80s as well I participated<br />
in a massive Johnny Reb game of Antietam.<br />
Even though we broke it apart into<br />
three different battles it was still a massive<br />
undertaking. Each battle would be<br />
on a 5x8 and events would influence the<br />
other battles where necessary.<br />
Although we had a lot<br />
of 15mm ACW figs, we<br />
were short several hundred.<br />
So, we ordered a ton of figs<br />
from Stone Mountain and<br />
set up painting nights that<br />
went on for quite some<br />
time. When we were finally<br />
ready we had figs to represent<br />
each regiment and battery<br />
for all three campaigns.<br />
The games were well planned out and<br />
fortunately they ended up being very<br />
close run affairs. Even though the South<br />
lost the sunken road in the center, they<br />
won on the flanks and held on for a victory.<br />
I think this monster game was memorable<br />
because it was one of those rare<br />
occurrences where everyone pitched in<br />
with buying figs, painting, creating terrain,<br />
and helping with the set up.<br />
I’ve mentioned this several times, but<br />
like most gamers in the 70s and early 80s<br />
I was obsessed by the NATO vs. Warsaw<br />
Pact theme. Not only did I have a huge<br />
stack of boardgames, books, magazines,<br />
etc., but I had several hundred GHQ and<br />
Enola Games miniatures. Naturally after<br />
playing a few campaigns and battles we<br />
wanted to do a really big game.<br />
Fortunately, one of the members of<br />
our group had access to their family’s big<br />
living room for a few days, so we set up a<br />
massive 6x18 table and got everything<br />
ready the night before as we had set aside<br />
a full Saturday for play. At that time I<br />
was using Enola<br />
Games Combat<br />
Commander rules<br />
and I had prepared<br />
a series of charts<br />
for everyone according<br />
to their<br />
commands.<br />
We had obtained<br />
a series of<br />
US Army maps of<br />
an area in West Germany, so we mirrored<br />
the terrain as best we could to match it,<br />
which looked fantastic to see it fully set<br />
up. The scenario was for a full Russian<br />
armored division with support to attack a<br />
U.S. brigade. It may not sound like<br />
much, but on a one to one scale it was<br />
huge with literally hundreds of vehicles,<br />
choppers, infantry stands, etc., all over<br />
the tabletop. Fire support was coordinated<br />
by one player on each side who also<br />
controlled air support. We used an article<br />
out of a wargaming magazine for the air<br />
battle with both sides allocating assets<br />
each turn.<br />
With a dozen players and starting at<br />
noon on a Saturday, the game went until<br />
2AM. It was a wild affair that saw the<br />
Russians stopped just short of their goal<br />
near the end of the table. Everyone was<br />
exhausted, but it had been a good game<br />
and it was talked about for months. I<br />
think we also set a record for the most<br />
snacks consumed at a game!<br />
Most of these really big games were<br />
“back in the day” when many of us had<br />
more time for the hobby than we do now.<br />
I think it would be difficult to pull off<br />
these kinds of games today as many gamers<br />
don’t have the time, can’t focus on<br />
one subject for that long, too many distractions,<br />
and you just don’t see many<br />
gamers pooling their resources. It’s a<br />
shame because these games have given<br />
me many fond memories over the years.<br />
If you do get a chance to play in a “big”<br />
game please take the time to help out<br />
with painting, organizing, etc. as it’s an<br />
experience that should not be missed.<br />
Page 18<br />
NEWSLETTER TITLE
Blast From The Past pt.19: Older Skirmish Rules<br />
If you call yourself a<br />
wargamer then at some point<br />
in your gaming life you’ve<br />
played in a skirmish game.<br />
Despite the thousands of<br />
rules sets for big battles for<br />
ACW, Ancients, Medieval,<br />
WW2, and so on, at some<br />
point everyone likes to see<br />
combat at the tactical level. I<br />
thought it would be interesting to revisit a<br />
few sets of skirmish rules that I’ve played<br />
over the decades and that I’m sure many<br />
of you have as well. This is by no means<br />
a comprehensive list, but rather just a<br />
small selection that stood out when I<br />
started thinking about this article.<br />
When I got into the board game/<br />
miniatures hobby back in 1976 there were<br />
of course Airfix figures and soon plenty<br />
of releases by Atlantic in 1/72nd scale.<br />
Thinking that there surely must be wargame<br />
rules for miniatures similar to the<br />
few SPI board games I owned I went to<br />
the local store and sure enough, there was<br />
a copy of Angriff. I seem to recall it was<br />
a choice between Tractics and this, but<br />
the length of the rules in Tractics scared<br />
me off.<br />
I got home, read the rules and played a<br />
game or two. It was far different than the<br />
SPI board games I had, so it took me<br />
awhile to get the hang of things. Luckily,<br />
I met up with a gaming group that played<br />
miniatures and they took me in, showing<br />
me other sets of rules and that the miniatures<br />
hobby was far larger than just<br />
WW2! I continued<br />
to play Angriff for<br />
several years, but<br />
with the introduction<br />
of other sets of rules<br />
it swiftly faded from<br />
view except as a<br />
memory of my first<br />
rules set.<br />
At my first two<br />
gaming clubs I was<br />
fortunate enough to<br />
have friends who had massive medieval<br />
armies that were based singly. Both of<br />
them used Chainmail, so we had a ton of<br />
fun fighting sieges, raids, and even a<br />
campaign or two. The rules were easy to<br />
use, the games played fast, and most of<br />
all, were a lot of fun. You don’t see<br />
too many Chanimail games anymore<br />
as Warhammer Fantsy and Ancients<br />
seem to have taken over those eras,<br />
but in its time it was a very popular<br />
and well thought of set of rules. Not<br />
the most realistic, but it was fun!<br />
If you wanted realistic<br />
medieval skirmishes then<br />
Battle Lust was the set for<br />
you. At the time it came out, a<br />
fantasy series called Harn-<br />
World was the current craze.<br />
It’s hard to explain now, but in<br />
the 70s Dungeons & Dragons<br />
was at the top of the gaming<br />
spectrum. Many of the fantasy<br />
RPG supplements that were<br />
coming out such as adventures, character<br />
sheets, maps, etc., were not exactly published<br />
with the highest graphical standards.<br />
So, when the first Harn supplement<br />
came out it was a tremendous shock. As<br />
each new release followed a new found<br />
awe for this company and their products<br />
grew.<br />
At some point during all of this they<br />
released their battle system called Battle<br />
Lust. Although it had a map of Harn,<br />
background material for some of the races,<br />
and standard sheets for units from that<br />
world, it was easily adaptable to other<br />
eras. We instantly took to the rules and<br />
fought several good sized battles. The<br />
interesting thing was that the rules were<br />
very, very good and I think many historical<br />
gamers missed out on this as they<br />
didn’t want to get contaminated by the<br />
fantasy element! Sadly, once the D&D<br />
craze started to die down and everyone<br />
went off in search of other games this set<br />
of rules got left behind. I still take out<br />
my set and look it over from time to time<br />
as there are some good ideas in there.<br />
As many of you know I’ve always<br />
been a big Colonial era<br />
gamer and have had armies<br />
in multiple scales for quite<br />
some time. I went through<br />
a phase back in the 80s<br />
where I couldn’t decide if<br />
The Sword and the Flame<br />
was going to be my preferred<br />
set of colonial rules<br />
or not. After reading the<br />
excellent Sudan series in The Courier and<br />
the article on rules, I ordered a set of<br />
Colonial Skirmish Rules, or the “blue<br />
book colonial rules” as they are more<br />
affectionately known as. This set of rules<br />
was radically different than TSATF as<br />
they were true man to man combat, with<br />
something like three seconds a<br />
turn and it took several turns to<br />
load a rifle!<br />
We played several very<br />
memorable games, but they did<br />
take awhile to play. They were<br />
designed for 3-5 figures per<br />
player, but we were using<br />
around 10 per player with 7-8<br />
players! As we got older and<br />
time became more critical, these<br />
rules were pushed to the back of the pack<br />
and TSATF became our standard set for<br />
this era. Still, they were unique and a lot<br />
of fun.<br />
Finally, we come to combat for the<br />
modern era. I can’t remember clearly,<br />
but at the time we had some modern skirmish<br />
troops, mercenaries, etc., and were<br />
looking for a set of skirmish rules. We<br />
liked the Avalon Hill Firepower game,<br />
but translating to the tabletop was going<br />
to be a lot of work. A new set of rules<br />
had arrived at the local store called Phoenix<br />
Command, so several of us bought a<br />
few sets and tried them out.<br />
Now, this was in the era where we<br />
played a lot of SPI’s Air War, Harpoon,<br />
and Starfleet Battles,<br />
but the complexity<br />
here frightened even<br />
us! It was a VERY<br />
realistic set of skirmish<br />
rules, but a five<br />
minute firefight took<br />
our group the better<br />
part of eight hours!<br />
Again, in the interest<br />
of time these rules<br />
faded from use.<br />
It is funny how things come full circle.<br />
I started out with simple skirmish<br />
rules, went down the complexity road and<br />
now have come back to simple sets again.<br />
I think that when you’re doing skirmish<br />
games the idea is to have fun and the<br />
realism aspect can get in the way of that<br />
at times!<br />
VOLUME 1, ISSUE 1<br />
Page 19
Yet Again, Successors vs. Romans<br />
WMA Battle Report<br />
If you’ve been reading this magazine<br />
for awhile, then our love for Warmaster<br />
Ancients is well known. The game is<br />
easy to set up, so if we have no idea who<br />
is coming to our meetings or where we’re<br />
going to play, WMA is a good stand by.<br />
Once again we needed a quick game for a<br />
variety of reasons and yet again, we<br />
turned to a Successors vs. Romans WMA<br />
battle.<br />
Although we have several armies<br />
available for use, the Successors always<br />
seems to be a popular choice. Whether<br />
it’s the pikes, elephants, weird units, or<br />
that it is just a colorful army, we seem to<br />
use them a lot. The Romans seem to be a<br />
good opponent for them as they can take<br />
the pike charges and still keep fighting.<br />
The Romans went with what is now<br />
their standard set up; namely legions<br />
backed by auxiliary infantry covered by a<br />
few units of archers and then several<br />
units of average cavalry. The idea is to<br />
maintain parity on the flanks until the<br />
legions can take out the middle of the<br />
opposing army. Not too exciting, but it<br />
works pretty good when everything goes<br />
according to plan!<br />
The Successors went with a heavier<br />
than usual option with cataphracts, elephants,<br />
and several pike units. There<br />
were the usual skirmishers, warbands,<br />
Thorakites, etc., attached to soak up casualties<br />
and keep the enemy honest until the<br />
pikes and heavy cavalry can get close<br />
enough to do their dirty work.<br />
The game started out well for both<br />
sides as the command rolls ensured that<br />
everyone’s units got to move at least<br />
once. The Successors did well until the<br />
second turn where a command blunder<br />
put a permanent –1 modifier on the best<br />
cavalry unit! The Romans blundered as<br />
well, so the second turn came to a<br />
screeching halt. From that point forward<br />
it was a series of starts and stops for both<br />
sides where coordination became a huge<br />
problem. There was some skirmishing on<br />
the Roman right where several cavalry<br />
and foot skirmish troops traded shots and<br />
a few close combats.<br />
On the right the Successors were having<br />
a hard time doing anything right.<br />
Some of the cavalry got into a fight with<br />
some archers and Roman cavalry, but<br />
they simply could not coordinate their<br />
charges. The flank was there for the Successors<br />
to seize, but they could not finish<br />
the fight. Instead, the Romans continued<br />
the archery fire, brought up fresh units,<br />
and fought the Successor heavy cavalry<br />
to a standstill. Both sides took horrific<br />
casualties, but that flank degenerated into<br />
a stalemate, which in the end is exactly<br />
what the Romans needed.<br />
All of a sudden the Successors on the<br />
Roman right failed miserably. The running<br />
series of skirmish fights abruptly<br />
came to an end when several close combats<br />
saw bad die rolling by the Successors<br />
and their units evaporated. This<br />
opened the flank to the Successor center<br />
and the Romans exploited (cont. on p.21)<br />
Page 20<br />
NEWSLETTER TITLE
Yet Again, Successors vs. Romans (cont.)<br />
WMA Battle Report<br />
(cont. from p.20) it to the fullest.<br />
The legions advanced in the<br />
center and caught the Successor<br />
pikes standing still. The Successor<br />
elephants launched a charge<br />
that again saw some poor die rolling.<br />
What was supposed to be a<br />
grand charge that obliterated a<br />
few units saw the elephants<br />
pushed back, outflanked, and<br />
wiped out. The pike units were<br />
then faced with enemies on two<br />
sides and things began looking<br />
grim. The Roman artillery and<br />
archers continued to fire, disrupting<br />
the center and preventing any<br />
kind of a counterattack.<br />
The legions came on and<br />
despite less than stellar results on<br />
the first series of combats, pushed<br />
the pike units back. The Successors<br />
again failed a series of command<br />
rolls that would have<br />
brought up more fresh units. The<br />
legions attacked again, wiping out<br />
unit after unit. The Successors<br />
tried to form a new defense line<br />
and recall the heavy cavalry, but<br />
you guessed it, the command rolls<br />
failed again! The legions then<br />
advanced and once again after a<br />
series of average die rolls, followed<br />
up with a devastating series<br />
of secondary attacks. By this time<br />
the Successors were running on<br />
fumes and after another series of<br />
combats broke, ending the game.<br />
This was a beating the<br />
likes of which we had never<br />
seen in WMA, despite<br />
playing in well over 30<br />
games using these rules.<br />
What makes it even worse<br />
is that a Roman battlegroup<br />
consisting of two legions,<br />
two auxiliary infantry units<br />
and one unit of archers only<br />
moved on the first turn! If<br />
they had reached the front<br />
lines the game would have<br />
been over even faster!<br />
The failed command<br />
rolls, pike units unable to<br />
charge, the elephants getting<br />
flanked, etc., contributed<br />
to one of the worst beatings<br />
we’ve ever seen. Usually<br />
a 1500 point game like<br />
this will take at least three<br />
hours. This was over in<br />
less than two!<br />
As the Successor commander<br />
I have resolved to<br />
go back to the drawing<br />
board and re-think my 1500<br />
point force. The slower,<br />
heavily armored cataphracts<br />
may have to be<br />
discarded and more “throw<br />
away” troops may be needed<br />
to guard the flanks until<br />
the pikes can charge. This<br />
is part of what makes<br />
WMA fun in that you can<br />
tinker with the army lists!<br />
Several images from the battle showing the Successor pike units<br />
running into trouble with the Roman legions. The pike units don’t<br />
do well when on the defense and several got flanked.<br />
VOLUME 1, ISSUE 1<br />
Page 21
IABSM3: A Review (cont.)<br />
(cont. from p. 3) the number on the chart<br />
with 1s and 2s being misses, 3s and 4s<br />
producing shock points, and 5s and 6s<br />
being kills where you remove figures.<br />
It’s much simpler in practice and after a<br />
few tries it becomes second nature.<br />
Shock points are a<br />
unique feature for<br />
IABSM3 and they are<br />
in my opinion, a driving<br />
force behind the<br />
mid and end game<br />
tactics. Once units get<br />
into contact and start<br />
blazing away at each<br />
other, your squads and<br />
weapons teams start<br />
accumulating shock<br />
points, which can be<br />
almost as bad as actually<br />
taking kills.<br />
Shock points reduce<br />
your actions, firing,<br />
etc., so when you<br />
reach a large number<br />
of shock points it gets<br />
so bad that your squad<br />
can’t do anything but cower behind cover<br />
and there’s a good chance that they will<br />
break.<br />
So now here is where the beauty of<br />
the system really comes into play. You<br />
already have a number of decisions to<br />
make each turn, such as who to activate,<br />
how many dice to use for movement,<br />
firing, spotting, etc., but now you have to<br />
deal with shock points. Should you keep<br />
a big man around to clean up shock<br />
points or move him to a threatened sector<br />
to direct fire there Should you keep<br />
fighting with a unit that is loaded with<br />
shock or retire them to safety until they<br />
recover and take a chance that the enemy<br />
won’t exploit the vacated part of the line<br />
All of a sudden you have even more decisions<br />
that need to be made and in a skirmish<br />
game this is a good thing.<br />
Anti-vehicle fire is just as interesting.<br />
You roll 2D6 with modifiers to see if you<br />
score a hit. If you do the firer then rolls a<br />
number of “strike” dice while the defender<br />
rolls a number of dice equal to their<br />
armor to cancel any hits. The resulting<br />
number is cross referenced on a chart to<br />
see what happens to the vehicle. Again,<br />
it sounds convoluted and time consuming,<br />
but it’s pretty fast in theory, plus it<br />
keeps the game interactive by having the<br />
non-firing player doing something during<br />
an opponent’s turn.<br />
There are rules for artillery,<br />
flamethrowers, support<br />
weapons, die hard troops,<br />
snipers, and much, much<br />
more. In fact, you would<br />
be hard pressed to find<br />
something that the rules<br />
don’t cover! The interesting<br />
thing is that the<br />
additional rules really<br />
add very little complexity.<br />
You can just check<br />
the section, find the rule,<br />
and implement it as the<br />
authors solutions are<br />
usually pretty quick and<br />
easy.<br />
Close combat is decisive,<br />
but getting there can<br />
be one of the game’s<br />
longest procedures. In<br />
this case the system seems simple, but<br />
running through the myriad of modifiers<br />
to get to the result can take longer than<br />
pretty much any other mechanism in the<br />
rules. We’ve had some great house clearing<br />
firefights/melees that were fun and<br />
really felt like WW2 house to house battles,<br />
but figuring out what to roll each<br />
time and how it works always seems to<br />
slow the game down.<br />
If you’re thinking that this game produces<br />
a lot of chaos,<br />
then you’re right!<br />
From the card draw to<br />
the firing systems,<br />
there is a lot of randomness.<br />
If you are<br />
someone who likes<br />
clockwork type games<br />
with a strict sequence<br />
of play, then these<br />
rules should definitely<br />
be avoided by you.<br />
However, if you enjoy<br />
games where things<br />
don’t always go as<br />
planned, there’s a good<br />
chance of surprises just<br />
around the corner, and<br />
combat can be unpredictable at best, then<br />
these rules are for you.<br />
Overall, the third version of these<br />
rules is a marked improvement over previous<br />
sets. The rules are professionally<br />
laid out, there’s good examples of play,<br />
lots of color, and you can see that there’s<br />
been some thinking towards making the<br />
games system easy to understand. Game<br />
play is very interactive due to the card<br />
draw system, so this is suitable for group<br />
games with a large number of figures/<br />
vehicles.<br />
So, are there any problems Yes, but<br />
mostly they’re a matter of taste and/or<br />
game play style. As stated before, the<br />
drop shadow on the font makes anything<br />
larger than normal sized text blurry. Lists<br />
just for the Normandy period are another<br />
pet peeve of mine, but quite a few rules<br />
sets are guilty of this. The Tea Break<br />
card(s) if they come early can leave a lot<br />
of units inactive or taking the bare minimum<br />
of actions, which if it happens over<br />
and over can be a big turnoff for some<br />
gamers. Also, the large number of dice<br />
that you roll can produce wild swings of<br />
fortune and unusual results. Fortunately,<br />
most of these are small problems and in<br />
the end it comes down to whether or not<br />
your gaming group likes card driven,<br />
chaotic skirmish games<br />
I did order the deluxe package with<br />
the deck of cards and setoff tokens. The<br />
cards are a good deal, although much<br />
bigger than the average card deck. The<br />
tokens I’m not sold on. There was no<br />
explanation for what they<br />
were until someone sent<br />
me a link from TMP and<br />
my personal view is that<br />
they could have been designed<br />
better and more<br />
obvious as to what they’re<br />
used for.<br />
In the end the rules are<br />
a good value and fun to<br />
play. Once the other lists<br />
get converted to IABSM3<br />
status that will help out the<br />
situation as well. You<br />
can’t go wrong adding this<br />
set to your collection of<br />
WW2 skirmish rules.<br />
Page 22<br />
NEWSLETTER TITLE
Hobby Boss 1/48th KV-1 & KV-2<br />
Kit Reviews<br />
OK, I admit it. I’m one of those gamers<br />
who thinks that 1/48th scale vehicles<br />
look better than the large ranges of 1/56th<br />
stuff that are out right now. For some<br />
reason, whether it’s the “heroic” figure<br />
proportions, bases on the figures, etc., the<br />
1/56th stuff just doesn’t look right for<br />
28mm<br />
WW2 skirmish<br />
games.<br />
Not only<br />
that, resin<br />
kits, while<br />
very easy<br />
to build and<br />
paint, lack a tremendous amount of detail<br />
that really becomes noticeable when<br />
compared to the same scale of plastic<br />
models.<br />
Unfortunately, the selection for<br />
1/48th is limited compared to 1/56th.<br />
Tamiya has an ever growing catalog and<br />
there’s a few odds and ends, but recently<br />
a Chinese firm called Hobby Boss has<br />
been converting some of their 1/35th<br />
scale kits to 1/48th scale. I bought a KV-<br />
1 and a KV-2 to try them out. Fortunately,<br />
they are almost the exact same kit<br />
except for the turrets<br />
and guns, so the lessons<br />
I learned on<br />
building the KV-2<br />
made the KV-1 go<br />
much faster.<br />
First, there are a<br />
LOT of parts, so patience<br />
will be needed. Fortunately, things<br />
go together quickly and you can have one<br />
of these built in a long afternoon. They<br />
do use brass etched parts for the fenders<br />
and the tracks are in<br />
many pieces, but they<br />
provide a jig to glue the<br />
track parts around<br />
which ensures a good<br />
fit. I painted the tracks,<br />
fenders, turret, hull,<br />
etc., separately, then<br />
did the final assembly.<br />
Getting the cables that<br />
run from the front of<br />
the tanks to hooks on<br />
the fenders was a challenge,<br />
but looks good<br />
in the end.<br />
Overall, the kits<br />
look great completed<br />
and appear to be the hulking<br />
monsters that they actually<br />
were in real life. The level of<br />
detail is apparent when<br />
viewed with figures on the<br />
tabletop and why anyone<br />
would not want detailed<br />
1/48th models to go with<br />
their figures is beyond me. I<br />
got these for around $15 each on the<br />
Squadron site and while they took time to<br />
assemble it was worth every minute of it<br />
when you see the final result.<br />
Fireforge Games Mounted Sergeants<br />
Figure Review<br />
This boxed set is very similar to the<br />
Teutonic Knights set reviewed earlier in<br />
this issue. You get the same sprues for<br />
twelve horses, only there aren’t any horses<br />
with barding, so these will be much<br />
simpler to paint. The figures themselves<br />
are basically the knight bodies, but the<br />
heads do not have any fully enclosed<br />
helmets.<br />
Weapons are again the same set that<br />
you got in the boxes of knights along<br />
with capes and a cross standard. The<br />
figures go together quickly and with a<br />
wide variety of weapons you can certainly<br />
create a unit that<br />
will have some unique<br />
individual features.<br />
For my first box of<br />
these I chose some<br />
with cloaks, half with<br />
spears, and the rest<br />
with a variety of hand<br />
weapons.<br />
Overall, these are<br />
again good value for<br />
the money and go together<br />
quite nicely.<br />
They can certainly be<br />
used for more periods<br />
than just the Crusades<br />
and the wide variety of<br />
weapons, shields, and heads gives the<br />
gamer the opportunity to customize units.<br />
Highly recommended.<br />
VOLUME 1, ISSUE 1<br />
Page 23
BKC2: East <strong>Front</strong> Convoy<br />
Battle Report<br />
I’ve been working on a 1944-5 Russian<br />
Tank Corps this past year and<br />
thought it might be a good time to do<br />
another BKC2 East <strong>Front</strong> scenario as that<br />
always seems to provide incentive to do<br />
more painting! So, back to the East <strong>Front</strong><br />
it was and after just reading a book about<br />
the campaigns in East Prussia late in the<br />
war I thought it would be good to try out<br />
a common situation from the book.<br />
It is late 1944 and the Russians are<br />
attempting to cut off a German held city.<br />
Naturally, Hitler has declared it to be a<br />
festung, or fortress, so it is to be held to<br />
the last man. Russian forces have enclosed<br />
a ring around the city, but in many<br />
places it is very thin in units, which gives<br />
the Germans a chance to run convoys in<br />
and out of the city. The city was represented<br />
as only partly on board and placed<br />
in the corner. There is a bridge that is<br />
still open as well as a pontoon bridge that<br />
leads back to the German lines. Several<br />
groups of Russians have already taken up<br />
positions outside of this part of the city,<br />
but more are moving up at what would be<br />
randomly determined times during the<br />
game.<br />
There were several halftracks and<br />
trucks loaded with wounded in the city<br />
waiting for the signal to cross the bridges<br />
and break out towards the German lines.<br />
German forces on the outside<br />
of the city had several battlegroups<br />
plus a convoy of vehicles<br />
with ammo and food for<br />
the defenders. There were a<br />
total of 16 convoy vehicles at<br />
both ends of the board. For<br />
each vehicle with food/ammo<br />
that got into the city or for<br />
each vehicle with wounded<br />
that made it back to the German<br />
lines the German side<br />
would earn 6 percentage<br />
points. At the end the<br />
amount would be totaled,<br />
then a German player would<br />
roll D100 and if under the total the operation<br />
would have been deemed successful<br />
by the German high command.<br />
The Russians began with two understrength<br />
T-34/76 battalions on the board<br />
and one infantry battalion deployed at a<br />
village crossroads. There was also a<br />
FAO with three batteries of 12mm artillery<br />
off board. The Russians also had a<br />
battalion of T-34/85s, a battery of SU-<br />
85s, a 120mm mortar battalion, and a<br />
battalion of SU-76s that would randomly<br />
appear as reinforcements throughout the<br />
game.<br />
The Germans had three battlegroups<br />
that would enter on the first turn from<br />
either road. The first group consisted of<br />
three Stug IIIs and two Tigers; the second<br />
had a company of panzergrenadiers with<br />
some heavy weapons halftracks in support;<br />
and the third was a composite armor<br />
battalion with three Panthers and four<br />
PZIVHs. There was also a FAO with<br />
three batteries of 105mm artillery in support.<br />
The Germans planned to pin the Russian<br />
infantry in the village, occupy the<br />
village/hill on the other flank with the<br />
panzergrenadiers, then strike down the<br />
center towards the bridge with the main<br />
armor force. Hopefully by that time there<br />
would be a chance to run the convoys in<br />
and out of the city without too much enemy<br />
interference. The Russians, quite<br />
naturally, were going to try to prevent<br />
this, but first needed to determine the<br />
main axis of attack. The main problem<br />
for the Russians was not knowing where<br />
or when their reinforcements would arrive.<br />
The German attack got off to a less<br />
than stellar start, with most commands<br />
failing their second command rolls. This<br />
gave the Russians a chance to reorient<br />
their defense and bring their armor into<br />
firing positions. The main German armor<br />
force proceeded up the center of the<br />
board and was duly engaged by the waiting<br />
T-34s, knocking one of the Panthers<br />
out. The panzergrenadiers also took fire,<br />
losing their mortar halftrack and the<br />
75mm armed halftrack. However, they<br />
did roll a 2 for their command roll, meaning<br />
they were then able to do two actions.<br />
The panzergrenadiers promptly moved<br />
into the village and (cont. on p. 25)<br />
Page 24<br />
NEWSLETTER TITLE
BKC2: East <strong>Front</strong> Convoy (cont.)<br />
Battle Report<br />
(cont. from p. 24) dismounted, which<br />
immediately forced the T-34s in the area<br />
to withdrew along with the SU-85s that<br />
had just arrived.<br />
The Stug IIIs and the Tigers got more<br />
than they bargained for against the Russian<br />
held crossroads and began a several<br />
turn duel for control of the village that<br />
eventually sucked in another unit of T-<br />
34s. The main fight began in the center<br />
when the recently arrived T-34/85s started<br />
slugging it out with the Panthers and<br />
PZ IVHs. This engagement went on for<br />
several turns, with artillery, smoke, and<br />
massive exchanges of tank fire. In the<br />
end the Germans left the T-34/85 battalion<br />
in ruins, but they had lost the initiative<br />
and were running out of units.<br />
The panzergrenadiers close assaulted<br />
the SU-85s, knocking them out, but not<br />
before they destroyed several of the convoy<br />
vehicles. The T-34s that were helping<br />
with the defense of the village crossroads<br />
withdrew to new positions to engage<br />
the German armor. However, bad<br />
die rolls meant that they were then swiftly<br />
overwhelmed by the Germans.<br />
At this time the signal was given for<br />
the convoy in the city to break out over<br />
one of the bridges. What followed was a<br />
frantic few turns while Russian forces<br />
headed to shoot at the convoy and German<br />
armor moved to intercept them. In<br />
the end eight of the sixteen convoy vehicles<br />
made to their destination. Multiplying<br />
by 6% gave the Germans a 48%<br />
chance of the operation being deemed<br />
successful and they rolled a 45, meaning<br />
that the Germans were declared the victors.<br />
Overall, it was a tense and fascinating<br />
game. It was our first widespread use of<br />
smoke to screen the armor attack and we<br />
had some desperate armor against armor<br />
slugfests. Both sides got too caught up in<br />
the village crossroads battle with the German<br />
armor unable to push the Russians<br />
off the road due to a lack of infantry<br />
while the T-34s didn’t want to show<br />
themselves for fear of being destroyed by<br />
the Tigers. Both sides’ armor units could<br />
have been decisively used elsewhere.<br />
Other than that, it was a well played<br />
game that showed us once again why we<br />
like BKC2. Including set up and playing<br />
ten turns we finished everything in just<br />
under 3 1/2 hours.<br />
VOLUME 1, ISSUE 1<br />
Page 25
GDB: French Defense & Counterattack<br />
Battle Report<br />
This battle ended up being<br />
one of the largest and longest<br />
that we’ve recently fought. If<br />
you’ve been reading this magazine<br />
for awhile, you know that<br />
we flit back and forth between<br />
Age of Eagles and General de<br />
Brigade. Mainly it’s that we<br />
have a ton of figures that can be<br />
used for either game as the bases<br />
are similar, but sometimes<br />
we want a detailed, lower level<br />
game while on other nights<br />
AOE provides a faster, higher<br />
level game.<br />
This scenario began as a<br />
combined Russian-Prussian attack and<br />
then switched to a French counterattack,<br />
followed by another Allied attack. It was<br />
played over three nights with a total of<br />
five players for a combined 11 hours,<br />
which is a lot of gaming time, but then<br />
again there was a lot going on!<br />
The first night was mainly set up,<br />
getting the forces straightened out, commands<br />
assigned, etc., followed by the<br />
initial Allied moves. Mainly this consisted<br />
of Prussian infantry brigades with<br />
artillery support pushing back the leading<br />
French elements. Not quite a large skirmish<br />
action, but the fighting consisted<br />
mainly of French forces firing a few shots<br />
and withdrawing back to the main line of<br />
defense.<br />
The second night, however, is where<br />
the action really got off to a fast start.<br />
For one thing, the French forces on the<br />
far French right flank were determined<br />
not to go away quietly. They counterattacked,<br />
even when presented with larger<br />
enemy numbers, driving the Prussian<br />
infantry back upon their supports and<br />
creating somewhat of a traffic jam. At<br />
one point the French broke through the<br />
Prussian lines and almost cut<br />
one of the brigades off from<br />
their division before heavy<br />
fire drove them off.<br />
In the center the Prussian<br />
spent a good part of the second<br />
night getting everything<br />
ready for an attack on the hill<br />
that dominated the center of<br />
the board. The French were<br />
positioned there in quite some<br />
numbers and were waiting for<br />
the attack. On the Allied<br />
right the Prussians slowly<br />
moved to establish a solid line<br />
of Allied infantry across the<br />
board. A Prussian light cavalry unit<br />
screened the far Prussian right while artillery<br />
readied themselves<br />
for the first attack.<br />
However, it was the<br />
French who struck first<br />
on that flank. Using<br />
forces that recently arrived<br />
they moved out<br />
quickly and engaged the<br />
waiting Prussians. The<br />
French garrisoned the<br />
village on that flank and<br />
then charged home in a<br />
series of attacks with<br />
light cavalry. This drove<br />
the Prussians back, with<br />
the Prussian light cavalry<br />
retreating far behind the brigade. Prussian<br />
infantry quickly formed square and<br />
prepared for the next series of charges.<br />
The French artillery hammered the front<br />
lines of the Prussian infantry who had<br />
moved to engage the French on the hill.<br />
Now with the threat of the French light<br />
cavalry they pulled back slightly so as not<br />
to be flanked.<br />
In the center the Prussians moved<br />
forward in series of attacks against the<br />
French center. The French held firm,<br />
although there were heavy casualties to<br />
both sides. Both the Prussians and the<br />
French used their artillery well, softening<br />
up units for attacks or counterattacks. At<br />
one point the Prussians broke through and<br />
it looked as if they would sweep down<br />
the hill on the other side, but newly arrived<br />
French forces counterattacked and<br />
drove the Prussians down the opposite<br />
side of the hill instead!<br />
So, at the end of the second night the<br />
situation was confusing, but it appeared<br />
as if the French had gained the upper<br />
hand. The Prussian attack on the left had<br />
been broken up, with scattered French<br />
battalions now positioned between the<br />
Prussians and their main line of advance<br />
in the center. The French on the Prussian<br />
right had forced the Prussian brigade into<br />
squares and it had taken a serious beating<br />
from combined artillery barrages and<br />
cavalry charges. In the center the first<br />
Prussian attack had failed and the French<br />
counterattack had achieves some success,<br />
but the French had suffered heavily in<br />
defending the hill. Both sides were<br />
bringing up fresh reserves to renew the<br />
battle on the final night. (cont. on p. 27)<br />
Page 26<br />
NEWSLETTER TITLE
GDB: French Defense & Counterattack (cont.)<br />
Battle Report<br />
(cont. from p. 26) At the start of the third<br />
and final night the casualties for both<br />
sides were beginning to mount. A series<br />
of charges and countercharges in the center<br />
decimated several battalions on both<br />
sides. A French force that counterattacked<br />
too far was isolated and cut to<br />
pieces before falling back to rally. The<br />
Prussian forces on the Prussian right defended<br />
their area against further French<br />
attacks, but they also had to fall back to<br />
rally.<br />
Both sides by this time were at the<br />
point of being unable to continue offensive<br />
operations. There were few fresh<br />
units available and most orders to the<br />
various brigades and divisions changed to<br />
Defend to either hold their ground or to<br />
get reorganized for another attack.<br />
It was at this time that both sides<br />
moved up their reserves, which consisted<br />
of several regiments of heavy cavalry.<br />
With the center of the battlefield having<br />
turned into a no mans land, it seemed as a<br />
natural place for the deciding finish!<br />
Both sides opened gaps in the lines for<br />
the cavalry regiments to move through<br />
and get aligned for the deciding attack.<br />
There was still fighting going on in<br />
other sectors of the battlefield which consisted<br />
of trying to cause as many casualties<br />
as possible in an effort to break enemy<br />
brigades and divisions. I’m not sure<br />
if I’ve ever seen that many casualty<br />
markers on units in one game before!<br />
The cavalry charges went in and for<br />
several turns there were a furious series<br />
of attacks and counterattacks. In the end<br />
both sides cavalry were down to approximately<br />
half of their strength and the Prussians<br />
were able to make little headway.<br />
After reviewing the battlefield and looking<br />
at the positions of the units it was<br />
determined that while the French had<br />
taken a serious beating, they were still in<br />
control of the main hill. The Prussians<br />
and Russians had been worn down and<br />
would be unable to renew the attack.<br />
A very long (three nights) battle that<br />
featured a lot of figures on the board.<br />
The good thing about big games like this<br />
is that the use of reserves come into play<br />
and both sides need to show patience<br />
when committing their forces to action.<br />
Overall, it was a very good gaming experience<br />
and had the distinct feel of a large<br />
Napoleonic battle.<br />
VOLUME 1, ISSUE 1<br />
Page 27
IABSM3 Playtest<br />
After reviewing the IABSM3<br />
rules earlier in this issue, the least we<br />
could do is to report on a playtest<br />
using those rules! We had played<br />
IABSM during its first incarnation<br />
and we’ve played Sharp Practice<br />
several times, so we were already<br />
familiar with the major parts of the<br />
rules system. I had painted up three<br />
boxes of Plastic Soldier Company<br />
WW2 Russians, so we had several<br />
squads, AT guns, and heavy weapons,<br />
plus a few 1/48th scale Hobby<br />
Boss tanks. After reading through<br />
the rules a few times, making some<br />
shock counters, plus a few odds and<br />
ends, we were ready to at least try a small<br />
game.<br />
It’s late fall in 1941 on the road to<br />
Moscow. A German recon force has<br />
been ambushed and set on fire along the<br />
main road, plus there are reports of a<br />
heavy Russian attack. A German<br />
kampfgruppe consisting of a platoon of<br />
PZIVDs and a platoon of mech infantry<br />
in halftracks is rushed to the scene to<br />
prevent the Russians from seizing a vital<br />
crossroads.<br />
The Russian force consisted of two<br />
KV-1s and a KV-2 with one squad of<br />
SMG troops riding on the tanks. They<br />
were backed by a sniper (we wanted to<br />
see how the system worked with these),<br />
two infantry squads, two 45mm AT guns,<br />
and a 81mm mortar section with two<br />
mortars. At this stage we had no idea<br />
about the scenario balance, so it was a<br />
credit to both sides that they went along<br />
with the game to try the system out.<br />
Both sides used blinds to hide the<br />
advance of their forces. We were using a<br />
4x6 table, which with the number of vehicles<br />
we had was not a good choice and it<br />
should be recommended that larger tables<br />
be used for more than a platoon of armor<br />
per side if using 28mm or 1/48th kits.<br />
The blinds moved up fairly<br />
quickly and when the first<br />
one was revealed it was a bit<br />
shocking to the German side.<br />
A KV-2 was sitting dead<br />
center along the main road!<br />
The Sdkfz-251/10 that spotted<br />
it opened with its 37mm<br />
AT gun, but would have<br />
needed a miracle and didn’t<br />
get it. The return fire from<br />
the KV-2 immobilized the<br />
halftrack, then the Russian<br />
45mm AT guns revealed<br />
themselves and knocked the<br />
halftrack out for good.<br />
The German PZIVDs deployed and<br />
tried to use cover to engage the KV-2<br />
along with the AT guns. The<br />
KV-2 shook off the several<br />
hits it took, but the SMG<br />
squad riding it were not so<br />
lucky. One of the dismounted<br />
German squads in the barn<br />
opened fire on them, killing<br />
several. The first PZIVD<br />
went up in flames after being<br />
hit multiple times and the<br />
Germans were reeling. Another<br />
blind was spotted and<br />
unfortunately for the Germans<br />
it was a KV-1 moving<br />
up on the Russian left flank.<br />
Battle Report<br />
The Germans responded by turning<br />
one of the PZIVDs to engage this<br />
new threat while the other two<br />
squads of infantry moved to take up<br />
defensive positions. The KV-1 and 2<br />
then engaged a pair of PZIVDs in a<br />
battle that went on for a number of<br />
turns. The Russian AT guns began to<br />
shell the barn that a German squad<br />
was in, but got more than they bargained<br />
for when the return fire<br />
knocked out the crew of one of the<br />
AT guns.<br />
The KV-1 was then immobilized<br />
by a hit from a PZIVD and for a second<br />
it looked like the Germans<br />
might get back into the game. However,<br />
the PZIVD was then itself knocked out<br />
by the KV-2, which sat like a fortress in<br />
the middle of the board, taking everything<br />
the Germans could throw at it.<br />
Also, another KV-1 appeared on the Russian<br />
right flank and the Germans then<br />
moved to counter it. A brief counterattack<br />
by a squad of Germans and a<br />
halftrack knocked out the final Russian<br />
AT gun, but then the halftrack was hit<br />
and knocked out.<br />
The KV-2 then began to do something<br />
it was designed for; knocking out buildings.<br />
The German squad in the farmhouse<br />
took a battering and had to fall<br />
back. The last two PZIVDs got the benefit<br />
of the card draw and were able to fire<br />
on the Russian armor first the next two<br />
turns, but couldn’t score any knockouts.<br />
The return fire destroyed both of them<br />
and with that the game ended as the Germans<br />
would be forced to withdraw. The<br />
Russians still had mortars (cont. p. 29)<br />
Page 28<br />
NEWSLETTER TITLE
IABSM3 Playtest (cont.)<br />
Battle Report<br />
(cont. from p. 28) and two squads of infantry<br />
that had not even deployed yet!<br />
A few observations from our first<br />
game. First, the rules are a huge improvement<br />
over the first version that we<br />
tried years before, so that was good. The<br />
infantry firing chart and the anti-armor<br />
charts need to be on a reference card as<br />
those are what gets used the most as far<br />
as we could tell from this game.<br />
I think that there was some confusion<br />
on our end about running vehicles as a<br />
platoon or individually. It appears from<br />
the rules that you should have a Big Man<br />
in charge of vehicle platoons to issue<br />
orders, but what if there isn’t one We<br />
couldn’t make heads or tails of that during<br />
the game, so we’ll need to look into<br />
that further.<br />
The infantry and anti-vehicle firing<br />
systems are fun to use and there is some<br />
excitement when seeing if a vehicle can<br />
block a number of hits to it with its armor<br />
saves. I’ve always been a big fan of the<br />
shock system that is used in these rules<br />
and I like how it degrades the performance<br />
of the units during the game. We<br />
felt that the game’s base systems work<br />
well and can be easily picked up by gamers<br />
in a group setting. Once everyone<br />
understands how the card system operates<br />
and you get through the first few turns the<br />
game proceeds pretty quickly.<br />
In terms of problems there were a<br />
few, but fortunately they were pretty minor.<br />
First, there is some preparation time<br />
required to run a game, most notably<br />
getting the right cards, quality of troops,<br />
and Big Men organized. Nothing that<br />
takes hours, but it does help to come prepared.<br />
We found that snipers are particularly<br />
nasty as well as early Russian armor,<br />
which really imbalanced the scenario<br />
in hindsight. We were just learning the<br />
system, so no big deal, but in the future<br />
we’ll look at these things more closely.<br />
I think the biggest thing that skirmish<br />
gamers may need to get used to is the<br />
number of troops that you will need for a<br />
group game. We’re talking about needing<br />
(in our estimation) at least a platoon<br />
per player and some of the scenarios have<br />
quite a bit of stuff on the board. These<br />
rules are definitely designed for large<br />
skirmishes, i.e., company sized engagements<br />
with maybe two platoons of infantry<br />
plus heavy weapons along with support.<br />
Now some might argue that it will<br />
slow the game down, but actually IAB-<br />
SM3 handles large amounts of figs pretty<br />
well with the card system, plus infantry<br />
don’t last long in these battles!<br />
Overall, it was a very fun game and<br />
we liked the rules. I’m already working<br />
on getting some more infantry and vehicles<br />
painted up for even larger battles!<br />
For the cost of the rules you certainly<br />
can’t go wrong.<br />
VOLUME 1, ISSUE 1<br />
Page 29
WFHGS<br />
WASATCH FRONT HISTORICAL<br />
GAMING SOCIETY<br />
Meets every other Friday nigh in the SLC, Utah area. We play a<br />
wide variety of games in 1/300th, 10mm, 15mm, and 25mm,<br />
including Age of Reason, Age of Discovery, Age of Eagles, Fire<br />
& Fury, General de Brigade, Warmaster Ancients, TSATF,<br />
Phantoms, Mustangs, BKC2, and more...<br />
Email the editor:<br />
mirsik1@juno.com<br />
The best in historical miniatures<br />
gaming<br />
Visit us on the web:<br />
www.wfhgs.com<br />
Several issues ago I wrote about how I found the plastics market in wargaming to be<br />
very interesting and would it replace or supplant the lead figure industry. I think at<br />
this stage it’s safe to say that lead figures will continue to be around for quite some<br />
time in the hobby. However, the plastics side of the hobby has certainly taken tremendous<br />
strides from those first boxed sets by Wargames Factory and others. With<br />
The Plastic Soldier Company, Victrix, Warlord, Perry’s, Fireforge, and more, there<br />
is now an ever growing selection of plastic miniatures to choose from. The sculpting<br />
isn’t bad and you certainly can’t argue the price, but what is stopping the plastics<br />
from pretty much taking over the hobby is the same thing that has plagued plastics<br />
since the days of Airfix, Atlantic, Esci, and others. First, there are the strange<br />
poses you seem to get in many boxes. Second, the ranges are usually the tried and<br />
true, such as WW2, ACW, Spartans, and so on. Third, the sculpting, while improving,<br />
still is missing out on details when compared to lead figures. These new boxed<br />
sets, however, are great for building up the core of your armies, but for specialty<br />
figs, i.e., officers, engineers, crews, etc., you still need lead figures. Overall, it’s<br />
been great to see this side of the hobby grow and I look forward to new releases.<br />
One thing that continues to interest me, though, is with all of these cheaper figures<br />
now available and for all the hoopla, the number of painted figs I see at the FLGS,<br />
blogs, web sites, etc., still hasn’t jumped in quantity. Are people just buying stacks<br />
of plastic figs and storing them for future use<br />
Battleground Prussia<br />
Book Review<br />
While there are many books<br />
about the end of WW2, particularly<br />
on the Battle of the Bulge or the<br />
Battle for Berlin, there aren’t many<br />
that focus on the Russian drive to<br />
the Vistula and Oder rivers. Batleground<br />
Prussia is an interesting<br />
book in that it covers these interesting<br />
battles during late 1944 and<br />
early 1945.<br />
The book does start off in an<br />
unusual way in that it goes over the<br />
history of the Prussian area, especially<br />
the ethnic background. Then the<br />
scene shifts to the destruction of Army<br />
Group Center and the Russian drive to<br />
the Baltic Sea. Army Group North,<br />
which covered this area was split apart<br />
and basically run over by a steamroller of<br />
Russian forces. The book covers the start<br />
of the campaign all the way to the final<br />
evacuations just before the armistice went<br />
into effect.<br />
Along the way you are treated to a<br />
multitude of interesting<br />
battles and stories from<br />
the participants. Most of<br />
the book covers Russian<br />
attacks against individual<br />
towns or areas with eyewitness<br />
accounts of the<br />
fighting. These range<br />
from assault gun platoons<br />
going into a counterattack<br />
to German infantry<br />
units trying to fall back<br />
to the next defensive line.<br />
All in all, the battles are fascinating and<br />
give you a good idea of what the situation<br />
was on the ground.<br />
I was struck by several things in this<br />
book that I knew very little about. The<br />
first was the scale of the evacuations<br />
along the Baltic coasts, which were enormous.<br />
The second was the fire support<br />
provided by ships of the Kriegsmarine<br />
during the battles. The third was how the<br />
refugee traffic greatly affected operations<br />
on both sides.<br />
Also, the book goes into detail on the<br />
German command structure and greatly<br />
out of touch Berlin was with the front<br />
lines at the end of the war. Numerous<br />
units ran out of ammo and fuel, units<br />
were trapped in pockets, reinforcements<br />
sent back and forth to the wrong sectors,<br />
and more. It was an interesting look at<br />
the crumbling of an army when a war is<br />
nearly over. Still, many German units<br />
continued to launch counterattacks until<br />
the bitter end.<br />
Overall, I found this to be an excellent<br />
book on a much neglected area of<br />
WW2. I wasn’t too pleased with the<br />
maps and some with greater detail, particularly<br />
about some of the strategic towns,<br />
would have been most welcome. Despite<br />
that, the eyewitness accounts of the battles,<br />
refugees struggling towards the west,<br />
and the ships trying to save both soldiers<br />
and civilians at the end makes for fascinating<br />
reading. If you are an East <strong>Front</strong><br />
aficionado then this book definitely deserves<br />
to be in your library.