HOW TO MAP ADRIVE WEBDAV – WINDOWS VISTA
HOW TO MAP ADRIVE WEBDAV – WINDOWS VISTA
HOW TO MAP ADRIVE WEBDAV – WINDOWS VISTA

Create successful ePaper yourself
Turn your PDF publications into a flip-book with our unique Google optimized e-Paper software.
<strong>HOW</strong> <strong>TO</strong> <strong>MAP</strong> <strong>ADRIVE</strong> <strong>WEBDAV</strong> <strong>–</strong> <strong>WINDOWS</strong> <strong>VISTA</strong><br />
(For ADrive Signature and Premium users only. Basic users will need to upgrade<br />
to a Signature or Premium storage plan to access WebDAV.)<br />
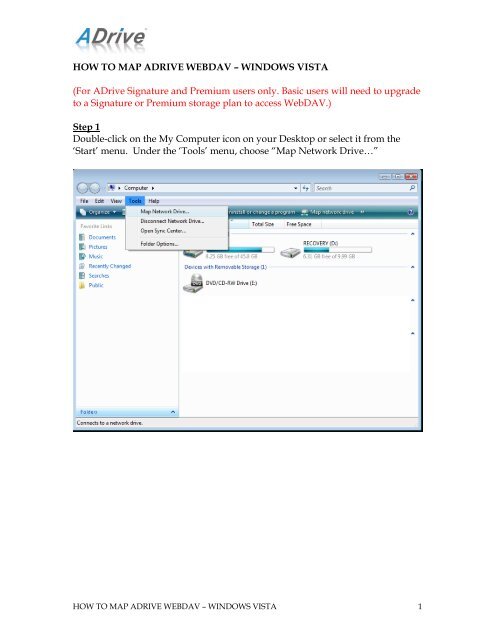
Step 1<br />
Double-click on the My Computer icon on your Desktop or select it from the<br />
‘Start’ menu. Under the ‘Tools’ menu, choose “Map Network Drive…”<br />
<strong>HOW</strong> <strong>TO</strong> <strong>MAP</strong> <strong>ADRIVE</strong> <strong>WEBDAV</strong> <strong>–</strong> <strong>WINDOWS</strong> <strong>VISTA</strong> 1
Step 2<br />
A new Window titled ‘Map Network Drive’ will appear. Click on the link<br />
“Connect to a Web site that you can use to store your documents and pictures.”<br />
as shown below.<br />
Step 3<br />
The next window that will appear is ‘Welcome to the Add Network Location<br />
Wizard.’ Click “Next” to move on to the next step.<br />
<strong>HOW</strong> <strong>TO</strong> <strong>MAP</strong> <strong>ADRIVE</strong> <strong>WEBDAV</strong> <strong>–</strong> <strong>WINDOWS</strong> <strong>VISTA</strong> 2
Step 4<br />
The Add Network Location Wizard will ask where to create the network<br />
location. Click “Choose a custom network location” and then click “Next.”<br />
<strong>HOW</strong> <strong>TO</strong> <strong>MAP</strong> <strong>ADRIVE</strong> <strong>WEBDAV</strong> <strong>–</strong> <strong>WINDOWS</strong> <strong>VISTA</strong> 3
Step 5<br />
Next, the Wizard asks for an “Internet or network address:”. In the highlighted<br />
box below, enter the following address: https://www.adrive.com/webDAV.php<br />
and then click “Next” to continue.<br />
<strong>HOW</strong> <strong>TO</strong> <strong>MAP</strong> <strong>ADRIVE</strong> <strong>WEBDAV</strong> <strong>–</strong> <strong>WINDOWS</strong> <strong>VISTA</strong> 4
Step 6<br />
Now enter your email address and password that is associated with your ADrive<br />
account. Make sure to check the “Remember my password” box. This will<br />
prevent you from having to re-enter your account information in the future.<br />
Then click “OK”.<br />
<strong>HOW</strong> <strong>TO</strong> <strong>MAP</strong> <strong>ADRIVE</strong> <strong>WEBDAV</strong> <strong>–</strong> <strong>WINDOWS</strong> <strong>VISTA</strong> 5
Step 7<br />
Now enter a name for the WebDAV folder in the “Type a name for this network<br />
location:” text box as shown below. An example of a name is “ADrive<br />
WebDAV”. Click “Next” to move on to the next step.<br />
<strong>HOW</strong> <strong>TO</strong> <strong>MAP</strong> <strong>ADRIVE</strong> <strong>WEBDAV</strong> <strong>–</strong> <strong>WINDOWS</strong> <strong>VISTA</strong> 6
Step 8<br />
In the final step, choose whether you want to open the newly created network<br />
location. To open the network location, check the box next to “Open this<br />
network location when I click Finish.” as shown below and then click “Finish”.<br />
Otherwise, uncheck the box and click “Finish”.<br />
<strong>HOW</strong> <strong>TO</strong> <strong>MAP</strong> <strong>ADRIVE</strong> <strong>WEBDAV</strong> <strong>–</strong> <strong>WINDOWS</strong> <strong>VISTA</strong> 7
Managing Files and Connection<br />
If you chose to open the network location when finished from Step 8, then<br />
Windows will open an Explorer window. From the Explorer window, you will<br />
be able to manage all your ADrive files as if they were in folders on your local<br />
machine. You can also drag & drop to upload & download files between your<br />
ADrive account and your local computer.<br />
If you did not choose to open the network location in Step 8, then when you are<br />
ready to manage your ADrive account double-click the My Computer icon on<br />
your desktop. In the Explorer window, you will see the ADrive WebDAV<br />
Network Location (name will be whatever you created in Step 7). From that<br />
Explorer window, you can double-click the Network Location icon to open your<br />
ADrive account to manage it on your local computer. You can also select “My<br />
Network Places” from your ‘Start’ menu.<br />
Right-click on the ADrive WebDAV (or the name you created in Step 7) Network<br />
Location. An action menu (pictured below) will appear. From this menu, you<br />
can open the network location, create a shortcut, or delete the network location.<br />
Only choose “Delete” if you would like to remove the WebDAV link to your<br />
ADrive account. This will disconnect your computer from ADrive, but will<br />
neither delete/cancel your ADrive account nor delete any files stored in your<br />
ADrive account. However, if you delete the WebDAV link, you will need to<br />
follow all of the above steps again to re-map the network location.<br />
<strong>HOW</strong> <strong>TO</strong> <strong>MAP</strong> <strong>ADRIVE</strong> <strong>WEBDAV</strong> <strong>–</strong> <strong>WINDOWS</strong> <strong>VISTA</strong> 8
*This tutorial has covered how to map ADrive WebDAV for Windows Vista<br />
users.<br />
If you have any questions that have not been answered in this tutorial, please<br />
visit ADrive’s FAQ page at www.adrive.com/info/faq or contact our Support<br />
Team at support@adrive.com.<br />
<strong>HOW</strong> <strong>TO</strong> <strong>MAP</strong> <strong>ADRIVE</strong> <strong>WEBDAV</strong> <strong>–</strong> <strong>WINDOWS</strong> <strong>VISTA</strong> 9