How to apply WISP mode in the - Edimax
How to apply WISP mode in the - Edimax
How to apply WISP mode in the - Edimax

Create successful ePaper yourself
Turn your PDF publications into a flip-book with our unique Google optimized e-Paper software.
<strong>How</strong> <strong>to</strong> <strong>apply</strong> <strong>WISP</strong> <strong>mode</strong> <strong>in</strong> <strong>the</strong> AP-router<br />
Author: Longcent<br />
(2006-6-16)<br />
This FAQ is applied <strong>to</strong> <strong>the</strong> below <strong>Edimax</strong> <strong>mode</strong>l and operation systems:<br />
BR-6204Wg / BR-6304Wg.<br />
W<strong>in</strong>dows 2000/XP.<br />
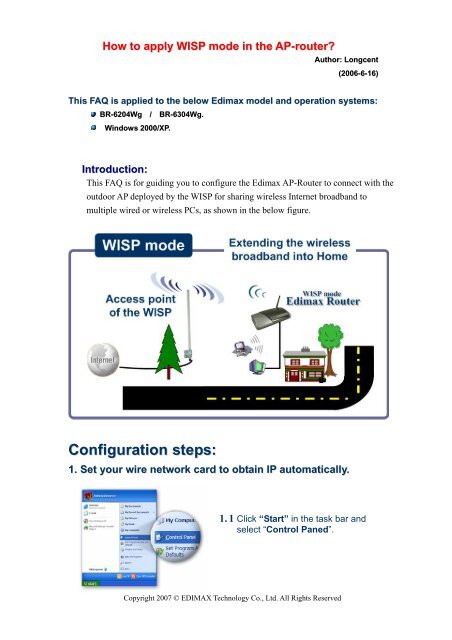
Introduction:<br />
This FAQ is for guid<strong>in</strong>g you <strong>to</strong> configure <strong>the</strong> <strong>Edimax</strong> AP-Router <strong>to</strong> connect with <strong>the</strong><br />
outdoor AP deployed by <strong>the</strong> <strong>WISP</strong> for shar<strong>in</strong>g wireless Internet broadband <strong>to</strong><br />
multiple wired or wireless PCs, as shown <strong>in</strong> <strong>the</strong> below figure.<br />
Configuration steps:<br />
1. Set your wire network card <strong>to</strong> obta<strong>in</strong> IP au<strong>to</strong>matically.<br />
1. 1 Click “Start” <strong>in</strong> <strong>the</strong> task bar and<br />
select “Control Paned”.<br />
Copyright 2007 © EDIMAX Technology Co., Ltd. All Rights Reserved
1. 2 Click “Switch <strong>to</strong> Classic View”<br />
on <strong>the</strong> left <strong>to</strong>p.<br />
1.3 Double-click <strong>the</strong> “Network<br />
Connection” icon.<br />
1.4 Rick-click <strong>the</strong> “Local Area<br />
Connection” and select<br />
“Properties”.<br />
1.5 Select “Internet Pro<strong>to</strong>col”<br />
and click “Properties”.<br />
Copyright 2007 © EDIMAX Technology Co., Ltd. All Rights Reserved
1.6 Ensure <strong>the</strong> option “Obta<strong>in</strong><br />
an IP au<strong>to</strong>matically” and<br />
“Obta<strong>in</strong> DNS address<br />
au<strong>to</strong>matically” is checked<br />
and click “OK”.<br />
2. <strong>Edimax</strong> Router configuration:<br />
2.1 Enter <strong>the</strong> default IP of <strong>the</strong> router .<br />
2.2 Enter <strong>the</strong> default user name “adm<strong>in</strong>”<br />
and password “1234” <strong>to</strong> log on.<br />
2.3 Click “WAN Type”, “Wireless ISP”, and “Apply” but<strong>to</strong>n.<br />
Copyright 2007 © EDIMAX Technology Co., Ltd. All Rights Reserved
2.4 Click “Cont<strong>in</strong>ue” but<strong>to</strong>n.<br />
2.5 Click “Site Survey” but<strong>to</strong>n.<br />
2.6 Once <strong>the</strong> “Site survey” but<strong>to</strong>n is clicked, <strong>the</strong> pop-up w<strong>in</strong>dow will show<br />
you all <strong>the</strong> nearbe APs. Please click <strong>the</strong> name of <strong>the</strong> AP deployed by your<br />
<strong>WISP</strong>. In this example, we choose “ISP-2” and click “Done” but<strong>to</strong>n.<br />
Copyright 2007 © EDIMAX Technology Co., Ltd. All Rights Reserved
2.7 Click “Dynamic IP”, and “Apply” but<strong>to</strong>n.<br />
2.8 Click “Apply” but<strong>to</strong>n for reboot<strong>in</strong>g <strong>the</strong> router.<br />
2.9 Check whe<strong>the</strong>r <strong>the</strong> IP addresses assigned by <strong>the</strong> <strong>WISP</strong> is logged <strong>in</strong> <strong>the</strong><br />
below table by click “Status Info” and “Intenet Connection”.<br />
Note:<br />
If <strong>the</strong>se is an IP address shown <strong>in</strong> <strong>the</strong> step 2.9 table, it<br />
<strong>in</strong>dicates that <strong>the</strong> router is connected <strong>to</strong> your ISP, and you are<br />
able <strong>to</strong> access <strong>the</strong> Internet.<br />
Copyright 2007 © EDIMAX Technology Co., Ltd. All Rights Reserved
Congratulations!<br />
Copyright 2007 © EDIMAX Technology Co., Ltd. All Rights Reserved