
You also want an ePaper? Increase the reach of your titles
YUMPU automatically turns print PDFs into web optimized ePapers that Google loves.
TECHNIQUES TO USE<br />
Masking or frisket is used mostly to create a sharp edge or when more than one color is applied. A new<br />
frisket is cut for each color and covers any area that should not<br />
be sprayed. <strong>Badger</strong>’s Foto/Frisket Film is specially formulated<br />
for use on all surfaces commonly used for airbrushing.<br />
A flat surface mask can be cut from Foto/Frisket Film. For a<br />
sharp edge, hold the mask flat in position. For a softer edge,<br />
elevate the mask slightly by resting on a ruler or other flat object.<br />
For contour masking (models, ceramics, etc.) liquid frisket is<br />
recommended.<br />
STENCILS/TEMPLATES<br />
Stencils/templates are used when a design needs to be<br />
duplicated, as in posters and decorating. Cut from stiff paper,<br />
FOTO/FRISKET FILM or NO-TACK Stencil Film, hold the<br />
stencil firmly in position and spray starting with the edges<br />
and work inward. A reverse (negative) stencil can also be<br />
used, spray along the stencil edge.<br />
POSITIVE<br />
REVERSE (negative)<br />
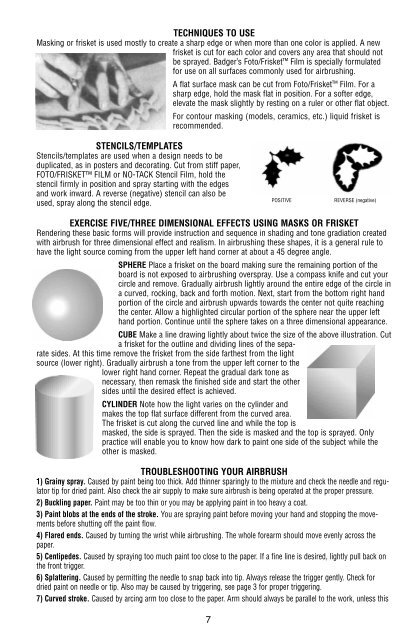
EXERCISE FIVE/THREE DIMENSIONAL EFFECTS USING MASKS OR FRISKET<br />
Rendering these basic forms will provide instruction and sequence in shading and tone gradiation created<br />
with airbrush for three dimensional effect and realism. In airbrushing these shapes, it is a general rule to<br />
have the light source coming from the upper left hand corner at about a 45 degree angle.<br />
SPHERE Place a frisket on the board making sure the remaining portion of the<br />
board is not exposed to airbrushing overspray. Use a compass knife and cut your<br />
circle and remove. Gradually airbrush lightly around the entire edge of the circle in<br />
a curved, rocking, back and forth motion. Next, start from the bottom right hand<br />
portion of the circle and airbrush upwards towards the center not quite reaching<br />
the center. Allow a highlighted circular portion of the sphere near the upper left<br />
hand portion. Continue until the sphere takes on a three dimensional appearance.<br />
CUBE Make a line drawing lightly about twice the size of the above illustration. Cut<br />
a frisket for the outline and dividing lines of the separate<br />
sides. At this time remove the frisket from the side farthest from the light<br />
source (lower right). Gradually airbrush a tone from the upper left corner to the<br />
lower right hand corner. Repeat the gradual dark tone as<br />
necessary, then remask the finished side and start the other<br />
sides until the desired effect is achieved.<br />
CYLINDER Note how the light varies on the cylinder and<br />
makes the top flat surface different from the curved area.<br />
The frisket is cut along the curved line and while the top is<br />
masked, the side is sprayed. Then the side is masked and the top is sprayed. Only<br />
practice will enable you to know how dark to paint one side of the subject while the<br />
other is masked.<br />
TROUBLESHOOTING YOUR AIRBRUSH<br />
1) Grainy spray. Caused by paint being too thick. Add thinner sparingly to the mixture and check the needle and regulator<br />
tip for dried paint. Also check the air supply to make sure airbrush is being operated at the proper pressure.<br />
2) Buckling paper. Paint may be too thin or you may be applying paint in too heavy a coat.<br />
3) Paint blobs at the ends of the stroke. You are spraying paint before moving your hand and stopping the movements<br />
before shutting off the paint flow.<br />
4) Flared ends. Caused by turning the wrist while airbrushing. The whole forearm should move evenly across the<br />
paper.<br />
5) Centipedes. Caused by spraying too much paint too close to the paper. If a fine line is desired, lightly pull back on<br />
the front trigger.<br />
6) Splattering. Caused by permitting the needle to snap back into tip. Always release the trigger gently. Check for<br />
dried paint on needle or tip. Also may be caused by triggering, see page 3 for proper triggering.<br />
7) Curved stroke. Caused by arcing arm too close to the paper. Arm should always be parallel to the work, unless this<br />
7