Explosion Proof High Bay LED Light Installation - Magnalight.com
Explosion Proof High Bay LED Light Installation - Magnalight.com
Explosion Proof High Bay LED Light Installation - Magnalight.com

Create successful ePaper yourself
Turn your PDF publications into a flip-book with our unique Google optimized e-Paper software.
Larson Electronics LLC www.LarsonElectronics.<strong>com</strong> sales@larsonelectronics.<strong>com</strong><br />
9419 E US HWY 175, Kemp, TX 75143 - P: (800) 369-6671 - F: (903) 498-3364<br />
EPLC2-HB-150<strong>LED</strong>-RT<br />
This explosion proof light is designed for illumination of industrial locations. It uses the latest in solid<br />
state lighting technology for long life, low maintenance and high efficiency.<br />
The unique design focuses the light where it is needed, giving improved efficiency over a conventional<br />
HID luminaire.<br />
An internal, universal input, power-factor-corrected switch-mode supply allows it to be used from any<br />
nominal 120-277V AC supply without any variation in light output.<br />
WARNING<br />
To avoid the risk of fire, explosion or electric shock, this product should be installed, inspected and<br />
maintained by a qualified electrician only, in accordance with all applicable electrical codes.<br />
To avoid electric shock:<br />
<br />
<br />
Be certain electrical power is OFF before and during installation and maintenance.<br />
Luminaire must be connected to a wiring system with an equipment-grounding conductor.<br />
To avoid explosion:<br />
<br />
<br />
<br />
<br />
Make sure the supply voltage is within the luminaires’ voltage rating.<br />
Ensure the marked T rating is less than the ignition temperature of the Hazardous Atmosphere.<br />
Do not operate in ambient temperatures above those indicated on the luminaire nameplate.<br />
Do not operate if the lens is cracked or damaged. All fasteners should be properly seated.<br />
For supply connections, use wire rated for at least 110°C<br />
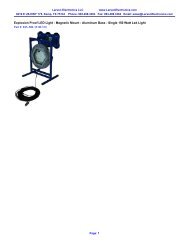
Re<strong>com</strong>mended mounting height is 25-40 feet.<br />
MOUNTING<br />
This fixture offers an adjustable mounting system that allows this fixture to be mounted to any flat<br />
surface including walls and ceilings. A single ½-13 bolt is used to mount the fixture to the surface.<br />
Check to ensure that all mounting hardware is included.<br />
2 Small Brackets<br />
1 Large Trunnion Bracket<br />
8 Bolts<br />
8 Lock-Washers<br />
4 Nuts
Larson Electronics LLC www.LarsonElectronics.<strong>com</strong> sales@larsonelectronics.<strong>com</strong><br />
9419 E US HWY 175, Kemp, TX 75143 - P: (800) 369-6671 - F: (903) 498-3364<br />
1. Using four bolts, washers and the four nuts provided, attach brackets “A” to both sides of<br />
bracket “B”.<br />
2. The <strong>LED</strong> fixture has 9 holes for a versatile mount option. Select the holes that you would like to<br />
use.<br />
3. Brackets “A” will then be bolted to the <strong>LED</strong> fixture with the remaining bolts and washers.<br />
4. The fixture is now ready for installation.<br />
See Images Below as a Reference
Larson Electronics LLC www.LarsonElectronics.<strong>com</strong> sales@larsonelectronics.<strong>com</strong><br />
9419 E US HWY 175, Kemp, TX 75143 - P: (800) 369-6671 - F: (903) 498-3364<br />
WIRING<br />
See attached wiring diagram.<br />
MAINTENANCE<br />
Caution: To avoid personal injury, disconnect power to the light and allow the unit to cool down<br />
before performing maintenance.<br />
Warning: No user serviceable parts inside of fixture. Risk of electric shock. Removal of the lens will<br />
void the warranty.<br />
1. Perform visual, mechanical and electrical inspections on a regular basis. We re<strong>com</strong>mend routine<br />
checks to be made on a yearly basis. Frequency of use and environment should determine this.<br />
It is re<strong>com</strong>mended to follow an Electrical Preventive Maintenance Program as described in NFPA<br />
70B: Re<strong>com</strong>mended practice for Electrical Equipment.<br />
2. The lens should be cleaned periodically as needed to ensure continued photometric<br />
performance. Clean the lens with a damp, non-abrasive, lint-free cloth. If not sufficient, use mild<br />
soap or a liquid cleaner.<br />
3. Inspect the cooking fins on the luminaire to ensure that they are free of any obstructions or<br />
contamination (i.e. excessive dust build-up). Clean with a non-abrasive cloth if needed.<br />
4. Do not operate if the lens is cracked or damaged. All fasteners should be properly seated.
1<br />
2<br />
3<br />
4<br />
5<br />
6<br />
7<br />
A<br />
Black<br />
A<br />
EPL-HB-150<strong>LED</strong>-RT<br />
White<br />
Green<br />
Brass<br />
Silver<br />
..<br />
5-15 Cord Cap<br />
D<br />
D<br />
C<br />
C<br />
E<br />
B<br />
B<br />
1<br />
2<br />
3<br />
4<br />
5<br />
I<br />
Title<br />
EPL-HB-150<strong>LED</strong>-RT<br />
Author<br />
JB<br />
LARSON ELECTRONICS<br />
File<br />
\Wiring Diagrams\EPL-HB-150<strong>LED</strong>-RT Wiring.dsn<br />
Document<br />
1<br />
Revision<br />
Date<br />
Sheets<br />
1.0<br />
10/16/14 1 of 1<br />
6<br />
7<br />
E