DreamSNES tutorial for Windows users - Lysator
DreamSNES tutorial for Windows users - Lysator
DreamSNES tutorial for Windows users - Lysator

Create successful ePaper yourself
Turn your PDF publications into a flip-book with our unique Google optimized e-Paper software.
<strong>DreamSNES</strong> Win32 CD-R creation <strong>tutorial</strong><br />
<strong>DreamSNES</strong> <strong>tutorial</strong> <strong>for</strong> <strong>Windows</strong> <strong>users</strong><br />
Page 1 of 10<br />
This <strong>tutorial</strong> tries to explain how to create a CD-R containing the <strong>DreamSNES</strong> SNES emulator <strong>for</strong> Dreamcast. No prior knowledge of<br />
the Dreamcast or CD-burning is required, but general knowledge on GUI-conventions like "right-clicking something" and "open a<br />
directory by clicking on it" is assumed.<br />
Requirements:<br />
• A PC with a CD-R burner<br />
• Microsoft <strong>Windows</strong> (Win98 or later should work, Win95OSR2 might work. Only WinXP tested.)<br />
• A working Internet connection<br />
• One or more SNES cartridge dumps. Known as ROMs<br />
• A blank CD-R<br />
Note: The pictures <strong>for</strong> this <strong>tutorial</strong> is taken from a <strong>Windows</strong> XP session, so the image borders might look different from what you are<br />
used to on your Win98, NT or other installation.<br />
Let's get on with it then:<br />
1. Get http://www.lysator.liu.se/dreamsnes/dsinstaller.zip (5.9MiB)<br />
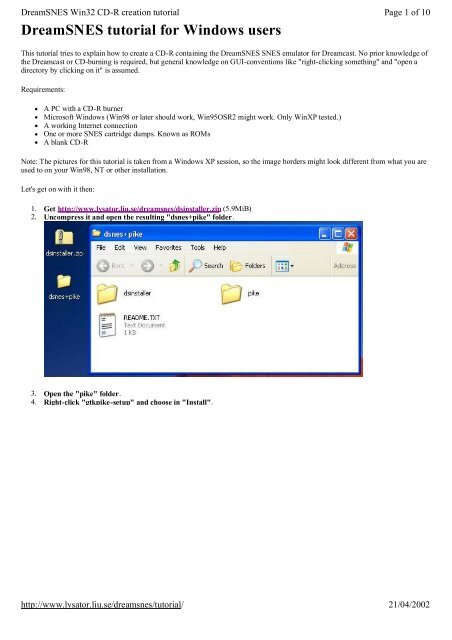
2. Uncompress it and open the resulting "dsnes+pike" folder.<br />
3. Open the "pike" folder.<br />
4. Right-click "gtkpike-setup" and choose in "Install".<br />
http://www.lysator.liu.se/dreamsnes/<strong>tutorial</strong>/<br />
21/04/2002
<strong>DreamSNES</strong> Win32 CD-R creation <strong>tutorial</strong><br />
Page 2 of 10<br />
This will start the installation of Pike (the language the installer is written in). Have patience, it can take a few minutes. Up to<br />
ten or fifteen minutes if you have a slow computer or slow disks.<br />
5. Close the "pike" folder and open the "dsinstaller" folder instead.<br />
6. Start the installer by double-clicking the on "dreamsnesinstall".<br />
The installer will first contact it's update server over the Internet to check if it needs updating or if there are any new<br />
Dreamcast applications available.<br />
http://www.lysator.liu.se/dreamsnes/<strong>tutorial</strong>/<br />
21/04/2002
<strong>DreamSNES</strong> Win32 CD-R creation <strong>tutorial</strong><br />
Page 3 of 10<br />
When the application is finished upgrading and testing your system (should only take a few seconds) it will show you the<br />
"Basic setup" tab.<br />
7. Select the burner you want to use by clicking on it.<br />
(You could optionally choose the "NERO image file" entry. That would produce a CD image that can be burned with Aheads<br />
CD burner software "NERO". Use this only if <strong>for</strong> some reason the CD burner software included in the installer in unable to<br />
burn on your CD burner hardware.)<br />
8. Select the application you want to burn by clicking on it. In this case "<strong>DreamSNES</strong>".<br />
http://www.lysator.liu.se/dreamsnes/<strong>tutorial</strong>/<br />
21/04/2002
<strong>DreamSNES</strong> Win32 CD-R creation <strong>tutorial</strong><br />
Page 4 of 10<br />
9. Optional: If you are low on disk space you can select "Direct burn". That way it will burn directly from the files without<br />
first creating a CD image file. This works well on modern PCs with good hardware, but increases the risk <strong>for</strong> buffer underruns<br />
on slow PCs.<br />
10. Click on the "ROM list" tab to change view.<br />
11. Click on "Add" to bring up the ROM file selector.<br />
http://www.lysator.liu.se/dreamsnes/<strong>tutorial</strong>/<br />
21/04/2002
<strong>DreamSNES</strong> Win32 CD-R creation <strong>tutorial</strong><br />
Page 5 of 10<br />
12. Select the ROM you want to add to the CD and press "OK".<br />
http://www.lysator.liu.se/dreamsnes/<strong>tutorial</strong>/<br />
21/04/2002
<strong>DreamSNES</strong> Win32 CD-R creation <strong>tutorial</strong><br />
Page 6 of 10<br />
13. Repeat the last step until you have added all ROMs you want burned on the CD.<br />
14. Optional: Instead of adding ROMs file by file you can add an entire directory. Select the directory you want to add in<br />
the directory view to the left, BUT DON'T OPEN THE DIRECTORY. Then press "OK".<br />
http://www.lysator.liu.se/dreamsnes/<strong>tutorial</strong>/<br />
21/04/2002
<strong>DreamSNES</strong> Win32 CD-R creation <strong>tutorial</strong><br />
Page 7 of 10<br />
A small requester will ask you if you really want to add all ROMs in that directory. Click on "Yes".<br />
15. Optional: When you are finished adding the ROMs you want to use you can choose to change the names that will<br />
appear in <strong>DreamSNES</strong> ROM loader screen. Select a ROM you want to change the displayed name <strong>for</strong> and press<br />
"Rename".<br />
Change the name in the requester that pops up...<br />
http://www.lysator.liu.se/dreamsnes/<strong>tutorial</strong>/<br />
21/04/2002
<strong>DreamSNES</strong> Win32 CD-R creation <strong>tutorial</strong><br />
Page 8 of 10<br />
... then press "OK" and repeat with other ROMs until you are satisfied.<br />
16. Click on the "Action" tab to go to the final phase of the CD-R creation.<br />
17. Make sure you have a blank CD-R in your burner and then press the big "Start" button.<br />
The installer will now check if the latest <strong>DreamSNES</strong> is available and if not download it. (If you have already downloaded<br />
dreamsnes-0.9.7.tar.gz you can place that file in the "dsinstaller" directory be<strong>for</strong>e starting the installer to avoid having to<br />
download it again.)<br />
When the downloading is finished the burning will start, first with an audio track...<br />
http://www.lysator.liu.se/dreamsnes/<strong>tutorial</strong>/<br />
21/04/2002
<strong>DreamSNES</strong> Win32 CD-R creation <strong>tutorial</strong><br />
Page 9 of 10<br />
...and then the real data...<br />
After 100% has been reached it will take some time to empty the buffers and fixate the CD-R, so there will be an extra minute<br />
or two of waiting after 100% has been reached.<br />
18. When the Info requester pops up, press "OK" to exit the installer and then put your finished <strong>DreamSNES</strong> CD in your<br />
Dreamcast. Start the Dreamcast and enjoy the fun.<br />
http://www.lysator.liu.se/dreamsnes/<strong>tutorial</strong>/<br />
21/04/2002
<strong>DreamSNES</strong> Win32 CD-R creation <strong>tutorial</strong><br />
Page 10 of 10<br />
Written by Peter Bortas, Copyright 2002. Permission to copy this <strong>tutorial</strong> and incorporate it into your own site is granted as long the<br />
link to the installer (http://www.lysator.liu.se/dreamsnes/dsinstaller.zip) is not modified to point to any other location, and that this<br />
copyright and distribution notice appears somewhere on the page. This is <strong>for</strong> security and support reasons. Other than that, do<br />
whatever you wish with it.<br />
Go here <strong>for</strong> more in<strong>for</strong>mation about <strong>DreamSNES</strong><br />
http://www.lysator.liu.se/dreamsnes/<strong>tutorial</strong>/<br />
21/04/2002