Enclosure Manual - Steren Electronics
Enclosure Manual - Steren Electronics
Enclosure Manual - Steren Electronics

You also want an ePaper? Increase the reach of your titles
YUMPU automatically turns print PDFs into web optimized ePapers that Google loves.
<strong>Enclosure</strong>s<strong>Manual</strong>.qxd 7/6/04 4:01 PM Page 1<br />
Fast Media<br />
Home Network<br />
Systems<br />
<strong>Enclosure</strong><br />
Installation<br />
Guide<br />
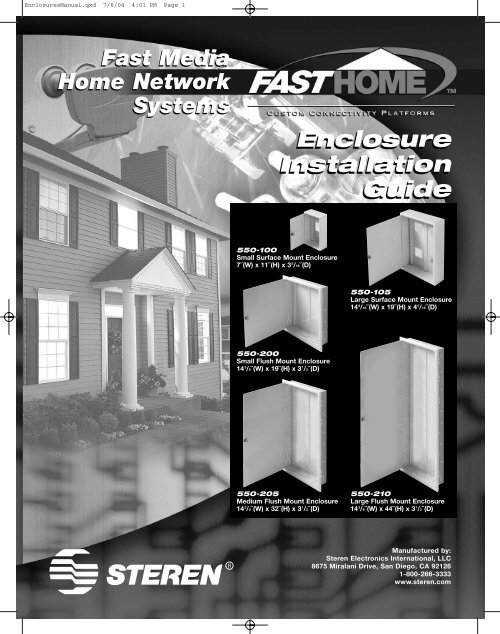
550-100<br />
Small Surface Mount <strong>Enclosure</strong><br />
7˝(W) x 11˝(H) x 3 5 /16˝(D)<br />
550-105<br />
Large Surface Mount <strong>Enclosure</strong><br />
14 9 /16˝(W) x 19˝(H) x 4 5 /16˝(D)<br />
550-200<br />
Small Flush Mount <strong>Enclosure</strong><br />
14 3 /8˝(W) x 19˝(H) x 3 1 /2˝(D)<br />
550-205<br />
Medium Flush Mount <strong>Enclosure</strong><br />
14 3 /8˝(W) x 32˝(H) x 3 1 /2˝(D)<br />
550-210<br />
Large Flush Mount <strong>Enclosure</strong><br />
14 3 /8˝(W) x 44˝(H) x 3 1 /2˝(D)<br />
R<br />
Manufactured by:<br />
<strong>Steren</strong> <strong>Electronics</strong> International, LLC<br />
8675 Miralani Drive, San Diego, CA 92126<br />
1-800-266-3333<br />
www.steren.com
<strong>Enclosure</strong>s<strong>Manual</strong>.qxd 7/6/04 4:01 PM Page 2<br />
FastHome <br />
Network <strong>Enclosure</strong>s Installation Guide<br />
Introduction<br />
Welcome to the FastHome Series<br />
Thank you for purchasing this product, part of the FastHome Series of Fast Media<br />
Home Network Systems by <strong>Steren</strong>. You have made an excellent choice for the homeowner.<br />
The FastHome Series of enclosures and modules provide a quality control<br />
center for the wiring of cable TV, phone/fax/modem, Ethernet, security, sound system<br />
and other voice, video, data and audio devices. Installation is easy and requires only<br />
basic tools. By following the instructions in this guide, you will ensure the proper installation<br />
of the FastHome enclosure.<br />
Product Description<br />
From a centralized location, Fast Media Home Network Systems enclosures fully<br />
integrate, manage and distribute broadband and multimedia services on a flexible, customizable<br />
and upgradeable platform. Constructed of 18-gauge cold rolled steel for<br />
strength and protection against interference, FastHome enclosures mount on a wall<br />
(surface mount) or between 16˝ center wall studs (flush mount). Multiple knock outs and<br />
pre-punched holes accommodate tie wraps, mounting screws, ground screws and wire<br />
bundles. Raised rails create a clean wiring channel behind mounted modules. Other<br />
features include a captured hinge cover design for easy access and a keyed latch for<br />
positive closure and security.<br />
About <strong>Steren</strong> <strong>Electronics</strong><br />
Based in San Diego California, <strong>Steren</strong> has been a leading component manufacturer<br />
for nearly 50 years. With more than 2,000 items in our catalog, we supply interconnect<br />
products and electronics accessories for home and commercial use. The FastHome <br />
Series of Fast Media Home Network Systems are produced with superior design and<br />
engineering, high-quality materials and exceptional manufacturing processes, attributes<br />
that are synonymous with the <strong>Steren</strong> name.<br />
Contents of Package<br />
1. FastHome enclosure (with pre-installed front cover for models 550-100 and<br />
550-105 only)<br />
2. Door assembly (for models 550-200, 550-205 and 550-210 only)<br />
3. Keys for lock<br />
4. Mounting screws<br />
5. Grommets for knock outs<br />
6. Installation guide<br />
Required for Assembly<br />
1. Phillips-head screwdriver<br />
2. Carpenter’s level<br />
3. Pencil<br />
4. Power drill<br />
5. Personal protective equipment<br />
R<br />
Fast Media Home Network Systems Revised 06/04<br />
—2—
<strong>Enclosure</strong>s<strong>Manual</strong>.qxd 7/6/04 4:01 PM Page 3<br />
FastHome <br />
Network <strong>Enclosure</strong>s Installation Guide<br />
Safety Instructions<br />
Read these safety instructions before installing this enclosure and<br />
follow them carefully. Keep these instructions handy and refer to them<br />
when working on the enclosure.<br />
• Be careful when installing this enclosure near electrical wires or outlets.<br />
Do not mount this enclosure in areas where wires, pipes or other<br />
materials may be hidden in the wall and damage the enclosure.<br />
• Always wear the necessary personal protective gear and follow all<br />
basic precautions and safety procedures when working with wires<br />
and electrical equipment, using power tools or working in unfinished<br />
construction areas.<br />
• To prevent electric shock: 1) do not touch uninsulated wires and terminals that<br />
may still be connected to a live circuit; 2) do not install wires or electrical equipment<br />
during a lightning storm; 3) do not install wires or electrical equipment or their<br />
enclosures near water or locations where water is used (in the kitchen, bathroom,<br />
laundry room, swimming pool, etc.); 4) do not install electrical components or<br />
equipment in wet areas, unless specifically rated for moisture.<br />
• Be careful when using tools that might touch exposed wires or live electrical contacts.<br />
Pre-Installation<br />
Planning<br />
Pre-Installation Planning<br />
This enclosure is designed to centralize the low voltage cabling in a<br />
home. Before installing the enclosure, you must first plan where to place<br />
it. Do not begin the installation until you have determined exactly where<br />
the enclosure will go, taking into consideration the routing of cables and<br />
existing wall outlets. In some newly constructed homes, an electrical<br />
contractor has already chosen the location and indicated it on the blueprints.<br />
In existing homes, planning the placement of the enclosure may<br />
be your responsibility.<br />
An important first step in planning is to ask questions that will help you<br />
ascertain the existing or likely placement of the electronics devices now<br />
and in the near future. Some of the answers to these questions will<br />
come after your pre-installation walkthrough, while others will come from<br />
the homeowner.<br />
How many different rooms have devices that need to be<br />
connected to modules in the enclosure<br />
Where are the wall outlets in these rooms<br />
What is the distance between each wall outlet and the enclosure<br />
What is the distance between the enclosure and an exterior<br />
telephony network interface device and/or cable TV network<br />
interface unit<br />
Which types of devices will go in each of the rooms<br />
How many modules will need to be connected in the enclosure<br />
Will video be transmitted as well as received<br />
Make sure that all special outlets (such as cable TV and closed-circuit video) are<br />
accommodated in your plan. Usually, the homeowner has major electronics devices<br />
(such as personal computers, audio systems or TV sets with cable connections) in the<br />
living room, bedrooms and family room. Some devices may be added in the future; for<br />
example, the homeowner may add a second cable TV or Ethernet outlet in an office or<br />
another phone outlet in the kitchen.<br />
Sample configuration for telephone,<br />
audio/video, security and Ethernet.<br />
R<br />
Fast Media Home Network Systems Revised 06/04<br />
—3—
<strong>Enclosure</strong>s<strong>Manual</strong>.qxd 7/6/04 4:01 PM Page 4<br />
FastHome <br />
Network <strong>Enclosure</strong>s Installation Guide<br />
Pre-Installation<br />
Planning<br />
(Cont.)<br />
The next step to determine enclosure placement is to examine the floor plan. Mark the<br />
likely or existing location of each of the electronics devices. Select a central location and<br />
calculate the length of each cable run, preferably no more than a 100 feet/30m distance<br />
for each connection (measured from the input device location to an output device<br />
location once the enclosure has been mounted). In a pre-wired home, there is often a<br />
central area accessible to all rooms, such as<br />
a main hallway or a wiring closet; in other<br />
cases, the best location may be in the basement.<br />
What you want to avoid is moving the<br />
enclosure to a new location once it has<br />
already been mounted.<br />
Once you have chosen the location of the<br />
enclosure, the final step is to determine which<br />
modules will be inserted in the enclosure.<br />
Diagram the location inside the enclosure<br />
where each module will be placed. (Installation<br />
instructions of each FastHome module will<br />
be found in its packaging.) Make sure the<br />
cabling serving each module is safely within<br />
the 100ft/30m distance. If a repeater is used<br />
for transmitting security video to other rooms,<br />
its distance to the module can be somewhat<br />
longer.<br />
Use the chart below to determine which modules<br />
will be needed and where.<br />
Planning Chart<br />
Location Device Distance to FastHome Module Cable Connector<br />
in Home Used <strong>Enclosure</strong> Module Port Type Type Completed Notes<br />
Living Room<br />
Office/Den<br />
or Family<br />
Room<br />
Master Bed<br />
Second Bed<br />
Kitchen/<br />
Other<br />
R<br />
Fast Media Home Network Systems Revised 06/04<br />
—4—
<strong>Enclosure</strong>s<strong>Manual</strong>.qxd 7/6/04 4:01 PM Page 5<br />
FastHome <br />
Network <strong>Enclosure</strong>s Installation Guide<br />
Installation Instructions for 550-100 and 550-105<br />
(Surface Mount <strong>Enclosure</strong>s)<br />
Surface mount units must be placed on the finished wall surface and are not designed<br />
to be placed between the studs of an unfinished wall (flush mount). Models 550-200,<br />
550-205 and 550-210 are flush mount enclosures.<br />
1. Remove the knock outs from the enclosure and attach the<br />
grommets.<br />
2. Confirm that the enclosure will be placed straight on the wall (or<br />
on a backboard attached to the wall) by placing a carpenter’s<br />
level on top of the enclosure when positioning.<br />
3. With a pencil, draw circles onto the wall through the<br />
pre-punched holes on the rear of the enclosure.<br />
Then remove the enclosure.<br />
4. Drill holes at the pencil marks.<br />
5. Position the enclosure again, then insert and tighten the mounting<br />
screws into the drilled holes. Do not overtighten.<br />
Installation<br />
Instructions<br />
for<br />
Surface and<br />
Flush Mount<br />
<strong>Enclosure</strong>s<br />
Installation Instructions for 550-200, 550-205 and<br />
550-210 (Flush Mount <strong>Enclosure</strong>s)<br />
Flush mount units may be placed between the studs or on the finished wall surface.<br />
1. Remove the knock outs from the enclosure and<br />
attach the grommets.<br />
2. Confirm that the enclosure will be placed straight<br />
between the wall studs and flush against the back<br />
of the wall by placing a carpenter’s level on top of<br />
the enclosure when positioning. Make sure that<br />
the knock-out holes for the electrical outlets<br />
appear at the bottom of the enclosure.<br />
3. With a pencil, draw circles onto the studs<br />
through the pre-punched holes on<br />
both sides of the enclosure, then<br />
remove the enclosure.<br />
4. Drill holes at the pencil marks.<br />
5. Position the enclosure again,<br />
then insert and tighten the wood<br />
screws into the drilled holes. Do<br />
not overtighten.<br />
6. Install the door by aligning it to fit along the left edge of the<br />
enclosure. With the door open, insert and tighten the screws.<br />
Do not overtighten.<br />
Important: Read all safety instructions before installing FastHome modules.<br />
R<br />
Fast Media Home Network Systems Revised 06/04<br />
—5—
<strong>Enclosure</strong>s<strong>Manual</strong>.qxd 7/6/04 4:01 PM Page 6<br />
FastHome<br />
Network <strong>Enclosure</strong>s Installation Guide<br />
For your future<br />
construction<br />
needs, consider<br />
the entire<br />
series of<br />
FastHome <br />
<strong>Enclosure</strong>s and<br />
Modules.<br />
FastHome <strong>Enclosure</strong>s<br />
From a centralized location, Fast Media Home Network Systems enclosures fully<br />
integrate, manage and distribute broadband and multimedia services on a flexible,<br />
customizable and upgradeable platform. Constructed of 18-gauge cold rolled steel for<br />
strength and protection against interference, FastHome enclosures mount on a wall<br />
(surface mount) or between 16˝ center wall studs (flush mount). Multiple knock outs<br />
and pre-punched holes accommodate tie wraps, mounting screws, ground screws<br />
and wire bundles. Raised rails create a clean wiring channel behind mounted modules.<br />
Other features include a captured hinge cover design for easy access and a keyed<br />
latch for positive closure and security.<br />
550-100<br />
Small Surface Mount <strong>Enclosure</strong><br />
7˝(W) x 11˝(H) x 3 5 /16˝(D)<br />
550-105<br />
Large Surface Mount <strong>Enclosure</strong><br />
14 9 /16˝(W) x 19˝(H) x 4 5 /16˝(D)<br />
550-200<br />
Small Flush Mount <strong>Enclosure</strong><br />
14 3 /8˝(W) x 19˝(H) x 3 1 /2˝(D)<br />
550-205<br />
Medium Flush Mount <strong>Enclosure</strong><br />
14 3 /8˝(W) x 32˝(H) x 3 1 /2˝(D)<br />
550-210<br />
Large Flush Mount <strong>Enclosure</strong><br />
14 3 /8˝(W) x 44˝(H) x 3 1 /2˝(D)<br />
R<br />
Fast Media Home Network Systems Revised 06/04<br />
—6—
<strong>Enclosure</strong>s<strong>Manual</strong>.qxd 7/6/04 4:01 PM Page 7<br />
FastHome <br />
Network <strong>Enclosure</strong>s Installation Guide<br />
FastHome Modules<br />
When installing FastHome enclosures, use only high-quality FastHome modules by<br />
<strong>Steren</strong>. FastHome modules provide secure, reliable connections for voice, video, data<br />
and audio applications. Each module is housed in a sturdy 18-gauge cold rolled steel<br />
construction for excellent RFI shielding. Nylon pins snap modules into place for easy<br />
installation. The system is expandable by adding multiple modules.<br />
For More<br />
Information<br />
about<br />
FastHome <br />
and<br />
Fast Media<br />
Home Network<br />
Systems,<br />
contact:<br />
550-010<br />
Fast Media Telephone/TV Hub Module<br />
6 1 /2˝(W) x 4 3 /4˝(H) x 1˝(D)<br />
550-020<br />
Fast Media Telephone Hub Module<br />
6 1 /2˝(W) x 2 7 /8˝(H) x 1˝(D)<br />
550-030<br />
Fast Media Data Hub Module<br />
6 1 /2˝(W) x 2 7 /8˝(H) x 1˝(D)<br />
550-040<br />
Fast Media TV Combiner/Splitter Module<br />
6 1 /2˝(W) x 2 7 /8˝(H) x 1˝(D)<br />
<strong>Steren</strong> <strong>Electronics</strong><br />
International, LLC<br />
8675 Miralani Drive<br />
San Diego, CA 92126<br />
1-800-266-3333<br />
www.steren.com<br />
550-050<br />
Fast Media Audio Splitter Module<br />
6 1 /2˝(W) x 2 7 /8˝(H) x 1˝(D)<br />
550-060<br />
Fast Media Ethernet Switch Module<br />
6 1 /2˝(W) x 2 3 /4˝(H) x 1˝(D)<br />
550-070<br />
Fast Media Power Module<br />
6 1 /2˝(W) x 2 5 /8˝(H) x 1˝(D)<br />
550-080<br />
Fast Media RF Modulator Module<br />
6 1 /2˝(W) x 3˝(H) x 2 3 /8˝(D)<br />
Copyright © 2004<br />
<strong>Steren</strong> <strong>Electronics</strong> International, LLC<br />
Printed in China<br />
R<br />
Fast Media Home Network Systems Revised 06/04<br />
—7—
<strong>Enclosure</strong>s<strong>Manual</strong>.qxd 7/6/04 4:01 PM Page 8<br />
<strong>Enclosure</strong><br />
Installation<br />
Guide<br />
Fast Media<br />
Home Network<br />
Systems<br />
550-100<br />
Small Surface Mount <strong>Enclosure</strong><br />
7˝(W) x 11˝(H) x 3 5 /16˝(D)<br />
550-105<br />
Large Surface Mount <strong>Enclosure</strong><br />
14 9 /16˝(W) x 19˝(H) x 4 5 /16˝(D)<br />
550-200<br />
Small Flush Mount <strong>Enclosure</strong><br />
14 3 /8˝(W) x 19˝(H) x 3 1 /2˝(D)<br />
550-205<br />
Medium Flush Mount <strong>Enclosure</strong><br />
14 3 /8˝(W) x 32˝(H) x 3 1 /2˝(D)<br />
550-210<br />
Large Flush Mount <strong>Enclosure</strong><br />
14 3 /8˝(W) x 44˝(H) x 3 1 /2˝(D)<br />
R<br />
Manufactured by:<br />
<strong>Steren</strong> <strong>Electronics</strong> International, LLC<br />
8675 Miralani Drive, San Diego, CA 92126<br />
1-800-266-3333<br />
www.steren.com<br />
Made in China