Challenger Vent Adaptor Installation Instructions - Triangle Tube
Challenger Vent Adaptor Installation Instructions - Triangle Tube
Challenger Vent Adaptor Installation Instructions - Triangle Tube

Create successful ePaper yourself
Turn your PDF publications into a flip-book with our unique Google optimized e-Paper software.
<strong>Challenger</strong> <strong>Vent</strong> <strong>Adaptor</strong><br />
<strong>Installation</strong> <strong>Instructions</strong><br />
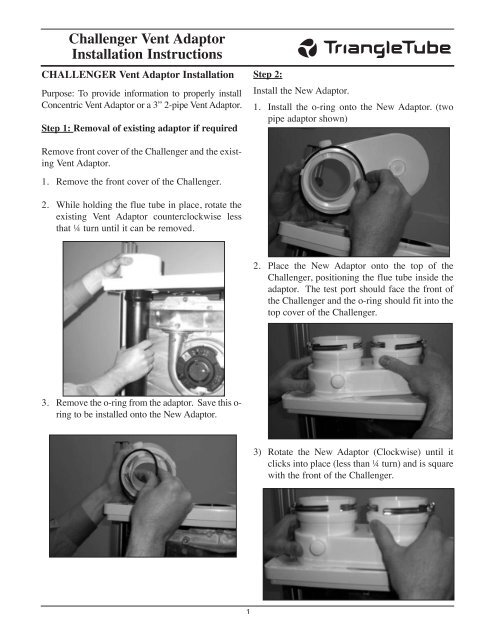
CHALLENGER <strong>Vent</strong> <strong>Adaptor</strong> <strong>Installation</strong><br />
Purpose: To provide information to properly install<br />
Concentric <strong>Vent</strong> <strong>Adaptor</strong> or a 3” 2-pipe <strong>Vent</strong> <strong>Adaptor</strong>.<br />
Step 1: Removal of existing adaptor if required<br />
Step 2:<br />
Install the New <strong>Adaptor</strong>.<br />
1. Install the o-ring onto the New <strong>Adaptor</strong>. (two<br />
pipe adaptor shown)<br />
Remove front cover of the <strong>Challenger</strong> and the existing<br />
<strong>Vent</strong> <strong>Adaptor</strong>.<br />
1. Remove the front cover of the <strong>Challenger</strong>.<br />
2. While holding the flue tube in place, rotate the<br />
existing <strong>Vent</strong> <strong>Adaptor</strong> counterclockwise less<br />
that ¼ turn until it can be removed.<br />
2. Place the New <strong>Adaptor</strong> onto the top of the<br />
<strong>Challenger</strong>, positioning the flue tube inside the<br />
adaptor. The test port should face the front of<br />
the <strong>Challenger</strong> and the o-ring should fit into the<br />
top cover of the <strong>Challenger</strong>.<br />
3. Remove the o-ring from the adaptor. Save this o-<br />
ring to be installed onto the New <strong>Adaptor</strong>.<br />
3) Rotate the New <strong>Adaptor</strong> (Clockwise) until it<br />
clicks into place (less than ¼ turn) and is square<br />
with the front of the <strong>Challenger</strong>.<br />
1
Step 3:<br />
<strong>Challenger</strong> <strong>Vent</strong> <strong>Adaptor</strong><br />
<strong>Installation</strong> <strong>Instructions</strong><br />
Inspect Condensate Pan and Reinstall the Front<br />
Cover.<br />
1. With the new <strong>Adaptor</strong> in place inspect the Flue<br />
and Condensate Pan to ensure proper fit.<br />
2. Push up on the Condensate Pan underneath the<br />
heat exchanger while pushing down on the<br />
Condensate Pan where it engages with the<br />
Condensate Trap.<br />
3. Inspect the connection with the Condensate Trap<br />
to ensure the Condensate Pan fits snugly in the<br />
gasketed connection to the Condensate Trap.<br />
WARNING<br />
Improper installation may result in flue gas<br />
leakage which may result in severe personal<br />
injury or death.<br />
5. Reinstall the front cover of the <strong>Challenger</strong>.<br />
WARNING<br />
Failure to properly support the vent and air<br />
piping at the appliance may result in severe<br />
personal injury or death.<br />
4. This condition where the Condensate Pan does<br />
not engage into the Condensate Trap is not<br />
acceptable and will result in flue gas recirculation,<br />
harming the boiler. Adjust the Condensate<br />
Pan to properly engage into the Condensate<br />
Trap gasket.<br />
9/20/11<br />
2<br />
2011-29 <strong>Challenger</strong> PVC <strong>Adaptor</strong> Inst.