InTroducTion
InTroducTion
InTroducTion

You also want an ePaper? Increase the reach of your titles
YUMPU automatically turns print PDFs into web optimized ePapers that Google loves.
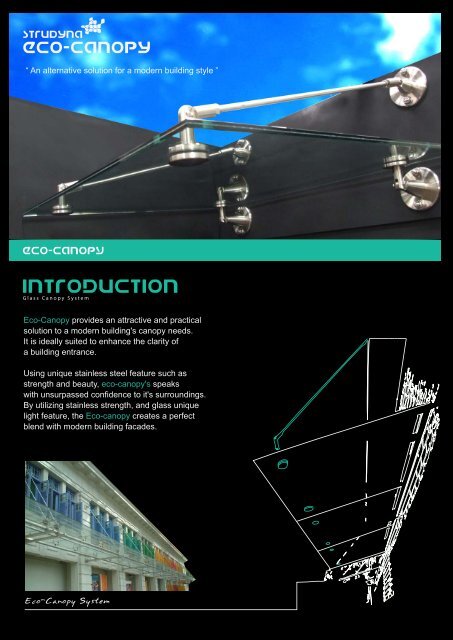
STRUDYNA<br />
eco-cANOPY<br />
“ An alternative solution for a modern building style ”<br />
eco-CAnopy<br />
<strong>InTroducTion</strong><br />
Glass Canopy System<br />
Eco-Canopy provides an attractive and practical<br />
solution to a modern building's canopy needs.<br />
It is ideally suited to enhance the clarity of<br />
a building entrance.<br />
Using unique stainless steel feature such as<br />
strength and beauty, eco-canopy's speaks<br />
with unsurpassed confidence to it's surroundings.<br />
By utilizing stainless strength, and glass unique<br />
light feature, the Eco-canopy creates a perfect<br />
blend with modern building facades.<br />
Eco-Canopy System
L6<br />
90<br />
90<br />
Performance<br />
Glass Canopy systems<br />
Selection Guide<br />
Stainless steel Glass Canopy system.<br />
Read all safety procedures below before Installation begins.<br />
Glass Layout<br />
1. Select Glass Thickness<br />
The first step of a stunning Eco-Glass Canopy setup is to select glass<br />
thickness. The following dimensions of glass and the glass layout are<br />
suggested as ideally balanced designs. Use this information to communicate<br />
to your glass supplier.<br />
Indoor<br />
Outdoor<br />
L5 L4<br />
L3<br />
Glass Thk. (mm) Dimension (mm) Est. Weight (kgs)<br />
Tempered Laminated ØD<br />
8 9.52 16<br />
10 11.52 16<br />
12 13.52 18<br />
L1<br />
1,400<br />
1,600<br />
1,800<br />
L2 L3<br />
800 1,200<br />
1,000 1,200<br />
1,200 1,200<br />
L4 L5<br />
50<br />
50<br />
95<br />
850<br />
850<br />
805<br />
34<br />
48<br />
65<br />
ØD<br />
14<br />
15.52<br />
18<br />
2,000<br />
1,400<br />
1,200<br />
95<br />
805<br />
84<br />
300<br />
L2<br />
300<br />
300<br />
16<br />
20<br />
17.52<br />
-<br />
18<br />
18<br />
2,100<br />
2,100<br />
1,500<br />
1,500<br />
1,200<br />
1,200<br />
95<br />
95<br />
805<br />
805<br />
101<br />
126<br />
L1<br />
Installation Layout<br />
2. Select Eco-Canopy Components<br />
Once you've selected the glass thickness , see the installation layout to<br />
select the components and use the table below to find the length of rod you<br />
must order.<br />
LH<br />
See more details at H1B10<br />
See more details at RHB10<br />
Glass Thk.<br />
(mm)<br />
8 - 11.52<br />
RHB10 (Rod)<br />
Thread L Order no.<br />
M10<br />
840<br />
940<br />
RHB1-0010-0840<br />
RHB1-0010-0940<br />
L5<br />
850<br />
850<br />
Dimension<br />
L6 L7<br />
290 904<br />
540 1,004<br />
L7<br />
12 - 20 M12<br />
940<br />
1,500<br />
RHB1-0012-0940<br />
RHB1-0012-1500<br />
805<br />
805<br />
604<br />
1,378<br />
1,015<br />
1,575<br />
95°<br />
RH<br />
L5<br />
See more details at Glass Layout<br />
See more details at H1B30<br />
See more details at H1B20<br />
Eco-Canopy System<br />
Page 2
Eco-Canopy Components<br />
componenTs<br />
Glass Canopy System<br />
H1B10<br />
D<br />
D1<br />
L<br />
M<br />
H1B10<br />
Canopy Rod Wall Bracket<br />
F<br />
L1<br />
Technical Data<br />
Material : 316<br />
Surface Treatment : Satin Finished<br />
Order no.<br />
Item Thread<br />
Size: M<br />
(For Rod)<br />
ØD<br />
(mm)<br />
ØD1<br />
(mm)<br />
ØF<br />
(mm)<br />
L<br />
(mm)<br />
L1<br />
(mm)<br />
H1B1 - 0010<br />
H1B1 - 0012<br />
M10<br />
M12<br />
60<br />
120<br />
43.5<br />
90.0<br />
8.5<br />
13.0<br />
52.0<br />
57.5<br />
47<br />
60<br />
L<br />
M<br />
H1B20<br />
L1<br />
H1B20<br />
Canopy Rod Glass Connector<br />
T<br />
A<br />
Technical Data<br />
Material : 316<br />
Gasket<br />
: Rubber<br />
Surface Treatment : Satin Finished<br />
Order no.<br />
Item Thread<br />
H1B2 - 0010<br />
H1B2 - 0012<br />
Size M<br />
(For Rod)<br />
M10<br />
M12<br />
ØA<br />
(mm)<br />
50<br />
70<br />
L<br />
(mm)<br />
52.0<br />
57.5<br />
L1<br />
(mm)<br />
42<br />
47<br />
T<br />
(Glass Thickness)<br />
8 - 11.52 mm<br />
12 - 20 mm<br />
A<br />
T<br />
H1B30<br />
D<br />
D1<br />
L<br />
H1B30<br />
Canopy Glass Wall Bracket<br />
F<br />
L1<br />
Technical Data<br />
Material : 316<br />
Gasket<br />
: Rubber<br />
Surface Treatment : Satin Finished<br />
Order no.<br />
Item Thread<br />
H1B3 - 0010<br />
H1B3 - 0012<br />
Size D<br />
(mm)<br />
60<br />
120<br />
ØA<br />
(mm)<br />
50<br />
70<br />
ØD1<br />
(mm)<br />
43.5<br />
90.0<br />
ØF<br />
(mm)<br />
8.5<br />
13.0<br />
L<br />
(mm)<br />
42<br />
47<br />
L1<br />
(mm)<br />
57<br />
100<br />
T<br />
(Glass Thickness)<br />
8 - 11.52 mm<br />
12 - 20 mm<br />
RHB10<br />
RH<br />
LH<br />
M<br />
RHB10<br />
Rod Type HB<br />
L<br />
LOC2<br />
Loctite 263<br />
Technical Data<br />
Material : 316<br />
Surface Treatment : Satin Finished<br />
Order no.<br />
Item Thread Length<br />
Size M<br />
(Thread)<br />
L<br />
(mm)<br />
Order no.<br />
Size<br />
RHB1 - 0010 - 0840<br />
RHB1 - 0010 - 0940<br />
RHB1 - 0012 - 0940<br />
RHB1 - 0012 - 1500<br />
M10<br />
M10<br />
M12<br />
M12<br />
840<br />
940<br />
940<br />
1,500<br />
LOC2 - 6350<br />
50 ml.<br />
Page 3
Installation Tips<br />
Performance<br />
Glass Canopy System<br />
1. Recommendation for glass clamp cover assembly of H1B20 and H1B30<br />
- Apply loctite adhesive onto the flat tip of the screw.<br />
- Tighten the screw with the glass clamp cover.<br />
(For more Information see Picture 1)<br />
Glass clamp cover<br />
Loctite no. 263<br />
H1B30<br />
H1B20<br />
Screw<br />
Flat<br />
Hex<br />
2. Recommendation for rod assembly with H1B10 and H1B20<br />
- Picture 1 -<br />
H1B10<br />
- First disengage the cotter pin of H1B20 and take out the pin.<br />
Once the Tension rod is correctly position, insert the pin back<br />
and use a pliers to splice open the cotter pin into a 180 degree<br />
direction. This will ensure the cotter pin won't be loosen accidentally.<br />
RHB10<br />
- Picture 2 -<br />
H1B20<br />
- Apply loctite adhesive on the tip of both threaded ends of the<br />
tension rod and adjust the tension rod from both sides of the rod<br />
to the required length. (For more Information see Picture 2)<br />
Exclusive Agents<br />
Year 2011<br />
Structural Dynamics Australia<br />
4 / 14 Dover Drive Burleigh Heads<br />
Queensland 4220 Australia<br />
Tel : +07 5568 7084<br />
Fax : +07 5576 5166<br />
Email : ross@strudyna.com.au<br />
Structural Dynamics Europe Limited.<br />
Unit 10 Wingate Rd. Gosport, Hampshire,<br />
UK. PO12 4DP<br />
Tel : +44 (0) 845 262 5557<br />
Fax : +44 (0) 239 294 0272<br />
Email : sales@strudyna.eu<br />
Anzor Fasteners Ltd.<br />
8 Arrenway Drive Albany,<br />
Auckland, New Zealand<br />
Tel : +(64) 9 476 0001<br />
Fax : +(64) 9 476 0090<br />
Email : sales@anzor.co.nz<br />
Keng Wah Hardware Co. Pte. Ltd.<br />
Blk 2 Kitchener Road #01-85<br />
Singapore 200002<br />
Tel : +(65) 6392 4896<br />
Fax : +(65) 6296 4736<br />
Email : sales@kengwah.com<br />
www.strudyna.com