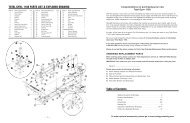
Jump Starter/PowerPack With Air Compressor ... - Cobra Electronics
Jump Starter/PowerPack With Air Compressor ... - Cobra Electronics
Jump Starter/PowerPack With Air Compressor ... - Cobra Electronics

Create successful ePaper yourself
Turn your PDF publications into a flip-book with our unique Google optimized e-Paper software.
Operation<br />
<strong>Jump</strong> starting a vehicle’s engine<br />
You can use the power pack to jump start a vehicle (or boat engine) that has<br />
a 12V starting battery using the jump start cables supplied with the unit.<br />
WARNING: Fire Hazard<br />
A reverse polarity connection may cause damage to the unit and/or create a<br />
sparking/explosion hazard. Never allow cables’ red and black clamps to touch<br />
each other or another common metal conductor. The connection of the<br />
cables to the vehicle’s battery terminals must be positive to positive (red<br />
clamp to battery “+”) and negative to negative (black clamp to battery “-“ or<br />
vehicle chassis).<br />
NOTE: Carefully follow these instructions for jump starting your vehicle as<br />
they may be different from the instructions supplied with other jump start<br />
products or cables.<br />
To jump start a vehicle:<br />
1. Turn off the vehicle and all accessories.<br />
2. Place the unit on a flat and stable surface near the battery which need to be<br />
started. Ensure that the unit’s jump start power switch is “OFF”.<br />
3. Connect the red positive (+) clamp of the cables to the positive (+)<br />
terminal of the engine battery.<br />
4. Connect the black negative (-) clamp of the cables to the engine block,<br />
cylinder head, or other stationary heavy metal part of the motor. If the red<br />
“Reverse Polarity” LED illuminates, then reverse polarity has been detected.<br />
Correct polarity must be established before proceeding. Disconnect the<br />
jump starting clamps from the vehicle’s battery and repeat steps (3) and (4).<br />
5. Switch on the jump start power switch. Before starting the engine, make<br />
sure the jumpstarter pack and the cables are clear of the metal parts and<br />
other moving things.<br />
6. Crank the engine for 5 seconds or until it starts, whichever is first.<br />
WARNING: Fire hazard<br />
Do not try to start the engine for more than 5 seconds. The jump start<br />
feature is designed for short term operation only. Operating the jump<br />
starting feature for more than 5 seconds may cause damage to the unit.<br />
Allow the unit to cool down for at least 3 minutes after each start attempt.<br />
Operation<br />
To jump start a vehicle continued:<br />
7. Switch off the jump start power switch.<br />
8. Remove the red positive (+) clamp and then the black negative (-) clamp.<br />
Recharging the power pack battery<br />
CAUTION: Do not operate AC or DC appliance while the power pack is<br />
being charged.<br />
Charging with the AC charging adapter<br />
Using the AC charging adapter is the simplest method for recharging the<br />
battery. While charging from an AC source, the charging status LED indicator<br />
will light red. When the battery has reached capacity, the indicator will light<br />
orange. Charging when the battery is fully discharged takes around 23 hours.<br />
NOTE: Recharge the 100W mobile power pack as soon as possible after each<br />
use. When not used the power pack, it should be recharged every 3 months!<br />
To recharge with AC charger:<br />
1. Turn the rotary switch to the “OFF” position.<br />
2. Plug AC charging adapter into charging jack on the front of the unit.<br />
3. Plug AC charging adapter into 120V AC electrical outlet.<br />
4. Continually charge until the battery is fully charged; for about 23 hours.<br />
CAUTION: The 23-hour charging time for the unit assumes that there is 120V<br />
at the AC wall outlet. If the voltage is less than 120V AC, it may take more<br />
than 23 hours to fully recharging. Once fully charged, the charging current<br />
automatically reduces to a floating charge mode, and the unit may be left<br />
permanently connected to the AC charger.<br />
14<br />
15