

Samsung TV - LE40C550 User manual
Samsung TV - LE40C550 User manual
Samsung TV - LE40C550 User manual

You also want an ePaper? Increase the reach of your titles
YUMPU automatically turns print PDFs into web optimized ePapers that Google loves.
Advanced Features<br />
Network Setup (PBC (WPS))<br />
How to set up using PBC (WPS)<br />
If your router has a PBC (WPS) button, follow these steps:<br />
1. Connect your <strong>TV</strong> to your LAN as described in the<br />
previous section.<br />
2. Turn on your <strong>TV</strong>, press the Menu button on your<br />
remote, use the ▲ or ▼ button to select Setup, and<br />
then press the ENTERE button.<br />
3. Use the ▲ or ▼ button to select Network in the Setup<br />
menu, and then press the ENTERE button.<br />
4. On the Network screen, select Network Type.<br />
5. Set Network Type to Wireless.<br />
6. Select Network Setup. The Network Setup screen<br />
appears.<br />
Network Setup<br />
Select a network : Not Selected ►<br />
Internet Protocol Setup : Auto<br />
IP Address :<br />
Subnet Mask :<br />
Gateway :<br />
DNS<br />
: Auto<br />
DNS Server :<br />
7. Press the Red button on your remote.<br />
8. Press the PBC (WPS) button on your router within 2<br />
minutes. Your <strong>TV</strong> player automatically acquires all the<br />
network setting values it needs and connects to your<br />
network.<br />
9. After the network connection is set up, press the<br />
Return button to exit the Network Setup screen.<br />
Network Setup (Auto)<br />
U Move E Enter R Return<br />
Most wireless networks have an optional security system<br />
that requires devices that access the network to transmit<br />
an encrypted security code called an Access or Security<br />
Key. The Security Key is based on a Pass Phrase, typically<br />
a word or a series of letters and numbers of a specified<br />
length you were asked to enter when you set up security for<br />
your wireless network. If you use this method of setting up<br />
the network connection, and have a Security Key for your<br />
wireless network, you will have to enter the Pass Phrase<br />
during the setup process.<br />
How to set up automatically<br />
To set up the wireless connection automatically, follow these<br />
steps:<br />
1. Follow Steps 1 through 6 in the “How to set up PBC<br />
(WPS)” above.<br />
2. Press the ▼ button to select Internet Protocol Setup,<br />
and then press the ENTERE button. Press the ▲ or<br />
▼ button to select Auto, and then press the ENTERE<br />
button.<br />
3. Press the ▲ button to go to Select a Network, and<br />
then press the ENTERE button. The Network function<br />
searches for available wireless networks. When done, it<br />
displays a list of the available networks.<br />
4. In the list of networks, press the ▲ or ▼ button to select<br />
a network, and then press the ENTERE button.<br />
✎✎ If the AP is set to Hidden (Invisible), you have<br />
to select Add Network and enter the correct<br />
Network Name (SSID) and Security Key to<br />
establish the connection.<br />
5. If the Security/PIN pop-up appears, go to Step 6. If the<br />
Network Connecting Screen appears, go to Step 10.<br />
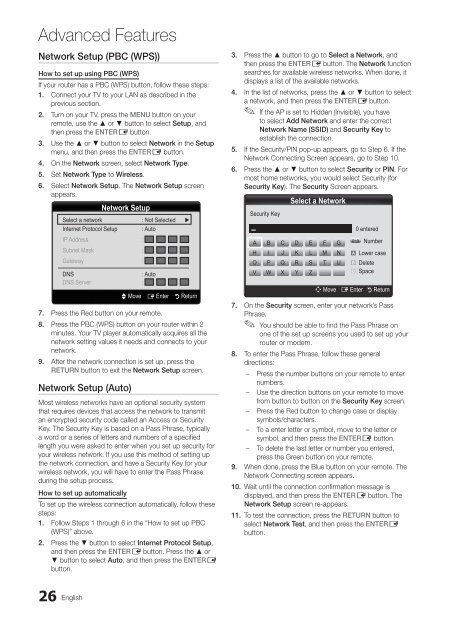
6. Press the ▲ or ▼ button to select Security or PIN. For<br />
most home networks, you would select Security (for<br />
Security Key). The Security Screen appears.<br />
Security Key<br />
A B C D E F G<br />
H I J K L M N<br />
O P Q R S T U<br />
V W X Y Z<br />
Select a Network<br />
7. On the Security screen, enter your network’s Pass<br />
Phrase.<br />
✎✎ You should be able to find the Pass Phrase on<br />
one of the set up screens you used to set up your<br />
router or modem.<br />
8. To enter the Pass Phrase, follow these general<br />
directions:<br />
–– Press the number buttons on your remote to enter<br />
numbers.<br />
–– Use the direction buttons on your remote to move<br />
from button to button on the Security Key screen.<br />
–– Press the Red button to change case or display<br />
symbols/characters.<br />
–– To a enter letter or symbol, move to the letter or<br />
symbol, and then press the ENTERE button.<br />
–– To delete the last letter or number you entered,<br />
press the Green button on your remote.<br />
9. When done, press the Blue button on your remote. The<br />
Network Connecting screen appears.<br />
10. Wait until the connection confirmation message is<br />
displayed, and then press the ENTERE button. The<br />
Network Setup screen re-appears.<br />
11. To test the connection, press the RETURN button to<br />
select Network Test, and then press the ENTERE<br />
button.<br />
0~9<br />
0 entered<br />
Number<br />
Lower case<br />
B Delete<br />
C Space<br />
n Move E Enter R Return<br />
26 English<br />
[LC550-XH]BN68-02688P.indb 26 2010-10-27 12:32:50