Thomson DTI 6021 Digital Television Recorder (DTR) - Top Up TV
Thomson DTI 6021 Digital Television Recorder (DTR) - Top Up TV
Thomson DTI 6021 Digital Television Recorder (DTR) - Top Up TV

You also want an ePaper? Increase the reach of your titles
YUMPU automatically turns print PDFs into web optimized ePapers that Google loves.
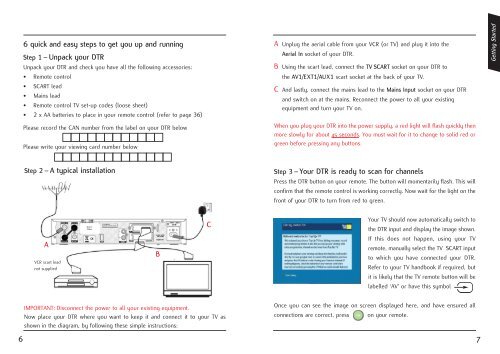
6<br />
6 quick and easy steps to get you up and running<br />
Step 1 – Unpack your <strong>DTR</strong><br />
Unpack your <strong>DTR</strong> and check you have all the following accessories:<br />
• Remote control<br />
• SCART lead<br />
• Mains lead<br />
• Remote control <strong>TV</strong> set-up codes (loose sheet)<br />
• 2 x AA batteries to place in your remote control (refer to page 36)<br />
Please record the CAN number from the label on your <strong>DTR</strong> below<br />
Please write your viewing card number below<br />
Step 2 – A typical installation<br />
A<br />
VCR scart lead<br />
not supplied<br />
IMPORTANT: Disconnect the power to all your existing equipment.<br />
Now place your <strong>DTR</strong> where you want to keep it and connect it to your <strong>TV</strong> as<br />
shown in the diagram, by following these simple instructions:<br />
B<br />
C<br />
A Unplug the aerial cable from your VCR (or <strong>TV</strong>) and plug it into the<br />
Aerial In socket of your <strong>DTR</strong>.<br />
B Using the scart lead, connect the <strong>TV</strong> SCART socket on your <strong>DTR</strong> to<br />
the AV1/EXT1/AUX1 scart socket at the back of your <strong>TV</strong>.<br />
C And lastly, connect the mains lead to the Mains Input socket on your <strong>DTR</strong><br />
and switch on at the mains. Reconnect the power to all your existing<br />
equipment and turn your <strong>TV</strong> on.<br />
When you plug your <strong>DTR</strong> into the power supply, a red light will flash quickly then<br />
more slowly for about 45 seconds. You must wait for it to change to solid red or<br />
green before pressing any buttons.<br />
Step 3 – Your <strong>DTR</strong> is ready to scan for channels<br />
Press the <strong>DTR</strong> button on your remote. The button will momentarily flash. This will<br />
confirm that the remote control is working correctly. Now wait for the light on the<br />
front of your <strong>DTR</strong> to turn from red to green.<br />
Your <strong>TV</strong> should now automatically switch to<br />
the <strong>DTR</strong> input and display the image shown.<br />
If this does not happen, using your <strong>TV</strong><br />
remote, manually select the <strong>TV</strong> SCART input<br />
to which you have connected your <strong>DTR</strong>.<br />
Refer to your <strong>TV</strong> handbook if required, but<br />
it is likely that the <strong>TV</strong> remote button will be<br />
labelled ‘AV’ or have this symbol<br />
Once you can see the image on screen displayed here, and have ensured all<br />
connections are correct, press on your remote.<br />
7<br />
Getting Started