
Create successful ePaper yourself
Turn your PDF publications into a flip-book with our unique Google optimized e-Paper software.
ENGLISH<br />
LONGUS-3 has 10 FUNCTIONS: SPD, DST, ODO, CLK, AVG, MAX, TM, TTM, SCAN, SPEED PACER.<br />
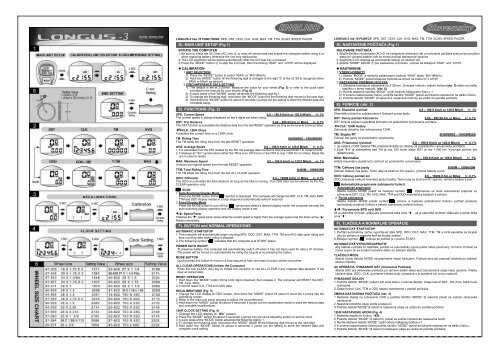
D). <strong>MAIN</strong> <strong>UNIT</strong> <strong>SETUP</strong> (<strong>Fig.1</strong>)<br />
INITIATE THE COMPUTER<br />
1. Be sure to press the All Clear (AC) key � to clear all stored data and initiate the computer before using it or<br />
when replacing battery otherwise the unit may malfunction.<br />
2. The LCD segments will be tested automatically after the All Clear key is pressed.<br />
3. Press the “MODE” button � to stop the LCD test, then the flicking “KM/h” and “c2155” will be displayed.<br />
� CALIBRATION<br />
1.<strong>UNIT</strong> SELECTION<br />
1). Press the “MODE” button to select “KM/h” or “M/h”(Mile/h).<br />
2). Hold the “MODE” button till the flickering digit is changed to the digit “2” of the c2155 to recognize either<br />
KM/h or Mile/h as desired.<br />
2.CIRCUMFERENCE DATA SETTING<br />
1). The default is set at 2155mm. Measure the value for your wheel (Fig. 5) or refer to the quick table<br />
provided in the manual for your bicycle. (Fig. 6)<br />
2). A quick press of the “MODE” button advances the flickering digit by 1.<br />
3). To change the flickering digit, hold down the “MODE” button till the flickering digit moves to the next digit.<br />
4). Hold down the “MODE” button till (about 6 seconds) it jumps out the setting to store the desired data and<br />
complete setup.<br />
E). FUNCTIONS (Fig. 2)<br />
SPD: Current Speed 0.0 – 199.9 Km/h or 120.0 Mile/h +/- 1%<br />
The current speed is always displayed on the 4 digits set when riding.<br />
DST: Trip Distance 0.00 – 999.99 Km or Miles +/- 0.1%<br />
The DST function accumulates the distance data from the last RESET operation as long as the bicycle is being ridden.<br />
CLK: 12HR Clock<br />
It displays the current time on a 12HR clock.<br />
TM: Riding Time 0H00M00S - 19H59M59S<br />
The TM totals the riding time from the last RESET operation.<br />
AVG: Average Speed 0.0 – 199.9 Km/h or 120.0 Mile/h +/- 0.1%<br />
1. It is calculated from the DST divided by the TM; the average data counted is from the last RESET to current points.<br />
2. It displays an "Err" symbol when either the TM is over 100 hours or the DST is over 1,000 km (or miles). Reset the<br />
unit in order to restart.<br />
MAX: Maximum Speed 0.0 – 199.9 Km/h or 120.0 Mile/h +/- 1%<br />
It shows the highest speed from the last RESET operation.<br />
TTM: Total Riding Time 0H00M – 1999H59M<br />
The TM totals the riding time from the last ALL CLEAR operation.<br />
ODO: Odometer 0.0 – 19999.9 Km or Miles +/- 0.1%<br />
The ODO accumulates the total distance as long as the bike is moving. The ODO data can be cleared by the ALL<br />
CLEAR operation only.<br />
: SCAN<br />
1. Auto-Scanning Display Mode<br />
Press the MODE button till the“ ” symbol is displayed. The computer will change the DST, CLK, TM, AVG, MAX,<br />
TTM and ODO display modes in a loop sequence automatically every 6 seconds.<br />
2. Fixed Display Mode<br />
Press the MODE button to turn off the “ ” symbol and select a desired display mode; the computer will stop the<br />
auto-scanning display operation and the display mode is set.<br />
�/�: Speed Pacer<br />
It flashes the “�” speed pacer arrow while the current speed is higher than the average speed and the down arrow “�”<br />
flickers conversely.<br />
F). BUTTON and NORMAL OPERATIONS<br />
AUTOMATIC START/STOP<br />
1. The computer will automatically begin counting SPD, ODO, DST, MAX, TTM, TM and AVG data upon riding and<br />
stop counting data when riding is stopped.<br />
2.The flickering symbol “ ” indicates that the computer is at START status.<br />
POWER AUTO ON/OFF<br />
To preserve battery, this computer will automatically switch off when it has not been used for about 10 minutes.<br />
The power will be turned on automatically by riding the bicycle or by pressing the button.<br />
MODE BUTTON<br />
Quickly press this button to move in a loop sequence from one basic function screen to another.<br />
ALL CLEAR OPERATIONS (Initiate the Computer)<br />
Press the ALL CLEAR (AC) key to initiate the computer or use ALL CLEAR if any irregular data appears. It will<br />
clear all stored data.<br />
RESET OPERATION<br />
1. Hold down the “MODE” button till the LCD digit is blanked, then release it. The computer will RESET the DST,<br />
TM, AVG, MAX.<br />
2.It cannot reset CLK, TTM and ODO data.<br />
RECALIBRATIONS (Fig. 3)<br />
1. Change the LCD display to ODO screen, hold down the “MODE” button till (about 6 seconds) it jumps into the<br />
calibrating screen.<br />
2. Refer to the main unit setup process to adjust the circumference.<br />
3. Hold down the “MODE” button till (about 6 seconds) it jumps out the recalibration mode to store the desired data<br />
and complete recalibrations.<br />
12HR CLOCK SETTING (Fig. 4)<br />
1.Change the LCD display to “ ” screen.<br />
2. Press the “MODE” button till (about 6 seconds) it jumps into the clock adjusting screen to set the clock.<br />
3. A quick press of the “MODE” button advances the flickering digit by 1.<br />
4. To change the flickering digit, hold down the “MODE” button till the flickering digit moves to the next digit.<br />
5. Hold down the “MODE” button till (about 6 seconds) it jumps out the setting to store the desired data and<br />
complete clock setting.<br />
Slovensky<br />
LONGUS-3 má 10 FUNKCIÍ: SPD, DST, ODO, CLK, AVG, MAX, TM, TTM, SCAN, SPEED PACER.<br />
D). NASTAVENIE PO�ÍTA�A (<strong>Fig.1</strong>)<br />
NULOVANIE PO�ÍTA�A<br />
1. Stla�te tla�idlo vynulovania (AC) � na vymazanie uložených dát a iniciovanie po�íta�a pred prvým použitím<br />
alebo pri výmene batérie inak by mohol po�íta� nepracova� správne.<br />
2. Segmenty LCD displeja sa automaticky testujú po stla�ení AC.<br />
3.Stla�te “MODE” tla�idlo � pre zastavenie LCD testu, zobrazí sa blikajúce “KM/h” and “c2155”.<br />
� NASTAVENIE<br />
1. VÝBER HODNOTY<br />
1). Stla�te “MODE” a nastavte požadovanú hodnotu “KM/h” alebo “M/h”(Mile/h).<br />
2). Podržte “MODE” pokia� blikajúca hodnota sa zmení na �íslicu“2” z c2155.<br />
2. NASTAVENIE PRIEMERU KOLESA<br />
1). Základná hodnota je nastavená na 2155mm. Zmerajte hodnotu vašeho kolesa (obr. 5) alebo sa ria�te<br />
tabu�kou v tomto manuáli. (obr. 6)<br />
2). Rýchle stla�enie tla�ítka “MODE” zvýši hodnotu blikajúceho �ísla o 1.<br />
3). K zmene nastavovanej �íslice, podržte tla�idlo “MODE” pokia� sa blikanie nepresunie na dalšiu �íslicu.<br />
4). Podržte tla�idlo “MODE” (6 sekúnd) a nastavené hodnoty sa uložia do pamäte po�íta�a.<br />
E). FUNKCIE (obr. 2)<br />
SPD: Okamžitá rýchlos�<br />
Okamžitá rýchlos� je zobrazovaná 4 �íslicami po�as jazdy.<br />
0.0 – 199.9 Km/h or 120.0 Mile/h +/- 1%<br />
DST: Denný po�íta� Kilometrov 0.00 – 999.99 Km or Miles +/- 0.1%<br />
DST funkcia zobrazí najazdené kilometre od posledného vynulovania po�íta�a.<br />
CLK: 12HR Hodiny<br />
Zobrazuje aktuálny �as zobrazovaný 12HR .<br />
TM: Stopky RT 0H00M00S - 19H59M59S<br />
Zobrazí �as jazdy od posledného vynulovania.<br />
AVG: Priemerná rýchlos� 0.0 – 199.9 Km/h or 120.0 Mile/h +/- 0.1%<br />
1.Je rátaná z DST delená TM, priemerné dáta sú rátané od posledného vynulovania po�íta�a.<br />
2. Znak "Err" je zobrazebný ke� TM je cez 100 hodín alebo DST je cez 1,000 km. Vynulujte po�íta� pre<br />
reštartovanie.<br />
MAX: Maximálka 0.0 – 199.9 Km/h or 120.0 Mile/h +/- 1%<br />
Ukáže maximálnu dosiahnutú rýchlos� od posledného vynulovania.<br />
TTM: Celkový �as jazdy<br />
Zobrazí celkový �as jazdy. Tento údaj sa stratí pri AC operáci, výmena batérie a pod.<br />
0H00M – 1999H59M<br />
ODO: Celkový po�íta� km 0.0 – 19999.9 Km or Miles +/- 0.1%<br />
ODO zobrazuje celkové kilometre jazdy bicykla. Tento údaj sa stratí pri AC operáci, výmena batérie a pod.<br />
: Automatické prepínanie zobrazenia funkcií.<br />
1. Automatické prepínanie<br />
Stla�te tla�idlo MODE pokia� sa neobjaví symbol “ ”. Zobrazenie sa bude automaticky prepína� zo<br />
zobrazenia DST, CLK, TM, AVG, MAX, TTM and ODO automaticky každých 6 sekúnd.<br />
2. Pevné zobrazenie<br />
Stla�te tla�idlo MODE pokia� symbol“ ” zmizne a nastavte požadovanú funkciu; po�íta� prestane<br />
automaticky prepína� funkcie a ostane zobrazená zvolená funkcia.<br />
�/�: Porovnanie SPD vo�i AVG<br />
Ak je okamžitá rýchlos� vyššia ako priemerná bliká znak “�” , ak je okamžitá rýchlos� nižšia ako priemer bliká<br />
znak “�”.<br />
F). TLA�IDLÁ A NORMÁLNE OPERÁCIE<br />
AUTOMATICKÝ ŠTART/STOP<br />
1. Po�íta� automaticky za�ne vypo�ítava� dáta SPD, ODO, DST, MAX, TTM, TM a AVG akonáhle sa bicykel<br />
udá do pohybu a prestane ke� sa bicykel zastaví.<br />
2.Blikajúci symbol “ ” indikuje že po�íta� je v pozícii ŠTART.<br />
AUTOMATICKÉ VYPNUTIE/ZAPNUTIE<br />
Aby batéria vydržala �o najdlhšie, po�íta� sa automaticky vypne pokia� nebol používaný 10 minút. Po�íta� sa<br />
znova zopne ak sa bicykel rozbehne alebo po stla�ení tla�idla.<br />
TLA�IDLO MODE<br />
Stla�te rýchlo tla�idlo MODE na prepínanie medzi funkciami. Funkcie sa budú prepína� dookola po každom<br />
stla�ení tla�idla.<br />
AC OPERÁCIA, VYMAZANIE DÁT (Iniciovanie Po�íta�a)<br />
Stla�te (AC) pre iniciovanie po�íta�a, po výmene batérií alebo ke� zobrazované údaje niesú správne. Všetky<br />
uložené dáta, ODO , CLK, aj priemer kolesa budú vymazané a je potrebné ich znovu nastavi�.<br />
VYMAZANIE ÚDAJOV<br />
1. Podržte tla�idlo “MODE” pokia� LCD �ísla bliknú. Uvo�nite tla�idlo. Údaje fukncií DST, TM, AVG, MAX budú<br />
vymazané.<br />
2.Údaje funkcií CLK, TTM a ODO ostanú nezmenené v pamäti po�íta�a.<br />
ZMENA NASTAVENIA PO�ÍTA�A (obr. 3)<br />
1. Nastavte displej na zobrazenie ODO a podržte tla�idlo “MODE” (6 sekúnd) pokia� sa zobrazí obrazovka<br />
nastavenia.<br />
2. Nastavte potrebné údaje pod�a postupu D.<br />
3.Podržte tla�idlo“MODE”(6 sekúnd) nastavené údaje sa uložia do pamäte po�íta�a.<br />
12HR NASTAVENIE HODÍN (Fig. 4)<br />
1. Nastavte displej na funkciu “ ”.<br />
2. Podržte tla�idlo “MODE” (6 sekúnd), pokia� sa zobrazí obrazovka nastavenia hodín.<br />
3. Rýchle stla�enie tla�idla “MODE” zvýši hodnotu blikajúcej �íslôice o 1.<br />
4. K zmene nastavovanej �íslice podržte tla�idlo “MODE” pokia� sa blikanie nepresunie na dalšiu �íslicu.<br />
5. Podržte tla�idlo “MODE” (6 sekúnd) nastavené údaje sa uložia do pamäte po�íta�a.
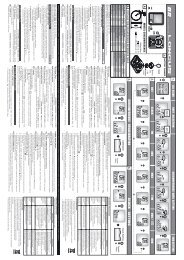
A). PHYSICAL DESCRIIPTIONS<br />
ENGLISH<br />
1. LCD DISLPAY 2. MODE BUTTON 3. BATTERY CAP<br />
4. ALL CLEAR (AC) KEY 5. CONTACTS 6. RING<br />
7. MAGNET 8. BRACKET<br />
9. 1.5V BATTERY (LR44 IS TYPICAL) 10. BRACKET RUBBER PAD 11. SENSOR RUBBER PAD<br />
12. SENSOR 13. SENSING ZONES 14. CABLE TIES<br />
B). INSTALLATIONS<br />
SENSOR and MAGNET MOUNTING<br />
1. Mount the SENSOR with 2 cable ties on the front fork with the RUBBER PAD , and let the sensor<br />
face the spoke, do not tighten the cable ties before the sensor is placed in the right position. (Fig. A)<br />
2. Mount the MAGNET � on one spoke of the front wheel and let the magnet face the sensing zones .<br />
Place the RING � around the nut to enhance the reliability of the fixed screw. (Fig. B)<br />
(New magnet with cross gap fit to all wheel spokes both flat and round).<br />
3. Adjust the relative position between the sensor and the magnet. (Fig. C)<br />
a). Aline the center of the MAGNET to either of the sensing zones .<br />
b). Make sure the GAP between the magnet and the sensor is within 4mm (1/6 inch).<br />
Adjust the desired gap by moving both the magnet and the sensor up or down.<br />
IMPORTANT: If either a) or b) is incorrect, poor signal input will result.<br />
4. Be sure all relative positions are correct, tightening the cable ties so they will not move.<br />
5. Cut the excess strapping on the cable ties when the installation is finished. (Fig. D)<br />
BRACKET MOUNTING (Fig. E)<br />
Attached the bracket to the handlebar and fit with pad(s), use the two cable ties to mount the bracket, do<br />
not tighten the cable ties before the bracket is place at the right position.<br />
SECURING THE SENSOR CABLE (Fig. F)<br />
1.Select suitable positions to clip the sensor cable to the fork with CABLE TIES.<br />
2. Make sure the sensor cable is loose enough for the handlebar to turn freely before tightening the cable ties.<br />
3. Secure excess wire near the fork crown by wrapping it around the front brake cable or by bending it back and<br />
forth and securing it with cable ties.<br />
<strong>MAIN</strong> <strong>UNIT</strong> MOUNTING (Fig. G)<br />
1. Mount the main unit onto the bracket by sliding it from front to rear till it clicks into position.<br />
2. This bracket is designed with a lock lever. It can lock up the main unit, ensuring that the main unit will not drop<br />
out while riding.<br />
3. To remove the main unit, press down on the lock lever of the bracket then pull the main unit forward and off.<br />
C). BATTERY CHANGE (Fig. H)<br />
1. When the brightness of the LCD display is dim, it means that the battery is nearly exhausted.<br />
2. Replace with a new LR44 � (Cross reference type A76, AG13 or V13GA) battery in the compartment on the<br />
back of the computer with the positive (+) pole toward the battery cap.<br />
� PRECAUTIONS<br />
1. This computer can be used in the rain but should not be used under water.<br />
2. Don’t leave the main unit exposed to direct sunlight when not riding the bike.<br />
3. Don’t disassemble the main unit or it’s accessories.<br />
4. Check relative position and gap of sensor and magnet periodically.<br />
5. Clean the contacts of the bracket and the bottom of the main unit periodically.<br />
6. Don’t use thinner, alcohol or benzine to clean the main unit or its accessories when they become dirty.<br />
7.Remember to pay attention to the road while riding.<br />
� TROUBLE SHOOTING<br />
Check the following before taking unit in for repairs.<br />
PROBLEM CHECK ITEMS REMEDY<br />
No display 1. Is the battery dead?<br />
2. Is there incorrect battery installation?<br />
No current<br />
Speed or<br />
incorrect<br />
data<br />
1. Is it at the recalibrating or 12HR clock<br />
setting screen?<br />
2. Are the contacts between the main unit<br />
and the bracket poor?<br />
3. Are the relative positions and gap of<br />
sensor and magnet correct?<br />
4. Is the wire broken?<br />
5. Is the circumference correct?<br />
1. Replace the battery.<br />
2. Be sure that the positive pole of the battery is<br />
facing the battery cap.<br />
1. Refer to the adjusting procedure and<br />
complete the adjustment.<br />
2. Wipe contacts clean.<br />
3. Refer to (Fig.B) and (Fig.C) and readjust data<br />
correctly.<br />
4. Repair or replace wire.<br />
5. Refer to "CALIBRATION" and enter correct<br />
Irregular<br />
value.<br />
Refer to the "<strong>MAIN</strong> <strong>UNIT</strong> <strong>SETUP</strong>" and initiate<br />
display<br />
the computer again.<br />
LCD is black Did you leave main unit under direct Place main unit in the shade to return to normal<br />
sunlight when not riding the bike for a long state.<br />
time?<br />
No adverse effect on data.<br />
Display is Is the temperature below 0°C (32°F)? Unit will return to normal state when the<br />
slow<br />
temperature rises.<br />
A). POPIS PO�ÍTA�A<br />
Slovensky<br />
1. LCD DISPLEJ 2. MODE BUTTON 3. KRYT BATÉRIE<br />
4. NULOVACÍ (AC) KLÚ� 5. KONTAKTY 6. KRÚŽOK<br />
7. MAGNET 8. OBJÍMKA<br />
9. 1.5V BATÉRIA (LR44) 10. PODLOŽKA OBJÍMKY 11. PODLOŽKA SNÍMA�A<br />
12. SNÍMA� 13. SNÍMACIE ZÓNY 14. UPÍNA� KÁBLOV<br />
B). INŠTALÁCIA<br />
MONTÁŽ MAGNETU A SENZORA.<br />
1. Sníma� utiahnite 2 páskami na prednú vidlicu a podložte podložkou , senzor nasmerujte tvárou<br />
ku špicom, páski neu�ahujte pokia� nieje sníma� v správnej polohe.(obr. A)<br />
2. Upevnite magnet � na špic predného kolesa tak aby bol tvárou k snímacím zónam . Vložte krúžok<br />
� a zatiahnite skrutkou. (obr. B)<br />
(Nový magnet s krížovým výrezom je použite�ný aj na ploché špice).<br />
3. Nastavte najvhodnejšiu polohu medzi sníma�om a magnetom. (obr. C)<br />
a). Nastavte stred magnetu do jednej zo snímacích zón .<br />
b). Uistite sa aby medzera medzi magnetom a sníma�om bola do 4mm .<br />
Požadovanú vzdialenos� dosiahnete pohybom magneta so senzorom dole alebo hore po vidlici.<br />
DOLE�ITÉ: Ak obe, a) alebo b) je nesprávne, po�íta� nemusí ukazova� – slabý signál.<br />
4. Uistite sa že pozície sníma�a s magnetom sú správne, utiahnite pásky tak aby sa sníma� nehýbal.<br />
5. Nadbyto�né konce u�ahovacích pások odstrihnite. (obr. D)<br />
MONTÁŽ OBJÍMKY (obr. E)<br />
Priložte objímku na riaditka s podložkami, použite dve u�ahovacie pásky na utiahnutie, neu�ahujte<br />
pásky pred tým ako je objímka umiestnená v správnej polohe.<br />
ZAISTENIE KÁBLA SNÍMA�A (obr. F)<br />
1. Nastavte kábel do najvhodnejšej polohy a zaistite ho u�ahovacími páskami.<br />
2. Uistite sa aby kábel bol dostato�ne vo�ný a bolo zaistené vo�né otá�anie riaditok.<br />
3. Kábel omotáme okolo vidlice a bowdenu prednej brzdy, uistíme u�ahovacími páskami.<br />
MONTÁŽ HLAVNEJ JEDNOTKY (obr. G)<br />
1. Nasu�te hlavnú jednotku do objímky – nasunú� s predu do zadu až pokial nevyjde kliknutie.<br />
2. Objímka je zaistená proti nahodnému vysunutiu po�íta�a po�as jazdy pá�kou.<br />
3. Na vysunutie po�íta�a z objímky stla�te pá�ku a vysu�te po�íta� von z objímky.<br />
C). VÝMENA BATÉRIE(Fig. H)<br />
1. Ak �íslice na displeji sú zobrazované matne až sa strácajú, znamená to že batéria je takmer vybitá.<br />
2. Vyme�te ju za novú LR44 � (CR typ A76, AG13 alebo V13GA) znakom (+) ku krytu batérie.<br />
� OPATRENIA<br />
1. Tento po�íta� môže by� používany za daž�a ale nesmie by� používaný pod vodou.<br />
2. Nenechávajte po�íta� na priamom slnku pokia� nejazdíte na bicykli.<br />
3. Nerozoberajte po�íta� ani jeho príslušenstvo.<br />
4. Pravidelne kontrolujte vzdialenos� medzi sníma�om a magnetom.<br />
5. Pravidelne o�istite kontakty na po�íta�i a objímke po�íta�a.<br />
6. Nepoužíva� riedidlo, benzín ani iné prostriedky s obsahom alkoholu na �istenie po�íta�a a jeho príslušenstva.<br />
7.Po�as jazdy dávajte najvyššiu pozornos� na vedenie bicykla.<br />
� RIEŠENIE PROBLÉMOV<br />
Pred podozrením na závadu skontrolujte skôr tieto veci:<br />
PROBLÉM KONTROLA RIEŠENIE<br />
Displej<br />
neukazuje<br />
Žiadne<br />
alebo<br />
nesprávne<br />
hodnoty.<br />
Nesprávny<br />
displej<br />
�ierny<br />
displej.<br />
Displej je<br />
pomalý.<br />
1.Je batéria dobrá?<br />
2.Je batéria inštalovaná správne?<br />
1. Bliká obrazovka po�íta�a alebo je v<br />
nastavovacom móde?<br />
2. Sú kontakty medzi po�íta�om a<br />
objímkou �isté?<br />
3.Je vzdialenos� medzi magnetom a<br />
sníma�om správna?<br />
4.Je kábel v poriadku<br />
5.Je nastavený správny priemer<br />
kolesa?<br />
1.Vyme�te batériu.<br />
2.Uistite sa �i je batéria správne vložená (+)<br />
ku krytu batérie.<br />
1.Postupujte pod�a nastavovacej schémy a<br />
dokon�ite nastavovanie.<br />
2. O�istite kontakty.<br />
3. Pozri k (obr.B) a (obr.C) a nastavte<br />
správnu pozíciu.<br />
4.Opravte alebo vyme�te kábel.<br />
5.Pozri"KALIBRÁCIA" a nastavte správne<br />
hodnoty.<br />
Bol po�íta� vystavený priamemu<br />
Pozri "NASTAVENIE PO�ÍTA�A” a nastavte<br />
ho znovu.<br />
Dajte po�íta� do tiena aby sa vrátil do<br />
slne�nému žiareniu po dlhšiu dobu? normálneho stavu.<br />
Nemá vplyv na dáta.<br />
Je teplota pod 0°C (32°F)? Po�íta� sa vráti do normálnej polohy ke�<br />
stúpne teplota.