
You also want an ePaper? Increase the reach of your titles
YUMPU automatically turns print PDFs into web optimized ePapers that Google loves.
<strong>How</strong> <strong>to</strong> <strong>setup</strong> <strong>wireless</strong> function <strong>of</strong> Edimax <strong>IP</strong> <strong>Camera</strong><br />
The <strong>wireless</strong> function <strong>of</strong> Edimax <strong>IP</strong> <strong>Camera</strong> is disabled by default. You need <strong>to</strong> hardwired <strong>the</strong> camera by E<strong>the</strong>rnet<br />
cable <strong>to</strong> connect <strong>the</strong> camera <strong>to</strong> your network first.<br />
Introduction<br />
For any new wi-fi devices (<strong>wireless</strong> computers, Edimax <strong>wireless</strong> camera, iPhone, Android) <strong>to</strong> join a Wi-Fi network, you need <strong>to</strong> know<br />
two things about your Wi-Fi network.<br />
1. The SSID is <strong>the</strong> name <strong>of</strong> <strong>the</strong> <strong>wireless</strong> network.<br />
2. The <strong>wireless</strong> encryption password <strong>of</strong> <strong>the</strong> <strong>wireless</strong> network.<br />
If you have no idea above <strong>the</strong> above two, you need <strong>to</strong> check your <strong>wireless</strong> router’s setting and find <strong>the</strong>m out.<br />
Procedures<br />
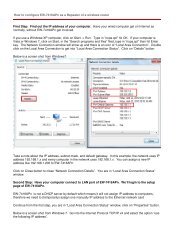
Step 1. We recommend you assign a static <strong>IP</strong> address <strong>to</strong> <strong>IP</strong> camera, <strong>the</strong>refore, you’d better<br />
know <strong>the</strong> <strong>IP</strong> addresses used in your network.<br />
1. Go <strong>to</strong> a computer which connects <strong>to</strong> your network as usual. Hardwired computer is<br />
preferred.<br />
2. For Windows XP, click on Start, click on Run. Enter “cmd” hit OK.<br />
For Windows 7/Windows Vista, click on Start, go <strong>to</strong> “Search programs & files”, enter “cmd”<br />
hit OK.<br />
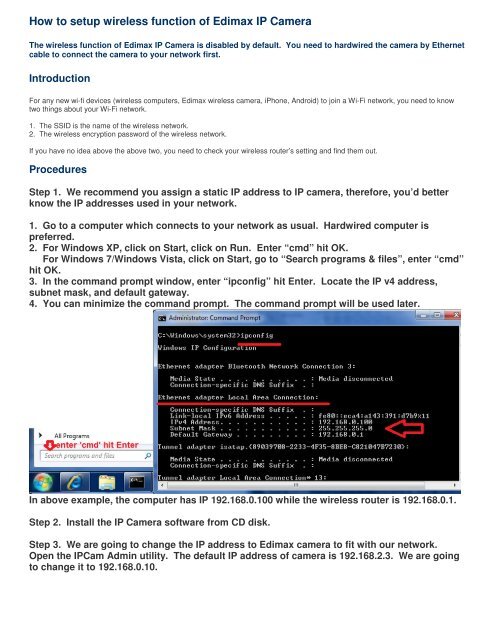
3. In <strong>the</strong> command prompt window, enter “ipconfig” hit Enter. Locate <strong>the</strong> <strong>IP</strong> v4 address,<br />
subnet mask, and default gateway.<br />
4. You can minimize <strong>the</strong> command prompt. The command prompt will be used later.<br />
In above example, <strong>the</strong> computer has <strong>IP</strong> 192.168.0.100 while <strong>the</strong> <strong>wireless</strong> router is 192.168.0.1.<br />
Step 2. Install <strong>the</strong> <strong>IP</strong> <strong>Camera</strong> s<strong>of</strong>tware from CD disk.<br />
Step 3. We are going <strong>to</strong> change <strong>the</strong> <strong>IP</strong> address <strong>to</strong> Edimax camera <strong>to</strong> fit with our network.<br />
Open <strong>the</strong> <strong>IP</strong>Cam Admin utility. The default <strong>IP</strong> address <strong>of</strong> camera is 192.168.2.3. We are going<br />
<strong>to</strong> change it <strong>to</strong> 192.168.0.10.
Click on “Configure camera”. Enter <strong>the</strong> password ‘1234’. Click Ok.<br />
The default <strong>IP</strong> is 192.168.2.3. We enter <strong>the</strong> a new <strong>IP</strong> 192.168.0.10, Gateway 192.168.0.1, and<br />
DNS server 192.168.0.1.<br />
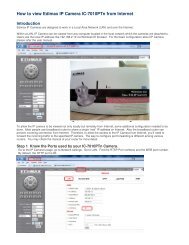
Step 4. Open Internet Explorer or o<strong>the</strong>r browser. Enter <strong>the</strong> <strong>IP</strong> address <strong>of</strong> Edimax <strong>Camera</strong>.<br />
Login with username admin and password 1234.<br />
If it prompts <strong>to</strong> install an ActiveX, click on Run Add-On.
Step 5. Go <strong>to</strong> Network, go <strong>to</strong> WLAN. Click on <strong>the</strong> circle for Enable Wireless Connection.<br />
It shows all <strong>the</strong> available <strong>wireless</strong> networks near <strong>the</strong> camera. You should see <strong>the</strong> SSID <strong>of</strong> your<br />
<strong>wireless</strong> network.<br />
You may want <strong>to</strong> pay attention about <strong>the</strong> Signal and Encryption for your <strong>wireless</strong> network.<br />
Click on <strong>the</strong> circle in front <strong>of</strong> <strong>the</strong> SSID <strong>of</strong> your <strong>wireless</strong> network <strong>to</strong> connect.<br />
Once you click on <strong>the</strong> Connect but<strong>to</strong>n, its SSID, Au<strong>the</strong>ntication/Encryption will be copied <strong>to</strong><br />
below table.<br />
Delete all <strong>the</strong> * in <strong>the</strong> field <strong>of</strong> WPA Pre-Shared Key. Enter your WPA pre-shared key <strong>of</strong> your<br />
<strong>wireless</strong> network. Please note <strong>the</strong> pre-shared key is case-sensitive (‘A’ is different than ‘a’).<br />
So please enter <strong>the</strong> security key carefully. Then press “Apply”.<br />
There is no any message after you click on “Apply”. The screen seems intact. This is normal.
If your <strong>wireless</strong> network uses WEP encryption, enter your WEP password repeatedly in WEP Key1, WEP Key2,<br />
WEP Key3, WEP Key4. Then press “Apply” but<strong>to</strong>n.<br />
Step 6. Get <strong>to</strong> <strong>the</strong> command prompt. Use a command called “ping” <strong>to</strong> ping <strong>the</strong> <strong>IP</strong> address <strong>of</strong><br />
<strong>the</strong> camera.<br />
Please note <strong>the</strong> “-t” at <strong>the</strong> end <strong>of</strong> <strong>the</strong> command. It will do continuously ping until you press<br />
Ctrl + C. The result is like this.
Step 7. Unplug <strong>the</strong> E<strong>the</strong>rnet cable from <strong>the</strong> <strong>wireless</strong> camera.<br />
The <strong>wireless</strong> LED on <strong>the</strong> front <strong>of</strong> <strong>the</strong> camera turns on and flashes.<br />
If you see replies from <strong>the</strong> camera, Congratulations, <strong>the</strong> camera is attached <strong>to</strong> your <strong>wireless</strong><br />
network successfully.<br />
Press Ctrl + C <strong>to</strong> s<strong>to</strong>p <strong>the</strong> PING command. Enter “exit” hit Enter <strong>to</strong> close <strong>the</strong> command<br />
prompt.<br />
Go <strong>to</strong> IE http://<strong>IP</strong>_address_<strong>of</strong>_<strong>Camera</strong> and you should be able <strong>to</strong> see <strong>the</strong> camera.<br />
Now you can move <strong>the</strong> <strong>wireless</strong> camera <strong>to</strong> a desired spot with its power adapter. Just power it<br />
on, <strong>the</strong> camera will connect <strong>to</strong> your <strong>wireless</strong> network successfully.