

Setup Guide (for VIERA Connection) - Igor Chudov
Setup Guide (for VIERA Connection) - Igor Chudov
Setup Guide (for VIERA Connection) - Igor Chudov

You also want an ePaper? Increase the reach of your titles
YUMPU automatically turns print PDFs into web optimized ePapers that Google loves.
<strong>Setup</strong> <strong>Guide</strong> (<strong>for</strong> <strong>VIERA</strong> <strong>Connection</strong>)<br />
Network Camera<br />
Be<strong>for</strong>e Reading this Document<br />
This document is written <strong>for</strong> users who wish to view camera images using<br />
a compatible Panasonic <strong>VIERA</strong> TV.<br />
Make sure you have read the Important In<strong>for</strong>mation document and<br />
followed the instructions in the Installation <strong>Guide</strong> <strong>for</strong> connecting your<br />
camera.<br />
• The TV screen shots in this document depict the screens displayed on the TC-P42G10.<br />
Compatible Panasonic <strong>VIERA</strong> TVs<br />
The camera is compatible with the following Panasonic <strong>VIERA</strong> TVs<br />
(as of October, 2009).<br />
G10 series, G15 series, V10 series, Z1 series<br />
Abbreviations<br />
The Network Camera is referred to as “the camera” in this document.<br />
The <strong>Setup</strong> CD-ROM is referred to as “the CD-ROM” in this document.<br />
A compatible Panasonic <strong>VIERA</strong> TV is referred to as “the TV” in this document.<br />
Trademarks<br />
<strong>VIERA</strong> Link is a trademark of Panasonic Corporation.<br />
<strong>VIERA</strong> CAST is a trademark of Panasonic Corporation.<br />
All other trademarks identified herein are the property of their respective owners.<br />
<strong>Setup</strong> Procedure Overview<br />
© Panasonic System Networks Co., Ltd. 2009<br />
PNQX2377YA KK0809CQ1109<br />
1. Press the [MENU] button.<br />
2.<br />
Please read this document be<strong>for</strong>e using the product,<br />
and save this document <strong>for</strong> future reference.<br />
Panasonic Network Camera Website:<br />
http://panasonic.net/pcc/ipcam/<br />
About the Documentation<br />
All documentation can be found on the included CD-ROM.<br />
Important In<strong>for</strong>mation (PDF <strong>for</strong>mat; printed version also included)<br />
Provides general in<strong>for</strong>mation and safety instructions <strong>for</strong> using the camera.<br />
Installation <strong>Guide</strong> (PDF <strong>for</strong>mat; printed version also included)<br />
Describes how to physically connect the camera to the power supply and network, as<br />
well as how to mount or place the camera <strong>for</strong> regular use.<br />
<strong>Setup</strong> <strong>Guide</strong> (PDF <strong>for</strong>mat; printed version also included)<br />
Describes how to set up the camera so that it can be accessed using a PC.<br />
Operating Instructions (HTML <strong>for</strong>mat)<br />
Explains how to operate, program, and maintain the camera.<br />
Troubleshooting <strong>Guide</strong> (HTML <strong>for</strong>mat)<br />
Provides solutions <strong>for</strong> problems you may have when using the camera.<br />
Additional Documentation For <strong>VIERA</strong> <strong>Connection</strong><br />
<strong>Setup</strong> <strong>Guide</strong> (<strong>for</strong> <strong>VIERA</strong> <strong>Connection</strong>) (PDF <strong>for</strong>mat; printed version also included)<br />
This document. Describes how to set up the camera so that it can be accessed from a TV.<br />
Operating Instructions (HTML <strong>for</strong>mat)<br />
Explains how to operate, and configure the camera using a TV.<br />
Troubleshooting <strong>Guide</strong> (HTML <strong>for</strong>mat)<br />
Provides solutions <strong>for</strong> problems you may have when using the camera with a TV.<br />
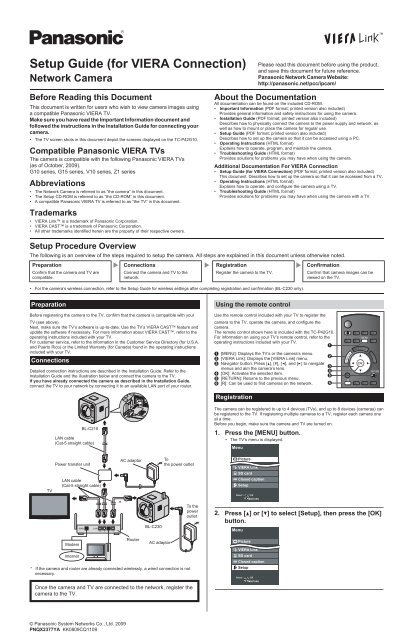
The following is an overview of the steps required to setup the camera. All steps are explained in this document unless otherwise noted.<br />
Preparation<br />
Confirm that the camera and TV are<br />
compatible.<br />
Preparation<br />
Be<strong>for</strong>e registering the camera to the TV, confirm that the camera is compatible with your<br />
TV (see above).<br />
Next, make sure the TV’s software is up-to-date. Use the TV’s <strong>VIERA</strong> CAST feature and<br />
update the software if necessary. For more in<strong>for</strong>mation about <strong>VIERA</strong> CAST, refer to the<br />
operating instructions included with your TV.<br />
For customer service, refer to the in<strong>for</strong>mation in the Customer Service Directory (<strong>for</strong> U.S.A.<br />
and Puerto Rico) or the Limited Warranty (<strong>for</strong> Canada) found in the operating instructions<br />
included with your TV.<br />
<strong>Connection</strong>s<br />
<strong>Connection</strong>s<br />
Connect the camera and TV to the<br />
network.<br />
Detailed connection instructions are described in the Installation <strong>Guide</strong>. Refer to the<br />
Installation <strong>Guide</strong> and the illustration below and connect the camera to the TV.<br />
If you have already connected the camera as described in the Installation <strong>Guide</strong>,<br />
connect the TV to your network by connecting it to an available LAN port of your router.<br />
Once the camera and TV are connected to the network, register the<br />
camera to the TV.<br />
Registration<br />
Register the camera to the TV.<br />
For the camera’s wireless connection, refer to the <strong>Setup</strong> <strong>Guide</strong> <strong>for</strong> wireless settings after completing registration and confirmation (BL-C230 only).<br />
TV<br />
BL-C210<br />
LAN cable<br />
(Cat-5 straight cable)<br />
Power transfer unit<br />
LAN cable<br />
(Cat-5 straight cable)<br />
Modem<br />
Internet<br />
AC adaptor<br />
Router<br />
BL-C230<br />
AC adaptor<br />
To<br />
the power outlet<br />
* If the camera and router are already connected wirelessly, a wired connection is not<br />
necessary.<br />
*<br />
To the<br />
power<br />
outlet<br />
Using the remote control<br />
Use the remote control included with your TV to register the<br />
camera to the TV, operate the camera, and configure the<br />
camera.<br />
The remote control shown here is included with the TC -P42G10.<br />
For in<strong>for</strong>mation on using your TV’s remote control, refer to the<br />
operating instructions included with your TV.<br />
A<br />
A<br />
B<br />
[MENU]: Displays the TV’s or the camera’s menu.<br />
[<strong>VIERA</strong> Link]: Displays the [<strong>VIERA</strong> Link] menu.<br />
B<br />
C<br />
D<br />
E<br />
Navigator button: Press [D], [C], [F], and [E] to navigate<br />
menus and aim the camera’s lens.<br />
[OK]: Activates the selected item.<br />
[RETURN]: Returns to the previous menu.<br />
C<br />
D<br />
E<br />
F [R]: Can be used to find cameras on the network. F<br />
Registration<br />
The camera can be registered to up to 4 devices (TVs), and up to 8 devices (cameras) can<br />
be registered to the TV. If registering multiple cameras to a TV, register each camera one<br />
at a time.<br />
Be<strong>for</strong>e you begin, make sure the camera and TV are turned on.<br />
The TV’s menu is displayed.<br />
Menu<br />
Picture<br />
<strong>VIERA</strong> Link<br />
SD card<br />
Closed caption<br />
<strong>Setup</strong><br />
Select<br />
OK<br />
RETURN<br />
Confirmation<br />
Confirm that camera images can be<br />
viewed on the TV.<br />
Press [D] or [C] to select [<strong>Setup</strong>], then press the [OK]<br />
button.<br />
Menu<br />
Picture<br />
<strong>VIERA</strong> Link<br />
SD card<br />
Closed caption<br />
<strong>Setup</strong><br />
Select<br />
OK<br />
RETURN
3. Select [Network cameras list], then press the [OK]<br />
button.<br />
<strong>Setup</strong> 2/2<br />
<strong>VIERA</strong> Link settings<br />
Network setting<br />
<strong>VIERA</strong> CAST setting<br />
Network cameras list<br />
Eco mode setting<br />
Advanced setup<br />
About<br />
Reset<br />
Select<br />
Change RETURN<br />
This item may be on the second screen of the [<strong>Setup</strong>] menu. Scroll down until<br />
[Network cameras list] is displayed.<br />
If no cameras are registered to the TV:<br />
A message is displayed prompting you to begin searching <strong>for</strong> cameras.<br />
Please refer to camera’s settings and enable its link<br />
mode.<br />
Start searching <strong>for</strong> network camera?<br />
Yes No<br />
If a camera is already registered to the TV:<br />
The network camera list is displayed. Press the [R] (red) button to register another<br />
camera. Up to 8 cameras can be registered to the TV.<br />
4. Press and hold the camera’s PRIVACY button <strong>for</strong><br />
about 3 seconds, until the AV LINK indicator flashes.<br />
The camera illustrations in this document<br />
depict the BL-C210.<br />
If the POWER indicator lights in red, the<br />
camera’s privacy mode feature has been<br />
activated. Press the PRIVACY button to<br />
deactivate privacy mode, then press and hold<br />
the PRIVACY button <strong>for</strong> about 3 seconds.<br />
AV LINK indicator flashes orange in the<br />
registration mode.<br />
Complete the next step within 5 minutes.<br />
5. Select [Yes], then press the [OK] button.<br />
Please refer to camera’s settings and enable its link<br />
mode.<br />
Start searching <strong>for</strong> network camera?<br />
Yes No<br />
The TV will search <strong>for</strong> cameras that are available <strong>for</strong> registration.<br />
After the camera is registered, it is displayed in the network camera list.<br />
Network cameras list<br />
Camera name Model Status Default<br />
NetworkCamera XX-XXXX Connected<br />
...<br />
...<br />
...<br />
...<br />
...<br />
...<br />
...<br />
...<br />
...<br />
...<br />
...<br />
...<br />
...<br />
...<br />
...<br />
...<br />
...<br />
...<br />
...<br />
...<br />
...<br />
Select<br />
RETURN<br />
R Find cameras G Delete<br />
B Disconnect Y Default camera<br />
If the camera detects motion<br />
If the camera’s heat sensor and motion sensor features detect motion, the following<br />
message is displayed on the screen.<br />
Press the [OK] button to display the camera image, or press the [RETURN] button to<br />
cancel the message. Once a sensor is triggered, sensor features will be inactive <strong>for</strong><br />
60 seconds by default. Refer to the Operating Instructions (<strong>for</strong> <strong>VIERA</strong> <strong>Connection</strong>) on<br />
the included CD-ROM <strong>for</strong> more in<strong>for</strong>mation on using and configuring the camera’s<br />
sensor features.<br />
Confirmation<br />
OK<br />
NetworkCamera<br />
Moving object detected<br />
Use the remote control included with your TV to view camera images on your TV.<br />
1. Press the [<strong>VIERA</strong> Link] button.<br />
The [<strong>VIERA</strong> Link] menu is displayed.<br />
2. Press [D] or [C] to select [Network Camera], then<br />
press the [OK] button.<br />
Record now<br />
Stop recording<br />
<strong>VIERA</strong> Link control<br />
Network Camera<br />
Speaker output<br />
TV<br />
Select<br />
Change RETURN<br />
PRIVACY<br />
button<br />
AV LINK<br />
indicator<br />
• Still images (JPEG) from up to 4 or 8 connected cameras registered to the TV are<br />
displayed on the multi screen.<br />
Press the [R] (red) button to switch between 4-camera and 8-camera display.<br />
4-camera display<br />
Multi screen<br />
(1/4)<br />
Camera name<br />
NetworkCamera<br />
Model XX-XXXX<br />
Select OK<br />
RETURN<br />
R 4 cam / 8 cam<br />
3. Select the desired camera, then press the [OK]<br />
button.<br />
Live images from the selected camera are displayed.<br />
Single screen<br />
Camera name<br />
NetworkCamera<br />
Model XX-XXXX<br />
Pan<br />
Tilt<br />
RETURN<br />
1 - 9 Preset position<br />
0 Home position<br />
Panning and tilting the lens<br />
Additional In<strong>for</strong>mation<br />
Configuring the camera<br />
The camera menu is displayed.<br />
Repeat this step as necessary.<br />
Repeat this step as necessary.<br />
8-camera display<br />
To pan or tilt the camera lens while viewing the single screen, press [F], [E], [D], or [C].<br />
You can aim the lens at pre-programmed positions called presets. You can register up to 8<br />
presets. Presets 1-4 are registered by default. To aim the camera lens at a preset position,<br />
press the corresponding number button on the remote control ([1] to [8]). For in<strong>for</strong>mation<br />
on changing the presets or adding additional presets, refer to the Operating Instructions<br />
(<strong>for</strong> <strong>VIERA</strong> <strong>Connection</strong>) on the included CD-ROM.<br />
You can aim the lens at the pre-programmed home position by pressing the [0] button. The<br />
home position is the position the camera lens aims at when the camera is turned on.<br />
If [PRIVACY] is displayed<br />
If [PRIVACY] is displayed, the selected camera is in privacy mode and cannot be<br />
accessed. Press the camera’s PRIVACY button to turn off privacy mode.<br />
You can configure certain camera settings while accessing the camera with the TV.<br />
1. While viewing camera images on the single screen,<br />
press the [MENU] button.<br />
Camera menu<br />
Brightness<br />
Sensor preview<br />
Preset settings<br />
Camera settings<br />
Camera details<br />
Select<br />
OK<br />
RETURN<br />
2. Press [D] or [C] to select the desired item, then press<br />
the [OK] button to display the next screen.<br />
3. Once the desired screen is displayed, press [F] or<br />
[E] to change the setting, then press the [OK] button<br />
to change the setting.<br />
Press the [RETURN] button when finished to return<br />
to the menu or previous screen.<br />
For more in<strong>for</strong>mation<br />
Multi screen<br />
(1/9)<br />
Camera name<br />
NetworkCamera<br />
Model XX-XXXX<br />
Select OK 1 - 9<br />
RETURN<br />
R 4 cam / 8 cam<br />
For the camera’s wireless connection, refer to the <strong>Setup</strong> <strong>Guide</strong> <strong>for</strong><br />
wireless settings after completing registration and confirmation<br />
(BL-C230 only).<br />
Once you have registered the camera to the TV and confirmed that<br />
camera images can be viewed using the TV, you may disconnect<br />
the camera and install it in the location where it will be permanently<br />
used. For in<strong>for</strong>mation on installing the camera, refer to the<br />
Installation <strong>Guide</strong>.<br />
For more in<strong>for</strong>mation on operating and configuring the camera using your TV, refer to the<br />
Operating Instructions (<strong>for</strong> <strong>VIERA</strong> <strong>Connection</strong>) on the included CD-ROM.<br />
For in<strong>for</strong>mation on troubleshooting issues when using the camera with your TV, refer to the<br />
Troubleshooting <strong>Guide</strong> (<strong>for</strong> <strong>VIERA</strong> <strong>Connection</strong>) on the included CD-ROM.


