Black, White & Currant III Quilted Tote Bag - Henry Glass & Co
Black, White & Currant III Quilted Tote Bag - Henry Glass & Co
Black, White & Currant III Quilted Tote Bag - Henry Glass & Co

Create successful ePaper yourself
Turn your PDF publications into a flip-book with our unique Google optimized e-Paper software.
<strong>Henry</strong> <strong>Glass</strong> Fabrics <strong>Co</strong>. Inc.<br />
<strong>Black</strong>, <strong>White</strong> & <strong>Currant</strong> <strong>III</strong> <strong>Quilted</strong> <strong>Tote</strong> <strong>Bag</strong><br />
By <strong>Co</strong>lor Principle<br />
Cutting Requirements<br />
7714-99 <strong>Black</strong>/Small <strong>White</strong> Flowers<br />
(2) 2 ¼ “ x 20” strips, cut on bias for flap & outside<br />
pocket (double fold)<br />
(2) 18˝ x 21˝ rectangles for lining<br />
(2) 1 ½˝ x 21˝ for tote top section<br />
(2) 6˝ x 21˝ rectangles for inside pocket<br />
(2) 4˝ x 17˝ rectangles for bottom insert<br />
7716-44 <strong>White</strong>/Large Flowers<br />
(2) 12˝ x 21˝ for tote middle section<br />
7715-88 Red/<strong>White</strong> Flowers<br />
(2) 9 ½” x 13”outside pocket<br />
(2) 6” x 9 ½” flap<br />
7710-98 Red Paisley<br />
(2) 6˝ x 21˝ for tote bottom section<br />
(2) 5˝ x 26˝ for handles<br />
Muslin<br />
(2) Muslin 19˝ x 22˝ for quilt backing<br />
Fusible fleece (or batting)<br />
(2) 19˝ x 21˝<br />
Medium weight fusible interfacing<br />
(1) 6˝ x 21˝ for inside pocket<br />
(1) 9 ½ ” x 13” for outside pocket<br />
(1) 6” x 9 ½”for flap<br />
(2) 4˝ x 26˝ strips for handles<br />
Stiff fusible interfacing<br />
(1) 4˝ x 17˝ rectangle for bottom insert<br />
Fabric Requirements<br />
Approximately 20˝ x 15˝ x 5˝<br />
1 ½ yd 7714-99 <strong>Black</strong>/Small <strong>White</strong> Flowers <strong>Tote</strong> Top Section/Binding/Lining/<br />
Inside Pocket/Bottom Insert<br />
⅜ yd 7716-44 <strong>White</strong>/Lg Flowers <strong>Tote</strong> Middle Section<br />
⅓ yd 7715-88 Red/<strong>White</strong> All-Over Flowers Outside Pocket/Flap<br />
½ yd 7710-98 Red Paisley <strong>Tote</strong> Bottom Section/Handles<br />
Additional Materials:<br />
⅝ yd Muslin for quilt backing<br />
2 pieces - 19˝ x 21˝ Fusible Fleece (or batting)<br />
4˝ x 17˝ Stiff fusible interfacing for bottom insert<br />
Medium weight fusible interfacing for pocket, flap and handles<br />
Decorative Button, hook & loop tape or closure of your choice.<br />
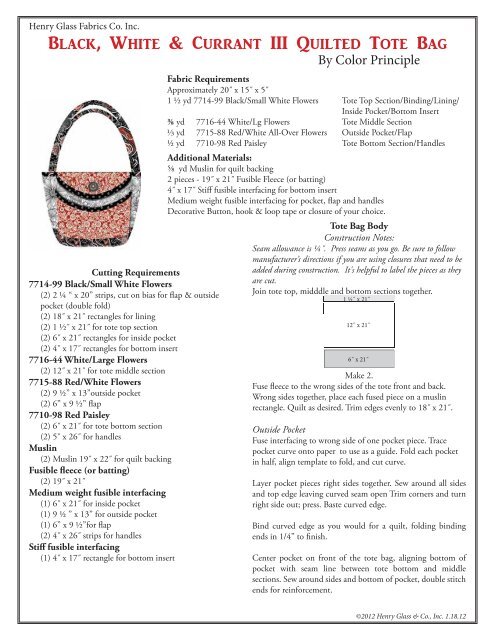
<strong>Tote</strong> <strong>Bag</strong> Body<br />
<strong>Co</strong>nstruction Notes:<br />
Seam allowance is ¼˝. Press seams as you go. Be sure to follow<br />
manufacturer’s directions if you are using closures that need to be<br />
added during construction. It's helpful to label the pieces as they<br />
are cut.<br />
Join tote top, midddle and bottom sections together.<br />
Make 2.<br />
Fuse fleece to the wrong sides of the tote front and back.<br />
Wrong sides together, place each fused piece on a muslin<br />
rectangle. Quilt as desired. Trim edges evenly to 18˝ x 21˝.<br />
Outside Pocket<br />
Fuse interfacing to wrong side of one pocket piece. Trace<br />
pocket curve onto paper to use as a guide. Fold each pocket<br />
in half, align template to fold, and cut curve.<br />
Layer pocket pieces right sides together. Sew around all sides<br />
and top edge leaving curved seam open Trim corners and turn<br />
right side out; press. Baste curved edge.<br />
Bind curved edge as you would for a quilt, folding binding<br />
ends in 1/4” to finish.<br />
Center pocket on front of the tote bag, aligning bottom of<br />
pocket with seam line between tote bottom and middle<br />
sections. Sew around sides and bottom of pocket, double stitch<br />
ends for reinforcement.<br />
©2012 <strong>Henry</strong> <strong>Glass</strong> & <strong>Co</strong>., Inc. 1.18.12
Sew Front and Back<br />
With right sides together, sew tote front and back together at<br />
the side and bottom edges. Press seam allowances open.<br />
To shape a flat bottom, fold the tote (with right sides<br />
together) so that the side seam meets up with the bottom.<br />
Pin the seams together. Measure 2 ½˝ from point and draw<br />
a line. Sew on the marked line. Stitch again to reinforce the<br />
seam.<br />
Trim<br />
2 ½˝<br />
Trim seam allowance to ½˝ and zig zag stitch along raw edges.<br />
Turn tote right side out.<br />
Lining<br />
Inside Pocket<br />
Fuse 6˝ x 21˝ interfacing to the wrong side one of the inside<br />
pockets. Place pocket pieces right sides together. Stitch along<br />
both long edges, leaving the sides open. Turn right side out<br />
and press. Top stitch 1/8˝ from the top edge of the pocket.<br />
Place pocket on the right side of one of the lining sides. Align<br />
the raw edges of the pocket with the side edges of the lining,<br />
approximately 3˝ down from the top. Baste pocket in place<br />
along side seams. Top stitch through all the layers along the<br />
bottom edge.<br />
6˝<br />
3”<br />
Front side of lining<br />
21˝<br />
If you like, divide the pocket into three separate pockets by<br />
stitching 6˝ in from each side. Back stitch to reinforce the<br />
seams.<br />
With right sides together, sew side and bottom edges of<br />
lining. Leave a 6˝ opening in the bottom seam for turning<br />
tote right side out. Press seams open. Stitch bottom corners<br />
in the same manner as you did for the tote. Leave lining<br />
wrong side out.<br />
Handles<br />
Press strips in half to mark center. Open and press ½˝ to<br />
the inside along both long edges of the handle strips. Open<br />
pressed edges. Place fusible interfacing on the wrong side of<br />
the handle strip between the fold lines. Fuse in place.<br />
6˝<br />
Fold in edges again, fold the handle strip in half lengthwise<br />
and press. Top stitch both long sides of the handle. Make two.<br />
Fold handle in half crosswise to find the center. Mark with a<br />
pin. Fold the handle in half lengthwise and measure 3˝ from<br />
each side of the pin. Stitch folded edges together for 6˝ to<br />
make a narrow section of the handle. It is easier to carry this<br />
way.<br />
3˝<br />
Flap<br />
Trace curve onto paper and use as a guide for the flap. Fuse<br />
interfacing to the wrong side of one flap piece. Place the two<br />
flap pieces wrong sides together. Pin or baste. Bind around<br />
curved edge as you would for a quilt. Baste raw edges of the<br />
straight edge of the flap.<br />
Measure 3˝ in from each side of the side seams and pin<br />
handles to right side of the front and back of the tote,<br />
matching raw edges. Place flap at the center of the right side<br />
of the bag back, raw edges even. Pin. Baste close to the edges.<br />
3” 3”<br />
center<br />
tote bag<br />
wrong side out<br />
Assemble <strong>Tote</strong> <strong>Bag</strong><br />
Insert tote body inside tote lining with right sides together.<br />
Tuck handles and flap down into the tote, out of the way.<br />
Align raw edges and side seams. Sew top edges together.<br />
Stitch again over handles and flap for reinforcement.<br />
Turn tote and lining right side out through the opening in<br />
the lining. Pull lining out of the tote and stitch the opening<br />
closed.<br />
Tuck the lining back down inside the tote. Be sure handles<br />
and flap are pulled out. Press top edge. Top stitch.<br />
Bottom Insert and Closure<br />
Layer the stiff interfacing with the lining fabric and fuse. Zig<br />
zag around the four edges of the fabric covered rectangle.<br />
Place in the bottom of the tote. (Adjust size if necessary.)<br />
Add hook & loop tape, button and button hole, or snap to<br />
complete the tote bag.<br />
3˝<br />
POCKET<br />
PLACE ON FOLD<br />
FLAP<br />
Interfacing<br />
Press ½˝<br />
©2012 <strong>Henry</strong> <strong>Glass</strong> & <strong>Co</strong>., Inc. 1.18.12