Lab Handout
Lab Handout
Lab Handout

You also want an ePaper? Increase the reach of your titles
YUMPU automatically turns print PDFs into web optimized ePapers that Google loves.
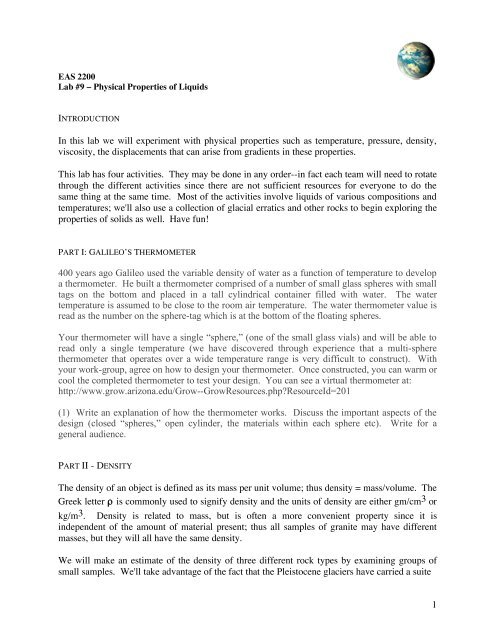
EAS 2200<br />
<strong>Lab</strong> #9 – Physical Properties of Liquids<br />
INTRODUCTION<br />
In this lab we will experiment with physical properties such as temperature, pressure, density,<br />
viscosity, the displacements that can arise from gradients in these properties.<br />
This lab has four activities. They may be done in any order--in fact each team will need to rotate<br />
through the different activities since there are not sufficient resources for everyone to do the<br />
same thing at the same time. Most of the activities involve liquids of various compositions and<br />
temperatures; we'll also use a collection of glacial erratics and other rocks to begin exploring the<br />
properties of solids as well. Have fun!<br />
PART I: GALILEO’S THERMOMETER<br />
400 years ago Galileo used the variable density of water as a function of temperature to develop<br />
a thermometer. He built a thermometer comprised of a number of small glass spheres with small<br />
tags on the bottom and placed in a tall cylindrical container filled with water. The water<br />
temperature is assumed to be close to the room air temperature. The water thermometer value is<br />
read as the number on the sphere-tag which is at the bottom of the floating spheres.<br />
Your thermometer will have a single “sphere,” (one of the small glass vials) and will be able to<br />
read only a single temperature (we have discovered through experience that a multi-sphere<br />
thermometer that operates over a wide temperature range is very difficult to construct). With<br />
your work-group, agree on how to design your thermometer. Once constructed, you can warm or<br />
cool the completed thermometer to test your design. You can see a virtual thermometer at:<br />
http://www.grow.arizona.edu/Grow--GrowResources.phpResourceId=201<br />
(1) Write an explanation of how the thermometer works. Discuss the important aspects of the<br />
design (closed “spheres,” open cylinder, the materials within each sphere etc). Write for a<br />
general audience.<br />
PART II - DENSITY<br />
The density of an object is defined as its mass per unit volume; thus density = mass/volume. The<br />
Greek letter ρ is commonly used to signify density and the units of density are either gm/cm 3 or<br />
kg/m 3 . Density is related to mass, but is often a more convenient property since it is<br />
independent of the amount of material present; thus all samples of granite may have different<br />
masses, but they will all have the same density.<br />
We will make an estimate of the density of three different rock types by examining groups of<br />
small samples. We'll take advantage of the fact that the Pleistocene glaciers have carried a suite<br />
1
of commonly-occurring rocks to the Ithaca area. Rock Group 1 will represent average Earth<br />
crust. Rock Group 2 (peridotite) will represent the interior – the mantle of the Earth. Rock<br />
Group 3 is just for fun. These are samples of volcanic pumice, and are formed when dissolved<br />
gasses come out of the magma solution when volcanoes erupt.<br />
• Select a group of samples from each of the 3 boxes provided.<br />
• Use the small lab scale to measure the mass of the group (put them all in the tray together);<br />
try to find a group of samples with a cumulative mass of 200-400 grams<br />
• Find the volume of each sample by immersing the samples in water using a large graduated<br />
cylinder. 1 ml = 1 cm 3 .<br />
• Find the total volume of the sample group that you weighed.<br />
• Calculate the density in units of g/cm 3 .<br />
(2) What density did you calculate for (a) Rock Group 1 (b) Rock Group 2 (c) Rock Group 3<br />
Show your work.<br />
PART III - VISCOSITY<br />
Viscosity (η) is defined as the resistance of a fluid to flow. Fluids with low viscosities flow very<br />
easily, fluids with high viscosities flow only very slowly. We can measure viscosity by<br />
measuring the speed at which objects fall through fluids. You will test the viscosity of water,<br />
mineral oil, honey and glycerin by dropping small steel weights into these fluids and timing their<br />
descent. Viscosity is measured in units of force and time (force x time, which is called a Pascalsecond,<br />
or Pa•s).<br />
Fill the largest graduated cylinder (1000 ml) with water, nearly to the top (you don't need to<br />
know the volume this time). Get your stopwatch ready. Carefully drop a steel bead into the<br />
cylinder so that it does not hit the sides (although you may find this difficult…). Time the<br />
descent of the bead as best you can. Velocity is measured in units of m/s (meters per second).<br />
Measure the distance that you allowed the bead to fall (you can measure in cm and then convert<br />
to m: 1 m = 100 cm). Repeat this measurement three or more times and average your results.<br />
(3) Calculate the velocity of the bead in water.<br />
The viscosity of water is .001 Pa•s (η = .001 Pa•s =.001 kg/m·s). We can compare the viscosity<br />
of other fluids to water by comparing the velocities of beads as they fall through these other<br />
fluids. The difference in velocity (V) is inversely proportional to the difference in viscosity:<br />
Vwater =<br />
Voil<br />
ηoil<br />
ηwater<br />
(4) Find the velocity of beads in mineral oil, honey and glycerin (use the medium-sized<br />
graduated cylinders for oil (250 or 500 ml) & glycerin (100 ml), the smallest for honey (25 ml)).<br />
2
Calculate the viscosity of these fluids. Present all of your data in a table (avg. time, distance,<br />
velocity and viscosity). Rank the liquids according to their viscosities.<br />
• Explore the effect of changing temperature on the viscosity of honey. Fill a large beaker<br />
with water and place it on the hot plate (set on high) until it just begins to boil. Place your<br />
cylinder of honey in the water for a few minutes and record its temperature (the water, not<br />
the honey--they should be the same). The level of the honey and water should be about the<br />
same (to get all the honey warm). Remove the honey and quickly repeat the viscosity<br />
measurement!<br />
• Finally, place a cylinder of room-temperature honey in an ice-water bath. Leave it there a<br />
few minutes, and again remove it and try to repeat the viscosity measurement. [You might<br />
want to measure a distance less than the full height of the cylinder for this experiment.]<br />
(5) Record your temperature results and present them in table form as above. What relationship<br />
can you discern between the temperature of a substance and its viscosity<br />
(6) Consider a sample of Silly Putty. Mold a small cone or cube or sphere out of Silly Putty.<br />
Observe your Silly Putty after appx. 30 minutes. Where would you place its viscosity with<br />
respect to the other substances you've measured Try to estimate its viscosity in Pa•s, and<br />
add Silly Putty to your chart from Q(4).<br />
In a few weeks when we examine volcanoes and the way that they erupt, you will see that<br />
viscosity turns out to be very important. Unfortunately, not only is the temperature of most<br />
volcanic lavas quite high, but their viscosities are very high as well, making it difficult to<br />
perform in-class experiments. To get around this obstacle, we’ve designed a web site that will<br />
allow you to explore materials with higher viscositites than those that you’ve worked with today.<br />
At home, use your web browser to go to<br />
http://www.geo.cornell.edu/hawaii/220/PRI/viscosity.html<br />
In the experiment presented here, the velocity of the bead in water is 0.667 m/s and the height of<br />
the cyinder is 20 cm. The viscosities of other materials are indicated. Perform a few trial runs to<br />
see how some of the higher viscosity materials react.<br />
(7) How long would you have to wait for the bead to fall 20 cm through:<br />
• Pahoehoe lava (this is what we saw in the home video)<br />
• A’a lava<br />
• Andesite lava<br />
[Hint - don’t let your computer run all night – use the known numerical values and calculate the<br />
answer to this question!]<br />
3
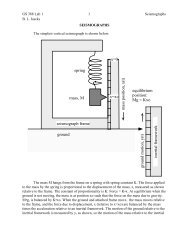
PART IV - CONVECTION<br />
The process of convection occurs when a fluid is heated from below and cooled from above.<br />
You have probably observed convection within a pot of soup on a hot stove. Use the clear<br />
plastic containers to set up and observe a convection experiment as follows (see figure on next<br />
page):<br />
• Fill 2 containers with cold water to a depth of appx. 6 cm.<br />
• Invert 8 paper cups and set each container on a set of 4 "legs."<br />
• Allow the water to become motionless.<br />
• Using the small plastic pipette, place a drop of food coloring on the bottom center of one<br />
container. See figure below.<br />
• Place two drops in the other container, one on the bottom just off-center, and the other on<br />
the top of the water, off-center to the other side.<br />
• Fill 2 other cups with very hot water and gently slide them under the containers until they<br />
are centered.<br />
(8) Observe the containers carefully and make a series of sketches that illustrate what happens to<br />
the food coloring. Holding a sheet of white paper behind the container will make it easier to<br />
observe the experiment. Describe, then explain your observations.<br />
Set-up for convection experiment:<br />
pipette<br />
H<br />
You can view a computer-simulation of convection at:<br />
http://www.geo.cornell.edu/hawaii/220/PRI/convection.html<br />
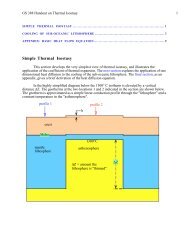
PART V – ISOSTASY<br />
Isostasy describes how materials float. When we explored the Earth's interior, we discovered<br />
that the outermost layer, the lithosphere, lies above a partially molten layer, the asthenosphere.<br />
The lithosphere is less dense and thus "floats" on the asthenosphere. The principle of isostasy is<br />
extremely important to plate tectonics--this is what allows the plates to move. You may be more<br />
4
familiar with isostasy as it applies to ice cubes floating in water (especially ice bergs floating in<br />
the ocean). The principle is the same, only the materials are different.<br />
We can define "The Law of Isostasy," which states that: A body floats when it displaces a mass<br />
of fluid equal to its own mass.<br />
In this experiment you have two Plexiglas aquaria, a number of blocks of wood, and some water.<br />
Fill the cube-shaped container with water (as full as it will go) and set it inside the wide flat<br />
container (this is the "flood-prevention container"). We'll use the blocks to perform two related<br />
experiments, (1) ice bergs floating in the ocean, and (2) the collision of continents and the<br />
creation of mountain ranges. For both of these processes the law of isostasy is very important.<br />
Note that two sides of the cube-shaped container are taller than the others. The thickness of the<br />
wooden blocks is the same as the distance between the upper and lower walls of the container.<br />
Other parameters for this experiment: density of water = 1.0 g/cm 3<br />
density of ice = 0.917 g/cm 3<br />
density of continental crust = 2.8 g/cm 3<br />
density of asthenosphere = 3.17 g/cm 3<br />
Top of box<br />
Water surface<br />
H 2 O<br />
• Add a wooden block to the apparatus. Note that as you hold the block just at the surface of<br />
the water (before letting go) the top of the block is even with the top of the apparatus. When<br />
you release the block and allow it to float in the water the top is no longer level with the top<br />
of the container.<br />
(9) Why is this<br />
(10) What fraction of the block lies below the water<br />
(11) How many blocks can you add before the top of the stack reaches the top of the apparatus<br />
(12) Measure the size of the wooden block and calculate its density using the Law of Isostasy.<br />
ISOSTASY ON A LARGER SCALE<br />
When continents collide the crust is shortened and thickened. For example, the average<br />
thickness of continental crust is 35 km, but beneath the Himalaya and Andes mountains the<br />
thickness is 70 km. This extra-thick crust is what creates mountains. Once high mountains form<br />
5
they immediately begin to erode. Thus erosion works to reduce the height of mountains while<br />
collision acts to increase this height.<br />
Examine the wooden blocks floating in the aquarium. Think of these blocks now as representing<br />
not ice bergs, but rather, the thick crust of mountain ranges.<br />
• "Erode" your mountains by removing one the blocks. What happens to the others<br />
(13) Use the measurements that you made in Experiment #1 to derive a formula that relates the<br />
submerged thickness of a wooden block (H s ) to the total thickness of the block (H), the density<br />
of water (ρ H2O) and the density of wood (ρ wood ). Hint: this will take the form of a<br />
proportionality.<br />
(13) Now consider the Himalayan mountains, with a crustal thickness of 70 km. Using the<br />
densities for crust and asthenosphere given above and your formula from (5), calculate (a) how<br />
much of the Himalayan crust "sticks up" as mountains and, (b) how much is hidden beneath our<br />
feet. For simplicity, consider the level of the water to be the reference level for these<br />
“mountains” as well.<br />
(15) Now erode the Himalayas. Use your answer from (6a) and erode the entire height of the<br />
Himalayas. What happened to the newly eroded surface Is the elevation of this newly eroded<br />
surface at sea level, or some other height (give the elevation)<br />
If you are interested, you can try more isostasy experiments at home at the Discover Our Earth<br />
web site. Check out http://www.geo.cornell.edu/hawaii/220/PRI/isostasy.html.<br />
6