Dare to Be Different: The Shield Punt - Fast and Furious Football
Dare to Be Different: The Shield Punt - Fast and Furious Football
Dare to Be Different: The Shield Punt - Fast and Furious Football

You also want an ePaper? Increase the reach of your titles
YUMPU automatically turns print PDFs into web optimized ePapers that Google loves.
<strong>Dare</strong> <strong>to</strong> <strong>Be</strong> <strong>Different</strong>:<br />
<strong>The</strong> <strong>Shield</strong> <strong>Punt</strong><br />
Mike Gibson<br />
Special Teams/Tight Ends<br />
Coach<br />
Rutgers University<br />
Piscataway, N.J.<br />
On behalf of the Head Coach Terry<br />
Shea <strong>and</strong> the entire Rutgers<br />
University football staff, it is my pleasure <strong>to</strong><br />
present an article for the AFCA Summer<br />
Manual.<br />
At Rutgers, we believe very strongly that<br />
the kicking game can win at least two football<br />
games a season <strong>and</strong> provide a very<br />
solid chance for success in every game.<br />
<strong>The</strong> kicking game is something that<br />
takes commitment. Just wanting good<br />
things <strong>to</strong> happen in special team play will<br />
not get it done! You must truly give your<br />
kicking units a chance for success <strong>and</strong> this<br />
will only happen if you allot the proper<br />
meeting <strong>and</strong> practice time for each individual<br />
kicking phase.<br />
Philosophy<br />
An effective kicking unit is built with personnel,<br />
morale, organization, fundamentals,<br />
<strong>to</strong>ughness, <strong>and</strong> preparation. <strong>The</strong> players<br />
selected <strong>to</strong> play special teams at Rutgers<br />
are chosen on the following criteria:<br />
Care About Winning: We will <strong>and</strong> you<br />
should always have a superior effort when<br />
everyone’s primary goal is winning.<br />
Know Your Assignment: All kicking<br />
plays involve specific assignments. You<br />
cannot help your team, no matter what your<br />
a b i l i t y, if you do not underst<strong>and</strong> your<br />
assignment.<br />
Love for Contact: You must be a great<br />
contact player. Toughness is an essential<br />
characteristic <strong>to</strong> be a special teams player.<br />
Speed: Speed is essential. <strong>The</strong> ability<br />
<strong>to</strong> run in order <strong>to</strong> make blocks or tackles is<br />
what it’s all about.<br />
Hustle: Simply play a little harder than<br />
you think you can on every special team<br />
play.<br />
<strong>Shield</strong> <strong>Punt</strong><br />
A vast majority of all football teams<br />
<strong>to</strong>day use some form of the spread punt<br />
formation with two wide gunners or cover<br />
men. <strong>Be</strong>low is something different <strong>to</strong> think<br />
about, the shield punt.<br />
Philosophy<br />
<strong>The</strong> shield punt is a formation that<br />
gives you the ability <strong>to</strong> get as many as<br />
seven immediate cover players, plus it<br />
gives your opponents something very different<br />
<strong>to</strong> prepare for in only one week of<br />
t i m e .<br />
1. Do you rush the punt How<br />
2. Do you work a return How do you<br />
hold up<br />
• AFCA Summer Manual — 1999 •<br />
Personnel<br />
<strong>The</strong> front line players are the fastest six<br />
players on your football team who you have<br />
faith in as open-field tacklers. You get a<br />
bonus player if you can find a defensive<br />
back, runningback, or wide receiver who<br />
can also deep snap — as your center has<br />
no blocking responsibility.<br />
<strong>The</strong> shield personnel are made up with big<br />
bodies. At Rutgers, we use linemen who can<br />
run. After their blocking responsibility, they<br />
serve as our support players in coverage.<br />
Mechanics<br />
A. Always huddle on the sideline for any<br />
special instructions <strong>and</strong> for the call.<br />
B. We do not huddle on the field. Hustle<br />
on<strong>to</strong> the field <strong>and</strong> get lined up.<br />
C . Take proper split, stance, <strong>and</strong> alignment.<br />
D. See the ball out of the corner of your<br />
eye <strong>and</strong> move on the snap.<br />
Procedure at the Line of Scrimmage<br />
<strong>Shield</strong> one is your quarterback (he will<br />
make all your calls). Your terminology can<br />
be anything you are comfortable with, but<br />
the following must be communicated.<br />
A. Check <strong>to</strong> see that you have 11 men<br />
on the field <strong>and</strong> also check the front <strong>and</strong><br />
make sure your team is ready for play.<br />
B. Protection call.<br />
C. Set your team one final time. <strong>The</strong>re<br />
can be no movement after this final call, the<br />
center will pause at least one second after<br />
this comm<strong>and</strong> <strong>and</strong> then snap the ball.<br />
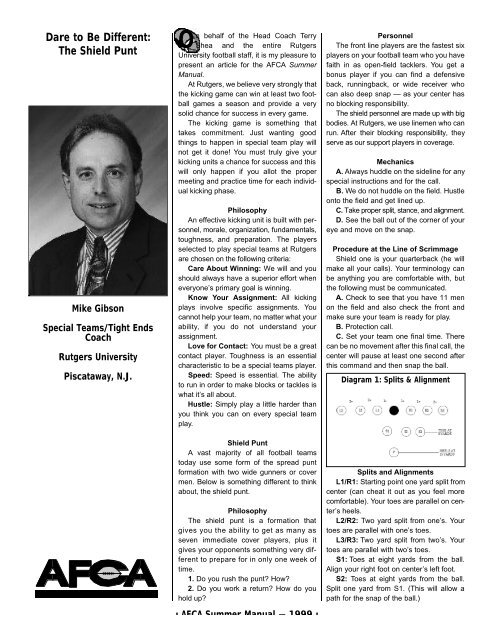
Diagram 1: Splits & Alignment<br />
Splits <strong>and</strong> Alignments<br />
L1/R1: Starting point one yard split from<br />
center (can cheat it out as you feel more<br />
comfortable). Your <strong>to</strong>es are parallel on center’s<br />
heels.<br />
L2/R2: Two yard split from one’s. Your<br />
<strong>to</strong>es are parallel with one’s <strong>to</strong>es.<br />
L3/R3: Two yard split from two’s. Your<br />
<strong>to</strong>es are parallel with two’s <strong>to</strong>es.<br />
S1: Toes at eight yards from the ball.<br />
Align your right foot on center’s left foot.<br />
S2: Toes at eight yards from the ball.<br />
Split one yard from S1. (This will allow a<br />
path for the snap of the ball.)
S3: Toes at eight yards from ball. Split<br />
six inches from S2.<br />
<strong>Punt</strong>er: Heels at 15 yards.<br />
Diagram 2: Release &<br />
Blocking Technique<br />
Release <strong>and</strong> Blocking Technique<br />
Front Line<br />
A: Your release technique is <strong>to</strong> take a<br />
lead step laterally, then cross over in<strong>to</strong> your<br />
release lane. <strong>The</strong> further the man in your<br />
lane is from you, the flatter your release<br />
must be <strong>to</strong> make sure he doesn’t penetrate<br />
the line of scrimmage without you making<br />
contact with him.<br />
B : Your blocking technique is <strong>to</strong> run<br />
through rushers. To achieve this type of<br />
blocking, it is important <strong>to</strong> keep your head<br />
up, maintain a good running base (slightly<br />
narrower than shoulder width) <strong>and</strong> keeping<br />
your h<strong>and</strong>s inside on the opponent’s<br />
numbers. It is important <strong>to</strong> run through<br />
rushers, not <strong>to</strong> brush them with your<br />
h<strong>and</strong>s or the edge of your shoulder. Keep<br />
your feet moving throughout the collision,<br />
which will s<strong>to</strong>p the rushers’ initial charge,<br />
<strong>and</strong> then release.<br />
C: If no one penetrates your release<br />
lane, avoid defenders trying <strong>to</strong> slow your<br />
coverage. If you are L1/R1, you must take<br />
your first step in<strong>to</strong> your release lane, <strong>and</strong> if<br />
you are being driven outside, you can<br />
come under the defender <strong>to</strong> get in<strong>to</strong> the<br />
alley.<br />
Diagram 3: L1/R1 Release Lanes<br />
Release Lanes<br />
L1/R1: Your release lane is from your<br />
outside shoulder <strong>to</strong> head-up on L2/R2<br />
L2/R2: Your release lane is from your<br />
outside shoulder <strong>to</strong> head-up on L3/R3<br />
L3/R3: Your release lane is from headup<br />
<strong>to</strong> anyone outside.<br />
Diagram 4: L2/R2 Release Lanes<br />
Diagram 5: L3/R3 Release Lanes<br />
Diagram 6: Release <strong>and</strong><br />
Blocking Technique<br />
<strong>Shield</strong><br />
As the ball is snapped, the shield must<br />
step up <strong>and</strong> in <strong>to</strong> close the distance<br />
between S1 <strong>and</strong> S2. After stepping a half<br />
yard up <strong>and</strong> in, the shield will then set<br />
themselves in a solid football position, with<br />
knees bent, butt down, head up <strong>and</strong> arms<br />
out. <strong>Be</strong>cause this is a zone protection<br />
scheme, the shield personnel may have <strong>to</strong><br />
block more than one rusher in their area. It<br />
is important that the shield think “Big,”<br />
punch with h<strong>and</strong>s inside, <strong>and</strong> above all, do<br />
not drop your helmets at collision!<br />
Diagram 7<br />
• AFCA Summer Manual — 1999 •<br />
Center<br />
A.<strong>The</strong> No. 1 responsibility is <strong>to</strong> make a<br />
crisp, accurate snap. It is better low <strong>and</strong><br />
around the right thigh of a right footed<br />
punter. <strong>The</strong> snap should reach the punter’s<br />
h<strong>and</strong> in .8 seconds. Notice the shield personnel<br />
will align in a position <strong>to</strong> give you a<br />
proper snapping lane <strong>to</strong> the punter. Use<br />
this lane as your guide.<br />
B. After “set” call by S1, you may snap<br />
the ball anytime. Always sprint <strong>to</strong> a head-up<br />
position on the ball. You are a ball man.<br />
<strong>Punt</strong>er<br />
A. <strong>The</strong> alignment should be with your<br />
heels at 15 yards from the ball.<br />
B. Give the snapper a high hip target<br />
with both h<strong>and</strong>s.<br />
C. <strong>Punt</strong> with a quick, smooth rhythm.<br />
D. After punt, give a directional call (Left,<br />
Middle, Right, Short)<br />
E. After punt, release <strong>and</strong> cover, you are<br />
the safety. Pin the ballcarrier <strong>to</strong> the sideline<br />
<strong>and</strong> try <strong>and</strong> slow the returner until help<br />
arrives. Buy time.<br />
Coverage<br />
<strong>The</strong> beauty of this punt formation is that<br />
you can get up <strong>to</strong> seven immediate cover<br />
people. This formation allows you three ball<br />
men, two alley players <strong>and</strong> two contain<br />
players.<br />
Diagram 8<br />
Coaching Point: If three’s are having<br />
difficulty releasing off the of line of scrimmage<br />
— make switch call which exchanges<br />
responsibilities between three’s <strong>and</strong> two’s.<br />
Coaching Breakdown<br />
<strong>The</strong> ideal situation would be <strong>to</strong> have four<br />
coaches work with this unit (You can get<br />
away with three, if that is all the manpower<br />
you can afford).<br />
<strong>The</strong> front line should have two coaches<br />
assigned <strong>to</strong> it — one <strong>to</strong> work with L1, L2<br />
<strong>and</strong> L3 <strong>and</strong> one <strong>to</strong> work with R1, R2 <strong>and</strong><br />
R3. (If you need <strong>to</strong>, one coach can work<br />
with the entire front, but this would not be<br />
the ideal situation since they are <strong>to</strong>o spread<br />
out.) One coach can h<strong>and</strong>le the <strong>Shield</strong> personnel<br />
- S1, S2 <strong>and</strong> S3, <strong>and</strong> one coach can<br />
work with the center <strong>and</strong> the punter.<br />
We do a lot of half line work. This way<br />
you can get two shields <strong>to</strong> work — <strong>and</strong> I<br />
feel the shield is what takes the most time<br />
<strong>to</strong> develop.