PLANO Instruction Manual - Advanced Machinery
PLANO Instruction Manual - Advanced Machinery
PLANO Instruction Manual - Advanced Machinery

Create successful ePaper yourself
Turn your PDF publications into a flip-book with our unique Google optimized e-Paper software.
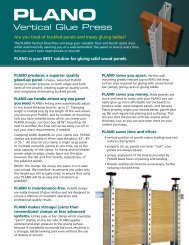
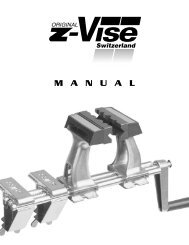
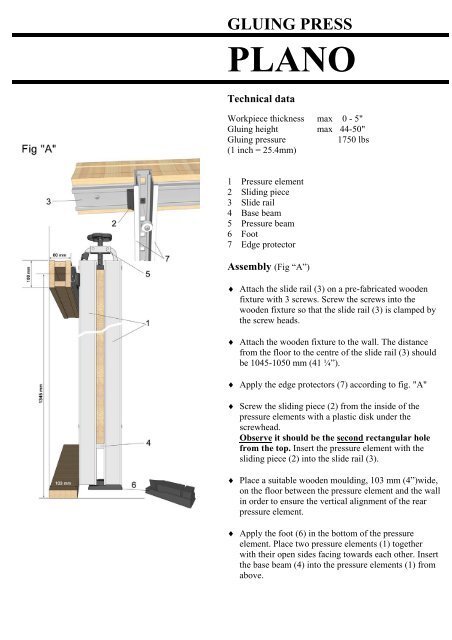
GLUING PRESS<br />
<strong>PLANO</strong><br />
Technical data<br />
Workpiece thickness max 0 - 5"<br />
Gluing height max 44-50"<br />
Gluing pressure<br />
1750 lbs<br />
(1 inch = 25.4mm)<br />
1 Pressure element<br />
2 Sliding piece<br />
3 Slide rail<br />
4 Base beam<br />
5 Pressure beam<br />
6 Foot<br />
7 Edge protector<br />
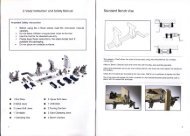
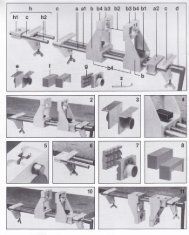
Assembly (Fig “A”)<br />
♦ Attach the slide rail (3) on a pre-fabricated wooden<br />
fixture with 3 screws. Screw the screws into the<br />
wooden fixture so that the slide rail (3) is clamped by<br />
the screw heads.<br />
♦ Attach the wooden fixture to the wall. The distance<br />
from the floor to the centre of the slide rail (3) should<br />
be 1045-1050 mm (41 ¼”).<br />
♦ Apply the edge protectors (7) according to fig. "A"<br />
♦ Screw the sliding piece (2) from the inside of the<br />
pressure elements with a plastic disk under the<br />
screwhead.<br />
Observe it should be the second rectangular hole<br />
from the top. Insert the pressure element with the<br />
sliding piece (2) into the slide rail (3).<br />
♦ Place a suitable wooden moulding, 103 mm (4”)wide,<br />
on the floor between the pressure element and the wall<br />
in order to ensure the vertical alignment of the rear<br />
pressure element.<br />
♦ Apply the foot (6) in the bottom of the pressure<br />
element. Place two pressure elements (1) together<br />
with their open sides facing towards each other. Insert<br />
the base beam (4) into the pressure elements (1) from<br />
above.
FIG. "B":<br />
♦ Insert the pressure beam (5) from above into the<br />
pressure elements. The plastic fitting is designed to<br />
serve as a support when inserting the wooden boards<br />
to be glued.<br />
Expandability<br />
FIG. "C":<br />
♦ The slide rails can be attached end-to-end, permitting<br />
the use of as many clamps as needed<br />
Working with <strong>PLANO</strong><br />
FIG. "D/E":<br />
♦ Adjust the lower base beam (4) to the desired height.<br />
♦ Raising the adjustment height = fig. D<br />
♦ Lowering the adjustment height = fig. E<br />
♦ To adjust the rectangular holes as precisely as<br />
possible, it is advisable to number the rectangular<br />
holes in the pressure elements.<br />
♦ Insert the wooden boards to be glued one by one.<br />
After all boards are inserted, engage the pressure<br />
beam into the front pressure element and tighten the<br />
hand wheel.<br />
♦ After completion of the work, push the pressure<br />
elements together for compact storage.<br />
Maintenance<br />
♦ The spindle of the hand wheel should always be<br />
lightly greased.<br />
♦ Keep the pressure elements as well as the base and<br />
pressure beams free of glue.<br />
Guarantee<br />
This glue press is covered by a 12 month's guarantee.<br />
♦ The guarantee covers only material and construction<br />
faults. Faulty parts are replaced free of charge,<br />
customers must carry out replacement work.<br />
♦ The guarantee does not cover: Transport damage,<br />
wearing parts, damage resulting from improper use or<br />
failure to observe operating instruction.<br />
♦ Guarantee claims are valid only if no repairs have<br />
been made by a third party.<br />
The warranty certificate is only valid with the invoice.<br />
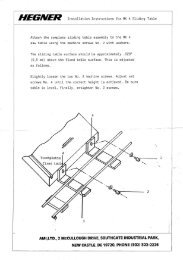
ADVANCED MACHINERY IMPORTS LTD, P.O. Box 312, New Castle, DE 19720<br />
Phone: (302) 322 2226