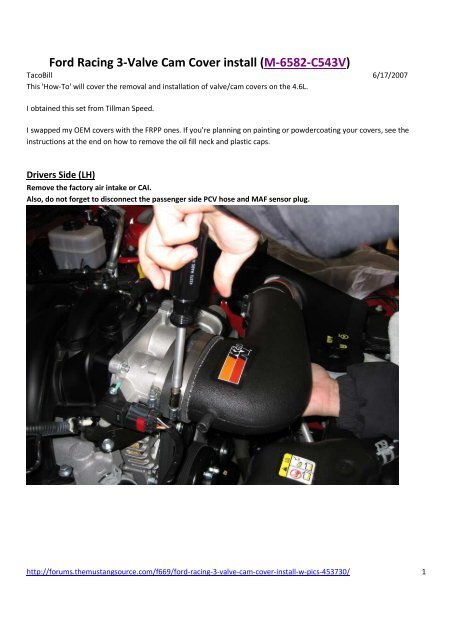
Ford Racing 3-Valve Cam Cover install (M-6582-C543V)
Ford Racing 3-Valve Cam Cover install (M-6582-C543V)
Ford Racing 3-Valve Cam Cover install (M-6582-C543V)

Create successful ePaper yourself
Turn your PDF publications into a flip-book with our unique Google optimized e-Paper software.
<strong>Ford</strong> <strong>Racing</strong> 3-<strong>Valve</strong> <strong>Cam</strong> <strong>Cover</strong> <strong>install</strong> (M-<strong>6582</strong>-<strong>C543V</strong>)<br />
TacoBill 6/17/2007<br />
This 'How-To' will cover the removal and <strong>install</strong>ation of valve/cam covers on the 4.6L.<br />
I obtained this set from Tillman Speed.<br />
I swapped my OEM covers with the FRPP ones. If you're planning on painting or powdercoating your covers, see the<br />
instructions at the end on how to remove the oil fill neck and plastic caps.<br />
Drivers Side (LH)<br />
Remove the factory air intake or CAI.<br />
Also, do not forget to disconnect the passenger side PCV hose and MAF sensor plug.<br />
http://forums.themustangsource.com/f669/ford-racing-3-valve-cam-cover-<strong>install</strong>-w-pics-453730/ 1
<strong>Ford</strong> <strong>Racing</strong> 3-<strong>Valve</strong> <strong>Cam</strong> <strong>Cover</strong> <strong>install</strong> (M-<strong>6582</strong>-<strong>C543V</strong>)<br />
TacoBill 6/17/2007<br />
Slide the green release lever on the end clip of the PCV hose to the side and pull to disconnect (both ends, then set<br />
hose aside).<br />
http://forums.themustangsource.com/f669/ford-racing-3-valve-cam-cover-<strong>install</strong>-w-pics-453730/ 2
<strong>Ford</strong> <strong>Racing</strong> 3-<strong>Valve</strong> <strong>Cam</strong> <strong>Cover</strong> <strong>install</strong> (M-<strong>6582</strong>-<strong>C543V</strong>)<br />
TacoBill 6/17/2007<br />
http://forums.themustangsource.com/f669/ford-racing-3-valve-cam-cover-<strong>install</strong>-w-pics-453730/ 3
<strong>Ford</strong> <strong>Racing</strong> 3-<strong>Valve</strong> <strong>Cam</strong> <strong>Cover</strong> <strong>install</strong> (M-<strong>6582</strong>-<strong>C543V</strong>)<br />
TacoBill 6/17/2007<br />
Remove the bolt using a 7mm socket that holds down the Coil On Plug (COP) to the cover; 4 places.<br />
http://forums.themustangsource.com/f669/ford-racing-3-valve-cam-cover-<strong>install</strong>-w-pics-453730/ 4
<strong>Ford</strong> <strong>Racing</strong> 3-<strong>Valve</strong> <strong>Cam</strong> <strong>Cover</strong> <strong>install</strong> (M-<strong>6582</strong>-<strong>C543V</strong>)<br />
TacoBill 6/17/2007<br />
Disconnect the plug from the Variable <strong>Cam</strong>shaft Timing Oil Control Solenoid.<br />
http://forums.themustangsource.com/f669/ford-racing-3-valve-cam-cover-<strong>install</strong>-w-pics-453730/ 5
<strong>Ford</strong> <strong>Racing</strong> 3-<strong>Valve</strong> <strong>Cam</strong> <strong>Cover</strong> <strong>install</strong> (M-<strong>6582</strong>-<strong>C543V</strong>)<br />
TacoBill 6/17/2007<br />
Pull the wire conduit support off from the cover studs.<br />
http://forums.themustangsource.com/f669/ford-racing-3-valve-cam-cover-<strong>install</strong>-w-pics-453730/ 6
<strong>Ford</strong> <strong>Racing</strong> 3-<strong>Valve</strong> <strong>Cam</strong> <strong>Cover</strong> <strong>install</strong> (M-<strong>6582</strong>-<strong>C543V</strong>)<br />
TacoBill 6/17/2007<br />
Pull the wire support clip up off from the cover; 2 places, top and bottom.<br />
http://forums.themustangsource.com/f669/ford-racing-3-valve-cam-cover-<strong>install</strong>-w-pics-453730/ 7
<strong>Ford</strong> <strong>Racing</strong> 3-<strong>Valve</strong> <strong>Cam</strong> <strong>Cover</strong> <strong>install</strong> (M-<strong>6582</strong>-<strong>C543V</strong>)<br />
TacoBill 6/17/2007<br />
http://forums.themustangsource.com/f669/ford-racing-3-valve-cam-cover-<strong>install</strong>-w-pics-453730/ 8
<strong>Ford</strong> <strong>Racing</strong> 3-<strong>Valve</strong> <strong>Cam</strong> <strong>Cover</strong> <strong>install</strong> (M-<strong>6582</strong>-<strong>C543V</strong>)<br />
TacoBill 6/17/2007<br />
I placed a rag on top of the exhaust manifold to avoid spilling any oil directly on them when removing the cover.<br />
http://forums.themustangsource.com/f669/ford-racing-3-valve-cam-cover-<strong>install</strong>-w-pics-453730/ 9
<strong>Ford</strong> <strong>Racing</strong> 3-<strong>Valve</strong> <strong>Cam</strong> <strong>Cover</strong> <strong>install</strong> (M-<strong>6582</strong>-<strong>C543V</strong>)<br />
TacoBill 6/17/2007<br />
Completely unscrew the 15 bolts from the cover using a 8mm socket.<br />
Note: You do not need to pull the bolts completely off from the cover. There are rubber bushings on the bolt that will<br />
hold them in place.<br />
Note: Use of a Universal Joint socket may aid in accessing some of the lower bolts.<br />
http://forums.themustangsource.com/f669/ford-racing-3-valve-cam-cover-<strong>install</strong>-w-pics-453730/ 10
<strong>Ford</strong> <strong>Racing</strong> 3-<strong>Valve</strong> <strong>Cam</strong> <strong>Cover</strong> <strong>install</strong> (M-<strong>6582</strong>-<strong>C543V</strong>)<br />
TacoBill 6/17/2007<br />
http://forums.themustangsource.com/f669/ford-racing-3-valve-cam-cover-<strong>install</strong>-w-pics-453730/ 11
<strong>Ford</strong> <strong>Racing</strong> 3-<strong>Valve</strong> <strong>Cam</strong> <strong>Cover</strong> <strong>install</strong> (M-<strong>6582</strong>-<strong>C543V</strong>)<br />
TacoBill 6/17/2007<br />
Once you're sure all the bolts are loose, carefully pull up on the cover, and with caution, guide it out from the car.<br />
Note: Be careful of the VCTOC Solenoid (in the center of the black plug). The cover must be pulled straight up until it<br />
clears the end of the solenoid.<br />
Note: You will notice that the black rubber gasket will pull away from the cover. This is because it'll be stuck to the<br />
RTV sealant at the front of the head.<br />
Once the cover is free, carefully pull the gasket off from the sealant. (Care must be taken especially if youâ€re<br />
planning on reusing it; the FRPP kit will include new gaskets as well as new bolts)<br />
Note: You can rotate the COP's (or unplug and remove them completely like what I did on the RH side) so they don't<br />
interfere with the cover as it's being removed.<br />
http://forums.themustangsource.com/f669/ford-racing-3-valve-cam-cover-<strong>install</strong>-w-pics-453730/ 12
<strong>Ford</strong> <strong>Racing</strong> 3-<strong>Valve</strong> <strong>Cam</strong> <strong>Cover</strong> <strong>install</strong> (M-<strong>6582</strong>-<strong>C543V</strong>)<br />
TacoBill 6/17/2007<br />
http://forums.themustangsource.com/f669/ford-racing-3-valve-cam-cover-<strong>install</strong>-w-pics-453730/ 13
<strong>Ford</strong> <strong>Racing</strong> 3-<strong>Valve</strong> <strong>Cam</strong> <strong>Cover</strong> <strong>install</strong> (M-<strong>6582</strong>-<strong>C543V</strong>)<br />
TacoBill 6/17/2007<br />
http://forums.themustangsource.com/f669/ford-racing-3-valve-cam-cover-<strong>install</strong>-w-pics-453730/ 14
<strong>Ford</strong> <strong>Racing</strong> 3-<strong>Valve</strong> <strong>Cam</strong> <strong>Cover</strong> <strong>install</strong> (M-<strong>6582</strong>-<strong>C543V</strong>)<br />
TacoBill 6/17/2007<br />
http://forums.themustangsource.com/f669/ford-racing-3-valve-cam-cover-<strong>install</strong>-w-pics-453730/ 15
<strong>Ford</strong> <strong>Racing</strong> 3-<strong>Valve</strong> <strong>Cam</strong> <strong>Cover</strong> <strong>install</strong> (M-<strong>6582</strong>-<strong>C543V</strong>)<br />
TacoBill 6/17/2007<br />
With a non-metallic scraper, carefully scrape the factory applied sealant off from where the head meets the forward<br />
engine cover (2 places, top and bottom).<br />
Note: As you see from the pictures below, I only scraped off the upper and lower sealant globs and not the center<br />
rectangular rubber plug. I can't confirm if this was the correct thing to do, but to me, it looked like it was supposed to<br />
be there.<br />
Note: Use caution in not letting the sealant pieces to fall into the head. I used a rag to catch the debris as I scraped it.<br />
http://forums.themustangsource.com/f669/ford-racing-3-valve-cam-cover-<strong>install</strong>-w-pics-453730/ 16
<strong>Ford</strong> <strong>Racing</strong> 3-<strong>Valve</strong> <strong>Cam</strong> <strong>Cover</strong> <strong>install</strong> (M-<strong>6582</strong>-<strong>C543V</strong>)<br />
TacoBill 6/17/2007<br />
http://forums.themustangsource.com/f669/ford-racing-3-valve-cam-cover-<strong>install</strong>-w-pics-453730/ 17
<strong>Ford</strong> <strong>Racing</strong> 3-<strong>Valve</strong> <strong>Cam</strong> <strong>Cover</strong> <strong>install</strong> (M-<strong>6582</strong>-<strong>C543V</strong>)<br />
TacoBill 6/17/2007<br />
Using an appropriate solvent (I used brake cleaner), wipe the mating surface of the head.<br />
http://forums.themustangsource.com/f669/ford-racing-3-valve-cam-cover-<strong>install</strong>-w-pics-453730/ 18
<strong>Ford</strong> <strong>Racing</strong> 3-<strong>Valve</strong> <strong>Cam</strong> <strong>Cover</strong> <strong>install</strong> (M-<strong>6582</strong>-<strong>C543V</strong>)<br />
TacoBill 6/17/2007<br />
In anticipation of the new cover, I decided to give myself some additional room by loosening the oil dipstick tube. In<br />
hindsight, I should have loosened this bolt before removing the stock cover as it would've provided additional<br />
clearance.<br />
Note: There's no need to remove the bolt completely, just far enough so the tube can be pushed to the side.<br />
http://forums.themustangsource.com/f669/ford-racing-3-valve-cam-cover-<strong>install</strong>-w-pics-453730/ 19
<strong>Ford</strong> <strong>Racing</strong> 3-<strong>Valve</strong> <strong>Cam</strong> <strong>Cover</strong> <strong>install</strong> (M-<strong>6582</strong>-<strong>C543V</strong>)<br />
TacoBill 6/17/2007<br />
http://forums.themustangsource.com/f669/ford-racing-3-valve-cam-cover-<strong>install</strong>-w-pics-453730/ 20
<strong>Ford</strong> <strong>Racing</strong> 3-<strong>Valve</strong> <strong>Cam</strong> <strong>Cover</strong> <strong>install</strong> (M-<strong>6582</strong>-<strong>C543V</strong>)<br />
TacoBill 6/17/2007<br />
Side by side comparison shot.<br />
http://forums.themustangsource.com/f669/ford-racing-3-valve-cam-cover-<strong>install</strong>-w-pics-453730/ 21
<strong>Ford</strong> <strong>Racing</strong> 3-<strong>Valve</strong> <strong>Cam</strong> <strong>Cover</strong> <strong>install</strong> (M-<strong>6582</strong>-<strong>C543V</strong>)<br />
TacoBill 6/17/2007<br />
http://forums.themustangsource.com/f669/ford-racing-3-valve-cam-cover-<strong>install</strong>-w-pics-453730/ 22
<strong>Ford</strong> <strong>Racing</strong> 3-<strong>Valve</strong> <strong>Cam</strong> <strong>Cover</strong> <strong>install</strong> (M-<strong>6582</strong>-<strong>C543V</strong>)<br />
TacoBill 6/17/2007<br />
Each cover gasket is marked 'L' or 'R' on one of the indexing tabs. Without it, it can get a little confusing.<br />
http://forums.themustangsource.com/f669/ford-racing-3-valve-cam-cover-<strong>install</strong>-w-pics-453730/ 23
<strong>Ford</strong> <strong>Racing</strong> 3-<strong>Valve</strong> <strong>Cam</strong> <strong>Cover</strong> <strong>install</strong> (M-<strong>6582</strong>-<strong>C543V</strong>)<br />
TacoBill 6/17/2007<br />
Clean off the gasket (whether new or reusing the old one) before <strong>install</strong>ing it within the cover groove (I used isopropyl<br />
alcohol).<br />
Also clean the inside of the groove of the cover where the gasket will seat into.<br />
Carefully press in the gasket until it's completely seated all the way around.<br />
http://forums.themustangsource.com/f669/ford-racing-3-valve-cam-cover-<strong>install</strong>-w-pics-453730/ 24
<strong>Ford</strong> <strong>Racing</strong> 3-<strong>Valve</strong> <strong>Cam</strong> <strong>Cover</strong> <strong>install</strong> (M-<strong>6582</strong>-<strong>C543V</strong>)<br />
TacoBill 6/17/2007<br />
Apply a bead of RTV sealant at the same location directly on the seam where the head meets the front engine cover,<br />
top and bottom of that rectangular plug, 2 places.<br />
Note: Per the sealant directions, the part must be <strong>install</strong>ed within 4 minutes of application. Otherwise, it must be<br />
removed and re-applied.<br />
http://forums.themustangsource.com/f669/ford-racing-3-valve-cam-cover-<strong>install</strong>-w-pics-453730/ 25
<strong>Ford</strong> <strong>Racing</strong> 3-<strong>Valve</strong> <strong>Cam</strong> <strong>Cover</strong> <strong>install</strong> (M-<strong>6582</strong>-<strong>C543V</strong>)<br />
TacoBill 6/17/2007<br />
http://forums.themustangsource.com/f669/ford-racing-3-valve-cam-cover-<strong>install</strong>-w-pics-453730/ 26
<strong>Ford</strong> <strong>Racing</strong> 3-<strong>Valve</strong> <strong>Cam</strong> <strong>Cover</strong> <strong>install</strong> (M-<strong>6582</strong>-<strong>C543V</strong>)<br />
TacoBill 6/17/2007<br />
http://forums.themustangsource.com/f669/ford-racing-3-valve-cam-cover-<strong>install</strong>-w-pics-453730/ 27
<strong>Ford</strong> <strong>Racing</strong> 3-<strong>Valve</strong> <strong>Cam</strong> <strong>Cover</strong> <strong>install</strong> (M-<strong>6582</strong>-<strong>C543V</strong>)<br />
TacoBill 6/17/2007<br />
Getting ready to <strong>install</strong> the new cover!<br />
http://forums.themustangsource.com/f669/ford-racing-3-valve-cam-cover-<strong>install</strong>-w-pics-453730/ 28
<strong>Ford</strong> <strong>Racing</strong> 3-<strong>Valve</strong> <strong>Cam</strong> <strong>Cover</strong> <strong>install</strong> (M-<strong>6582</strong>-<strong>C543V</strong>)<br />
TacoBill 6/17/2007<br />
Carefully guide the cover onto the head. Make sure the cover bolts are lined up before you press the cover down,<br />
especially over the freshly applied sealant.<br />
Once down, start each bolt making sure you're not cross threading any of the bolts. Only lightly snug down all the<br />
bolts.<br />
http://forums.themustangsource.com/f669/ford-racing-3-valve-cam-cover-<strong>install</strong>-w-pics-453730/ 29
<strong>Ford</strong> <strong>Racing</strong> 3-<strong>Valve</strong> <strong>Cam</strong> <strong>Cover</strong> <strong>install</strong> (M-<strong>6582</strong>-<strong>C543V</strong>)<br />
TacoBill 6/17/2007<br />
http://forums.themustangsource.com/f669/ford-racing-3-valve-cam-cover-<strong>install</strong>-w-pics-453730/ 30
<strong>Ford</strong> <strong>Racing</strong> 3-<strong>Valve</strong> <strong>Cam</strong> <strong>Cover</strong> <strong>install</strong> (M-<strong>6582</strong>-<strong>C543V</strong>)<br />
TacoBill 6/17/2007<br />
Using a torque wrench, torque each bolt in the sequence below to 89 lbs-in (That's inch pounds!)<br />
http://forums.themustangsource.com/f669/ford-racing-3-valve-cam-cover-<strong>install</strong>-w-pics-453730/ 31
<strong>Ford</strong> <strong>Racing</strong> 3-<strong>Valve</strong> <strong>Cam</strong> <strong>Cover</strong> <strong>install</strong> (M-<strong>6582</strong>-<strong>C543V</strong>)<br />
TacoBill 6/17/2007<br />
Tighten the oil dipstick tube bolt, COP bolts, and re-connect everything that you removed or unplugged.<br />
Driver's side complete!<br />
http://forums.themustangsource.com/f669/ford-racing-3-valve-cam-cover-<strong>install</strong>-w-pics-453730/ 32
<strong>Ford</strong> <strong>Racing</strong> 3-<strong>Valve</strong> <strong>Cam</strong> <strong>Cover</strong> <strong>install</strong> (M-<strong>6582</strong>-<strong>C543V</strong>)<br />
TacoBill 6/17/2007<br />
Passenger Side (RH)<br />
Procedure is basically the same except what's noted below.<br />
Remove the battery and tray.<br />
http://forums.themustangsource.com/f669/ford-racing-3-valve-cam-cover-<strong>install</strong>-w-pics-453730/ 33
<strong>Ford</strong> <strong>Racing</strong> 3-<strong>Valve</strong> <strong>Cam</strong> <strong>Cover</strong> <strong>install</strong> (M-<strong>6582</strong>-<strong>C543V</strong>)<br />
TacoBill 6/17/2007<br />
Going through a learning curve from the LH side, I decided to unplug the injector electrical plugs and remove the<br />
COP's completely. Doing so provided more than enough clearance to remove and <strong>install</strong> the cover.<br />
http://forums.themustangsource.com/f669/ford-racing-3-valve-cam-cover-<strong>install</strong>-w-pics-453730/ 34
<strong>Ford</strong> <strong>Racing</strong> 3-<strong>Valve</strong> <strong>Cam</strong> <strong>Cover</strong> <strong>install</strong> (M-<strong>6582</strong>-<strong>C543V</strong>)<br />
TacoBill 6/17/2007<br />
I seriously doubt it makes any difference, but I decided to keep each COP assigned to its respective spark plug.<br />
http://forums.themustangsource.com/f669/ford-racing-3-valve-cam-cover-<strong>install</strong>-w-pics-453730/ 35
<strong>Ford</strong> <strong>Racing</strong> 3-<strong>Valve</strong> <strong>Cam</strong> <strong>Cover</strong> <strong>install</strong> (M-<strong>6582</strong>-<strong>C543V</strong>)<br />
TacoBill 6/17/2007<br />
I disconnected this plug off from the main harness (near the front) so I can pull it further outboard when it's time to<br />
re-<strong>install</strong> the cover.<br />
http://forums.themustangsource.com/f669/ford-racing-3-valve-cam-cover-<strong>install</strong>-w-pics-453730/ 36
<strong>Ford</strong> <strong>Racing</strong> 3-<strong>Valve</strong> <strong>Cam</strong> <strong>Cover</strong> <strong>install</strong> (M-<strong>6582</strong>-<strong>C543V</strong>)<br />
TacoBill 6/17/2007<br />
Once again, sealant was applied on the seam between the head and front engine cover. Same as the LH side.<br />
http://forums.themustangsource.com/f669/ford-racing-3-valve-cam-cover-<strong>install</strong>-w-pics-453730/ 37
<strong>Ford</strong> <strong>Racing</strong> 3-<strong>Valve</strong> <strong>Cam</strong> <strong>Cover</strong> <strong>install</strong> (M-<strong>6582</strong>-<strong>C543V</strong>)<br />
TacoBill 6/17/2007<br />
As you can see, with the harness pulled away, there was plenty of room to guide the cover into position.<br />
http://forums.themustangsource.com/f669/ford-racing-3-valve-cam-cover-<strong>install</strong>-w-pics-453730/ 38
<strong>Ford</strong> <strong>Racing</strong> 3-<strong>Valve</strong> <strong>Cam</strong> <strong>Cover</strong> <strong>install</strong> (M-<strong>6582</strong>-<strong>C543V</strong>)<br />
TacoBill 6/17/2007<br />
Using a torque wrench, torque each bolt in the sequence below to 89 lbs-in.<br />
Note: Only 14 bolts are in the RH cover as opposed to 15 on the LH.<br />
(Putting Chris to work)<br />
http://forums.themustangsource.com/f669/ford-racing-3-valve-cam-cover-<strong>install</strong>-w-pics-453730/ 39
<strong>Ford</strong> <strong>Racing</strong> 3-<strong>Valve</strong> <strong>Cam</strong> <strong>Cover</strong> <strong>install</strong> (M-<strong>6582</strong>-<strong>C543V</strong>)<br />
TacoBill 6/17/2007<br />
Like the LH side, re-<strong>install</strong> the COP's, battery, and re-connect everything that you removed or unplugged (this includes<br />
the injector, COP, and VCTOC Solenoid plugs).<br />
Installation complete!<br />
http://forums.themustangsource.com/f669/ford-racing-3-valve-cam-cover-<strong>install</strong>-w-pics-453730/ 40
<strong>Ford</strong> <strong>Racing</strong> 3-<strong>Valve</strong> <strong>Cam</strong> <strong>Cover</strong> <strong>install</strong> (M-<strong>6582</strong>-<strong>C543V</strong>)<br />
TacoBill 6/17/2007<br />
Note: I opted not to re-<strong>install</strong> the oil fill neck onto my FRPP cover. To me, the MGW oil cap looked much cleaner when<br />
<strong>install</strong>ed directly onto the cover (same cam lock design).<br />
http://forums.themustangsource.com/f669/ford-racing-3-valve-cam-cover-<strong>install</strong>-w-pics-453730/ 41
<strong>Ford</strong> <strong>Racing</strong> 3-<strong>Valve</strong> <strong>Cam</strong> <strong>Cover</strong> <strong>install</strong> (M-<strong>6582</strong>-<strong>C543V</strong>)<br />
TacoBill 6/17/2007<br />
http://forums.themustangsource.com/f669/ford-racing-3-valve-cam-cover-<strong>install</strong>-w-pics-453730/ 42
<strong>Ford</strong> <strong>Racing</strong> 3-<strong>Valve</strong> <strong>Cam</strong> <strong>Cover</strong> <strong>install</strong> (M-<strong>6582</strong>-<strong>C543V</strong>)<br />
TacoBill 6/17/2007<br />
http://forums.themustangsource.com/f669/ford-racing-3-valve-cam-cover-<strong>install</strong>-w-pics-453730/ 43
<strong>Ford</strong> <strong>Racing</strong> 3-<strong>Valve</strong> <strong>Cam</strong> <strong>Cover</strong> <strong>install</strong> (M-<strong>6582</strong>-<strong>C543V</strong>)<br />
TacoBill 6/17/2007<br />
http://forums.themustangsource.com/f669/ford-racing-3-valve-cam-cover-<strong>install</strong>-w-pics-453730/ 44
<strong>Ford</strong> <strong>Racing</strong> 3-<strong>Valve</strong> <strong>Cam</strong> <strong>Cover</strong> <strong>install</strong> (M-<strong>6582</strong>-<strong>C543V</strong>)<br />
TacoBill 6/17/2007<br />
Special Section<br />
To those planning on either painting or having your covers powdercoated, you'll need to remove the oil fill neck and<br />
the black rubber/plastic plug for the cam sensor.<br />
To remove the fill neck, carefully pry up on the plastic tab (I used a flat screwdriver) and slight rotate it until the tab<br />
clears from its locked position. Now, grasp the neck and forcefully turn in counter-clockwise to release it from the<br />
cover (cam type).<br />
http://forums.themustangsource.com/f669/ford-racing-3-valve-cam-cover-<strong>install</strong>-w-pics-453730/ 45
<strong>Ford</strong> <strong>Racing</strong> 3-<strong>Valve</strong> <strong>Cam</strong> <strong>Cover</strong> <strong>install</strong> (M-<strong>6582</strong>-<strong>C543V</strong>)<br />
TacoBill 6/17/2007<br />
http://forums.themustangsource.com/f669/ford-racing-3-valve-cam-cover-<strong>install</strong>-w-pics-453730/ 46
<strong>Ford</strong> <strong>Racing</strong> 3-<strong>Valve</strong> <strong>Cam</strong> <strong>Cover</strong> <strong>install</strong> (M-<strong>6582</strong>-<strong>C543V</strong>)<br />
TacoBill 6/17/2007<br />
To remove the cam sensor plug, it must be removed from the inside-out.<br />
I used the largest socket I had (1") along with an extension and a mallet.<br />
Here you can see both covers, one with and one without the VCTOC Solenoid plug. When re-<strong>install</strong>ing the plug, simply<br />
press it in from the top aligning the notches.<br />
Total time for my swap was around 3.5 hours, which included documentation.<br />
http://forums.themustangsource.com/f669/ford-racing-3-valve-cam-cover-<strong>install</strong>-w-pics-453730/ 47