MC5 Multifunction Calibrator Quick Guide for the Data Logging Utility
MC5 Multifunction Calibrator Quick Guide for the Data Logging Utility
MC5 Multifunction Calibrator Quick Guide for the Data Logging Utility

Create successful ePaper yourself
Turn your PDF publications into a flip-book with our unique Google optimized e-Paper software.
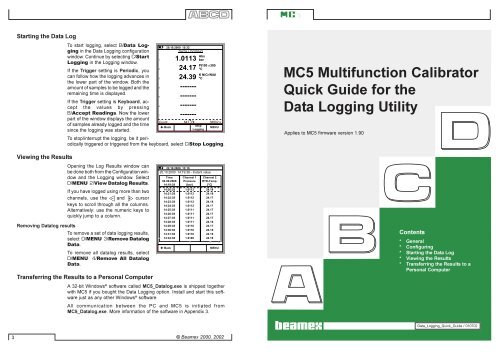
Starting <strong>the</strong> <strong>Data</strong> Log<br />
Viewing <strong>the</strong> Results<br />
To start logging, select B/<strong>Data</strong> <strong>Logging</strong><br />
in <strong>the</strong> <strong>Data</strong> <strong>Logging</strong> configuration<br />
window Continue by selecting C/Start<br />
<strong>Logging</strong> in <strong>the</strong> <strong>Logging</strong> window<br />
If <strong>the</strong> Trigger setting is Periodic, you<br />
can follow how <strong>the</strong> logging advances in<br />
<strong>the</strong> lower part of <strong>the</strong> window Both <strong>the</strong><br />
amount of samples to be logged and <strong>the</strong><br />
remaining time is displayed<br />
If <strong>the</strong> Trigger setting is Keyboard, accept<br />
<strong>the</strong> values by pressing<br />
B/Accept Readings Now <strong>the</strong> lower<br />
part of <strong>the</strong> window displays <strong>the</strong> amount<br />
of samples already logged and <strong>the</strong> time<br />
since <strong>the</strong> logging was started<br />
To stop/interrupt <strong>the</strong> logging, be it periodically<br />
triggered or triggered from <strong>the</strong> keyboard, select C/Stop <strong>Logging</strong><br />
Opening <strong>the</strong> Log Results window can<br />
be done both from <strong>the</strong> Configuration window<br />
and <strong>the</strong> <strong>Logging</strong> window Select<br />
D/MENU 2/View <strong>Data</strong>log Results<br />
If you have logged using more than two<br />
channels, use <strong>the</strong> and cursor<br />
keys to scroll through all <strong>the</strong> columns<br />
Alternatively: use <strong>the</strong> numeric keys to<br />
quickly jump to a column<br />
20.10.2000 15:32<br />
DATA LOGGING<br />
Abs<br />
bar<br />
1.0113<br />
24.17<br />
24.39<br />
-------<br />
-------<br />
-------<br />
-------<br />
Pt100 α385<br />
°C<br />
K NiCr/NiAl<br />
°C<br />
Posit. kantti<br />
kHz<br />
Posit. kantti<br />
kHz<br />
Posit. kantti<br />
kHz<br />
Posit. kantti<br />
kHz<br />
Removing <strong>Data</strong>log results<br />
To remove a set of data logging results,<br />
select D/MENU 3/Remove <strong>Data</strong>log<br />
1 2<br />
<strong>Data</strong><br />
Back<br />
MENU<br />
To remove all datalog results, select<br />
D/MENU 4/Remove All <strong>Data</strong>log<br />
<strong>Data</strong><br />
xx x xx xx xxx x xxx<br />
- xx xx x x xxx x xxxxx x<br />
Transferring <strong>the</strong> Results to a Personal Computer<br />
- xxxx xxx xx xxxx xxx xx x<br />
A 32-bit Windows ® software called <strong>MC5</strong>_<strong>Data</strong>logexe - xxx xx x xx xx is shipped xxx x xxx toge<strong>the</strong>r<br />
with <strong>MC5</strong> if you bought <strong>the</strong> <strong>Data</strong> <strong>Logging</strong> option Install and start this software<br />
just as any o<strong>the</strong>r Windows - xx xx x x xxx x xxxxx x<br />
® software<br />
- xxxx xxx xx xxxx xxx xx x<br />
All communication between <strong>the</strong> PC and <strong>MC5</strong> is initiated from<br />
<strong>MC5</strong>_<strong>Data</strong>logexe More in<strong>for</strong>mation - of xxx <strong>the</strong> xx software x xx in xx Appendix xxx x 3 xxx<br />
- xx xx x x xxx x xxxxx x<br />
- xxxx xxx xx xxxx xxx xx x<br />
1<br />
2<br />
3<br />
4<br />
5<br />
6<br />
7<br />
Count 647 38802 s<br />
Stop<br />
Back<br />
MENU<br />
<strong>Logging</strong><br />
22.10.2000 13:19<br />
20.10.2000 14:19:38 - Instant value<br />
Time Channel 1 Channel 2<br />
04.09.2000 Pressure RTD-Temp.<br />
14:19:38 [bar]<br />
[°C]<br />
14:20:38<br />
14:21:38<br />
14:22:38<br />
14:23:38<br />
14:24:38<br />
14:25:38<br />
14:26:38<br />
14:27:38<br />
14:28:38<br />
14:29:38<br />
14:30:38<br />
14:31:38<br />
14:32:38<br />
1.0113<br />
1.0113<br />
1.0112<br />
1.0112<br />
1.0112<br />
1.0111<br />
1.0111<br />
1.0111<br />
1.0111<br />
1.0110<br />
1.0110<br />
1.0110<br />
1.0109<br />
24.18<br />
24.18<br />
24.17<br />
24.18<br />
24.17<br />
24.17<br />
24.17<br />
24.17<br />
24.16<br />
24.17<br />
24.16<br />
24.16<br />
24.16<br />
About<br />
this<br />
section:<br />
-<br />
xxx<br />
<strong>MC5</strong> <strong>Multifunction</strong> <strong>Calibrator</strong><br />
<strong>Quick</strong> <strong>Guide</strong> <strong>for</strong> <strong>the</strong><br />
<strong>Data</strong> <strong>Logging</strong> <strong>Utility</strong><br />
Applies to <strong>MC5</strong> firmware version 190<br />
Contents<br />
* General<br />
* Configuring<br />
* Starting <strong>the</strong> <strong>Data</strong> Log<br />
* Viewing <strong>the</strong> Results<br />
* Transferring <strong>the</strong> Results to a<br />
Personal Computer<br />
<strong>Data</strong>_<strong>Logging</strong>_<strong>Quick</strong>_<strong>Guide</strong> / 010702<br />
3<br />
© Beamex 2000, 2002
<strong>Data</strong> <strong>Logging</strong><br />
General<br />
Configuring<br />
The <strong>Data</strong> <strong>Logging</strong> utility is a firmware option that allows you to collect data<br />
using <strong>MC5</strong> The collected data may <strong>the</strong>n be viewed, transferred to a personal<br />
computer (PC) and printed using a utility shipped toge<strong>the</strong>r with <strong>MC5</strong> if<br />
<strong>the</strong> <strong>Data</strong> <strong>Logging</strong> option is purchased<br />
The maximum amount of measuring channels can be up to seven (valid<br />
only if your <strong>MC5</strong> includes a sufficient amount of measuring modules/ports)<br />
<strong>Data</strong> <strong>Logging</strong> may be configured to collect data using different triggers and<br />
saving methods as described fur<strong>the</strong>r on<br />
To start configuring <strong>the</strong> <strong>Data</strong> <strong>Logging</strong><br />
(starting from Basic Mode), press<br />
D/Menu,<br />
C/O<strong>the</strong>rs,<br />
5/<strong>Data</strong> <strong>Logging</strong><br />
The upper part of <strong>the</strong> <strong>Data</strong> <strong>Logging</strong> configuration<br />
window is reserved <strong>for</strong> seven<br />
measurement channels and <strong>the</strong> lower<br />
part <strong>for</strong> general settings The following<br />
subchapters describe how <strong>the</strong>y are configured<br />
20.10.2000 14:57<br />
DATA LOGGING SETUP<br />
1 None<br />
2 None<br />
3 None<br />
4 None<br />
5 None<br />
6 None<br />
7 None<br />
Trigger<br />
Save Method<br />
Interval [s]<br />
Samples<br />
Time [h min s]<br />
Basic<br />
Mode<br />
<strong>Data</strong><br />
<strong>Logging</strong><br />
Periodic<br />
Instant Value<br />
2<br />
10<br />
0 0 20<br />
Edit<br />
MENU<br />
Assigning Measurement Ports to Channels<br />
Move <strong>the</strong> cursor to one of <strong>the</strong> measurement<br />
channel rows in <strong>the</strong> <strong>Data</strong> <strong>Logging</strong><br />
configuration window Press C/Edit to<br />
open <strong>the</strong> following channel settings window:<br />
Select <strong>the</strong> measurement port first The<br />
o<strong>the</strong>r settings depend on <strong>the</strong> port setting<br />
To clear a channel, select port None in<br />
<strong>the</strong> channel settings window To remove<br />
all channel settings, select D/MENU,<br />
1/Clear All Channels in <strong>the</strong> <strong>Data</strong><br />
<strong>Logging</strong> configuration window<br />
General <strong>Data</strong> <strong>Logging</strong> Settings<br />
Trigger<br />
Available options: Periodic and Keyboard<br />
When Keyboard is selected, <strong>the</strong> fields<br />
Interval, Samples and Time are not<br />
needed and thus not shown<br />
Save Method<br />
Options: Instant, Average, Minimum,<br />
Maximum, Min & Max and All values<br />
Interval<br />
Accepted values: 1 to 3600 seconds<br />
Enter <strong>the</strong> value as an integer<br />
Samples<br />
Maximum amount of samples: 13043<br />
Time<br />
Channel<br />
20.10.2000 15:01<br />
DATA LOGGING SETUP<br />
Port<br />
Pressure Type<br />
Automatically calculated based on <strong>the</strong> Interval and Samples settings Alternatively,<br />
by changing <strong>the</strong> Time settings, <strong>the</strong> Samples value is automatically<br />
changed to suit <strong>the</strong> new Time settings Maximum value: 30 days (720<br />
hours)<br />
Note<br />
In addition to <strong>the</strong> previously mentioned limits, <strong>the</strong> maximum values of<br />
Samples and Time settings also depend on <strong>the</strong> available free memory If<br />
you enter values that require more memory than is available, <strong>MC5</strong> automatically<br />
replaces <strong>the</strong> entered value with <strong>the</strong> currently allowed maximum value<br />
Unit<br />
Cancel<br />
1<br />
P3:B<br />
Abs<br />
bar<br />
Edit<br />
20.09.2000 15:02<br />
DATA LOGGING SETUP<br />
1 P3:B bar abs<br />
2 ET:RTD(mea) °C Pt100 α385<br />
3 ET:TCi(mea) °C K NiCr/niAl<br />
4 None<br />
5 None<br />
6 None<br />
7 None<br />
Trigger<br />
Save Method<br />
Interval [s]<br />
Samples<br />
Time [h min s]<br />
Basic<br />
Mode<br />
<strong>Data</strong><br />
<strong>Logging</strong><br />
OK<br />
Periodic<br />
Instant Value<br />
60<br />
720<br />
12 0 0<br />
Edit<br />
MENU<br />
1<br />
2