Ethel's - Palmer/Pletsch Publishing
Ethel's - Palmer/Pletsch Publishing
Ethel's - Palmer/Pletsch Publishing

Create successful ePaper yourself
Turn your PDF publications into a flip-book with our unique Google optimized e-Paper software.
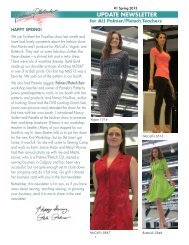
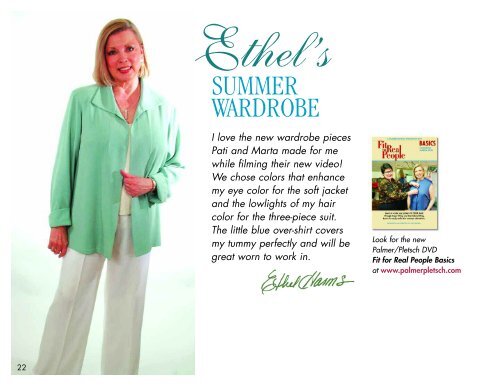
Ethel’s<br />
SUMMER<br />
WARDROBE<br />
I love the new wardrobe pieces<br />
Pati and Marta made for me<br />
while filming their new video!<br />
We chose colors that enhance<br />
my eye color for the soft jacket<br />
and the lowlights of my hair<br />
color for the three-piece suit.<br />
The little blue over-shirt covers<br />
my tummy perfectly and will be<br />
great worn to work in.<br />
Look for the new<br />
<strong>Palmer</strong>/<strong>Pletsch</strong> DVD<br />
Fit for Real People Basics<br />
at www.palmerpletsch.com<br />
22
Ethel’s<br />
SUMMER<br />
WARDROBE<br />
Ethel’s pendant<br />
is a perfect<br />
compliment.<br />
Ethel’s Tencel loose-fitting<br />
unlined jacket is sewn<br />
from McCall’s<br />
<strong>Palmer</strong>/<strong>Pletsch</strong><br />
M4842. The back has a<br />
slight flare. The cuffs roll<br />
up to your favorite length.<br />
We used PerfectFuse<br />
Medium interfacing on the<br />
facing and both upper and<br />
under collar. For more<br />
about PerfectFuse see<br />
page 34.<br />
23
Ethel’s<br />
SUMMER<br />
WARDROBE<br />
The wool crepe suit is from<br />
McCall’s M4391.<br />
The front is interfaced with<br />
PerfectFuse Light. The pants are<br />
lined with our favorite lining from<br />
Logantex, Ambience. It makes the<br />
pants feel heavenly!<br />
Ethel’s fitted shirt is McCall’s M2079 and is made from linen/cotton<br />
blend. The interfacing on the front and under collar is PerfectFuse<br />
Sheer. The essence of darts in the back adds a slimming shape—<br />
nice if you have a full tummy.<br />
24
SEWING<br />
Pati<br />
WITH<br />
<strong>Palmer</strong>/<strong>Pletsch</strong><br />
McCall’s M4785<br />
Are you wondering if I made all the things I told you about in our Fall/Winter 2005 issue.<br />
OK, I sewed MOST of what I was planning to sew. Did your parents ever tell you “your<br />
eyes are bigger than your stomach” Well, all of us fashion sewers are the same! We pull<br />
out more projects we can sew that season. But, I decided that what I am sewing is fairly<br />
classic and I will get several seasons wearing these pieces fashionably. And, I LOVE them<br />
and they FIT me— TODAY anyway.<br />
I have a few winter things I didn’t finish, but I will keep at it and have them for this fall.<br />
That’s OK! I loved EVERY MINUTE of time I spent sewing this season and wonder why I<br />
don’t treat myself to such a pleasure more often. It is the ultimate in creativity.<br />
We donate to the national Make It With Wool contest every year. I do it just to read the<br />
thank you notes, often accompanied by photos of the winning garments. From young to<br />
older, it is great to see FASHION SEWING is alive and well. Those who love it really<br />
LOVE it. Don’t you wish we could bring it back like quilting, which was nearly dead in<br />
the 1960s and look at it now. Will FASHION SEWING ever do that If so, what do YOU<br />
think it will take. I’d love your feedback!<br />
25 McCall’s M4785<br />
McCall’s M4598<br />
McCall’s M5064
SEWING<br />
Pati<br />
WITH<br />
Purple<br />
wool<br />
crepe<br />
suit<br />
<strong>Palmer</strong>/<br />
<strong>Pletsch</strong><br />
McCall’s<br />
M4785.<br />
It is difficult to find beautiful wool crepe today.<br />
If you find one that is soft, springs back when<br />
you wrinkle it up in your hand, and drapes well,<br />
grab it! I was a little disappointed in the quality<br />
of this one as I have been spoiled in the past.<br />
Your best bet is to find a store that buys excess<br />
fabric from top designers. However, the good<br />
news is “this is wool crepe” and it is my favorite<br />
fabric as it is easy to sew and just molds to fit<br />
your body.<br />
Pin-fitting to alter a too-tight jacket:<br />
We let out each seam only<br />
1/8” in this princess-seam jacket.<br />
Being a size 12 on top and size 18 on the bottom, I usually don’t<br />
wear short jackets. But this one has lots of places to fit to your<br />
contours. There are darts in the front as well as front and back sideprincess<br />
lines. I made the darts narrower to allow for my fuller tummy,<br />
but I allowed the back seams to give me a little shape. I let all seams<br />
out a bit more after trying the jacket on with the pants and blouse.<br />
The worst look is for a jacket to be too tight through your middle.<br />
I made the collar double, but with no interfacing. It was still a little<br />
stiff, so I folded it as shown and steamed to make it hold the cascading<br />
folds I wanted which are a little different than shown on<br />
the pattern.<br />
The jacket front is fused with PerfectFuse TailorUltra and the<br />
back with PerfectFuse Light. I used white so I could see my<br />
dart markings, but then needed to use a black permanent<br />
marker along the inside of the machine buttonholes<br />
to cover the white peaking out. We’re excited<br />
about our PerfectFuse interfacings. For more<br />
about them see page 35<br />
I used our easy-set-in-sleeve technique from our new<br />
tailoring book, Jackets for Real People. Instead of tie interfacing to ease the cap in,<br />
I used self fabric. It worked like a charm! For how-tos, see the next page.<br />
I rounded the neckline on the tank top to make it easier to add a bias facing.<br />
FABRIC IDEA: Make this suit from silk crepe de chine and fuse the front and back with our new Perfect<br />
Fuse TailorUltra. It makes lightweight fabrics tailorable, yet they retain their softness.<br />
The pants are from McCall’s 4842 as I wanted a flat front pant instead of a<br />
trouser. I also wanted to try the contour waistband. I fused PerfectFuse TailorUltra to<br />
the band and sewed Sta-tape in with the seam when I attached the facing. This will<br />
prevent stretch. For contour waistband how-tos, see page 28.<br />
26
Setting in the Sleeve with a Sleeve Head—<br />
THE “QUICK METHOD”—A BRIEF OVERVIEW<br />
Marta first discovered this 2-in-1 QUICK METHOD in the<br />
1970s, using a loosely woven men’s tie interfacing as a surefire<br />
way to set in a sleeve in hard-to-ease Ultrasuede. A sleeve<br />
head is used to fill out the ease area of a sleeve cap or “head.”<br />
In this method, you sew in the sleeve head BEFORE setting in<br />
the sleeve.<br />
Purchase 1/4 yd. (25cm) of Armo-Rite or take apart an old<br />
tie! You can also use linen or loosely woven wool. Cut one<br />
bias strip 10-12" (30cm) long and 1 /2" (4cm) wide for each<br />
sleeve.<br />
12”<br />
27<br />
1 1 /2”<br />
Place the strip on the wrong side of the<br />
sleeve cap at the ease point notch.<br />
Lower the needle in the 5/8" (1.5cm)<br />
stitching line. Using a 4mm stitch length,<br />
start sewing.<br />
Begin to pull on the bias strip firmly<br />
while stitching. It will get narrower as you<br />
stretch it so that it will be about 1/4” (6mm)<br />
from the edge of the cap. That is fine<br />
as you want a smaller amount in the seam<br />
allowance and a longer amount hanging<br />
down into the sleeve.<br />
As you sew, make sure the edge of the<br />
cap stays next to your 5/8” marking on the<br />
machine.<br />
The sleeve cap is<br />
automatically eased<br />
and ready to sew into<br />
the armhole.<br />
If it seems awkward<br />
the first time, simply unstitch and redo.<br />
With a bit of practice, it will be easy.<br />
Excerpted from Jackets for Real People,<br />
available at www.palmerpletsch.com<br />
A FEW<br />
MORE TIPS<br />
FOR THIS<br />
METHOD<br />
The area you will<br />
ease is the upper<br />
half of the sleeve<br />
cap.<br />
Lower needle into<br />
bias strip, which<br />
is even with edge<br />
of sleeve. Begin<br />
stitching with a<br />
4mm stitch<br />
length.<br />
Then pull<br />
firmly on<br />
bias strip. It<br />
narrows so<br />
is now<br />
about 1/4”<br />
from the<br />
edge of the<br />
cap.<br />
The sleeve<br />
cap is slightly<br />
gathered.<br />
Even if<br />
sleeve is<br />
still a bit<br />
large for<br />
the armhole,<br />
the<br />
additional<br />
fullness<br />
will ease in<br />
smoothly.<br />
Pin the sleeve<br />
cap to the armhole<br />
over the<br />
curve of your<br />
hand with the<br />
sleeve on top.<br />
This will help it<br />
ease in evenly.<br />
The bias strip<br />
helps fill in<br />
the areas<br />
that would<br />
normally want<br />
to pucker.<br />
Machine baste<br />
from the bias<br />
strip side. Use<br />
your fingers to<br />
smooth out the<br />
ease as you go.<br />
The cap is<br />
pucker-free.<br />
Always push<br />
the seam<br />
allowances<br />
toward the<br />
sleeve.<br />
SLEEVE<br />
ARMHOLE
Contour Waistlines<br />
The contour waistline has the<br />
look of the faced waistline, but it<br />
shapes the top of the pant with a<br />
separate curved band fitted to the<br />
body rather than being shaped<br />
with darts. Usually the contour waistline sits below<br />
your actual waist.<br />
Fitting a Contour Waistline<br />
A pattern’s curve may not match yours. To fit, try on<br />
the tissue.<br />
1. If you do not have a full front and back pattern<br />
piece, make one so you can fit both sides of your<br />
body.<br />
2. Pin the side seams<br />
together with seams<br />
sticking out.<br />
3. Alter the pattern to<br />
fit your shape.<br />
If your waist is larger than the pattern measurement,<br />
slash from the top to, but not through, the bottom in<br />
several places and spread. Have someone else help<br />
you. Tape over the<br />
slashes right to<br />
your body to hold<br />
the spread.<br />
After altering, take the waistband off and place it on<br />
tissue. The tape will stick. Add more tape as necessary<br />
and trim away excess tissue.<br />
28<br />
tissue<br />
If your waist is<br />
smaller than the<br />
pattern, slash from<br />
the top and lap the<br />
pattern pieces. Pin<br />
or tape.<br />
If your high<br />
hip/tummy area is<br />
larger than the<br />
pattern, slash from<br />
the bottom and<br />
spread. Tape.<br />
If your high hip/<br />
stomach area is<br />
smaller than the<br />
pattern, but the waist<br />
fits, slash from the<br />
bottom up and lap.<br />
Pin or tape.<br />
Sewing a Contour Waistband<br />
1. Cut two front and back pieces for the band<br />
and its facing.<br />
2. Fuse interfacing to wrong side of band with<br />
stable direction going around your body.<br />
Prevent stretch by taping upper<br />
and lower edges of waistband on<br />
wrong side with Stay-tape or other seam binding<br />
centered over the 5/8” seamline. Shape<br />
seam binding first by<br />
curving it under the iron<br />
as you press. Machinebaste<br />
in place 1/2” from<br />
the raw edge.<br />
3. Pin waistband sections<br />
right sides together,<br />
with pins parallel to the<br />
edge in the seamline.<br />
Wrap band around your<br />
waist to make sure you<br />
like the fit. Adjust sides<br />
seams as necessary.<br />
4. Sew the band<br />
side seams<br />
and press<br />
open.<br />
5. Sew band<br />
to pants.<br />
Press seam<br />
allowances<br />
toward band.<br />
6. Sew facing<br />
(which you cut<br />
from same<br />
altered pattern<br />
piece) to band.<br />
7. Trim, turn and<br />
press. Turn under lower edge of facing and slipstitch<br />
in place.<br />
Excerpted from Pants for Real People, available<br />
at www.palmerpletsch.com<br />
seam binding
SEWING<br />
Pati<br />
WITH<br />
<strong>Palmer</strong>/<strong>Pletsch</strong> McCall’s M4785 Suit<br />
McCall’s M4785 Blouse<br />
This wool tweed is from the same jacket<br />
pattern as the purple suit, McCall’s M4785—<br />
but without the collar. A cardigan is so quick<br />
to sew. Use the same fitting techniques<br />
mentioned previously. I fused the front with<br />
PerfectFuse TailorUltra and the back and front<br />
facing with PerfectFuse Light.<br />
The blouse is from McCall’s M4921 and is a<br />
silk charmeuse. The only thing I did was to<br />
eliminate the princess<br />
seam. Use the dart<br />
transfer technique<br />
from our fit book, Fit<br />
for Real People. Lap<br />
the princess seams<br />
from the armhole to<br />
the bust. The opening<br />
below is like a<br />
dart. Either sew the<br />
dart or take the width of the dart off the<br />
side seam which is what I did. Silk<br />
charmeuse is best with as few seams and<br />
darts as possible. Marta made the same<br />
blouse, but kept the seam. See page 33.<br />
29
RETRO<br />
RETRO<br />
RETRO<br />
McCall’s M5064<br />
This is our new pattern that started with a 1950s swing coat found in a thrift shop in Portland, Oregon by my friend who volunteers<br />
there, Brenda Boyd. I sent it to McCall’s and they were wowed. It was updated for “today” and it is now McCall’s M5064.<br />
EASY TO SEW—EASY TO WEAR!! And, I used my new favorite fabric, Pago’s Santa Cruize. It is polyester, rayon and linen.<br />
What a great combo for the look of silk suiting with easy care properties. I don’t preshrink it as it seems not to shrink enough to<br />
make a difference.<br />
I made the short version with a back box pleat, shawl collar and raglan SEWING<br />
Pati<br />
sleeves. I used the blouse fabric for the back pleat inset.<br />
WITH<br />
The silk tank top is from McCall’s<br />
M4785 but rounded.<br />
I made a<br />
Dior rose<br />
bouquet<br />
from the<br />
Couture<br />
book for my<br />
flower pin—<br />
a very new<br />
look today.<br />
The pants<br />
are from<br />
our pant<br />
fit pattern<br />
McCall's<br />
M3740<br />
using the<br />
trouser view.<br />
Don’t forget<br />
to check out<br />
our book<br />
Pants for<br />
Real People<br />
for fit and<br />
sewing<br />
details.
McCall’s<br />
M4598<br />
blazer<br />
I sewed our blazer<br />
pattern McCall’s M4598<br />
while we were writing<br />
the new jacket book. I<br />
chose the shawl collar<br />
version as it is not only<br />
easier, but I felt it was<br />
dressier and<br />
would work<br />
well with my<br />
gold buttons.<br />
31<br />
The pant<br />
is from<br />
McCall’s<br />
M3740, our<br />
favorite teaching<br />
pattern. I<br />
lined the pants<br />
with our<br />
favorite<br />
Ambiance<br />
rayon lining.<br />
SEWING<br />
Pati<br />
WITH<br />
I found this great fake fur trim at the Fabric Depot<br />
in Portland (www.fabricdepot.com). It blends<br />
beautifully and can be temporarily pinned or<br />
tacked to the collar for a very different look.